Schlage BE365 User manual

*23780000*
23780000
Prepare for Installation
IMPORTANT NOTES
• DO NOT use a power drill for installation!
• Use a screwdriver to remove product from packaging.
• Install and test lock with door open to avoid being locked out.
• Pay special attention to step 1. If lock is installed with
the cam in the wrong position, the lock will not function
properly!
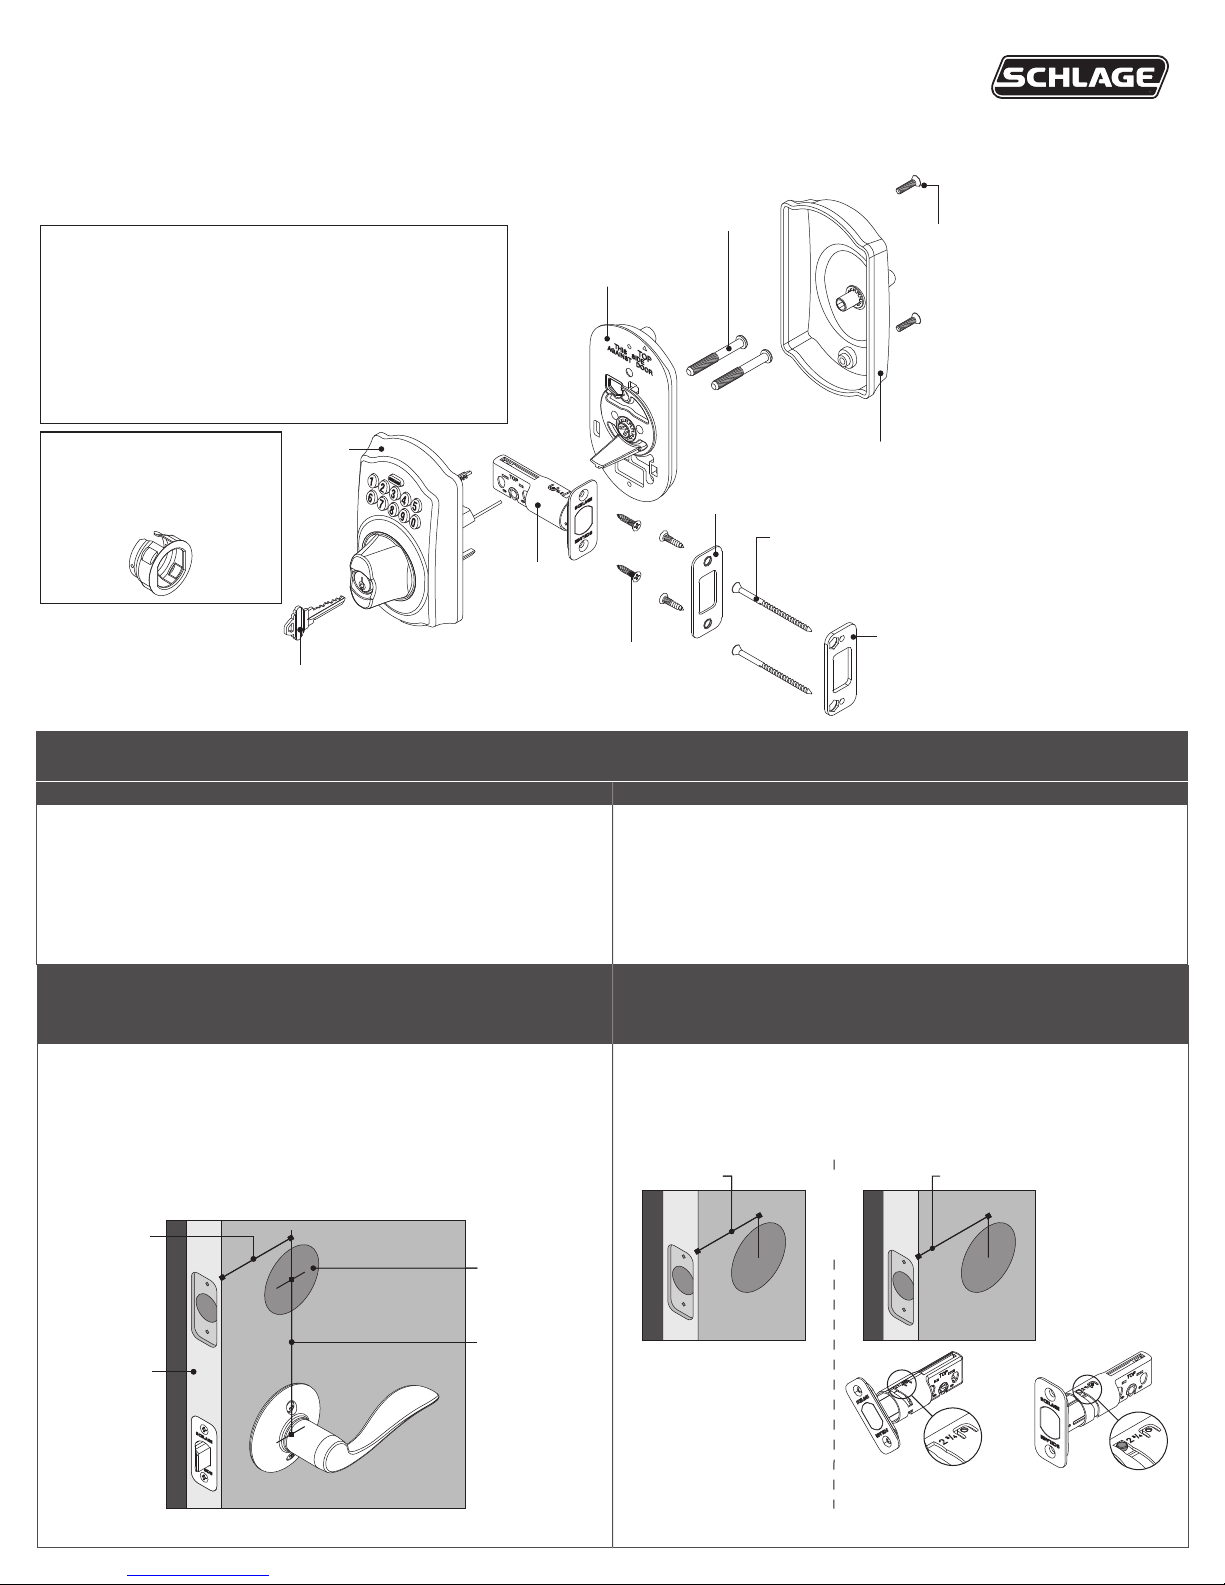
A Check door dimensions.
See consumer.schlage.com/Service-Support for door preparation
instructions if dimensions are different.
2³⁄₄" (70 mm)
OR
2³⁄₈" (60 mm)
Door Edge
2¹⁄₈" (53 mm)
Hole
5¹⁄₂" (140 mm)
Minimum
B Adjust bolt length, if necessary.
Measure the dimension shown. If the measurement is 2C\v” (70 mm),
extend the bolt.
2³⁄₈" (60 mm) 2³⁄₄" (70 mm)
OR
No adjustment needed. Rotate faceplate 180° to extend.
Not Extended Extended
Keypad
Bolt
Baseplate Baseplate
Screws (2)
Cover
Cover
Screws (2)
Latch/Strike
Screws (4)
Strike Reinforcement
Screws (2)
Reinforcement
Plate
Key
Additional Parts
Optional Bolt
Faceplate
Tools Needed
• Phillips screwdriver
• Tape Measure
• Pencil
Optional
• Flathead Screwdriver
• Wood Block
• Hammer
Model BE365
Keypad Deadbolt
Installation Instructions
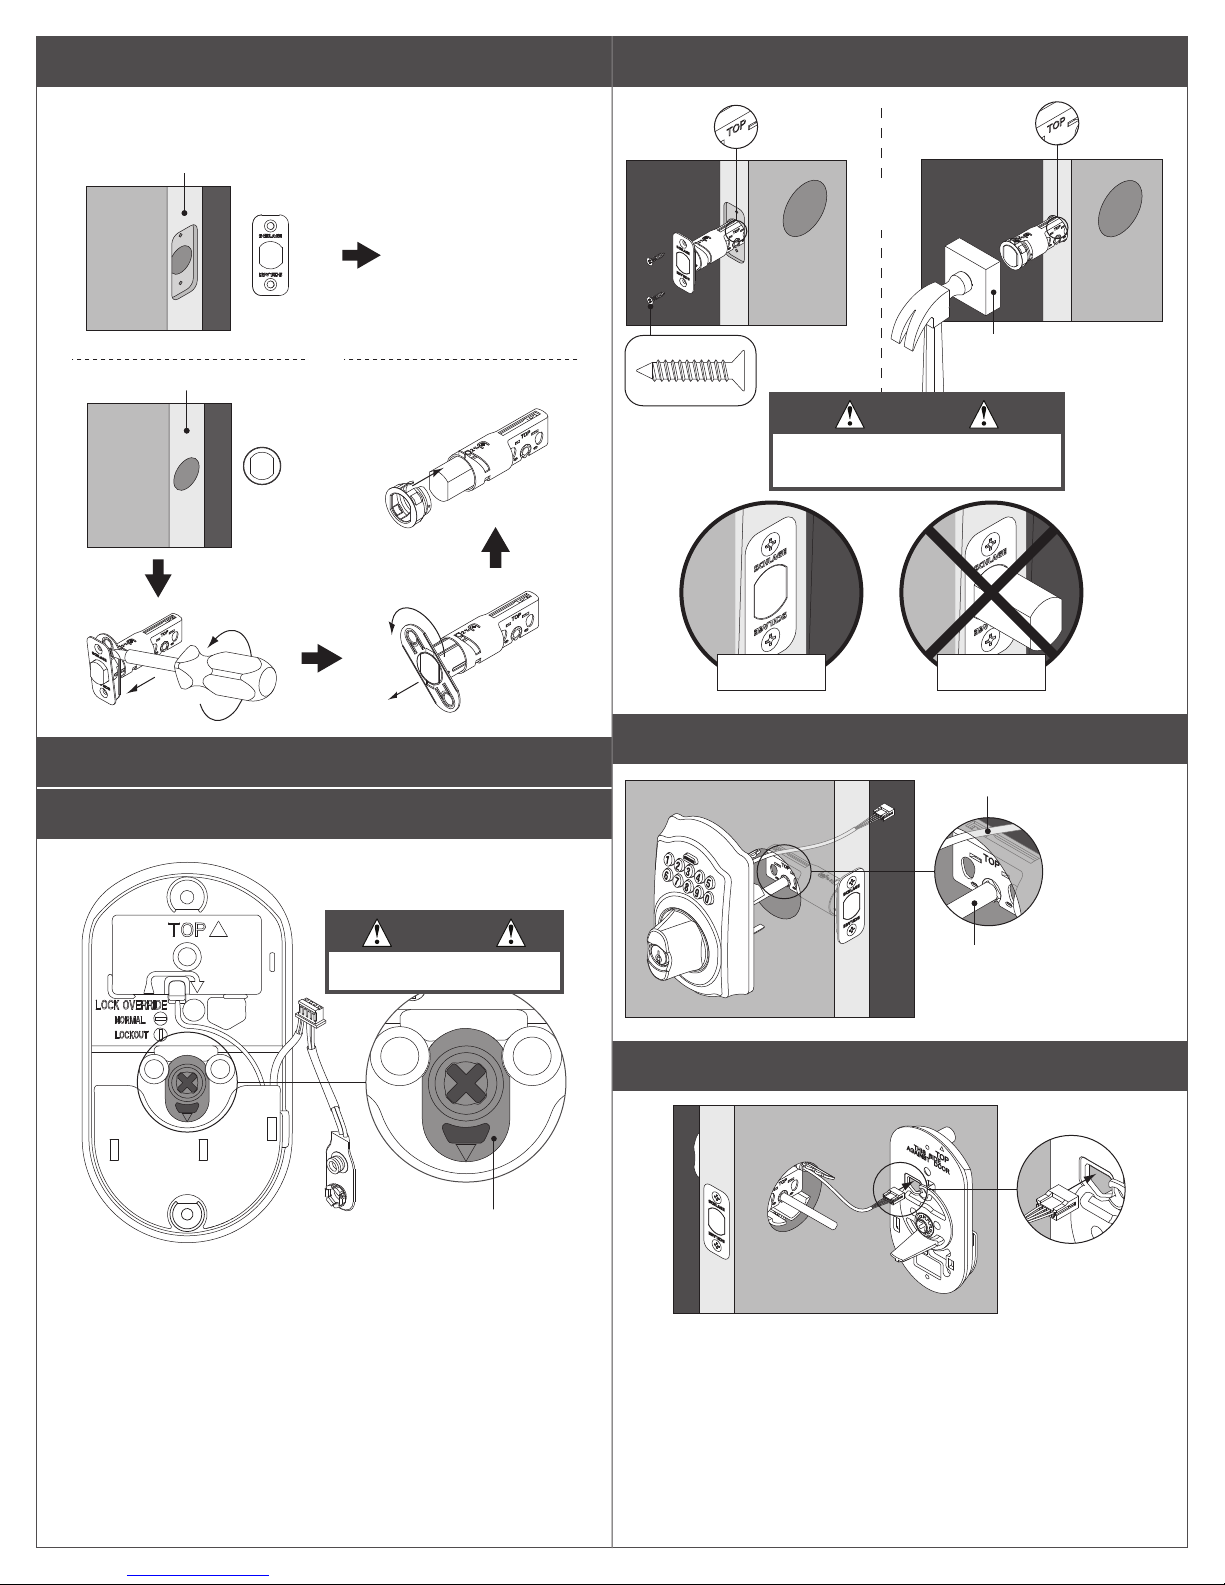
C Change faceplate, if necessary.
Choose the drawing that matches your door edge. If the hole has no
mortise, change to the circular faceplate.
OR
Door Edge
Door Edge
No change
necessary.
Install Lock
1 Rotate baseplate cam to correct position.
Cam
2 Install bolt.
OR
Wood Block
(Not Included)
Actual Size
Retracted Extended
3 Install keypad.
Slide tailpiece through slot.
Route wire over bolt.
4 Route wire through hole in baseplate.
CAUTION
Cam MUST be vertical!
CAUTION
Bolt must remain retracted
throughout installation!
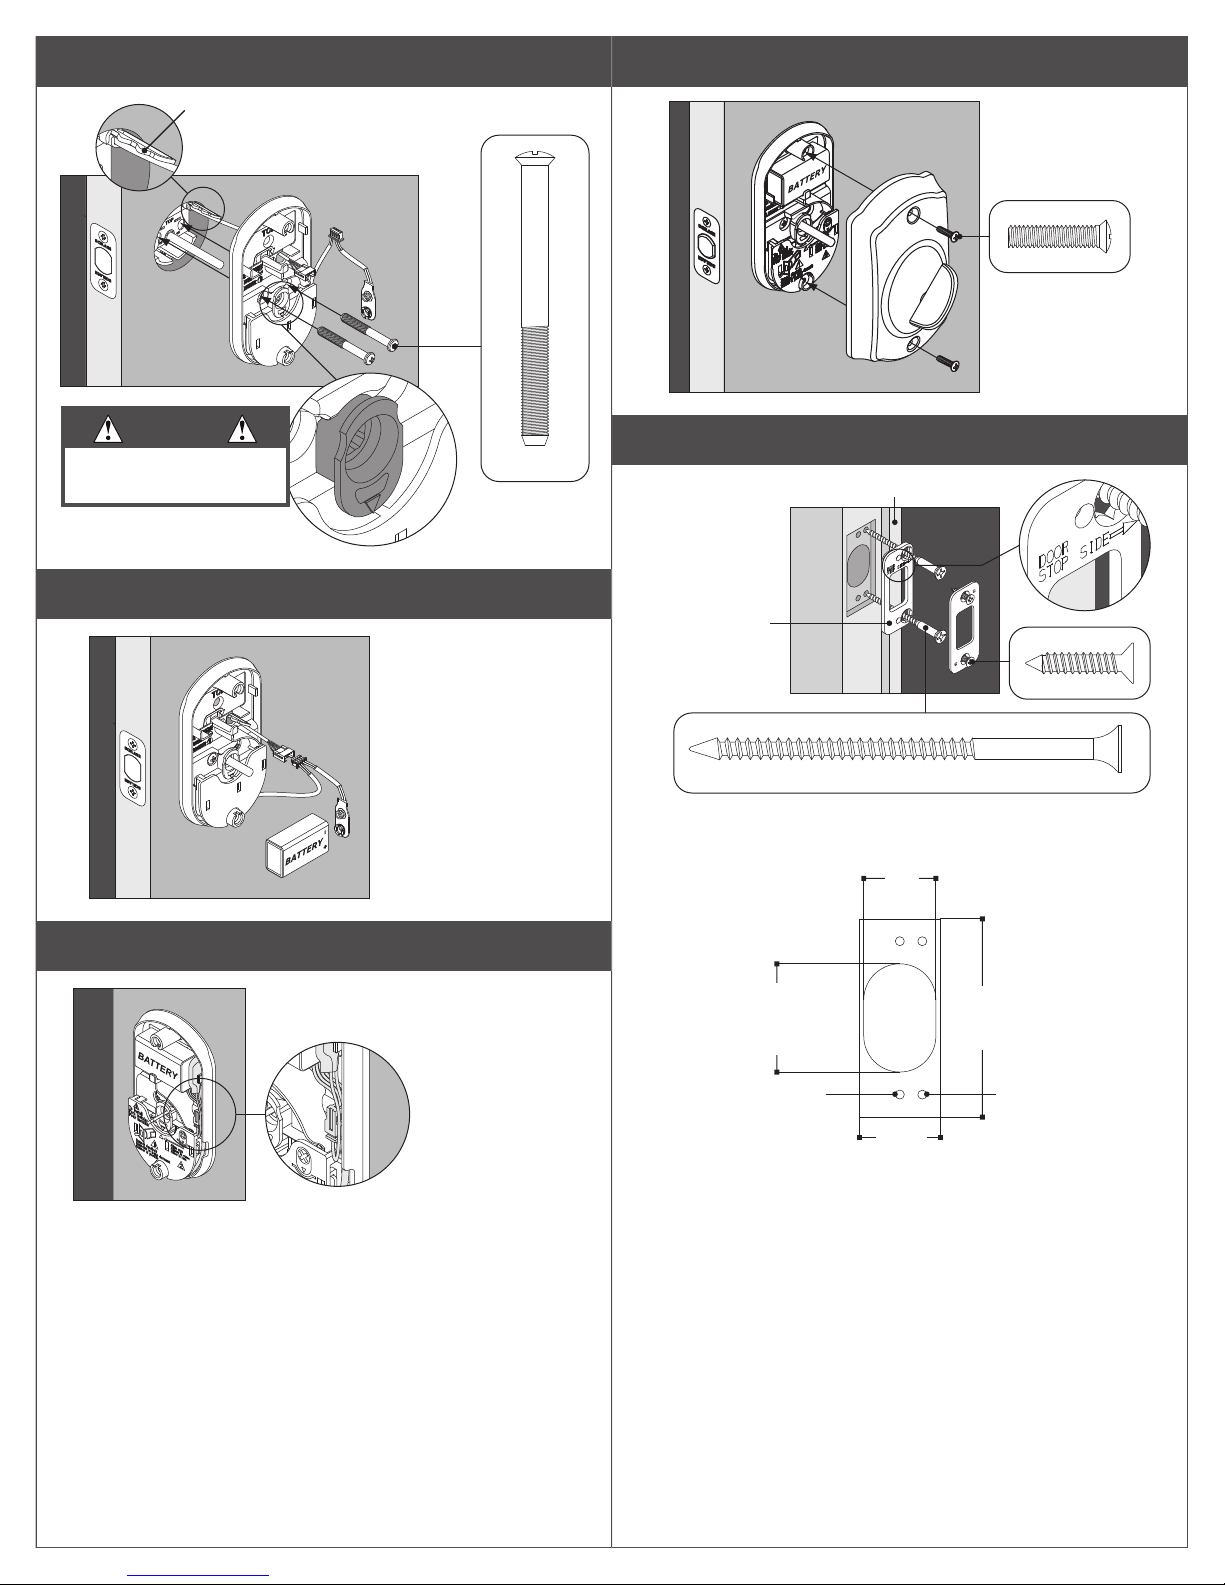
5 Install baseplate.
Actual Size
Slides through same hole as wire.
Holds keypad and baseplate
together during installation.
6 Connect wire and 9V battery.
Lock will beep when
battery is connected.
7 Place battery in holder and tuck wires.
Any wire routing is acceptable as long
as wires will not be pinched by cover.
8 Install cover.
Actual Size
9 Install reinforcement plate and strike into door jamb.
1¹⁄₈"
(29 mm)
2³⁄₄"
(70 mm)
1"
(25 mm)
¹⁄₈" (3 mm)
Pilot Hole
¹⁄₈" (3 mm)
3" (76 mm) Deep
1¹⁄₂" (38 mm)
1" (25 mm)
Deep
Strike Cut-Out (not to scale)
Rotate 180˚ if
door stop is on
left side.
For maximum
security, install
reinforcement
plate.
Actual Size
Actual Size
Door Stop
CAUTION
Cam MUST be vertical!
Review Step 1!

© Allegion 2014
Printed in U.S.A.
23780000 Rev. 07/14-d
Test Lock
a Extend bolt (lock).
1. Press the
Schlage button.
2. Rotate thumbturn
towards door edge.
Did bolt extend?
Yes. Lock is
installed correctly.
No. Lock is not installed
correctly. Remove lock and
reinstall. Pay close attention
to cam position in step 1.
b Retract bolt (unlock).
1. Find User Code A on the
Keypad Locks
Programming Guide.
2. Enter User Code A
(four digits) into the
keypad.
Did bolt retract?
Yes. Lock is
installed correctly.
No. Lock is not installed
correctly. Remove lock and
reinstall. Pay close attention
to cam position in step 1.
3. Rotate thumbturn away
from door edge.
Program Lock
See the Keypad Locks Programming Guide that came with this lock. See the Keypad Locks User Guide for additional information.
Go to keypad.schlage.com for videos and more. Register your product at RegisterMySchlage.com.
Schlage Customer Service
Calling From:
U.S.A.: (888) 805-9837
Canada: (800) 997-4734
Mexico: 018005067866
Servicio de atención al cliente
de Schlage
Si llama desde:
EUA: (888) 805-9837
Canadá: (800) 997-4734
México: 018005067866
Service à la clientèle de
Schlage
Tout appel provenant de :
É-U: (888) 805-9837
Canada : (800) 997-4734
Mexique : 018005067866
Get the free
mobile app at
http://gettag.
mobi.
Obtenga la
aplicación móvil
gratis en gettag.mobi.
Obtenez l’application gratuite
pour mobile au gettag.mobi.
Lifetime Limited Mechanical and Finish
Warranty and 3-Year Limited Electronics
Warranty
Subject to the terms and conditions of this
warranty, Schlage extends a lifetime limited
mechanical and nish warranty and a three-
year limited electronics warranty to the original
consumer user (“Original User”) of our Schlage
brand product (“Product”) against defects in
material and workmanship, as long as the Original
User occupies the residential premises upon which
the Product was originally installed.
What Schlage will do: Upon return of the
defective Product to Schlage, Schlage’s sole
obligation, at its option, is to either repair or replace
the Product, or refund the original purchase price
in exchange for the Product.
Original User: This warranty only applies to the
Original User of Products. This warranty is not
transferable.
What is not covered: The following costs,
expenses and damages are not covered by
the provisions of this limited Warranty: (i) labor
costs including, but not limited to, such costs
as the removal and reinstallation of Product; (ii)
shipping and freight expenses required to return
Product to Schlage; and (iii) any other incidental,
consequential, indirect, special and/or punitive
damages, whether based on contract, warranty,
tort (including, but not limited to, strict liability or
negligence), patent infringement, or otherwise,
even if advised of the possibility of such damages.
Some local laws do not allow the exclusion or
limitation of incidental or consequential damages,
so the above exclusion or limitation may not apply
to you.
The provisions of this warranty do not apply
to Products: (i) used in commercial applications;
(ii) used in common area applications; (iii) used
for purposes for which they are not designed
or intended; (iv) which have been subjected to
alteration, abuse, misuse, negligence or accident;
(v) which have been improperly stored, installed,
maintained or operated; (vi) which have been
used in violation of written instructions provided
by Schlage; (vii) which have been subjected
to improper temperature, humidity or other
environmental conditions; or (viii) which, based
on Schlage’s examination, do not disclose to
Schlage’s satisfaction non- an implied warranty
lasts, so that the above limitations may not fully
apply. Refer to your local laws for your specic
rights under this warranty.
Guaranteed Fit Program: Schlage products
are designed to t standard residential door
preparations and retrot existing tubular locks.
Note: Mortise locks and preparations are not
considered standard and are not guaranteed under
this program.
During the initial installation, if there is a problem
with the Product’s performance, the Original User
may simply contact Schlage Customer Service
at 888-805-9837 in the U.S. and Canada or 800-
506-7866 in Mexico for assistance.Program and
warranty claims: If you encounter a residential
door preparation or t issue under the Guaranteed
Fit Program or have a claim under this warranty,
please contact Schlage Customer Service for
repair, replacement or refund of the original
purchase price in exchange for the return of the
Product to Schlage.
Modelo BE365
Modèle BE365
Cerrojo con teclado
Pêne dormant du clavier numérique
Instrucciones de Instalación
Instructions d’installation
A Verique las dimensiones de la puerta.
Vériez les dimensions de la porte.
Vea consumer.schlage.com/Service-Support para conocer las
instrucciones acerca de la preparación de la puerta, en caso de que
las dimensiones fueran diferentes.
Si les dimensions sont différentes, visiter le site consumer.schlage.
com/Service-Support pour plus d’information à propos des
instructions de préparation.
2³⁄₄" (70 mm)
O/OU
2³⁄₈" (60 mm) 2¹⁄₈" (53 mm)
Orificio
Orificio
5¹⁄₂" (140 mm)
Mínimo
Mínimo
Borde de la
puerta
Bord de la
porte
B Si es necesario, ajuste el largo del perno.
Réglez la longueur du pêne au besoin.
Mida la dimensión que se muestra. Si la medida es 2C\v” (70 mm),
extienda el perno.
Mesurez la dimension illustrée. Si la mesure est de 70 mm (2C\v po),
déployez le pêne.
2³⁄₈" (60 mm) 2³⁄₄" (70 mm)
O
OU
No es necesario
realizar ajustes.
Aucun réglage requis.
Gire la placa
frontal 180° para
extenderla.
Faites pivoter la
place de base de
180 degrés pour
déployer.
No se extendió
Aucun déploiement
Extendido
Déployé
Teclado
Clavier
Perno
Verrou
Placa base
Plaque de base
Tornillos de la placa base (2)
Vis de la plaque de base (2)
Cubierta
Couvercle
Tornillos de la cubierta (2)
Vis du couvercle (2)
Tornillos del pestillo/percutor (4)
Vis du verrou/gâche (4)
Cerrojo
Gâche
Tornillos de refuerzo (2)
Vis de renforcement (2)
Placa de refuerzo
Plaque de renfort
Llave
Clé
Piezas adicionales
Pièces additionnelles
Placa frontal del perno opcional
Têtière de pêne en option
Herramientas necesarias
• Desatornillador Phillips
• Cinta métrica
• Lápiz
Opcional
• Destornillador de cabeza
plana
• Bloque de Madera
• Martillo
Outils nécessaires
• Tournevis cruciforme
• Ruban à mesurer
• Crayon
En option
• Tournevis à tête plate
• Bloc en bois
• Marteau
NOTAS IMPORTANTES
• ¡NO utilice un taladro eléctrico para la instalación!
• Utilice un destornillador para retirar el producto del embalaje.
• Instale la cerradura y pruébela con la puerta abierta para evitar
quedarse afuera.
• Preste especial atención al paso 1. ¡Si la cerradura es
instalada con la leva en la posición incorrecta, la cerradura
no funcionará de forma apropiada!
REMARQUES IMPORTANTESL’INSTALLATION!
• N’utilisez PAS une perceuse électrique pour l’installation!
• Utilisez un tournevis pour retirer le produit de son emballage.
• Installez la serrure et faites un essai en maintenant la porte
ouverte pour éviter d’être embarré à l’extérieur.
• Portez une attention particulière à l’étape 1. Si la came de
la serrure est installée en mauvaise position, la serrure ne
fonctionnera pas correctement!
Prepare todo para la instalación Préparez l’installation
Other manuals for BE365
13
Table of contents
Other Schlage Keypad manuals


