manuals.online logo
Brands
  1. Home
  2. •
  3. Brands
  4. •
  5. Schlage
  6. •
  7. Lock
  8. •
  9. Schlage B-Series User manual

Schlage B-Series User manual

Heightline
Centerline 1¹⁄₂" (38mm) Hole
SCHLAGE
SCHLAGE
B250PD
B460P, B461P, B463P
Single Cylinder Locks
B-Series
Installation Instructions
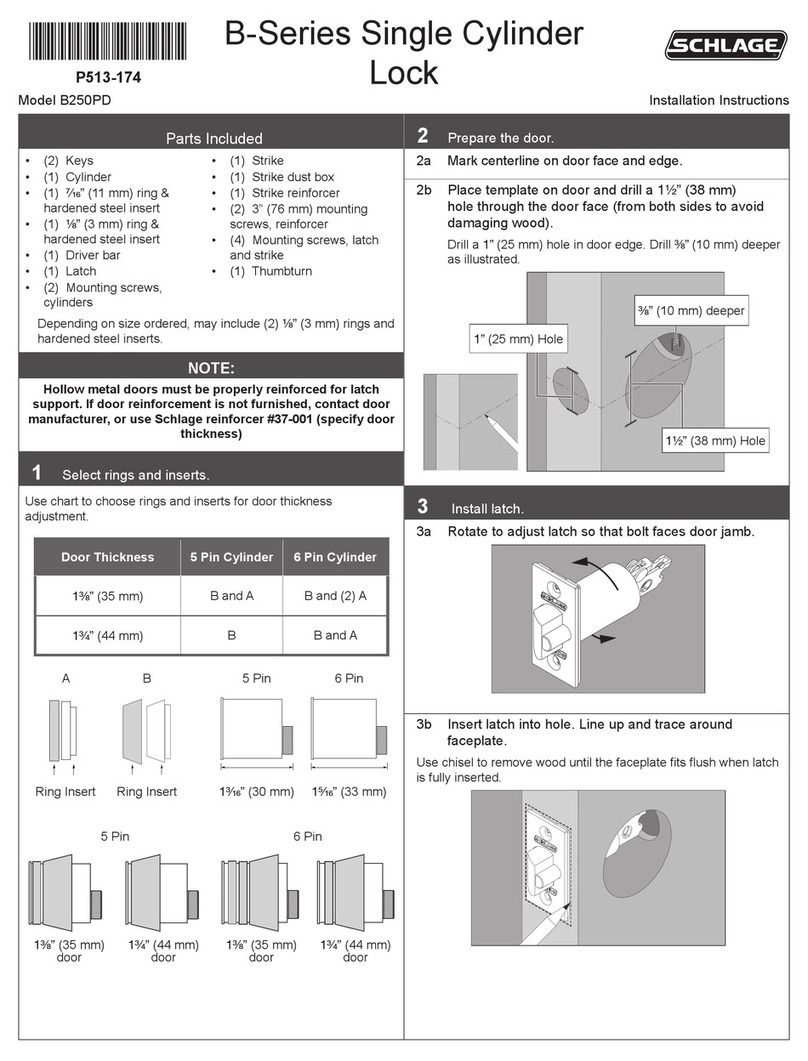
Mark door
Position centerline of template on heightline and mark center for 1¹⁄₂"
(38mm) hole. Mark center of door thickness for latch hole.
Drill (2) holes
Drill a 1¹₂" (38mm) hole thru door face (from both sides to avoid damag-
ing wood). Drill a 1" (25mm) or ⁷⁄₈" (22mm) hole (depending on bolt housing
diameter) in door edge. Drill ³⁄₈" (10mm) deeper as illustrated.
1" (25mm) or
⁷⁄₈" (22mm) Hole
(depending on
bolt housing
diameter)
³⁄₈" (10mm) deeper
1¹₂" (38mm) Hole
NOTE: Hollow metal doors must be properly reinforced for latch sup-
port. If door reinforcement is not furnished, contact door manufacturer,
or use Schlage reinforcer #37-001 (specify door thickness).
Install deadbolt
(See Step 4 for B250PD)
B460P, B461P, and B463P Deadbolts
A. With deadbolt retracted (to retract bolt use provided driver bar or
screwdriver to rotate cam), insert deadbolt into hole in edge of door.
Retract bolt.
B. Line up and trace around faceplate for cutout. Remove deadbolt.
Use chisel to remove wood until faceplate fits flush when bolt is fully
inserted. Fasten to door with screws.
Cam at bottom
EXTEND BOLT. Use screwdriver to extend bolt. Bolt must be extended
before proceeding.
C. (For Circular Deadbolts only)
Insert deadbolt into hole as far as it will go. (Bolt must be retrac-
ted, as shown.) Place wooden block against bolt. Tap block with
hammer or mallet until faceplate is flush with door edge.
Install deadbolt
B250PD Deadlatch
A. Rotate faceplate (if necessary) to adjust latch so that bolt will face
door jamb.
B. Insert latch into hole. Line up and trace around faceplate for cutout.
Remove latch and use chisel to remove wood until faceplate fits
flush when latch is fully inserted. Fasten to door with screws.
Crank pin on top
1¹₈" (29mm) x 2¹⁄₄" (57mm)
C
L
BA
C
L
C
L
Prepare door jamb
Locate exact centerline of latchbolt and mark centerline on door jamb.
Strike for B460P, B461P, and B463P Deadbolts
A. Mark drill points above and below horizontal centerline. Drill (2)
overlapping ⁷⁄₈" (22mm) holes, 1¹⁄₈" (29mm) deep. Clean out holes for
strike box. Place strike box in hole. Place strike over strike box and
trace for cutout. Chisel ¹⁄₄" (6mm) deep for flush fit of reinforcer, strike
box, and strike.
⁷⁄₈" (22mm) Hole,
1¹⁄₈" (29mm) deep
⁷⁄₈" (22mm) Hole,
1¹⁄₈" (29mm) deep
B. Place reinforcer screw holes toward door stop. Mark and drill ³⁄₁₆"
(5mm) pilot holes for 3" (76mm) wood screws. Install reinforcer,
strike box, and strike. (Bolt must fit fully into strike without binding.)
Reinforcer
Strike box
Doorstop
Strike
Strike for B250PD Deadlatch
Mark drill points ¹⁄₄" (6mm) above and below horizontal centerline. Drill (2)
overlapping ⁷⁄₈" (22mm) holes, ¹¹⁄₁₆" (17mm) deep. Clean out holes for
strike box. Use strike as pattern for cutout, ¹⁄₄" (6mm) deep. Install strike
box and strike with provided screws.
C
L
⁷⁄₈" (22mm) Hole,
¹¹⁄₁₆" (17mm) deep
⁷⁄₈" (22mm) Hole,
¹¹⁄₁₆" (17mm) deep
Clear out for strike box.
Select rings and inserts
Use chart to choose rings and inserts for door thickness adjustment.
5 Pin Cylinder 6 Pin Cylinder
B and A
B
B and (2) A
B and A
1³⁄₈"(35 mm)
1³⁄₄"(44 mm)
Door
Thickness
5 Pin 6 Pin
Ring insert Ring insert 1⁵⁄₁₆"
(33mm)
1³⁄₁₆"
(30mm)
5 Pin 6 Pin
1³⁄₈" (35mm) dr. 1³⁄₄" (44mm) dr. 1³⁄₈" (35mm) dr. 1³⁄₄" (44mm) dr.
Install cylinders
A. Tip driver bar into cylinder opening and rotate vertically.
B. With key removed, insert cylinders into ring(s) and guide cylinder
bars, vertically, into cam on deadbolt. Install thumbturn with bolt pro-
jected. Retract bolt, insert and tighten mounting screws evenly.
INSIDE
OUTSIDE
Parts contained in package
2-Keys
1-Cylinder
2-⁷⁄₁₆" (11mm) rings & hardened steel inserts
2-¹⁄₈" (3mm) rings & hardened steel inserts
1-Driver bar
1-Deadlatch (B250PD) or 1-Deadbolt (B460P)
or 1-Deadbolt (B461P) or 1-Deadbolt (B463P)
2-Mounting screws (cylinders)
1-Strike
1-Strike box
1-Strike reinforcement (B460P only)
2-3" (76mm) mounting screws (reinforcer)
4-Mounting screws, latch and strike
©2000 Schlage Lock Company
Printed in USA
P513-174 Rev. 03/00

Other manuals for B-Series

6

This manual suits for next models

4

Other Schlage Lock manuals

Schlage F-Series User manual

Schlage

Schlage F-Series User manual

Schlage CO-100 User manual
Schlage

Schlage CO-100 User manual
Schlage FE575 User manual

Schlage

Schlage FE575 User manual

Schlage AD-200 User manual

Schlage

Schlage AD-200 User manual

Schlage AL-SERIES User manual

Schlage

Schlage AL-SERIES User manual

Schlage CM993 Series Quick setup guide

Schlage

Schlage CM993 Series Quick setup guide

Schlage ND Series User manual

Schlage

Schlage ND Series User manual

Schlage BE365 User manual

Schlage

Schlage BE365 User manual

Schlage L9000 Series User manual

Schlage

Schlage L9000 Series User manual

Schlage CO-200 User manual

Schlage

Schlage CO-200 User manual

Schlage FE59 FLA CAM LH User manual

Schlage

Schlage FE59 FLA CAM LH User manual

Schlage B580 User manual

Schlage

Schlage B580 User manual

Schlage 390G+ User manual

Schlage

Schlage 390G+ User manual

Schlage BE467F User manual

Schlage

Schlage BE467F User manual

Schlage L400 Series User manual

Schlage

Schlage L400 Series User manual

Schlage ND Series User manual

Schlage

Schlage ND Series User manual

Schlage FE410F User manual

Schlage

Schlage FE410F User manual

Schlage FE410F User manual

Schlage

Schlage FE410F User manual

Schlage GF3000 Gravity Force Series User manual

Schlage

Schlage GF3000 Gravity Force Series User manual

Schlage F60 User manual

Schlage

Schlage F60 User manual

Schlage FE575 Operating instructions

Schlage

Schlage FE575 Operating instructions

Schlage FE595 Operating instructions

Schlage

Schlage FE595 Operating instructions

Schlage KING COBRA Operating instructions

Schlage

Schlage KING COBRA Operating instructions

Schlage Sentronic LCN 4040-SE User manual

Schlage

Schlage Sentronic LCN 4040-SE User manual

Popular Lock manuals by other brands

LockUP LockUp M operating guide

LockUP

LockUP LockUp M operating guide

Nationwide Industries Keystone Advantage KLADV-P2 Installation, adjustment and maintenance instructions

Nationwide Industries

Nationwide Industries Keystone Advantage KLADV-P2 Installation, adjustment and maintenance instructions

Ideal Security Decibel SL1000 instructions

Ideal Security

Ideal Security Decibel SL1000 instructions

Lockwood PADDE TRIMEC 200 Series installation instructions

Lockwood

Lockwood PADDE TRIMEC 200 Series installation instructions

AutoMotionShade 4285P Quick reference guide

AutoMotionShade

AutoMotionShade 4285P Quick reference guide

Salto Clay IQ Installation

Salto

Salto Clay IQ Installation

Weiser 62841/01 installation guide

Weiser

Weiser 62841/01 installation guide

Kurt D40 AngLock Operating instructions manual

Kurt

Kurt D40 AngLock Operating instructions manual

Assa Abloy Yale Real Living Assure Lock YRC216 Installation and programming instructions

Assa Abloy

Assa Abloy Yale Real Living Assure Lock YRC216 Installation and programming instructions

Alarm Lock DL2700-SERIES Programming instructions

Alarm Lock

Alarm Lock DL2700-SERIES Programming instructions

RCI 4 Series installation guide

RCI

RCI 4 Series installation guide

motogadget mo.lock NFC instruction manual

motogadget

motogadget mo.lock NFC instruction manual

Raritan DX2-DH2C2 Quick setup guide

Raritan

Raritan DX2-DH2C2 Quick setup guide

danalock V3 SCANDI ASSA 2000 install guide

danalock

danalock V3 SCANDI ASSA 2000 install guide

NL Premier User instructions

NL

NL Premier User instructions

ZKTeco CL10 installation guide

ZKTeco

ZKTeco CL10 installation guide

CDVI V3SR quick start guide

CDVI

CDVI V3SR quick start guide

Ojmar OTS ADVANCE E-30 Assembly instructions

Ojmar

Ojmar OTS ADVANCE E-30 Assembly instructions

manuals.online logo
manuals.online logoBrands
  • About & Mission
  • Contact us
  • Privacy Policy
  • Terms and Conditions

Copyright 2025 Manuals.Online. All Rights Reserved.