4.2. BLEEDING
Note: BEFOREEACHUSEORIFJACKPERFORMANCEDECREASES,checkforexcessiveairandproperhydraulicuidlevelinJack.
If Jack appears not to be working properly, it may be necessary to purge its hydraulic system of excessive air as follows:
4.2.1. Loosen the Fill Screw.
4.2.2. Twist the Handle counter-clockwise to open the Valve.
4.2.3. Checkuidleveland,ifnecessary,topoffaccordingtoAddingHydraulicFluidbelow.
4.2.4. Twist the Handle clockwise to close the Valve, then pump the Handle quickly several times.
4.2.5. Replace Fill Screw.
IMPORTANT: After bleeding the Jack, test the Jack for proper operation prior to its actual use
4.2.6. If, after bleeding, the Jack does not appear to be working properly, DO NOTuseituntilrepairedbyaqualiedservicetechnician.
5. OPERATION
5.1. ATTACHING THE HANDLE
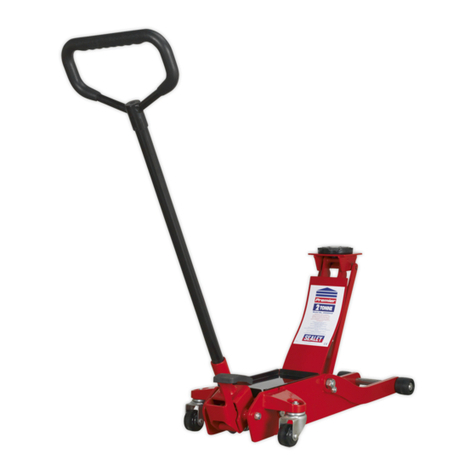
5.1.1. Attach the Upper Handle to the Lower Handle.
5.1.2. Loosen the Set Screw and insert the assembled Handle into the
Handle Socket.
5.1.3. Tighten the set screw.
5.2. LIFTING
5.2.1. Parkvehicleonaat,level,solid,surfacesafelyawayfrom
oncomingtrafc.Turnoffthevehicle’sengine.Placethe
vehicle’stransmissionin“PARK”(ifautomatic)orinitslowest
gear(ifmanual).Setthevehicle’semergencybrake.Then
chock the wheels that are not being lifted.
5.2.2. Slowly twist the Handle counter-clockwise to lower the Jack.
OncetheJackisfullylowered,twisttheHandlermlyclockwise.
5.2.3. CarefullypositiontheJack’sSaddleunderthe
vehiclemanufacturer’srecommendedliftingpoint.(Seevehicle
manufacturer’sowner’smanualforlocationofframelifting
point.)
5.2.4. Pump the Handle until the top of the Saddle has nearly reached
thevehicle’sliftingpoint.PositiontheSaddledirectlyunderthe
vehicle’sliftingpoint.
5.2.5. To lift the vehicle, pump the Handle. Use smooth, full strokes.
5.2.6. Select matching jack stands (sold separately) of appropriate
capacity. Set the jack stands to the same height according to the
manufacturer’sinstructions,makingsuretheylocksecurelyinto
position.
5.2.7. Positionthejackstands’saddlesunderthevehicle
manufacturer’srecommendedsupportpoints.
WARNING! Ensure that the vehicle support points are fully
seated in the saddles of both jack stands. Use a matched pair of
jack stands per vehicle to support one end only.
5.2.8. Slowly twist the Handle counter-clockwise to lower the vehicle
ontothejackstands’saddles.
5.2.9. Once the vehicle is fully seated on the jack stands, continue
slowly lowering the Jack until it is completely lowered.
5.2.10. Remove the Jack and store safely out of the way.
5.3. LOWERING
5.3.1. Carefully remove all tools, parts, etc., from under the vehicle.
5.3.2. PositiontheJack’sSaddleundertheliftingpoint.TurntheHandlermlyclockwiseandraisevehiclehighenoughtoclearthejack
stands.
5.3.3. Carefully remove the jack stands.
5.3.4. Slowly turn the Handle counter-clockwise to lower the vehicle onto the ground.
5.3.5. LowertheJackcompletely.StoretheJackindoorsoutofchildren’sreach.
6. MAINTENANCE
WARNING: TO PREVENT SERIOUS INJURY FROM TOOL FAILURE: DO NOT use damaged equipment. If abnormal noise or
vibration occurs, have the problem corrected before further use.
6.1. Before each use, inspect the general condition of the Jack. Check for:
• Loosehardware,
• Misalignmentorbindingofmovingparts,
• Crackedorbrokenparts,
• Anyconditionthatmayaffectitssafeoperation.
6.2. Before each use, thoroughly test the Jack for proper operation prior to its actual use. If the Jack appears not to be working
properly, follow Bleeding instructions on page 4.
6.3. Atleastonceeverythreeyears,changethehydraulicuid:
A. With the Jack fully lowered, remove the Fill Screw.
B. TiptheJackovertoallowtheoldhydraulicuidtodrainoutcompletely.Disposeoftheoldhydraulicuidinaccordancewithlocal
regulations.
C. WiththeJackupright,completelylltheHydraulicUnitwithhighgradehydraulicuiduntiltheuidis1/4″belowthetopoftheFill
Port.
D. Turn the Handle counter-clockwise to open the Release Valve.
E. Pump the Handle up and down quickly several times to purge air from the system.
g.1
g.2
RJAS1500.V2 Issue 1 09/10/18
Original Language Version
© Jack Sealey Limited

