manuals.online logo
Brands
  1. Home
  2. •
  3. Brands
  4. •
  5. Sealey
  6. •
  7. Jack
  8. •
  9. Sealey RE97/4.V3 User manual

Sealey RE97/4.V3 User manual

Thank you for purchasing a Sealey product. Manufactured to a high standard this product will, if used according to these instructions and
properly maintained, give you years of trouble free performance.
IMPORTANT: PLEASE READ THESE INSTRUCTIONS CAREFULLY. NOTE THE SAFE OPERATIONAL REQUIREMENTS, WARNINGS & CAUTIONS.
USE THIS PRODUCT CORRECTLY AND WITH CARE FOR THE PURPOSE FOR WHICH IT IS INTENDED. FAILURE TO DO SO MAY CAUSE DAMAGE
AND/OR PERSONAL INJURY AND WILL INVALIDATE THE WARRANTY. PLEASE KEEP INSTRUCTIONS SAFE FOR FUTURE USE.
2. INTRODUCTION & CONTENTS
1. SAFETY INSTRUCTIONS
1.1 GENERAL SAFETY
pWARNING! Ensure Health & Safety, local authority and general workshop practice regulations are adhered to when using this equipment.
3Only fully trained and qualified persons should use this equipment. Familiarise yourself with the application and limitations, as well as the
specific potential hazards, of the repair kit.
pWARNING! No part of this unit or any accessory relating to the repair kit is designed for lifting loads. It is intended only as a
pushing device and must be used as such, with care.
pWARNING! Disconnect the repair kit from the hydraulic pump before servicing or performing any maintenance on the unit.
3Maintain repair kit in good order. Replace/repair with genuine parts only. Unauthorised parts may be dangerous and will invalidate the
warranty.
3Use qualified person to lubricate and maintain the hydraulic pump. DO NOT use brake fluid to top up hydraulic unit. Use Sealey hydraulic oil
only.
3Keep the repair kit clean for best and safest performance.
pWARNING! Ensure you know how much load you are pushing. Never exceed the maximum pushing capacity.
3Use only with the supplied Sealey hydraulic pump and accessories. Other equipment may damage unit and will invalidate your warranty.
3The kit accessories may be used with other popular makes of kit.
3Ensure there is positive engagement of repair kit accessories with the vehicle body before pushing.
3Maintain correct balance and footing. Ensure the floor is not slippery and wear non-slip shoes.
3If working on an off centre load, pump with care. If you feel undue resistance, stop and re-adjust the set-up.
pWARNING! Keep your hands, body and clothing away from the repair kit and accessories when in use. Take any necessary precautions to
protect your personal safety and that of others whilst using the repair kit.
3Ensure the hydraulic hose is not bent or kinked.
3Keep non-essential persons away from the operating area. Be aware of the locations of other persons assisting you.
3When releasing tension from the load be sure to undo the hydraulic valve VERY slowly.
7DO NOT operate the repair kit if any parts are damaged or missing as this may cause failure and/or personal injury.
pWARNING! DO NOT use repair kit as a lifting device of any type. DO NOT use for any purpose other than for which it is designed.
7DO NOT over extend the ram as the plunger may be forced out of the cylinder.
7DO NOT heat accessories as this may weaken them.
7DO NOT modify accessories for use with this kit.
3When not in use, place dust cap on end of hydraulic hose and store the kit, in the case, in a safe, dry, childproof location.
INSTRUCTIONS FOR:
HYDRAULIC BODY REPAIR KIT
4TONNE SNAP TYPE
MODEL No: RE97/4.V3
RE97/4.V3 Issue No: 1 - 18/02/13
Original Language Version
© Jack Sealey Limited 2013
Heavy gauge snap-together pipework and cast snap-together attachments compatible with most leading makes of snap-together equipment.
Supplied with hand-pump, hose, hydraulic ram and storage/carry-case.
1
2
4
17
8
5
6
7
11 13
16
3
Fig.1
9
18
10
12
14
15
Item Component Description
1 RE97.4-01 Pump assembly
2 RE97.4-02 Ram assembly
3 RE97.4-03 Hose assembly
4 RE97.4-A14 Ext. tube 19-1/2"
5 RE97.4-A01 Ext. tube 16-1/2"
6 RE97.4-A02 Ext. tube 8-1/2"
7 RE97.4-A03 Ext. tube 5"
8 RE97.4-A04 Ext. tube 3-1/4"
9 RE97.4-A05 Male connector
10 RE97.4-A06 Serrated saddle
11 RE97.4-A07 Wedge head
12 RE97.4-A08 Flat base
13 RE97.4-A09 90° Combination head
14 RE97.4-A10 Rubber head
15 RE97.4-A11 Ram toe
16 RE97.4-A12 Plunger toe
17 RE97.4-A13 Hydraulic spreader
18 RE97.4-H1-2 Handle with grip
19 Moulded case
(For spare parts of pump, ram and hose etc. see
Parts Support).
19
Sited on pump
RE97/4.V3 Issue No: 1 - 18/02/13
Original Language Version
© Jack Sealey Limited 2013
pWARNING! Ensure you have read and understand Section 1 Safety Instructions.
4.1 When using to repair vehicle damage an assessment must be made of all vehicle parts and bodywork distortions. Measurements
should be taken and compared with original manufacturer's specifications. Stored energy (memory) in the areas of damage could
result in sudden stored energy release, causing body shell movements other than the predicted hydraulic ram stroke.
4.2 DO NOT commence operation of ram until you are sure of total deflection requirement. Comprehensive planning for all operations is
essential. Ensure the task undertaken falls within the capacity of the pump and any attachment (items 9,10 & 11).
4.3 The pump may be used in any position from horizontal to vertical. When not horizontal ensure the hose end of the pump is down.
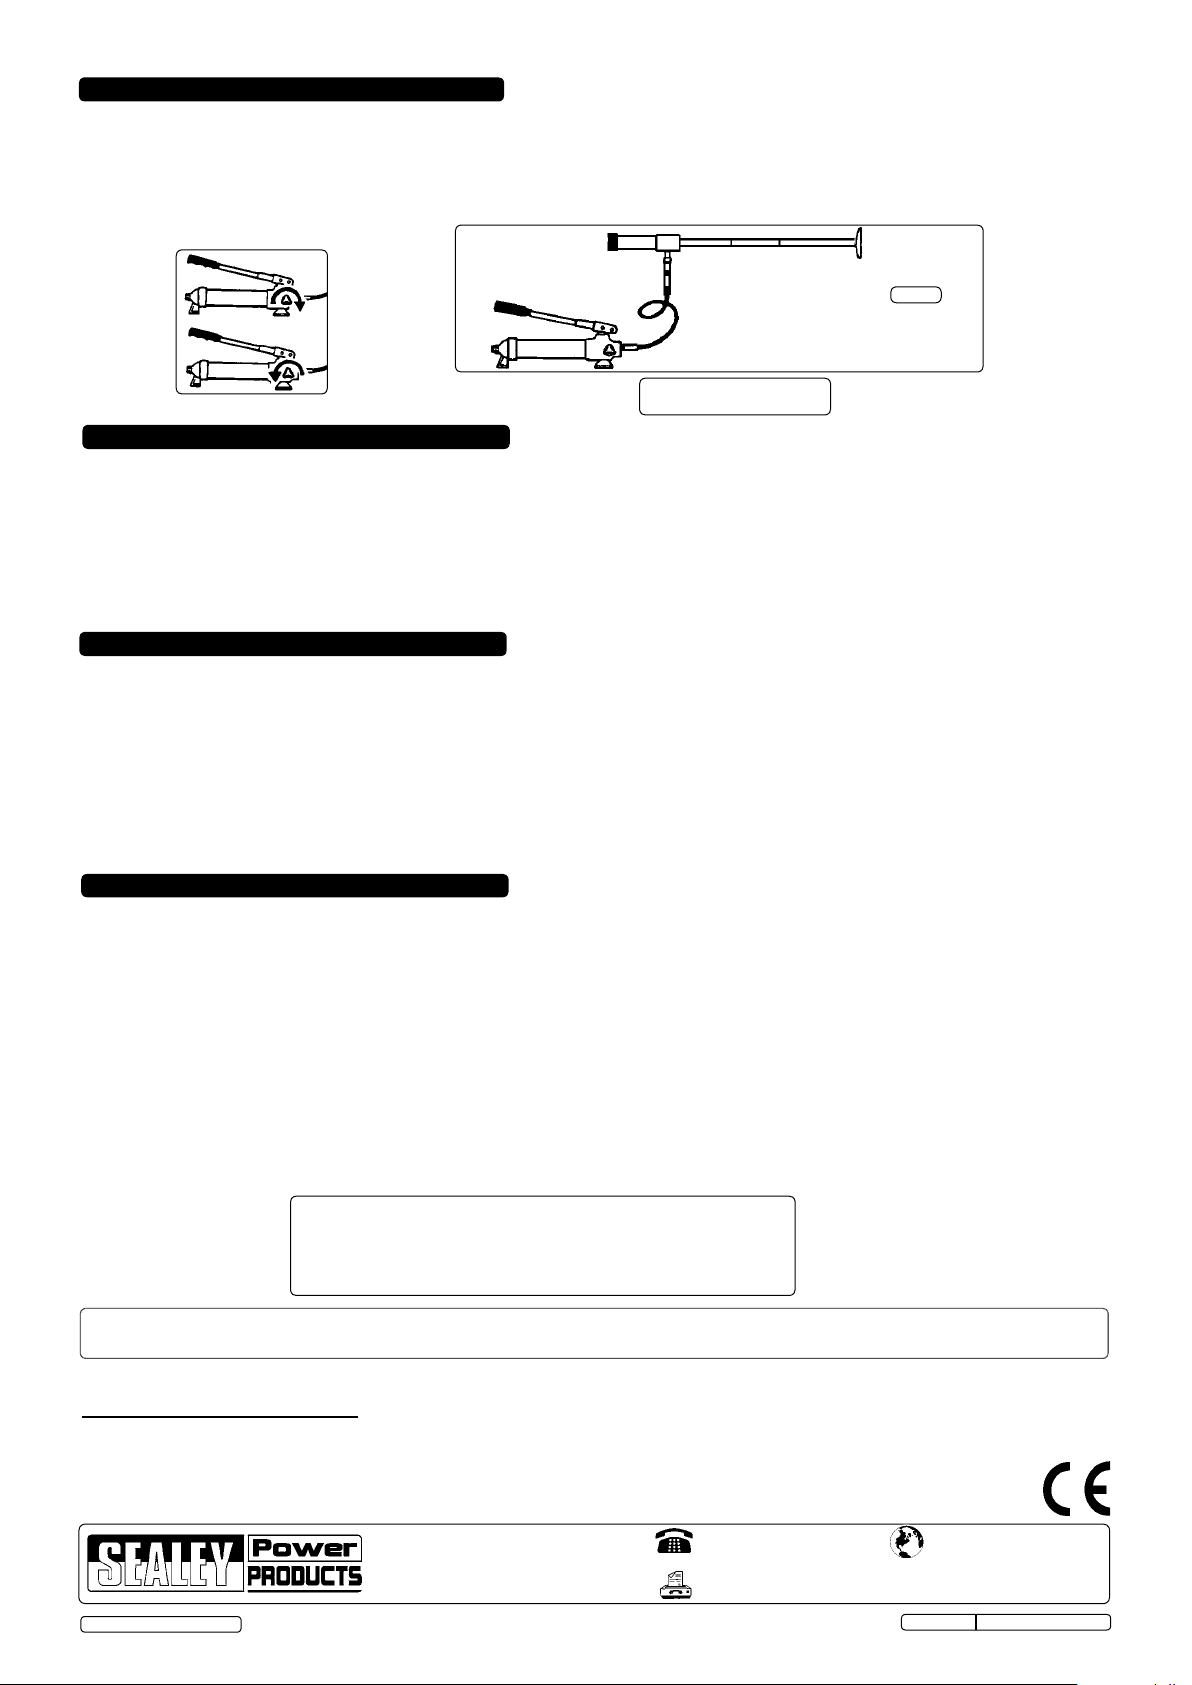
4.4 To use the pump, close valve (Fig.1 and Fig.2) by turning the knob clockwise and pump the handle up and down to apply the load.
4.5 To release pump pressure, turn knob anti-clockwise.
4. INSTRUCTIONS
6. MAINTENANCE
NOTE: It is our policy to continually improve products and as such we reserve the right to alter data, specifications and component parts without prior notice.
IMPORTANT: No liability is accepted for incorrect use of product.
WARRANTY: Guarantee is 12 months from purchase date, proof of which will be required for any claim.
INFORMATION: For a copy of our latest catalogue and promotions call us on 01284 757525 and leave your full name and address, including postcode.
IMPORTANT: NO RESPONSIBILITY IS ACCEPTED FOR INCORRECT USE.
Hydraulic products are only repaired by local service agents. We have service/repair agents in all parts of the UK.
DO NOT RETURN PRODUCT TO US. Please telephone us on 01284 757500 to obtain the address and phone number of your local agent.
If product is under guarantee please contact your dealer.
Sole UK Distributor, Sealey Group,
Kempson Way, Suffolk Business Park,
Bury St. Edmunds, Suffolk,
IP32 7AR
01284 757500
01284 703534
sales@sealey.co.uk
www.sealey.co.uk
Web
email
Parts support is available for this product.
To obtain a parts list and diagram please log on to www.sealey.co.uk, email sales@sealey.co.uk or phone 01284 757500
IMPORTANT: Only fully qualified personnel should attempt maintenance or repair of the hydraulic system.
6.1 Pump oil level
Release pressure and disconnect the ram from the pump.
Hold pump in an upright position.
Ensure the hydraulic ram is fully retracted. Remove the oil reservoir plug (opposite valve) and top up using Sealey hydraulic jack oil
(Sealey Part Nos HJO500MLS/HJO5LS). DO NOT use brake fluid. After filling, purge the system in order to eliminate any air. Open
the release valve (Fig.1.) and pump the handle several times (suggested 20 times). Close the valve and replace the oil reservoir
plug. Should the system fail at any time, repeating this process may resolve the problem.
6.2 General
Before each use check for broken, cracked, bent, loose parts, or any visible damage to welds, ram, pump, hose or accessories.
Suspect items to be removed from service and repaired or replaced. Repair or replace with genuine parts only. Unauthorised repairs
or parts may be dangerous and will invalidate the warranty.
6.3 De-commissioning hydraulic pump/ram
Should the pump or ram become unserviceable, draw off the oil into an approved container and dispose of the product and the oil in
accordance with local authority regulations.
5.1 Hydraulic Ram- For use in large spaces and where a large amount of force is required. Comes with several attachments.
5.2 Snap Tubing- Plug into the hydraulic ram in different combinations in order to obtain the required length.
5.3 Serrated Saddle, Combi, Rubber, Wedge Heads, Ram and Plunger Toes- Typically used on the pushing end in frame repair. Can
be attached to either end of the hydraulic ram or extension bars.
5.4 Flat Base- This is used on the stationary side to spread the force of the hydraulic ram. Can be attached to either end of the
hydraulic ram or extension bars.
5.6 Adaptor- This is used with the extension bars and other attachments that may be connected to the hydraulic ram. Plugs into
either end of the hydraulic ram.
NOTE! When positioning the hydraulic ram, it is necessary wherever possible to use a smaller attachment on the side that is to be bent or
shaped. To further reduce the danger of the stationary side being damaged, place a block of wood or dense hard rubber behind the flat base
plate (item 12) in order to cushion the stationary side and spread the pressure exerted by the hydraulic ram.
5. ATTACHMENTS
3.1 Unscrew the end plugs from the hose and hydraulic ram. Retain end caps for use when storing the kit.
3.2 Screw the hose into the hydraulic ram. Ensure the hose is secure but DO NOT overtighten.
3.3 Fit the pump handle to the pump unit - DO NOT overtighten.
To provide maximum versatility a combination of pump accessories may be used.
3.4 To use the flat base plate (item 12) and snap tubing sections (items 4-8) with the hydraulic ram, see Fig.3.
3. ASSEMBLY / SPECIFICATIONS
Environmental Protection.
Recycle unwanted materials instead of disposing of them as
waste. All tools, accessories and packaging should be sorted,
taken to a recycle centre and disposed of in a manner which
is compatible with the environment.
Pump
Snap tubing sections
(extension tubes)
Ram
Typical arrangement with
base plate attachment.
Fig.3
Flat base plate
(item 12)
Fig.2
Close
Release

Other Sealey Jack manuals

Sealey Quality MACHINERY 2010S User manual

Sealey

Sealey Quality MACHINERY 2010S User manual

Sealey 3003CXQ User manual

Sealey

Sealey 3003CXQ User manual

Sealey Quality Machinery 2080CX User manual

Sealey

Sealey Quality Machinery 2080CX User manual

Sealey SJ3.V3 User manual

Sealey

Sealey SJ3.V3 User manual

Sealey 1015CX User manual

Sealey

Sealey 1015CX User manual

Sealey YAJ30H.V2 User manual

Sealey

Sealey YAJ30H.V2 User manual

Sealey 1050CX.V3 User manual

Sealey

Sealey 1050CX.V3 User manual

Sealey 1510HL User manual

Sealey

Sealey 1510HL User manual

Sealey 3010LR User manual

Sealey

Sealey 3010LR User manual

Sealey 500TTJ.V2 User manual

Sealey

Sealey 500TTJ.V2 User manual

Sealey SJ2.V3 User manual

Sealey

Sealey SJ2.V3 User manual

Sealey 2500LE.V4 User manual

Sealey

Sealey 2500LE.V4 User manual

Sealey 800GTA.V2 User manual

Sealey

Sealey 800GTA.V2 User manual

Sealey 2010HL User manual

Sealey

Sealey 2010HL User manual

Sealey SBJ2W User manual

Sealey

Sealey SBJ2W User manual

Sealey 5001.V4 User manual

Sealey

Sealey 5001.V4 User manual

Sealey 3000HL User manual

Sealey

Sealey 3000HL User manual

Sealey 500TTJ User manual

Sealey

Sealey 500TTJ User manual

Sealey PTBJ2 User manual

Sealey

Sealey PTBJ2 User manual

Sealey ADT200 User manual

Sealey

Sealey ADT200 User manual

Sealey BJ10LE User manual

Sealey

Sealey BJ10LE User manual

Sealey FJ48 User manual

Sealey

Sealey FJ48 User manual

Sealey 3290CX User manual

Sealey

Sealey 3290CX User manual

Sealey 4040AG User manual

Sealey

Sealey 4040AG User manual

Popular Jack manuals by other brands

Pro-Lift G-737 Operating instructions & parts manual

Pro-Lift

Pro-Lift G-737 Operating instructions & parts manual

Motomaster 009-1535-4 instruction manual

Motomaster

Motomaster 009-1535-4 instruction manual

rodac RQGCL10T35A Operation and maintenance instructions

rodac

rodac RQGCL10T35A Operation and maintenance instructions

Raider RD-HB02 Original instruction manual

Raider

Raider RD-HB02 Original instruction manual

Extreme Max 5001.5047 instructions

Extreme Max

Extreme Max 5001.5047 instructions

Sunex Tools 6710 owner's manual

Sunex Tools

Sunex Tools 6710 owner's manual

MSW MSW-TJ2500N user manual

MSW

MSW MSW-TJ2500N user manual

ATD Tools ATD-7435 Operating instructions & parts manual

ATD Tools

ATD Tools ATD-7435 Operating instructions & parts manual

Matco Tools MB20 operating instructions

Matco Tools

Matco Tools MB20 operating instructions

Hamron 601-007 instruction manual

Hamron

Hamron 601-007 instruction manual

Pro-Lift T-6902D Operating instructions & parts manual

Pro-Lift

Pro-Lift T-6902D Operating instructions & parts manual

Neilsen CT2421 Original manual

Neilsen

Neilsen CT2421 Original manual

Prolux 431055 Assembly instruction

Prolux

Prolux 431055 Assembly instruction

AEG KH5G Original instructions

AEG

AEG KH5G Original instructions

NORAUTO B20S Installation Manual and Security Information

NORAUTO

NORAUTO B20S Installation Manual and Security Information

TradeQuip 1128T owner's manual

TradeQuip

TradeQuip 1128T owner's manual

AC Hydraulic SD20PHL user guide

AC Hydraulic

AC Hydraulic SD20PHL user guide

MARTINS Industries MFJ-30T manual

MARTINS Industries

MARTINS Industries MFJ-30T manual

manuals.online logo
manuals.online logoBrands
  • About & Mission
  • Contact us
  • Privacy Policy
  • Terms and Conditions

Copyright 2025 Manuals.Online. All Rights Reserved.