Sealey 800GTA.V2 User manual

INSTRUCTIONS FOR:
TELESCOPIC TRANSMISSION JACK
MODEL No: 800GTA.V2
Thank you for purchasing a Sealey product. Manufactured to a high standard this product will, if used according to these instructions
and properly maintained, give you years of trouble free performance.
1. SAFETY INSTRUCTIONS
IMPORTANT!
BEFORE USING THIS PRODUCT, PLEASE READ THE INSTRUCTIONS CAREFULLY. MAKE CAREFUL NOTE OF SAFETY INSTRUCTIONS,
WARNINGS AND CAUTIONS. THIS PRODUCT SHOULD ONLY BE USED FOR ITS INTENDED PURPOSE. FAILURE TO DO SO MAY CAUSE
DAMAGE AND/OR PERSONAL INJURY AND WILL INVALIDATE THE WARRANTY. KEEP THESE INSTRUCTIONS SAFE.
2. INTRODUCTION & SPECIFICATION
Rated capacity .............800kg
Saddle height (min.) .......1025mm
Saddle height (max) .......1950mm
Ram ....................2-Stage
Saddle forward tilt............. 42°
Saddle backward tilt ........... 46°
Saddle right/left tilt ............ 12°
Base length/width .......760/760mm
Saddle length .............450mm
Saddle width max/min ...330/225mm
WARNING!Ensure all preliminary checks are carefully carried out before using the jack. Immediately repair or replace damaged parts
(use authorised service agent). Ensure use of genuine parts only. Unauthorised parts may be dangerous and will invalidate the warranty.
WARNING! Use the jack on level and solid ground, preferably concrete. Ensure that the floor over which the jack will be wheeled is swept
clean.
DANGER! DO NOT use on tarmacadam, or any other soft surface, as the jack may sink or topple. Serious or fatal injury may result.
Use the jack in a suitable work area and keep area clean and tidy and free from unrelated materials. Ensure there is adequate lighting.
Before use ensure that the gearbox weight and size does not exceed the capacity of the jack.
Ensure that the vehicle is raised and stabilised at the correct height before attempting to move the jack under the vehicle.
Keep all unauthorised persons away from the jack during lifting, lowering and when transporting the gearbox on the saddle.
Maintain correct balance and footing. Ensure that the floor is not slippery and wear non-slip shoes.
Remove ill fitting clothes. Remove ties, watches, rings, and other loose jewellery, and contain and/or tie back long hair.
WARNING! Ensure load is placed level and centrally on jack saddle and is fixed in place before attempting to lift, lower, or transport.
Lowering speed will vary according to the weight of the load and the release valve setting.
WARNING!Always use load restraint chains, corner support bracket, and attachments to
stabilise and secure the load to saddle.
Ensure that the chain is tight and correctly positioned to effectively harness the load.
Always transport the jack with the saddle fully down in lowest position.
Diligence is required in ensuring that you continually monitor the operation until completed.
If the jack emits any abnormal sounds during use, STOP and contact your local service agent.
DANGER! If jack tips or leans STOP WHAT YOUR ARE DOING. MOVE QUICKLY TO A SAFE
DISTANCE. DO NOT TRY TO HOLD OR STEADY JACK. Serious or fatal injury may result.
WARNING! DO NOT operate jack if any parts are damaged or missing.
DO NOT exceed the rated capacity of the jack.
DO NOT place any part of your body within or under the jack during use.
DO NOT raise or lower the vehicle lifting platform whilst the transmission jack is being used.
DO NOT transport the jack, with or without a load, with the saddle in the raised position.
DO NOT get jack wet or use in damp or wet locations or areas where there is condensation.
DO NOT make any modifications to jack. DO NOT adjust or tamper with the safety valve.
DO NOT operate jack when you are tired or under the influence of alcohol, drugs or intoxicating medication.
DO NOT lift or support vehicles with jack, and do not use jack as a load sustaining device.
DO NOT use the jack for any purpose other than for vehicle transmissions.
DO NOT use jack without restraint chains and DO NOT replace chains with an inferior form of restraint.
DO NOT use brake fluid to top up hydraulic unit. Use Sealey hydraulic oil only.
DO NOT remove any labels from the jack. If labels are damaged or unclear replace them.
Use qualified person to lubricate and maintain the jack.
Before storing ensure jack is clean, free of grease and oil and saddle is fully lowered.
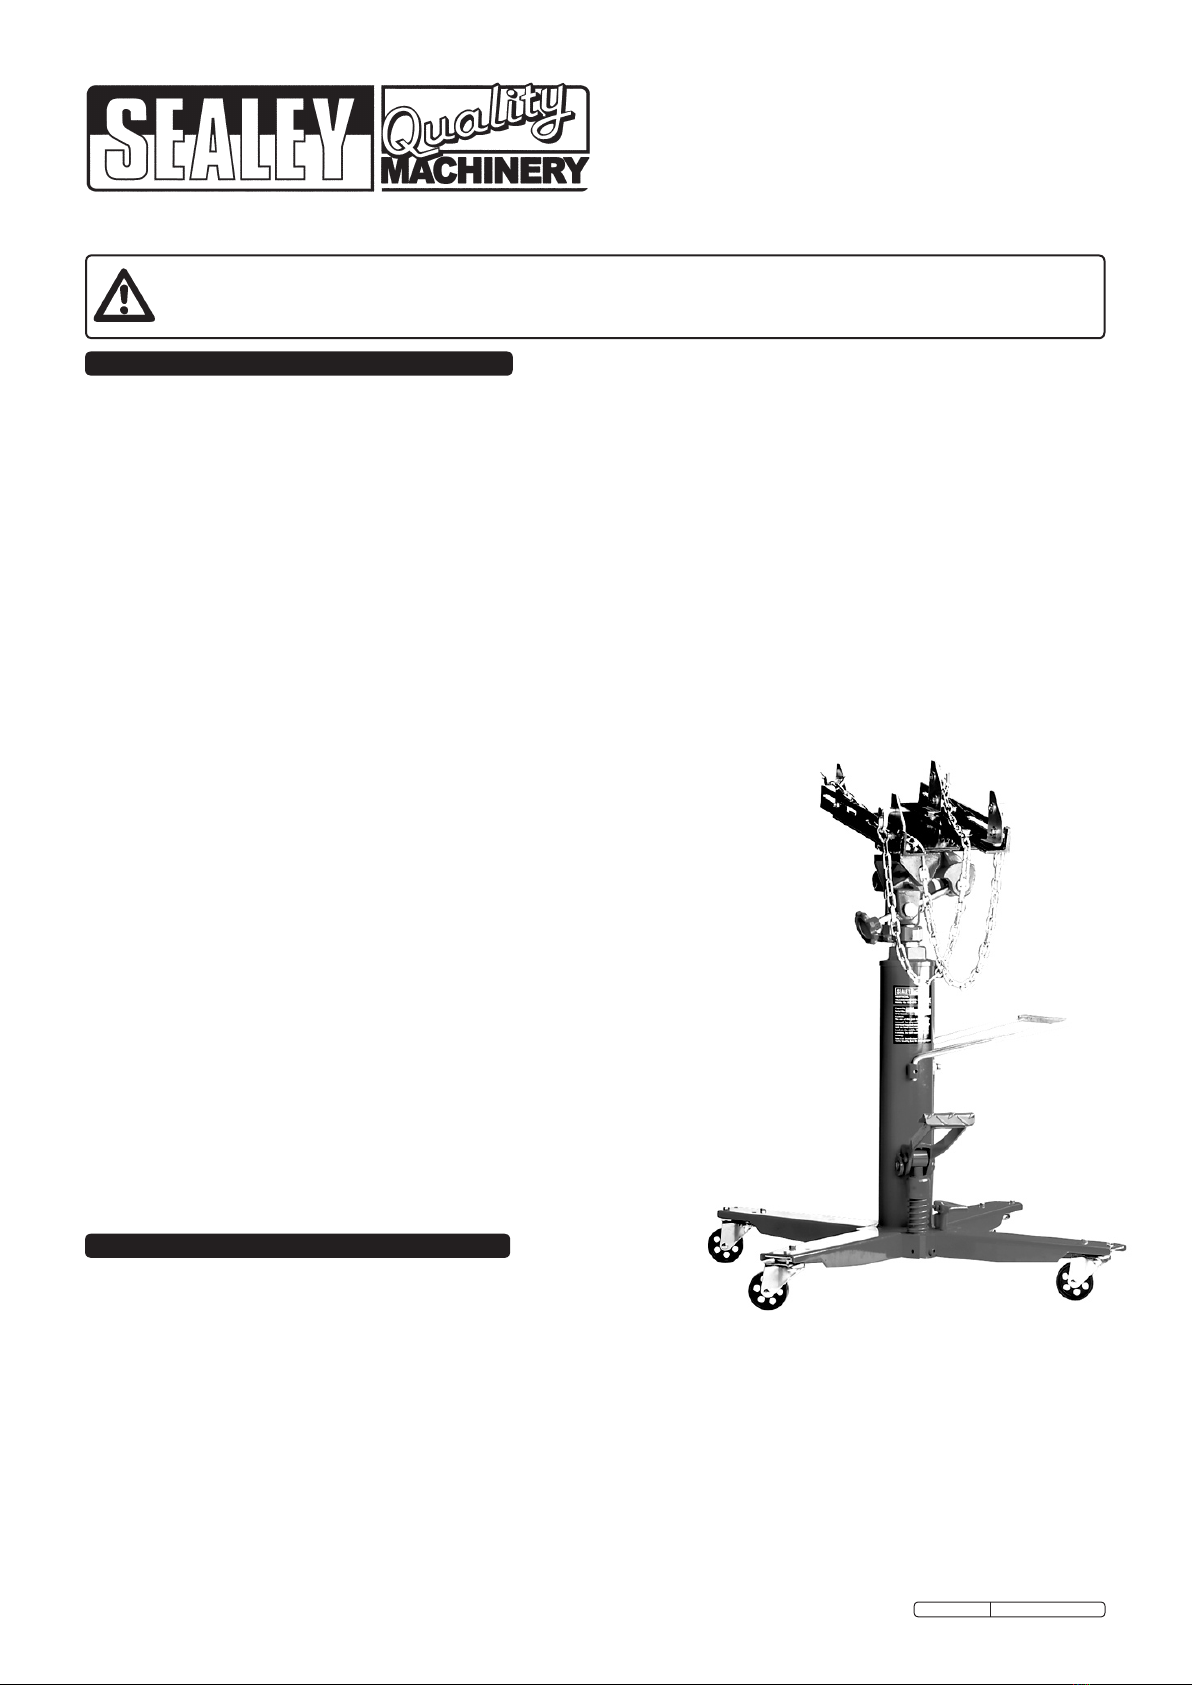
The 800GTA Telescopic Transmission Jack has been manufactured to a high
specification and is equipped with a telescopic two-stage hydraulic ram for greater
range, precise load control and rapid lift. A foot operated pump system for raising and
lowering allows you to use both hands to position the saddle under the gearbox. It is
equipped with a wide base and with swivel ball bearing caster wheels, for stability and manoeuvrability.
The saddle tilts 12°left, 12°right and 40+°forward and backward for precise alignment.
SPECIFICATION:
Original Language Version 800GTA.V2 Issue: 2 - 23/10/09

IMPORTANT: Before EACH use, check that jack is in sound working order. Use the following list to form an habitual pre-check
procedure. Check that items are not: broken, cracked, bent, malfunctioning, distorted, worn, loose, damage to welds, leaking, dirty,
noisy or missing.
WARNING! DO NOT use the jack if any suspect part is found, or if you believe the jack to have been subjected to abnormal
load or shock. Immediately remove from service and contact your authorised service agent.
6......Handle
7......Cylinder/Hydraulic unit
8......Stopper rings and cotter pins
9......All nuts and bolts
10.....All seals
1......Saddle attachments
2......Saddle base
3......Saddle tilt controls
4......Tilt mechanism
5......Piston rod
11.....Jack main frame/legs
12.....Pump handle and/or foot pump
13.....Swivel castor wheels
14.....Chains, hooks & pins
Use the Parts List diagram in conjunction with the following instructions to assist in assembly.
WARNING! Failure to assemble the jack correctly may result in serious damage and/or personal injury.
3.1. Attach a castor (104) to each of the legs (101) with screws (105), washers (106) and nuts (107).
3.2. Attach legs to hydraulic unit (001) using screws (103) and washers (102). Before finally tightening screws ensure that all four castors
are on the ground and the hydraulic unit is vertical.
3.3. Attach the handle (014) to the hydraulic unit using screws (013).
3.4. Attach saddle assembly to upper end of hydraulic unit and locate with screw (204).
3.5. Attach saddle plate (203) to saddle with pin (207) and snap rings (208).
3.6. Slide bearing (212) onto end of adjuster (209) and fit end of adjuster through pin (211) in head plate. Fit bearing (212) and nut (213) to
end of adjuster.
3.7. Assemble saddle brackets (215) to saddle plate using screws (216), washers (217) and nuts (218).
3.8. Fit restraint chain brackets (219 and 220 - 2 off each) and chains.
3. ASSEMBLY INSTRUCTIONS
4. PRE-USE CHECK LIST
IMPORTANT: BEFORE FIRST USING JACK PURGE AIR FROM THE HYDRAULIC CIRCUIT.
Before using the jack for the first time, purge the hydraulic circuit, in order to eliminate any air that may have
accumulated in the system during transit, as follows:
1. Remove transit screw (fig.1.016) and replace with attached air bleed screw (017). Retain transit screw
for future use.
2. With ram fully retracted depress and hold down release pedal (020), then pump foot pedal (002) for
about 20 strokes (assistance will be required).
3. If jack does not operate correctly after this then raise ram as far as possible and loosen bleed screw
(053) in top cylinder nut. Push ram down, to expel any air, until oil appears from bleed screw. Tighten
screw.
5. OPERATING INSTRUCTIONS
5.1. SADDLE TILT MECHANISM
Adjusting the pitch and tilt of saddle will assist you to support and transport the transmission
safely. The saddle (fig.2. A) may be tilted left or right 12° by turning knob ‘B’ and forward or
backward 40+° by turning ‘C’. The saddle brackets ‘D’ can be adjusted, on slotted holes, to give
a saddle width from 225 to 330mm.
5.2. POSITIONING JACK BENEATH LOAD
WARNING! Ensure that you prepare vehicle correctly before attempting to use the jack.
WARNING! Before use ensure that you read, understand and apply Section 1 safety
instructions.
Before use ensure that the transmission weight and size do not exceed the capacity of the jack.
5.2.1. Ensure that the vehicle from which the gearbox is to be removed is correctly positioned, raised
and locked on an appropriate lift system.
5.2.2. Ensure that there are no other persons around or under the vehicle.
5.2.3. Ensure that the saddle is in the lowest position and use handle (014) to move and centrally position the jack beneath the gearbox.
5.2.4. Check that the release pedal is fully closed, and pump foot pedal to raise saddle to the load.
5.2.5. When the saddle is just beneath transmission re-adjust alignment if necessary to centralise saddle.
5.2.6. Position so that the load weight will be equally distributed on saddle, and adjust pitch and tilt controls (fig. 2) to suit gearbox.
5.2.7. Position, adjust and tighten corner support brackets and secure load.
WARNING! Never put transmission on the saddle by lowering the vehicle. Always raise jack to transmission.
5.3. LOWERING THE LOAD
WARNING! Ensure that the load is central and stable on the jack saddle before attempting to lower.
5.3.1. SLOWLY depress the release pedal (fig. 1. 020) to GENTLY lower the saddle to minimum height before attempting to transport the
load.
IMPORTANT: Speed of lowering is controlled by amount you depress the pedal. The more the pedal is depressed the more rapid the
saddle descent. Ensure that the descent is slow and controlled to avoid the risk of sudden dropping.
fig. 1
fig. 2
Original Language Version 800GTA.V2 Issue: 2 - 23/10/09

5.4. TRANSPORTING THE LOAD
WARNING! Ensure you have read, understood and apply Section 1 safety instructions.
5.4.1. Ensure the jack saddle is fully lowered, then secure the load by placing the support chains over the load, pull taut and engage with
hook on opposite side of the saddle. Tighten wing nut.
5.4.2. Transport the load over level and solid surfaces only, preferably concrete, and ensure that the floor is swept clean.
5.4.3. Continually monitor the load in transit. Keep all other persons at a safe distance.
DANGER! DO NOT use on tarmacadam, or any soft surface as jack may sink or topple. Serious or fatal injury may result.
DANGER! Should jack tip or lean for any reason STOP WHAT YOUR ARE DOING AND MOVE QUICKLY TO A SAFE DISTANCE.
DO NOT TRY TO HOLD OR STEADY the JACK. Serious personal or fatal injury may result.
5.5. RE-INSTALLING A TRANSMISSION
To transport, reposition beneath a vehicle, and raise a load up, reverse the procedures outlined above.
6. MAINTENANCE
IMPORTANT: Only fully qualified personnel should attempt maintenance or repair.
6.1. When the jack is not in use, the saddle must be in the lowest position to minimise ram and piston corrosion.
6.2. Oil moving parts, and grease the tilt mechanism. Wipe excessive oil and grease off and keep jack clean.
6.3. Check hydraulic oil regularly with the saddle in the lowest position.
a) Remove air bleed screw (fig.1.017) and add oil, if necessary, via screw hole.
b)The hydraulic oil should be changed once a year. Contact your authorised dealer for information.
WARNING! Use only good quality jack oil, such as SEALEY HYDRAULIC JACK OIL. DO NOT use brake fluid as this will
damage the seals.
6.4. Before each use check for any visible damage to welds and ensure components are not damaged, broken, cracked, bent,
malfunctioning, distorted, worn, loose, leaking, dirty, noisy or missing (see Section 4). If any suspect item is found remove jack from
service and take necessary action to remedy the problem.
DO NOT use the jack if you believe it to have been subjected to abnormal load or shock. Inspect and take appropriate action.
6.5. Periodically check the pump piston and piston rod for signs of corrosion. Clean exposed areas with a clean oiled cloth.
IMPORTANT: NO RESPONSIBILITY IS ACCEPTED FOR INCORRECT USE OF THE MACHINE.
Hydraulic products are only repaired by local service agents. We have service/repair agents in all parts of the UK. DO NOT RETURN JACKS
TO US. Please telephone 01284 757500 to obtain address and ‘phone number of your local agent. If jack is under guarantee please contact
your dealer.
De-commissioning: Should the jack become completely unserviceable, draw off the oil into an approved container and dispose of the jack
and the oil according to local regulations.
PROBLEM CAUSE SOLUTION
Jack will not lift.
Jack will only lift halfway.
Jack will not hold load.
Poor lifting.
Saddle tilt screw too tight.
Jack will not lower.
Release valve is open or no hydraulic oil.
Defective suction valve or delivery valve.
Hydraulic oil low, or excess of hydraulic oil.
Defective valves, or defective piston packing.
Defective plunger packing.
Bolts and nuts may be bent or rusted.
Release valve blocked by foreign object.
Close release valve, adjust oil level.
Contact authorised service agent.
Adjust oil level.
Contact authorised service agent.
Check, clean, oil or replace items.
Clear any items from around pedal.
7. TROUBLESHOOTING
IMPORTANT! Although the following may identify a problem, in most cases the problem must be resolved by your authorised service agent.
NOTE: It is our policy to continually improve products and as such we reserve the right to alter data, specifications and component parts without prior notice.
IMPORTANT: No liability is accepted for incorrect use of this product.
WARRANTY: Guarantee is 12 months from purchase date, proof of which will be required for any claim.
INFORMATION: For a copy of our latest catalogue and promotions call us on 01284 757525 and leave your full name and address, including postcode.
01284 757500
01284 703534
sales@sealey.co.uk
Sole UK Distributor, Sealey Group,
Kempson Way, Suffolk Business Park,
Bury St. Edmunds, Suffolk,
IP32 7AR
www.sealey.co.uk
Web
email
Original Language Version 800GTA.V2 Issue: 2 - 23/10/09
Table of contents
Other Sealey Jack manuals

Sealey
Sealey W1200T User manual

Sealey
Sealey RJA2500 User manual

Sealey
Sealey AM12A User manual

Sealey
Sealey 1025HL.V3 User manual

Sealey
Sealey 1050CX.V3 User manual

Sealey
Sealey MaJ25 User manual

Sealey
Sealey 2000CJX.V2 User manual

Sealey
Sealey Quality machinery PREMIER TJ3.V3 User manual

Sealey
Sealey VS2003HV.V2 User manual

Sealey
Sealey PBJ20 User manual

Sealey
Sealey Quality Machinery 3075LE User manual

Sealey
Sealey Quality Machinery 1500TR User manual

Sealey
Sealey 1510HL User manual

Sealey
Sealey 2000LJ User manual

Sealey
Sealey PTBJ2 User manual

Sealey
Sealey 1015CX User manual

Sealey
Sealey 3000HLC.V2 User manual

Sealey
Sealey SJ2T User manual

Sealey
Sealey 5010HL User manual

Sealey
Sealey 3015CXD User manual