Seat NAVI SYSTEM PLUS User manual

SEAT NAVI SYSTEM PLUS
Owner’s manual
5F0012720EA
Inglés 5F0012720EA (11.14) (GT9)

SEAT S.A. is permanently concerned about continuous development of its types and models. For this reason we ask you to under-
stand, that at any given time, changes regarding shape, equipment and technique may take place on the car delivered. For this reason
no right at all may derive based on the data, drawings and descriptions in this current handbook.
All texts, illustrations and standards in this handbook are based on the status of information at the time of printing. Except for error
or omission, the information included in the current handbook is valid as of the date of closing print.
Re-printing, copying or translating, whether total or partial is not allowed unless SEAT allows it in written form.
SEAT reserves all rights in accordance with the “Copyright” Act.
All rights on changes are reserved.
❀This paper has been manufactured using bleached non-chlorine cellulose.
© SEAT S.A. - Reprint: 15.11.14
About this manual
This manual contains information, recommen-
dations, advice and warnings related to your
radio system. The other publications in the
vehicle documentation contain further infor-
mation of which you should be aware for your
own safety and for that of your passengers.
Ensure that the onboard documentation is
kept in the vehicle at all times. This is espe-
cially important when lending or selling the
vehicle to another person.
This manual contains a description of the
equipment supplied with the vehicle at the
time of press. Some of the units described
herein will not be available until a later date or
is only available in certain markets.
The illustrations are intended as a general
guide and may vary from the equipment fitted
in your vehicle in some details.
The screen colour and the colour of the infor-
mation displayed on it can vary according to
vehicle model.
Directions and positions of components (e.g.
right, left, front, rear) are always relative to the
direction of travel of the vehicle unless other-
wise stated.
*The equipment marked with an aster-
isk* is fitted as standard only in certain
versions, and is only supplied as op-
tional extras for some versions, or are
only offered in certain countries.
® All registered marks are indicated with
®. Although the copyright symbol does
not appear, it is a copyrighted mark.
>> The section is continued on the follow-
ing page.
WARNING
Texts preceded by this symbol contain infor-
mation on safety. They warn you about possi-
ble dangers of accident or injury.
CAUTION
Texts with this symbol draw your attention to
potential sources of damage to your vehicle.
For the sake of the environment
Texts preceded by this symbol contain rele-
vant information concerning environmental
protection.
Note
Texts preceded by this symbol contain additio-
nal information.

Table of Contents
Table of Contents
Important Information . . . . . . . . . . . . . . . . . 2
Introduction . . . . . . . . . . . . . . . . . . . . . . . . . . 3
Safety instructions relating to the
Infotainment system . . . . . . . . . . . . . . . . . . . . . 3
Overview of control panel . . . . . . . . . . . . . . . . . 5
Menu summary . . . . . . . . . . . . . . . . . . . . . . . . . 6
General instructions for use . . . . . . . . . . . . . . . 6
Voice control . . . . . . . . . . . . . . . . . . . . . . . . . . . . 11
Audio and Media Mode . . . . . . . . . . . . . . . . 14
Radio Mode . . . . . . . . . . . . . . . . . . . . . . . . . . . . 14
Media mode . . . . . . . . . . . . . . . . . . . . . . . . . . . . 23
Navigation . . . . . . . . . . . . . . . . . . . . . . . . . . . . 40
Navigation, entry and control . . . . . . . . . . . . . . 40
CAR menu . . . . . . . . . . . . . . . . . . . . . . . . . . . . 52
Introduction to managing the CAR menu . . . . . 52
Telephone management system
(PHONE) . . . . . . . . . . . . . . . . . . . . . . . . . . . . . . 56
Introduction to the telephone management
system . . . . . . . . . . . . . . . . . . . . . . . . . . . . . . . . 56
Description of the telephone management
system . . . . . . . . . . . . . . . . . . . . . . . . . . . . . . . . 59
MirrorLink™ . . . . . . . . . . . . . . . . . . . . . . . . . . . . 67
Settings . . . . . . . . . . . . . . . . . . . . . . . . . . . . . . 70
Menu and system setup . . . . . . . . . . . . . . . . . . 70
Volume and sound setup . . . . . . . . . . . . . . . . . . 72
Abbreviations . . . . . . . . . . . . . . . . . . . . . . . . . 73
Abbreviations . . . . . . . . . . . . . . . . . . . . . . . . . . . 73
Index . . . . . . . . . . . . . . . . . . . . . . . . . . . . . . . . . 75
1

Important Information
Important Information. Traffic safety
Travelling on today's roads requires the driv-
er's full attention at all times.
Only operate the radio and its various func-
tions when the traffic situation really permits
this.
WARNING
●Before starting the trip, you should fa-
miliarise yourself with the different radio
functions.
●High audio volume may represent a dan-
ger to you and to others.
●Adjust the volume in a way that you can
distinguish surrounding noise, for exam-
ple, horns and sirens, etc.
●Changes to the Infotainment system set-
tings should be made when the car is
stopped, or by a passenger.
2

Introduction
Introduction
Safety instructions relating to the
Infotainment system
WARNING
Distracting the driver in any way can lead to
an accident and cause injuries. Operating the
Infotainment system can distract your atten-
tion from the traffic.
●Always drive carefully and responsibly.
●Select volume settings that allow you to
easily hear signals from outside the vehicle
at all times (e.g. emergency services sirens
and horns).
●Hearing may be impaired if using too high a
volume setting, even if only for short periods
of time.
WARNING
The volume level may suddenly change when
you switch audio source or connect a new au-
dio source.
●Lower the base volume before connecting
or switching audio sources.
WARNING
The driving recommendations and traffic indi-
cations shown on the navigation system may
differ from the current traffic situation.
●Traffic signs and traffic regulations have
priority over the recommendations and dis-
plays provided by the navigation system.
●Adjust your vehicle speed and driving style
to suit visibility, weather, road and traffic
conditions.
WARNING
Connecting, inserting or removing a data me-
dium while driving can distract your attention
from the traffic and cause an accident.
WARNING
Connecting leads for external devices may
obstruct the driver.
●Arrange the connecting leads so that they
do not obstruct the driver.
WARNING
External devices that are loose or not proper-
ly secured could move around the passenger
compartment during a sudden driving or
braking manoeuvre or an accident and cause
damage or injury.
●Never place or fit external devices to the
doors, windscreen, steering wheel, dash pan-
el, the backs of the seats, on top of or near
the area marked “AIRBAG” or between these
areas and the occupants. External devices
can cause serious injury in an accident, espe-
cially when the airbags inflate.
WARNING
The armrest may obstruct the driver's arm
movements, which could cause an accident
and severe injuries.
●Always keep the armrest closed while the
vehicle is in motion.
WARNING
Opening a CD or DVD player's housing can
lead to injuries from invisible laser radiation.
●Have CD or DVD players repaired only by a
qualified workshop.
CAUTION
The Infotainment system can be damaged by
the incorrect insertion of a data storage de-
vice or the insertion of an incompatible data
storage device.
●When inserting a data storage device, make
sure it is correctly positioned ››› page 23.
●Applying force may irreparably damage the
memory card slot locking mechanism.
●Only use compatible memory cards.
●When inserting and removing CDs and
DVDs, always hold them at right angles to the
front of the CD/DVD drive without tilting so as
not to scratch them.
●If a CD or DVD is inserted while another is
already in the unit or being ejected, the DVD
drive may be irreparably damaged. Always
wait until the data medium is completely
ejected. »
3

Introduction
CAUTION
Any foreign objects stuck to a data storage
device and non-round media may damage the
DVD drive.
●Only clean, standard 12 cm CDs or DVDs
should be used.
–Do not affix stickers or other items to the
data medium. Stickers may peel off and
damage the drive.
–Do not use printable data media. Printed
labels and coverings may peel off and
damage the CD/DVD drive.
–Do not insert 8 cm single CDs or irregu-
larly shaped CDs or DVDs.
–Do not insert DVD-Plus discs, Dual Discs
or Flip Discs, as these are thicker than
normal CDs.
–The maximum length of a USB device
connected to the port inside the glove
box is 55mm. You must not drive with the
passenger glove box open.
CAUTION
The vehicle loudspeakers may be damaged if
the volume is too high or the sound is distor-
ted.
4

Introduction
Overview of control panel
Fig. 1 Overview of the controls
The Infotainment system is available in differ-
ent versions so there may be differences in
the markings and function of some of the
buttons ››› Fig. 1 2.
Rotary/push knob:
–Press to switch on or off ››› page 6.
–Turn to modify the base volume of the
source being played ››› page 6.
Infotainment buttons: To activate one of
the functions.
1
2
–RADIO : switches to radio mode and
changes frequency band in radio mode
››› page 14.
–MEDIA : To change to Media mode and
change the media source. ››› page 23.
–PHONE : To open the Telephone man-
agement system ››› page 56.
–VOICE : To start Voice control
››› page 11.
–NAV: To change to Navigation mode
››› page 40.
–TRAFFIC : To consult current traffic mes-
sages ››› page 47.
–CAR : To open the Vehicle and system
setup and move around the CAR menu
››› Booklet Instruction Manual.
–MENU : To go to menu summary
››› page 6.
Touch screen: Operate by touching the
buttons displayed on the screen
››› page 6.»
3
5

Introduction
Setting knob: The function of this button
depends on the mode that is currently ac-
tive ››› page 6.
–Turn on all Radio modes to access the
station list and press to start and stop
automatic play (SCAN) ››› page 14.
–In Media mode turn to view the track
list ››› page 23.
–Turn to mark the menu options on long
lists and press to select the marked en-
try (for example, to select a station from
a list).
–Turn in order to modify some settings
(for example, the scale of a map).
–Press to repeat a navigation announce-
ment during route guidance.
Proximity sensor: The screen will auto-
matically change to control mode when
you move your hand towards it
››› page 10.
Menu summary
The Infotainment system touchscreen
››› Fig. 1 3 can be used to select the differ-
ent main menus.
Press the Infotainment system MENU button
to open the menu summary.
Radio To change to Radio mode ››› page 14, Ra-
dio Mode.
4
5
Media switches to media mode ››› page 23, Me-
dia mode.
Telephone To open the Telephone management sys-
tem ››› page 56, Telephone management
system (PHONE).
Naviga-
tion
To change to Navigation mode
››› page 40, Navigation.
Traffic To open current traffic reports ››› page 47,
Traffic reports and dynamic route guidance
(TRAFFIC).
Vehicle To open the Vehicle and system setup
››› Booklet Instruction Manual.
Images To view Images ››› page 38.
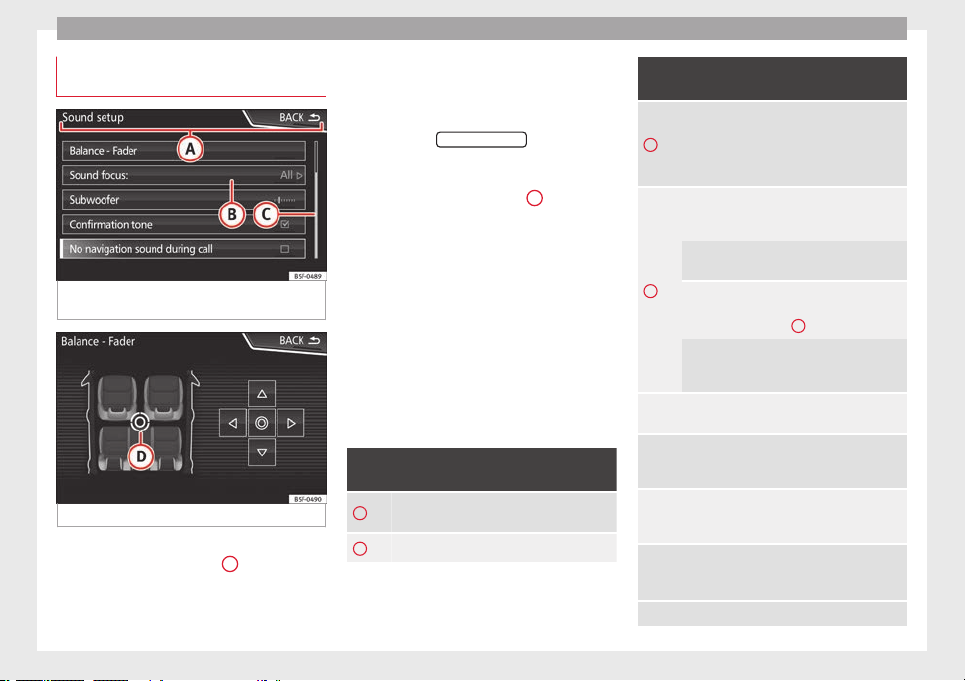
Sound To open the Sound setup ››› page 72, Vol-
ume and sound setup.
Settings To open the System setup ››› page 70,
Menu and system setup.
Mirror
Link™
To change to Mirror Link™ mode
››› page 66
General instructions for use
Introduction
If the setup is changed, this may change the
display on the screen and in some cases, the
Infotainment system may behave in a manner
different to that described in this manual.
Note
●Lightly pressing the buttons or briefly
pressing the touchscreen is sufficient to op-
erate the Infotainment system.
●Not all listed function buttons and func-
tions described may be available due to the
device software used in your market. The
equipment is not faulty if a function button is
missing from the screen.
●Due to country-specific legislation, certain
functions may not be available on the screen
when the vehicle is travelling above a certain
speed.
●Using a mobile telephone in the vehicle
may cause noise from the vehicle loudspeak-
ers.
●Restrictions on the use of devices using
Bluetooth® technology may apply in some
countries. For further information, contact the
local authorities.
●On some vehicles with ParkPilot, the vol-
ume of the audio source is automatically low-
ered when reverse gear is selected. You can
change settings for lowering the volume in
the Sound setup menu ››› page 72.
Infotainment system rotary knobs and
buttons
Rotary/push knobs
The left-hand rotary knob ››› Fig. 1 1 is the
volume control or the on/off button.
6

Introduction
The right-hand rotary knob ››› Fig. 1 4 is the
setup button.
Infotainment buttons
The buttons on the unit are shown in this
manual with the words "Infotainment button"
and its function within a rectangle, for exam-
ple, MEDIA Infotainment button.
The Infotainment buttons are used by press-
ing them or pressing and holding.
Switch on and switch off
To manually switch the Infotainment system
on and off, briefly press the rotary knob
››› Fig. 1 1.
When switching on, the system starts-up with
the last set volume, provided that this does
not exceed the preset maximum start-up vol-
ume ››› page 72, Volume and sound setup.
Depending on the unit and the country, the
infotainment system switches off automati-
cally when the engine is switched off or the
vehicle key is removed from the ignition. If
the Infotainment system is switched on
again, it will switch off automatically after ap-
proximately 30 minutes (switch-off delay).
Note
●The Infotainment system is a part of the ve-
hicle. It cannot be used in any other vehicle.
●If the battery has been disconnected, the
ignition must be activated before switching
on the Infotainment system.
Change base volume
Increasing or decreasing the volume or
muting the sound
Increasing the volume: Turn the volume con-
trol clockwise or move the left thumbwheel
on the multifunction steering wheel upward
››› Booklet Instruction Manual.
Lowering the volume: Turn the volume con-
trol anti-clockwise or move the left thumb-
wheel on the multifunction steering wheel
downward ››› Booklet Instruction Manual.
Changes in volume are indicated by a volume
bar on the screen. The volume can be control-
led using the steering wheel controls. In this
case, the changes in volume are represented
on the control screen by a volume bar.
It is possible to preset certain volume set-
tings and adjustments ››› page 72, Volume
and sound setup.
Muting the Infotainment system sound
●Turn the volume control anti-clockwise
until it displays .
Muting the Infotainment system sound stops
the media source that is playing The screen
displays .
Note
If the base volume has been considerably in-
creased to play a certain audio source, lower
the volume again before switching to another
audio source.
7

Introduction
Operation of the function buttons and
the instructions on the screen
Fig. 2 View of some of the function buttons
on the screen.
Fig. 3 Sound setup menu
The Infotainment system comes equipped
with a touchscreen ››› Fig. 1 3.
Active areas of the screen that call up a cer-
tain function are called “function buttons”.
These buttons are operated by briefly press-
ing the screen or by pressing and holding.
The function buttons appear in the instruc-
tions with the label “function button” and a
button symbol inside a rectangle .
Function buttons start functions or open sub-
menus. The currently selected menu is dis-
played in the title bar ››› Fig. 2 1 of the sub-
menus.
Inactive (grey) function buttons cannot be se-
lected.
Increase or decrease the size of the images
displayed on the screen
The size of the navigation map image
››› page 40 and, for example, photos when
viewing images ››› page 23 can be enlarged
or reduced. To do so, enlarge or reduce the
image displayed by moving two fingers.
Overview of screen and function buttons
Display and function buttons: operation and ef-
fect
AThe title bar shows the selected menu and,
where applicable, other function buttons.
BPress it to open another menu.
Display and function buttons: operation and ef-
fect
C
The scroll bar is shown on the right and its size
depends on the entries in the list. Move the
bar on the screen by pressing lightly and with-
out lifting the finger, see ››› page 9, Open
list entries and search lists.
D
Movable cursor: Move the cursor around the
screen by pressing lightly and without lifting
the finger.
OR: To move the cursor to a particular posi-
tion, press that spot on the screen.
Fixed crosshair: Press the up, down, left and
right arrows to move the sound according to
preference. The cursor D will move.
OR: Press the central button to centre the ster-
eo sound in the centre of the passenger com-
partment
Press it on some lists to move up a level, one
by one.
BACK
Press to return from the submenus one at a
time to the main menu or to undo the entries
made.
When pressed, a pop-up window opens (op-
tions window) which displays other setup op-
tions.
/
Some functions or messages are accompanied
by a check box and are activated
or deacti-
vated
by pressing said check box.
OK Press to confirm an entry or a selection.
8

Introduction
Display and function buttons: operation and ef-
fect
×
Press to close a pop-up window or an input
window.
/
Press them to change the setup adjustments
one at a time.
Move the slider around the screen by pressing
it lightly and without lifting your finger.
Open list entries and search lists
Fig. 4 Entries on a setup menu list.
The entries on a list can be activated by
pressing them on the screen directly or by us-
ing the setup button ››› Fig. 1 4.
Mark list entries using the setup button and
open them
●Turn the setup button to mark the entries
on the list with a rectangle one by one and
continue searching the list in this manner.
●Press the setup button to activate the
marked entry on the list.
Search lists (scrolling the screen)
The scroll bar is shown on the right and its
size depends on the entries in the list
››› Fig. 4 1.
●Briefly press the screen above or below the
scroll marker.
●OR: Place a finger over the scroll marker
and without lifting it, move it around the
screen. Lift your finger off the screen when
you reach the desired position.
●OR: Place your finger in the centre of the
screen and without lifting it, move it around
the screen. Lift your finger off the screen
when you reach the desired position.
Input masks with on-screen keypad
Fig. 5 Input window with on-screen keypad.
Input windows with on-screen keypad are
used for functions such as entering an entry
name, selecting a destination address or en-
tering a search term for searching long lists.
The function buttons listed below are not
available in all countries or for all topics.
Subsequent chapters only explain those
functions that differ from those in the screen
shown in the figure.
The input line with cursor is located on the
left in the top bar of the screen. All inputs are
displayed here.
Input windows for “free text input”
In the input masks for open text, you may en-
ter letters, numbers and special characters in
any combination. »
9

Introduction
Pressing the OK function button applies the
sequence of characters currently displayed in
the window.
Input windows for selecting a saved entry
(e.g. selection of a destination address)
It is only possible to select a sequence of let-
ters, numbers and special characters that
matches a stored entry.
Suggestions for matching stored destina-
tions appear depending on the characters
entered in the input line. In the case of com-
pound names, it is necessary to enter a
space.
If there are fewer than 99 selectable entries,
the number of remaining entries is displayed
after the input line ››› Fig. 5 3. Pressing this
function button displays these remaining en-
tries in a list. If there are fewer than 6 desti-
nations left, the list opens automatically.
Overview of the function buttons
Icon and function text: operation and effect
1
Postcode a): Press to enter a postcode in Navi-
gation mode.
123 : Press to open the input window for
numbers and special characters.
ABC : Press to go back to the input window
for letters.
Icon and function text: operation and effect
2
Press to change the keypad to another lan-
guage. Keypad languages can be selected
from the menu system setup ››› page 70.
3
Displays the number and opens the list of re-
maining selectable entries that match the en-
tered text.
Letters
and dig-
its
Press them to copy them into the input line.
Letters
and 4
Hold and press to display a pop-up window
with the special characters based on said let-
ter.
Press the desired character to enter it. Some
special characters can be written out instead
(e.g. “AE” for “Ä”).
Press to switch between upper and lower
case.
Press to enter a space.
OK Press to accept the suggestion in the input
line and close the input window.
Press to delete characters in the input line
from right to left.
Press and hold to delete several characters.
BACK
Press to close the input window.
a) Depends on the market and unit in question.
Proximity sensors
The Infotainment system is equipped with an
integrated proximity sensor ››› Fig. 1 5.
The image on the screen changes from dis-
play mode to automatic operation when your
hand moves toward it. In operation mode,
the function buttons are automatically high-
lighted to facilitate their use.
Additional displays and display
options
The displays appearing on the screen may
vary depending on the settings, and may dif-
fer from those described here.
The status bar on the screen can display, for
example, the current time and outside tem-
perature.
All displays can be viewed only after com-
pletely restarting the Infotainment system.
10

Introduction
Voice control
Fig. 6 Voice control: start menu display and
main commands
Many radio, media, telephone and navigation
functions may be activated through voice
commands.
The Infotainment system's voice control will
only be available for the language selected in
System setup ››› page 70.
Setup of voice control ››› page 13.
When you activate voice control, you can
choose which text and icons take on the col-
our of the different functions:
●Red (RADIO and MEDIA) ››› page 12 and
››› page 12
●Green (PHONE) ››› page 12
●Blue (NAV) ››› page 13
Start and stop the voice control
●To activate the voice control, briefly press
the button on the multi-function steering
wheel . It can also be activated with the
VOICE button in the Infotainment system.
●When activating voice control, a rising sig-
nal will sound and a menu containing the
main orders for that the function will appear
(the menu will appear if the option is activa-
ted in Voice control setup ››› page 13) The
spoken instructions will guide you through
the following “dialogue”.
●Pronounce the desired order and follow the
instructions of the “dialogue”. A function can
often be activated with different spoken com-
mands. In case of doubt, try to give a com-
mand.
●When an action is performed (e.g. calling a
contact), the voice control automatically de-
activates and must be reactivated again
when needed. There are certain commands
after which the voice control does not end
and waits with What do you wish to do now?.
●To end voice control manually, keep the
button pressed on the multi-function steering
wheel until you hear the corresponding con-
firmation (descending sound), or press the
button in the display. You can also briefly
press the VOICE button twice to deactivate
voice control.
Help with voice control
Listening to Help when using voice control for
the first time is recommended.
●Switch on the speech control system .
●Give the Help command in the language
established in the System setup, and follow
the dialogue instructions. The Help order can
also be spoken in an active function and in
dropdown menus.
Operation during the dialogue
While the infotainment system transmits a
spoken indication, the display will show the
symbol .
●The announcement can be stopped by
briefly pressing the screen, except when a list
of results appears, in which case it pauses.
To continue with the announcement, touch
the screen once more .
●Briefly press the button on the multi-
function steering wheel to interrupt the spo-
ken indication of the infotainment system
and give the next command.
IMPORTANT: The system will ONLY recognise
a command when the symbol is displayed
as “active” on the display or touch screen.
If you make a mistake when giving a com-
mand or give an incomplete command, and it
has no effect, you can repeat the command.
The symbol remains active. »
11

Introduction
●Briefly press the button of the multi-
function steering wheel to repeat the com-
mand.
Instructions for voice control
For optimum functioning of the voice control,
follow these instructions:
●Speak slowly and clearly, as far as possi-
ble. The system will not recognise words pro-
nounced unclearly, or words and figures in
which syllables are omitted.
●Telephone numbers must be given digit by
digit or in blocks of numbers in ones, tens or
hundreds.
●Speak at a normal volume, without exag-
gerated intonation or long pauses.
●Avoid noise from the exterior and nearby
(for example, conversations inside the vehi-
cle). Close all doors, windows and the sliding
roof.
●Do not aim the air from the diffusers at the
roof of the passenger compartment.
●If you are driving very fast, speak a little
louder.
You can access the instructions by saying:
“Instructions, tutorial, introduction”. You can
also listen to the instructions in parts. These
are divided into 7 blocks. To access them,
give any of the previous commands followed
by “part + <number>”. For example “Tutorial
part 1”.
Voice control (RADIO) – Red
But-
ton
Main radio commands (FM)
Next station
Previous station
Radio station <name> or Frequency <number> or
Wavelength <AM/FM/DAB>
Scan mode
AM mode:
Voice control (MEDIA) – Red
But-
ton
Main media commands
Next source
Previous source
Next track
Previous track
Mix Mode
Repeat track mode
Repeat all mode
Select <Artist/Album/Title/Genre>
Source (Jukebox/USB/CD/SD)
Pause/play
Voice control (PHONE) - Green
But-
ton
Main Telephone commands
Dial number
Mark name
Mark <name>
Call voice mail
Redial
Read contacts
See calls
Missed calls
Incoming calls
Numbers dialled
12

Introduction
Voice control (NAV) – Blue
But-
ton
Main Navigation commands
Search + POI <Banks/Petrol stations/Restau-
rants/etc.>
New destination
Enter street
Home address
Route guidance to <contact name>
Last destinations
Begin navigation
Stop navigation
Load destination
Save position
Activate/Deactivate directions
Note
Voice control is unavailable during parking
manoeuvres
Voice control setup
●Press the Infotainment button MENU to
open the main menu System setup.
●Press the function button SETUP to access
the system setup.
●Press the function button Voice control .
When you close a menu, the changes will
take effect automatically.
Summary of the indications and function
buttons
Function button: effect
Dialogue style : select the type of dialogue.
Long : during the voice control you will hear some
additional help instructions.
Brief : some additional commands from the long
dialogue are omitted.
Display available commands : when you activate voice con-
trol, the spoken commands of the function you are oper-
ating at that time are viewed in the display.
Voice control session start tone : when you activate voice
control a signal will be emitted. Press to deactivate the
signal.
Voice control session end tone : when you deactivate voice
control a signal will be emitted. Press to deactivate the
signal.
Input tone in voice dialogue : the input tone to confirm a
command is activated.
13

Audio and Media Mode
Radio Mode
RADIO main menu
Fig. 7 RADIO main menu
Fig. 8 Radio mode: station list (FM).
Press the Infotainment RADIO button to open
the RADIO main menu ››› Fig. 7.
RADIO main menu function buttons
Function button: effect
1
To change the group of memory buttons
slide a finger over the memory buttons from
left to right or vice-versa
BAND for selecting the desired frequency band.
STA-
TIONS
Opens the list of currently receivable radio
stations ››› page 18.
MANUAL Opens the frequency dial for the selected fre-
quency band ››› page 18.
VIEWa)
Displays additional services ››› page 17.
The function button is only available in DAB
mode.
SET-
TINGS
Opens the setup menu of the currently selec-
ted frequency band (FM, AM or DAB)
››› page 21.
/
To change between available radio stations
››› page 21.
1 to 18 Preset buttons to store radio stations
››› page 17.
a) This depends on the country and unit in question.
Possible messages and symbols
Display: Meaning
A
View the frequency or the name of the sta-
tion and, where applicable, the radio text.
The name of the radio station and the radio
text will only be displayed if equipped with
RDS and if it is active ››› page 15.
RDS
Offa)
The RDS radio data service is deactivated.
The RDS can be activated in the FM setup
menu ››› page 21.
TPa) The TP function is active and can be tuned in
››› page 20.
a) No traffic news station available.
The radio station is stored on a preset but-
ton.
a) There is no DAB reception.
a) This depends on the country and unit in question.
Note
●Bear in mind that being underground, in
tunnels, in areas with tall buildings or moun-
tains can interfere with radio signals.
●Foil or metal-coated stickers attached to
the windows may affect reception on vehicles
with a window aerial.
14

Audio and Media Mode
RDS radio data services
Fig. 9 RADIO main menu
Fig. 10 Radio mode: list of stations.
The RDS (Radio Data System) offers addition-
al information in FM such as the visualisation
of the station name, automatic station track-
ing (Alternative Frequencies AF), text emitted
by radio (Radio Text), traffic reports (TP) and
station types (PTY).
RDS is not supported by all units and is not
available everywhere or on every FM radio
station.
Depending on the country and the unit in
question, the RDS can be deactivated in the
FM setup menu ››› page 21.
Without RDS it is not possible to use radio
data services.
Name of the station and automatic station
tracking
If equipped with the RDS function, the names
of the stations can be displayed in the main
RADIO menu and in the FM station list.
FM radio stations may occasionally or contin-
uously broadcast different content on differ-
ent regional frequencies under the same sta-
tion name (e.g. Station 3).
By default, automatic station tracking always
switches to the currently selected station's
frequency that offers the best reception, as
the vehicle travels from one area to the next.
As a result, this may cause the regional sig-
nal to be lost.
Automatic frequency changing and automatic
station tracking can be deactivated in FM set-
up ››› page 21.
Radio Text (RDS)
Some RDS-enabled stations also broadcast
additional text information known as radio
text.
Radio Text is displayed in the upper half of
the screen above the preset buttons
››› Fig. 7 A.
The Radio Text display can be deactivated in
FM setup ››› page 21.
Note
Radio stations are responsible for the content
of the information they transmit.
15

Audio and Media Mode
Digital radio mode (DAB, DAB+ and
audio DMB)
Fig. 11 Display of preset buttons in DAB
mode.
Fig. 12 Display of station information in DAB
mode.
The DAB radio receiver supports the DAB,
DAB+ and DMB-Audio broadcasting stand-
ards.
In Europe, digital radio is transmitted via
Band III frequencies (174 MHz to 240 MHz)
and the L Band (1452 MHz to 1492 MHz).
The frequencies of the two bands are referred
to as “channels” and each has a channel
name (e.g. 12 A).
Several DAB stations are combined into one
channel with the additional services availa-
ble in a “block”.
Starting DAB radio mode
●From the RADIO main menu press the BAND
function button and select DAB .
The DAB radio station that was last selected
will be played if it can still be received at the
current location.
The selected DAB station is displayed in the
upper bar of the screen; the group of selec-
ted stations is displayed below ››› Fig. 11.
Additional DAB stations (Secondary Service
Components)
Some DAB stations temporarily or perma-
nently offer additional stations, (for example,
for broadcasting sports events).
Press the name of the main station in the
DAB menu to select an additional station. Or,
select the additional station from the station
list.
The DAB main menu shows the name of the
additional selected station on the right
alongside the abbreviated name of the main
DAB station.
The additional stations cannot be stored.
Automatic station tracking: change from DAB
to FM
DAB is currently not available in all areas. In
areas without DAB, is displayed in DAB ra-
dio mode.
Automatic station tracking can be activated
in DAB setup to change to the FM frequency
band ››› page 22.
If reception of the currently selected DAB sta-
tion is lost (e.g. no DAB reception available),
the Infotainment system attempts to find the
station on the FM frequency band and tune to
it. Automatic station tracking between fre-
quency bands only works if the DAB station
and the FM station transmit the same station
identifier or the DAB signal indicates a corre-
sponding station on the FM frequency band.
Once the corresponding FM station has been
found, (FM) is displayed after the station
name. When reception for the corresponding
DAB station returns, the unit will switch back
to DAB mode after a short time. The (FM) dis-
play is hidden.
If the reception of the selected DAB station is
too weak and the station can no longer be
16

Audio and Media Mode
found on the FM frequency band, the radio
will be muted.
Additional DAB services
The function buttons refer to the menu that
appears when the View button is pressed
››› Fig. 11.
Function button: effect
Preset list : Preset buttons display ››› Fig. 11.
Station information : Simultaneous displaying of Radio Text
››› Fig. 12 A and slideshow B instead of the preset
buttons.
Radio text : Radio Text is displayed instead of preset but-
tons.
Presentation : The slideshows are displayed in full screen.
Note
●Not all DAB stations support Radio Text and
slideshows.
●Radio stations are responsible for the con-
tent of the information they transmit.
Preset buttons
Fig. 13 RADIO main menu
The stations of the currently selected fre-
quency range can be stored on the numbered
function buttons in the RADIO main menu.
These function buttons are called “station
buttons”.
Functions of the preset buttons
Selecting the
station from the
preset buttons
Press the preset button correspond-
ing to the desired station.
The stored stations can only be
played by pressing the correspond-
ing preset button provided it can be
received at your current location.
Functions of the preset buttons
Switching be-
tween memory
banks
Move your finger over the screen
from left to right or vice-versa.
OR: Press one of the function buttons
››› Fig. 13 1
The preset buttons are displayed in
groups of 5 memory buttons ( 1 to
5, 6 to 10 , 11 to 15 and 16 to
18 ).
Storing stations
automatically
on the preset
buttons
See: Store stations ››› page 19.
Storing the sta-
tion logo on the
preset buttons
A station logo can be assigned to the
stations stored on the preset buttons
››› page 18.
Automatically save station logos in
the saved station buttons (only in FM
and DAB modes)
A station is automatically assigned a logo
when it is saved if it is available from the ra-
dio’s database.
If there are 2 or more logos in the database,
it gives the option to manually choose the
correct one. »
17

Audio and Media Mode
Note
Not all stations are stored in the database
and therefore it is not always possible to as-
sign logos automatically.
Manually save station logos in the
saved station buttons
The station logos can be imported from a
compatible data medium (for example, mem-
ory card or memories with USB port).
●Press the function button Setup and then
Station logos .
●Press the station button where you wish to
store the logo of a station.
●Select the source where the logo is stored
(for example, SD card 1 ). We recommend sav-
ing logos in the memory unit’s root directory.
●Select the station logo.
●Repeat the process to assign other logos;
press the infotainment button RADIO to re-
turn to the RADIO main menu.
●If you wish to change the logo of a preset
button that already has one assigned to it, it
must first be deleted from the button in ques-
tion.
Select, tune and store a station
Fig. 14 RADIO main menu
Fig. 15 Radio mode: list of stations.
Selecting stations
Select stations
with the arrow
buttons
Press either the
function button or
››› Fig. 14.
This will change between available
stations ››› page 21.
Selecting stations
Selecting sta-
tions from the
station list
Press the Station ››› Fig. 14 function
button to open the station list.
Search through the list and press the
required station to select it.
To close the station list, press the
BACK
function button ››› Fig. 15.
The station list closes automatically
after a period of inactivity.
Manually tuning in a station frequency.
Viewing the fre-
quency dial
Press the Manual function button
››› Fig. 14.
Changing the
frequency in
steps
Turn the setting knob.
OR: Press the + or – keys on the di-
al that appears on the screen.
Browsing the
frequency band
quickly
Press and hold one of the arrow but-
tons on the left of the multifunction
steering wheel. After releasing the ar-
row button, the unit automatically
tunes to the next available radio sta-
tion.
OR: Place your finger on the slider in
the frequency range and drag it to
move the button.
18
Table of contents
Other Seat Automobile Accessories manuals
Popular Automobile Accessories manuals by other brands

RVS systems
RVS systems RVS-082612 Product manual and installation instructions

walser
walser 31082 User instructions

Aries
Aries S223015 installation manual

Motorola
Motorola T605 - Bluetooth hands-free Car Motomanual

Discount Car Stereo
Discount Car Stereo A2DIY-JAG97 Quick Start Bluetooth Installation Guide

STO N SHO
STO N SHO SNS 289 Installation procedures