Seat ibiza User manual

MEDIA SYSTEM
TOUCH/COLOUR
Owner’s manual
575012720CA
Inglés 575012720CA (04.16)

SEAT S.A. is permanently concerned about continuous development of its types and models. For this reason we ask you to under-
stand, that at any given time, changes regarding shape, equipment and technique may take place on the car delivered. For this reason
no right at all may derive based on the data, drawings and descriptions in this current handbook.
All texts, illustrations and standards in this handbook are based on the status of information at the time of printing. Except for error
or omission, the information included in the current handbook is valid as of the date of closing print.
Re-printing, copying or translating, whether total or partial is not allowed unless SEAT allows it in written form.
SEAT reserves all rights in accordance with the “Copyright” Act.
All rights on changes are reserved.
❀This paper has been manufactured using bleached non-chlorine cellulose.
© SEAT S.A. - Reprint: 15.04.16
About this manual
This manual contains information, recommen-
dations, advice and warnings related to your
radio system. The other publications in the
vehicle documentation contain further infor-
mation of which you should be aware for your
own safety and for that of your passengers.
Ensure that the onboard documentation is
kept in the vehicle at all times. This is espe-
cially important when lending or selling the
vehicle to another person.
This manual contains a description of the
equipment supplied with the vehicle at the
time of press. Some of the units described
herein will not be available until a later date or
is only available in certain markets.
The illustrations are intended as a general
guide and may vary from the equipment fitted
in your vehicle in some details.
The screen colour and the colour of the infor-
mation displayed on it can vary according to
vehicle model.
Directions and positions of components (e.g.
right, left, front, rear) are always relative to the
direction of travel of the vehicle unless other-
wise stated.
The equipment marked with an aster-
isk* is fitted as standard only in certain
versions, and is only supplied as op-
tional extras for some versions, or are
only offered in certain countries.
® All registered marks are indicated with
®. Although the copyright symbol does
not appear, it is a copyrighted mark.
>> The section is continued on the follow-
ing page.
WARNING
Texts preceded by this symbol contain infor-
mation on safety. They warn you about possi-
ble dangers of accident or injury.
CAUTION
Texts with this symbol draw your attention to
potential sources of damage to your vehicle.
For the sake of the environment
Texts preceded by this symbol contain rele-
vant information concerning environmental
protection.
Note
Texts preceded by this symbol contain additio-
nal information.

Table of Contents
Table of Contents
Overview . . . . . . . . . . . . . . . . . . . . . . . . . . . . . 2
Overview of the unit (valid for: IBIZA, LEON,
TOLEDO) . . . . . . . . . . . . . . . . . . . . . . . . . . . . . . . 2
Overview of the unit (valid for: ATECA) . . . . . . . 3
Main menus . . . . . . . . . . . . . . . . . . . . . . . . . . . . 4
Introduction . . . . . . . . . . . . . . . . . . . . . . . . . . 6
General operating information . . . . . . . . . . . . . 6
Radio . . . . . . . . . . . . . . . . . . . . . . . . . . . . . . . . . 11
Radio mode . . . . . . . . . . . . . . . . . . . . . . . . . . . . 11
Media . . . . . . . . . . . . . . . . . . . . . . . . . . . . . . . . 18
Media mode . . . . . . . . . . . . . . . . . . . . . . . . . . . . 18
Telephone management system
(PHONE)* . . . . . . . . . . . . . . . . . . . . . . . . . . . . . 26
Introduction to the telephone management
system . . . . . . . . . . . . . . . . . . . . . . . . . . . . . . . . 26
Description of the telephone management
system . . . . . . . . . . . . . . . . . . . . . . . . . . . . . . . . 29
CAR menu . . . . . . . . . . . . . . . . . . . . . . . . . . . . 36
Introduction to managing the CAR menu . . . . . 36
Setup . . . . . . . . . . . . . . . . . . . . . . . . . . . . . . . . . 39
System setup Menu (SETUP) . . . . . . . . . . . . . . . 39
Sound . . . . . . . . . . . . . . . . . . . . . . . . . . . . . . . . 41
Sound and volume setup . . . . . . . . . . . . . . . . . . 41
Index . . . . . . . . . . . . . . . . . . . . . . . . . . . . . . . . . 43
1

Overview
Main menus
Fig. 3 Summary of the menus
4

Overview
Radio ››› page 11
Main menu RADIO ››› page 11
Radio data services RDS ››› page 12
Digital radio mode ››› page 13
Memory buttons ››› page 14
Select, tune and store stations to memory ››› page 14
SCAN ››› page 15
Traffic information TP ››› page 15
Settings ››› page 16
Media ››› page 18
Media sources and audio files ››› page 18
Playing order ››› page 19
Changing the media source ››› page 20
Memory card ››› page 21
External player with Bluetooth® ››› page 23
Change track ››› page 21
Select a track ››› page 24
Settings ››› page 25
USB/AUX-IN ››› page 22, ››› page 25
Sound ››› page 41 Sound and volume setup ››› page 41
Telephone ››› page 26
Pairing ››› page 28
Bluetooth® ››› page 27
Function buttons ››› page 29
Active call ››› page 29
Entering number ››› page 31
Phonebook ››› page 32
Call list ››› page 33
Setup ››› page 34
Vehicle ››› page 36 Journey ››› page 36
Status ››› page 38
Tyres ››› page 38
Consumers ››› page 36
Air conditioning ››› Booklet Instruction Manual
Settings ››› page 39
Display ››› page 39
Language ››› page 40
Date and time ››› page 40
Units ››› page 40
Factory settings ››› page 40
5

Introduction
Introduction
General operating information
Safety notes
Travelling on today's roads requires the driv-
er's full attention at all times.
Only operate the radio and its various func-
tions when the traffic situation really permits
this.
WARNING
●Before starting the trip, you should famili-
arise yourself with the different radio func-
tions.
●High audio volume may represent a danger
to you and to others.
●Adjust the volume in a way that you can
distinguish surrounding noise, for example,
horns and sirens, etc.
●Radio settings should be made when the
car is stopped or by a passenger.
WARNING
Distracting the driver in any way can lead to
an accident and cause injuries. Operating the
infotainment system while driving can dis-
tract your attention from the traffic.
●Always drive carefully and responsibly.
●Select volume settings that allow you to
easily hear signals from outside the vehicle
at all times (e.g. emergency service sirens).
●If you set the volume excessively high you
may suffer damage to your ears. This can also
happen if you are exposed to an excessively
high volume even for a short time.
WARNING
The volume level may suddenly change when
you switch audio source or connect a new au-
dio source.
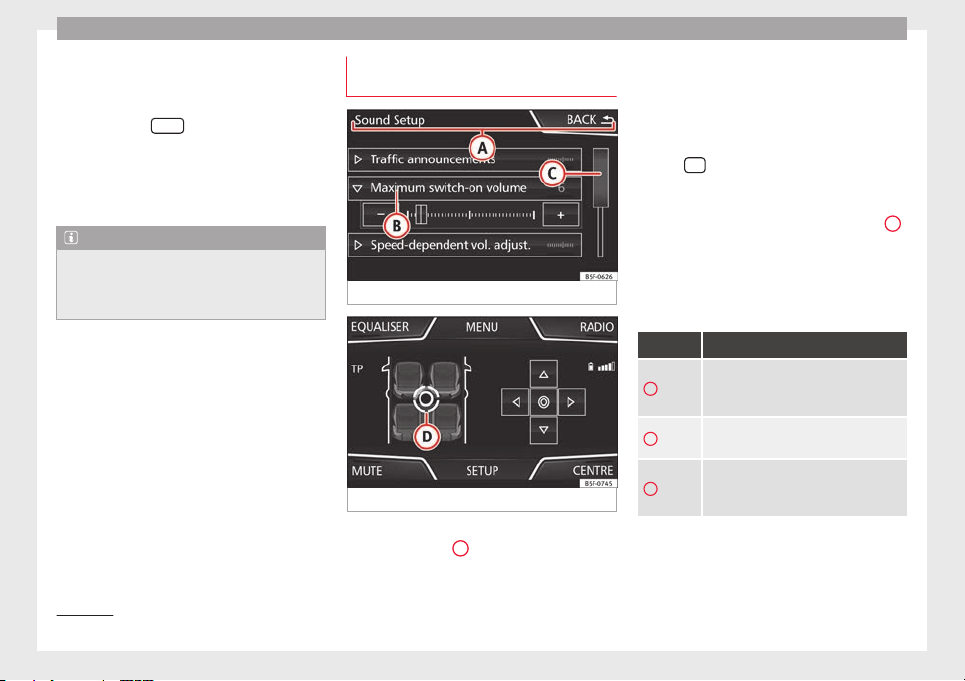
●Reduce the base volume before switching
audio source or connecting a new audio
source ››› page 7.
WARNING
Connecting, inserting or removing a data me-
dium while driving can distract your attention
from the traffic and cause an accident.
WARNING
Connecting leads for external devices may
obstruct the driver.
●Arrange the connecting leads so that they
do not obstruct the driver.
WARNING
External devices that are loose or not proper-
ly secured could be flung though the interior
during a sudden driving or braking manoeu-
vre, or in the event of an accident.
●Never, for any reason, fit the external units
on the doors, on the windscreen, on or near
the area marked “AIRBAG” on the steering
wheel, on the dash panel, on the seat backr-
ests or between these areas and the passen-
gers. These units may cause serious injury in
the event of an accident, especially if the air-
bag is activated.
WARNING
The centre armrest may obstruct the driver's
arm movements, which could cause an acci-
dent and severe injuries.
●Always keep the armrest closed while the
vehicle is in motion.
Note
●Not inserting the data medium correctly, or
inserting unsuitable data media, may damage
the unit.
●When inserting the memory card, make
sure it is in the correct position ››› page 21
●If you push too hard, you could damage the
lock on the memory card slot.
●Only use suitable memory cards.
●The vehicle loudspeakers may be damaged
if the volume is too high or the sound is dis-
torted.
6

Introduction
●Lightly pressing the buttons or briefly
pressing the touchscreen is sufficient to op-
erate the unit.
●It is possible that not all the functions and
function buttons are available as the software
of the unit responds to the specific character-
istics of each market. A missing function but-
ton on the screen is not the result of an error
in the unit.
●Due to country-specific legislation, certain
functions cannot be selected on the screen
when the vehicle is travelling above a certain
speed.
●Using a mobile telephone inside the vehicle
can cause noise in the speakers.
●There may be restrictions on the use of
Bluetooth devices in some countries. Infor-
mation is available from the local authorities.
●In some vehicles equipped with a parking
distance warning system, the volume of the
audio source is automatically lowered when
the gear is engaged.
●If the steering wheel has a voice control
button , it will not work in this radio mod-
el, so it has no function in relation to the ra-
dio.
Rotary knobs and buttons
Rotary knobs
The left-hand rotary knob ››› Fig. 1,
››› Fig. 2 8 is used as the volume control
or on/off button.
The right-hand rotary knob ››› Fig. 1,
››› Fig. 2 10 is used as the setup button.
Infotainment buttons
In these instructions, the unit buttons are de-
picted by the word “infotainment button”
and their function is shown inside a rectan-
gle (for example: infotainment button MEDIA
››› Fig. 1, ››› Fig. 2.
The infotainment buttons are operated by
pressing them or holding them down.
Switching on and off
To manually switch the Infotainment system
on and off, briefly press the rotary knob
››› Fig. 1, ››› Fig. 2 8.
When the unit is switched on the system
starts up. The last active audio source will be
played with the volume set, as long this does
not exceed the maximum, predefined switch-
on volume ››› page 41.
The unit will switch off automatically when
the key is removed from the ignition or when
the on/off button is pressed (depending on
the equipment fitted or the vehicle). If you
turn the unit back on after the engine has
been switched off, it will turn off automatical-
ly after approximately 30 minutes (delayed
switch-off).
Note
●The unit is linked to the vehicle. It cannot
be used in any other vehicle.
●If only the battery has been disconnected
from the vehicle, the vehicle must be started
before turning the unit back on.
Adjusting the base volume
Function Use
Increase
the vol-
ume.
Turn the volume control
clockwise or
scroll the
thumbwheel upwards on the
multifunction steering wheel ››› Book-
let Instruction Manual.
Lower the
volume.
Turn the volume control
anticlockwise
or scroll the thumbwheel downwards
on the multifunction steering wheel.
The volume modification is shown on the
screen with a bar.
It is possible to preset certain volume set-
tings and adjustments ››› page 41.»
7

Introduction
Silence the unit
●Turn the volume control anticlockwise
until you see .
●OR: Press the MUTE function button
››› Fig. 51).
While the unit is muted, the active media
source is paused. is displayed on the
screen.
Note
If the basic playback volume of an audio
source has been increased substantially, low-
er the volume before changing to another au-
dio source.
Operating the function buttons on-
screen
Fig. 4 View of possible function buttons
Fig. 5 View of possible function buttons
The unit is equipped with a touchscreen
››› Fig. 1, ››› Fig. 2 2.
The active areas of the screen that represent
a function are called “function buttons” and
are used by pressing them briefly on the dis-
play or holding them down. The function but-
tons are represented in the instructions with
the word “function buttons” and the button
symbol - - - .
Function buttons start functions or open sub-
menus. The menu currently selected is
shown in the submenus title line ››› Fig. 4 A.
The function buttons that appear deactivated
(in grey) may not be selected at that time.
Summary of the indications and function
buttons
Operation and effect
A
The title line shows the menu selected at
that time and, if applicable, other function
buttons ››› Fig. 4.
BPress to open an additional menu
››› Fig. 4.
C
Move the control around the screen by
pressing lightly, without lifting your finger
››› Fig. 4.
1) According to version
8

Introduction
Operation and effect
D
Move the cursor around the screen by
pressing lightly, without resting your fin-
ger. OR: Press the desired destination on
the screen; the cursor will move to this
position ››› Fig. 5.
BACK
Briefly press to return progressively to the
main menu from a submenu, or to undo
the changes made.
Press briefly to open a pop-up window
with additional setup options. To close
the pop-up window briefly press outside
of it or select an option.
/
Activated/deactivated function.
Some functions or instructions are
marked with a checkbox, and are activa-
ted or deactivated by touching them brief-
ly.
OK Briefly press to confirm the data entered
or to select.
×
Briefly press to close a pop-up window or
a data entry screen.
/
Briefly press to modify the setup progres-
sively.
SETUP To activate the setup of the menus and
systems.
MENU Go to menu selection.
Activating the list entries and search-
ing through the lists
Fig. 6 Setup menu list entries.
Select and activate the list entries with the
setting knob or by pressing directly on the
screen.
●Search for an element in the list by turning
the setting knob: each entry on the list will
appear marked, one by one, until you find
your desired entry.
●Press the setting knob to activate the selec-
ted list entry.
Scrolling through the list
If a list contains more elements than can be
viewed on the screen, a scroll bar will be
shown on the right of the screen ››› Fig. 4 D.
●Moving through a list, line by line: turn the
setting knob.
●To quickly scan through a long list: Place
your finger on the scroll marker and move it
downwards over the screen without losing
contact. Lift your finger off the screen when
you reach the desired position.
Additional information and display
options
The information on the screen can vary de-
pending on the settings and may differ from
the descriptions shown here.
The main screens show the current time and
outdoor temperature.
All information is displayed just after fully
starting up the infotainment system.
Initial configuration wizard
Fig. 7 Initial configuration wizard »
9

Introduction
The initial configuration wizard will help you
to set up your Infotainment system the first
time you switch it on.
Every time you switch on the Infotainment
system, the initial setup screen will appear
››› Fig. 7 if any parameters have not been set
or if the NEVER function button has not been
pressed.
Function
button
Function
CLOSE
Closes the Configuration Wizard, and the
main menu or last mode in which you
used the Infotainment system will ap-
pear. The next time you switch on the
system, the Configuration Wizard will
start up again.
NEVER
Disables the possibility of changing the
settings of the Infotainment system. If
you want to perform the initial system
setup, you must enter via System setup
and select Configuration Wizard
››› page 39.
START Starts up the Configuration Wizard.
APress to set the time.
BPress to set the date.
C
Press to search and store to memory the
radio stations that have the best recep-
tion at that moment.
DPress to link your mobile telephone to
the Infotainment system.
Function
button
Function
PREVIOUS
NEXT
To go to the previous or next parameter
to set.
When a parameter has been set, the only
way to reset it is from the main menu,
clicking on it, and not using the Previ-
ous/Next buttons.
When setting any parameter, a confirma-
tion mark will appear on it
.
FINISH
Once one or more settings have been ap-
plied, click on this in the main menu of
the wizard to confirm and finalize the
settings.
If there are any parameters you have not
set, the next time you connect the Info-
tainment system, the Initial Configura-
tion Wizard will start up.
10

Radio
Radio
Radio mode
Introduction
Note
●Please bear in mind that in car parks, tun-
nels, areas with high buildings or mountains
the radio signal can be impaired.
●Foil or metal-coated stickers attached to
the windows may affect reception on vehicles
with a window aerial.
●The availability of AM and DAB bands de-
pends on the country and/or equipment.
RADIO main menu
Fig. 8 RADIO main menu
Fig. 9 Station list
Press the RADIO Infotainment button to open
the Radio main menu ››› Fig. 8.
Radio main menu function buttons
Function
button
Function
BAND Allows you to select the frequency band
and memory bank.
STATION
LIST
Opens the list of currently receivable ra-
dio stations ››› page 14.
MANUAL Allows you to select the frequency man-
ually ››› table on page 14.
SETUP Opens the setup menu of the active fre-
quency band ››› page 16.
INFO Allows you to view the radio text of the se-
lected station.
Function
button
Function
or
Selects the previous/next stored station
(or available station). Arrow buttons setup
in the Setup (FM, AM, DAB) menu
››› page 16.
or
Change between station banks.
SCAN
Stops the station scan function (only visi-
ble when the function is running)
››› page 15.
1 to 12 Memory buttons ››› table on page 14.
Updating Updates the list of stations (AM/DAB)
››› page 14.
Information and possible icons
Display: Meaning
The RDS radio data service is disabled.
TP Traffic news is available .
No stations with traffic news are availa-
ble.
AF off The tracking of alternative frequencies is
disabled.
The radio station is stored in a memory
button.
11

Radio
Radio Data Services RDS (FM band)
Fig. 10 Radio text.
Fig. 11 Filter (PTY).
The RDS (Radio Data System) offers addition-
al information in FM such as the visualisation
of the station name, automatic station track-
ing (AF), text broadcast by radio (Radio Text
››› Fig. 8), traffic announcements (TP) and sta-
tion type (PTY).
Not all units have RDS, nor do all FM stations
offer this service.
Without RDS it is not possible to obtain radio
data services.
Station name and automatic station tracking
When the RDS is available, you can view the
names of the stations providing this service
in the RADIO main menu and in the list of
FM stations.
The FM stations send different contents un-
der one name (for example, Radio 3) in vari-
ous regional frequencies, provisionally or
permanently ››› Fig. 8.
When driving, the automatic station tracking
automatically changes to the frequency that
provides the best reception of the currently-
selected station. However, this can interrupt
the regional station currently tuned.
The automatic change of frequencies and au-
tomatic station tracking can be linked
through the FM setup ››› page 16.
Set a station name
In some cases the name of the station is too
long. This text may be blocked/unblocked by
pressing on the station name for 3 seconds.
A dot will appear/disappear to the left or
right of the station name.
Radio text
Some RDS-enabled stations also broadcast
additional text information known as radio
text.
Filter by station type (PTY)
With the RDS activated, stations may provide
information on their broadcast content
(news, music, culture, etc.). As seen in figure
››› Fig. 11, it is possible to filter stations by
their content.
Note
●The broadcasting companies are responsi-
ble for the content broadcast.
●Due to matters of infrastructure, RDS func-
tions may be limited in certain countries, and
you may not be able to receive traffic an-
nouncements, automatic station tracking (AF)
or programme types (PTY). The TP button will
not function in these countries.
12

Radio
Digital radio mode (DAB, DAB+ and
DMB audio)*
Fig. 12 Main DAB RADIO menu.
The DAB radio receiver is compatible with the
standards DAB, DAB+ and DMB audio.
In Europe, digital radio broadcasts on fre-
quencies from band frequency III (174 MHz
to 240 MHz) and band frequency L
(1452 MHz to 1492 MHz).
The frequencies of the two bands are referred
to as “channels” and each has a channel
name (e.g. 12 A).
Several available DAB stations are combined
into one channel in an “ensemble”.
DAB is not currently available in all areas. In
DAB Radio mode, it will show when you are in
an area with no DAB service .
Starting DAB radio mode
In the RADIO main menu, press the function
key ››› Fig. 12 BAND and select DAB .
The DAB radio station that was last selected
will be played if it can still be received at the
current location.
The station selected at that time is shown on
the top line of the screen. The selected En-
semble of stations is displayed below
››› Fig. 12.
Additional DAB stations
Some DAB stations temporarily or perma-
nently offer additional programmes, (for ex-
ample, for broadcasting sports events).
Additional stations are selected in the same
way as the conventional DAB stations. How-
ever, these are differentiated in the station
list by the icon 2nd.
The name of the additional available station
is displayed in the main DAB menu next to
the symbol .
The additional stations cannot be stored.
From the main
screen
Press the name of the main sta-
tion
Press the memory button of the
main station
From the station list Select the additional station
from the list
Automatic station tracking: change from DAB
to FM
In DAB setup/Advanced settings you
can change to the FM frequency band for au-
tomatic station tracking.
When the DAB station you are listening to
can no longer be received (for example, due
to DAB no longer being available), the unit
will try to locate and tune in this station in
the FM band frequency.
For station tracking across various frequen-
cies, the DAB station and the FM station must
broadcast the same station code, or the sta-
tion in FM that corresponds to the equivalent
in DAB, must be indicated through the DAB.
Once the corresponding FM station has been
found, (FM) is displayed after the station
name. When reception for the corresponding
DAB station returns, the unit will switch back
to DAB mode after a short time. The (FM)
display is hidden.
If the reception of the selected DAB station is
too weak and the station can no longer be
found on the FM frequency band, the radio
will be muted.
Note
The radio stations are responsible for the
content broadcast.
13

Radio
Memory buttons
Fig. 13 Group of stored stations
In the RADIO main menu you can store sta-
tions of the frequency band selected at that
time, using the 12 numbered function but-
tons. These function buttons are called
“memory buttons”.
Activating a station using the memory but-
tons
●Press the memory button corresponding to
the required station.
A stored station can only be activated using
the memory button if it can be received in the
place where you are at that moment.
Switching between memory banks
●Press the function button, BAND ››› Fig. 13.
The memory buttons are displayed in groups
of 4 function buttons, respectively ( 1-4 , 5-8
and 9-12 ). It is also possible to change mem-
ory banks by using the and buttons on
the touchscreen.
Viewing the memory buttons
If the radio text can be seen but not the mem-
ory buttons, press radio text to display the
stored memory buttons again.
Storing stations on memory buttons
See: Storing stations ››› table on page 14.
Select, tune and store stations to
memory
Selecting a station
Select the sta-
tion with the
arrow buttons
Press the
or the
function button.
This will change between stored or
available stations, depending on the
setup of the arrow buttons. Arrow but-
tons setup in the Setup (FM, AM
and DAB) menu ››› page 16.
Selecting a
station from a
station list
Press the Stations function button to
open the list of stations. Go through
the list and select the desired station
by pressing it. Press the BACK
func-
tion button to return to the previous
screen.
Selecting a station
To update the
list of stations
The list of stations in the FM frequency
band is automatically updated. For the
AM and DAB frequency bands, press
the function button Update to update
the station list.
Manually tuning in a station frequency.
Viewing the
frequency dial
Briefly press the Manual function but-
ton.
Adjusting the
frequency in
stages
Press the buttons + –, to the right and
left of the frequency band.
OR: Turn the adjustment knob.
Quickly brows-
ing the fre-
quency band
Place your finger on the slider in the
frequency dial and drag it along the
dial.
Hiding the fre-
quency band
Briefly press the button Manual .
Storing stations
Storing the
station being
listened to
on a memory
button
Hold down the desired memory button
until you hear the signal. The station
that you are listening to will be stored in
this memory button.
14

Radio
Storing stations
Storing a sta-
tion on the
list of sta-
tions
Press the Stations function button to
open the list of stations. Select the de-
sired station (by holding a finger on the
touchscreen or holding down the setup
button) until the store display appears.
Press the memory button and, after the
confirmation tone, the station will then
be recorded on this memory button.
To store more stations from the list,
press Back and repeat the process.
Deleting a
stored sta-
tion
The stored stations can be deleted one
by one or all at once in the FM, AM and
DAB setup menu.
Scan function (SCAN)
When the scan function is running, all availa-
ble stations on the current frequency band
are played in sequence for around 5 seconds
each.
Starting the scan function
●Press the function button Setup and then
select SCAN .
End station scan function
●Press the function button to stop the
scan function on the station you are listening
to.
●OR: Briefly press the setup button. The
scan function also ends when you manually
select a station using the stored station but-
tons, or when a traffic announcement comes
in.
Traffic information (TP)
Traffic news tracking with the TP function is
only possible if the TP station is available.
The traffic announcement stations are indica-
ted in the Radio main menu and in the list of
stations by displaying TP ››› Fig. 8 and
››› Fig. 9.
Some stations that do not have their own
traffic news support the TP function by broad-
casting traffic announcements from other
stations (EON).
Switching the TP function on and off
●In the menu Setup (FM, AM and
DAB), press the function button
Traffic Program (TP) to activate or deactivate
this function ››› page 16.
If the station you are listening to at that time
does not support the TP function, will be
displayed halfway up the left of the screen.
Active TP function and station selection
While the traffic news tracking is running, in
audio mode TP will be displayed half-way up
the screen on the left. In this case, the traffic
announcements of the current station or of
the station that broadcasts the correspond-
ing traffic information will be played.
In FM mode, the station tuned in must have
the TP function. If, after activating the TP
function, you manually select or use the stor-
ed station buttons to select a station that
does not support the TP function, it will not
check for traffic announcements (display:
).
When the traffic announcement station that
is tuned in stops being received, the symbol
will also be displayed, and you must
search for a station manually.
During operation in AM or Media mode, a
traffic announcement station is always set
automatically in the background, provided
there is one that can be tuned in. Depending
on your location, this process can take some
time.
Incoming traffic information
In active Audio mode, an incoming traffic an-
nouncement will play automatically.
During the traffic announcement, a pop-up
window is displayed and the radio changes,
depending on the case, to the traffic news
station (EON).
The media mode is paused and the volume is
adjusted to the preset level ››› page 41.»
15

Radio
The volume of the traffic announcement can
be adjusted with the volume control. The ad-
justed volume setting will be applied to sub-
sequent announcements.
●Press the function button Cancel to end the
current traffic announcement. The TP function
remains activated.
●OR: Press the function button Deactivate to
end the current traffic announcement and
permanently deactivate the TP function. This
can be reactivated in the setup menu.
Setup (FM, AM, DAB)
FM setup
●Select the frequency band FM by pressing
the infotainment button RADIO .
●Press the function button Setup to open the
menu FM setup.
Function button: function
SCAN : Scan function. When the scan function is active,
all available stations on the current frequency band are
played in sequence for approximately 5 seconds each
››› page 15.
Traffic news station (TP) *: The TP function (traffic news
station tracking) is active ››› page 15 a).
Seek mode : determines the setup of the buttons with ar-
rows
and
. This setting applies to all frequency
bands (FM, AM and DAB).
Function button: function
Preset list : All stored stations on the selected frequen-
cy band can be selected with the arrow buttons.
Station list : All available stations on the selected fre-
quency band can be selected with the arrow buttons.
Sort by *: to choose the mode in which the stations will
be arrangeda).
Group : sort by station group.
Alphabet : sort by alphabetical order.
Delete presets : to delete all or some of the stored sta-
tions.
Advanced settings *:
Radio data system (RDS) : radio data system (RDS) acti-
vated ››› page 12. With the checkbox deselected
,
the functions depending on the RDS system will not
be available. The function buttons depending on the
RDS system will remain inactive (in grey).
Alternative frequency (AF) : the automatic station track-
ing is active. With the checkbox deselected
the
function button RDS Regional remains inactive (grey).a)
Regional RDS : determines the setup for the regional au-
tomatic station tracking via the RDS ››› page 12a).
Fixed : the unit only switches to alternative frequen-
cies for the selected station if the same regional
service is being broadcast.
Automatic : the unit always switches to the station's
frequency that currently offers the best reception. As
a result, regional programmes may be interrupted.
a) This depends on the country and unit in question.
AM setup
●Select the AM frequency band by pressing
the RADIO infotainment button.
●Press the function button Setup to open the
menu AM setup.
Function button: function
SCAN : Scan function. When the scan function is active,
all available stations on the current frequency band are
played in sequence for approximately 5 seconds each
››› page 15.
Traffic news station (TP) : the TP function (traffic news sta-
tion tracking) is active ››› page 15.
Seek mode : determines the setup of the buttons with ar-
rows
and
. This setting applies to all frequency
bands (FM, AM and DAB).
Preset list : all stored stations on the selected frequen-
cy band can be selected with the arrow buttons.
Station list : all available stations on the selected fre-
quency band can be selected with the arrow buttons.
Delete presets : to delete all or some of the stored sta-
tions.
DAB setup
●Select the DAB frequency band by pressing
the RADIO infotainment button.
●Press the function button Setup to open the
menu DAB setup.
16

Radio
Function button: function
SCAN : Scan function. When the scan function is active,
all available stations on the current frequency band are
played in sequence for approximately 5 seconds each
››› page 15.
Seek mode : determines the setup of the buttons with ar-
rows
and
. This setting applies to all frequency
bands (FM, AM and DAB).
Preset list : all stored stations on the selected frequen-
cy band can be selected with the arrow buttons.
Station list : all available stations on the selected fre-
quency band can be selected with the arrow buttons.
VIEW : to select the type of view of the DAB station list.
Ensemble : hierarchical view of stations and ensembles
in alphabetical order.
Station list : overall view of stations in alphabetical or-
der.
Traffic news station (TP) : the TP function (traffic news sta-
tion tracking) is active ››› page 15.
Delete presets : to delete all or some of the stored sta-
tions.
Advanced settings : DAB services setup.
DAB traffic announcements : DAB traffic announcements
are played in the same way as TP traffic announce-
ments in all operating modes.
Other DAB alerts : DAB announcements (news, sport,
weather, warnings etc.) will interrupt the current DAB
radio mode.
Function button: function
DAB-DAB station tracking : automatic station tracking
within the DAB frequency band has been activated.
Automatic DAB-FM switching : switching to FM frequency
band is allowed for automatic station tracking.
17

Media
Media
Media mode
Introduction
Media sources are audio sources containing
audio files on various different data storage
devices (e.g. SD memory card, USB, external
MP3 player, etc.). These audio files can be
played by the infotainment system from its
corresponding drives or audio input sockets
(memory card slot, AUX-IN multi-media sock-
et etc.)
Note
●The audio coding technology MPEG-4 HE-
AAC and patents have a Fraunhofer IIS li-
cence.
●This product is protected by copyright and
property rights of Microsoft Corporation. Us-
ing or distributing similar technology outside
of this product without a licence from Micro-
soft or any of its authorised subsidiaries is
prohibited.
●The infotainment system only plays undam-
aged compatible audio files; other files are
ignored.
●Consult the list of supported devices on the
web.
Requirements for the media sources
and audio files
The supported file formats listed are collec-
tively referred to below as "audio files".
Media sources Requirements for playing
in the unit
SD and MMC Mem-
ory cards compatible
with the FAT12, FAT16,
FAT32, XFAT or VFAT file
system (max. 2GB), as
well as SDHC and
SDXC memory cards.
– MP3 files (.mp3) with a rate
of 8 to 320 kbit/s or variable.
– WMA files (.wma) of up to
9.2 mono/stereo with no copy
protection.
– Playlists in PLS, M3U, WPL
and ASX formats.
– Playlists no larger than
1000 elements or 20 kB.
– Filenames and addresses
no larger than 256 characters.
– On memory cards: a maxi-
mum of 1000 folders and a
maximum of 2048 files.
USB data storage
device with 2.0 specifi-
cation, compatible
with the FAT12, FAT16,
FAT32, or VFAT file sys-
tem (max. 2GB).
Audio file playback
via Bluetooth®a).
– The external media player
must support the Bluetooth
profile A2DP.
a) Bluetooth® is a registered trademark of Bluetooth SIG, Inc.
Restrictions and instructions
Contamination, exposure to high tempera-
tures and mechanical damage may render a
data medium unusable. Please observe the
manufacturer's instructions.
Variations in the quality of data media pro-
duced by different manufacturers may lead to
anomalies during playback.
Please observe copyright laws.
The unit may be unable to read individual
tracks or the entire data medium due to the
data medium configuration or the devices
and programs used for recording. Informa-
tion can be found on the internet regarding
the best ways to create audio files and data
media (compression rate, ID3 tag etc.).
Depending on the size, its condition due to
use (copy and delete processes), the folder
structure and file type, the read time of the
data media used can vary considerably.
Playlists only determine a certain playing or-
der. There are no files stored in a playlist. The
unit will not play a playlist if the files are not
on the data medium at the locations referred
to by the playlist (relative file paths).
Note
●Do not use adaptors for memory cards.
●We will not accept any responsibility for
files damaged or lost on the data medium.
18
Other manuals for ibiza
8
This manual suits for next models
3
Table of contents
Other Seat Car Receiver manuals

Seat
Seat ALANA User manual

Seat
Seat Radio AURA User manual

Seat
Seat ALANA User manual

Seat
Seat SOUND SYSTEM 1.0 User manual

Seat
Seat Media System Plus User manual

Seat
Seat Radio Elba User manual

Seat
Seat SOUND SYSTEM 1.0 User manual

Seat
Seat Arona User manual

Seat
Seat Media System 3.2 User manual

Seat
Seat PLUS/NAVI SYSTEM User manual