Makita DUP180 User manual

DUP180
EN Battery Powered Pruning
Shears INSTRUCTION MANUAL 8
FR Sécateur à batterie MANUEL D’INSTRUCTIONS 17
DE Akku-Astschere BETRIEBSANLEITUNG 26
IT Cesoie per potare a batteria ISTRUZIONI PER L’USO 36
NL Accusnoeischaar GEBRUIKSAANWIJZING 46
ES Tijera de podar Inalámbrica MANUAL DE
INSTRUCCIONES 56
PT Tesoura de Jardim a Bateria MANUAL DE INSTRUÇÕES 66
DA Akku grensaks BRUGSANVISNING 76
EL 85
TR KULLANMA KILAVUZU 95

2
1
3
4
5
6
7
8
9
2
Fig.1

3
3
1
2
4
51
Fig.2
3
2
4
1
Fig.3
1
2
Fig.4
1
2
Fig.5
1
2
Fig.6
1
2
3
4
Fig.7
3
1
2
Fig.8

4
1
2
Fig.9
1
Fig.10
1
Fig.11
1
2
3
4
Fig.12
1
2
3
4
Fig.13
1
Fig.14
1
Fig.15
1
2
Fig.16

5
1
Fig.17
Fig.18
1
Fig.19
Fig.20
Fig.21
1
Fig.22
Fig.23
Fig.24

6
Fig.25
1
Fig.26
Fig.27
1
Fig.28
1
Fig.29
1
Fig.30
Fig.31
1
Fig.32

7
1
2
Fig.33
1
Fig.34
1 2
Fig.35
1
Fig.36

8ENGLISH
ENGLISH (Original instructions)
SPECIFICATIONS
Model: DUP180
Max. cutting capacity ø30 mm
Overall length
(Shears part only)
296 mm
Rated voltage D.C. 18 V
Net weight *1
(Shears part only)
0.68 kg
without notice.
*1
Applicable battery cartridge and charger
Battery cartridge BL1815N / BL1820B / BL1830B / BL1840B / BL1850B / BL1860B
Charger DC18RC / DC18RD / DC18RE / DC18SD / DC18SE / DC18SF /
DC18SH / DC18WC
residence.
WARNING: Only use the battery cartridges and chargers listed above.
WARNING: Do not use an optional corded
power supply such as battery adapter or portable
power pack with this tool. Do not connect two
or more battery adapters for extension purpose.
Symbols
for the equipment. Be sure that you understand their
Take particular care and attention.
Read instruction manual.
Do not expose to moisture.
Ni-MH
Li-ion
Only for EU countries
Due to the presence of hazardous com-
ponents in the equipment, waste electrical
and electronic equipment, accumulators
on the environment and human health.
Do not dispose of electrical and electronic
waste!
In accordance with the European Directive
on waste electrical and electronic equip-
as well as their adaptation to national law,
and delivered to a separate collection point
for municipal waste, operating in accor-
dance with the regulations on environmen-
tal protection.
equipment.
Intended use
Noise
The typical A-weighted noise level determined accord-
ing to EN62841-4-5:
Sound pressure level (LpA) : 70 dB(A) or less
Uncertainty (K) : 3 dB (A)
The noise level under working may exceed 80 dB (A).

9ENGLISH
NOTE: The declared noise emission value(s) has
another.
NOTE: The declared noise emission value(s)
exposure.
WARNING: Wear ear protection.
WARNING: The noise emission during actual
value(s) depending on the ways in which the
tool is used especially what kind of workpiece is
processed.
WARNING: Be sure to identify safety mea-
sures to protect the operator that are based on an
estimation of exposure in the actual conditions of
use (taking account of all parts of the operating
cycle such as the times when the tool is switched
trigger time).
Vibration
-
mined according to EN62841-4-5:
h) : 2.5 m/s2or less
Uncertainty (K) : 1.5 m/s2
NOTE:
measured in accordance with a standard test method
NOTE:
WARNING: The vibration emission during
declared value(s) depending on the ways in which
the tool is used especially what kind of workpiece
is processed.
WARNING: Be sure to identify safety mea-
sures to protect the operator that are based on an
estimation of exposure in the actual conditions of
use (taking account of all parts of the operating
cycle such as the times when the tool is switched
trigger time).
Declarations of Conformity
For European countries only
The Declarations of conformity are included in Annex A
to this instruction manual.
SAFETY WARNINGS
General power tool safety warnings
WARNING Read all safety warnings, instruc-
this power tool. Failure to follow all instructions listed
Save all warnings and instruc-
tions for future reference.
The term "power tool" in the warnings refers to your
(cordless) power tool.
Pruning shears safety warnings
1. Do not use the pruning shears in bad weather
conditions, especially when there is a risk of
lightning.
2. Keep all power cords and cables away from
cutting area.
3. Hold the pruning shears by insulated gripping
surfaces only, because the blade may contact
hidden wiring or its own cord. Blades contacting
a "live" wire may make exposed metal parts of the
pruning shear "live" and could give the operator an
electric shock.
4. Keep all parts of the body away from the blade.
Do not remove cut material or hold material to
be cut when blades are moving.
5. When clearing jammed material or servicing
the pruning shears, make sure the power
removed. Unexpected actuation of the pruning
-
6. Carry the pruning shears by the handle with
the blade stopped and taking care not to oper-
ate the power switch. Proper carrying of the
pruning shears will decrease the risk of inadver-
Additional Safety Instructions
1. Use personal protective equipment. Always
wear eye protection. Protective equipment such
as a dust mask, non-skid safety shoes, hard hat or
hearing protection used for appropriate conditions
2. This tool is for pruning branches. Do not use it
3. Never allow children, persons with reduced
physical, sensory or mental capabilities or
lack of experience and knowledge or people
unfamiliar with these instructions to use the
tool. Local regulations may restrict the age of
the operator.
4. Children should be supervised to ensure that
they do not play with the appliance.

10 ENGLISH
5. Never operate the tool while people, especially
children, or pets are nearby.
6. Do not overreach and keep balance at all
times.
walk, never run.
7. Do not touch moving hazardous parts before
the tool is disconnected from the mains and/or
the battery cartridge is removed from the tool.
8. Always wear substantial footwear and long
trousers while operating the tool.
9. Disconnect the supply and/or remove the
battery cartridge from the tool:
tool,
tool for damage,
immediately check.
10. Never operate the tool with defective guards
or shields, or without safety devices, or if the
cord is damaged or worn.
11. Avoid using the tool in bad weather conditions
especially when there is a risk of lightning.
12. Check the branches for foreign objects, such
as wire fences or hidden wiring before operat-
ing the tool.
13.
14. The tool is intended to be used by the operator
at ground level. Do not use the tool on ladders
or any other unstable support.
15. Be careful not to catch foreign matter between
the shear blades.
16. Never hold the branch you are pruning with
your free hand. Keep your free hand away from
they are very sharp and you may cut yourself.
17. Don’t force the tool to make it cut. You could
unintentionally.
18. Avoid cutting electrical wires that may be
hidden.
19. Handle the shear blades with extreme care to
prevent cuts or injury from the shear blades.
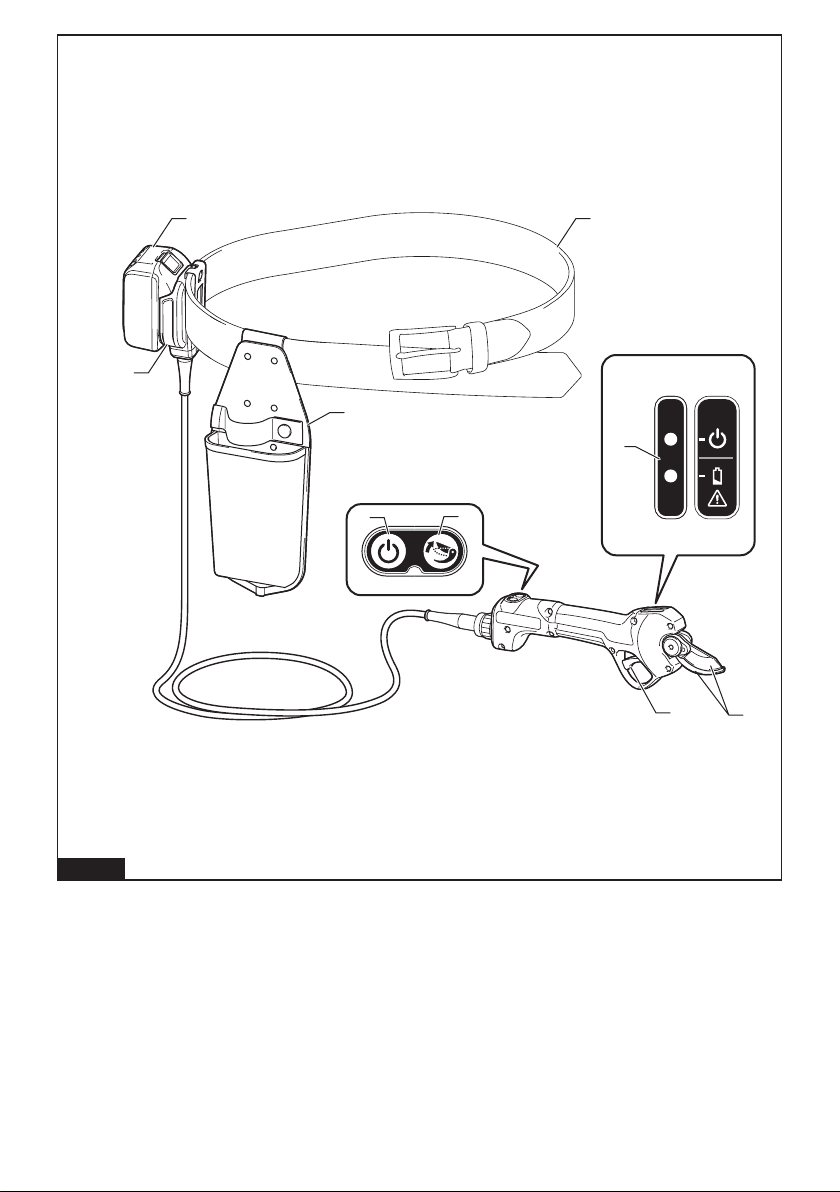
20. When not in use, always keep the tool in its
holster.
21. When power cords and cables get hot, stop
Allow the tool to
22. Do not handle power plugs, sockets and con-
nectors with wet hands. It may cause electric
shock.
Important safety instructions for
battery cartridge
1.
Before using battery cartridge, read all instruc-
tions and cautionary markings on (1) battery
charger, (2) battery, and (3) product using battery.
2. Do not disassemble or tamper with the battery
cartridge.
or explosion.
3. If operating time has become excessively
shorter, stop operating immediately. It may
result in a risk of overheating, possible burns
and even an explosion.
4.
If electrolyte gets into your eyes, rinse them out
with clear water and seek medical attention right
away. It may result in loss of your eyesight.
5. Do not short the battery cartridge:
(1) Do not touch the terminals with any con-
ductive material.
(2) Avoid storing battery cartridge in a con-
tainer with other metal objects such as
nails, coins, etc.
(3) Do not expose battery cartridge to water
or rain.
A battery short can cause a large current
breakdown.
6. Do not store and use the tool and battery car-
tridge in locations where the temperature may
reach or exceed 50 °C (122 °F).
7. Do not incinerate the battery cartridge even if
it is severely damaged or is completely worn
8. Do not nail, cut, crush, throw, drop the battery
cartridge, or hit against a hard object to the
battery cartridge. Such conduct may result in a
9. Do not use a damaged battery.
10.
The contained lithium-ion batteries are subject to
the Dangerous Goods Legislation requirements.
forwarding agents, special requirement on pack-
-
ing an expert for hazardous material is required.
national regulations.
around in the packaging.
11. When disposing the battery cartridge, remove
it from the tool and dispose of it in a safe
place. Follow your local regulations relating to
disposal of battery.
12. Use the batteries only with the products
-
sive heat, explosion, or leak of electrolyte.
13. If the tool is not used for a long period of time,
the battery must be removed from the tool.
14. During and after use, the battery cartridge may
take on heat which can cause burns or low
temperature burns. Pay attention to the han-
dling of hot battery cartridges.

11 ENGLISH
15.
Do not touch the terminal of the tool immediately
after use as it may get hot enough to cause burns.
16. Do not allow chips, dust, or soil stuck into the
terminals, holes, and grooves of the battery
cartridge.
-
17. Unless the tool supports the use near
high-voltage electrical power lines, do not use
the battery cartridge near high-voltage electri-
cal power lines. It may result in a malfunction or
18. Keep the battery away from children.
SAVE THESE INSTRUCTIONS.
CAUTION:
Only use genuine Makita batteries.
void the Makita warranty for the Makita tool and charger.
Tips for maintaining maximum
battery life
1. Charge the battery cartridge before completely
discharged. Always stop tool operation and
charge the battery cartridge when you notice
less tool power.
2. Never recharge a fully charged battery car-
tridge. Overcharging shortens the battery
service life.
3. Charge the battery cartridge with room tem-
perature at 10 °C - 40 °C (50 °F - 104 °F). Let
a hot battery cartridge cool down before
charging it.
4. When not using the battery cartridge, remove
it from the tool or the charger.
5. Charge the battery cartridge if you do not use
it for a long period (more than six months).
PARTS DESCRIPTION
Fig.1
1 2Indicator lamps 3
4 5Battery cartridge 6Switch trigger
7Battery adapter 8Holster 9
FUNCTIONAL
DESCRIPTION
CAUTION: Always be sure that the tool is
before adjusting or checking function on the tool.
Installing the connection cord
First, align the triangular mark of the female socket of
the connection cord with the triangular mark of the male
connector of the tool. Push in the socket of the connec-
tion cord to the connector of the tool. Then, align the
marking on the coupling with the triangular marks, and
push in and turn the coupling to tighten.
Fig.2: 1. Triangular mark 2. Connection cord 3. Tool
4. Marking on coupling 5. Coupling
NOTICE: Turn the coupling and align the mark-
when disconnecting the connection cord.
Installing or removing battery
cartridge
CAUTION:
installing or removing of the battery cartridge.
CAUTION: Hold the battery adapter and the
-
ing battery cartridge.
it into place. Insert it all the way until it locks in place
with a little click. If you can see the red indicator as
CAUTION: Always install the battery cartridge
fully until the red indicator cannot be seen. If not,
you or someone around you.
CAUTION: Do not install the battery cartridge
forcibly. If the cartridge does not slide in easily, it is
Fig.3: 1. Red indicator 2. Button 3. Battery cartridge
4. Battery adapter

12 ENGLISH
Indicating the remaining battery
capacity
Only for battery cartridges with the indicator
-
light up for a few seconds.
Fig.4: 1. Indicator lamps 2.
Indicator lamps Remaining
capacity
Lighted Blinking
75% to 100%
50% to 75%
25% to 50%
0% to 25%
Charge the
may have
malfunctioned.
NOTE: Depending on the conditions of use and the
from the actual capacity.
NOTE:
Tool / battery protection system
-
-
placed under one of the following conditions:
Overloaded:
restart.
the tool on again.
Low battery voltage:
tool does not operate. If you turn the tool on, the motor
Protections against other causes
Protection system is also designed for other causes
that could damage the tool and allows the tool to stop
automatically. Take all the following steps to clear the
halt or stop in operation.
restart.
system, then contact your local Makita Service Center.
NOTICE: If the tool stops due to a cause
not described above, refer to the section for
troubleshooting.
Indicator lamps
Fig.5: 1. Indicator lamp (green) 2. Indicator lamp
(red)
The meaning of indicator lamps is as follows:
Indicator lamps Description
On
Blinking
The tool is turned on and ready
to operate.
The tool is turned on and in the
normal mode, pull the switch
trigger twice.
(Green indicator status
may vary according to
operating conditions.)
is low.
or the tool is overloaded, or the
-
sists, ask your local authorized
service center for repair.

13 ENGLISH
Main power button
WARNING:
in use.
To turn on the tool, press and hold the main power
the switch trigger, and then press the main power
Fig.6: 1.2. Switch trigger
NOTE:
switch trigger is not pulled for a certain period after
the tool is turned on. When the green indicator lamp
normal mode.
NOTE:
To avoid unintentional start up. The tool automatically
shuts down when the switch trigger is not pulled for a
certain period after the tool is turned on.
Switch action
CAUTION: Before installing the battery car-
tridge into the tool, always check to see that the
switch trigger actuates properly and returns to
the "OFF" position when released.
Turn on the tool, and pull the switch trigger twice to
lights up in green. When you pull the switch trigger, the
Switching the shear blade angle
four levels. You can switch the opening angle according
Fig.7: 1. ø30 mm 2. ø25 mm 3. ø18 mm 4. ø10 mm
1. Turn on the tool and pull the switch trigger twice to
2. While pulling the switch trigger fully, press and
-
3. Pull the switch trigger repeatedly so that the open-
ing angle switches to your desired position.
4.
Cutting depth adjustment
1. Turn on the tool and pull the switch trigger twice to
2. While pulling the switch trigger fully, press and
3.
trigger repeatedly so that the overlap of the tips of the
Fig.8: 1.2.
3. 1 - 3 mm
NOTE:-
est position when you pull the switch trigger after the
NOTE:
cutting depth again.
4.
ASSEMBLY
CAUTION: Always be sure that the tool is
before carrying out any work on the tool.
CAUTION: When replacing the shear blades,
always wear gloves so that your hands do not
directly contact the shear blades.
Removing or installing the shear blades
1.
then turn over the tool.
Fig.9: 1. Bolt 2. Cover
2.
Fig.10: 1. Bolt
NOTICE: Do not loosen the nut before loosening
the bolt.
3.
remove it.
Fig.11: 1. Nut
4.
Fig.12: 1. Bolt 2. Blade holder 3.
4.
5.
Fig.13: 1. Bolt 2. Blade holder 3.
4.

14 ENGLISH
NOTICE: When attaching the upper shear blade,
make sure that the upper shear blade is placed in
6. Turn over the tool, and then attach the nut to the
tool and tighten it manually.
Fig.14: 1. Nut
NOTICE: The recommended tightening torque is
approximately 0.5 N•m.
7.
hex wrench.
Fig.15: 1. Bolt
8. Turn over the tool, then attach the cover to the
Fig.16: 1. Bolt 2. Cover
NOTICE: Tighten the bolts with the hex wrench
Fig.17: 1. Hex wrench
Fig.18
-
Fig.19: 1.
OPERATION
CAUTION:
CAUTION: Do not put any of your body parts
near the shear blades during operation.
CAUTION: Before use, inspect if the shear
blades, bolts or other parts are not worn or
damaged. Replace worn or damaged parts for safe
operation.
NOTICE: If the shear blades are stuck in a
branch during operation, do not twist the tool.
and then pull the shear blades straight out slowly
from the branch.
NOTICE: In case you cut too thick branch or
something too hard, the overload protection
works and the tool stops. In this case, release
pull the shear blades straight out slowly from the
branch.
Setting up holster and battery
adapter
Fig.20
Fig.21
the strap. Before inserting the tool into the holster, close
Fig.22: 1. Strap
Pruning operation
-
mately ø30 mm.
Fig.23
MAINTENANCE
CAUTION: Always be sure that the tool is
before attempting to perform inspection or
maintenance.
CAUTION: Wear safety gloves when handling
the shear blade. Otherwise it may result in personal
NOTICE: Never use gasoline, benzine, thinner,
alcohol or the like. Discoloration, deformation or
cracks may result.
To maintain product SAFETY and RELIABILITY,
Centers, always using Makita replacement parts.
Shear blade maintenance
NOTICE: Failure to perform blade maintenance
may cause excessive blade friction and shorten
the operating time per battery charge.
Before the operation or once per hour during operation,
-
Fig.24
Fig.25
Fig.26: 1.
Then apply low-viscosity oil (machine oil, or spray-type
Fig.27

15 ENGLISH
Adjusting shear blades tension
NOTICE: Adjust the tension on your shear
blades properly. Too loose tension may result
in dull cut, and too tight tension may result in
overload for the motor and short running time of
the tool.
1.
remove it.
Fig.28: 1. Bolt
NOTICE: Do not loosen the nut before loosening
the bolt.
2.
tighten it manually.
Fig.29: 1. Nut
NOTICE: The recommended tightening torque is
approximately 0.5 N•m.
3.
hex wrench.
Fig.30: 1. Bolt
4.
Fig.31
Fig.32: 1.
Grinding the shear blades
NOTE:
to the grinding stone will make the grinding smoother.
Upper shear blade
1.
Fig.33: 1.2. Grinding stone
2.
Fig.34: 1. Grinding stone
Lower shear blade
1.
Fig.35: 1. Grinding stone 2.
2.
Fig.36: 1. Grinding stone
NOTICE: When sharpening the back side of
shear blade, lightly apply the grinding stone,
and do not sharpen the shear blade too much.
TROUBLESHOOTING
do not attempt to dismantle the tool. Instead, ask Makita Authorized Service Centers, always using Makita replace-
ment parts for repairs.
State of abnormality Probable cause (malfunction) Remedy
after pulling the switch trigger.
Turn on the tool.
The switch trigger is defective. Stop using the tool immediately, and ask your local
authorized service center for repair.
The cut is not smooth.

16 ENGLISH
OPTIONAL
ACCESSORIES
CAUTION: These accessories or attachments
are recommended for use with your Makita tool
The use of any other
accessories or attachments might present a risk of
for its stated purpose.
If you need any assistance for more details regard-
ing these accessories, ask your local Makita Service
Center.
• Grinding stone
NOTE:
tool package as standard accessories. They may

17 FRANÇAIS
FRANÇAIS (Instructions originales)
SPÉCIFICATIONS
Modèle : DUP180
Capacité max. de coupe ø30 mm
Longueur totale
(Partie sécateur uniquement)
296 mm
Tension nominale 18 V CC
Poids net *1
(Partie sécateur uniquement)
0,68 kg
*1
Batterie et chargeur applicables
Batterie BL1815N / BL1820B / BL1830B / BL1840B / BL1850B / BL1860B
Chargeur DC18RC / DC18RD / DC18RE / DC18SD / DC18SE / DC18SF /
DC18SH / DC18WC
résidez.
AVERTISSEMENT : N’utilisez que les batteries et les chargeurs répertoriés ci-dessus. L’utilisation
AVERTISSEMENT : N’utilisez pas de source
d’alimentation câblée en option comme un adap-
tateur de batterie ou un support d’alimentation
portable avec cet outil. Ne connectez pas plus de
-
sion.
du sécateur provoquant une électrocution, un incen-
Symboles
Lire le mode d’emploi.
la lame.
Ni-MH
Li-ion
Pour les pays de l’Union européenne
uniquement
En raison de la présence de composants
dangereux dans l’équipement, les déchets
d’équipements électriques et électro-
peuvent avoir un impact négatif sur l’envi-
ronnement et la santé humaine.
ordures ménagères !
relative aux déchets d’équipements élec-
triques et électroniques et aux déchets
les déchets d’équipements électriques,
dans un point de collecte distinct pour
-
mentations en matière de protection de
l’environnement.
-
Utilisations
Bruit
EN62841-4-5 :
Niveau de pression sonore (LpA) : 70 dB (A) ou moins
Incertitude (K) : 3 dB (A)

18 FRANÇAIS
NOTE :-
-
parer les outils entre eux.
NOTE :-
préliminaire de l’exposition.
AVERTISSEMENT : Portez un serre-tête
antibruit.
AVERTISSEMENT : L’émission de bruit
lors de l’usage réel de l’outil électrique peut être
la façon dont l’outil est utilisé, particulièrement
selon le type de pièce usinée.
AVERTISSEMENT : Les mesures de sécurité
à prendre pour protéger l’utilisateur doivent être
basées sur une estimation de l’exposition dans
des conditions réelles d’utilisation (en tenant
compte de toutes les composantes du cycle
d’utilisation, comme par exemple le moment de
sa mise hors tension, lorsqu’il tourne à vide et le
moment de son déclenchement).
Vibrations
déterminée selon EN62841-4-5 :
h) : 2,5 m/s2ou moins
Incertitude (K) : 1,5 m/s2
NOTE :-
-
parer les outils entre eux.
NOTE :-
préliminaire de l’exposition.
AVERTISSEMENT : L’émission de vibrations
lors de l’usage réel de l’outil électrique peut être
la façon dont l’outil est utilisé, particulièrement
selon le type de pièce usinée.
AVERTISSEMENT : Les mesures de sécurité
à prendre pour protéger l’utilisateur doivent être
basées sur une estimation de l’exposition dans
des conditions réelles d’utilisation (en tenant
compte de toutes les composantes du cycle
d’utilisation, comme par exemple le moment de
sa mise hors tension, lorsqu’il tourne à vide et le
moment de son déclenchement).
Déclarations de conformité
Pour les pays européens uniquement
Les déclarations de conformité sont fournies en Annexe
CONSIGNES DE
SÉCURITÉ
Consignes de sécurité générales
pour outils électriques
AVERTISSEMENT Veuillez lire toutes les
consignes de sécurité, instructions, illustrations
-
trique. Le non-respect de toutes les instructions indi-
quées ci-dessous peut entraîner une électrocution, un
Conservez toutes les mises en
garde et instructions pour réfé-
rence ultérieure.
Le terme « outil électrique » dans les avertissements
-
Consignes de sécurité pour
sécateur
1. N’utilisez pas le sécateur par mauvais temps,
particulièrement en cas d’orage. Vous diminue-
2. Éloignez les cordons d’alimentation et les
câbles de la zone de coupe. Les cordons d’ali-
coupés accidentellement par la lame.
3. Tenez le sécateur uniquement par ses surfaces
de prise isolées, car la lame pourrait entrer en
contact avec le câblage caché ou son propre
cordon.
tension peut transmettre du courant dans les
pièces métalliques exposées du sécateur et élec-
trocuter l’opérateur.
4. Prenez soin de n’approcher aucune partie du
corps de la lame. Ne retirez pas le matériau
coupé ni ne tenez le matériau à couper lorsque
les lames sont en mouvement.
5. Lorsque vous dégagez un matériau bloqué ou
dépannez le sécateur, assurez-vous que l’inter-
rupteur d’alimentation est en position d’arrêt
et que la batterie est retirée ou débranchée. Le
déclenchement inopiné du sécateur pendant que
6. Transportez le sécateur par la poignée avec
la lame arrêtée et en prenant soin de ne pas
actionner l’interrupteur d’alimentation. En
transportant correctement le sécateur, vous dimi-
nuez le risque d’un démarrage intempestif et le

19 FRANÇAIS
Consignes de sécurité supplémentaires
1. Utilisez un équipement de protection indivi-
duelle. Portez toujours une protection ocu-
laire. Les équipements de sécurité tels que les
masques contre les poussières, les chaussures
de sécurité antidérapantes, les casques ou les
protecteurs d’oreilles utilisés pour les conditions
2. Cet outil sert à tailler des branches. Il est for-
mellement déconseillé de l’employer pour un autre
usage.
3. Ne laissez en aucun cas les enfants, les per-
sonnes aux facultés physiques, sensorielles
ou mentales diminuées ou sans expérience
ni expertise ou les personnes qui ne sont pas
familiarisées avec ces instructions utiliser
l’outil. Les réglementations locales peuvent
limiter l’âge de l’utilisateur.
4. Les enfants doivent faire l’objet d’une sur-
l’appareil.
5. N’utilisez jamais l’outil en présence de per-
sonnes, particulièrement les enfants et ani-
maux domestiques, à proximité.
6. Ne vous penchez pas trop loin et maintenez
constamment votre équilibre.
7. Ne touchez pas les pièces dangereuses en
mouvement avant d’avoir débranché l’outil de
la prise secteur et/ou d’avoir retiré la batterie
de l’outil.
8.
Portez toujours des chaussures adaptées et un
pantalon long pendant l’utilisation de l’outil.
9. Coupez l’alimentation et/ou retirez la batterie
de l’outil :
• lorsque vous laissez l’outil sans surveillance,
ou l’entretien de l’outil,
• après avoir heurté un corps étranger pour
10. N’utilisez jamais l’outil sans dispositifs de
protection ou de sécurité, ou s’ils sont défec-
tueux, ou si le cordon est endommagé ou usé.
11. Évitez d’utiliser l’outil par mauvais temps,
particulièrement en cas d’orage.
12.
branches avant d’utiliser l’outil.
13. Tenez l’outil fermement lorsque vous l’utilisez.
14. L’outil est conçu pour être utilisé par l’opéra-
teur au niveau du sol. N’utilisez pas l’outil sur
une échelle ou tout autre support instable.
15. Faites attention à ce qu’aucun corps étranger
ne se coince dans les lames du sécateur. Si les
lames du sécateur se trouvent entravées par un
corps étranger, éteignez immédiatement l’outil et
étranger des lames du sécateur.
16. Ne tenez jamais la branche que vous êtes en
train de tailler avec votre main libre. Éloignez
17. Ne forcez jamais sur l’outil pour le faire cou-
per.
ou de couper autre chose sans le vouloir.
18. Faites attention de ne pas couper des câbles
électriques qui pourraient être dissimulés.
19. Manipulez les lames du sécateur avec pru-
dence pour ne pas vous couper ou vous
blesser.
20. Lorsque l’outil n’est pas utilisé, conservez-le
toujours dans sa gaine.
21. Si les cordons d’alimentation et les câbles
deviennent chauds, cessez d’utiliser l’outil et
éteignez-le. Laissez l’outil refroidir avant de le
redémarrer.
22. -
mentation, les prises et les connecteurs avec
les mains mouillées. Vous risqueriez de vous
électrocuter.
Consignes de sécurité importantes
pour la batterie
1. Avant d’utiliser la batterie, lisez toutes les
instructions et précautions relatives (1) au
chargeur de batterie, (2) à la batterie, et (3) au
produit utilisant la batterie.
2.
batterie. Cela pourrait entraîner un incendie, une
chaleur excessive ou une explosion.
3. Cessez immédiatement l’utilisation si le temps
de fonctionnement devient excessivement
voire d’explosion.
4. Si l’électrolyte pénètre dans vos yeux, rin-
cez-les à l’eau claire et consultez immédiate-
ment un médecin. Il y a risque de perte de la
vue.
5. Ne court-circuitez pas la batterie :
(1) Ne touchez les bornes avec aucun maté-
riau conducteur.
(2) Évitez de ranger la batterie dans un
conteneur avec d’autres objets métal-
liques, par exemple des clous, des pièces
de monnaie, etc.
(3) N’exposez pas la batterie à l’eau ou à la
pluie.
Un court-circuit de la batterie peut provoquer
une intensité de courant élevée, une sur-
panne.
6. Ne rangez ni n’utilisez l’outil et la batterie dans
un endroit où la température risque d’atteindre
ou de dépasser 50 °C.
7. Ne jetez pas la batterie au feu même si elle est
sérieusement endommagée ou complètement
épuisée. La batterie peut exploser au contact
du feu.

20 FRANÇAIS
8. Abstenez-vous de clouer, couper, écraser,
jeter, laisser tomber la batterie, ou de la heur-
ter contre un objet dur. Cela pourrait entraîner
un incendie, une chaleur excessive ou une
explosion.
9. N’utilisez pas la batterie si elle est
endommagée.
10. Les batteries au lithium-ion contenues sont
soumises aux exigences de la législation sur
les marchandises dangereuses.
Lors du transport commercial par des tierces
parties ou des transitaires par exemple, des exi-
Pour la préparation de l’article expédié, il est
nécessaire de consulter un expert en matériau
dangereux. Veuillez également respecter les
plus détaillées.
11. Lors de la mise au rebut de la batterie, reti-
réglementations locales en matière de mise au
rebut des batteries.
12. Utilisez les batteries uniquement avec les
L’insertion de
provoquer un incendie, une chaleur excessive,
une explosion ou une fuite de l’électrolyte.
13. Lorsque vous n’utilisez pas l’outil pendant une
période prolongée, la batterie doit être retirée
de l’outil.
14. Pendant et après l’utilisation, la batterie peut
compris en cas de température relativement
basse. Manipulez les batteries chaudes avec
précaution.
15. Ne touchez pas la borne de l’outil immédiate-
ment après utilisation car elle peut être assez
16. Évitez que des copeaux, de la poussière ou
du sol adhèrent aux bornes, aux trous et aux
rainures de la batterie. Cela peut provoquer un
17. À moins que l’outil prenne en charge un tel
usage, n’utilisez pas la batterie à proximité de
lignes électriques haute tension. Cela pourrait
entraîner un dysfonctionnement ou casser l’outil
18. Conservez la batterie hors de portée des
enfants.
CONSERVEZ CES
INSTRUCTIONS.
ATTENTION : N’utilisez que des batteries
Makita d’origine.
-
risque d’incendie, de dommages matériels et corpo-
rels. Cela annulera également la garantie Makita pour
l’outil et le chargeur Makita.
Conseils pour assurer la durée
de vie optimale de la batterie
1. Chargez la batterie avant qu’elle ne soit com-
plètement déchargée. Arrêtez toujours l’outil
et rechargez la batterie quand vous remarquez
que la puissance de l’outil diminue.
2. Ne rechargez jamais une batterie complète-
ment chargée. La surcharge réduit la durée de
service de la batterie.
3. Chargez la batterie à une température
ambiante comprise entre 10 °C et 40 °C. Avant
de charger une batterie chaude, laissez-la
refroidir.
4. Lorsque vous n’utilisez pas la batterie, reti-
rez-la de l’outil ou du chargeur.
5. Rechargez la batterie si elle est restée inutili-
sée pendant une période prolongée (plus de
six mois).
DESCRIPTION DES PIÈCES
Fig.1
1Lame du sécateur 2Témoins 3Bouton de réglage de l’angle
4Bouton d’alimentation principale 5Batterie 6Gâchette
7 8Gaine 9Ceinture ventrale (en vente dans le
commerce)
Other manuals for DUP180
3
Table of contents
Languages:
Other Makita Power Tools manuals

Makita
Makita DUP361 User manual

Makita
Makita HM0871C Manual

Makita
Makita DHR280 User manual

Makita
Makita DHR264Z User manual

Makita
Makita HM1317C User manual

Makita
Makita AT1150A User manual

Makita
Makita HM1800 User manual

Makita
Makita DHR242 User manual

Makita
Makita VR250DA User manual

Makita
Makita 4324 User manual

Makita
Makita HK0500 User manual

Makita
Makita VR251D User manual

Makita
Makita 3612 User manual

Makita
Makita HM1317C User manual

Makita
Makita PJ7000J User manual

Makita
Makita HR2641 Manual

Makita
Makita DSC250 User manual

Makita
Makita UX01G User manual

Makita
Makita DTW284 User manual

Makita
Makita 5630DWA User manual