Secure Premier 300 User manual

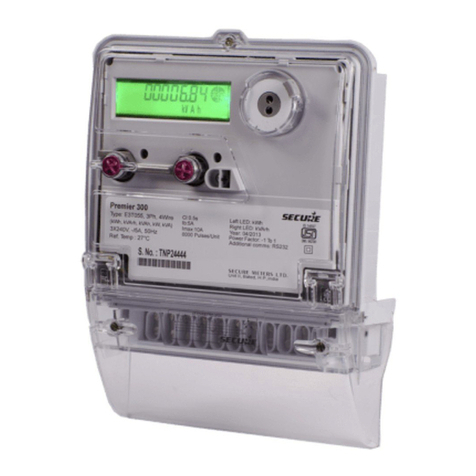
Premier 300
Interoperable Three-phase DLMS Meter
User Manual
BGX501-747-R04

Page 2 of 41 BGX501-747-R04, Premier 300 User Manual PUBLIC
Copyright © 2010-2012, Secure International Holdings Pte. Ltd. All rights reserved. E&OE.
Premier 300® is a registered trade name of Secure Meters Ltd.
Other product names are trade names or registered trademarks of their respective owners.

PUBLIC BGX501-747-R04, Premier 300 User Manual Page 3 of 41
Table of Contents
1Important ........................................................................................................................................5
2Disclaimer.......................................................................................................................................5
3Precautions and Safety Practices ................................................................................................7
4Deliverables....................................................................................................................................8
5Common Acronyms Used.............................................................................................................9
6Introduction..................................................................................................................................10
7General Specifications ................................................................................................................11
8External Features.........................................................................................................................12
9Using the Display.........................................................................................................................14
9.1Push-Button Details.....................................................................................................................................20
9.1.1Push-Button Mode........................................................................................................................20
9.1.2Auto mode ....................................................................................................................................20
9.2Premier 300 physical dimensions ...............................................................................................................21
9.3Connection Diagrams..................................................................................................................................21
10Premier 300 Installation...............................................................................................................23
10.1Preparing for Installation .............................................................................................................................23
10.1.1Selecting an appropriate mounting location .................................................................................24
10.1.2Selecting suitable mounting screws .............................................................................................24
10.1.3Required tools and accessories ...................................................................................................24
10.2Premier 300 installation procedure .............................................................................................................25
10.2.1Groundwork..................................................................................................................................25
10.2.2Mounting the Premier 300 ............................................................................................................25
10.2.3Preparing cables for termination...................................................................................................26
10.2.4Making connections......................................................................................................................26
11Energy, Demand and Time Management...................................................................................30
11.1Energy Types ..............................................................................................................................................31
11.2Fraud Metering............................................................................................................................................32
11.3STOD/TOU..................................................................................................................................................33
11.4MD Reset.....................................................................................................................................................33
11.5Power-off duration, Tamper count...............................................................................................................33
11.6Billing...........................................................................................................................................................33
11.7Maximum demand.......................................................................................................................................34
11.7.1Method of MD Calculation ............................................................................................................34
11.8Metrological output......................................................................................................................................34
11.9Time set.......................................................................................................................................................34
12Event Logging..............................................................................................................................35
12.1Event Categories.........................................................................................................................................35


Page 4 of 41 BGX501-747-R04, Premier 300 User Manual PUBLIC
12.2Event support ..............................................................................................................................................36
12.3Self diagnostic features...............................................................................................................................37
13External Communication.............................................................................................................38
13.1Active mode.................................................................................................................................................38
13.1.1Meter readings – Instantaneous session......................................................................................38
13.1.2Meter readings – Readings session.............................................................................................38
13.1.3Meter readings – Load survey session.........................................................................................38
13.1.4Meter readings – Events session .................................................................................................38
13.1.5Load survey / Interval data...........................................................................................................38
13.2Security........................................................................................................................................................38
13.3Sub-active (SA) Mode.................................................................................................................................39
14Notes.............................................................................................................................................40

PUBLIC BGX501-747-R04, Premier 300 User Manual Page 5 of 41
1 Important
1. As a result of our continuous efforts to improve our products, the specifications mentioned in this manual
may be subject to change. Therefore the availability of features may depend on the product variant.
2. The specifications and features listed in this manual were correct when this document was released but
may be subject to change and should be considered to be definitive. Please refer any queries to our sales
team.
3. No part of this manual or its contents may be published, distributed, scanned or copied, in electronic form or
otherwise, without prior written consent of Secure Meters Ltd.
4. While we have made every effort to minimise errors, some may exist. We request feedback from users in
this regard and undertake to correct such errors wherever possible.
5. Secure Meters Ltd. reserves the right to alter the features or specifications mentioned in this document
without prior notice.
6. Please direct queries on our products or services to our sales team.
7. In most countries, electrical installations must comply with one or more sets of regulations issued by
national authorities or by recognized local or international bodies. Such regulations must be adhered to,
even if they are not referred to directly in this document.
8. We conduct rigorous testing during the design and manufacture of our products to ensure that they comply
with appropriate standards.
9. There is no maintenance, repair or adjustment intended for this meter. There are no interchangeable or
serviceable parts.
10. The meter is intended to be installed in a mechanical environment ‘M1’, with shock and vibrations of low
significance.
2 Disclaimer
Secure Meters Ltd. assumes no responsibility for damage arising from misuse of our products such as, but not
limited to, the following:
1. Incomplete or incorrect installation or maintenance
2. Connection to incorrect voltage sources
3. Damaged insulation on connecting cables
4. Contact with hazardous substances
5. Immersion in water or any other liquid
6. Handling by unauthorized persons

Page 6 of 41 BGX501-747-R04, Premier 300 User Manual PUBLIC
7. Handling by inebriated, intoxicated or mentally unbalanced persons

PUBLIC BGX501-747-R04, Premier 300 User Manual Page 7 of 41
3 Precautions and Safety Practices
1. Energy meters are generally installed in electrically live surroundings. To minimise the risk of electrical
shock, stay away from loose or exposed electrical connections. If there is loose or exposed electrical wiring
near the installation site, initiate appropriate preventive measures.
2. Check for the wiring configuration of the meter and ensure that the meter is installed for the appropriate
wiring connection.
3. Before energizing the meter, ensure that no stray strands of wire are present outside the connector blocks.
4. Meter must be protected by fuses or voltage isolating links in each voltage circuit.
5. Under no circumstances should the current transformer (CT) connections to the meter be disconnected
while current is flowing in the primary circuit of the external CT.
6. Ensure that the connected load does not exceed the current range specified on the rating plate.
7. The meter contains a battery that must be disposed of in a suitable manner at the end of its life.
8. Secure Meters recommends carrying out regular installation checks, especially when the product is installed
at locations posing higher risk of degradation or corrosion – such as under direct, strong sunlight, areas with
high ambient temperature and little ventilation, areas near heat sources like a furnace, areas near sea or a
water body, areas where the meter is regularly exposed to chemical fumes, etc.
9. It is recommended to immediately cut off the meter supply upon occurrence of any fault within the meter.
10. Keep the meter away from fire, corrosive chemicals, and fumes thereof, rain and direct, prolonged exposure
to water.
11. The electrical installation of electronic meters at a site requires an adequate understanding of all governing
rules and regulations.

Page 8 of 41 BGX501-747-R04, Premier 300 User Manual PUBLIC
4 Deliverables
At the time of purchase you will be provided with the below listed items:
S.No. Item
1. Premier 300 Meter
2. Accessories (as per order)
Table 1: Premier 300 Deliverable List

PUBLIC BGX501-747-R04, Premier 300 User Manual Page 9 of 41
5 Common Acronyms Used
Abbreviation Description
BCS Base Computer Software
DIP Demand Integration Period
ETBC Extended Terminal Block Cover
ID Identity
LCD Liquid Crystal Display
LED Light Emitting Diode
MD Maximum demand
ND Neutral Disturbance
NVM Non Volatile Memory
P-N Phase-Neutral
RTC Real Time Clock
STOD Seasonal Time Of Day
TOD Time Of Day
DLMS Device Language Message Specification
Table 2: Common Acronyms

Page 10 of 41 BGX501-747-R04, Premier 300 User Manual PUBLIC
6 Introduction
Premier 300 is a DLMS (Indian standard) compliant, CT operated meter with CT/VT and LTCT variants that
offer numerous features, which make it ideal for industrial and commercial metering. It belongs to the latest cost
optimised product range and provides easy integration with diverse communication entities thus making it truly
interoperable.
The salient features of Premier 300 are:
CT-PT operated family includes 3-phase 3-wire, 3-phase 4-wire measurements for industrial and
commercial metering
Accuracy with class 0.2s and 0.5s for HT and 0.5s for LT variants
DLMS compliant as per Indian companion standard (IS15959)
True four quadrant measurement of active, reactive and apparent energies
Suitable energy selection for both Import-Export as well as forwarded metering application
Load Survey recording for a minimum of -700 parameter-days(LT) and 900 parameter –days(HT) with
15/30/60 minute SIP
Up to 8 time-of-day (TOD) rate registers
Up to 8 maximum demand (MD) registers for logging demand through fixed and sliding window
methods (with 15/30/60 DIP)
1107 optical communication port
Optional RJ-11 port for remote communication with external devices on RS-232 or RS485 at 9600 bps
Optically isolated communication channel and battery backup to allow limited no. of meter readings and
display checking even in absence of mains
Detection and logging of a whole spectrum of tampers and faults, with date and time stamp
Fraud detection facility
Two metro LEDs –the left one indicates the rate of active energy consumption, the right one can be
configured to indicate other energies.
Wide nominal operating voltage range
Spark immunity up to 35 kV
Logging of extensive energy and instantaneous parameters which include phase wise voltages and
currents, power, frequency, maximum demand, power factor along with date and time stamp
Large backlit LCD display with phase indicators, parameter identification and legends for tamper
indication.
Two push buttons

PUBLIC BGX501-747-R04, Premier 300 User Manual Page 11 of 41
7 General Specifications
The general specifications for Premier 300 are summarised below:
Table 3: General Specifications for Premier 300.
Specification Description
Mechanical
Dimensions (mm) 191 (L) x 256 (W) x 82 (H) mm approx
Weight 1.6 kg approximately
Mounting Type Projection type
Front Cover Fire-retardant polycarbonate (PC-FR)
Base PC-FR material
Extended Terminal Block
Cover PC-FR material
Terminal Block 10% Glass filled PC-FR material
Sealing Provision 2 seals on ETBC, 1 seal on IEC 1107 port, 1 seal on the left button
and 3 seals on the front cover
Display Super Twisted Nematic (STN) LCD with backlit
Electrical
Meter Type 3 Phase, 4 Wire (LT and HT) and 3 Phase, 3 Wire (HT)
Measuring Elements 3 CT for LT, 3 CT for HT4 and 2 CT for HT3
Rated Voltage 3*230/240V or 63.5 V(P-N) for HT4 and 110V(P-P) for HT3
Frequency 50 Hz ± 5%
Current Rating 5-10A for LT, 1(2)A or 5(10)A for HT
Power Factor Zero Lag <–> Unity <->Zero Lead
Accuracy HT: 0.5S, 0.2S or LT: 0.5S
Metrology lamp Metrological LED
Compliance Metrological DLMS Indian Companion Standard (IS15959), IS
14697, CBIP Report 304, IEC 62053-22
Environmental Protection IP51
Burden
Voltage Circuit (per
phase) <1W,<6VA
Current Circuit (per
phase) <1VA

Page 12 of 41 BGX501-747-R04, Premier 300 User Manual PUBLIC
8 External Features
Given below is a detailed description of the various parts that make up Premier 300.
Figure 1: Premier 300 part details
Name Plate:Displays the basic electrical and ownership information about the meter such as voltage and
current ratings, number of phases, barcode, serial number, month and year of manufacture, property of
(customer name and logo), part no., etc.
Meter Base and Front Cover:The base or enclosure of the meter is made of a high-grade fire retardant
poly-carbonate. The front cover, made of the same material, is fastened to the base with screws. A sealing
arrangement is provided to prevent tampering.
Push Buttons:Two push buttons, namely left and right buttons, allow interactions with Premier 300. These
buttons are used for various user operations such as display navigation, page mode selection, MD reset,
etc.There is provision of sealing left push button.
LCD Display:A large multi-segment LCD that supports alpha-numeric characters for displaying information
and values for various electrical parameters recorded by the meter.
IEC 1107 optical port:An optically-isolated, sealable port to enable data to be transferred to and from the
meter (for billing or downloading new parameters) through optical probe. This port is immune to spurious
external electrical signals.

PUBLIC BGX501-747-R04, Premier 300 User Manual Page 13 of 41
Terminals and Terminal Block:There are eleven main terminals at the bottom of Premier 300. The
arrangement of terminals is 1S (In), VR, 1L (Out), 2S (In), VY, 2L (Out), 3S (In) VB, 3L (Out), N (In) and
N (Out). In addition to these, there is a smaller termination on the left for fixing RJ11 connector for
communication on RS 232 and in RS485 variant RJ11 is on the right hand side. A terminal block, capable of
sustaining high temperature, is provided in the meter with adequate provisions for connecting wires to the
meter.
Extended Terminal Block Cover:ETBC not only protects the terminal connections from attempted
tampers and external interference but also enhances human safety from electrical hazards.
Sealing screw for ETBC:This screw facilitates the necessary sealing arrangement after the installation of
the meter in the field.
LEDs: Premier 300 has two metrological LEDs: while the left LED indicates the rate of consumption of
active energy, the right LED can be configured to indicate several different energies.

Page 14 of 41 BGX501-747-R04, Premier 300 User Manual PUBLIC
9 Using the Display
Premier 300 is equipped with a large multi-segment alpha-numeric LCD display and two buttons for the
essential user interface. Display parameters for Premier 300 are configurable through BCS.
Figure 2: All segment check for the LCD Display of Premier 300
The LCD screen has various sections and annunciators for displaying specific bits of information such as
current status of the meter, parameter values, user messages etc. An annunciator or a section corresponding to
the demanded information is illuminated at the time of display.
Details of individual sections are summarized below.
S. No. Icon / Segment Details / Remark
1
7 large 7 segment character display with 5 decimal points for alpha-numeric
displays.
2. 3 large 11 segment character display for alpha-numeric displays
3.
OBIS code - 8 small 7 segment character including 1 of 2 segments. This is
a standard code under DLMS understood by diverse communication
entities. OBIS code specifies six value groups for displaying meter data
information viz. A,B,C,D,E,F. Depending on the meter type, information
could be displayed using some or all of these value groups. Premier 300
displays information using value groups C, D, and E only. The significance
of each group is explained below:
Value Group ‘C’: Identifies the physical quantity measured by
the meter. For example Voltage, Line Currents etc.
Value Group ‘D’: Identifies how a parameter is processed for
example whether the parameter is logged instantaneously or
over an integrated time period such as (MD)
Value Group ‘E’: Identifies the different rate registers available in
the meter
4. Unit and multiplier indicator. These icons display unit values using proper
combination of characters like k, V, W, A, h.
5. Billing indicator
6. Critical event indicator

PUBLIC BGX501-747-R04, Premier 300 User Manual Page 15 of 41
7. Cover open indicator
8. Magnet tamper indicator
9. Phase presence indicator
10.
Quadrant indicator shows import, export, lag and lead. This indicates type of
energy being displayed which can be basic import or export, inductor and
capacitor for reactive lag and reactive lead respectively.
Table 4: Segment / Annunciators details for Premier 300 LCD
The table below shows an indicative list of supported Premier 300 displays. There may be more supported
displays.
General Displays
Meter serial number Time
Date Self diagnostic check
00: Healthy, 01: NVM Fail, 02: Battery Fail, 03: Both
Fail
Cumulative tamper occurrence count Instantaneous active power
Instantaneous reactive power Instantaneous power factor
Average power factor -history 1 Frequency
Neutral Current Instantaneous voltage R Phase

Page 16 of 41 BGX501-747-R04, Premier 300 User Manual PUBLIC
Instantaneous voltage Y Phase Instantaneous Voltage B Phase
Instantaneous line current R Phase Instantaneous line current Y Phase
Instantaneous line current B Phase Number of Power failure
Cumulative Power failure duration MD reset or bill count
Cumulative programming count LED pulse rate display
Primary Current Primary Voltage (For LT meters it will be zero)
Secondary Current Secondary Voltage
PT Ratio CT Ratio
Physical Device ID Connection check

PUBLIC BGX501-747-R04, Premier 300 User Manual Page 17 of 41
Main Energy and TOD Energy Displays
Current total active forwarded energy register Reactive lag energy
Reactive lead energy Apparent forwarded energy
Current active forwarded TOD energy (reg.1-8) Cumulative total active forwarded energy register –
history 1-6
Cumulative active energy in high resolution Reactive export while Active export energy
Reactive export while active import energy Reactive high net energy
Reactive low net energy Reactive net energy(Imp-Exp)
Total Active Import energy Total Active Export energy
Apparent while Active Import energy Apparent while Active Export energy
Reactive Import while Active Export Reactive Import while Active Import

Page 18 of 41 BGX501-747-R04, Premier 300 User Manual PUBLIC
Reactive Lag+Lead forward energy Active net energy
Demand Displays
Universal active maximum demand – current Universal apparent maximum demand - current
Date of universal apparent maximum demand -
current Time of universal apparent maximum demand -
current
Universal active maximum demand - history 1 Date of universal active maximum demand history 1
Time of universal active maximum demand -history 1 Universal apparent maximum demand -history 1
Date of universal apparent maximum demand -
history 1 Time of universal apparent maximum demand -
history 1
Cumulative active maximum demand Cumulative apparent maximum demand
Universal active maximum demand - history 1-6 MD reset date

PUBLIC BGX501-747-R04, Premier 300 User Manual Page 19 of 41
MD reset time
Tamper related Displays
Present status of PT tamper - From left > 1, 2, 3 PT
miss, voltage unbalance, invalid voltage.
Present status of CT tamper - From left > 1, 2, 3 CT
reverse, CT open, CT bypass, current unbalance and
over current.
Present status of tamper (others) - From left > ND,
Cover open, LPF, Magnet and 1, 2, 3 current miss. First occurred tamper
Date of first occurred tamper Time of first occurred tamper
Last restored tamper Date of last restored tamper
Time of last restored tamper Date of last cover open tamper
Time of last cover open tamper
Table 5: Some supported displays in Premier 300.

Page 20 of 41 BGX501-747-R04, Premier 300 User Manual PUBLIC
9.1 Push-Button Details
Push buttons can be used to carry out various operations in the meter. The default functionality of the different
push buttons is tabulated below. However, the push buttons are configurable at the factory end and may be
customized to suit different needs.
S. No. Button Action Possible functionality
1 Right
button Short
press (a) Advance to next display
(b) Advance to next page
2 Right
button Long
press (a) Advance to next page
(b) Scroll lock.
Scroll lock deactivates upon change of page, tariff download,
activation of sub-active mode auto display and midnight crossover.
3 Left
button Short
press (a) Go back to previous display
(b) Advance to next page
4 Left
button Long
press (a) Advance to next page
(b) Billing (MD reset)
Table 6: Operations possible through Premier 300 buttons
9.1.1 Push-Button Mode
The meter supports a list of parameters which can be displayed on the LCD. This requires configuring a
sequence of parameters called Display Sequence. The buttons provided on the meter can be used to scroll
through this sequence.
Premier 300 supports Page Mode display view. Multiple pages can be selected. While a long push (button
press > 5 seconds) allows page navigation, a short push allows scrolling through the available displays in a
page.
The default first display parameter will be the lamp test display with all display segments on. Upon reaching the
end of a display list, the display rolls over again to show the first one in Auto Mode.
A display on the LCD remains on until the normal on time is elapsed. The normal on time is configurable.
After timing out of the manual mode, the display switches to the sleep mode and reverts to auto mode
thereafter. Sleep period, or the display off time, is configurable.
9.1.2 Auto mode
Auto Mode is the default mode for the Premier 300 display. The configured parameters scroll automatically with
a specified period. The auto display cycle ends with a brief sleep mode. Upon recovering from the sleep mode,
the display cycle repeats for selected displays. Upon power interruption, the display starts in auto mode.
The Left button is used for performing the MD Reset operation. This requires pressing the Left button for five
seconds.
Other manuals for Premier 300
1
Table of contents
Other Secure Measuring Instrument manuals

Secure
Secure Elite 440 User manual

Secure
Secure TRACKSO ELITE 103-2 User manual

Secure
Secure Sprint 211 User manual

Secure
Secure PADS-2 User manual

Secure
Secure Premier 300 Instruction manual

Secure
Secure BGX501-806-R02 User manual

Secure
Secure APEX 100 User manual

Secure
Secure Liberty 100 Product manual

Secure
Secure Liberty 100 User manual

Secure
Secure Premier 211 User manual