SeeEyes SC-16HDS User manual

DIGITAL FULL HD SPLITTER
SC-16HDS
User's Manual
SC-16HDS

1
Precaution and Safety Guidelines
Please read this user’s manual thoroughly prior to use the unit for
its easy and convenient use.
•Do not install the product in the following places: extremely low or high
temperature conditions; places exposed to rain, snow, or high humidity;
places containing or exposed to oil and gas; places exposed to vibration
and shock; places under direct sunlight or exposed to outdoor weather
conditions; places exposed to radio waves (RF) or near to power lines.
It may cause low performance or malfunction of the unit.
• Do not disassemble the product or insert foreign objects.
• The unit is subject to electric shock hazard. Be careful not to get an
electric shock while using the device.
• Please use only electrical safety approved power supply unit (power
adapter) over 12VDC /0.5A with electromagnetic compatibility.
• Do not use and/or connect any devices inappropriate to the unit. It may
cause malfunction of the unit or fire.
• Use this product under temperature conditions only between 0°C and
+50°C.
• Should be careful not to have the lines changed when connecting them.
•Prior to turn on the device, check the cable insulation condition of the
data cable, connected with external devices.
• Before installing the product, check its voltage rate and then turn on the
power.
• Make sure to turn off the product prior to installation.
• Do not subject the product to physical shock or exert excessive force to
operate the product.
• Do not use the device when any smoke or smell is produced from the
unit. It may be subject to fire or electric shock. If any smoke or smell is
produced, please turn off the unit and remove the power cable
immediately, and contact your distributor to check the device properly.
• If the power does not turn ON, please check whether the power cable is
connected correctly or not.
• If the device does not work properly, please contact your distributor.

2
1. Introduction
1-1. Overview
The SC-16HDS, a Digital Full HD Splitter, offers a high resolution display for
video signals received from sixteen SD (standard definition) CCTV cameras
with 720*480 Pixel. And it splits the screen in various formats from full
screen to 16 screens display mode, without deterioration. Also, it displays
the video clearly in a Full HD monitor with 1920*1080P high resolution. With
this device, it is possible to amplify video signals to an external device such
as DVR from the Loop Thru terminal. And a remote control operation is
available through the RS-232C / RS-485 port. It displays the date and time,
the name of channel on the monitor, as well as when it occurs any channel
loss.
1-2. Features
•Displaying high resolution pictures and rapid image processing by the SOC
chip
•Displaying video from 16 cameras at real time
•Auto sequence mode
• Motion Detect Automatic Transitions
• Pattern change detection function
•Supporting NTSC & PAL system
•Displaying the date and time, the name of the channel and the current
status
•RS-232C / RS-485 communication port for external devices
•Various mode of screen split (1, 4, 6, 7, 8, 9, 10, 13, 16)
1-3 Applications
• Where a centralized supervisory and control system is needed such as the
control center at Subway, Airport, Port and etc,
• At a control center of large buildings and express way and etc.
2. Components
SC-16HDS
Rack
mount
bracket
Remote
Control
Power
Cable
User’s
Manual
- PS-2 Mouse, HDMI Cable (3m)

3
3. Product Parts and Peripheral Device Connection
3-1. Name of Parts and Function
3-1-1. SC-16HDS Front Side
①POWER: Select between ON/OFF
②CAMERA SELECT: Press the channel # you want to watch or double click
the mouse left side button to display the video in full screen.
③AUTO SEQUENCE : In full (single) screen, 4, 9 screen mode, press this
button to display the screen in auto sequence mode according to the dwell
time adjusted in each channel. Press it again to cancel the auto sequence
mode. You can set the auto screen dwell time of split screen in menu
Sequence Time. Please refer to menu 5-3-3 Sequence Time [Sec].
Full (Single) Screen 4 split 9 split
④MULTI SCREEN : Please press the multi screen button or click the
right mouse button to select the display mode among 1, 4, 6, 7, 8, 9, 10,
13, 16 screens. If you press this button and select the channel you want by
pressing the button #②(Camera Select), you can see the video of the
channel selected.
⑤ESC: Press this button to cancel the menu configuration in Setup Menu
mode.
⑥ENTER: Press this button to select the menu you want in Setup Menu mode.
⑦MENU: Press this button to go to the Setup Menu mode and select the
menu you want to adjust.
⑧▲/▼/◀/▶: Press these buttons to adjust the menu selected.
⑨+/- : Press these buttons to change the set value.
①
C
CA
AM
ME
ER
RA
A
S
SE
EL
LE
EC
CT
T
각
각
채
채널
널에
에
해
해당
당되
되는
는
버
버튼
튼을
을
누
누르
르면
면
해
해당
당
채
채널
널을
을
F
FU
UL
LL
L
화
화면
면으
으로
로
D
DI
IS
SP
PL
LA
AY
Y
하
하게
게
됩
됩니
니다
다.
.
②
C
CA
AM
ME
ER
RA
A
S
SE
EL
LE
EC
CT
T
각
각
채
채널
널에
에
해
해당
당되
되는
는
버
버튼
튼을
을
누
누르
르면
면
해
해당
당
채
채널
널을
을
F
FU
UL
LL
L
화
화면
면으
으로
로
D
DI
IS
SP
PL
LA
AY
Y
하
하게
게
됩
됩니
니다
다.
.
⑦⑧⑨
C
CA
AM
ME
ER
RA
A
S
SE
EL
LE
EC
CT
T
각
각
채
채널
널에
에
해
해당
당되
되는
는
버
버튼
튼을
을
누
누르
르면
면
해
해당
당
채
채널
널을
을
F
FU
UL
LL
L
화
화면
면으
으로
로
D
DI
IS
SP
PL
LA
AY
Y
하
하게
게
됩
됩니
니다
다.
.
③④⑤⑥
C
CA
AM
ME
ER
RA
A
S
SE
EL
LE
EC
CT
T
각
각
채
채널
널에
에
해
해당
당되
되는
는
버
버튼
튼을
을
누
누르
르면
면
해
해당
당
채
채널
널을
을
F
FU
UL
LL
L
화
화면
면으
으로
로
D
DI
IS
SP
PL
LA
AY
Y
하
하게
게
됩
됩니
니다
다.
.

4
Split mode
3-1-1-1 Mouse Channel Selection
- To select the video channel you want with the mouse, put the mouse icon
on the video screen you want to select and then click the left button of the
mouse. It will appear a red square on the selected picture. If you double
click the left mouse button, you can display the selected video in full screen.
- With the video selected in full screen mode, click the left button of the
mouse to go back to the previous split mode.
- With the video selected in full screen mode, click the right button of the
mouse, and it will appear the menu bar (the short cut window) on the screen.
3-1-2. SC-16HDS rear side (Connection)
Please connect the camera, the monitor and related devices as below.
①VIDEO INPUT: Connect the sixteen (16) cameras
②VIDEO OUT (Loop Through): It distributes the sixteen (16) input video
signals to other devices by loop through.
③MONITOR (Spot) Output: Connect the SD (Standard Definition) Video Monitor.
-You can watch the picture of specific channel through the Monitor output,
independently from the video out in live through the HDMI, DVI and VGA output.
-Selection of Monitor output display
1. Select MENU < SCREEN SETTING < SPOT
2. Mouse: Click Right Button > MENU > Screen Setting > CVBS
3. Front button: Press the MENU > ◀▶buttons in display menu mode,
then press [Enter] >▲▼ buttons. And then, press the [Enter] > +/-
button to change the set-up value.
4. (Ch1~Ch16, HD16), HD16 displays the same picture as the picture
displayed through HDMI port.
5. You can put out a single picture of 1~16CH or the picture entered
through HDMI port through the Monitor output port.
①② ③④⑤⑥⑦⑧⑨⑩

5
6. You can watch two equal pictures through two BNC-F terminals of
Monitor port.
④HDMI: Connect the HD (High Definition) Monitor with HDMI input port.
⑤VGA: Connect the Monitor with the VGA input (Only SZGA, WSXGA mode are available.)
⑥MOUSE: Connect the mouse.
⑦RJ-45: Connect the Firmware Upgrade device.
⑧, ⑨Serial Port: Connect the RS-232C/ RS-485 to link an external device.
-Data configuration
- Packet structure (Control Communication Data format)
Byte
Value
Function
1
0xA0
STX (Launching Data)
2
0x00 ~ 0xFF
0x16 (Device Code)
3
0x00 ~ 0xFF
Address (Device ID)
4
Data byte
Control Data
5
Check Sum
Check Sum = Byte2 + Byte3 + Byte4
- Control DATA Code
NO
Hex
ASCII
Function
Remarks
1
0x30 ~ 0x39
0 ~ 9
Display in Full CH 01 ~ 09
Full Display Control
2
0x41 ~ 0x46
A ~ F
Display in Full CH 11 ~ 16
〃
3
0x47
G
Multi Screen
〃
4
0x48
H
Menu
5
0x49
I
Enter
6
0x4A
J
ESC
7
0x50
P
Display in quad (4 split)
Display Control
8
0x51
Q
Display in six splits
〃
9
0x52
R
Display in nine splits
〃
10
0x53
S
Display in ten splits
〃
11
0x54
T
Display in thirteen splits
〃
12
0x55
U
Display in sixteen splits
〃
13
0x5A
Z
Auto Sequence
14
0x64
d
Down
Menu move
15
0x6C
l
Left
〃
16
0x72
r
Right
〃
17
0x75
u
Up
〃
18
0x6D
m
Minus
Set Value change
19
0x70
p
Plus
〃
⑩Input Power: Connect the power cable.
Data bit
8
Stop bit
1
Parity
No
Baud rate
9600bps

6
3-1-3. Motion Detection
When a motion is detected, it rings the buzzer alarm and it appears a
motion icon “M” on the upper right side of the video in which a motion is
detected. To activate this menu, select a channel and then select “ON” in
the motion detect menu.
When you select “ON” in the motion detection menu, it rings the buzzer
alarm and displays the video in which a motion is detected.
3-1-4. Pattern Change Detection
When any change is detected in the video pattern, it rings the buzzer alarm
and it appears a motion icon “P” on the upper right side of the video in
which a pattern change is detected. To activate this menu, select a channel
and then select “ON” in the pattern change detection menu.
Pattern change: By this feature you can set up the pattern change detection
area and watch the changes of the video pattern in the specified area,
which is set up in advance. And it has various uses such as theft prevention
in exhibition, detection of throwing thrash illegally and alarming in
trespassing prohibition area, etc.
3-1-5. Display Mode in Motion or Pattern Change Detection
When a motion or pattern change is detected,
- it displays in full screen if the changes are detected in one single channel;
- it displays in 16 splits mode indicating the detected channel in yellow
frame, if the changes are detected in more than 2 channels. When the
detection function is deactivated, the yellow frame will disappear after the
buzzer ring set time is over.
ICON Indicator
Motion:
Pattern:
Video Loss:
Channel Indicator
Motion: Yellow
Pattern: Cyan
7
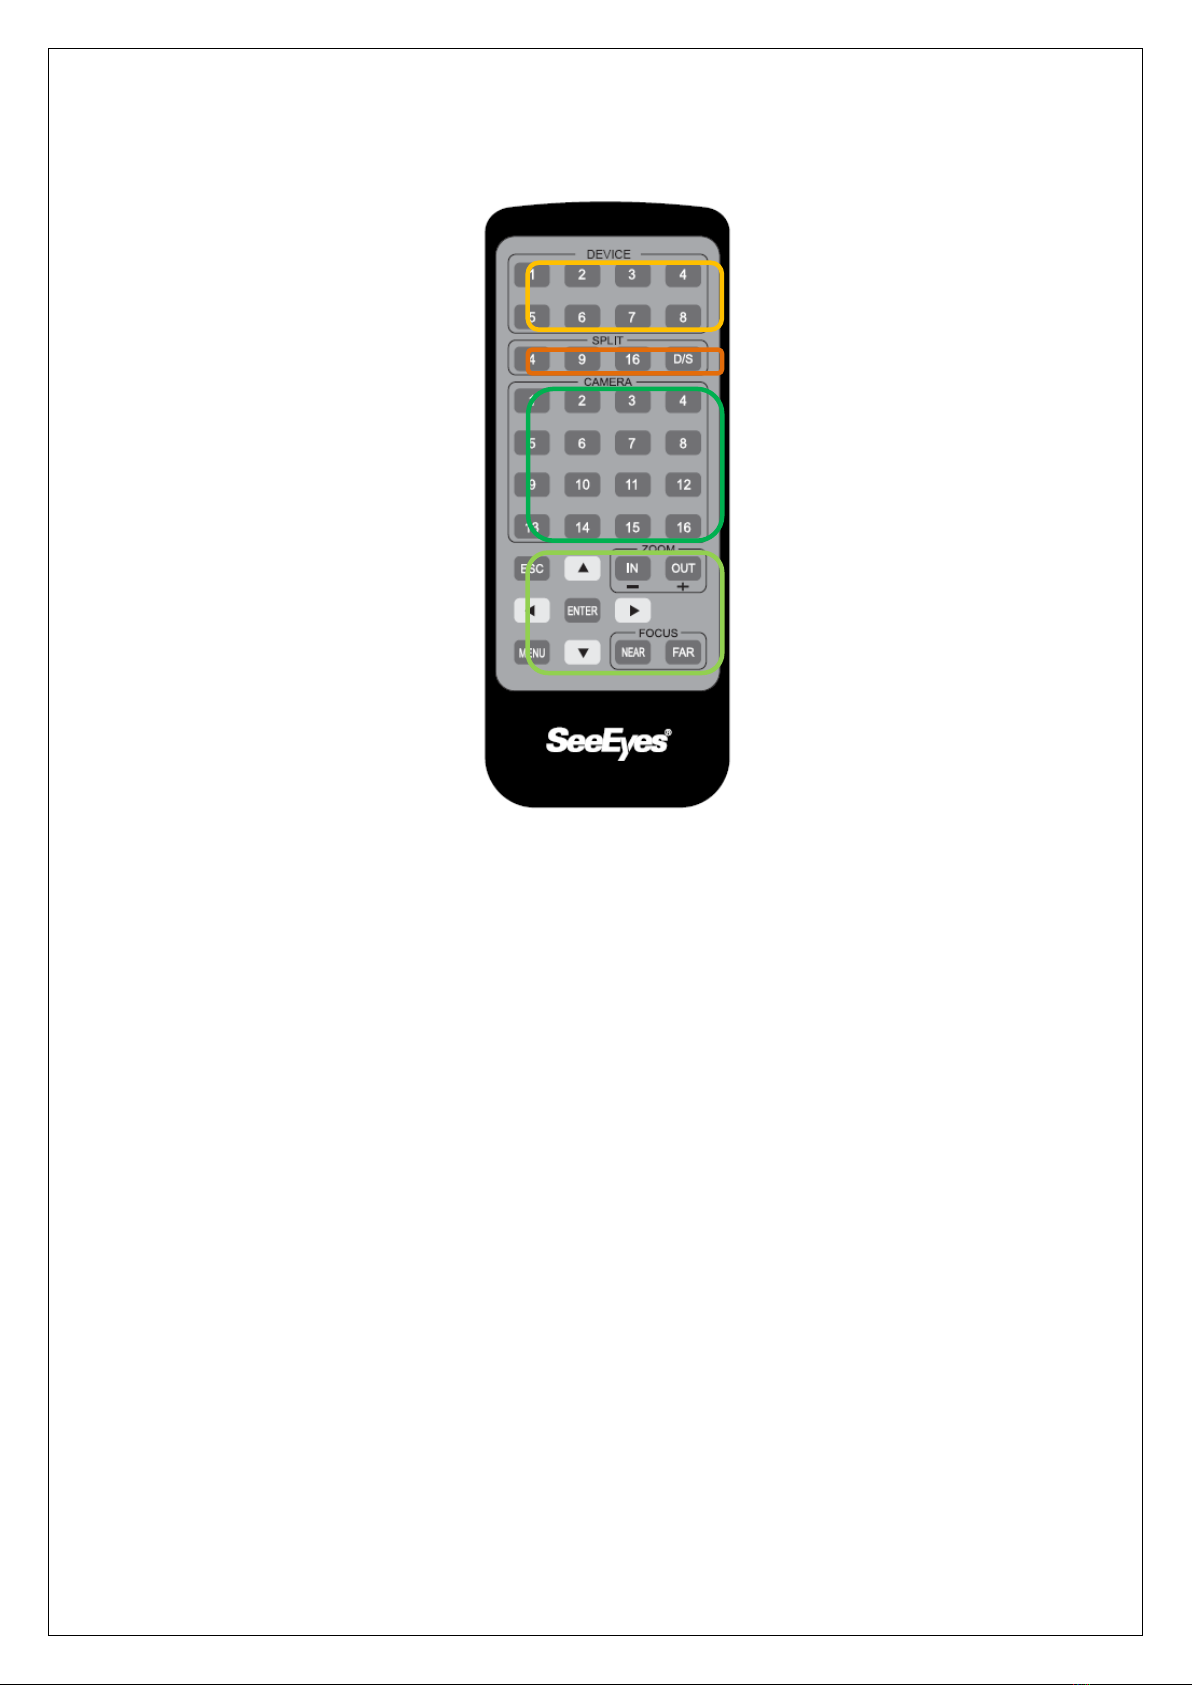
3-2. Remote Control
①DEVICE
- Choose the splitter you want to control with the remote control up to eight
splitters.
- The device number should have the same ID as the selected splitter. Set
the ID of the splitters in the menu setting.
- You can control up to 8 splitters with the same remote control.
- Therefore, you cannot control the ID # 9 with the single remote control.
②SPLIT
- With these buttons, you can split the screen in 4, 9, 16 and auto sequence
mode.
- 4: quad split
- 9: 9 splits mode
- 16: 16 splits mode
- D/S: auto sequence mode
③CAMERA
- Choose the camera you want.
- You can display the video you choose in full screen.
④Menu control button
- ESC: Press this button to cancel the set value of each menu in Setup menu mode.
- ENTER: Press this button to select the menu in Setup menu mode.
- MENU: Press this button to enter in Setup menu mode when you want to
check or change the status of each menu.
- Direction Buttons: Press these buttons to set the value of each menu.
- Set Value change: Press these buttons to change the menu set value.

8
4. Specification
MODEL
SC-16HDS
VIDEO
INPUT
75Ω 1 Vp-p(BNC-F) Ⅹ16
OUTPUT
HDMI Ⅹ1, D-SUB Ⅹ1, BNC-F Ⅹ2
Resolution
HDMI
Full HD
1920x1080P @50/60Hz
HD
1920x1080i @50/60Hz
WSXGA
1680x1050 @50/60Hz
SXGA
1280x1024 @50/60Hz
D-SUB
WSXGA/SXGA
BNC
720 x 480 @50/60Hz
FORMAT
NTSC / PAL selectable
Screen splitting mode
1, 4, 6, 7, 8, 9, 10, 13, 16
OSD(On Screen Display)
Insert up to 16 characters
(alphabet and/or numbers)
Interface
External
IR Receiver
Remote control
4Pin Mini Din
Mouse
RJ-45
Firmware upgrade
RS-232C / RS-485
Connection port for external devices
POWER
AC 100~240V, 50/60Hz
Consumption Power
8.2W
Temperature/Humidity
0℃~ +50℃/ 0 ~ 80%
Case body / Weight
Steel/ 4kg
Dimensions
430(W) ⅹ350(H) ⅹ44(D)mm
9
5. Menu Setup
•Press Menu button or click mouse right button in screen mode and then
click menu setting icon in shortcut command window, then the menu will
appear in the screen.
•How to setup the menu
-Using the Mouse: Click the right button and then click the corresponding
menu in shortcut command window.
-Using the Front buttons or the remote control: Press the menu button and
the menu setting will appear in the screen.
※Please refer to the button function of SC-16HDS front side (3-1-1).
①②③④
①Date and Time
②Display Mode: Click the icon with the mouse right button or
press ▲/▼/◀/▶and then press the ENTER button.
③Auto sequence button: Press this button to display the screen in auto
sequence mode according to the dwell time adjusted in each channel.
Press it again to cancel the auto sequence mode.
④Setting Menu: To go to the menu setting mode, click the menu icon, or
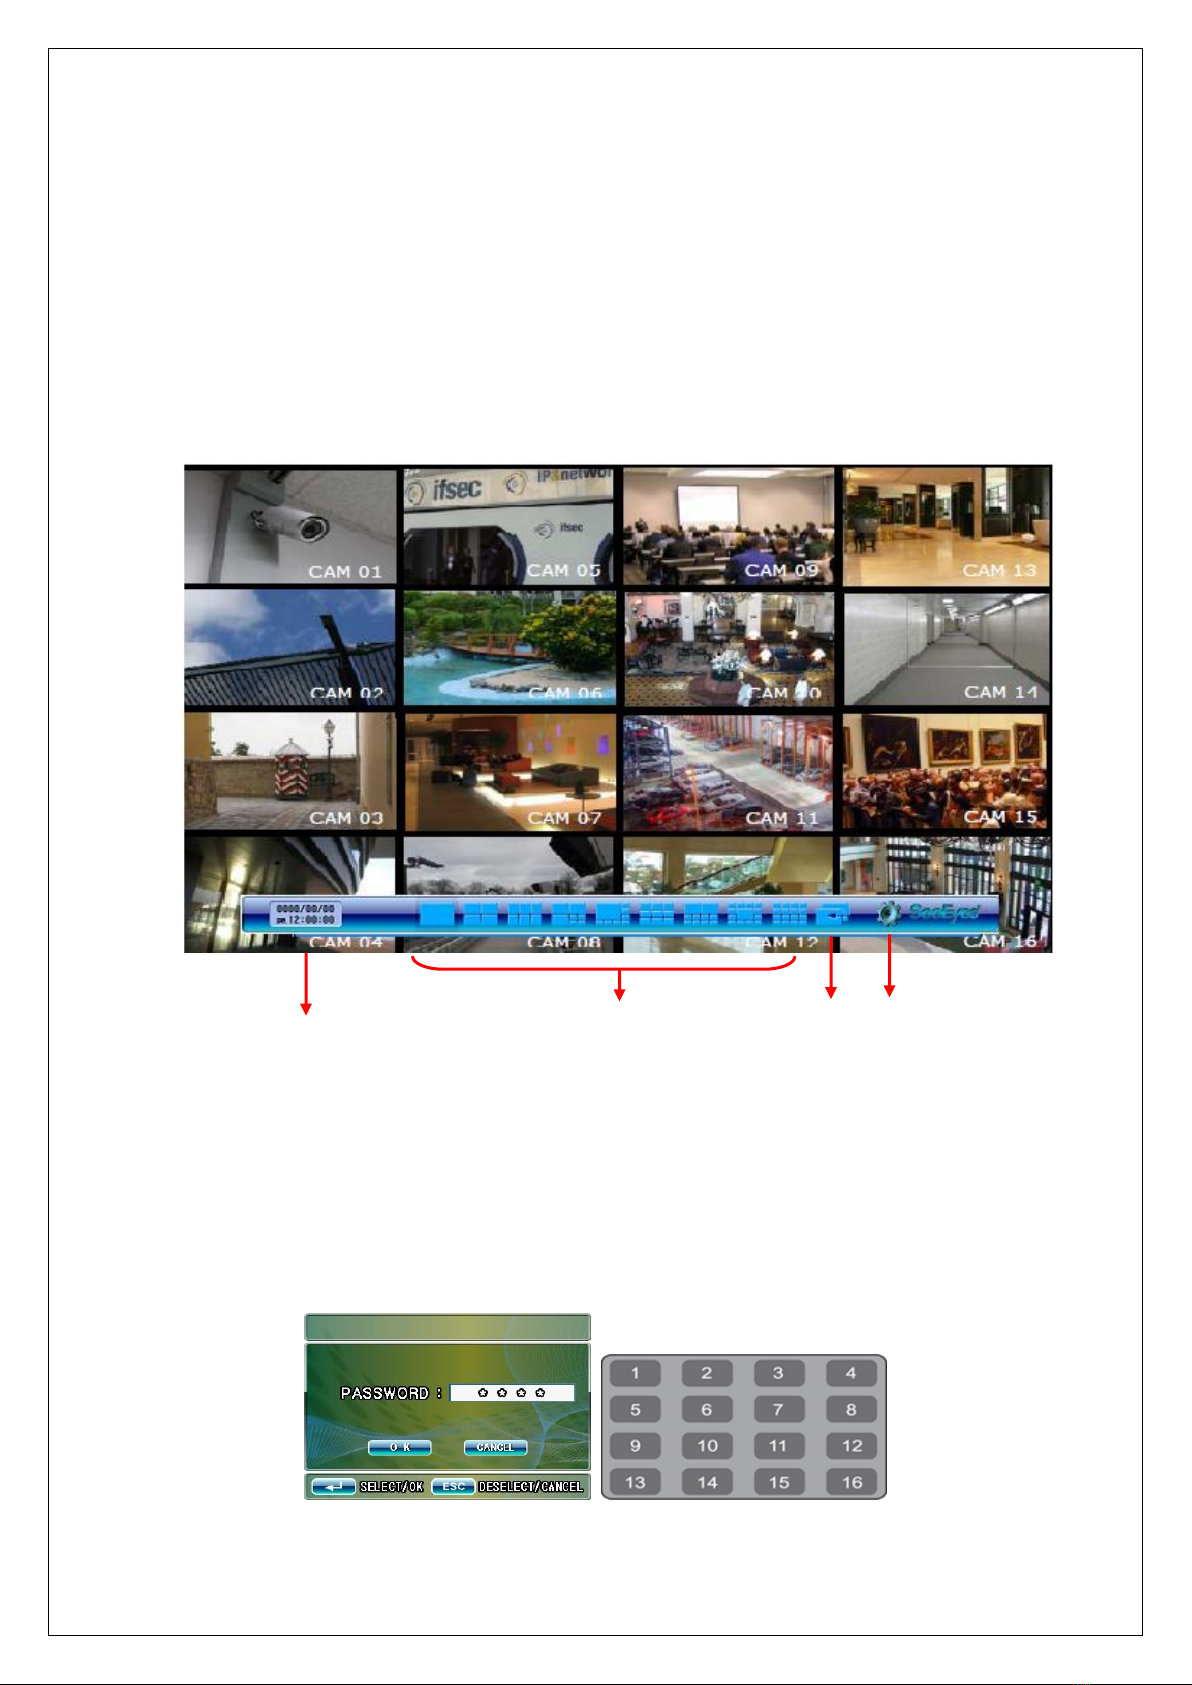
press the front menu button, or the menu button of the remote control.
- Log-in Window: If you set use mode in password menu (5-5-1), log-in
window appears as below (The password in default is “1111”)

10
5-1. Menu Structure
In menu setting mode, it is possible to set up system, display, channel and log-in
setting, menu structure as below.
5-2. System Setting
In System setting, it is possible to set up Language, system ID, and date and
time display format, Buzzer on/off, buzzer time.
11
5-2-1. Language
In this menu, it is possible to set the system language and it supports Korean
and English.
- Using the mouse: Click the right button of the mouse > click Menu> click
System set> and then select the language you want.
- Using the front button or the remote control: Press Menu button > ◀▶
buttons and then press [ENTER] in system set mode and then Press ▲▼ buttons.
Then, press [ENTER] and select Korean or English by pressing +/ - buttons.
5-2-2. System ID
When controlling SC-16HDS at long distance or short distance, you can use the
System ID. You can insert from 1 to 255.
- Using the mouse: Click the right button of the mouse > click Menu> click
System set> and then set the System ID.
- Using the front button or the remote control: Press Menu Button > ◀▶
buttons, and then press [ENTER]> button in System set and ▲▼ buttons. Then,
press [ENTER] in System ID and +/ - buttons to change the set-up value and
select the number from 1 to 255.
5-2-3. Date Display Format
In this menu, it is possible to set the date display format.
- Using the mouse: Click the right button of the mouse > click Menu> click
System set> and then set Date Format as you want.
- Using the front button or the remote control: Press Menu > press ◀▶ buttons
and [ENTER] in System set > press ▲▼ buttons and [ENTER] in date display
format > press +/ - buttons to change the set-up value and select the desired
format.
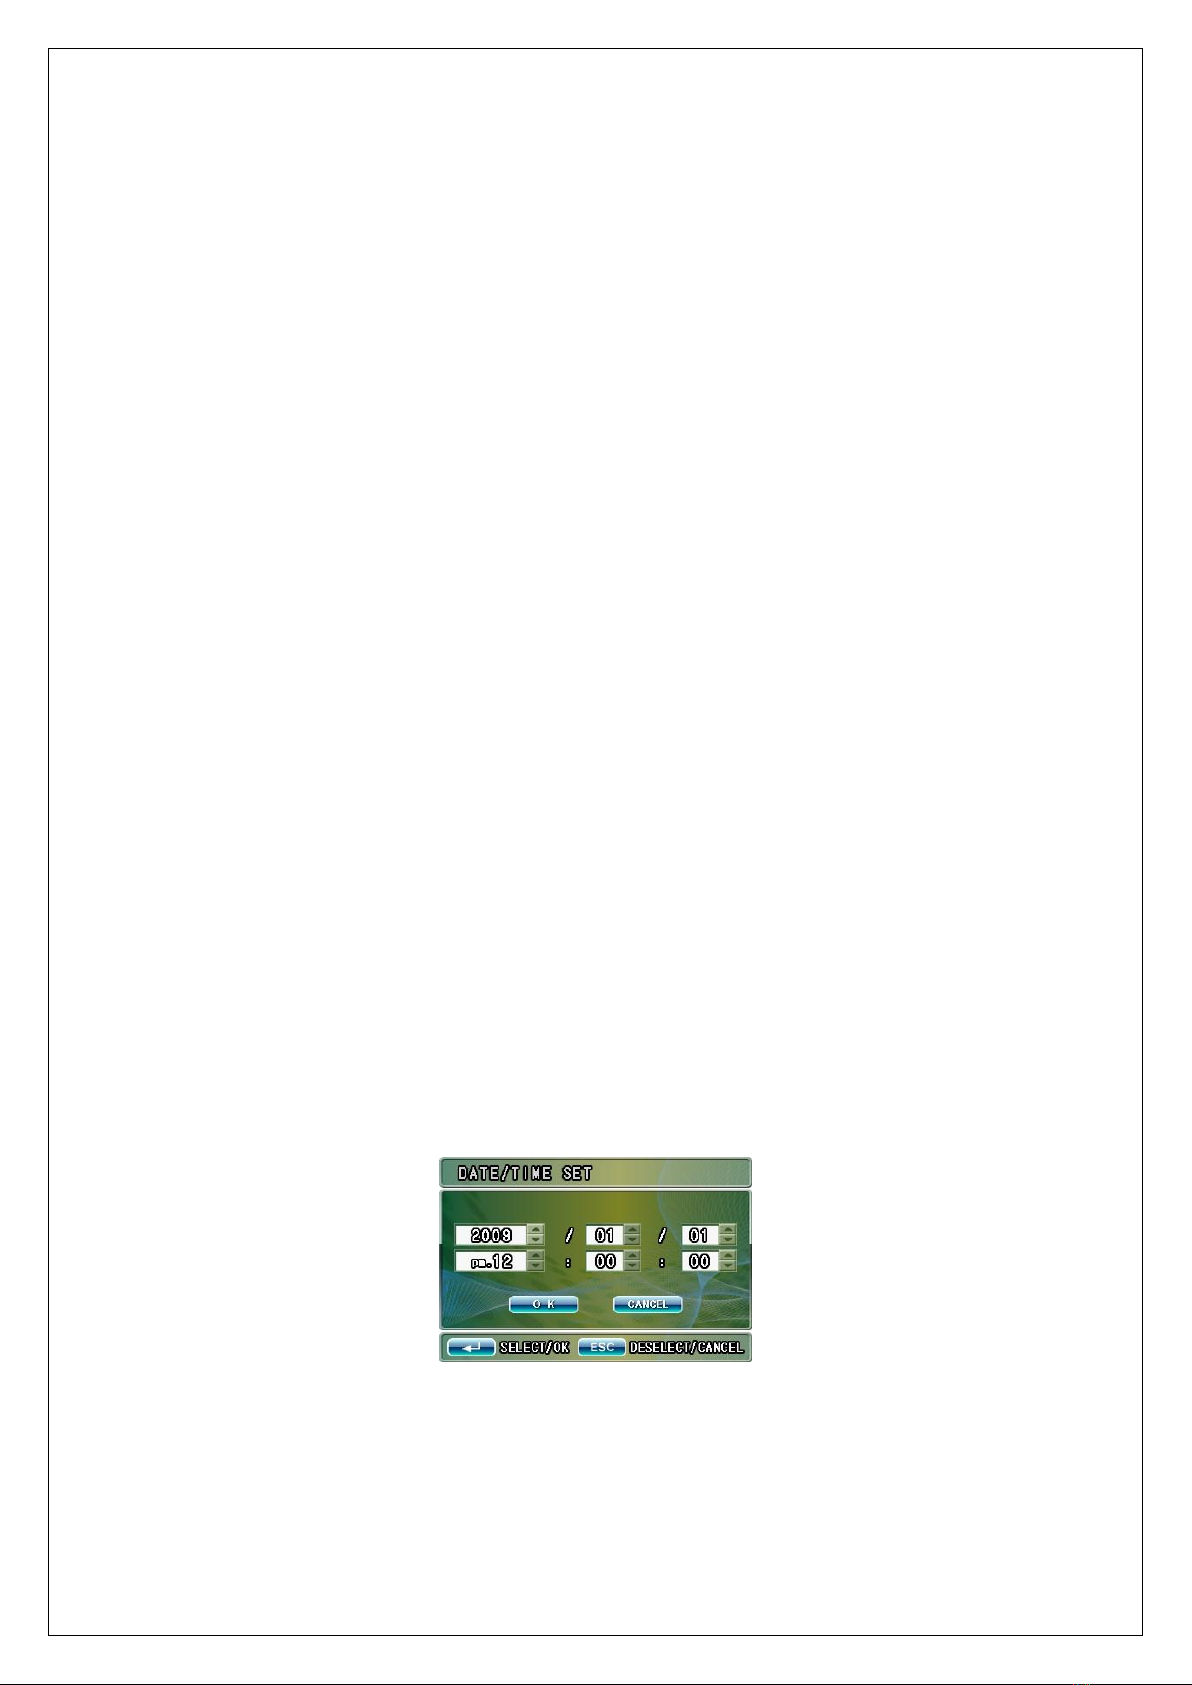
5-2-4. Date / Time Set
In this menu, it is possible to set date / time.
- Using the mouse: Click the right button of the mouse > click Menu> click
System set> and then set Date & Time.
- Using the front button or the remote control: Press Menu > press ◀▶ buttons
and [ENTER] in System set > press ▲▼ buttons and [ENTER] in Date > press +/
- buttons to change the set-up value.

12
5-2-5. Buzzer
In this menu, it is possible to set the buzzer when button is used, the motion is
detected and video signal loss is detected.
- Using the mouse: Click the right button of the mouse > click Menu> click
System set> and then set the Buzzer.
- Using the front button or the remote control: Press Menu > press ◀▶ buttons
and [ENTER] in System set > press ▲▼ buttons and [ENTER] in Buzzer > press
+/ - buttons to change the set value.
5-2-6. Buzzer Time [Sec]
It is possible to set buzzer duration time.
- Using the mouse: Click the right button of the mouse > click Menu> click
System set> and then set Buzzer Time.
- Using the front button or the remote control: Press Menu > press ◀▶ buttons
and [ENTER] in System set > press ▲▼ buttons and [ENTER] in Buzzer Time
(Sec) > press +/ - buttons to change the set value.(1~99 seconds)
5-2-7. Default Set
It is possible to initialize the value, and the menu will be set into default mode.
- Using the mouse: Click the right button of the mouse > click Menu> click
System set> and then set the menu value in default.
- Using the front button or the remote control: Press Menu > press ◀▶ buttons
and [ENTER] in System set > press ▲▼ buttons and [ENTER] in Default set >
select (ENTER) or (ESC)
5-3. Display Set
In Display set, it is possible to set Time, Channel name, Sequence time, Video
format (NTSC/PAL), HDMI resolution, HDMI display position, Spot display.

13
5-3-1. Time display
In this menu, it is possible to set the current date and time indication.
- Using the mouse: Click the right button of the mouse > click Menu> click
Display Set> and then set Time Display.
- Using the front button or the remote control: Press Menu > press ◀▶ buttons
and [ENTER] in Display set > press ▲▼ buttons and [ENTER] in Time display >
Press +/ - buttons to change the set value.
5-3-2. Channel Name Display
In this menu, it is possible to set the channel name indication.
- Using the mouse: Click the right button of the mouse > click Menu> click
Display Set> and then set the Channel Name Display.
- Using the front button or the remote control: Press Menu > press ◀▶ buttons
and [ENTER] in Display set > press ▲▼ buttons and [ENTER] in Channel name
display > Press +/ - buttons to change the set value.
5-3-3 Sequence Time [Sec]
It is possible to set display switching time by second (1~30) when selecting Auto
Sequence mode.
- Using the mouse: Click the right button of the mouse > click Menu> click
Display Set> and then set the Sequence Time.
- Using the front button or the remote control: Press Menu > press ◀▶ buttons
and [ENTER] in Display set > press ▲▼ buttons and [ENTER] in Sequence time
(Sec) > Press +/ - buttons to change the set value.
5-3-4. Video Input Type
It is possible to set display input format.
- Using the mouse: Click the right button of the mouse > click Menu> click
Display Set> and then set Video Input Type.
- Using the front button or the remote control: Press Menu > press ◀▶ buttons
and [ENTER] in Display set > press ▲▼ buttons and [ENTER] in Video input type
> Press +/ - buttons to change the set value.
5-3-5. HDMI RESOLUTION SET
It is possible to set the picture resolution that is outputted from HDMI Port.
Before setting, please check the resolution of monitor. If the resolution is set
higher than the available specification, the image may not be appeared on the
screen. In this case, you must use the adequate monitor and change the
configuration.
- Using the mouse: Click the right button of the mouse > click Menu> click
Display Set> and then set the HDMI Resolution.
- Using the front button or the remote control: Press Menu > press ◀▶ buttons
and [ENTER] in Display set > press ▲▼ buttons and [ENTER] in HDMI resolution
> Press ▲▼◀▶ and [ENTER] button to select the desired resolution.
Please cancel the setting, in case that the resolution set in pop-up menu cannot
be supported in the monitor.

14
5-3-6. Monitor (Spot) Out
This product also provides video signals out port for Standard Definition CVBS
monitor. In this menu, it is possible to set monitor (spot) output screen.
- Using the mouse: Click the right button of the mouse > click Menu> click
Display Set> and then set the Spot (monitor) Out.
- Using the front button or the remote control: Press Menu > press ◀▶ buttons
and [ENTER] in Display set > press ▲▼ buttons and [ENTER] in CVBS > Press +
/ - buttons to set. (CH1~CH16, HD16) HD16 displays the same split pictures as
those displayed from HDMI port
5-4. Channel Set
In this menu, it is possible to set up the Channel select, Channel name,
Brightness, Contrast, Hue, Motion detect, Pattern change det. etc.
5-4-1. Channel Select
You can select the channel you want to set up.
- Using the mouse: Click the right button of the mouse > click Menu> click
Channel Set> and then select the channel you want.
- Using the front button or the remote control: Press Menu > press ◀▶ buttons
and [ENTER] in Channel set > press ▲▼ buttons and [ENTER] in Channel select
> Press + / - buttons to select channel to set.

15
5-4-2. Channel Name
You can change the channel title (up to 10 letters).
- Using the mouse: Click the right button of the mouse > click Menu> click
Channel Set> and then set the channel name.
- Using the front button or the remote control: Press Menu > press ◀▶ buttons
and [ENTER] in Channel set > press ▲▼ buttons and [ENTER] in Channel select
> select the letter in pop up window. (Virtual keyboard)
[Virtual keyboard]
-Pop-up window: The current name appears on the upper side of Pop-up
window. When the red cursor appears on the bottom of the character, move
the cursor and edit the name using the ◀▶ buttons image appeared in the
pop-up menu. To move the character in the pop-up window, use the
direction key (Single Display button). And then press [ENTER] button in
virtual Keyboard to select the letter you want.
5-4-3. Brightness
It sets the brightness of each channel (0~99).
- Using the mouse: Click the right button of the mouse > click Menu> click
Channel Set> and then set the brightness.
- Using the front button or the remote control: Press Menu > press ◀▶ buttons
and [ENTER] in Channel set > press ▲▼ buttons and [ENTER] in Brightness >
Press + / - buttons to set up the value of brightness.
5-4-4. Contrast
It sets the Contrast of each channel (0~99).
- Using the mouse: Click the right button of the mouse > click Menu> click
Channel Set> and then set the contrast.
- Using the front button or the remote control: Press Menu > press ◀▶ buttons
and [ENTER] in Channel set > press ▲▼ buttons and [ENTER] in Contrast >
Press + / - buttons to set up the value of contrast.
5-4-5. HEU
It sets the Saturation of each channel (0~99).
- Using the mouse: Click the right button of the mouse > click Menu> click
Channel Set> and then set the HEU.
- Using the front button or the remote control: Press Menu > press ◀▶ buttons
and [ENTER] in Channel set > press ▲▼ buttons and [ENTER] in HEU > Press +
/ - buttons to set up the value of HEU.

16
5-4-6. Pattern change det.
It sets the Pattern Change Detection.
- Using the mouse: Click the right button of the mouse > click Menu> click
Channel Set> and then set the pattern change det.
- Using the front button or the remote control: Press Menu > press ◀▶ buttons
and [ENTER] in Channel set > press ▲▼ buttons and [ENTER] in Pattern change
det. > Set the pattern change detection in the created pop up window.
Detection
Function
Set the activation or deactivation of
Motion/Pattern change detection
function.
Select among OFF, Motion and Pattern.
- Using the mouse, click the set value,
then click the right and left direction
arrow to change the set value.
- Using the front function button, press
the button ▲/▼to move the cursor,
press ENTER and then change the value
pressing the ◀/▶.
Sensitivity
Set the sensitivity degree of motion
and/or pattern change detection
function. Select among Low, Normal
and High.
- Using the mouse, click the set value,
then click the right and left direction
arrow to change the set value.
- Using the front function button, press
the button ▲/▼to move the cursor,
press ENTER and then change the value
pressing the ◀/▶.
Area Set
Set the motion and/or pattern change
detection area.
CLEAR: It cancels the selected
detection setting area.
All: It selects all as detection area.
Set: You can set the detection area as
you want. To set the detection area,
select Set and then click Enter. It will
appear a cursor icon on the bottom of
the menu.
- Using the mouse, click the left button
and then drag the mouse to select the
detection area. To cancel the area
setting, click the right button and then
drag the selected area.
- Using the front function button, press
the button ▲/▼to move the cursor,
press ENTER and then change the value
pressing the ◀/▶. Then, press ENTER to
set the value selected.

17
5-4-6-1. How to set the detection area (32 X 24 Dot)
- Using the mouse, put the cursor of the mouse on the area you want. Then
click the left button to select one of the cross stripe. And then, drag the
mouse to the right lower direction. To cancel the are selection, click the right
button and then drag the area selected.
- Using the function button or the remote control, move the yellow cursor icon
to the area you want to start to set, then press the + (select) / –(cancel)
button. When it appears the + or –on the yellow cursor, move the icon to
select or cancel the set area.
- If you press the ESC button, a yellow cursor will appear and it will stop the
setting. If you press again the ESC button, it will return to the set menu
mode.
5-4-7. Alarm Input
In this menu, you can set whether you want to use the alarm or not.
To use the alarm, it should connect the Alarm board (SC-HDS/AIN) to the RS-
232 communication port.
The instruction on the alarm input should be referred to the user’s manual of the
Alarm board (SC-HDS/AIN). The SC-HDS/AIN is not included in the unit and it
should be purchased separately.

18
5-5. Login set
In this menu, it is possible to set the password and the change the password.
5-5-1. Password Enable
You can set the password you want to use.
Use this menu in case that only the authorized administrator can handle the
menu setting. In case of selecting the password use mode, whenever you enter
to the menu, the Login window appears and you should enter the password set.
- Using the mouse: Click the right button of the mouse > click Menu> click Login
Set> and then select “Enable” if you want to change the password.
- Using the front button or the remote control: Press Menu > press ◀▶ buttons
and [ENTER] in Login set > press ▲▼ buttons and [ENTER] in Password enable.
Press the + / - buttons to select whether you want to activate or deactivate the
password. ※The Password in default is “1111”.
5-5-2. Password Change
Use this menu to change the password.
- Using the mouse: Click the right button of the mouse > click Menu> click Login
Set> and then change the password as you want.
- Using the front button or the remote control: Press Menu > press ◀▶ buttons
and [ENTER] in Login set > press ▲▼ buttons and [ENTER] in Password change
> separate pop-up window appears.
- To change the password, set “Enable” the Password Enable menu.
- Choose the 4 digits among the camera select buttons #1~16 in front of the unit.
- The following password setting pop -up windows will appear.

19
5-6. Exit
After setting the menu, select Exit to return to the previous display screen
displayed before entering the menu.
Table of contents
Other SeeEyes Media Converter manuals

SeeEyes
SeeEyes SC-MAC02 User manual

SeeEyes
SeeEyes SC-HMC16E User manual

SeeEyes
SeeEyes SC-HDT0801S User manual

SeeEyes
SeeEyes SC-90DS User manual

SeeEyes
SeeEyes SC-MA1VDA User manual

SeeEyes
SeeEyes SC-16MHD User manual

SeeEyes
SeeEyes SC-MAC02U User manual

SeeEyes
SeeEyes SC-40DQH User manual

SeeEyes
SeeEyes SC-MHC01 User manual

SeeEyes
SeeEyes SC-SDHD01 User manual


 Installation and operation manual")


