This is a runner’s watch equipped with a smart lap function to automatically measure lap times or finish
times in response to a mat for measurements installed on a course or while running a marathon.
The watch is equipped with the MARATHON MODE to allow for easier measurements during a marathon.
The chronograph function enables up to 300 measurement times to be memorized (recorded) and recalled.
Data within 300 units of memory can be sorted by channel when being stored.
The results measured by the stopwatch function can be recalled by using the recall function. When
recalling the results, the best lap time and the average lap time can also be displayed.
The watch also adopts a tap function that turns on the clock light when the watch face is tapped.
In addition, this watch is equipped with a 3-channel alarm function, timer function, and world time function
which can display the time of 44 cities (including GMT) throughout the world.
TIME/CALENDAR
・
Month, date, day, hour, minute, second, and summer time mark can be displayed. Either
of a 12-hour indication or a 24-hour indication of time display can be selected. (The
western calendar year is displayed only when adjustments are made.)
・
The calendar automatically adjusts for odd and even months including February of leap
years from January 1, 2015 to December 31, 2064 (Automatic calendar).
STOPWATCH
・
The stopwatch can measure up to 99 hours 59 minutes 59 seconds 99 in 1/100 second increments.
・
The smart lap function can be set or cancelled.
・
Up to 300 units of lap time and split time memory can be stored.
・
Up to 300 units of memory can be sorted by channel when being stored.
・
The display positions can be changed over between lap time and split time.
・
The current time is constantly displayed even when the stopwatch is working.
SMART LAP
・
The function automatically measures lap time or finish time in response to a mat for
measurement on a course or while running a marathon.
・
The function responds to radio waves in a frequency band of 90KHz – 130KHz (It may
not respond to radio waves depending on conditions.).
MARATHON MODE
・
When information about a marathon (the date, the starting time, the time limit) is input in advance, the
mode is automatically changed to MARATHON MODE 30 minutes before the start.
・
The countdown starts 30 minutes before the start, while at the same time, the smart lap stand-by state starts.
・
When it reaches the starting time, measurement starts automatically. And a lap can be automatically
measured in response to a mat for measurement by using the smart lap function.
・
The gross time and the net time can be switched.
MEMORY RECALL
・
The stored data (lap number, lap time, and split time) can be recalled on demand after the measurement.
・
The total time, best lap, and average lap can be displayed.
TIMER
・
The watch is equipped with a double repeat timer function which allows you to set two different timer times.
・
The timer can be set from 10 seconds up to 99 hours, 59 minutes in one-second increments.
・
The number of times that the timers repeat their cycles can be set from 1 to 100 times.
The number of times the countdown has been completed is displayed.
ALARM
・
The three-channel daily alarm sounds at a designated time (hour and minute) every 24 hours.
・
Each alarm channel can be engaged (“on”) or disengaged (“-”) independently.
WORLD TIME
・
The time of 44 cities (including GMT) in different time zones throughout the world can be displayed.
・
The summer time (DST) can also be set for each city (except GMT).
THE BUILT-IN ILLUMINATING LIGHT (LED) FUNCTION/TAP INPUT FUNCTION
・
Tapping the watch face once illuminates the display for approximately 4 seconds.
・
Tapping the watch face two times sets/cancels the auto illumination function.
※ The auto illumination function is a function to simultaneously perform the pressed
function and illuminate the display.
Function to change the display to the TIME/CALENDAR display
・ A special button is provided to change any display to the TIME/CALENDAR display.
(Except during MARATHON MODE)
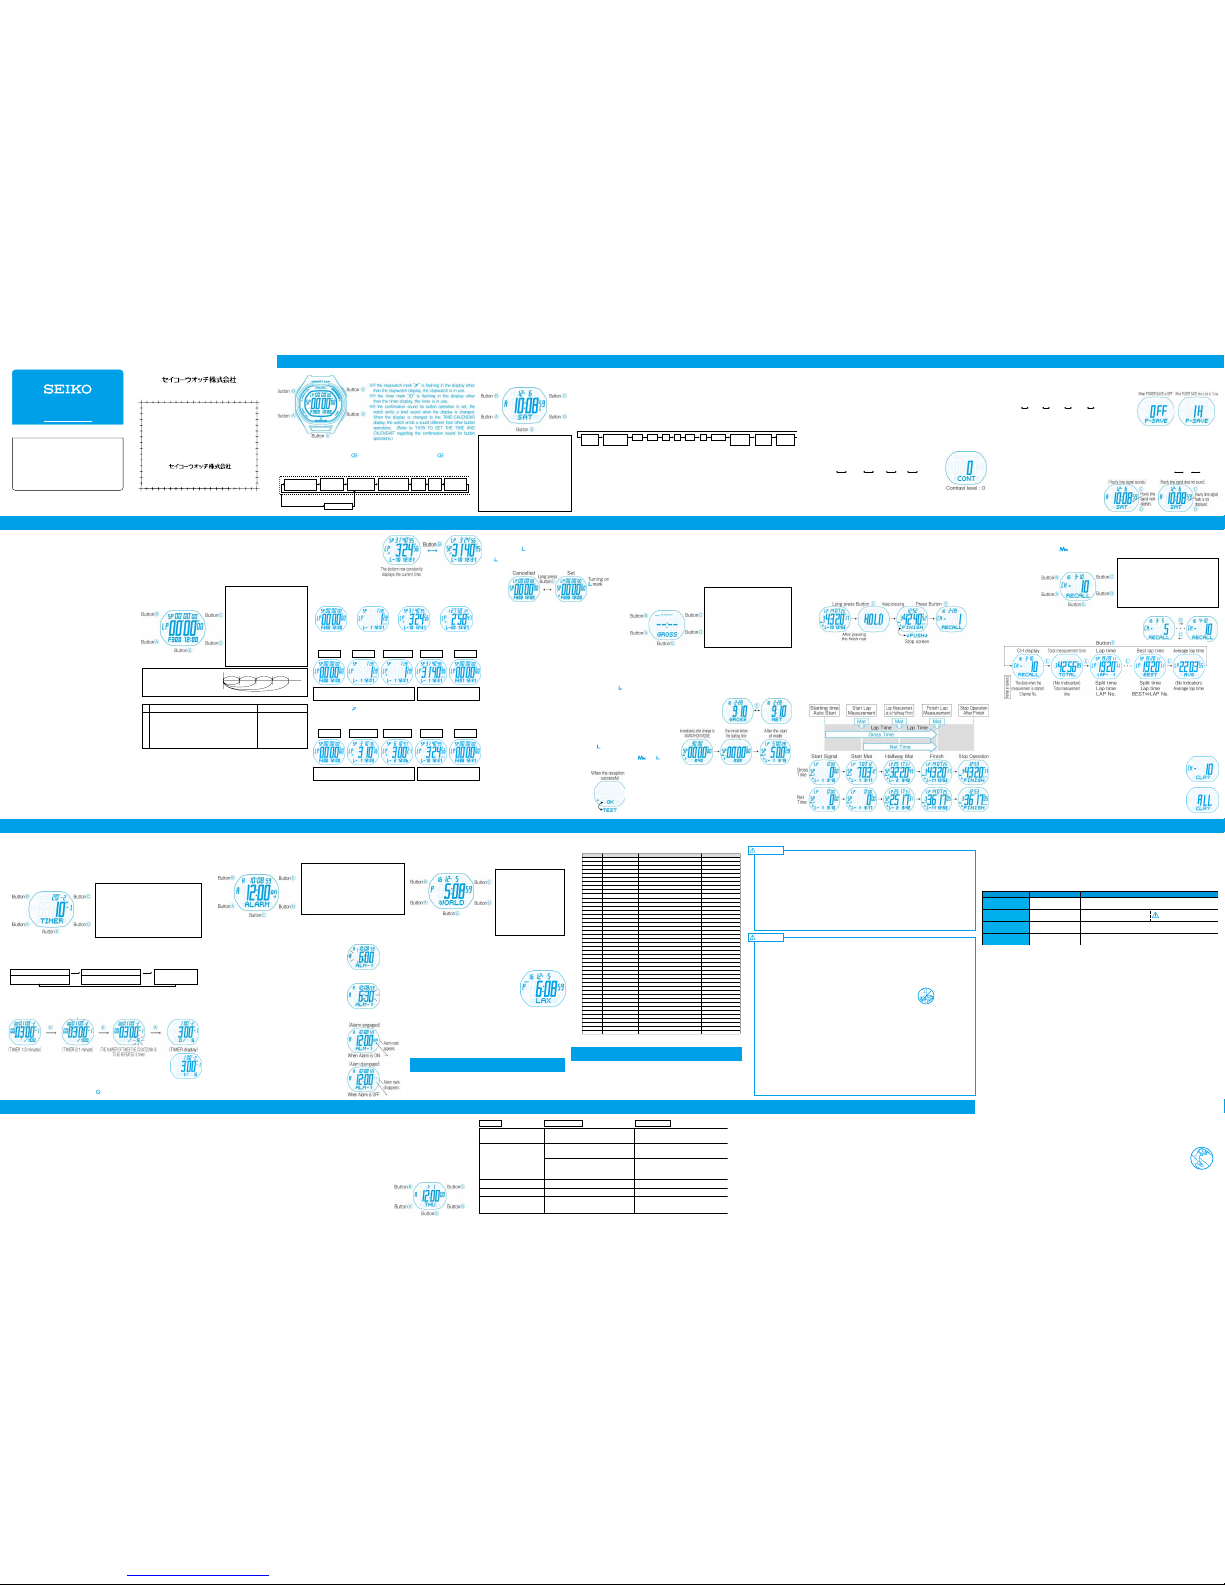
■ BUTTONS AND CHANGE OF DISPLAY ■ HOW TO SET THE TIME AND CALENDAR
■ TO PRESERVE THE QUALITY OF YOUR WATCH
● With each pressing of Button
Ⓐ
, the display changes in the following order.
・The built-in illuminating light function can be operated by tapping the watch face:
Tapping × one time:Turning on the built-in light
Tapping × two times:
Setting ( mark appears) / Canceling the auto illumination ( mark disappears)
・
Press Button Ⓓto change the display to the TIME/CALENDAR display. (Except MARATHON MODE)
ALARM
display
WORLDTIME
display
MARATHONMODE
SETdisplay
MEMORY
RECALLdisplay
TIMER
display
STOPWATCH
display
TIME/
CALENDARdisplay
MARATHONMODE
(WhentheMARATHONMODEisset)
30minutesbeforethestartingtime
Automaticchange
PressButtonⒺaftersavingdata.
・ The stopwatch can measure up to 99 hours 59 minutes 59 seconds 99
in 1/100 second increments.
・ Lap time “LP” and split time “SP” can be displayed simultaneously. The
memory of best lap time and average lap time can be stored.
・ When smart lap is set, lap time is automatically measured in response to a
mat for measurement.
・ Up to 300 units of memory can be sorted.
・
Data within 300 units of memory can be sorted by channel when being stored.
・
Lap/split time, best lap time, and average lap time can be recalled on the display.
(1)Buttons and operations
● Press Button Ⓐto show the
STOPWATCH display.
Button Ⓐ
:
Change to the STOPWATCH display
Button Ⓐ(
long press
)
:
Smart lap reception check
(When smart lap is set/reset)
Button Ⓑ:
Changes over the display positions
between lap time and split time
Button Ⓒ: Start/Stop
Button Ⓓ
:
Change to the TIME/CALENDAR display
Button Ⓔ:
Lap, Split/Reset
Button Ⓔ(
long press
)
:
Smart lap set/cancelled
(When smart lap is reset)
Tapping × one time
:
Turning on the built-in light
Tapping × two times
:
Setting /
canceling the auto illumination
※
Due to the function displaying the b est lap time and average lap time, it ta kes at least
three units of memory to store 1 time data. If you store data only in one channel, you can
use 300 units of me mory per channel. If you use more than one channel, the units of
memory you can use will be less than 300 units of memory in total. For example, if the
measured time data are stored in one channel, 30 0 units of memor y can be used , but if
data is divided and stored in 2 channels , 297 units of memory can be used in total.
※
When only one channel (CH) is used, the units from L-1 to L-300 are memo rized.
Although the units after L-301 are also measured, they are not memorized.
※ When the memory is full, the data for the oldest channel is deleted in channel
increments to register new memory data.
※
See “How to use the memory recall function” to select and delete each memory.
(1)Buttons and operations
●
Press Button Ⓐto show the TIME/CALENDAR display.
Button
Ⓐ :
Change to TIME/CALENDAR display
Button
Ⓐ
(long press)
:
Change to TIME/
CALENDAR SETTING display
Button
Ⓑ :
Selection of city name, adjusting items
or digits (moving back or decreasing)
Button
Ⓒ :
Engagement/disengagement of
hourly time signal, adjusting items
or digits (advancing or increasing)
Button
Ⓓ : No function
Button
Ⓔ :
WORLD TIME display/selection of
the item or digit to be adjusted
Tapping × one time
:
Turning on the built-in light
Tapping × two times
:
Setting/canceling the auto
illumination
※
Because the year, month, date, and day from 2015 to 2064 have been programmed in the automatic calendar,
in this period, it is not necessary to manually adjust odd and even months including February of leap years.
※
If summer time is set in the TIME/CALENDAR display and the same city is selected in the WORLD
TIME display, the summer time will also be shown in the WORLD TIME display.
※
If all indicators of the display light while in the TIME/CALENDAR SETTING display, it is not a malfunction. This
happens if buttons Ⓒ and Ⓓ are pressed at the same time. In such a case, press any one of buttons to return to the
TIME/CALENDAR display, and then, follow the above procedures from step 1 of (2) to set the time and calendar.
(3)How to adjust the contrast level
・
The contrast level of the display (variations of shading) can be adjusted. When the digital
display is initialized or the built-in IC is reset, the contrast is reset to the default level “0.”
● Press Button Ⓐto show the TIME/CALENDAR display.
① Long press Button Ⓐto show the TIME/CALENDAR SETTING display. The
city name currently set starts flashing.
② Press Button Ⓔto select “contrast.”
③ Press Button Ⓑor Ⓒto adjust the contrast level.
④ After the adjustment is completed, press Button Ⓐto
return to the TIME/CALENDAR display.
If the watch is left untouched with the digits flashing, the display will
automatically return to the TIME/CALENDAR display in two to three minutes.
(4)How to adjust the POWER SAVE setting
● Press Button Ⓐto show the TIME/CALENDAR display.
①
Long press Button Ⓐto show the TIME/CALENDAR SETTING display. The city name currently set starts flashing.
② Long press Button Ⓔto show the POWER SAVE SETTING display.
③ P r e s s B u t t o n Ⓑor Button Ⓒto select the OFF or set time. The factory
default setting is OFF.
※
The POWER SAVE function turns off the display to save consumption power while no button
operation is performed for the predetermined time. To recover the display, press any button to
recover the display before turning off.
④
After the adjustment is completed, press Button Ⓐto return to the TIME/CALENDAR display. If the watch is left untouched
with the digits flashing, the display will automatically return to the TIME/CALENDAR display in two to three minutes.
(5)How to adjust the tap sensitivity
・ Adjust the tap sensitivity.
● Press Button Ⓐto show the TIME/CALENDAR display.
①
Long press Button Ⓐto show the TIME/CALENDAR SETTING display. The city name currently set starts flashing.
② Press Button Ⓔto show the TAP SENSITIVITY SETTING display.
③ Press Button Ⓑor Button Ⓒto adjust the tap sensitivity.
※If tapping does not turn on the light easily, select Sensitivity High
(6)
How to test the alarm sound and how to engage/
disengage the hourly time signal and confirmation
sound for button operations
・
With each pressing of Button Ⓒin the TIME/CALENDAR display, the hourly time
signal and confirmation sound for button operations can be engaged or disengaged.
・
The alarm sound can be heard by pressing and holding Button Ⓒand Ⓓat the same time.
(5)How to use the smart lap function
・ Long pressing Button Ⓔwhen the stopwatch function is reset
turns on the “ ” mark to start the smart lap stand-by state.
・ Long press Button Ⓔto cancel the smart lap function. The
“” mark disappears and the smart lap function is
cancelled.
・ While the smart lap is set, a lap is automatically obtained in
response to a mat for measurement.
・
When the radio waves of a mat are received, the watch emits the response sound
(beep), and when the lap is determined, it emits the final sound (beep-beep).
※
After a smart lap is obtained, the display is stopped for 20 seconds.
And then it returns to the measurement display automatically.
※ The next lap can be manually obtained after 20 seconds passed
and the smart lap can be obtained after one minute passed.
・ If you would like to perform the lap measurement at any
timing, press Button Ⓔto manually measure a lap even
when the smart lap is set.
※
The display is stopped for 20 seconds after manual lap measurement.
And then it returns to the measurement display automatically.
・
When the signal from a mat for measurement during the stopwatch
function measurement was not received for 24 hours or longer, the
smart lap function is automatically cancelled to turn off the “ ”
mark. The stopwatch function measurement continues.
・
The timer is reset during the smart lap measurement. When the
mode is changed to the MARATHON MODE during the stopwatch
function measurement, the record during the measurement is
automatically memorized and the stopwatch function is reset.
・ The mode cannot be changed to another mode during
measurement/measurement stop of smart lap. Reset the
measurement and then change the mode.
・
When you would like to check that the smart lap function properly
operates during a marathon, etc., long press Button Ⓐon a mat for
measurement in the smart lap stand-by state (while the “ ” mark is lit).
When the radio waves are properly received, the bottom row alternately
displays “OK” and “TEST” for 5 seconds, and then it returns to the
stand-by state. When the radio waves cannot be received, it returns to
the stand-by state after 10 seconds.
※
When a watch is far from a mat for measurement,
radio waves cannot be received. Perform the
operation on the mat for measurement.
※ When radio waves cannot be received,
perform the lap measurement manually.
(2)How to set the timer
Example
:
If the timer 1 is set to three minutes, the timer 2 is set to one minute, and the repeating number is set to 5.
① Press Button Ⓐto show the TIMER display. ※ The timer is initially set for 1 minute.
② Long press Button Ⓐto show the TIMER SETTING display. The hour digits for Timer 1
starts flashing. Press Button Ⓔto select the item or digits to be adjusted (flashing).
③ With each pressing of Button Ⓒ, one digit is increased.
(With each pressing of Button Ⓑ, one digit is decreased.)
※ If Button Ⓑ or Ⓒ is kept pressed, the digits move quickly.
④
Press Button Ⓐto return to the TIMER display. If the watch is left untouched with the digits
flashing, the display will automatically return to the TIMER display in two to three minutes.
⑤ Press Button Ⓒto start/stop the timer. After stopping the timer, press
Button Ⓔto reset the timer.
※ Restarting and stopping the timer can be repeated as many times as necessary.
※
A time-up warning beep sounds 3 seconds before the set time is up. When the set time is up, the time-up beep sounds for approximately 5 seconds.
※
To stop the time-up warning beep and time-up beep while sounding, press either Button Ⓐ , Ⓑ , Ⓒ, Ⓓ , or Ⓔ .
※ While the timer is counting, the timer mark “ ” flashes.
■ FEATURES ■ HOW TO USE THE STOPWATCH
“Lap time” is the time that has elapsed from the
start of one stage of an activity to that of the next
stage. “Split time” is the time that has elapsed
from the start of an activity to any given stage.
Lap time
Split time
Start
・
When the Marathon Mode is set, the display is automatically changed to the
“MARATHON MODE display” 30 minutes befo re the star ting time of a marathon,
and the smart lap stand-by state starts.
・
When it reaches the starting time, the measurement starts automatically.
※ Adjust the time on the day before a marathon, etc.
・ The watch responds to a mat for measurement on a course by the smart
lap function and the lap measurement is automatically performed. Also the
lap measurement can be manually performed at any timing.
※
The mode cannot be changed to another mode during the MARATHON MODE. Reset the
measurement and then change the mode.
(1)Buttons and operations
●
Press Button Ⓐto show the
“M AR ATHON M ODE SE T dis play.”
① Long pressing Button Ⓐto select the “MARATHON MODE
SETTING.” Time is 9:00 and time limit is 7:00 are displayed.
②
S e t t h e “ d a t e , ” t h e “ s t a r t i n g t i m e ” a n d t h e “ t i m e l i m i t . ”
Press Button Ⓔto select the item to be adjusted (flashing).
③
After selecting the item to be adjusted, press Button Ⓑor Ⓒto set the digits.
※
The time limit can be set by 5 minute increments within the range of one hour to less than 24 hours.
④ After the setting is completed, press Button Ⓐto return to the
“MARATHON MODE SET display.”
⑤ Press Button Ⓔto select the gross time display or the net time display.
・
Gross time: The elapsed time from the starting time
・
Net time: The elapsed time after passing the starting line.
(The time cannot be changed after countdown starts.)
⑥
Press buttons Ⓑand Ⓒat the same time to reset the Marathon Mode.
(2)
How to use the MARATHON MODE
①
When it reaches 30 minutes
before the set starting time,
the display is automatically
changed to the “MARATHON
MODE display” to turn on the
“” a n d “ ” marks and
start countdown.
・
The countdown display automatically disappears one minute before the starting time.
※ Button Ⓒ (start function) is not available while the countdown is displayed.
※
When the mode is changed to the MARATHON MODE during the stopwatch function, the record
is automatically memorized and the stopwatch function is reset.
※ The timer is reset.
②
When it reaches the set starting time, stopwatch function measurement automatically starts.
③
The watch responds to a mat for measurement on a course to measure a lap by the smart lap function.
・
While the smart lap is set, the display is stopped for approximately 20 seconds after the lap
measurement. And then it automatically returns to the measurement display.
※ Oper ation of Button Ⓔ is not available while the lap time is displayed.
■ HOW TO USE THE MEMORY RECALL FUNCTION■ HOW TO USE THE MARATHON MODE
・ The watch responds to all the mats for measurement on a course.
※ In the case of a turn-around course, the watch may respond to a mat on the opposite side of the
road. Pay attention to the mat when running on the center of a road.
※ Also the watch may respond to mats other than mats for record.
④ When obtaining a lap at any timing at a point except a mat, press Button Ⓔ.
⑤
At the finish line, after a runner passes the finish mat, long press Button Ⓒto stop the measurement.
The last-minute lap is regarded as the finish lap. The time from finish to measurement
stop is excluded from the lap.
※ Short press Button Ⓒ to return to the measurement mode.
※ The record finish operation must be performed after a runner passes a mat for measurement.
※ When it exceeds the time limit during measurement of MARATHON MODE, the measurement
is automatically stopped. The measurement cannot be restarted.
⑥ When Button Ⓔis p ressed, a lap is automatically recor ded in the memory to
change the display to the memory recall display.
・ Do not press button Ⓔbut long press button Ⓒto restart measurement.
・ Gross time/Net time
In MARATHON MODE, both times are measured. As for the display during measurement,
either time is selected in advance (the display cannot be changed after countdown starts).
In the Recall Mode, a display can be changed. (See “How to use the memory recall
function.”)
※
As the time measured by this product is a memory obtained by an individual, it is not related to an
official memory recorded and managed by official marathon timekeepers.
・
The timer can be set from 10 seconds up to 99 hours, 59 minutes in one-second increments.
・
Two timers are provided, and the timer 2 starts after the timer 1 counted up. The repeating
function is also included so that the timer 1 restarts after the timer 2 counted up.
・
To use either Timer 1 or Timer 2 as a standard repeat timer, set the timer not in use to “00:00’00.”
・ The number of times the timers repeat the countdown can be set from 1 to 100 times.
(1)Buttons and operations
● Press Button Ⓐto show the TIMER
display.
Button
Ⓐ :Change to TIMER display
Button
Ⓐ(
long press
):
Change to TIMER SETTING display
Button
Ⓑ:
Timer time setting (decreasing digits)
Button
Ⓒ:
Timer time setting (increasing digits)
Button
Ⓓ:
Change to the TIME/CALENDAR display
Button
Ⓔ:
Selection of the item or digits to be adjusted
Reset the timer
Tapping × one time:
Turning on the built-in light
Tapping ×
two times
:
Setting/canceling the auto
illumination
■ HOW TO USE THE TIMER ■ HOW TO USE THE ALARM
・
The three-channel daily alarm sounds at a designated time (hour and minute) every 24 hours.
・Each alarm channel can be engaged (“on”) or disengaged (“--”) independently.
※ The alarm can be set only for the home time city.
(1)Buttons and operations
●
Press Button Ⓐto show the ALARM display.
(2)How to use the alarm
・
The way of using the alarm is the same for every alarm channel.
Example:Selecting alarm 1 and setting the alarm
time to “6:30 a.m.”
① Press Button Ⓔto show “ALARM 1.”
Long press Button Ⓐto show the ALARM
SETTING display. The hour digits start flashing.
② With each press of Button Ⓔ, hour digits and
minute digits flash alternately. Select the digits to
be adjusted (flashing).
③ With each pressing of Button Ⓒ, one digit is
increased. (With each pressing of Button Ⓑ, one
digit is decreased.)
※ If Button Ⓑ orⒹ is kept pressed, the digits move quickly.
④
After all adjustments are completed, press Button Ⓐto release the
ALARM SETTING display and to return to the ALARM 1 display. If
the watch is left untouched with the digits flashing, the display will
automatically return to the ALARM 1 display in two to three minutes.
(3)How to engage or disengage the alarm
・ Wi th each pre ssing of Button Ⓒin the ALARM
display, “ON” (the alarm is engaged) or “-” (the
alarm is disengaged) mark is displayed alternately.
(4) How to stop the alarm while sounding
・
At a designated time the alarm sounds for approximately 20
seconds and automatically stops. To stop the alarm manually
while sounding, press any of Buttons A, B, C, D, E, F or G.
※ Doing this in any display can stop the alarm.
Button
Ⓐ:Change to AL ARM display
Button
Ⓐ
(long press)
:
Change to ALARM TIME SETTING display
Button
Ⓑ:
Alarm time setting (decreasing digits)
Button
Ⓒ:
Alarm time setting (increasing digits)
Engagement/disengagement of the alarm
Button
Ⓓ:
Change to the TIME/CALENDAR display
Button
Ⓔ:
Change between the alarm 1, 2, and 3
Tapping × one time
:
Turning on the built-in light
Tapping × two times
:
Setting/canceling the auto illumination
(Hour:6 a.m.)
↓Ⓔ
↓Ⓐ
・ The time of 44 cities (including GMT) in different time zones
throughout the world can be displayed.
・ The summer time (DST) can also be set for each city (except GMT).
(1)Buttons and operations
●
Press Button Ⓐto show the WORLD TIME display.
Button Ⓐ
: Change to WORLD
TIME display
Button Ⓑ
:
Selection of the city (moving back)
Button Ⓒ
:
Selection of the city (advancing)
Button Ⓓ
:
Change to the TIME/
CALENDAR display
Button Ⓔ
:
Setting / canceling the DST
Tapping × one time: Turning on the
built-in light
Tapping × two times:
Setting/canceling
the auto illumination
(2)How to use the world time
① Press Button Ⓐto show the WORLD TIME display.
The city name, month, date, and time are displayed.
② To select the city, press Button Ⓒor Ⓓ.
(3)How to set the summer time
・ With each pressing of the Button Ⓔin the
WORLD TIME display, the summer time
can be alternately set or cancelled.
・ When the summer time is set, the DST
mark appears.
※
If summer time is set to the city which has also been set as “HOME” in the TIME/
CALENDAR display, the summer time will also be shown in the TIME/CALENDAR display. If
summer time is set in the TIME/CALENDAR display and the same city is selected in the
WORLD TIME display, the summer time will also be shown in the WORLD TIME display.
※
The time differences in each city in the table on the right are subject to change
according to the governments of the respective countries of regions.
■ HOW TO USE THE WORLD TIME
The normal life expectancy for the liquid crystal panel of the watch is approximately 7 years. After
that, it may decrease in contrast, becoming difficult to read. Please contact the retailer from whom
the watch was purchased to have the liquid crystal panel replaced with a new one.
■ NOTE ON THE LIQUID CRYSTAL PANEL The watch employs a method to uniformly diffuse light from a light-emitting
diode (LED) by light guiding panel.
※ When the voltage gets lowered with the battery life running out, the luminance
level decreases.
■ Built-in illuminating light (LED)
(4)
Comparison table between city and time difference(GMT indicates the Greenwich mean
time. + indicates advancement from the GMT and – indicates time lag from the GMT.
NO.
CityName
(AsofJuly2015)
TimedifferencefromGMT
1
2
3
4
5
6
7
8
9
10
11
12
13
14
15
16
17
18
19
20
21
22
23
24
25
26
27
28
29
30
31
32
33
34
35
36
37
38
39
40
41
42
43
44
GMT
LIS
LON
PAR
ROM
BER
ATH
CAI
MOW
JED
BGW
THR
DXB
KBL
KHI
DEL
DAC
RGN
BKK
JKT
SIN
HKG
BJS
SEL
TYO
ADL
GUM
SYD
OOL
NOU
WLG
HNL
ANC
YVR
LAX
DEN
CHI
NYC
YMQ
BOS
SDQ
BUE
RIO
PDL
0 0:0 0
0 0:0 0
0 0:0 0
+ 0 1:0 0
+ 0 1:0 0
+ 0 1:0 0
+ 0 2:0 0
+ 0 2:0 0
+ 0 3:0 0
+ 0 3:0 0
+ 0 3:0 0
+ 0 3:3 0
+ 0 4:0 0
+ 0 4:3 0
+ 0 5:0 0
+ 0 5:3 0
+ 0 6:0 0
+ 0 6:3 0
+ 0 7:0 0
+ 0 7:0 0
+ 0 8:0 0
+ 0 8:0 0
+ 0 8:0 0
+ 0 9:0 0
+ 0 9:0 0
+ 0 9:3 0
+ 1 0:0 0
+ 1 0:0 0
+ 1 0:0 0
+ 1 1:0 0
+ 1 2:0 0
− 1 0:0 0
− 0 9:0 0
− 0 8:0 0
− 0 8:0 0
− 0 7:0 0
− 0 6:0 0
− 0 5:0 0
− 0 5:0 0
− 0 5:0 0
− 0 4:0 0
− 0 3:0 0
− 0 3:0 0
− 0 1:0 0
Greenwich
Lisbon
London
Paris
Rome
Berlin
Athens
Cairo
Jeddah
Baghdad
Tehran
Moscow
Dubai
Kabul
Karachi
Delhi
Dhaka
Yangon
Bangkok
Jakarta
Singapore
HongKong
Beijing
Seoul
Tokyo
Adelaide
Guam
Sydney
GoldCoast
Nouméa
Wellington
Honolulu
Anchorage
Vancouver
LosAngels
Denver
Chicago
NewYork
Montreal
Boston
SantoDomingo
BuenosAires
RiodeJaneiro
Azores
● Daily care
The watch requires good daily care
・Wipe away moisture, sweat or dirt with a soft cloth
・ After soaking the watch in seawater, be sure to wash the watch in clean pure water and wipe it dry
carefully.
※ If your watch is rated as “non-water resistant” or “water resistant for daily use,” do not wash the watch.
● Water resistance
Refer the table below for the description of each degree of water resistant performance of your watch before using.
Indicationonthecaseback
Waterresistantperformance
Conditionofuse
WATERRESISTANT
5BAR
Waterresistanceforeveryday
lifeat5barometricpressures
Thewatchwithstandsaccidental
contactwithwaterineverydaylife.
Waterresistanceforeverydaylife
at10(20)barometricpressures.
WATERRESISTANT
10(20)BAR
WATERRESISTANT
Noindication Non-waterresistance
Waterresistanceforeverydaylife
Thewatchissuitableforsportssuchasswimming.
Thewatchissuitablefordivingnotusinganaircylinder.
Notsuitable
forswimming
Avoiddropsofwaterorsweat
WARNING
④
Once the case back is opened for battery replacement or other purposes,
the original water resistant quality designed for the watch may
deteriorate when it is closed. When you have the battery replaced with a
new one, also request the water resistance test pertaining to the water
resistant quality of your watch. If your watch has 10-bar or higher water
resistant quality, be sure to have such test performed on the watch every
time the battery is replaced. Please note that it takes several days to
check the water resistant quality of your watch. When requesting the
checking, therefore, please check the period required for it.
Please understand that we cannot guarantee the retention of data at the
time of battery replacement or repair.
2. Battery life indicator
The watch is equipped with a battery life indicator that enables
you to know when the battery needs to be replaced.
※
When all the digits start flashing in the TIME/CALENDAR display, the watch
may stop operating in 2 to 3days. In such a case, immediately have the battery
replaced with a new one by the retailer from whom the watch was purchased.
1.Notes on the battery
(1)Battery life
This watch operates for two years after assembling a new
normal battery.
※ The battery life (two years) is based on operation of alarm one time/
day, lighting one time/day, timer one time/day, stopwatch operation
one hour/day and smart lap function 8 hours/day.
(2)Monitor battery
The battery in your watch may run down in less than two years after
the date of purchase, as it is a monitor battery which is inserted at
the factory to check the function and performance of the watch.
(3)Battery replacement
①
For battery replacement, be sure to have the battery replaced with a new one at the
retailer from whom the watch was purchased, and specify a genuine SEIKO battery.
② If the old battery is le ft in the watch for a long ti me, a
malfunction may be caused due to battery leakage, etc.
Have it replaced with a new one as soon as possible.
③
Battery replacement is charged even if it runs down within the guarantee period.
■ REMARKS ON THE BATTERY
● Band
The band touches the skin directly and becomes dirty with sweat or dust. Therefore, lack of care may accelerate deterioration
of the band or cause skin irritation or stain on the sleeve edge. The watch requires a lot of attention for long usage.
Metallic band
・Moisture, sweat or soil will cause rust even on a stainless steel band if they are left for a long time.
・Lack of care may cause a yellowish or gold stain on the lower sleeve edge of shirts.
・Wipe off moisture, sweat or soil with a soft cloth as soon as possible.
・
To clean the soil around the joint gaps of the band, wipe it out in water and then brush it off with a soft toothbrush.
(Protect the watch body from water splashes by wrapping it up in plastic wrap etc.)
・
Because some titan bracelets use pins made of stainless steel, which has outstanding strength, rust may form in the stainless steel parts.
・
If rust advances, pins may poke out or drop out, and the watch case may fall off the bracelet, or the clasp may not open.
・
If a pin is poking out, personal injury may result. In such a case, refrain from using the watch and request repair.
Leather band
・
A leather band is susceptible to discoloration and deterioration from moisture, sweat and direct sunlight.
・ Wipe off moisture and sweat as soon as possible by gently blotting them up with a dry cloth.
・Do not expose the watch to direct sunlight for a long time.
・Please take care when wearing a watch with light-colored band, as dirt is likely to show up.
・
Refrain from wearing a leather band watch other than Aqua Free bands while bathing, swimming, and when
working with water even if the watch itself is water-resistant enforced for daily use(10-BAR water resistant).
Polyurethane band
・
A polyurethane band is susceptible to discoloration from light, and may be deteriorated by solvent or atmospheric humidity.
・
Especially a translucent, white, or pale colored band easily adsorbs other colors, resulting in color smears or discoloration.
・Wash out dirt in water and clean it off with a dry cloth.
(Protect the watch body from water splashes by wrapping it up in plastic wrap etc.)
・ When the band becomes less flexible, have the band replaced with a new one. If you continue to
use the band as it is, the band may develop cracks or become brittle over time.
Silicone band
・ As for material characteristics, the band is easily dirtied, and may be stained and discolored. Wipe
off dirt with a wet cloth or cleaning tissue.
・ Unlike bands of other materials, cracks may result in the band being cut. Take care not to damage
the band with an edged tool.
Notes on skin irritation and allergy
Skin irritation caused by a band has various reasons such as allergy to metals or leathers, or skin
reactions against friction on dust or the band itself.
Notes on the length of the band
Adjust the band to allow a little clearance with your wrist to ensure proper airflow.
When wearing the watch, leave enough room to insert a finger between the band and your wrist.
● Inspection and adjustment by disassembly and cleaning (overhaul)
・
Periodic inspection and adjustment by disassembly and cleaning (overhaul) are recommended approximately
once every 3 to 4 years in order to maintain optimal performance of the watch for a long time.
・According to use conditions, the digital display may go out due to liquid leakage.
・
As the parts such as the gasket may deteriorate, water-resistant performance may be impaired due to intrusion of perspiration and moisture.
Please contact the retailer from whom the watch was purchased for inspection and adjustment by disassembly and cleaning
(overhaul). For replacement of parts, please specify “SEIKO GENUINE PARTS.” When asking for inspection and adjustment
by disassembly and cleaning (overhaul), make sure that the gasket and push pin are also replaced with new ones.
・
When your watch is inspected and adjusted by disassembly and cleaning (overhauled), the movement of your watch may be replaced.
(2)How to set the time and calendar
①
Long press Button Ⓐto show the TIME/CALENDAR SETTING display. The city name currently set starts flashing.
② Press Button Ⓔto select the item to be adjusted (flashing).
※ Once the year, month and date have been set, the day of the week is automatically set.
※ If the city name is set to GMT, on (“on”) /off (“-”) mark of DST is not displayed.
※
If the “DST (summer time)” is set to “on,” the “DST” mark is displayed and the time advances for one hour.
③ To reset the seconds to “00,” press Button Ⓔto select the second digits (flashing), and then
press Button Ⓑor Ⓒin accordance with a time signal.
※ If Button Ⓑ or Ⓒ is pressed while the second digits count any number between "30" and "59,” one minute
is added and the second digits are immediately reset to “00.”
※ The telephone time signal service (Tel. 117) is convenient to set the time.
④
After selecting the item to be adjusted, press Button Ⓒor Ⓓto set the digits. With each pressing of Button
Ⓒ, one digit is increased or the city name advances one by one. (With each pressing of Button Ⓑ, one
digit is decreased or the city name moves back one by one). (Except “second,” “12H/24H,” and “DST”)
⑤
After all adjustments are completed, press Button Ⓐto return to the TIME/CALENDAR display. If the watch is left untouched
with the digits flashing, the display will automatically return to the TIME/CALENDAR display in two to three minutes.
With each pressing of Button Ⓔ, the display changes in the following order.
Tapsensitivity
adjustment
Powersave
setting
Contrastlevel
adjustment
DST
(summertime)
on/-
HOME
(Cityname)
second minute hour date month year 12H/24H
−1 0 1
SensitivityLow SensitivityHigh
● About memory
1 Start → Stop → Reset
3 to 4 units of memory
2 Start → Stop/Restart → Stop → Reset
3 to 4 units of memory
3 Start → Lap/Split → Stop → Reset
4 to 5 units of memory
4
Start → Stop/Restart → Lap/Split → Stop → Reset
4 to 5 units of memory
5
Start → Lap/Split → Lap/Split → Stop → Reset
5 to 6 units of memory
Units of memory used for storing 1 time data
How to measure time
● When the time exceeds one hour, the LP/ SP display section on the left
side shows hours.
Button Ⓒ
Start
Button Ⓔ
La p/S plit
Button Ⓔ
La p/S plit
Button Ⓔ
La p/S plit
・・・・→
(3)How to use the stopwatch (Standard measurement)
※ "Restart" and "Stop" can be repeated as many times as necessary.
※
If the stopwatch mark “ ” is flashing in the display other than the stopwatch display, the stopwatch is in use.
Button Ⓒ
Start
Button Ⓒ
Stop
Button Ⓒ
Restart
Button Ⓒ
Stop
Button Ⓔ
Reset
→→→→
・
If "F-300" is displayed, it means that 300 units of memory can be used.
・
After starting the stopwatch, "F-300" changes to "L-1."
・
"F-297" means that 297 units
of memory can be used.
(4)
Lap time/split time measurement (if lap time measurement is repeated 10 times)
※
After measuring lap time/split time, the STOPWATCH display is stopped for approximately 10
seconds, during which the number of laps flash. Then, the STOPWATCH display
automatically starts again. The number of laps displayed is the next number of laps.
※ The lap can be repeated as many times as necessary. The number of laps up to
999 can be displayed. Afterwards, the number of laps is displayed successively like
1001 (display: 001) and 1002 (display: 0 02).
Button Ⓒ
Start
Button Ⓔ
Lap/Split
Button Ⓔ
Lap/Split
Button Ⓒ
Stop
Button Ⓔ
Reset
→
・・・・→→
・
If "F-300" is displayed, it means that 300 units of memory can be used.
・
After starting the stopwatch, "F-300" changes to "L-1."
・
"F-288" means that 288 units
of memory can be used.
(2) How to display the
measured time
● Each time Button Ⓑis
pressed, the display
positions are changed
over between “LP” time
a n d “ S P ” t i m e .
(Minute:30 minutes) (When the summer time is set)
● Handling cautions
・Immediately stop wearing the watch in following cases.
○ If the watch body or band becomes edged by corrosion etc.
○ If the pins protrude from the band
※
Immediately consult the retailer from whom the watch was purchased or SEIKO CUSTOMER SERVICE CENTER.
・ Keep the watch and accessories out of the reach of babies and children.
Care should be taken to prevent a baby or a child accidentally swallowing the accessories.
If a baby or a child swallows the battery or accessories, immediately consult a doctor, as it will be harmful to the health of the baby or child.
・Do not remove the battery from the watch.
Replacement of the battery requires professional knowledge and skill. Please ask a watch retailer for replacement of the battery.
Do not recharge the battery, as doing so can generate heat which may cause bursting, leakage or ignition.
・
Do not use the watch in scuba diving or saturation diving.
The various tightened inspections under simulated harsh environment, which are usually required for watches designed for scuba diving or saturation diving,
have not been conducted on the water-resistant watch with the BAR (barometric pressure) display. For diving, use special watches for diving.
WARNING
・ Avoid wearing or storing the watch in the following places.
○
Places where volatile agents (cosmetics such as polish remover, bug repellent, thinners etc.) are vaporizing
○ Places where the temperature drops below 5 ℃ or rises above 35 ℃ for a long time
○ Places of high humidity ○ Places affected by strong magnetism or static electricity
○ Dusty places ○ Places affected by strong vibrations
※
For watches with batteries, do not leave a dead battery compartment for a long time as it may cause battery leakage.
・ If you observe any allergic symptoms or skin irritation
Stop wearing the watch immediately and consult a specialist such as a dermatologist or an allergist.
・ Do not pour running water directly from faucet.
The water pressure of tap water from a faucet is high enough to degrade
the water resistant performance of a water resistant watch for everyday life.
・Do not turn or pull out the crown when the watch is wet.
Water may get inside of the watch.
※
If the inner surface of the glass is clouded with condensation or water droplets appear inside of the watch for a long time, the water resistant performance
of the watch is deteriorated. Immediately consult the retailer from whom the watch was purchased or SEIKO CUSTMER SERVICE CENTER.
・Do not leave moisture, sweat and dirt on the watch for a long time.
Be aware of a risk that a water resistant watch may lessen its water resistant performance because of deterioration of the adhesive on the glass or gasket, or the development of rust on stainless steel.
・Do not wear the watch while taking a bath or a sauna.
Steam, soap or some components of a hot spring may accelerate the deterioration of water resistant performance of the watch.
・Other cautions
○
Replacement of the metal band requires professional knowledge and skill. Please ask a watch retailer
for replacement of the metal band, as there is a risk of hand or finger injury and fear of losing parts.
※
Length adjustment service for metallic bands is available at the retailer from whom the watch was purchased or SEIKO CUSTOMER SERVICE CENTER.
The service may also be available on a chargeable basis at other retailers, however, some retailers may not undertake the service.
○ Do not disassemble or tamper with the watch.
○
Keep the watch out of the reach of babies and children. Extra care should be taken to avoid risks of any injury or allergic rash or itching that may be caused when they touch the watch.
○
When disposing of used batteries, follow the instructions of your local authorities.
CAUTION
Thewatchstopsoperating.
The watch temporarily
gains/losestime.
Allthesegmentsofthedisplayareflashing.
Theblurintheglasspersistsforalongtime.
Although the L mark is lit, smart
lapcannotbemeasured.
・Thebatteryhasrundown.
・
Thewatch hasbeen leftinextremelyhigh
orlowtemperaturesforalongtime.
・
Youdroppedthe watch, hititagainst a hard
surfaceorworeitwhileplayingactivesports.
・
Thewatchwasexposedtostrongvibrations.
・Thebatterynearsitsend.
・
Watergotinsidethewatchduetothedeteriorationofthegasket,etc.
・
Thefrequencyof radio waves outputfrom
amatisnotavailableformeasurement.
・
Havethebatteryreplacedwithanewoneimmediately
bytheretailerfromwhomthewatchwaspurchased.
・
Thisconditionwillbecorrectedwhenthewatchtemperature
returnstonormal.Setthecorrecttimebeforeuse.
・
Setthecorrecttimebeforeuse.Ifthe abnormal
condition persists, consult the retailer from
whomthewatchwaspurchased.
・
Have the battery replaced with a new one as soon as
possiblebytheretailerfromwhomthewatchwaspurchased.
・
Consulttheretailerfromwhomthewatchwaspurchased.
・Performlapmeasurementmanually.
※Forthesolutionfortroublesotherthanabove,contacttheretailerfromwhomthewatchwaspurchased.
Problem Possiblecause Solution
■ TROUBLESHOOTING ■ AFTER-SALE SERVICE
● Notes on guarantee and repair
・
Contact the retailer the watch was purchased from or
SEIKO CUSTOMER SERVICE CENTER for repair.
・ Within the guarantee period, present the
certificate of guarantee to receive repair
services.
・ Guarantee coverage is provided in the
certificate of guarantee. Read carefully
and retain it.
・ For repair services after the guarantee
period has expired, if the functions of the
watch can be restored by repair work, we
will undertake repair services upon
request and payment.
(1)
Frequency of crystal oscillator
···· 32,768 Hz
(2)Loss/gain (monthly rate) ··· Less than 20 seconds
(when the watch is worn on your wrist in the
temperature range between 5℃ and 35℃ )
(3)
Operational temperature range
···· Between -10℃ and +60℃
For the display function: Between 0℃ and +50℃
(4)Display medium ················· Nematic Liquid Crystal,
FEM (Field Effect Mode)
(5)Battery ·································· Miniature lithium battery
SB-T1, 1 piece
(6)Battery life ··························· Approx. 3 years
(7)Battery life indicator
(8)IC (Integrated Circuit) ········
Oscillator, frequency divider and
driving circuits (C-MOS-LSI), 1 piece
※
The specifications are subject to change without prior notice, for product improvement.
■ SPECIFICATIONS
・
After the battery is replaced with a new one, or when an abnormal display
such as broken digits appears, follow the procedure below. The built-in IC
will be reset and the watch will resume normal operation.
How to reset the built-in IC
Keep buttons Ⓐ,Ⓑ,Ⓒand Ⓓpressed at the same time for 2 to 3
seconds. The display will become blank, and "1-1 THU AM 12:00oo"
will be displayed as the buttons are released.
Before using the watch, set the
watch in the following order.
① Time/calendar setting
② Alarm setting
■
NECESSARY PROCEDURE AFTER THE BATTERY CHANGE (RESETTING THE IC)
TIMER1 Ⓔ
Ⓔ Ⓔ
Hour→Minute→Second
TIMER2
Ⓔ Ⓔ
Hour→Minute→Second
Ⓔ
Ⓔ
THENUMBEROFTIMES
THECOUNTDOWNIS
TOBEREPEATED
Button
Ⓐ:
Change to MARATHON MODE Set
function display
Button
Ⓐ:
(Long press)change to the
MARATHON MODE SETTING display
Button
Ⓑ:
Adjust items or digits (moving back or decreasing)
Button
Ⓒ:
Adjust items or digits (advancing or increasing)
Button
Ⓓ:
Change to the TIME/CALENDAR display
Button
Ⓔ:
Change of gross/net, selection of items
or digits to be adjusted
Tapping × one time
:
Turning on the built-in light
Tapping × two times
:
Setting/
canceling the auto illumination
・Up to 300 units of memory can be used to store measured time data.
・The stored data can be recalled per channel.
・ MARATHON MODE mark “ ” is turned on for the memory measured in MARATHON MODE.
・The best lap time and average lap time can be displayed.
・
The date when the measurement is started is memorized in each channel.
(1)Buttons and operations
●
Press Button Ⓐt o
show the MEMORY
RECALL display.
※
The newest channel
is displayed.
※
If no data is stored in memory, "---" mark is displayed.
※ When the best lap is displayed, the “BEST” and “LAP-**” are alternately displayed.
※ The LAP time and SPLIT time positions are displayed in accordance with the stopwatch display position setting.
※
The gross/net of memory measured in MARATHON MODE is displayed according to the setting of MARATHON MODE.
To change the setting, see “How to use MARATHON MODE.”
③
If you would like to see another measurement result, select a desired channel by operation ① to check the result in a manner similar to ② .
(2)How to use the memory recall function
Example:If you want to see data in channel 5 (CH-5)
①
Press Button Ⓑand Ⓒto show the desired channel number (CH-5).
② Press Button Ⓔto check the lap time. With each pressing of
Button E, the display changes in the following order.
Button
Ⓐ :
Change to MEMORY RECALL display
Button
Ⓐ (long press):Data deletion
Button
Ⓑ :
Selection of channel (moving back)
Button
Ⓒ:Selection of channel (advancing)
Button
Ⓓ:
Change to the TIME/CALENDAR display
Button
Ⓔ:Data recall
Tapping × one time:Turning on the built-in light
Tapping × two times: Setting/canceling the auto illumination
(3)
To check data in other channels, press Button Ⓑor Ⓒto select the desired channel number and check the data in the same way as procedure ③ .
※ Make sure that the stopwatch is reset before deleting the data.
● How to delete a channel
① Press Button Ⓐto show the MEMORY RECALL display.
※ The newest channel is displayed.
② Press Button Ⓑor Ⓒto select the channel you want to delete.
③ Press Button Ⓐfor approximately 2 seconds. “CLR?” will be displayed.
④
Keep Button Ⓐpressed for approximately 2 seconds. When “ALL CLR?” is displayed, release Button Ⓐ.
⑤
After the number of remaining units is displayed, the watch automatically returns to the MEMORY RECALL display.
※ The channel number after the deleted data moves up.
● How to delete all channels
① Press Button Ⓐto show the MEMORY RECALL display.
※ The newest channel is displayed.
② Press Button Ⓐfor approximately 2 seconds. “CLR?” will be displayed.
③
Keep Button Ⓐpressed for approximately 2 seconds to show “ALL CLEAR?” And then keep Button Ⓐ
pressed for approximately another 2 seconds.
④
After the number of remaining units is displayed, the watch automatically returns to the MEMORY RECALL display.
S620 KSJS620-1604
取扱説明書
INSTRUCTIONS
この度は弊社製品をお買い上げいただき、
誠にありがとうございました。
ご使用の前にこの説明書をよくお読みの上、
正しくご愛用くださいますよう、お願い申
し上げます。
なお、この説明書はお手元に保管し、必要
に応じてご覧ください。
弊社製品についての修理その他のご相談は、「お買い上げ店」で
うけたまわっております。なお、ご不明の点は下記へお問い合せ
ください。
全国共通フリーダイヤル
0120-612-911
お客様相談室
〒
100-0005
東京都千代田区丸の内 3-1-1 国際ビル
〒
550-0013
大阪市西区新町 1-4-24 大阪四ツ橋新町ビルディング
http://www.seiko-watch.co.jp/
S620


