Selecon PLPROFILE1 MKII User manual
SF PLPROFILE1 –December 2012 pg1 of 4
SHORT FORM OPERATION MANUAL
PLPROFILE1 LED LUMINAIRE
THANK YOU FOR PURCHASING A PHILIPS SELECON PLPROFILE1 LED
LUMINAIRE. WE HAVE DESIGNED THIS LUMINAIRE TO PROVIDE YOU WITH A
SUPERIOR FITTING IN PERFORMANCE, DESIGN AND ENGINEERING. WE ARE
CONFIDENT THAT IT WILL PERFORM TO YOUR EXPECTATIONS FOR MANY
YEARS TO COME.
Caution! Installation is entirely at your risk. Do not attempt installation unless you are suitably qualified. If you do
not understand a point in this manual, don’t guess. Don’t take short cuts. If in doubt, stop! Contact Philips Selecon
or one of its authorised distributors for advice. Don’t be afraid to ask for help.
This SHORT FORM MANUAL is designed to provide you with the information that you will need IMMEDIATELY upon
unpacking your new luminaire. This manual covers information required for PLZS1-1834-03 & PLZS-2444-03 products.
We recommend making a note of the serial numbers of your purchased luminaires for future reference.
(The serial number can be found on the sticker on the side of the yoke on the unit and on the outside of the box the unit was packed in).
Important Note: Before discarding the packaging ensure you have the suspension bolt set
Electrical Installation
WARNING!!! Risk of fire and electric shock. This product is to be installed by a qualified electrician only. Ensure that the AC
power is switched off before attempting to make any wiring connections.
This fixture employs a grounded type receptacle and is not intended for connection to a two-wire, ungrounded source of supply.
To avoid the chance of product damage or malfunction, disconnect power before connecting wires, and do not connect or
disconnect cables (supply, data, lamps and interface cables) when voltage is supplied to the luminaire.
Mains Voltage: 100-240VAC (+/- 10%). unit must be direct switching mains only, not via a dimmer system.
When installing this fixture use wire conductor colour codes as follows:
Brown - Phase, live
Blue - Neutral, return
Green/Yellow - Earth, ground
Mounting
A safety bond MUST always be used when rigging luminaires on bars, trusses, etc. The safety bond is fixed to the luminaire
lamp-house anchor point, located at the rear of the luminaire, and is wrapped around the bar and attached to itself. This is the
only recommended anchor point for the luminaire. Philips Selecon supplies a fitted safety bond with all theatrical / entertainment
luminaires.
Ambient Operating Temperature: 0°C to 40°C
To guarantee product lifetime, the user should ensure that the ambient temperature remains within the recommended
temperature range.
Philips Selecon has packaged this product using environmentally friendly packaging. Please consider
either reuse of the packaging or dispose of responsibly with your nearest recycling collection agency.
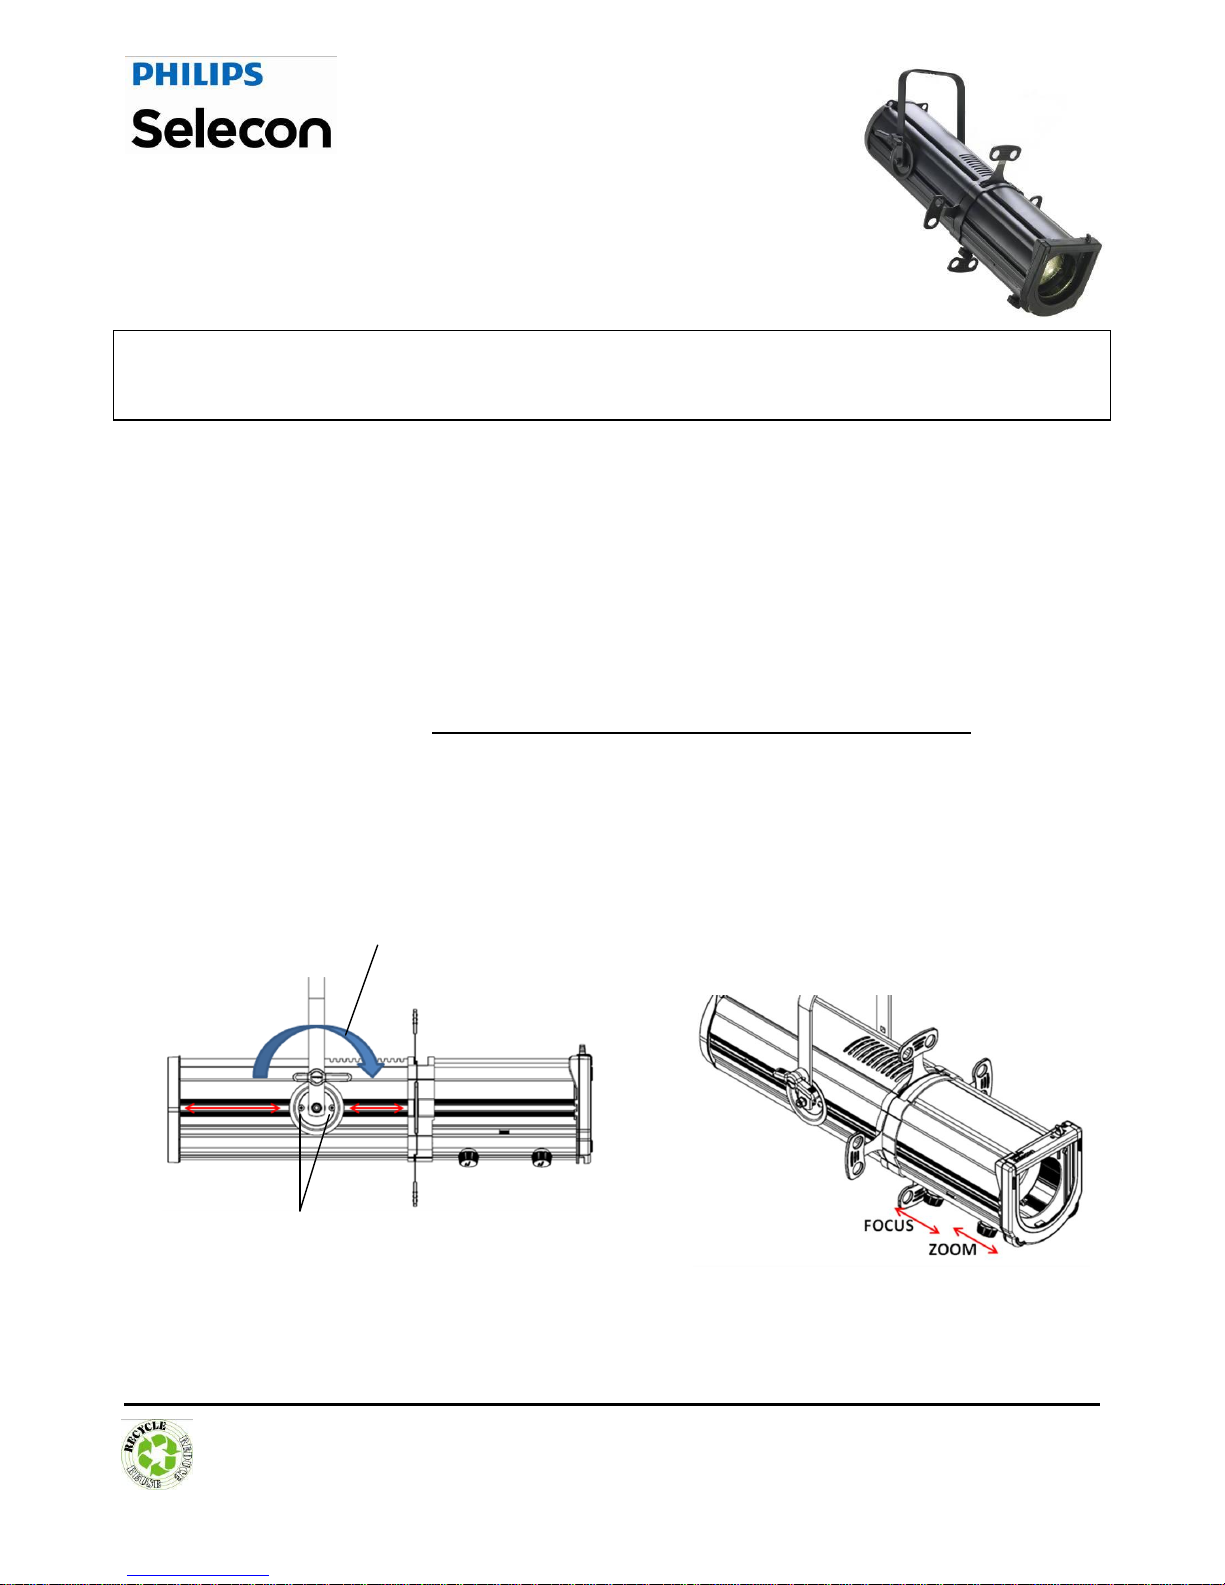
Adjusting the tilt angle
Loosen the lock off handle on the side of the
luminaire, tilt and retighten finger tight
Yoke Adjustment
Loosen the fasteners on either side of the yoke,
reposition yoke, tighten fasteners. Ensure yoke is
aligned correctly before tightening fasteners again.
Focus
Loosen the focus knobs on the bottom of the fixture,
gently slide lenses forward or backward for focus
and zoom, tighten focus knob once focused.

SF PLPROFILE1 –December 2012 pg 2 of 4
Operation and Programming
MAIN MENU (scrolling up or down from the splash screen)
LCD Display
Displays all menu parameters and
option settings. Also displays
DMX512 address.
Preset Button
Allows the recall of stored presets
Intensity Button
Allows the customisation of current
intensity (light output). Note, using
the LEFT and RIGHT arrow
buttons you can select each
RGBW channel individually and
using the UP and DOWN arrows
change their intensity.
OK (Enter) Button
Accesses details, activates a field, or
enters a setting depending on the
current menu item
Up/Down/Left/Right
Arrow Buttons
Navigates menu system and used for
selecting and setting options.
Escape Button
Enters menu options. Navigates
(backs up) one menu level.

SF PLPROFILE1 –December 2012 pg 3 of 4
MAIN MENU CONTINUED:
Settings available for editing are dependent on the current security
level. These include General, Presets, DMX, Fan and Display
Unwanted changes to a
luminaire‟s settings can be locked.
(see „security‟ on pg4)

SF PLPROFILE1 –December 2012 pg 4 of 4
Main Menu (if scrolling left or right from the main splash screen)
DMX Address (if fixture is unlocked, hit „OK‟ to change DMX address)
Fixture Hours (displays fixture operating hours since last reset)
Fixture Power (displays Max Power Limit setting, in Watts, Present Power consumed by fixture, in Watts, and Hrs of use)
Fixtures Status (displays current operational temperature, LED status, and fan speed setting)
Control
The PLProfile1 can be controlled using DMX protocol. Units are fitted with XLR5 in/out connectors.
Basic DMX512 installation consists of connecting multiple luminaires together (up to 32 luminaires) in „daisy-chain‟ fashion. A
cable runs from the DMX512 control source to the DMX connector on the first luminaire. Another cable is then connected from
the first luminaire to a dmx connector on the next luminaire, or device to be controlled, and so on.
DMX Addressing
The default address for the PLProfile1 is “001”.
The individual luminaire DMX address can be set by scrolling left or right from the main menu screen and selecting „OK‟ when on
the DMX Address Status Screen. The unit requires between 3 to 15 DMX channels, depending on the DMX mode.
DMX Channel
Parameter
16-bit Mode
8-bit Mode
3-Channel Mode
1
Intensity –High
Intensity
Intensity
2
Intensity –Low
Red
Preset Colour Selection
3
Red –High Byte
Green
Timing
4
Red –Low Byte
Blue
5
Green –High Byte
White
6
Green –Low Byte
Preset Colour Selection
7
Blue –High Byte
Not used (for future use)
8
Blue –Low Byte
Timing
9
White –High Byte
Control
10
White –Low byte
11
Preset Colour Selection
12
Not used (for future use)
13
Intensity Time
14
Colour Time
15
Control
Security
In the settings menu each feature (General, Presets, DMX, Fan Display) can be locked to prevent tampering.
A 4-digit password can be set for each of three different levels of security, within the settings menu, when in security level 3.
The fixture can be locked by scrolling to „Lock Fixture‟ in the menu and choosing „Yes‟ when asked if you want to lock the fixture.
To unlock the fixture the chosen password will be required.
Service and Maintenance
Philips Selecon has manufactured this luminaire in accordance with recognised best practices to recommended international
safety standards. It is your responsibility to maintain this luminaire in good and safe working condition. Repairs should only be
carried out by suitably qualified persons. Do not operate the luminaire with cracked body, damaged cable etc. Consult your
Philips Selecon distributor for assistance. Only replace damaged parts with authorised Philips spares.
Being a solid-state fixture the PLProfile1 requires very little routine maintenance by the user.
LIMITED 3-YEAR WARRANTY
Philips Selecon warrants its luminaires against defects in materials or workmanship. The term of this warranty is based
on the product usage and is from the date of delivery. Entertainment, Theatre relates to the typical conditions found in
a theatre performance venue viz: 4 –6 hrs per day, six days per week.
WARRANTY REGISTRATION: www.seleconlight.com/warrantyreg
Take full advantage of the Philips Selecon service commitment and register all your new Philips Selecon luminaires quickly
and easily online for full after-sales support.
If you require further assistance please contact your Philips Selecon dealer: www.seleconlight.com/distributors
These luminaires are not suitable
for outdoor use. They do not have
an IP rating.
Other Selecon Lighting Equipment manuals

Selecon
Selecon Pacific Dowser User manual

Selecon
Selecon Pacific 19PACLMCOV User manual

Selecon
Selecon High Performance Fresnel User manual

Selecon
Selecon PLPROFILE4 MKII User manual

Selecon
Selecon Rama Fresnel Series User manual

Selecon
Selecon MaxAV User manual

Selecon
Selecon ACCLAIM FRESNEL User manual

Selecon
Selecon 5.5-13 User manual
Popular Lighting Equipment manuals by other brands


Wetelux
Wetelux H-700 instruction manual

PLG
PLG LINEA A 3 user manual

Upland
Upland Umbrella Continuous Lighting Kit quick start guide

Whelen Engineering Company
Whelen Engineering Company Vertex LED Lighthead installation guide

KOZii
KOZii KLSBK5VBCCT instruction manual

Larson Electronics
Larson Electronics EPL-HB-150LED-RT-JB2-25-BCE instruction manual


