manuals.online logo
Brands
  1. Home
  2. •
  3. Brands
  4. •
  5. SelectBlinds
  6. •
  7. Indoor Furnishing
  8. •
  9. SelectBlinds Cordless Roller Shades User manual

SelectBlinds Cordless Roller Shades User manual

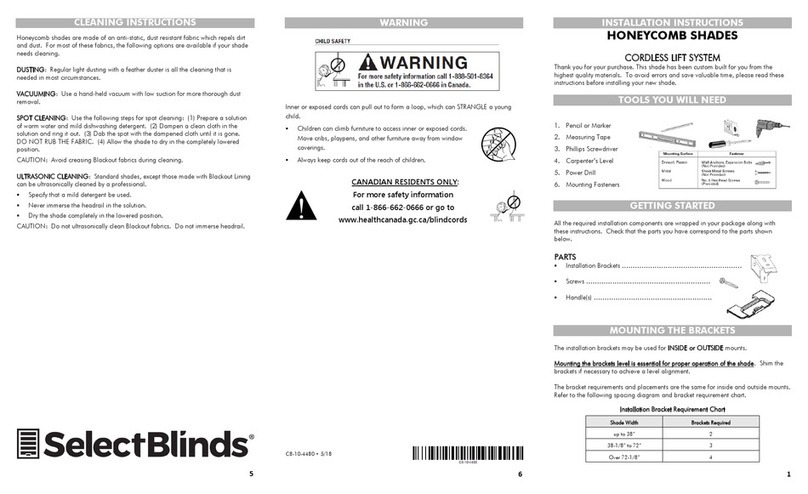
INSTALLATION INSTRUCTIONS – ROLLER SHADES
Tools Required:
Tape measure, pencil, drill, drill bits, screw driver, step
stool or ladder.
Note: use a 5/64” drill bit to pre-drill the screw holes
(for attachment to a wall stud or header board). Use
Wall Anchors (not included) for hollow dry wall or plaster
mounting.
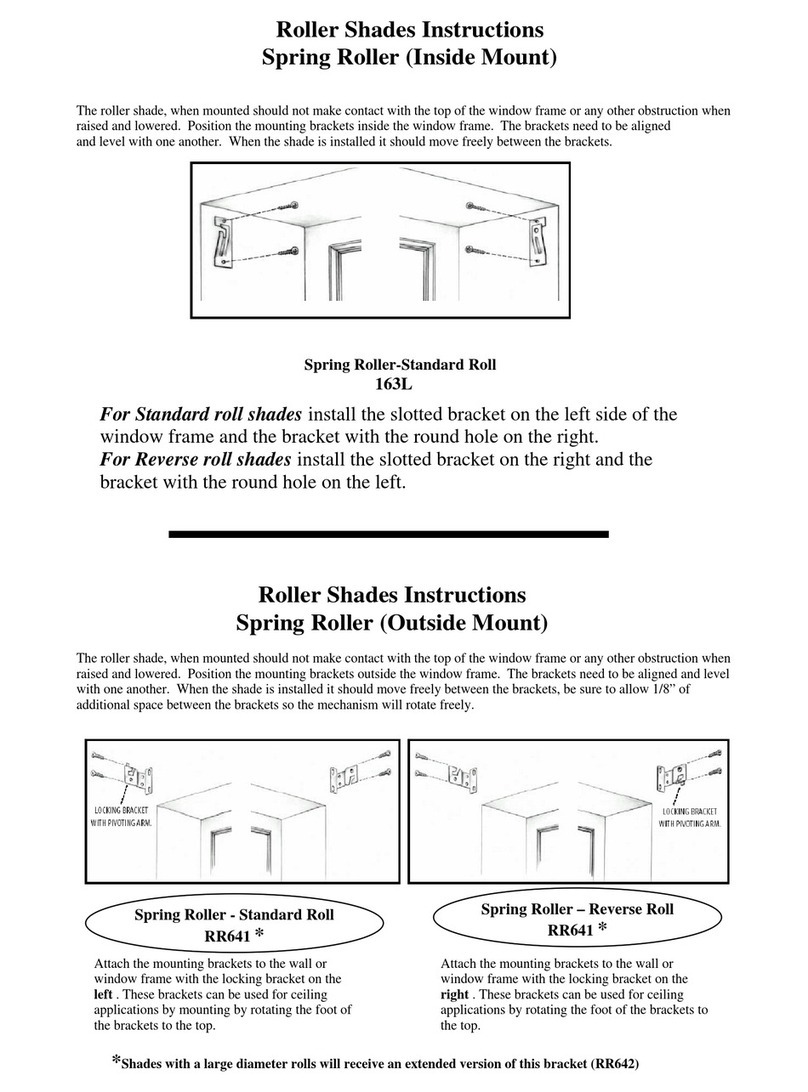
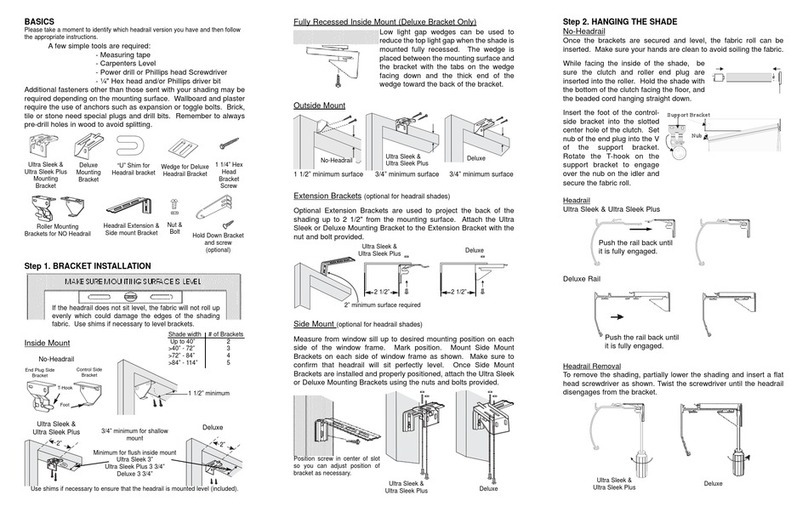
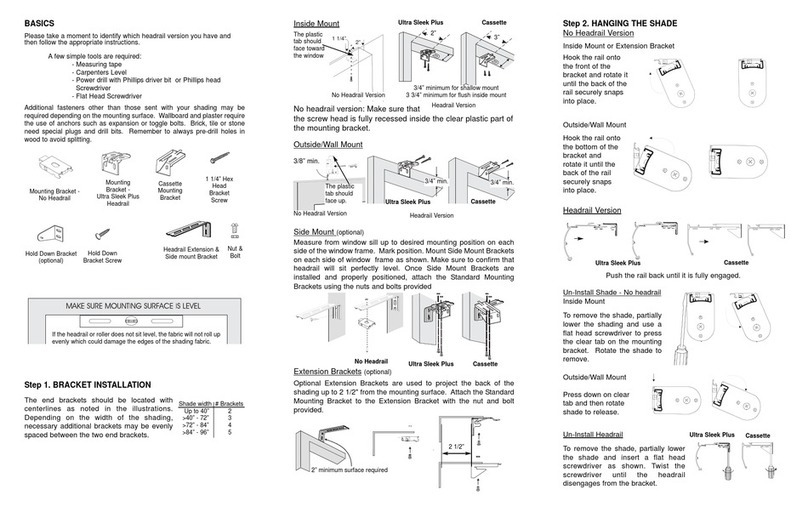
Step 1. Mount the Brackets
attach the brackets to the window frame, molding or
ceiling as shown. The brackets are “universal” – there
are no “right” and “left” brackets. Mark the screw
locations with a pencil – pre-drill the screw holes using
a 5/64” drill bit.
Step 2. Install the Shade
Put the spring loaded pin into the round hole of the
bracket, push the spring loaded tip into the bracket,
and then insert the hook arms on the opposite side of
the shade into the two hook arm receiver holes of the
bracket. Once the two hook arms are through the holes,
gently pull down until the two hook arms have locked securely to the bracket. For cord control
shades, the bottom of the clutch should always point straight down.
Step 3. Install the Bracket Covers
– For Outside Mount Shades Only!
Bracket covers slide onto the brackets as shown until
they snap into position.
Step 4. Install the Chain Tension Device
The tension device must be installed to make sure the
shade is fully operable.
Before doing anything, you must first slide the tension
device to the bottom of the bead chain.
While holding the tension device in one hand, pull the plunger away from the bead chain with the
other hand. Lift the bead chain out of the bead locking groove and slide the tension device to the
bottom of the chain loop.
Pull the tension device down until the bead chain is fully tensioned (plunger will be at the top)
and then move the tension device up appoximately 1/8”.
Mark the screw hole locations on the wall with a pencil.
Inside Mount: if mounting into wood, pre-drill screw holes and then install the tension device
using the 1¼” Phillips head screws provided.
If not securing into wood, use appropriate anchors for the substrate and follow anchor
manufacturer’s instructions.
Outside Mount: Align the mounting bracket screw holes with the pencil marks.
If mounting into wood, pre-drill screw holes and then install the mounting bracket using the 1¼”
Phillips head screws provided.
If not securing into wood, use appropriate anchors for the substrate and follow manufacturer’s
instructions.
Press the tension device onto the mounting bracket posts. Carefully attach the Tension Device to
the bracket using the 3/8” Phillips head screws provided. DO NOT OVER-TIGHTEN.
Step 5. Operating the Shade
Pulling gently on the cord in one direction raises the shade; pulling it in the other direction lowers
it. On shades where the fabric rolls against the window, the front cord lifts the shade. On shades
where the fabric rolls toward the room, the rear cord lifts the shade.
Step 6. Hold Down Brackets for Outdoor Shades
The elastic straps on each side of the bottom rail loop onto
the open ‘C’ section of the hold down brackets as illustrated.
Attach the hold down brackets to a wall, post or other solid
surface. Use 1” screws (or screws and anchors) to attach the
brackets. Put tension on the straps by stretching them when
positioning the brackets.
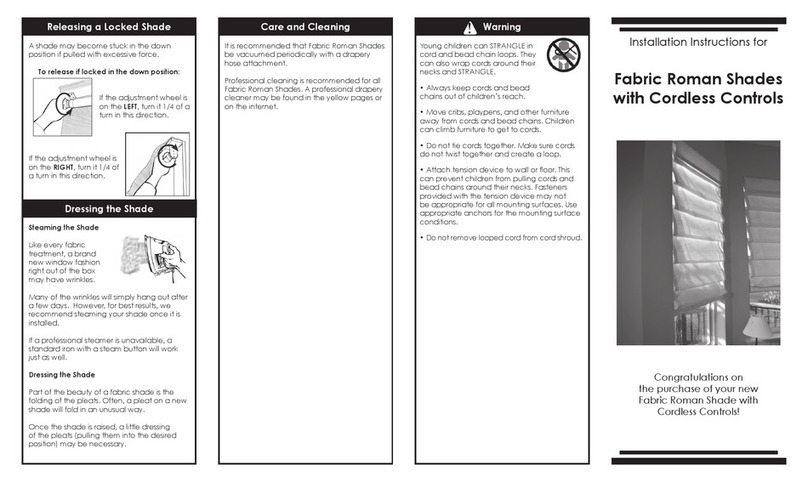
Cleaning the Shades
Dusting: Vacuum using the soft brush attachment. Washing:
Use a cloth, sponge or soft brush and a mild detergent. Use warm or cold water, not hot water.
Place toweling on the floor or window sill and wash the blind in sections.
REPLACEMENT PARTS
In the event that replacement parts are ever needed, you may call: 1-800-264-1190.
Please be sure to provide the following information, if possible:
• The complete model or catalog number of your product
• A description of the product
• A description of the part needed
continue >>
Tension
Device &
Bracket for
Outside
Mount
Chain
Tension
Device
Bracket for
Outside Mount
INSTALLATION INSTRUCTIONS – ROLLER SHADES
Warranty Remedy:
This shall be your sole remedy under this limited warranty.
If this product is found to have a manufacturing defect in materials or workmanship, we
will, at our discretion, do one of the following:
• Repair the product
• Replace the product
• Refund the cost of the product
Colors may vary from lot to lot and may not exactly match sample swatches or previous purchases.
Discontinued items or color selections will be replaced with the closest equivalent current product.
Your rights under state law: This lifetime limited warranty gives you specific legal rights, and you
may have other rights which vary from state to state. Some states do not allow limitations on how
long a warranty lasts, so the above limitations may not apply to you. No agent, representative, dealer
or unauthorized employee has the authority to increase or alter the obligation of this warranty. This
lifetime limited warranty supersedes any previous versions.
LIMITED LIFETIME WARRANTY
The enclosed product is warranted to the original residential retail purchaser as long as the product
remains in the original window.
Covered
Lifetime: Entire product against manufacturing defects (i.e. a flaw in the product design, materials, or
workmanship that causes the product to no longer function.
3 Years: Cords, including internal cords such as those found in cordless blinds or shades.
5 Years: All fabric
Not Covered
1. Normal wear and Tear
2. Any product that fails due to:
• Abuse • Alterations
• Exposure to salt air • Improper cleaning
• Improper installation • Misapplication
• Accident • Damage from pests/insects/pets
• Extraordinary use • Improper handling
• Improper operation • Misuse
3. Natural Wood Products that have:
• Loss of color intensity
• Variations in color, grain or texture
• Warping of wood slats in high humidity areas
4. Costs associated with:
• Product removal • Transportation to and from the retailer
• Brand label removal • Product re-measure
• Product reinstallation • Shipping
• Incidental or consequential damages
In the event there are multiple blinds/shades in the same room, only the defective blind/shade will
be replaced
To Report Shipping Damage:
If damage occurred during shipping, call the place of purchase and report within 7 calendar days, or
you may be denied credit for your damaged product.
To Obtain Service:
If you suspect this product has a manufacturing defect in materials or workmanship:
• Locate the sales receipt
• Call place of purchase
Any unauthorized returns will not be accepted.

Other manuals for Cordless Roller Shades

2

Other SelectBlinds Indoor Furnishing manuals

SelectBlinds Cordless Cellular Fabric Shade User guide
SelectBlinds

SelectBlinds Cordless Cellular Fabric Shade User guide

SelectBlinds Classic Roman Shades User manual
SelectBlinds

SelectBlinds Classic Roman Shades User manual

SelectBlinds Cordless Honeycomb Shades Manual
SelectBlinds

SelectBlinds Cordless Honeycomb Shades Manual

SelectBlinds STANDARD RECTANGULAR CORDLESS LIFT & LOCK HONEYCOMB... User manual

SelectBlinds

SelectBlinds STANDARD RECTANGULAR CORDLESS LIFT & LOCK HONEYCOMB... User manual

SelectBlinds Architect Roman Shades User manual

SelectBlinds

SelectBlinds Architect Roman Shades User manual

SelectBlinds Classic Roman Shades User manual

SelectBlinds

SelectBlinds Classic Roman Shades User manual

SelectBlinds Sheer Horizontal Window Shadings User manual

SelectBlinds

SelectBlinds Sheer Horizontal Window Shadings User manual

SelectBlinds Cellular Push Button Cordless Honeycomb... User manual

SelectBlinds

SelectBlinds Cellular Push Button Cordless Honeycomb... User manual

SelectBlinds Architect Roman Shades User manual

SelectBlinds

SelectBlinds Architect Roman Shades User manual

SelectBlinds Roller Shade Operation manual

SelectBlinds

SelectBlinds Roller Shade Operation manual

SelectBlinds Cordless Cellular Fabric Shade User guide

SelectBlinds

SelectBlinds Cordless Cellular Fabric Shade User guide

SelectBlinds Cordless Roller Shades User manual

SelectBlinds

SelectBlinds Cordless Roller Shades User manual

SelectBlinds Dual E Series User manual

SelectBlinds

SelectBlinds Dual E Series User manual

SelectBlinds Cordless Honeycomb Shades User manual

SelectBlinds

SelectBlinds Cordless Honeycomb Shades User manual

SelectBlinds Fabric Roman Shades with Cordless Controls User manual

SelectBlinds

SelectBlinds Fabric Roman Shades with Cordless Controls User manual

SelectBlinds Banded Fabric Loop Roller Shade User guide

SelectBlinds

SelectBlinds Banded Fabric Loop Roller Shade User guide

SelectBlinds ROMAN User manual

SelectBlinds

SelectBlinds ROMAN User manual

SelectBlinds Roller Shade User manual

SelectBlinds

SelectBlinds Roller Shade User manual
SelectBlinds Custom Woven Natural Shades User guide

SelectBlinds

SelectBlinds Custom Woven Natural Shades User guide

SelectBlinds CORDLESS LIFT SYSTEM HONEYCOMB SHADE User manual

SelectBlinds

SelectBlinds CORDLESS LIFT SYSTEM HONEYCOMB SHADE User manual

SelectBlinds RollEase User manual

SelectBlinds

SelectBlinds RollEase User manual
SelectBlinds Inside Mount Spring Roller User manual

SelectBlinds

SelectBlinds Inside Mount Spring Roller User manual

Popular Indoor Furnishing manuals by other brands
RUSTA ZANZIBAR manual

RUSTA

RUSTA ZANZIBAR manual

HB Moveis SONHARE 1.8 8350 Assembly instructions

HB Moveis

HB Moveis SONHARE 1.8 8350 Assembly instructions

Okamura T1 Series Instructions for use

Okamura

Okamura T1 Series Instructions for use

UpDown Desk PRO Series Install manual

UpDown Desk

UpDown Desk PRO Series Install manual

Titus Stefano Orlati Tekform DW70 Assembly instructions

Titus

Titus Stefano Orlati Tekform DW70 Assembly instructions

RH STACKED CANOPY BED instructions

RH

RH STACKED CANOPY BED instructions

Tradecraft Specialties LMSHLF-1 instruction manual

Tradecraft Specialties

Tradecraft Specialties LMSHLF-1 instruction manual

Hodedah 98802 Assembly instruction

Hodedah

Hodedah 98802 Assembly instruction

Trendteam TIME MEDIA installation instructions

Trendteam

Trendteam TIME MEDIA installation instructions

Ceriotti Wizzy 7259 manual

Ceriotti

Ceriotti Wizzy 7259 manual

Cooper Lighting Square Straight Aluminum SSA Specification sheet

Cooper Lighting

Cooper Lighting Square Straight Aluminum SSA Specification sheet

Allen + Roth WSWS-CS1C Assembly instruction

Allen + Roth

Allen + Roth WSWS-CS1C Assembly instruction

Furniture of America CM6216-LV Assembly instructions

Furniture of America

Furniture of America CM6216-LV Assembly instructions

Arblu TULIP COLONNA GIREVOLE Assembly instructions

Arblu

Arblu TULIP COLONNA GIREVOLE Assembly instructions

Allsteel Universal Screens installation instructions

Allsteel

Allsteel Universal Screens installation instructions

Bear chair BC201 instructions

Bear chair

Bear chair BC201 instructions

Mayer MyArti 2454 Assembly instructions

Mayer

Mayer MyArti 2454 Assembly instructions

Populas Infinity 4836GT Assembly instructions

Populas

Populas Infinity 4836GT Assembly instructions

manuals.online logo
manuals.online logoBrands
  • About & Mission
  • Contact us
  • Privacy Policy
  • Terms and Conditions

Copyright 2025 Manuals.Online. All Rights Reserved.