Sena SMH10 User manual

User's Guide
www.senabluetooth.com

SMH10
English
© 1998-2013 Sena Technologies, Inc. All rights reserved.
Sena Technologies, Inc. reserves the right to make any changes and improvements to its product without providing prior notice.
Sena™ is a trademark of Sena Technologies, Inc. or its subsidiaries in the USA and other countries. SMH10™, SMH10R™, SMH5™, SMH5-
FM™, SPH10™, SPH10H™, SPH10H-FM™, SPH10S™, SR10™, SM10™ are trademarks of Sena Technologies, Inc. or its subsidiaries. These
trademarks may not be used without the express permission of Sena.
The Bluetooth®word mark and logos are owned by the Bluetooth SIG, Inc. and any use of such marks by Sena is under license. iPhone, iPod
touch are the registered trademark of Apple Inc. Zumo™ is a trademark of Garmin Ltd. or its subsidiaries. TomTom™ is the trademark or
registered trademark owned by TomTom International B.V. Other trademarks and tradenames are those of their respective owners.

SMH10
CONTENTS
1. INTRODUCTION........................................................................................................................ 5
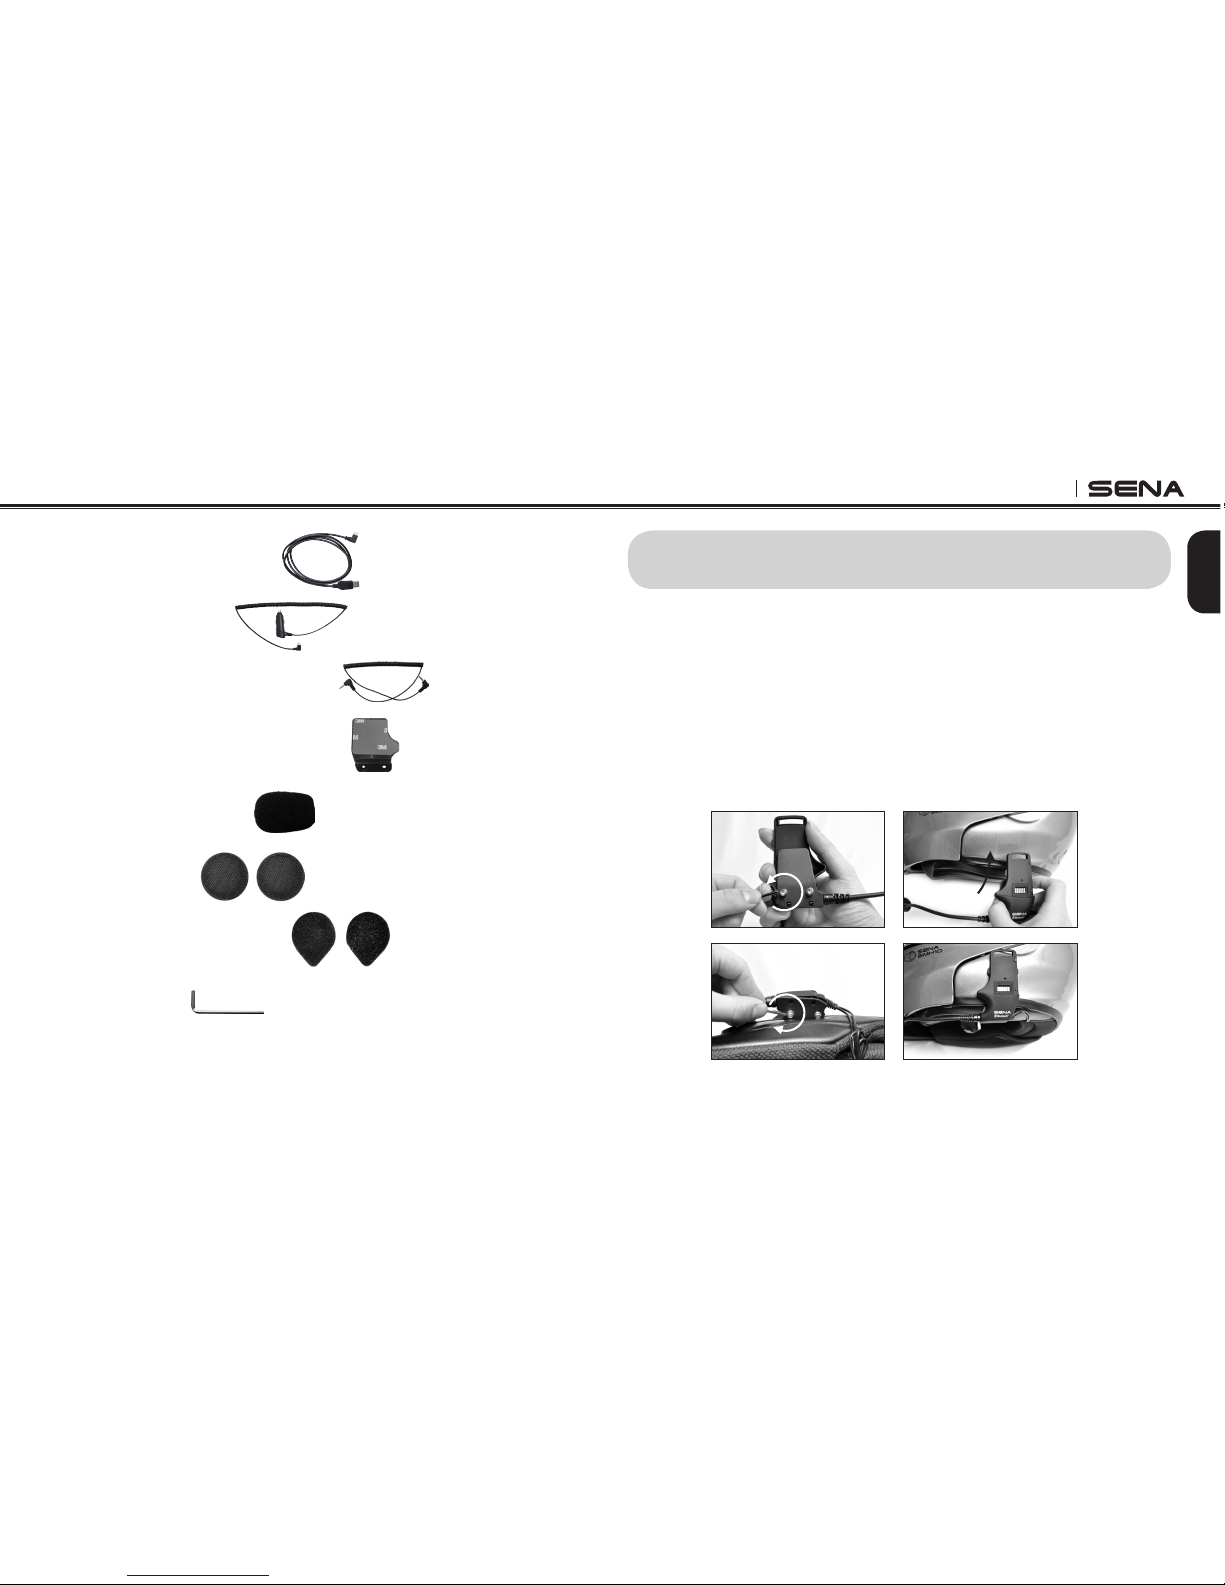
2. PACKAGE CONTENTS ............................................................................................................. 6
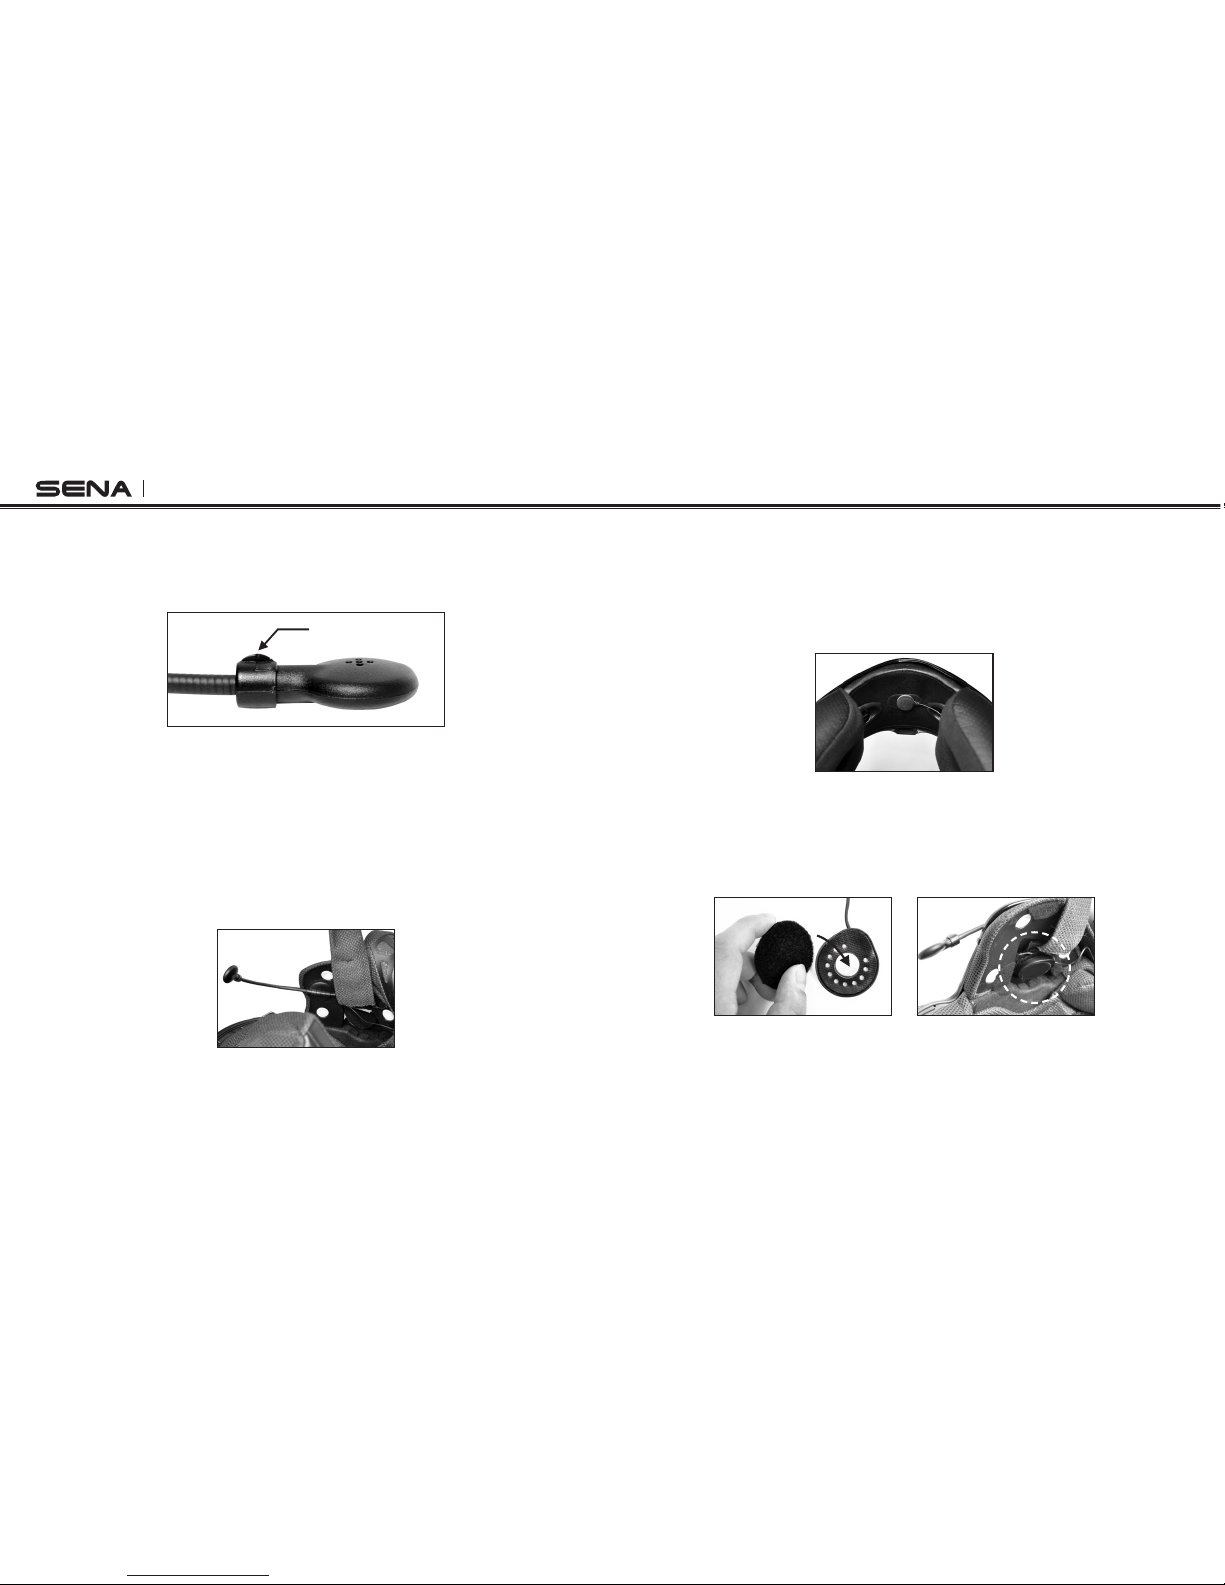
3. INSTALLING THE SMH10 ON YOUR HELMET........................................................................ 7
4. POWERING ON/OFF AND CHARGING.................................................................................. 10
4.1 Powering On.................................................................................................................... 10
4.2 Powering Off.................................................................................................................... 10
4.3 Charging ......................................................................................................................... 10
4.4 Low Battery Warning....................................................................................................... 10
4.5 Checking the Battery Level............................................................................................. 10
5. VOLUME ADJUSTMENT......................................................................................................... 11
6. PAIRING THE SMH10 WITH BLUETOOTH DEVICES ........................................................... 11
6.1 Mobile Phone Pairing ...................................................................................................... 11
6.2 Multipoint Pairing............................................................................................................. 12
6.3 Bluetooth Stereo Device Pairing ..................................................................................... 12
6.4 Bluetooth GPS Navigation Pairing................................................................................... 13
6.5 Pairing with the Sena SR10, Bluetooth Two-way Radio Adapter ................................... 15
7. PAIRING WITH SELECTIVE PROFILE: A2DP STEREO OR HANDSFREE .......................... 16
7.1 A2DP Stereo Music Only................................................................................................. 16
7.2 HFP for Phone Call Only.................................................................................................. 17
8. INTERCOM PAIRING .............................................................................................................. 17
8.1 Pairing with Other SMH10 Headsets for Intercom Conversation.................................... 17
8.2 Pairing with Other Sena Headset Models for Intercom Conversation............................. 18
9. SMH10 CONFIGURATION SETTING ..................................................................................... 19
9.1 Enabling/Disabling Voice Activated Phone Answering .................................................. 19
9.2 Enabling/Disabling Voice Activated Intercom ................................................................ 20
9.3 Enabling/Disabling Voice Prompts.................................................................................. 20
9.4 Delete all Bluetooth Pairing Information ......................................................................... 20
9.5 Exit Voice Configuration Menu ....................................................................................... 21
10. FUNCTION PRIORITY............................................................................................................. 21
11. STEREO MUSIC ...................................................................................................................... 22
11.1 By Stereo Audio Cable.................................................................................................... 22
11.2 By Bluetooth Wireless Stereo ......................................................................................... 22
12. MOBILE PHONE CALL MAKING AND ANSWERING............................................................. 23
13. TWO-WAY INTERCOM ........................................................................................................... 24
13.1 Start and End Two-way Intercom .................................................................................... 24
13.2 Intercom and Mobile Phone Call..................................................................................... 25
13.3 Intercom and GPS .......................................................................................................... 25
13.4 Intercom and Two-way Radio.......................................................................................... 26
14. THREE-WAY CONFERENCE INTERCOM ............................................................................. 27
14.1 Start Three-way Intercom................................................................................................ 27
14.2 End Three-way Intercom ................................................................................................. 28
15. FOUR-WAY CONFERENCE INTERCOM ............................................................................... 29
15.1 Start Four-way Intercom .................................................................................................. 29
15.2 End Four-way Intercom ................................................................................................... 29
16. THREE-WAY CONFERENCE PHONE CALL WITH INTERCOM PARTICIPANT .................. 30
17. INTERCOM FAILURE .............................................................................................................. 30
18. INTERCOM RECONNECTION ................................................................................................ 30
19. RESET TO FACTORY DEFAULT SETTINGS......................................................................... 31
20. FAULT RESET ......................................................................................................................... 31
21. FIRMWARE UPGRADE ........................................................................................................... 31
22. CASE STUDY .......................................................................................................................... 32
23. OPERATION QUICK REFERENCE........................................................................................ 35
BATTERY INFORMATION............................................................................................................ 36
MAINTENANCE AND CARE......................................................................................................... 36
DISPOSAL..................................................................................................................................... 37
CERTIFICATION AND SAFETY APPROVALS............................................................................. 37
• FCC RF Exposure Statement................................................................................................ 38
• FCC Caution ......................................................................................................................... 38
• CE Declaration of Conformity ............................................................................................... 38
• Industry Canada Statement.................................................................................................. 38
• Bluetooth License................................................................................................................. 38
WAIVER AND GENERAL RELEASE ............................................................................................ 39
• Two-Year Limited Warranty ................................................................................................... 40
• Limitation of Liability ............................................................................................................. 41
• Return for Full Refund........................................................................................................... 41
WARNING ..................................................................................................................................... 42

SMH10
5
English
1. INTRODUCTION
Thank you for choosing the Sena SMH10, Bluetooth Stereo Headset
and Intercom for Motorcycles. With the SMH10, you can call
handsfree on your Bluetooth mobile phone, listen to stereo music or
voice instructions of GPS navigations by Bluetooth wirelessly, and
have intercom conversations in full duplex with a passenger or other
motorcycle riders.
The SMH10 is compliant with the Bluetooth 3.0 supporting the following
profiles: Headset Profile, Hands-Free Profile (HFP), Advanced Audio
Distribution Profile (A2DP), and Audio Video Remote Control Profile
(AVRCP). Please check with the manufacturers of other devices to
determine their compatibility with this headset.
Please read this user’s guide carefully before using the headset. Also
check www.senabluetooth.com/support for the latest version of
the user’s guide and additional information related to Sena Bluetooth
products.
The SMH10 features:
•Bluetooth handsfree for Bluetooth mobile phones
•Bluetooth stereo headset for Bluetooth audio devices such as MP3
players
•Bluetooth stereo headset for Bluetooth GPS navigations
•Bluetooth intercom up to 900 meters (980 yards)*
•Four-way conference intercom
•Three-way conference phone call with intercom participant
•Multipoint Bluetooth pairing with GPS navigation or Sena SR10
two-way radio adapter
•Multipoint Bluetooth pairing for 2 mobile phones
•Stereo music by 3.5mm audio cable
•Firmware upgradeable
Key Specifications:
•Bluetooth 3.0
•Supporting profiles: Headset Profile, Hands-Free Profile (HFP),
Advanced Audio Distribution Profile (A2DP), Audio Video Remote
Control Profile (AVRCP)
* in open terrain

SMH10
6
SMH10
2. PACKAGE CONTENTS
• Headset Main Unit
SMH10
Jog Dial
• Answer and end a mobile phone call
• Reject an incoming mobile phone call
• Start and end intercom conversation
• Volume adjustment by rotating
• Play and pause Bluetooth stereo device
• Track-forward and track-back by rotating while pressing the
button
• Enter into intercom pairing mode
• Enter into voice configuration setting
• Navigate through configuration menu
Phone Button
• Answer and end a mobile phone call
• Redial last number
• Call transfer between mobile phone and headset
• Enter into mobile phone pairing mode
• Enter into Bluetooth stereo device paring mode
• Enter into factory reset mode
DC Power Charging & Firmware Upgrade Port
MP3 Jack
Microphone
Speakers
• Clamp and Speakers
• Boom Microphone
• Wired Microphone
• Clamp Unit
- Speaker-Microphone Clamp Unit - Basic Kit
(SMH10-10/SMH10D-10)
- Speaker-Microphone Clamp Unit with Universal Microphone Kit
(SMH10-11/SMH10D-11)

SMH10
7
English
3. INSTALLING THE SMH10 ON YOUR HELMET
To securely install the SMH10 on the helmet, please follow the
procedure.
1. Loosen the two screws on the back plate of the speaker-
microphone clamp unit using the enclosed Allen Wrench. Insert
the back plate of the clamp unit between the internal padding and
external shell of the helmet, and tighten the two screws. Please
make sure that the microphone is located properly close to your
mouth when you wear the helmet.
Insert
• USB Power & Data Cable
• Cigarette Charger
• 3.5mm Stereo Audio Jack Cable
• Glued Surface Mounting Adapter
• Microphone Sponges
• Speaker Pads
• Velcro Pads for Speakers
• Allen Wrench

SMH10
8
2. Please adjust the direction of the microphone so that the fin side
of the microphone is facing outward; away from your lips. You can
easily recognize it by touching the fin with your fingers.
fin
When installing the boom microphone included in the “Universal
Microphone Kit”, place the velcro end of the boom microphone
between the internal helmet cheek pad and the internal wall of the
helmet shell. The boom microphone should be mounted so it is
facing close to your mouth when you wear the helmet. You can use
the enclosed velcro pad and holder for the boom microphone to
ensure secure placement.
In the case of the wired microphone also included in the “Universal
Microphone Kit”, attach the enclosed velcro pad for wired
microphone to the inside of the chin guard for full-face helmets.
Place the wired microphone on the velcro pad and connect it to the
connector of the clamp unit.
3. Place the helmet speakers along with the velcro pads, centered to
your ear, in the ear pockets of the helmet. If the helmet has deep
ear pockets, you can use the speaker pads to place the speakers
closer to your ears.

SMH10
9
English
4. If you have any problem to clamp the speaker-microphone unit
on the helmet for any reason, you may use the glued surface
mounting adapter to attach the speaker-microphone clamp unit
on the external surface of the helmet.
•Remove the back plate of the speaker-microphone clamp unit by
loosening the two screws with the enclosed Allen Wrench.
•Attach the glued external adapter to the speaker-microphone
clamp unit by tightening the two screws instead of the removed
back plate.
•Locate a proper surface on the helmet to attach the unit, clean
the helmet surface location with a moistened towel, and allow to
dry thoroughly.
•Peel off the cover of the adhesive tape of the adapter and attach
the unit on the proper surface of your helmet.
Attach
Sena recommends the clamp unit over the glued surface
mounting adapter. Even though the glued surface mounting
adapter is provided for convenience, Sena does not assume
English
any responsibility for use of it. Users may have to use the glued
adapter at their own risk and responsibility.
5. Attach the headset main unit to the speaker-microphone clamp
unit. Insert the bottom part of the main unit completely into the
lower slot of the clamp unit first. Then push the upper part of the
main unit until it clicks into the upper holder of the clamp unit.
6. To remove the main headset from the speaker-microphone clamp
unit, hold the lower part of the speaker-microphone clamp unit
with your thumb and gently press down the hook on the upper part
of the headset main unit with your index finger until it clicks out.
You may have to do this to charge up or to carry the headset main
unit.
English

SMH10
10
4. POWERING ON/OFF AND CHARGING
To power on and off the headset, you don’t need to press and hold
any button for several seconds. Just short press the Jog Dial and
the Phone Button simultaneously, and you will get quick on-and-off
convenience.
4.1 Powering On
Press the Jog Dial and the Phone Button at the same time for about
1 second to power on. The blue LED turns on and you will hear
ascending beeps.
4.2 Powering Off
Just short press the Jog Dial and the Phone Button simultaneously,
you don’t need to press and hold for a few seconds. The red LED
turns on for a while until it turns off completely and you will hear
descending beeps.
4.3 Charging
The LED turns on red while charging, and turns to blue when the
headset is fully charged. It takes about 2.5 hours to be completely
charged.
4.4 Low Battery Warning
When the battery is low, the blinking blue LED in stand-by mode turns
to red and you will hear mid-tone triple beeps and a voice prompt
saying “Low battery”.
4.5 Checking the Battery Level
You can check the battery level in two different ways when the
headset is powering on.
4.5.1 LED Indicator
When the headset is powering on, the red LED flashes rapidly
indicating the battery level.
4 flashes = High, 70~100%
3 flashes = Medium, 30~70%
2 flashes = Low, 0~30%
4.5.2 Voice Prompt Indicator
When you power on the headset, keep pressing the Jog Dial and
Phone Button simultaneously for about 3 seconds until you hear
high tone triple beeps. Then you will hear voice prompt indicating
the battery level. However, if you release the buttons as soon as the
headset turns on, you will not hear the voice prompt of battery level
indication.

SMH10
11
English
5. VOLUME ADJUSTMENT
You can easily adjust the volume by rotating the Jog Dial. You will
hear a beep when the volume reaches maximum or minimum level.
The volume is set and maintained independently at different levels
for each audio source even when you turn off and on the headset.
For example, once you set the volume for mobile phone handsfree,
it will not change even if you adjust the volume when you hear
Bluetooth MP3 music. So you can always maintain the preferred
optimum volume level for each audio source.
6. PAIRING THE SMH10 WITH BLUETOOTH DEVICES
Before using the SMH10 Bluetooth headset with any of Bluetooth
devices for the first time, you need to do the pairing operation. It can
be paired with Bluetooth mobile phones, Bluetooth stereo devices
such as MP3, or motorcycle specific Bluetooth GPS, and with other
Sena Bluetooth headsets. This pairing operation is only required
once for each Bluetooth device. The headset will remain paired with
the devices and automatically connects to the paired devices again
when they are within range. You will hear a high tone single beep
and a voice prompt when the headset connects to the paired device
automatically: “Phone connected” to a mobile phone, “Media
connected” to a Bluetooth stereo device.
6.1 Mobile Phone Pairing
1. Turn on the SMH10 and press the Phone Button for 5 seconds until
the LED flashes red and blue alternately and you hear multiple
beeps. You will hear a voice prompt saying “Phone pairing”.
2. Search for Bluetooth devices on your mobile phone. Select the
Sena SMH10 in the list of the devices detected on the mobile
phone.

SMH10
12
3. Enter 0000 for the PIN. Some mobile phones may not ask for the
PIN.
4. The mobile phone confirms that pairing has completed and the
SMH10 is ready to use. You will hear a voice prompt from the
SMH10 saying “Your headset is paired”.
5. If the pairing process is not completed within three minutes, the
SMH10 will return to stand-by mode.
6.2 Multipoint Pairing
Typical Bluetooth headsets can connect with only one HFP (Hands-
Free Profile) device, but multipoint pairing allows the headset to
connect with two HFP devices at the same time. So, when you already
have a mobile phone connected with the SMH10, you can also pair
and connect a second mobile phone or other HFP devices such as
GPS or Sena SR10, Bluetooth adapter.
1. To pair the second mobile phone, press the Jog Dial for 5 seconds
again until the red LED is rapidly flashing and you hear multiple
beeps.
2. Within 2 seconds, tap the Phone Button again, then the LED turns
to blue flashing and the beeps turn to high tone double beeps. You
will hear a voice prompt saying “Multipoint pairing”.
3. Search for Bluetooth devices on your mobile phone. Select the
Sena SMH10 in the list of the devices detected on the mobile
phone.
4. Enter 0000 for the PIN. Some mobile phones may not ask for the
PIN.
5. The mobile phone confirms that pairing has completed and the
SMH10 is ready to use. You will hear a voice prompt from the
SMH10 saying “Your headset is paired”.
6. If you want to pair a GPS by multipoint pairing, search for the
Bluetooth device on the GPS screen, and select the Sena SMH10
at step 3. Please refer to the section “6.4.1 Multipoint GPS Pairing”
for more details.
7. If you want to pair the Sena SR10, Bluetooth adapter, please refer
to the section “6.5 Pairing with the Sena SR10, Bluetooth Two-way
Radio Adapter”.
6.3 Bluetooth Stereo Device Pairing
1. If the Bluetooth stereo device is integrated with the mobile phone
such as smartphones, you don’t need to pair the SMH10 with it
separately. When the SMH10 is paired with the mobile phone, it is
also paired as a stereo music device.
2. If you have a stand alone Bluetooth stereo device, follow the paring
procedure separately. The procedure is the same as the procedure
in “6.1 Mobile Phone Pairing”.

SMH10
13
English
Note:
1. If Bluetooth connection between the headset and a mobile phone
is disconnected, tap the Phone Button to recover the Bluetooth
connection immediately.
2. If Bluetooth connection between the headset and a media player is
disconnected, press the Jog Dial for 1 second to recover the Bluetooth
connection and play.
6.4 Bluetooth GPS Navigation Pairing
You can listen to voice instruction from Bluetooth GPS navigation.
Some GPS systems use mobile phone profile (HFP, Hands-Free
Profile) and others use stereo music profile (A2DP, Advanced
Audio Distribution Profile). Most motorcycle specific GPS systems
use mobile phone profile for turn-by-turn voice instruction. You can
simultaneously use a mobile phone and a GPS which uses mobile
phone profile by one of the following procedures.
6.4.1 Multipoint GPS Pairing
If you use GPS only for turn-by-turn voice instructions, not for Bluetooth
stereo music streaming, multipoint pairing is recommended for the
GPS connection. Multipoint Bluetooth pairing allows the SMH10
to connect two HFP devices at the same time: mobile phone and
GPS navigation. Follow the steps below to pair the GPS using the
multipoint pairing.
1. Turn on the headset and press the Jog Dial for 5 seconds until the
red LED is rapidly flashing and you hear multiple beeps.
2. Within 2 seconds, tap the Phone Button again, then the LED turns
to blue flashing and the beeps turn to high tone double beeps.
You will hear a voice prompt saying “Multipoint pairing”.
3. Search for Bluetooth devices on the GPS navigation screen.
Select the Sena SMH10 in the list of the devices detected on the
GPS.
4. Enter 0000 for the PIN.
5. The GPS confirms that pairing has completed and the SMH10 is
ready to use. You will hear a voice prompt from the SMH10 saying
“Your headset is paired”.
6. If the pairing process is not completed within three minutes, the
SMH10 will return to stand-by mode.

SMH10
14
The pairing diagram for multipoint GPS pairing is shown in the figure
below.
Smart Phone
SMH10 GPS
HFP
+
A2DP
Mobile Phone
Pairing
Multipoint
Pairing
HFP
Multipoint GPS Pairing
6.4.2 GPS Pairing as Mobile Phone
If GPS is not only used for turn-by-turn voice instructions but also
is your preferred Bluetooth stereo music source, you can pair the
GPS to the SMH10 by following the simple procedures in “6.1 Mobile
Phone Pairing”. When you do this, the SMH10 thinks the GPS is a
mobile phone so you can no longer pair your mobile phone to the
SMH10 directly. However, since some GPS systems support mobile
phone bridging over Bluetooth, you can pair the mobile phone to the
GPS to use your mobile phone. Please refer to the user’s guide of your
GPS for details.
Mobile Phone
SMH10
GPS
HFP
+
(A2DP)
Mobile Phone
Pairing
HFP
GPS Pairing as Mobile Phone
Note:
You have to use a motorcycle specific GPS which transmits turn-by-
turn voice instruction to the headset by Bluetooth. Most automotive GPS
systems don’t have this feature.

SMH10
15
English
6.5 Pairing with the Sena SR10, Bluetooth Two-way
Radio Adapter
The Sena SR10 is a Bluetooth two-way radio adapter for group
communication, and uses HFP as do most motorcycle specific GPS
navigation systems. If you pair the SMH10 with a SR10 by multipoint
pairing, the SMH10 is able to have two HFP devices at the same
time: mobile phone and Sena SR10.
1. Turn on the headset and press the Jog Dial for 5 seconds until the
red LED is rapidly flashing and you hear multiple beeps.
2. Within 2 seconds, tap the Phone Button again, then the LED turns
to blue flashing and the beeps turn to high tone double beeps.
You will hear a voice prompt saying “Multipoint pairing”.
3. Turn on the SR10 and follow the SR10’s “Bluetooth Headset
Pairing” procedure to complete the process. Please refer to the
SR10 user's guide for details.
4. When the pairing is completed, you will hear a voice prompt
saying “Your headset is paired”.
5. If the pairing process is not completed within three minutes, the
SMH10 will return to stand-by mode.
The incoming audio from the two-way radio via SR10 is heard in
the background while having an intercom conversation or a mobile
phone call. You can listen to music, answer a mobile call, have an
intercom conversation and use a two-way radio via SR10 for group
communication as shown in the figure below. A GPS navigation or
a radar detector could be connected to the SR10 by wire. The GPS
voice instruction or the radar detector alarm is also heard in the
background via SR10 while having an intercom conversation or a
phone call. Please refer to the SR10 user's guide for details.

SMH10
16
Smart Phone Two-way radio
SMH10 GPS
Sena SR10
Radar Detector
HFP
+
A2DP
Mobile Phone
Pairing
Multipoint
Pairing
HFP
Wired
Connection
Wired
Connection
Wired
Connection
Parallel Connection of SR10 and Mobile Phone by
Bluetooth Multipoint Pairing
7. PAIRING WITH SELECTIVE PROFILE:
A2DP STEREO OR HANDSFREE
If you have a MP3 stereo music phone such as a smartphone,
sometimes you may need to selectively use the SMH10 for
A2DP stereo music only or for mobile phone handsfree only. This
instruction is for advanced users who want to pair the SMH10 to their
smartphones only with one selective profile: A2DP stereo for music or
HFP for phone call.
If you have previously paired a mobile phone to the SMH10, you
must clear the previous paring list on both devices; the mobile phone
and SMH10. To clear the pairing list on SMH10, please do a factory
reset or follow the pairing list clearing procedure described in this
manual. To clear the pairing list on the mobile phone, please refer to
the mobile phone manual. For most smartphones, delete the Sena
SMH10 from the list of Bluetooth devices in setting menu.
7.1 A2DP Stereo Music Only
1. Turn on the headset and press the Phone Button for 5 seconds
until the LED flashes red and blue alternately and you hear multiple
beeps.

SMH10
17
English
2. Within 2 seconds, tap the Jog Dial again, then the LED turns to
red flashing and the beeps turn to double mid-tone beeps. You
will hear a voice prompt saying “Media selective pairing”.
3. Search for Bluetooth devices on your smartphone. Select the
Sena SMH10 in the list of devices detected on your phone.
4. Enter 0000 for the PIN. Some smartphones may not ask for PIN.
7.2 HFP for Phone Call Only
1. Turn on the headset and press the Phone Button for 5 seconds
until the LED flashes red and blue alternately and you hear
multiple beeps.
2. Within 2 seconds, tap the Phone Button again, then the LED turns
to blue flashing and the beeps turn to multiple mid-tone beeps.
You will hear a voice prompt saying “Phone selective pairing”.
3. Search for Bluetooth devices on your smartphone. Select the
Sena SMH10 in the list of devices detected on your phone.
4. Enter 0000 for the PIN. Some smart phones may not ask for PIN.
8. INTERCOM PAIRING
8.1 Pairing with Other SMH10 Headsets for Intercom
Conversation
The SMH10 can be paired with up to three other headsets for
Bluetooth intercom conversation.
1. Turn on the two SMH10 headsets (A and B) that you would like to
pair with each other.
2. Press and hold the Jog Dial of the headset A and B for 5 seconds
until red LEDs of the both units start to flash rapidly. You will hear
a voice prompt saying “Intercom pairing”.
3. Simply tap the Jog Dial of any one of the two headsets A or B
(It doesn’t matter that you choose A or B.) and wait until the
LEDs of both headsets turn to blue and intercom connection is
automatically established. The two SMH10 headsets A and B are
paired with each other for intercom conversation. If the pairing
process is not completed within one minute, the SMH10 will return
to stand-by mode.

SMH10
18
A
BD
C
Pairing A & B
4. You can make other pairings between the headset A and C, and
between the headset A and D by following the same procedure as
above.
A
BD
C
Pairing A & C
A
BD
C
Pairing A & D
5. The intercom pairing queue is ‘Last-Come, First-Served’. If a
headset has multiple paired headsets for intercom conversations,
the last paired headset is set as rst intercom friend. The
previous intercom friend becomes second intercom friend, and
third intercom friend.
Note:
For example, after the pairing procedures listed above, headset D is the
rst intercom friend of headset A. Headset C is the second intercom
friend of headset A, and headset B is the third intercom friend of headset
A.
8.2 Pairing with Other Sena Headset Models for Intercom
Conversation
The SMH10 can be paired with all other Sena headset models such
as the SMH5 and the SPH10 for intercom conversation. Please follow
the same procedure as above to pair with these headset models.
Note:
The SMH5 cannot participate in three-way or four-way conference intercom
with the SMH10 or the SPH10. The SMH5 has a limited capability of having
two-way intercom with each other or with other Sena headsets such as the
SMH10 and the SPH10.

SMH10
19
English
9. SMH10 CONFIGURATION SETTING
You can set the configuration of the SMH10 by the voice menu
instruction as below.
1. To enter into voice configuration menu, press and hold the Jog
Dial for 12 seconds until the LED shows solid blue and you hear
high tone double beeps. You will also hear a voice prompt saying
“Conguration menu”.
2. Rotate the Jog Dial clockwise or counter-clockwise to navigate
between the menus. You will hear voice prompts for each menu
items as below.
3. You can enable the feature or execute the command by tapping
the Phone Button, or disable the feature by tapping the Jog Dial.
4. If any button is not pressed within 10 seconds, the SMH10 will exit
the configuration and goes back to stand-by.
5. If you want to exit the configuration immediately, rotate the Jog
Dial until you hear a voice prompt, “Exit conguration”, and tap
the Phone Button.
The voice prompt for each menu item is as below:
(1) VOX phone (4) Delete all pairings
(2) VOX intercom (5) Exit conguration
(3) Voice prompt
VOX phone
Exit configuration VOX intercom
Delete all pairings Voice prompt
9.1 Enabling/Disabling Voice Activated Phone Answering
Voice Prompt “VOX phone”
Factory Default Enable
Enable Tap the Phone Button
Disable Tap the Jog Dial
If this feature is enabled, you can answer incoming calls by simply
saying a word loudly enough. For example, when you hear a series
of beeps for an incoming call, you can answer the phone by saying

SMH10
20
“Hello” or any other word loudly. This is enabled from the factory but
you can disable this. If this mode is disabled, you have to tap the Jog
Dial or the Phone Button to answer an incoming call.
9.2 Enabling/Disabling Voice Activated Intercom
Voice Prompt “VOX intercom”
Factory Default Disable
Enable Tap the Phone Button
Disable Tap the Jog Dial
If this feature is enabled, you can initiate an intercom conversation
with the last connected intercom friend by speaking any word loudly
enough.The most effortless way to trigger intercom VOX is to blow
into the microphone as if blowing dust off the microphone. If you
start an intercom conversation by VOX, the intercom terminates
automatically when you and your intercom friend remain silent for 20
seconds. However, if you manually start an intercom conversation by
tapping the Jog Dial, you have to terminate the intercom conversation
manually.
However, even when this feature is enabled, if you terminate intercom
conversation manually with the Jog Dial, you are not able to start
intercom by voice temporarily. In this case, you have to tap the Jog
Dial to restart the intercom. This is to prevent repeated unintentional
intercom connections by strong wind noise. If you tap the Jog Dial to
start an intercom conversation, it is not terminated by 20 seconds of
silence. After turning SMH10 off and on, you can start intercom by
voice again.
9.3 Enabling/Disabling Voice Prompts
Voice Prompt “Voice prompt”
Factory Default Enable
Enable Tap the Phone Button
Disable Tap the Jog Dial
You can disable voice prompts by configuration setting, but the
following voice prompts are always on.
- Voice prompts for configuration setting menu
- Voice prompts for battery level Indicator
- Voice prompts for factory reset
9.4 Delete all Bluetooth Pairing Information
Voice Prompt “Delete all pairings”
Factory Default N/A
Execute Tap the Phone Button

SMH10
21
English
To delete all Bluetooth pairing information of the SMH10, rotate the
Jog Dial until you hear a voice prompt, “Delete all pairings”, and
tap the Phone Button to confirm. Taping the Jog Dial is not available
for this setting.
9.5 ExitVoiceCongurationMenu
Voice Prompt “Exit conguration”
Factory Default N/A
Enable Tap the Phone Button
To exit voice configuration menu and get back to stand-by
mode, rotate the Jog Dial until you hear a voice prompt, “Exit
conguration”, and tap the Phone Button to confirm. Tapping the
Jog Dial is not available for this setting.
Rotate Jog Dial Tap Phone Button Tap Jog Dial
VOX Phone Enable Disable
VOX Intercom Enable Disable
Voice Prompt Enable Disable
Delete All Pairings Execute N/A
Exit Configuration Execute N/A
Voice Conguration Menu & Button Operations
10. FUNCTION PRIORITY
The SMH10 operates in the following order of priority:
(highest) Mobile phone,
Intercom,
Stereo music by audio cable,
(lowest) Bluetooth stereo music
A lower priority function is always interrupted by a higher priority
function. For example, stereo music is interrupted by intercom call,
and intercom conversation is interrupted by incoming mobile phone
call.
Other manuals for SMH10
9
Table of contents
Other Sena Headset manuals