plates.
Do not allow the power cord to hang free;z
the cord must be kept well away from hot
parts of the appliance.
Always remove the plug from the wallz
socket
in case of any malfunction,-
aer use,-
to turn the appliance o completely,-
before cleaning the appliance.-
When removing the plug from the wallz
socket, never pull on the power cord;
always grip the plug itself.
No responsibility is accepted if damagez
results from improper use, or if these
instructions are not complied with.
is appliance is intended for domestic usez
only and not for commercial applications.
In order to comply with safety regulationsz
and to avoid hazards, repairs of electrical
appliances must be carried out by qualied
personnel, including the replacement
of the power cord. If repairs are needed,
please send the appliance to one of our
customer service departments. e
address can be found in the appendix to
this manual.
Before using for the rst time
Remove any packaging materials and check
that all components are present.
Before the appliance is used for the rst
time, or aer extended periods of non-use, it
should be thoroughly cleaned as described in
the section General Care and Cleaning.
When rst switched on, the appliance may
emit a slight smell, but this will disappear aer
a short while. Ensure sucient ventilation.
Operation
We recommend the use of long-life low-fat
milk (UTF, 1.5% fat content). For best results,
the milk should be taken from the refrigerator
immediately before frothing.
e underside of the container and the contact
area on the inside of the base must be clean
and dry.
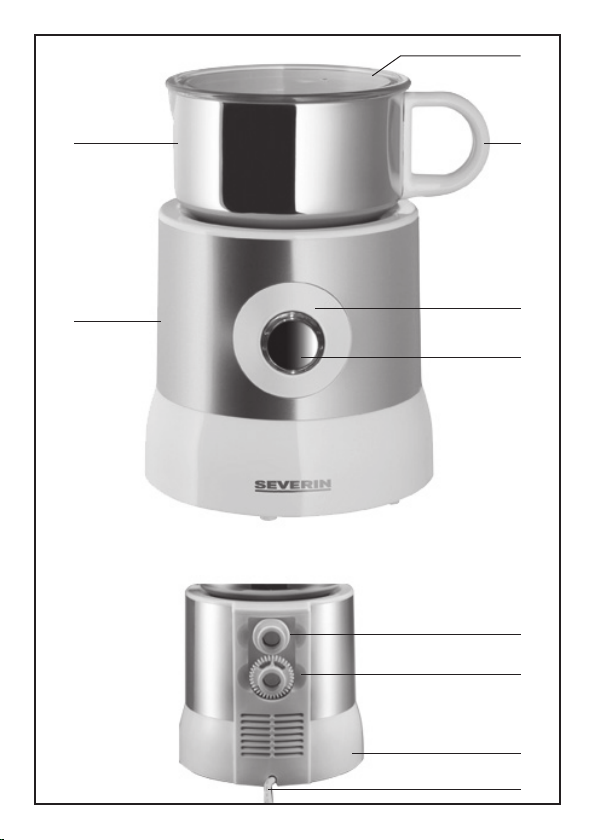
Choosing the stirring head
Use the smooth stirring head to heat up–
milk.
For frothing milk, use the serrated head.–
During periods of non-use, the stirring–
heads may be safely stored at the rear of
the housing.
Heating up or hot-frothing milk
1. Remove the lid from the milk
container.
2. Place the appropriate head onto the
mounting protrusion inside the bottom
of the container.
…If the serrated stirring head (for
frothing milk) is used, do not put more
than 260 ml of milk into the container
(lower max level mark ).
…If the smooth stirring head (for
heating milk) is used, ll the container
with a maximum of no more than 500
ml of milk (upper max level mark ).
3. Place the lid on the container.
4. Place the container onto the base.
5. Insert the plug into a suitable wall
socket. A beep-signal is heard and the
main indicator lamp ashes.
6. Press the On/O switch.
A double beep-signal is heard, the main
indicator lamp shows a steady light
and the motor cooling system of the
appliance is heard to start up.
A moment later, the appliance starts
to heat up and stir the milk. Once the
milk is suciently hot, the heating and
stirring process stops automatically. e
main indicator lamp starts ashing and
a number of beep-signals are heard.
7. Press the On/O switch to stop the
beep-signals.
8. You can now remove the milk container
from the base.
e cooling system continues to run for
a brief period.
e main indicator lamp stops ashing
aer about 3 minutes.
9