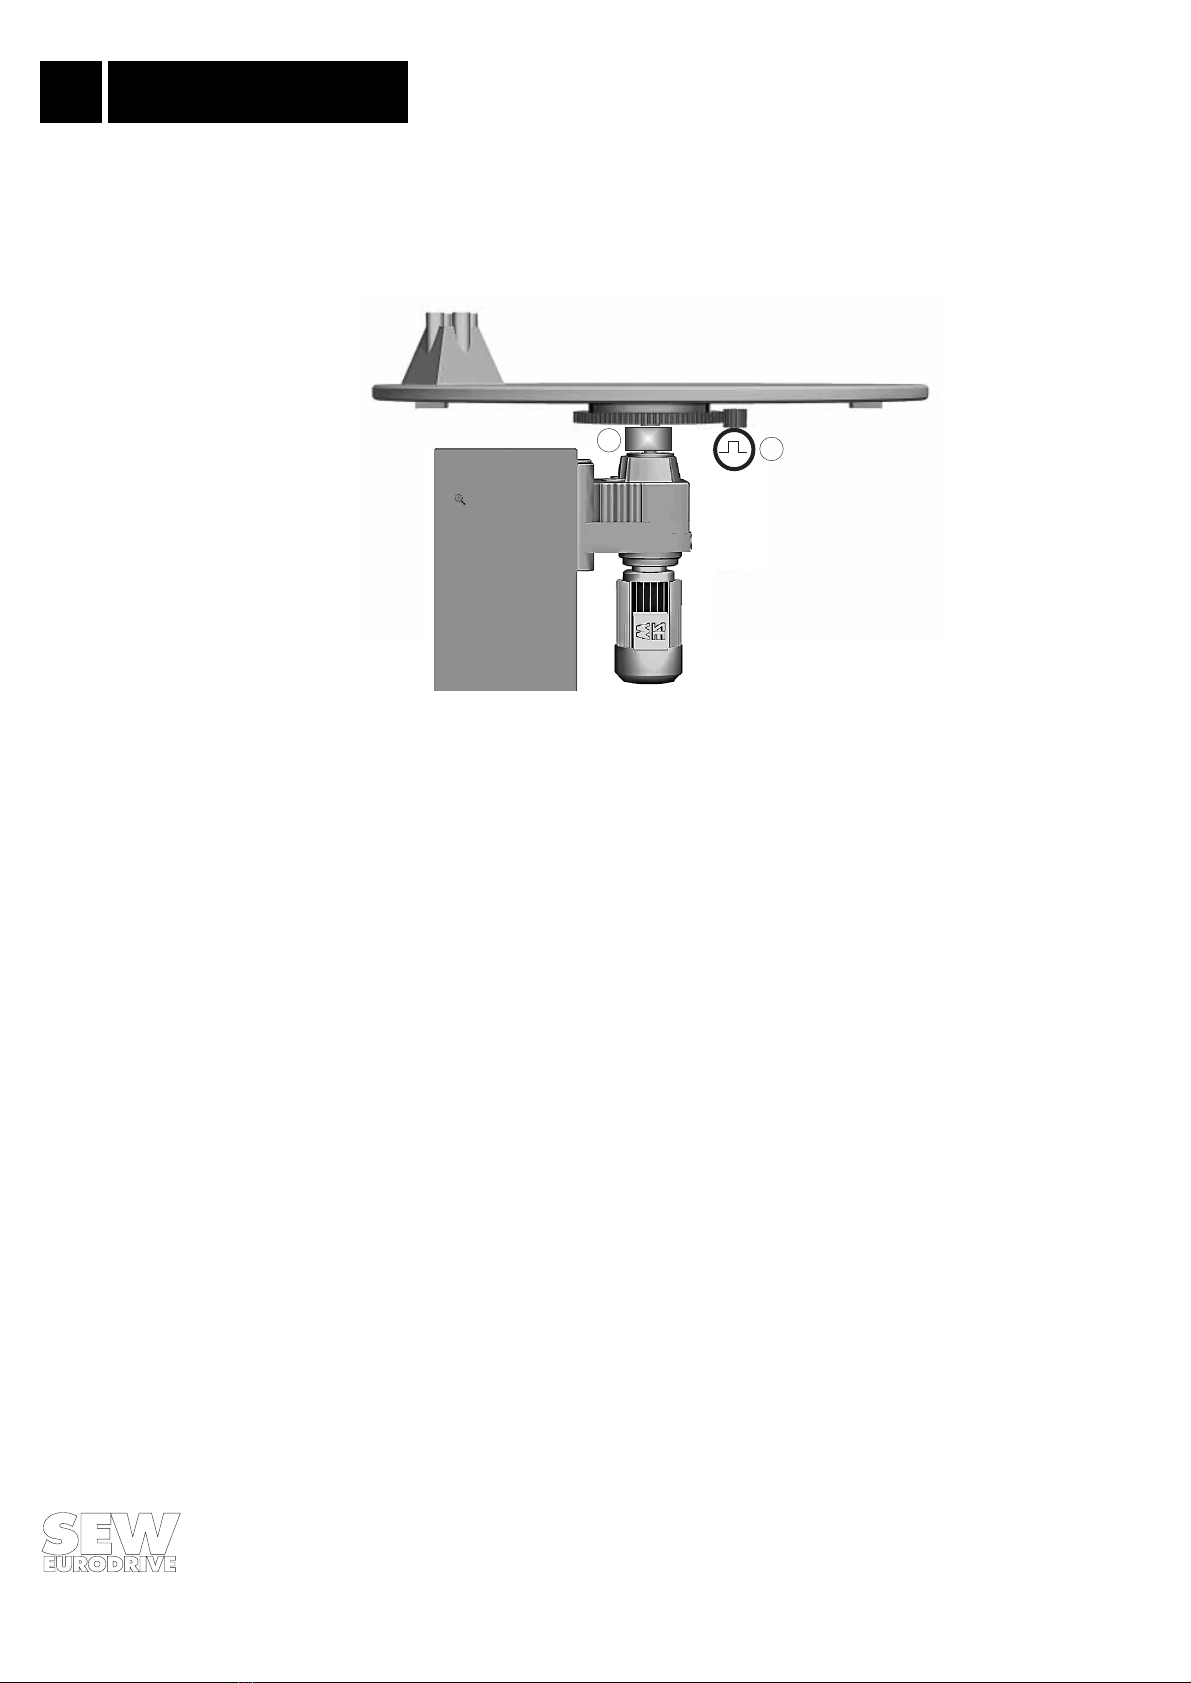
SEW-Eurodrive MOVIDRIVE MD*60A Series Installation and operating instructions

UL
®
UL
®
C
T
MOVIDRIVE®
MD_60A
Drive Inverter
Addendum to the System Manual
Round Axle
Edition 06/2000
1050 3811 / 072000
0°
45°
90°
135°
180°
225°
270°
315° 0
1
2
3
4
5
6
7

2
MOVIDRIVE
®
Round Axle
Important Notes
•Read through this manual carefully before you commence installation and startup of
MOVIDRIVE®
drive inverters with round axle.
This manual assumes that the user has access to and is familiar with the documentation on
the MOVIDRIVE® system, in particular the MOVIDRIVE®
system manual.
•Safety notes:
Always follow the safety and warning instructions contained in this manual!
Safety notes are marked as follows:
Electrical hazard, e.g. during live working.
Mechanical hazard, e.g. when working on hoists.
Important instructions for safe and fault-free operation of the driven machine/
system, e.g. pre-setting before startup.
• In this manual, cross references are marked with a →, e.g.:
(→Sec. X.X) means: Further information can be found in section X.X of this manual.
• A requirement of fault-free operation and fulfillment of any rights to claim under guarantee is
that this information is observed.
• This information does not replace the detailed operating instructions!
• Installation and startup only by trained personnel observing applicable accident prevention
regulations and the MOVIDRIVE®
operating instructions!

Contents
MOVIDRIVE
®
Round Axle
3
1 System Description.....................................................................................4
2 Project Planning ........................................................................................7
2.1 Pre-requisites ..................................................................................................................7
2.1.1 PC and software...............................................................................................7
2.1.2 Inverters, motors and encoders .......................................................................7
2.2 Functional description......................................................................................................8
2.3 Scaling of the drive..........................................................................................................9
2.4 Reference cam and machine zero ..................................................................................10
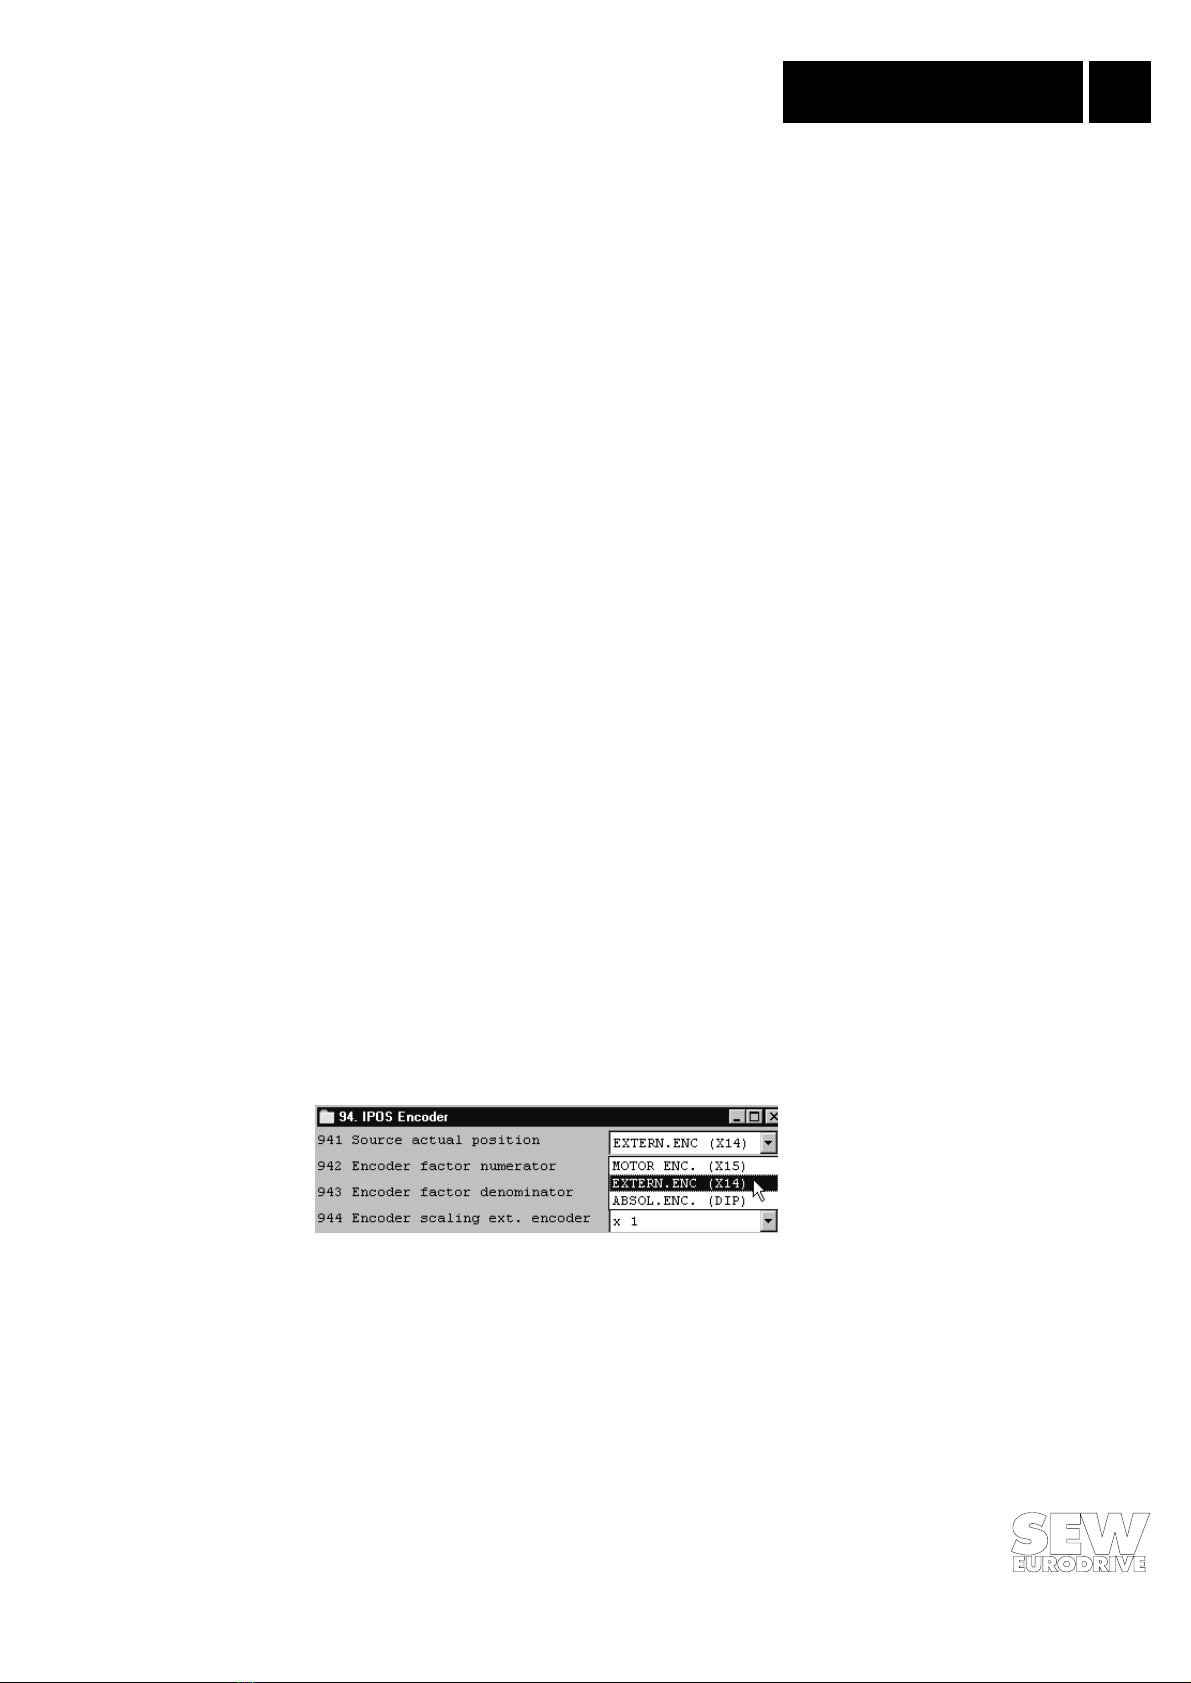
2.5 Notes on position measurement....................................................................................10
2.6 Binary coding of the table positions...............................................................................11
2.7 Process data assignment...............................................................................................12
3 Installation............................................................................................. 14
3.1 Software ........................................................................................................................14
3.2 With MOVIDRIVE®terminal expansion board option type DIO11A................................15
3.3 Function of input terminals DI10...DI17.........................................................................16
3.4 Bus installation ..............................................................................................................17
3.4.1 PROFIBUS......................................................................................................18
3.4.2 INTERBUS......................................................................................................19
3.4.3 CAN bus .........................................................................................................20
3.4.4 DeviceNet .......................................................................................................21
4 Startup.................................................................................................. 22
4.1 General information .......................................................................................................22
4.2 Preliminary work............................................................................................................22
4.3 Starting the “round axle” program.................................................................................24
4.3.1 Setting the general parameters.......................................................................25
4.3.2 Entering table positions..................................................................................27
4.4 Parameters ....................................................................................................................30
4.5 Startup with fieldbus......................................................................................................31
4.5.1 Selecting the target position using the virtual input terminals........................31
4.5.2 Specifying a variable target position using the fieldbus..................................32
4.5.3 Assignment of process output data words.....................................................33
4.5.4 Assignment of process input data words .......................................................34
4.6 Starting the drive ...........................................................................................................35
4.6.1 Operating modes............................................................................................35
4.6.2 Referencing mode ..........................................................................................37
4.6.3 Jogging mode ................................................................................................38
4.6.4 Teach mode....................................................................................................39
4.6.5 Automatic mode.............................................................................................40
5 Operation and Servicing ............................................................................. 45
5.1 Timing diagrams............................................................................................................45
5.1.1 Referencing mode and automatic mode with position optimization ...............45
5.1.2 Jogging mode and teach mode ......................................................................46
5.2 Fault information............................................................................................................47
5.3 Fault messages..............................................................................................................48

4
MOVIDRIVE
®
Round Axle
1System Description
1 System Description
A large number of movements have to be controlled in automated conveyor and logistics
applications in order to transport the material. Linear movements in the form of trolleys and hoists,
and rotary movements with rotary tables, play an important part in these applications.
Rotary movements often occur in pulses (rotary indexing tables) in which the material is moved on
by a certain number of degrees every cycle. However, there are also many rotational applications in
which the material should be moved to its destination by the shortest possible route (distance-
optimized positioning) or in which it is only permitted to move to the target position in a defined
direction of rotation (positioning with fixed direction of rotation).
The position axis is represented on a numbered circle from 0 to 360° in order to meet these
requirements. As a result, the actual position always moves within this range.
The round axle application model accomplishes these tasks with various operating modes which
are selected using the binary inputs or the virtual terminals (control via fieldbus).
Application fields:
The round axle is particularly suited to the following applications:
Lathes
Rotary tables
Rotary indexing tables
Swiveling devices
Feed units
Timing belts
The round axle offers the following advantages in these applications:
• User-friendly user interface
• You only have to enter the parameters required for the round axle (ratios, speeds, diameters)
• User-friendly application programs guide you through the process of setting parameters, so
there is no need for complicated programming
• Monitor mode for optimum diagnosis
• You do not need any programming experience
• It doesn’t take long to get to know the system

MOVIDRIVE
®
Round Axle
5
System Description 1
The “round axle” application allows you to make the following combinations:
• Control of the inverter
– using binary inputs
– using a fieldbus interface
• Motor shaft/load connection
– Interlocking (= slip-free) connection →No external encoder is required, the signals from the
motor encoder are used for positioning.
03631AXX
➀Sensor for registering the zero point (using reference cam)
Fig. 1: Example of rotary table with interlocking connection
03633AXX
➀Sensor for registering the zero point (using reference cam)
➁Reference cam
➂Pulse width
Fig. 2: Example of a timing belt with interlocking connection
X15
DIØ3
1
X15
DIØ3
12
3

6
MOVIDRIVE
®
Round Axle
1System Description
– Non-positive connection (= with slip) →An external encoder is required for positioning. It
must be assured that one revolution of the system generates a whole number of increments
(= whole number ratio between the external encoder and the system). Flying referencing (=
setting a new zero point on every revolution) is not possible and unnecessary because of the
whole number ratio.
03633AXX
➀Non-positive coupling (= with slip) between the motor shaft and the rotary table
➁External incremental encoder is mounted on the rotary table with an interlocking connection (= slip-free).
Fig. 3: Example of a rotary table with non-positive connection
• Flying referencing (only with positioning on the signals of the motor encoder).
– Whole number gear unit and additional gear ratio between motor shaft and system.
No flying referencing is required. The drive is only referenced once after the power supply is
switched on.
– Non-whole number gear unit and additional gear ratio between motor shaft and system.
One revolution corresponds to a non-whole number of increments so the zero point fluctuates
with every revolution. As a result, flying referencing is required (= setting a new zero point on
every revolution).
12

MOVIDRIVE
®
Round Axle
7
Project Planning 2
2 Project Planning
2.1 Pre-requisites
2.1.1 PC and software
The round axle is implemented as an IPOSplus®
program and forms part of the SEW MOVITOOLS
software package. In order to use MOVITOOLS, you must have a PC with one of the following
operating systems: Windows 95®
, Windows 98®
or Windows NT®
version 4.0.
2.1.2 Inverters, motors and encoders
•Inverters
The round axle application can be performed using MOVIDRIVE®
MDV60A or MOVIDRIVE®
MDS60A. In this case, either the MOVIDRIVE®
terminal expansion board option type DIO11A or
a fieldbus interface (PROFIBUS, INTERBUS, CAN or DeviceNet) is required depending on the
combination. The round axle is not an option with MOVIDRIVE®
MDF60A because no encoder
feedback is possible. Position measurement with absolute encoder is not supported.
•Motors
– For operation on MOVIDRIVE®
MDV60A:
Asynchronous servo motors CT/CV, encoder installed as standard.
AC motors DT/DV/D with incremental encoder option.
– For operation on MOVIDRIVE®
MDS60A:
Synchronous servo motors DS/DY, resolver installed as standard.
• External encoder and reference cam
– Interlocking connection between the motor shaft and the load:
No external encoder required.
– Non-positive connection between the motor shaft and the load:
External encoder required in addition to motor encoder/resolver.
Incremental encoder as external encoder →Connection on the basic unit X14:
– Reference cam:
Absolute positioning →A machine reference point is required. This is defined by a reference
cam.
Relative positioning →No reference cam is required if no machine reference point is
required.
• Possible combinations
*)The terminal expansion board must not be installed with control using a fieldbus interface, since the virtual terminals
will not be available otherwise.
Motor shaft/load connection
Positive,
no external encoder required
Non-positive,
external encoder required
Encoder type, external
encoder - Incremental encoder
Reference travel Yes (absolute positioning) Yes (absolute positioning)
Required
MOVIDRIVE®
option*)Terminal expansion board type DIO11A or
fieldbus interface (DFP/DFI/DFC/DFD11A)
Terminal expansion board type DIO11A or
fieldbus interface (DFP/DFI/DFC/DFD11A)

8
MOVIDRIVE
®
Round Axle
2Project Planning
2.2 Functional description
The ”round axle” application offers the following functional characteristics:
• 16 table positions can be defined and selected.
• Positions are specified in relation to angle [°] or [mm].
• The travel speed can be selected as required for each positioning movement.
• The ramp can be set separately for each positioning movement.
• Flying referencing with non-whole number gear unit and additional gear ratio.
• Positioning with position optimization.
• Pulse mode with 16 step widths.
• Incremental encoders can be evaluated as external encoders.
• The actual position is located within the circle of numbers between 0 and 360° in all operating
modes.
• Control using binary inputs (basic unit and DIO11A option) or fieldbus/system bus.
• Different ramp profiles can be selected for the movement ramp.
The functions are implemented with six operating modes:
• Jog mode
– The drive is moved to the left or the right using two binary inputs.
– Two speeds can be selected using a binary input, namely rapid traverse and creep traverse for
fine positioning.
•Teachmode
– Movement can be performed to every single position in jog mode and then saved in teach
mode.
• Referencing mode
– Reference travel is started with a start command at a binary input. Reference travel
establishes the reference point (machine zero) for absolute positioning operations.
• Automatic modes
– Selecting the target position using four binary inputs (binary coded).
– Sending back the selected target position prior to movement using four binary outputs
(binary coded).
– Acknowledging that the selected position has been reached, using one binary output.
• Automatic mode with position optimization
– Positioning travel with position optimization so the shortest route to the destination is
always taken.
• Automatic mode with direction of rotation inhibit (clockwise – counterclockwise)
– Movement with absolute positioning in a fixed direction of rotation.
• Pulsed automatic mode
– Selecting the step width per pulse using four binary inputs (binary coded).
– Sending back the selected step width prior to movement using four binary outputs (binary
coded).
– Movement with relative positioning in a fixed direction of rotation.
– Acknowledging that the selected position has been reached, using one binary output.

MOVIDRIVE
®
Round Axle
9
Project Planning 2
2.3 Scaling of the drive
The control needs to know the number of encoder pulses (increments) per travel unit so it can
calculate the travel information and position the drive correctly.
Drives without an external encoder (interlocking connection):
In drives without an external encoder, you can have scaling performed automatically by the round
axle startup procedure. To do this, you have to enter the following data:
• Select the user travel unit in degrees [°] or millimeters [mm].
• Diameter of the drive wheel or the rotary table for central drive (only with the unit [mm]).
• Gear unit ratio (i gear unit)
• Additional gear ratio (i additional gear)
Scaling factor in pulses/distance [inc/mm] or [inc/°], is automatically calculated by the round axle
startup procedure.
You can also enter the pulses/distance directly. If you enter a unit other than millimeters [mm] or
degrees [°] as the travel unit, this user travel unit is also used for the reference offset and the table
positions.
Non-whole number gear unit and additional gear ratios:
If position measurement is performed by the motor encoder in non-whole number gear unit and
additional gear ratios, then one revolution of the rotary table corresponds to a non-whole number
of increments. This means the machine zero fluctuates from one revolution to the next. This
positioning error can be detected after several revolutions.
Only gear units with a whole-number ratio and a very low flank clearance, e.g. planetary gear units,
should be used if a high level of positioning accuracy is required (< 1 mm).
Drive with an external encoder (non-positive connection):
In this case, you must have activated and scaled the external encoder before starting up the round
axle. Make the following settings in Shell in order to do this:
• Set P941 ”Source actual position” to EXTERN.ENC (X14). You can also make this setting during
the startup of the round axle.
03456AEN
Fig. 4: Setting the source actual position
• Set P942...P944 encoder factor numerator, encoder factor denominator and encoder scaling ext.
encoder. correctly before the startup of the round axleround axle.
Calculation of the scaling is now blocked during startup of the round axle.
For more information about scaling an external encoder, please refer to the ”IPOSplus®
Positioning
and Sequence Control System” manual (publication number 0919 1712).

10
MOVIDRIVE
®
Round Axle
2Project Planning
2.4 Reference cam and machine zero
You can enter a reference offset during startup of the round axle if you do not want the machine
zero (= reference point for positioning) to be located on the reference position.
The following formula applies: Machine zero = Reference position + Reference offset
In this way, you can alter the machine zero without having to move the reference cam. Please note
that the reference offset must refer to an angle between 0 and 360° and to a position within the
circumference. The reference offset is entered using the interface of the ”round axle” application.
2.5 Notes on position measurement
Many rotary indexing tables operate continuously in one direction of rotation. Bear this in mind
when selecting the gear unit and mounting sensors for position measurement.
Positioning accuracy:
The positioning accuracy of a rotary table is significantly determined by the nature of position
measurement.
If the drive is central then the positioning accuracy is significantly determined by the gear unit
backlash. In this case, it is necessary to use low-backlash gear units (planetary gear units, helical-
bevel gear unit with reduced backlash). There is no benefit to be gained from using an external
encoder mounted on the circumference because the motor cannot set the required mechanical
position due to the gear unit backlash.
Greater positioning accuracies can be achieved by shifting the drive to the circumference (annular
gear, toothed belt/pinion connection). The gear unit backlash is no longer significant due to the
very high additional gear ratio; the level of backlash in the pinion/annular gear connection does
have to be taken into account, however.
Using whole-number ratios (no flying referencing) always leads to a greater positioning accuracy
than in non-whole number ratios.
Flying referencing:
During movement, the machine zero is updated using the reference cam after each revolution in
order to avoid positioning errors when there is a non-whole number ratio.
External incremental encoder:
If the position measurement is taken using an external incremental encoder, make sure that one
revolution results in a whole number of increments. Flying referencing is not possible if position
measurement uses an incremental encoder.

MOVIDRIVE
®
Round Axle
11
Project Planning 2
2.6 Binary coding of the table positions
The table positions must be specified in binary coded format and the corresponding checkbacks
are also in binary code. This means DI14 (DO13) = 20and DI17 (DO16) = 23.
No. DI14 (DO13) DI15 (DO14) DI16 (DO15) DI17 (DO16)
0“0” “0” “0” “0”
1“1” “0” “0” “0”
2“0” “1” “0” “0”
3“1” “1” “0” “0”
4“0” “0” “1” “0”
5“1” “0” “1” “0”
6“0” “1” “1” “0”
7“1” “1” “1” “0”
8“0” “0” “0” “1”
9“1” “0” “0” “1”
10 “0” “1” “0” “1”
11 “1” “1” “0” “1”
12 “0” “0” “1” “1”
13 “1” “0” “1” “1”
14 “0” “1” “1” “1”
15 “1” “1” “1” “1”

12
MOVIDRIVE
®
Round Axle
2Project Planning
2.7 Process data assignment
The ”round axle” application can also be controlled using a fieldbus. The virtual terminals in control
word 2 are used for this (→MOVIDRIVE®
Fieldbus Unit Profile). The terminal expansion board
type DIO11A must not be installed in this case.
Two types of control are differentiated:
1. Using the positions saved in the inverter. Selecting the target position using the virtual input
terminals. In this case, binary inputs DI1Ø – 17 are actuated using the fieldbus (virtual
terminals) and they have exactly the same function as when the round axle is controlled using
the input terminals of the DIO11A option (→Sec. 3.3, page 16). The maximum number of
target positions is still restricted to 16 values. A process data word (PO1, PI1) is required.
2. The target position is sent to the inverter via the fieldbus as a variable value (process data
word PO2). In this case, inputs DI1Ø – 17 are also actuated via the fieldbus (virtual terminals)
and are used for selecting the ramp and the speed. This means two process data words are
required (PO1, PI1, PO2, PI2).
03512AEN
Fig. 5: Process data channel
The assignment of the process output data words is as follows:
• PO1 control word 2
03510AEN
Fig. 6: PO1 control word
• PO2 target position
03517AEN
Fig. 7: PO2 target position
P1 P2
P1 P2
EQ
OO
II
Process input data (PI)
Process output data (PO)
15 14 13 12 11 10 9 8 7 6 5 4 3 2 1 0
8:
9:
10:
11:
12:
13:
14:
15:
Fixed definitionVirtual input terminals
0: Controller inhibit/Enable
1: Enable/Rapid stop
2: Enable/Stop
3: Stop control
4: Integrator switching
5: Parameter set switching
6: Reset
7: Reserved
virtual terminal 1 = P610 binary input DI1Ø
virtual terminal 2 = P611 binary input DI11
virtual terminal 3 = P612 binary input DI12
virtual terminal 4 = P613 binary input DI13
virtual terminal 5 = P614 binary input DI14
virtual terminal 6 = P615 binary input DI15
virtual terminal 7 = P616 binary input DI16
virtual terminal 8 = P617 binary input DI17
15 14 13 12 11 10 9 8 7 6 5 4 3 2 1 0
Target position [user-defined unit]

MOVIDRIVE
®
Round Axle
13
Project Planning 2
The assignment of the process input data words is as follows:
• PI1 status word 2
03511AEN
Fig. 8: PI1 status word
• PI2 actual position
03518AEN
Fig. 9: PI2 actual position
15 14 13 12 11 10 9 8 7 6 5 4 3 2 1 0
8:
9:
10:
11:
12:
13:
14:
15:
Fixed definitionVirtual output terminals
0: Output stage enabled
1: Inverter ready for operation
2: PO data enabled
3: Current integrator set
4: Current parameter set
5: Fault/Warning
6: Limit switch CW activated
7: Limit switch CCW activated
virtual terminal 1 = P630 binary output DO1Ø
virtual terminal 2 = P631 binary output DO11
virtual terminal 3 = P632 binary output DO12
virtual terminal 4 = P633 binary output DO13
virtual terminal 5 = P634 binary output DO14
virtual terminal 6 = P635 binary output DO15
virtual terminal 7 = P636 binary output DO16
virtual terminal 8 = P637 binary output DO17
15 14 13 12 11 10 9 8 7 6 5 4 3 2 1 0
Actual position [user-defined unit]

14
MOVIDRIVE
®
Round Axle
3Installation
3 Installation
3.1 Software
The round axle is part of the SEW MOVITOOLS software package (version 2.30 and higher).
Proceed as follows to install MOVITOOLS on your computer:
1. Insert the MOVITOOLS CD into the CD ROM drive of your PC.
2. Select “Start/Run...”.
3. Type “{Drive letter of your CD drive}:setup” and press the Enter key.
4. The MOVITOOLS setup menu appears. Follow the instructions of the installation wizard.
You can now use Program Manager to start MOVITOOLS. If a MOVIDRIVE®
unit is connected to
your PC, select the correct port (PC COM port) and set point-to-point connection. Select <Update>
to display the inverter in the “Connected Units” window.
03505AEN
Fig. 10: MOVITOOLS window

MOVIDRIVE
®
Round Axle
15
Installation 3
3.2 With MOVIDRIVE®
terminal expansion board option type DIO11A
With an interlocking connection between the motor shaft and the load (no external encoder
necessary) or a non-positive connection and an incremental encoder as the external encoder.
03457AEN
Fig. 11: Wiring diagram with DIO11A
X14:
X15:
X13:
DIØØ
DIØ1
DIØ2
DIØ3
DIØ4
DIØ5
DCOM
VO24
DGND
ST11
ST12
1
2
3
4
5
6
7
8
9
10
11
X10:
X22:
X23:
TF1
DGND
DBØØ
DOØ1-C
DOØ1-NO
DOØ1-NC
DOØ2
VO24
VI24
DGND
DI1Ø
DI11
DI12
DI13
DI14
DI15
DI16
DI17
DCOM
DGND
DO1Ø
DO11
DO12
DO13
DO14
DO15
DO16
DO17
DGND
1
2
3
4
5
6
7
8
9
10
1
2
3
4
5
6
7
8
9
10
1
2
3
4
5
6
7
8
9
1
5
5
1
6
9
9
6
=
+-
24 V
DIO
1
2
3
1
2
3
4
5
6
1
2
3
4
5
6
7
8
9
10
1
2
3
4
5
6
7
8
9
MDV (MDS)
X11
X12
S11
S12
X13
X10
X14 X15
ENCODER IN/OUT ENCODER IN
(RESOLVER IN)
1
2
3
4
5
1
2
3
4
5
6
7
8
9
10
11
1
2
3
4
5
6
7
8
9
10
1
2
3
SUPPLY OUT 24V=
mA V↔
R ON OFF↔
X
20
X
21
X
22
X
23
IPOS output: MODE (2^0)
IPOS output: MODE (2^1)
IPOS output: MODE (2^2)
IPOS output: value 1 (2^0)
IPOS output: value 2 (2^1)
IPOS output: value 4 (2^2)
IPOS output: value 8 (2^3)
IPOS output: target position reached
Reference potential binary signals
IPOS input: MODE (2^0)
IPOS input: MODE (2^1)
IPOS input: MODE (2^2)
IPOS input: function 1
IPOS input: function 2
IPOS input: function 3
IPOS input: function 4
IPOS input: function 5
Reference X22:DI1Ø...DI17
Reference potential binary signals
TF input
Reference potential binary signals
/BrakeRelay contact/fault
NO relay/fault
NC relay /fault
IPOS reference
+24V output
+24V input
Reference potential binary signals
Motor encoder:
Incremental encoder (MDV) or resolver (MDS)
(Connection MOVIDRIVE operating instructions)→®
Input external encoder
Incremental encoder 5 V TTL
(Connection MOVIDRIVE operating instructions)
→®
/Controller inhibit
Enable/rapid stop
Reset
Reference cam
No function
No function
Reference X13:DIØØ...DIØ5
+24V output
Reference potential
RS-485+
RS-485-

16
MOVIDRIVE
®
Round Axle
3Installation
3.3 Function of input terminals DI10...DI17
The operating modes are set using binary inputs X22:DI1Ø...DI12.
Operating modes:
The functions of binary inputs X22:DI13...DI17 (DIO11A) differ according to the operating mode
setting.
Function of binary inputs DI13 – DI17:
Operating mode Binary input
DI1Ø: Mode (20)DI11: Mode (21)DI12: Mode (22)
Jog mode “0” “0” “0”
Teach mode “1” “0” “0”
Referencing mode “0” “1” “0”
Automatic, with position optimization “1” “1” “0”
Automatic, clockwise positioning “0” “0” “1”
Automatic, counterclockwise positioning “1” “0” “1”
Automatic, clockwise pulse mode “0” “1” “1”
Automatic, counterclockwise pulse mode “1” “1” “1”
Operating mode Jog mode Teach mode Referencing mode Automatic mode
DI13: Function 1 Reserved Strobe Start referencing Start positioning
DI14: Function 2 Jog positive Position 20Reserved Position 20
DI15: Function 3 Jog negative Position 21Reserved Position 21
DI16: Function 4 Rapid traverse Position 22Reserved Position 22
DI17: Function 5 Reserved Position 23Reserved Position 23

MOVIDRIVE
®
Round Axle
17
Installation 3
3.4 Bus installation
Please refer to the information in the relevant addendums to the operating instructions for
information about bus installation. These addendums are included with the DFP11A, DFI11A,
DFC11A and DFD11A fieldbus interfaces. Please refer to the operating instructions for information
about installing the system bus (SBus).
02800AXX
Fig. 12: Bus types
Important:
With control using a fieldbus, the terminal expansion board type DIO11A must not be installed
otherwise the virtual terminals will not be available.
DFP
PROFIBUS
FMS / DP
DFI
INTERBUS-S
Module Ident.
227
DFC
CAN-Bus
BUS-
S1
BIO
PIO
DFD
Mod/
DEVICE-NET
S2
DR(0)
DR(1)
NA(0)
NA(1)
NA(2)
NA(3)
NA(4)
10
NA(5)
X30
OFF
Net
1
2
3
4
5
P R OF I
BU S
PROCESS FIELD BUS
Device Net

18
MOVIDRIVE
®
Round Axle
3Installation
3.4.1 PROFIBUS
The PROFIBUS documentation package contains detailed information. This package can be
obtained from SEW, publication number 0919 3235. This documentation package contains the
GSD files and type files for MOVIDRIVE®
in order to help with project planning and to facilitate
startup.
Technical data:
01009AEN
Fig. 13: Front view of DFP11A
Pin assignment:
01222BEN
Fig. 14: Assignment of 9-pin sub D plug to DIN 19245
Option PROFIBUS fieldbus interface type DFP11A
Part number 822 724 1
Resources for
startup/diagnosis
DBG11A keypad
MOVITOOLS or MX_SHELL PC program
Protocol
variants
PROFIBUS-DP to EN 50170 V2 / DIN E 19245 P3
PROFIBUS-FMS to EN 50170 V2 / DIN E 19245 P3
Mixed mode PROFIBUS DP/FMS (combi-slave)
Supported
baud rates
Automatic detection of baud rate:
9.6 kbaud
19.2 kbaud
93.75 kbaud
187.5 kbaud
500 kbaud
1500 kbaud
Connection 9-pin sub D socket
Assignment to EN 50170 V2 / DIN 19245 P3
Bus termination Can be activated for cable type A (up to 1500 kbaud)
to EN 50170 V2 / DIN 19245 P3
Station address 0...125, can be set using DIP switch
Default
bus parameter
Min-TSDR for FMS/DP or DP mode
Can be selected via DIP switch
GSD file SEW_6000.GSD
DP identity
number 6000hex = 24576dec

MOVIDRIVE
®
Round Axle
19
Installation 3
3.4.2 INTERBUS
The INTERBUS documentation package contains detailed information. This package can be
obtained from SEW, publication number 0919 326X.
Technical data:
01008AEN
Fig. 15: Front view of DFI11A
Pin assignment:
01046AEN
Fig. 16:Assignment of 9-pin sub D socket of the incoming remote bus cable
01047AEN
Fig. 17: Assignment of 9-pin sub D plug of the outgoing remote bus cable
Option INTERBUS fieldbus interface type DFI11A
Part number 822 723 3
Resources for
startup/diagnosis
DBG11A keypad
MOVITOOLS or MX_SHELL PC program
Connection Remote bus input: 9-pin sub D plug
Remote bus output: 9-pin sub D socket
RS-485 transmission technology, 6-core shielded and
twisted-pair cable
Module ID E3hex = 227dec
DFI
INTERBUS-S
Module Ident.
227
4 LED Green
1 LED Red
×
×
DIP switch to set the
process data count
X30:
Remote bus input
X31:
Remote bus output
6
1
7
2
3
/DO
DO
/DI
DI
COM
EQ
Q
Brown
Grey
Pink
Yellow
Green
Conductive connection between
connector
9-pin sub D
Twisted-pair signal
cables
6
1
7
2
3
5
9
/DO
DO
/DI
DI
COM
EQ
Brown
Grey
Pink
Yellow
Green
connector housing, cable shield.
Conductive connection between
Bridged
cables
Twisted-pair signal
connector
9-pin sub D

20
MOVIDRIVE
®
Round Axle
3Installation
3.4.3 CAN bus
The CAN bus documentation package contains detailed information. This package can be obtained
from SEW, order number 0919 3308.
Technical data:
01010AEN
Fig. 18: Front view of DFC11A
Pin assignment:
01013AEN
Fig. 19: Assignment of 9-pin sub D connection
Option CAN fieldbus interface type DFC11A
Part number 822 725 X
Resources for
startup/diagnosis
DBG11A keypad
MOVITOOLS or MX_SHELL PC program
Supported baud
rates
Can be selected via DIP switch:
125 kbaud
250 kbaud
500 kbaud
1000 kbaud
Connection 9-pin sub D plug
Assignment to CiA standard
2-core twisted cable to ISO 11898
Bus termination Can be switched on using DIP switch (120Ω)
ID range 3...1020
Base ID: 0 – 63, can be selected using DIP switch
DFC
CAN-Bus
LED Green: TxD
LED Red: RxD
DIP switch to set process
data length and baud rate
DIP switch to set the
base ID and to switch
the termination
resistor on/off
X30: Bus connection
6
7
2
3
DGND
CAN High
CAN Low
DGND
EQ
Q
9-pin sub D connector
Twisted-pair
signal cables
Conductive line between
connector housing and screen!
Other manuals for MOVIDRIVE MD*60A Series
4
This manual suits for next models
2
Table of contents
Other SEW-Eurodrive Inverter Drive manuals