Shark HC450UK Series User manual

READ ALL THESE INSTRUCTIONS BEFORE USE.
1. DO NOT operate with a damaged cord or plug. Discard or return to an
authorised service facility for examination and/or repair.
2. DO NOT run cord under carpeting. DO NOT cover cord with throw rugs,
runners, or similar coverings. DO NOT route cord under furniture or
appliances. Arrange cord away from traffic area and where it will not be
tripped over.
3. If the cord is damaged, it must be replaced by the manufacturer, its service
agent, or similarly qualified persons in order to avoid a hazard.
4. This appliance is not intended for use by persons (including children) with
reduced physical, sensory or mental capabilities, or lack of experience
and knowledge, unless they have been given supervision or instruction
concerning use of the appliance by a person responsible for their safety.
USE WARNINGS
5. Children should be supervised to ensure that they DO NOT play with the
appliance. Keep the cord out of reach of children.
6. Cleaning and user maintenance should not be done by children.
7. Prior to cleaning or other maintenance, the appliance must be disconnected
from the supply mains.
8. DO NOT handle plug or appliance with wet hands.
9. DO NOT use without filter in place.
10. Only use Shark® branded filters and accessories.
11. DO NOT damage the power cord:
a) DO NOT pull or carry appliance by the cord or use the cord as
a handle.
b) DO NOT unplug by pulling on cord. Grasp the plug, not the cord.
c) DO NOT stand the appliance on the power cord, close a door on the
cord, pull the cord around sharp corners, or leave the cord near heated
surfaces.
12. DO NOT use with any opening blocked; keep free of dust, lint, hair and
anything that may reduce airflow.
13. DO NOT use if appliance is not working as it should, or has been dropped,
damaged, left outdoors, or dropped into water.
14. DO NOT place appliance on unstable surfaces such as chairs or tables.
15. DO NOT use in the following areas:
a) Wet or damp surfaces
b) Outdoor areas
c) Spaces that are enclosed and may contain explosive or toxic fumes or
vapours (lighter fluid, petrol, kerosene, paint, paint thinners, mothproofing
substances, or flammable dust).
16. Turn off all controls before unplugging the appliance.
17. Unplug from electrical outlet when not in use and before any maintenance or
cleaning.
18. Hand wipe external surfaces with water only. Wiping with cleaning chemicals
could damage the unit.
19. Make sure filter is in place after routine maintenance.
IMPORTANT INSTRUCTIONS
20. This heater is hot when in use. To avoid burns, DO NOT let bare skin touch
hot surfaces. If provided, use handles when moving this heater. Keep
combustible materials, such as furniture, pillows, bedding, papers, clothes,
and curtains at least 0.9 m (3 feet) from the front of the heater and keep
them away from the sides and rear.
21. DO NOT use this heater in small rooms when they are occupied by persons
not capable of leaving the room on their own, unless constant supervision is
provided.
22. Extreme caution is necessary when any heater is used by or near children or
invalids and whenever the heater is left operating and unattended.
23. DO NOT use this heater in the immediate surroundings of a bath, a shower or
a swimming pool and similar indoor locations. Never locate heater where it
may fall into a bathtub or other water container
24. DO NOT insert or allow foreign objects to enter any ventilation or exhaust
opening as this may cause an electric shock or fire or damage the heater.
25. In order to avoid overheating, DO NOT cover the heater. To prevent a
possible fire, do not block air intakes or exhaust in any manner. DO NOT use
on soft surfaces, like a bed, where openings may become blocked
26. A heater has hot and arcing or sparking parts inside. DO NOT use it in areas
where petrol, paint, or flammable liquids are used or stored.
27. Use this heater only as described in this manual. Any other use not
recommended by the manufacturer may cause fire, electric shock, or injury to
persons.
28. Always plug heaters directly into a wall outlet/receptacle. Never use with
an extension cord or relocatable power tap (outlet/power strip). DO NOT
position the heater immediately below a socket outlet.
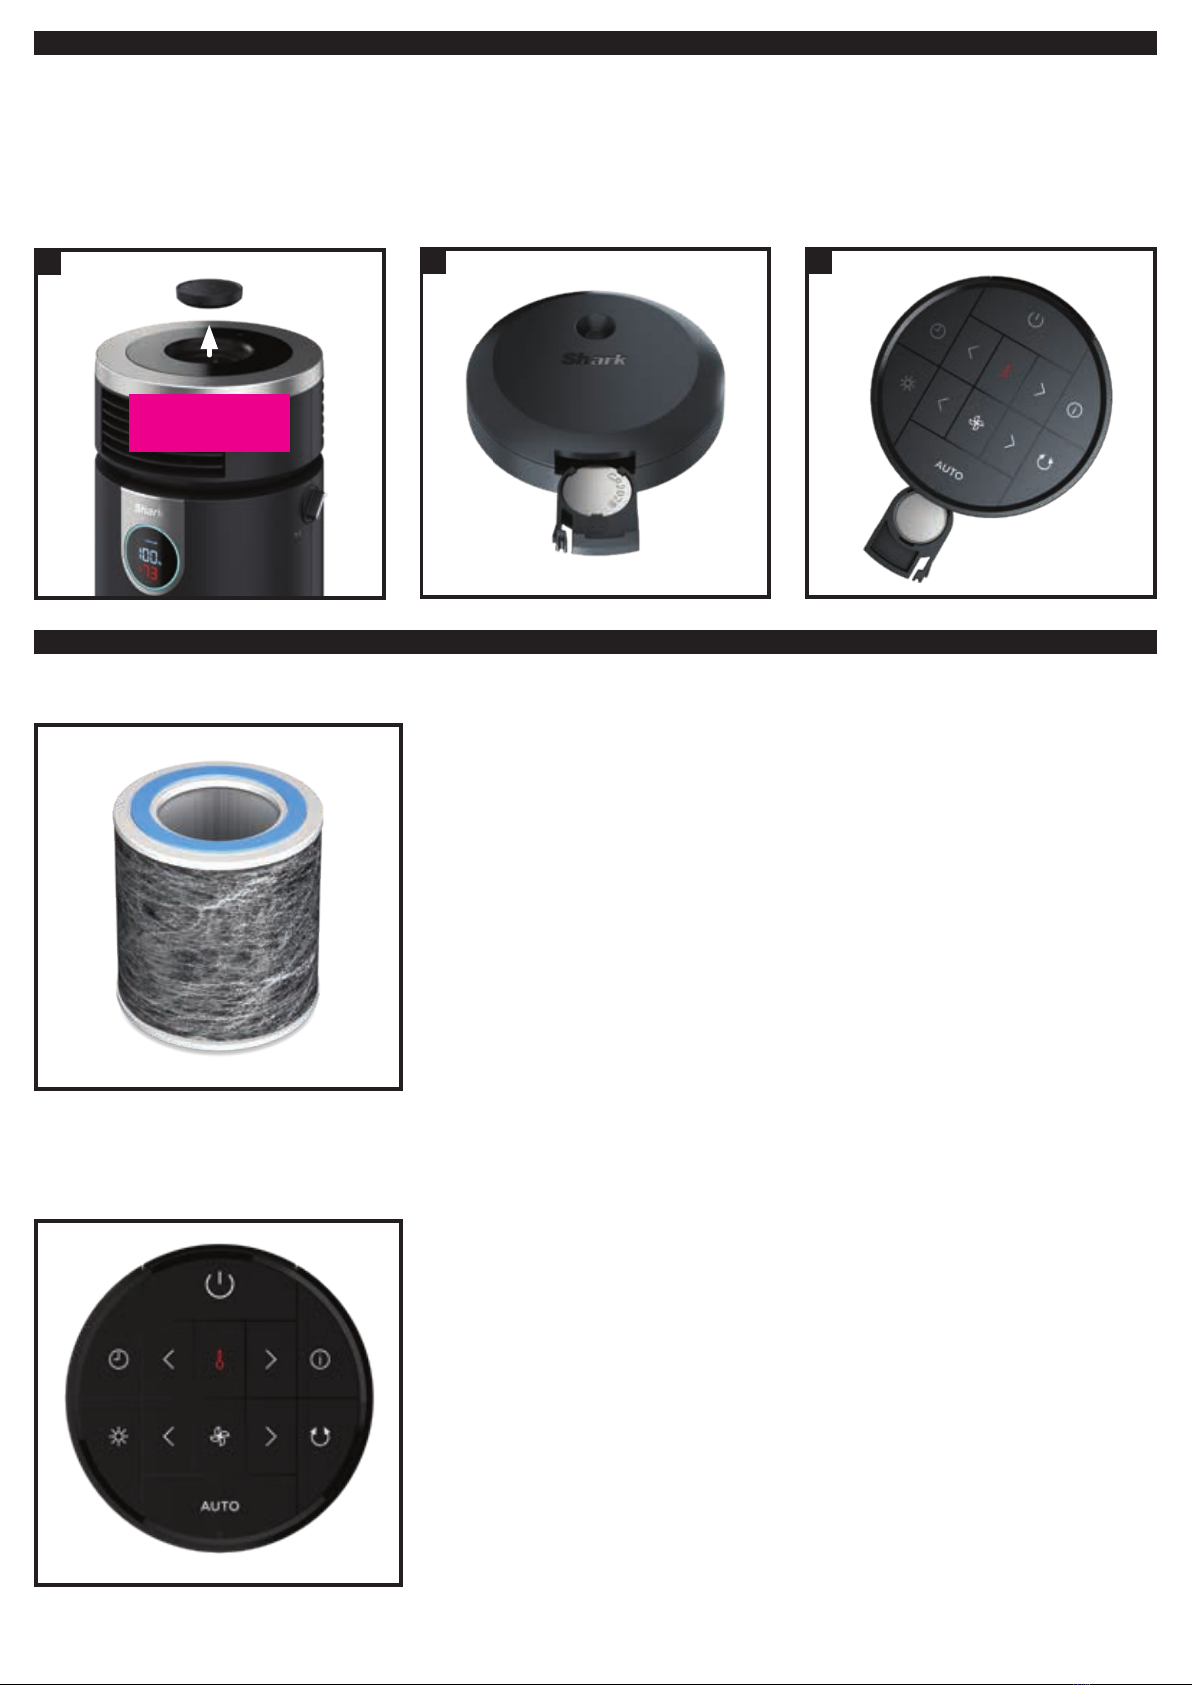
REMOTE CONTROL BATTERY WARNINGS
29. The battery must be disposed of properly, including keeping it away from
children, as even used batteries can cause injury.
WARNING: Chemical Burn Hazard. Keep batteries away from children.
This product contains a lithium button/coin cell battery. If a new or used
lithium button/coin cell battery is swallowed or enters the body, it can cause
severe internal burns and can lead to death in as little as 2 hours. Always
completely secure the battery compartment. If the battery compartment
does not close securely, stop using the product, remove the batteries and
keep it away from children. If you think batteries might have been swallowed
or placed inside any part of the body, seek immediate medical attention.
IMPORTANT SAFETY INSTRUCTIONS
HOUSEHOLD USE ONLY • READ ALL INSTRUCTIONS BEFORE USE
NOTE: SAVE THESE INSTRUCTIONS. KEEP FOR FUTURE REFERENCE.
Unplug or disconnect the appliance from the power
supply before servicing.
WARNING
TO REDUCE THE RISK OF FIRE, ELECTRIC SHOCK OR INJURY:
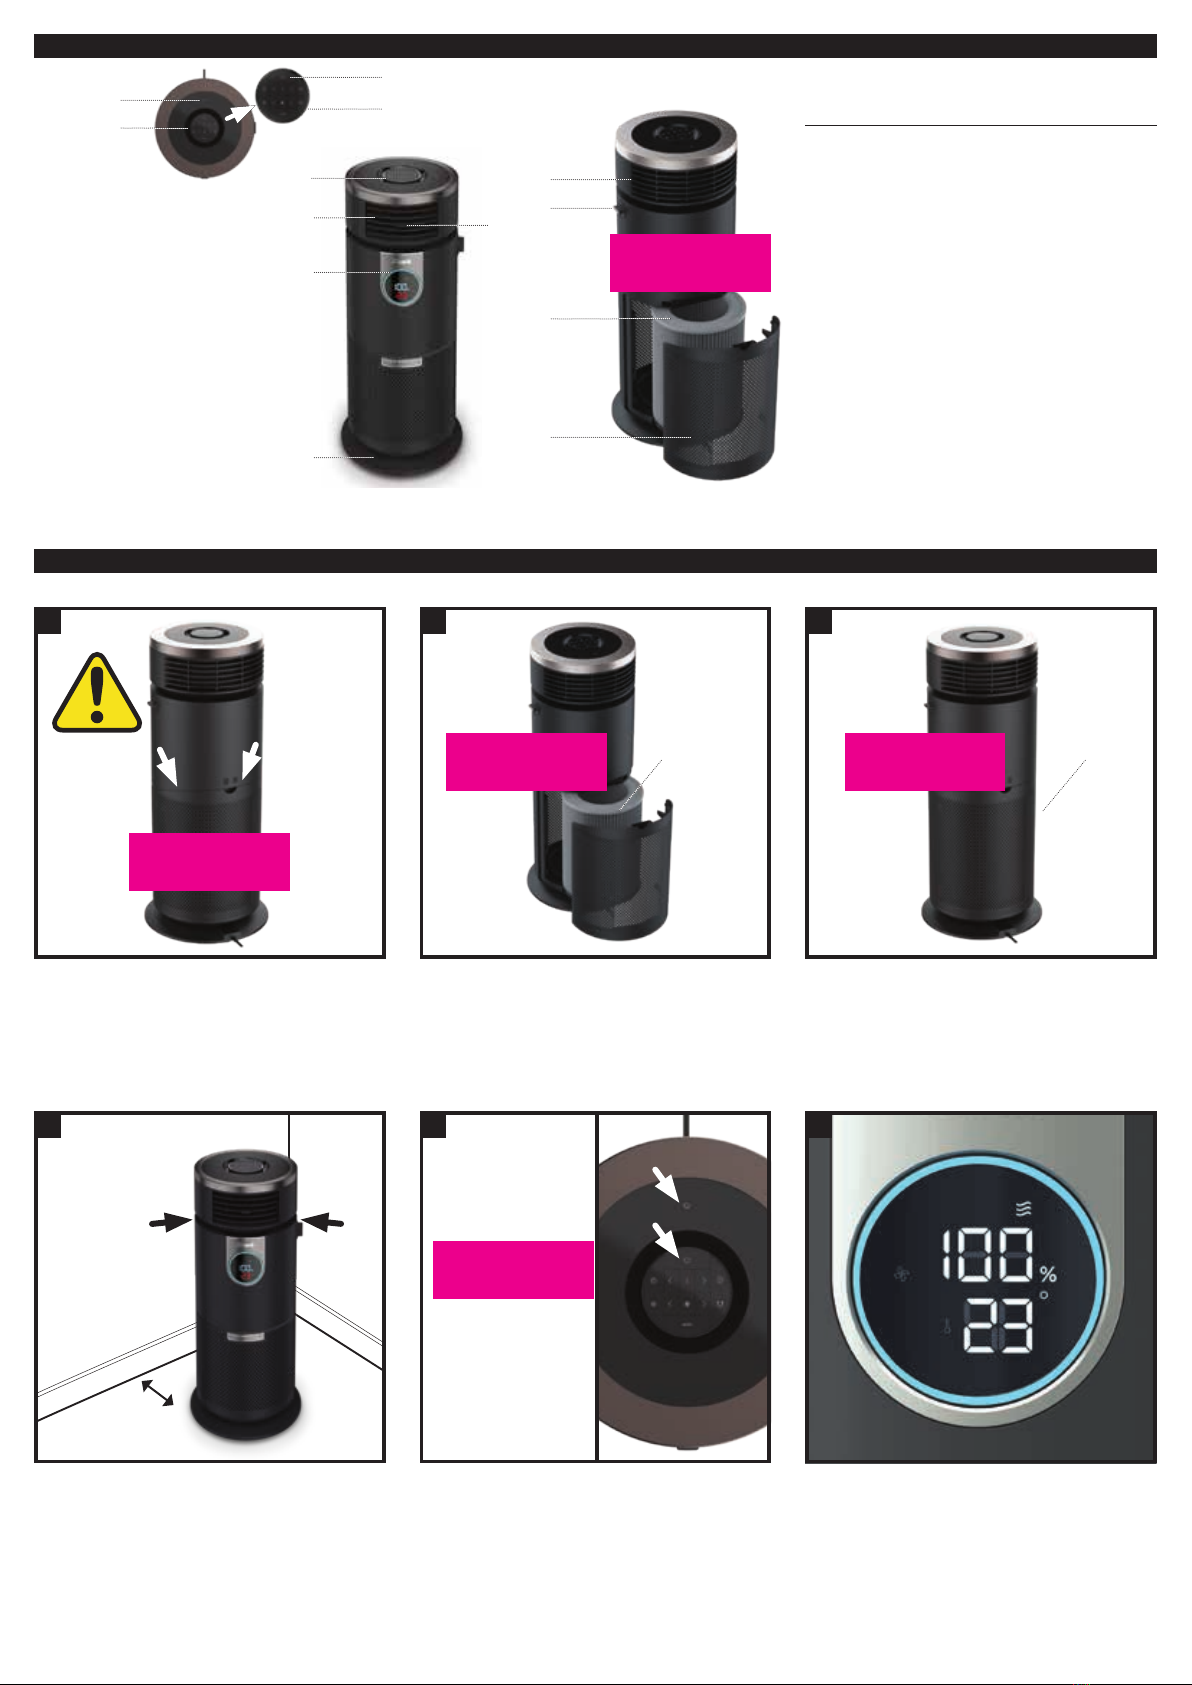
Remove Enclosed Filter From
Packaging Before Operating
visit qr.sharkclean.com/HC450UK or
SCAN HERE
USING YOUR SMARTPHONE CAMERA
FOR FULL INSTRUCTIONS, GUARANTEE AND REPLACEMENT
PARTS” to ‘’SCAN FOR ADDITIONAL RESOURCES.
WARNING:
In order to avoid overheating, do not cover the heater.
Read and review instructions for
operation and use.
Indicates the presence of a hazard
that can cause personal injury, death,
or substantial property damage if the
warning included with this symbol is
ignored.
For indoor and household use only.
Shark Air Purifier 3-in-1
HC450UK Series
OWNER’S GUIDE
SAVE THESE INSTRUCTIONS

SETTING UP YOUR UNIT
Parts:
1. Remote Dock
2. Power Button
3. Front Vents
4. Air Angle Adjustment Tab
5. Mode Dial
6. Display
7. Unit Base
8. Back Vents
9. NanoSeal HEPA Filter
10. Filter Door
11. Remote
1
4
10
7
9
3
8
5
6
TIPS FOR SETTING UP YOUR UNIT
• Orient the unit with display facing away from
the wall.
• Do not move the unit while it is running.
Turn o the power and unplug the unit before
moving it.
• Make sure the vents are not blocked.
• Do not place anything on the appliance.
• Do not place the appliance near heaters or
radiators.
• Keep the unit out of direct sunlight and away
from water or other liquid.
• Keep all nearby doors and windows closed
when operating the air purifier.
• Avoid using in very humid environments.
1
2
2
11
0.9 metres
minimum
4
32
Remove
filter from
packaging
5 6
1
1. You must remove the filter and take it
out of its packaging before operating.
First, remove the filter cover and filter
from the back of the air purifier.
2. Take the filter out of its sealed
packaging. Slide filter back into the
air purifier.
3. Reinstall the filter cover. Insert the tabs
on the bottom of the cover into the slots.
Press the top and sides of the cover until
it clicks into place.
4. Set up the air purifier on a level floor
surface at least 0.9m from the wall and
any furnishings.
When carrying the air purifier, hold it
below the venting area. Do not put
your hands inside the vents
5. Make sure the power switch on the back
of the unit by the cable exit is in the (I)
ON position.
6. When the air purifier is powered on, it
will begin to analyase the air quality,
indicated by the rotating lights.
After a few seconds, the air purifier will
display the current air quality and room
temperature. From there, use the remote
and dial to customize the settings.
Back of
air purifier
Angle filter
cover to
align tabs at
the bottom
SETTING UP YOUR AIR PURIFIER
FPO
FPO FPO
FPO
FPO

REMOTE
You can use the removable remote control to customise the settings.
Power on/o
Heating
Controls
Timer
Fan
Controls
Brightness
AUTO Mode
Air Info
Oscillation
Remote Buttons
MAX
On/O: Press to turn the power on or o.
MAX
AUTO mode: Press to turn on AUTO mode. The fan speed
automatically adjusts, based on the air quality. As the air quality
improves, the fan speed will decrease. If air quality worsens, the
fan speed will increase. Leave your air purifier in AUTO mode for
optimal filter life and performance. AUTO mode is only available
in PURIFIED AIR mode.
Optimise Performance in ECO mode: After the air is 100% status for
10 minutes, the air purifier will enter ECO mode and will appear
on the display. This reduces power draw and optimises the filter life.
Air Info: Press to switch between air quality display options.
See the Air Info Settings section for more information.
Fan Controls: Use the arrows to adjust the fan speed from 1-6.
Press the fan button to view the speed setting. Fan speed can be
adjusted in all 3 modes.
Note: When using AUTO mode, if fan speed is manually changed,
AUTO mode will be deactivated. For tips on optimal fan setting, see
Optimising Fan Speed section.
Heater Controls: Press the Thermometer button to turn HEAT on/o.
Target Temperature: Use the arrows to adjust the target
temperature. The heater will automatically work to reach and
maintain the target. The air purifier will beep when the target
temperature is reached.
HI HEAT Mode: To run the heater in HI HEAT mode without
selecting a target temperature, press and hold the right-side
temperature arrow until HI appears on the display. For more tips on
optimising heater performance, see the Heater Operation section.
MAX
Shut-O Timer: Set the number of hours for the air purifier to
run before it automatically shuts o. Timer can be set from
1–12 hours.
MAX
Brightness: Press to dim the brightness of the display. Switch
between 3 options: full brightness, partially dim, or fully dim.
Oscillation: Press to turn the oscillation on or o. When oscillating,
the unit will rotate side to side to distribute airflow around the room.
REMOTE SHORTCUTS
Turn O Sound: To turn o sounds, press and hold
the Brightness button for 3 seconds.
Turn On/O Child Safety Lock: Press and hold the Timer
and Oscillation buttons to turn the Child Safety Lock on or
o. The Lock icon will appear on the front display when
the lock is activated.
Change Temperature Display from Celsius
to Fahrenheit: Press and hold Fan and Thermometer
buttons to change the temperature display from Celsius to
Fahrenheit.
Reset Filter Life: Press and hold the info button for
3 seconds to reset the Filter Life display after changing
the filter.
MODE DIAL
Turn the dial to change modes.
1. PURIFIED FAN
To operate FAN mode, turn the dial to the Fan icon. In this mode,
purified air will be directed out of the front vents.
2. PURIFIED HEAT
To operate HEAT mode, turn the dial to the Air icon. Then press
the Thermometer button on remote. In this mode, purified,
warm air will be directed out of the front vents.
3. PURIFIED AIR
To operate PURIFIED AIR mode, turn the mode dial to the Air icon.
In this mode, purified air will be diused out the back vents. This
allows for continuous air purification without the breeze of a fan.
While the air will be purified in all modes, PURIFIED AIR mode
boosts cleaning power.
PURIFIED AIR mode is compatible with AUTO and ECO modes.
Dial in FAN or HEAT Mode
Dial in PURIFIED AIR Mode
Air directed out of the FRONT
Air diused out of the BACK

MODE DISPLAYS
THE INFORMATION ON THE FRONT DISPLAY IS DIFFERENT IN EACH MODE.
UNDERSTANDING YOUR AIR QUALITY
The ring around the display will change color as the air quality changes, for easy monitoring from far away.
GOOD
85–100%
.
FAIR
70–84%
POOR
0–69%
Note: The air quality sensor uses a cumulative particle count across all particle sizes to determine percentage of clean air.R
AIR INFO SETTINGS
The built-in sensor detects your air quality to give you real-time information. Use the AIR INFO button to switch between settings.
INFO REAL-TIME READING
% AIR QUALITY Displays the air quality rating: • Poor: 0%–69%• Fair: 70%–84%• Good: 85%–100%
If your unit reads 100% this means your air quality is very good. Should the air quality drop, the % will adjust accordingly.
TIME REMAINING Shows the estimated time remaining until reaching air quality rating- Good: 85% - 100%
PARTICLE SIZES The PM (particulate matter) value is the amount of particulate in your air, measured in micrograms
(g) per cubic meter. Your air purifier measures three particle sizes, PM1, PM2.5, and PM10.
PM1 Displays the amount of PM1-sized particles in your air, including viruses and ultra-fine allergens.
PM2.5 Displays the amount of PM2.5-sized particles in your air, including smoke and bacteria.
PM10 Displays the amount of PM10-sized particles in your air, including dust, mold, and pollen.
ROOM TEMPERATURE Displays the current temperature in the room. *Only visible in PURIFIED AIR mode
FILTER LIFE Displays the remaining filter life, as a percentage.
To improve FAIR or POOR air quality increase the fan speed or select AUTO mode.
PURIFIED FAN
The top reading is the clean air
percentage and the bottom reading
is the current room temperature.
PURIFIED HEAT
In this mode, the top reading is the clean
air percentage and the bottom reading in
red is the target temperature. Once the
target temperature is reached, the bottom
reading will display the current room
temperature in white.
PURIFIED AIR
In this mode, the percentage
of clean air is shown.
The red thermometer light indicates
that the heater is on and warming
to reach the target temperature.
MAX
MAX
MAX

AIR PURIFIER OPERATION
TO ACTIVATE PURIFIED AIR MODE AND ADJUST SETTINGS:
1. Turn the mode dial to the Air icon.
2. The display will show air quality as a percentage. Press
the info button to change the air information displayed.
3. Press the fan arrows to adjust the fan speed. As fan speed
increases, so will purification performance.
4.To activate AUTO mode, press the AUTO button. In this mode,
the fan speed will automatically adjust, based on the quality of
the air. AUTO mode is only available in PURIFIED AIR mode.
5. When in AUTO mode, if the air quality is 100% for 10 minutes,
the air purifier will enter ECO mode and will appear on the
display. This will reduce energy consumption and extend the
filter life.
FAN OPERATION
TO ACTIVATE THE FAN AND ADJUST AIRFLOW:
1. Turn the mode dial to the Fan icon.
2. On the front display, the top number is the air quality
percentage and the bottom number is the current room
temperature.
Press the Info button to change the air information
displayed.
3. Press the fan arrows to adjust the fan speed or press the
Fan button to check current fan speed. As fan speed
increases, so will purification performance.
4.Press the Oscillation button on the remote to turn
oscillation on or off.
5. Additionally, the airflow angle can be adjusted by moving the
front vents up or down.
NIGHT USE
For non-disruptive performance at night:
• Lower the fan speed for soothing white noise.
• Press the Brightness button to fully dim the display.
• Turn on oscillation for better fan coverage.
• Press and hold the Brightness button for 3 seconds to
turn sound off or on.
52-4
2-4
1
1
TIPS FOR USING PURIFIED AIR MODE:
Air quality fluctuates, depending on what is introduced in the
home. Some factors that can affect the air quality:
• Cooking or burning food
• Vacuuming or dusting
• Spraying cleaning products
• Smoking
• Opening windows or exterior
doors can introduce pollen.
Leave the air purifier in AUTO mode for optimal filter life
and performance.
AUTO mode is ONLY available in PURIFIED AIR mode.
2
2
3
3
4
4
5

HEATER OPERATION
TO ACTIVATE THE HEATER AND ADJUST SETTINGS:
1. Turn the mode dial to the Heat icon and press to turn on heat.
2. On the front display, the top number is the air quality
percentage. The bottom number in red is the target
temperature.
3. Press the temperature arrows to set the target temperature or
hold down the right arrow for HI heat mode. When the target
temperature is set, the display will flash and beep twice
to confirm.
Note: The heater may need up to 25 seconds to fully warm up.
This will be indicated by the red ‘heating up’ animation.
4.After the target temperature is set and the heater is active,
the bottom number in the display will turn white and will
update to show current room temperature.
5. When the target temperature is reached, there will be a long
beep, and heating will pause.
6.Use the fan arrows to adjust the heated air flow rate.
7. Press the Info button to change the air information display.
8. Press the Oscillation icon to turn oscillation on or off.
9. Additionally, the airflow angle can be adjusted by moving
the front vents up or down.
3
2
6-8
1
4TIPS FOR USING PURIFIED HEAT MODE
• When using the air purifier at close
range for personal heating, lower the
fan speed for optimal performance.
• When using the air purifier at a distance
for whole-room heating, increase the
fan speed and turn on oscillation for
optimal performance.
• In HI heat mode, the heater will not have
a temperature target and will continue
to run until turned off.
7
6
8
HEATER SAFETY FUNCTION AND RESET
The HC500 has multiple safety features designed to prevent overheating, accidents, and damage.
TIP-OVER AUTOMATIC SHUTOFF
If your air purifier gets tipped over, it will automatically turn off.
Follow these steps to reactivate the heater:
1. Turn the power off and unplug the air purifier.
2. Set the air purifier upright, on a level floor surface.
3. Plug in the air purifier and turn on power.
4. Turn the mode dial to the Heat icon and press to turn on heat.
OVERHEAT AUTOMATIC SHUTOFF
Your air purifier could overheat if obstructions block the vents.
If this happens, the unit will automatically turn off. Follow these
steps to reactivate the heater:
1. Turn the power off and unplug the air purifier.
2. Remove any obstructions from the vents.
3. Wait 5 minutes, then plug in the air purifier and turn on power.
4. Turn the mode dial to the Heat icon and press to turn on heat.
Note: Any rattling heard when moving
the air purifier may be caused by
the internal safety tilt switch.

2
INSTALLING AND REMOVING THE FILTER
NOTE: Always remove all protective packaging from the filter before installing.
Shark® filters are engineered to last between 6-12 months. When the filter life has 0% remaining, FILTER LIFE will illuminate and flash,
indicating that it’s time to install a new filter.
1. Turn o and unplug the air purifier before removing or
installing filters.
2. First, remove the filter cover from the back of the air purifier.
Use the handle to pull the filter door towards you.
3. To remove the old filter, pull it out by the removal tabs.
Discard old filter in a rubbish bin.
4. Remove all packaging and wrapping from the new filter.
5. Insert the new filter, then replace the filter cover. Insert the tabs
on the bottom of the cover into the slots. Press the top and sides
of the cover until it clicks into place.
6. Plug the air purifier back on and turn on power.
Calibration will begin.
7. After installing a new filter, press and hold the Info button
for 3 seconds to reset the filter life percentage. The air purifier
will beep to confirm when the filter life is reset to 100%.
Disposing of used filters
Filters can’t be cleaned or recycled. After removing a used filter, wrap it in an airtight
bag for disposal. As an extra precaution, wear gloves when handling a dirty filter.
To maximise filter life, every three months, remove the filter, then turn it upside down
and reinstall it. This will help equalize and balance the distribution of captured particles
throughout the filter, allowing for extended use.
MAINTAINING YOUR AIR PURIFIER
NOTE: Always unplug the unit before doing any cleaning or maintenance.
Exterior Cleaning:
For best results, clean the exterior of the air purifier every two
months or as needed. Use a microfiber cloth to remove dust.
To sanitise, wipe down the exterior with a microfiber cloth
dampened with warm, soapy water. Avoid excess water and
abrasive chemical cleaners to prevent damage.
Interior Cleaning:
For best results, clean the interior of the unit every two months
or as needed. Remove the filter cover, take out the filter, and use
a vacuum cleaner or a microfiber cloth to remove dust and debris
from the interior of the air purifier. DO NOT use abrasive chemical
cleaners on the inside of the air purifier.
3
Remove
filter
from
packaging
1
FPOFPO
FPO

REPLACING THE REMOTE BATTERY
The removable remote is equipped with a CR2025 lithium coin cell battery with a life of up to 3 years. Periodically, the remote battery will
require replacement.
1. Remove the remote from its dock on the top of the air purifier.
2 Pinch the tab on the battery compartment, then slide out
the compartment.
3. Remove the battery and dispose of it immediately.
Keep the battery away from children and pets.
4. Insert a new battery, (+) side facing up. Then slide the battery
compartment back into the remote, until it clicks into place.
5. Point the remote at the air purifier and adjust the settings to
ensure the remote is functioning properly. If there are persisting issues
with the remote, see the Troubleshooting section.
AVAILABLE ACCESSORIES
ORDER ADDITIONAL ACCESSORIES AND REPLACEMENT FILTERS
from sharkclean.co.uk
SHARK® NANOSEAL BASE FILTER
WITH HEPA
Captures 99.97% of large, small & micro-sized
particles from the air.
SHARK® HC450 SERIES REMOTE CONTROL.
3
2
1
FPO

TROUBLESHOOTING
ERROR CODE MEANING SOLUTION
AUTO mode is not available
in Purified Heat or Fan mode.
• Make sure the mode dial on the side of the
air purifier is pointing to the Air icon.
• Then press AUTO on the remote to
activate AUTO mode.
The heater is not active
OR
purified heat is not available in this mode.
• Make sure the mode dial on the side of the
air purifier is pointing to the Heat icon.
• Then press on the remote to turn on
PURIFIED HEAT mode.
PROBLEM SOLUTION
My air purifier is not powering on,
what should I do?
• Make sure the air purifier is set up on a flat, level floor surface. Plug it in and ensure that the outlet works.
Press the power button to turn the air purifier on.
• Make sure the filter cover is properly installed in the back of the air purifier. Insert the tabs on the bottom of
the cover into the slots. Press the top and sides of the cover until it clicks into place.
• Make sure filter is installed fully in the unit. Push filter into the unit firmly until the filter cannot be pushed
back any more.
I can’t feel air blowing out of the
front of the air purifier.
• For PURIFIED FAN mode, make sure the mode dial on the side of the air purifier is pointing to the Fan icon.
This will direct air out of the front vents.
• For PURIFIED AIR mode, make sure the mode dial on the side of the air purifier is pointing to the Air icon.
This will direct air out of the back vents.
• Make sure the filter has been removed from its packaging.
How do I know when my
air purifier is in AUTO mode?
• The icon on the display illuminates when the air purifier is in AUTO mode. AUTO mode is ONLY available
in PURIFIED AIR mode.
• For PURIFIED AIR mode, make sure the mode dial on the side of the air purifier is pointing to the Air icon.
I can’t turn the heater on. • Make sure the mode dial on the side of the air purifier is pointing to the Heat icon.
• Press the Heat icon on the remote to turn on PURIFIED HEAT mode.
My heater turned o on its own.
• Once a target temperature is set, the heater will work to achieve it. After the target is reached, the heater
will monitor the temperature in the room and turn back on if the room temperature falls below the target.
• The heater has built-in safety features designed to prevent overheating, accidents, and damage. If your heat-
er has malfunctioned, follow the steps in the Heater Safety Function and Reset section.
How do I change the temperature
display from Celsius to Fahrenheit?
• Simultaneously press and hold Fan and Thermometer buttons to change the temperature
measurement display from Celsius to Fahrenheit.
Why does my air smell bad?
• Make sure the filter has been removed from its packaging.
• If your air purifier is brand new, there may be an initial electronic smell that will go away on its own.
• If there have been odours in the area recently, such as from cigarettes or food, allow more time for the air
purifier to remove them.
• Clean o any dust or debris from the intake vent and air vent areas.
• The filter may need to be replaced.
Can I wash the filter? • No, the filter is not washable. Keep filter away from water and dispose of it when it is dirty.
How do I turn o the beeping? • To turn sound on or o, press and hold the Brightness button for three seconds.
Why is my air purifier vibrating
or making unusual loud noises? • Make sure the air purifier is set up on its base and on a flat, level space on the floor.
My remote is not working.
• Make sure the Child Safety Lock is not activated, indicated by the Lock icon on the display.
• To turn on/o Child Lock, simultaneously press and hold the Timer and Oscillation buttons.
• Try replacing the remote battery. For instructions, see Replacing the Remote Battery’ section.
Customer Service
For further assistance, call 0800 8620453.

When a consumer buys a product in the UK, they get the benefit of legal rights relating to the quality of the product (your “statutory rights”).
You can enforce these rights against your retailer. However, at Shark® we are so confident about the quality of our products that we give the
product owner an additional manufacturer’s guarantee of up to two years - one year as standard, two years total on registration. These terms and
conditions relate to our manufacturer’s guarantee only - your statutory rights are unaected.
The conditions below describe the prerequisites and scope of our guarantee. They do not aect your statutory rights or the obligations of your
retailer and your contract with them.
Shark® Guarantees
A household appliance like a Air Purifier constitutes a sizeable investment. Your new machine needs to work properly for as long as possible.
The guarantee it comes with is an important consideration - and reflects how much confidence the manufacturer has in its product and
manufacturing quality.
Every Shark® machine comes with a free parts and labour guarantee. Our customer service helpline (0800 862 0453) is open from 9.00am
to 6.00pm Monday - Friday. It’s free to call, and you’ll be put straight through to a Shark® representative. You’ll also find online support at
www.sharkclean.co.uk.
How do I register my extended Shark® guarantee?
You can register your guarantee online within 28 days of purchase. To save time, you’ll need the following information about your machine:
• Date you purchased the machine (receipt or delivery note).
To register online, please visit www.Sharkclean.eu/uk/register-guarantee. Products purchased directly from Shark® are automatically registered.
What is covered by the free Shark® guarantee?
Repair or replacement (at Shark’s discretion) of your Shark® machine, including all parts and labour. A Shark® guarantee is in addition to your legal
rights as a consumer.
What are the benefits of registering my free Shark® guarantee?
The key benefit is the additional one year guarantee. When you register your guarantee we’ll have your details to hand if we ever need to get in
touch. If you further agree to receive communications from us, you can also receive tips and advice on how to get the best out of your Shark® Air
Purifier and hear the latest news about new Shark® technology and launches.
If you register your guarantee online, you’ll get instant confirmation that we’ve received your details.
How long are new Shark® machines guaranteed for?
Our confidence in our design and quality control means that your new Shark® Air Purifier is guaranteed for a total of up to two years - one year as
standard, two years on registration.
Where can I buy genuine Shark® spares and accessories?
Shark® spares and accessories are developed by the same engineers who developed your Shark® Air Purifier. You’ll find a full range of Shark® spares,
replacement parts and accessories for all Shark® machines at www.sharkclean.co.uk.
Please remember that damage caused by use of non-Shark® spares is not covered under your guarantee.
What is not covered by the free Shark® guarantee?
1. Normal wear and tear of wearable parts, which require regular maintenance and/or replacement to ensure the proper functioning of your unit,
are not covered by this guarantee. Replacement parts are available for purchase at sharkclean.co.uk.
2. Any unit that has been tampered with or used for commercial purposes.
3.
Accidental damage and faults caused by negligent use or care, misuse, neglect, careless operation or handling of
the Air Purifier which is not in accordance with this Shark® Instruction booklet supplied with your machine.
4. Use of parts not assembled or installed in accordance with these instructions.
5. Faulty installation (except where installed by Shark®).
6. Repairs or alterations carried out by parties other than Shark® or its agents.
TWO (2) YEAR LIMITED GUARANTEE
© 2022 SharkNinja Operating LLC.
SHARK is a registered trademark of SharkNinja Operating LLC.
sharkclean.co.uk
HC450UK_IB_A4-DIGITAL_MP_Mv1_221020 @sharkcleaninguk @sharkcleanuk @sharkcleanuk
Table of contents
Other Shark Air Cleaner manuals

Shark
Shark HP100 Series User manual

Shark
Shark HE600 Series User manual

Shark
Shark HP100EU User manual

Shark
Shark HP100 Series User manual

Shark
Shark HE600 Series User manual

Shark
Shark HE400 Series User manual

Shark
Shark HP100 Series User manual

Shark
Shark HP300 Series User manual

Shark
Shark HP102 User manual

Shark
Shark HE400 Series User manual