Shark HP300 Series User manual

Air Purifier
HP300 Series
OWNER’S GUIDE
IMPORTANT SAFETY INSTRUCTIONS
HOUSEHOLD USE ONLY
WARNING
TO REDUCE THE RISK OF FIRE, ELECTRIC SHOCK, OR INJURY:
GENERAL WARNINGS
1. This appliance has a polarized plug (one blade is wider
than the other). To reduce the risk of electric shock, this
plug is intended to fit in a polarized outlet only one way. If
the plug does not fit fully in the outlet, reverse the plug. If
it still does not fit, contact a qualified electrician. Do not
attempt to defeat this safety feature. Unplug
or disconnect the appliance from the power supply before
servicing.
2. DO NOT operate any unit with a damaged cord or plug.
Discard the unit or return to an authorized service facility
for examination and/or repair.
3. DO NOT run cord under carpeting. DO NOT cover
cord with throw rugs, runners, or similar coverings.
DO NOT route cord under furniture or appliances.
Keep cord away from high traffic areas where it will
not be tripped over.
4. If the power cord is damaged, it must be replaced by
the manufacturer, its service agent, or similarly qualified
persons in order to avoid a hazard.
5. This appliance should only be placed on flat and dry surfaces.
6. This appliance is not intended for use by anyone
(including children) with reduced physical, sensory or
mental capabilities, or lack of experience and knowledge,
unless they have been given supervision or instruction
concerning use of the appliance by a person responsible
for their safety.
7. Children should be supervised to ensure that they
DO NOT play with the appliance.
8. Cleaning and user maintenance shall not be made by
children without supervision.
9. Prior to cleaning or other maintenance, the appliance must
be unplugged from the electrical outlet.
10. DO NOT handle plug or appliance with wet hands.
11. DO NOT use without filter in place.
12. Only use Shark® branded filters and accessories.
13. DO NOT damage the power cord:
a) DO NOT pull or carry appliance by the cord or use the
cord as a handle.
b) DO NOT unplug by pulling on cord. Grasp the plug, not
the cord.
c) DO NOT stand the appliance on the power cord, close a
door on the cord, pull the cord around sharp corners, or
leave the cord near heated surfaces.
14. DO NOT use with any opening blocked; keep free of dust,
lint, hair, and anything that may reduce airflow.
15. DO NOT use if airflow is restricted. If the air paths become
blocked, turn the appliance off and unplug from electrical
outlet. Remove all obstructions before you plug in and turn
on the unit again.
16. DO NOT use if appliance is not working as it should, or
has been dropped, damaged, left outdoors, or dropped
into water.
17. DO NOT place appliance on unstable surfaces such as
chairs or tables.
18. DO NOT use in the following areas:
a) Wet or damp surfaces
b) Outdoor areas
c) Spaces that are enclosed and may contain explosive or
toxic fumes or vapors (lighter fluid, gasoline, kerosene,
paint, paint thinners, mothproofing substances, or
flammable dust)
19. Turn off all controls before plugging in or unplugging the
appliance.
20. Unplug from electrical outlet when not in use and before
any maintenance or cleaning.
21. Hand wash exterior/hard plastic/non-electronic
parts with water only. Do not immerse. Cleaning
with chemicals could damage the unit.
22. Make sure filter is in place after routine maintenance.
23. Not suitable for use with solid-state speed controls.
ODOR NEUTRALIZER TECHNOLOGY
24. Observe the following when interacting with the Odor
Neutralizer Technology cartridge.
a) DO NOT attempt to disassemble Odor Neutralizer
Technology cartridge.
b) Avoid direct contact with the fragrance pod in
the cartridge.
c) DO NOT directly inhale from the odor neutralizer
technology cartridge.
d) Keep away from children and pets.
e) Keep away from heat, sparks, and open flame.
f) DO NOT place in direct sunlight.
g) Avoid contact with fabrics and finished surfaces.
FRAGRANCE CARTRIDGE FIRST AID
a) Eye contact: Remove contact lenses if present.
Rinse continuously with water for several minutes
b) Skin contact: Wash hands thoroughly after handling. If
irritation or rash develops, seek medical
advice/attention.
c) Inhalation: Move person to fresh air if they are
experiencing any respiratory symptoms. If
symptoms persist, seek medical advice/attention.
d) Ingestion: DO NOT induce vomiting. Seek medical
advice/attention.
25. Dispose of batteries properly. Keep batteries away
from children at all times. Even used batteries can
cause injury.
WARNING: Chemical Burn Hazard. Keep batteries away
from children.
This product contains a lithium button/coin cell battery. If
a new or used lithium button/coin cell battery is swallowed
or enters the body, it can cause severe internal burns and
can lead to death in as little as 2 hours. When not changing
batteries, keep the battery compartment completely closed.
If the battery compartment does not close securely, stop
using the product, remove the batteries, and keep them
away from children. If you think batteries might have been
swallowed or placed inside any part of the body, seek
immediate medical attention.
SAVE THESE INSTRUCTIONS

SETTING UP YOUR AIR PURIFIER
Parts:
1. Air Output Vents
2. Odor Neutralizer
Technology Dial
3. Control Panel
4. Front Display
5. Air Purifier Body
6. Air Intake Vents
7. Mesh Dust Filters
8. HEPA Filter
9. HEPA Filter Door
1. DO NOT plug in the air purifier. First,
carefully turn the air purifier upside
down and place it on a level floor surface.
Rotate the filter door counterclockwise
to unlock it, then lift it o to access the
HEPA filter.
2. Take the HEPA filter out of its plastic
packaging. Reinstall the HEPA filter in
either orientation.
3. With the HEPA filter reinstalled, rotate
the filter door clockwise until it clicks
into place.
4. Set up the air purifier on a flat, level,
floor surface, at least 3 inches (8 cm)
away from walls and objects.
If Odor Neutralizer Technology is
included with your air purifier, find
the odor cartridge and follow the
instructions to install it.
5. Carefully remove the yellow sticker on
the top of the air purifier to access the
control panel.
Plug the air purifier into an electrical
outlet and press the power button on
the top control panel.
6. When the air purifier power is on, the
air purifier will begin to analyze the air
quality, indicated by the rotating lights.
After a few seconds, the air purifier will
display the current air quality.
3-inch
minimum
4
32
Remove
HEPA filter
from plastic
packaging
5 6
1
TIPS FOR SETTING
UP YOUR AIR PURIFIER
• Make sure the front panel of the air purifier
faces away from the closest wall.
• Do not move the unit while it is running. Turn
o the power and unplug the air purifier before
moving it.
• Make sure the air intake vents are not blocked.
• Do not place anything on the air purifier.
• Do not place the air purifier near heaters
or radiators.
• Keep the air purifier out of direct sunlight and
away from water or other liquid.
• Keep all nearby doors and windows closed
when operating the air purifier.
• Avoid using in very humid environments.
Note: Odor Neutralizer Technology is not
included on all Shark HP300 series products.
Note: NeverChange HEPA Filter Technology allows up to 5 years* of use out of a single HEPA filter.
*Tested to GB/T18801-2015 P.CCM, based on 50% CADR declined, 300 sq. ft. cleaning area and 12 hours daily operation on MAX fan speed.
6.
5.
7.
3. 1.
9.
8.
2.
4.
Insert Odor
Neutralizer
Technology
Cartridge
Remove sticker
then power on

CONTROL PANEL
There is a control panel on the top of the air purifier and a display screen on the front.
TOP CONTROL PANEL
FRONT DISPLAY SCREEN
Displays the current air quality status based on the Air Info mode
selected on the top control panel.
TOP CONTROL PANEL BUTTONS
MAX
On/O: Press to turn the power on or o.
MAX
Auto Mode: Press to turn on Auto Mode. In this setting the
fan speed automatically adjusts based on real-time air quality
readings. As the air quality improves, the fan speed will
decrease. If air quality worsens, the fan speed will increase.
Leave your unit in Auto Mode for optimal filter life
and performance.
MAX
Fan Speed: Adjusts the speed of the fan. Select one of 5 settings:
1 Quiet, 2 Low, 3 Medium, 4 High, 5 Maximum. Note: If fan speed
is manually changed, Auto Mode will be deactivated. For tips and
more information, see the Optimizing Fan Speed section.
Air Info: Press to switch between air quality display options.
See the Air Info Settings section for more information.
MAX
Shut-O Timer: Set the number of hours for the air purifier
to run before it automatically shuts o. Timer can be set from
1 to 12 hours.
MAX
Brightness: Adjusts the brightness of both the front display
screen and the top control panel. Switch between 3 options:
full brightness, partially dim, fully dim. In fully dim mode, the
air purifier will continue to run with the LED light o—perfect
for nighttime.
Dust Filter Life: Press to show the remaining life of the mesh dust
filters before additional maintenance is required. When Dust Filter
Life reaches 0%, the filter icon will flash to indicate the mesh dust
filters need to be checked for debris buildup. See Mesh Dust Filter
Maintenance section for more information.
Child Lock: Press and hold for two seconds to lock the top control
panel buttons. To unlock, press and hold for two seconds again.
Tips and Tricks:
Optimize Performance in Eco Mode: After 100% clean air
status is achieved for 5 minutes in Auto Mode, your air purifier
will enter Eco Mode. Your unit’s filter life will be optimized.
Turn O Beeping: To turn o notification sounds, press and
hold the Air Info and Child Lock buttons at the same time for
two seconds. To resume, press and hold both buttons again.
AIR INFO SETTINGS
The built-in sensor detects your air quality to give you real-time information. Use the AIR INFO button to switch between air quality
display options.
INFO FRONT DISPLAY
SCREEN REAL-TIME READING
% CLEAN AIR
Displays the air quality rating:
• Poor: 0%–69%• Fair: 70%–84%• Good: 85%–100%
% CLEAN AIR uses particulate matter (PM) air quality standards
as determined by the EPA to calculate the air quality rating.
PARTICLE SIZES
The PM (particulate matter) value is the amount of particulate in
your air, measured in micrograms (g) per cubic meter. Your air
purifier measures three particle sizes, PM1, PM2.5, and PM10.
PM1
Displays the number of PM1-sized particles
in your air, including ultra-fine allergens.
*Allergens refers to non-living matter.
PM2.5 Displays the number of PM2.5-sized particles
in your air, including smoke.
PM10 Displays the number of PM10-sized particles in
your air, including dust, and pollen.

UNDERSTANDING YOUR AIR QUALITY
The rings on the front display will change color as your air quality changes,
allowing you to easily monitor your air quality even when the air purifier is across the room.
GOOD
85–100%
0–25
particles
A blue ring means your air quality
is good, with a low level of particle
concentration.
FAIR
70–84%
26–80
particles
An amber ring means your air quality
is fair, with a moderate level of particle
concentration. For better results, increase
fan speed or select Auto Mode.
POOR
0–69%
81–430+
particles
A red ring means your air quality
is poor, with a high level of particle
concentration. For better results,
increase fan speed or select Auto Mode.
Note: The air quality sensor uses a cumulative particle count across all particle sizes to determine percentage of clean air.
OPTIMIZING FAN SPEED
Your air purifier is equipped with 5 fan speed settings. Adjust fan speed to optimize your cleaning performance.
DISPLAY SPEED BEST FOR
AUTO Optimizing HEPA filter life
1-2 Quiet operation
3-4 Reducing odors.
5 (MAX) Maximum purification and debris capture.
TROUBLESHOOTING AND FREQUENTLY ASKED QUESTIONS
Product
What are the
recommended settings?
We recommend using this air purifier in Auto Mode. Auto Mode leverages your air purifier’s
particle sensor, and this adjusts the fan speed automatically. Higher fan speeds work best
for reducing odors and capturing debris most effectively.
Where should I
set up my air purifier?
We recommend setting up the air purifier in the room of your home where there is the most
activity. This will help to clear the air of pollutants and odors as they are introduced.
What is Eco mode?
After 100% clean air is achieved for 5 minutes in Auto Mode, your air purifier will enter Eco
Mode. The fan will turn off until a significant number of particles are detected, optimizing
your HEPA filter’s life.
Can I mute the air purifier, so
it doesn’t beep when pressing
the buttons?
To turn off notification sounds, press and hold the Air Info and Child Lock buttons
at the same time for two seconds. To reactivate sounds, press and hold both buttons
for 2 seconds again.
Why are the top control panel
buttons not working?
Your air purifier may have the child lock setting activated. Press and hold
the Child Lock button for two seconds to turn this setting on or off.
Air Quality
Why is my air quality
always at 100%?
If your air purifier displays a blue ring, your air quality is good. However, air quality will
fluctuate as you introduce pollutants into your home. Activities like smoking, cooking, dusting,
or spraying cleaning products (among other things) can add pollutants to your air. Our Clean
Sense IQ™ technology tracks this fluctuation in real time and adjusts as it detects particles.
To determine if the sensor is working correctly, spray perfume or aerosol cleaning product
near the sensor on the back of the air purifier. Please visit sharkclean.com/support for more
information.
Why is my air quality
never at 100%?
If your air quality never reaches 100%, make sure that the HEPA filter is properly installed and
that its original plastic packaging has been removed. Activities like smoking, burning candles,
running a humidifier, opening windows, and cooking (among other things) can add more
pollutants to your air. Make sure to survey your environment and remove anything that could
be causing low air quality.
Mesh Dust Filter
What are these filters on both
sides of the air purifier for?
These easy-to-clean mesh dust filters capture large debris like hair, dust, and lint to protect
the 3-layer HEPA filter. Maintenance is required on these mesh dust filters when indicated on
the front display. Refer to the Mesh Dust Filter Maintenance section for more information.
How do I know when to clean
these 2 filters?
When the mesh dust filters need maintenance, the front display will show a
pulsing red ring along with the text “check dust filters.” Refer to the Mesh Dust Filter
Maintenance section for more information.
HEPA
Filter
Can I wash the HEPA filter? No, the HEPA filter is not washable. Keep filter away from water and dispose of it when it is dirty.
Customer Service
For further assistance, call 1-855-523-4061. Note: Odor Neutralizer Technology is not included on all Shark HP300 series products.

MESH DUST FILTER MAINTENANCE
Checking the Mesh Dust Filters:
When the mesh dust filters need maintenance, the front display will show the following screen with a pulsing red ring:
Cleaning the Mesh Dust Filters:
When the Check Dust Filters message appears on the front display, remove the dust filters and inspect them for debris.
If maintenance is required, be sure to KEEP THE AIR PURIFIER PLUGGED IN and running, and complete the following steps:
Gently slide up the filters to remove
them. Check the screens for dust and
debris buildup.
Use a vacuum cleaner on low speed with
a soft brush attachment OR a cloth/towel
to remove debris from the mesh screens.
DO NOT use abrasive chemical cleaners.
If additional cleaning is required, rinse the
mesh dust filters with room temperature
tap water. Be sure to completely dry the
screens for 12 hours before reinstalling.
DO NOT USE the air purifier when mesh
filers are wet.
Gently reinsert the mesh dust filters into the
slots on the sides of the air purifier. Be sure
to push each dust filter into place until it is
flush with the air purifier body.
Once both mesh dust filters have been
cleaned and reinstalled, the air purifier will
recalibrate and begin to analyze air quality,
indicated by the rotating lights.
1. LOCATE AND REMOVE
MESH DUST FILTERS
4. REINSTALL MESH DUST FILTERS
2. CLEAN DUST FILTERS
5. RECALIBRATION
3. ADDIITONAL CLEANING
(NOT REQUIRED)
Note: The NeverChange HEPA Filter Technology allows up to 5 years* of use out of a single HEPA filter.
*Tested to GB/T18801-2015 P.CCM, based on 50% CADR declined, 300 sq. ft. cleaning area and 12 hours daily operation on MAX fan speed.
Note: To manually reset the Check
Dust Filters indicator, press and hold
the filter icon on the top control panel
for 1.5 seconds.

MAINTAINING YOUR AIR PURIFIER
NOTE: Unplug the air filter whenever doing any cleaning or maintenance (other than checking the mesh dust filters.)
Exterior Cleaning:
For best results, clean the exterior every two months or as needed.
Use a microfiber cloth to remove dust. To clean, wipe down the
exterior with a microfiber cloth dampened with warm, soapy
water. Avoid excess water and abrasive chemical cleaners to
prevent damage.
Interior Cleaning:
For best results, clean the interior of the air purifier every two
months or as needed. Remove the filter door, take out the HEPA
filter, and use a vacuum cleaner or a microfiber cloth to remove
dust and debris from the interior. DO NOT use abrasive chemical
cleaners or water on the inside of the air purifier.

ODOR NEUTRALIZER TECHNOLOGY
SETTINGS
Settings: The Odor Neutralizer Technology dial has 4 intensity settings: Low, Medium, High, and O.
TIPS
Odor Cartridge Removal
• Remove the odor cartridge from the dial if you don’t want to use Odor Neutralizer Technology.
• To remove the cartridge, flip up the handle and rotate the odor dial clockwise until the two arrows are aligned.
Pull the handle to remove the dial and access the cartridge.
Maintenance Required
• Replace the cartridge as recommended under Odor Cartridge Replacement.
• Visit qr.sharkclean.com/odortech to learn more and purchase replacements.
Fragrance Strength Over Time
• The intensity of the Odor Neutralizer Technology’s fragrance may diminish over time. It may also have no noticeable fragrance
at all. This is natural and does not indicate that the technology is not working. Follow replacement instructions to ensure
continued performance.
Remove the odor cartridge assembly from
the cardboard box and aluminum bag.
Flip up the handle on the odor dial, align
the arrows, then insert the assembly into
the air purifier.
To lock and engage the odor cartridge
assembly, rotate it counterclockwise until it
clicks at least once. Continue to rotate the
dial toward the high position to increase
the intensity.
1. OPEN THE PACKAGED ODOR
CARTRIDGE
ASSE MBLY
2. INSERT ODOR CARTRIDGE
ASSEMBLY INTO AIR PURIFIER 3. ROTATE UNTIL CLICK
LOW
Rotate the dial to the
Low position to decrease
intensity to the lowest level
when in use.
HIGH
Rotate the dial to the High
position to increase intensity to
the highest level when
in use.
Note: Adjusting the fan
speed is another way to
control Odor Neutralizer
Technology intensity. See the
Optimizing Fan Speed section
for more information.
NOTE: Odor Neutralizer Technology is not included on all Shark HP300 series products.
ODOR DIAL POSITION CLICKS SETTING RECOMMENDED FOR
1 OFF
• When you are not actively looking
to reduce odors. This will extend
the life of the odor cartridge.
2LOW
• Mild odor events such as
trash smells.
• Small spaces like a bathroom
or entryway.
3 MEDIUM
• Strong odor events such as cook-
ing or pet smells.
• Mid-sized spaces like a bedroom
or kitchen.
4 HIGH
• Optimal odor-reducing
performance.
• Extreme odor events such as
smoke or lingering burnt smells.
• Large spaces like a living room
or multiple rooms.

ODOR NEUTRALIZER TECHNOLOGY REPLACEMENT
Flip up the handle and rotate the dial counterclockwise
until the two arrows are aligned. Pull the handle to
remove the dial from the air purifier.
Align the arrow on the dial cover with the arrow on the air
purifier, then reinsert the dial into the air purifier. Rotate the
dial counterclockwise until it clicks into an intensity setting
to engage. Rotate further to change the intensity setting.
Rotate the cartridge counterclockwise in the dial
housing and pull out the cartridge to remove it.
Align the yellow arrow on the side of the cartridge with the yellow
arrow on the side of the dial cover, then insert the cartridge
into the dial. Rotate the cartridge clockwise to lock it in place.
Remove the new odor cartridge from the sealed
packaging. To maintain the life of the cartridge,
keep it in the sealed packaging until you are
ready to install it.
Dispose of the old cartridge by dropping it
into the trash.
1. REMOVE THE ODOR
CARTRIDGE ASSEMBLY
2. REMOVE OLD ODOR CARTRIDGE
3.REMOVE NEW CARTRIDGE
FROM BAG 4. INSTALL NEW CARTRIDGE IN DIAL
6. USED CARTRIDGE DISPOSAL
5. INSTALL THE ODOR DIAL ASSEMBLY
NOTE: Odor Neutralizer Technology is not included on all Shark HP300 series products.
TURN
UNTIL CLICK
TO LOCK
Note: Odor cartridges should be replaced every 3 months or as
needed for optimal Odor Neutralizer Technology performance.

AVAILABLE ACCESSORIES
ORDER ADDITIONAL ACCESSORIES AND REPLACEMENT FILTERS
Additional accessories and replacement filters are available
on sharkaccessories.com
Odor Neutralizer Technology Cartridges (2)
Two replacement cartridges that guard against bad odors for
a fresher-smelling home. We recommend replacing cartridges
every 3 months or as needed in your air purifier. Odor Neutralizer
Technology intensity dial sold separately.
Remote Control
Use the remote control to operate your air purifier
from a distance.
REMOTE CONTROL BUTTONS
1. On/O: Turns the air purifier on/o.
2. Air Info: Switch between air quality display options.
3. Auto: Enables Auto Mode.
4. Brightness: Adjusts brightness.
5. Fan Speed: Adjusts fan speed.
6. Shut-O Timer: Sets shut-o timer.
1
5 6
2 43

TWO (2) YEAR LIMITED WARRANTY
The Two (2) Year Limited Warranty applies to purchases made from
authorized retailers of SharkNinja Operating LLC. Warranty coverage
applies to the original owner and to the original product only and is
not transferable.
SharkNinja warrants that the unit shall be free from defects in material and
workmanship for a period of two (2) years from the date of purchase when
it is used under normal household conditions and maintained according to
the requirements outlined in the Owner’s Guide, subject to the following
conditions and exclusions:
What is covered by this warranty?
1. The original unit and/or non-wearable parts deemed defective, in
SharkNinja’s sole discretion, will be repaired or replaced up to two (2)
years from the original purchase date.
2. In the event a replacement unit is issued, the warranty coverage ends
six (6) months following the receipt date of the replacement unit or
the remainder of the existing warranty, whichever is later. SharkNinja
reserves the right to replace the unit with one of equal or greater value.
What is not covered by this warranty?
1. Normal wear and tear of wearable parts (such as filters and batteries,
etc.), which require regular maintenance and/or replacement to ensure
the proper functioning of your unit, are not covered by this warranty.
Replacement parts are available for purchase at sharkaccessories.com.
2. Any unit that has been tampered with or used for commercial purposes.
3. Damage caused by misuse, abuse, negligent handling, failure to perform
required maintenance (e.g., not replacing the filters), or damage due to
mishandling in transit.
4. Consequential and incidental damages.
5. Defects caused by repair persons not authorized by SharkNinja. These
defects include damages caused in the process of shipping, altering, or
repairing the SharkNinja product (or any of its parts) when the repair is
performed by a repair person not authorized by SharkNinja.
6. Products purchased, used, or operated outside North America.
How to get service
If your appliance fails to operate properly while in use under normal
household conditions within the warranty period, visit sharkclean.com/
support for product care and maintenance self-help. Our Customer
Service Specialists are also available at 1-855-523-4061 to assist with product
support and warranty service options, including the possibility of upgrading
to our VIP warranty service options for select product categories. So we may
better assist you, please register your product online at registeryourshark.
com and have the product on hand when you call.
SharkNinja will cover the cost for the customer to send in the unit to us for
repair or replacement. A fee of $25.95 (subject to change) will be charged
when SharkNinja ships the repaired or replacement unit.
How to initiate a warranty claim
You must call 1-855-523-4061 to initiate a warranty claim. You will need the
receipt as proof of purchase. We also ask that you register your product
online at registeryourshark.com and have the product on hand when you
call, so we may better assist you. A Customer Service Specialist will provide
you with return and packing instruction information.
How state law applies
This warranty gives you specific legal rights, and you also may have other
rights that vary from state to state. Some states do not permit the exclusion
or limitation of incidental or consequential damages, so the above may not
apply to you.
IMPORTANT INFORMATION
REGISTER YOUR PURCHASE
registeryourshark.com
Scan QR code using
mobile device
RECORD THIS INFORMATION
Model Number:
�������������������������������������������������������������������������������������������������������������������������������������������������������������������������������
Serial Number:
���������������������������������������������������������������������������������������������������������������������������������������������������������������������������������
Date of Purchase:
�����������������������������������������������������������������������������������������������������������������������������������������������������������������������
(Keep receipt)
Store of Purchase:
���������������������������������������������������������������������������������������������������������������������������������������������������������������������
TECHNICAL SPECIFICATIONS
Voltage: 120V 60Hz
Watts: 54W
Benefits of registering your product and creating an account:
• Get easier, faster product support and access to warranty
information
• Access troubleshooting and product care instructions
• Be among the first to know about exclusive product promotions
TIP: You can find the model and serial numbers on the QR code label
on the bottom of the unit.
BATTERY REMOVAL AND DISPOSAL
This product’s remote control uses a lithium button battery. When the
battery no longer has a charge, it should be removed from the remote and
recycled. DO NOT incinerate or compost the battery.
When your lithium battery needs to be replaced, dispose of it or recycle it in
accordance with local ordinances or regulations. In some areas, it is illegal to
place spent lithium batteries in the trash or in a municipal solid waste stream.
Return spent battery to an authorized recycling center or to retailer for
recycling. Contact your local recycling center for information on where to drop
o the spentbattery.
FCC WARNINGS
Note: This unit has been tested and found to comply with FCC limits for Class
B digital devices. These limits are designed to provide reasonable protection
against harmful interference in a residential installation. This unit generates,
uses, and can radiate radio frequency energy, and if not installed and used in
accordance with the instructions, may cause harmful interference to
radio communications.
This device complies with part 15 of the FCC Rules. Operation is subject to the
following two conditions: (1) this device may not cause harmful interference,
and (2) this device must accept any interference received, including
interference that may cause undesired operation.
To see if this unit interferes with radio or television reception, try turning it
o and on.
To correct any interference:
■Reorient or relocate the receiving antenna.
■Increase the distance between the unit and the receiver.
■Connect the unit to a dierent outlet than the receiver.
■Consult the dealer or an experienced technician for help.
Caution: Any changes or modifications to this unit not expressly approved
by the party responsible for compliance could void the user’s authority to
operate it.
PLEASE READ CAREFULLY AND KEEP FOR FUTURE REFERENCE.
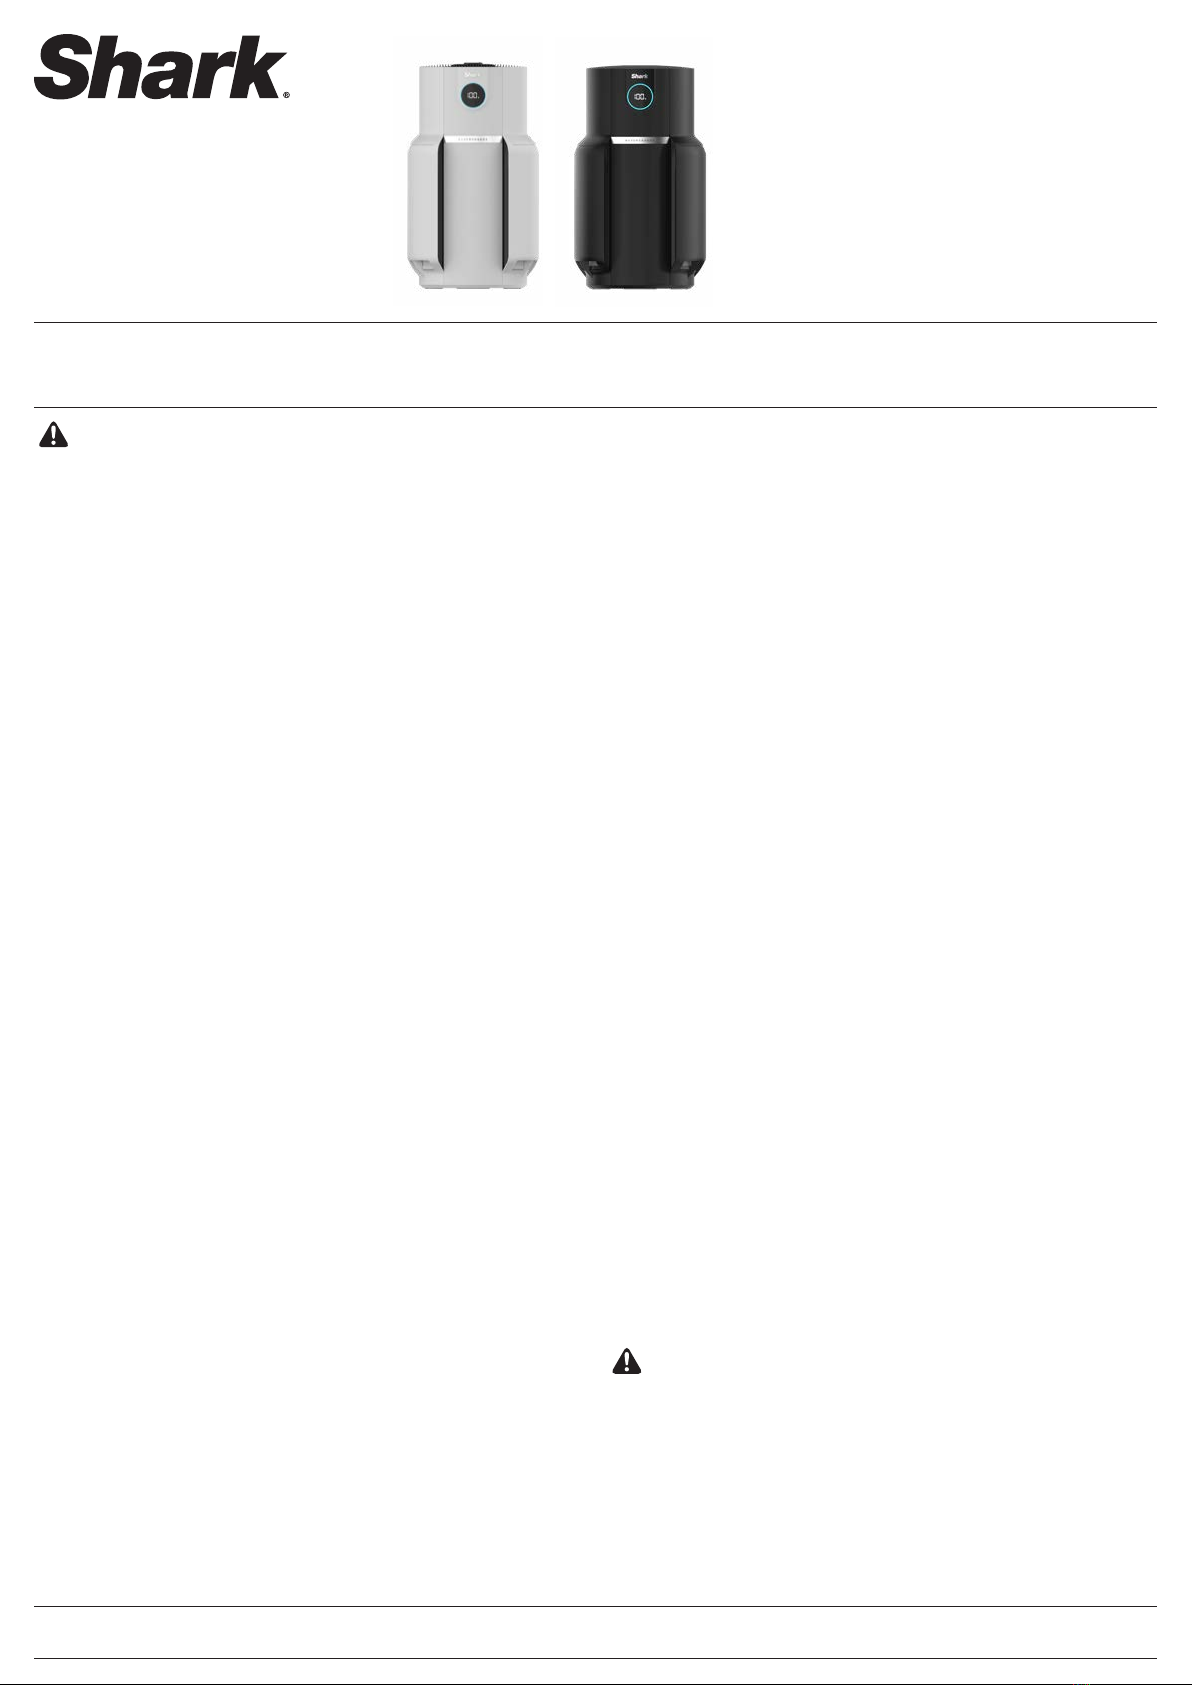
This Owner’s Guide is designed to help you get a complete understanding of your new Shark® Air Purifier.
SharkNinja Operating LLC
US: Needham, MA 02494
CAN: Ville St-Laurent, QC H4S 1A7
1-800-798-7398
sharkclean.com
Illustrations may dier from actual product. We are constantly striving to improve our products; therefore the specifications contained herein
are subject to change without notice.
This product may be covered by one or more U.S. patents. See sharkninja.com/patents for more information.
© 2023 SharkNinja Operating LLC. SHARK is a registered trademark of SharkNinja Operating LLC.
CLEAN SENSE IQ is a trademark of SharkNinja Operating LLC.
HP300Series�IB-A4�MP�Mv7�230713
Table of contents
Other Shark Air Cleaner manuals

Shark
Shark HP200 Series User manual

Shark
Shark HC500 Series User manual

Shark
Shark HC450 Series User manual

Shark
Shark HE400 Series User manual

Shark
Shark APT502C User manual

Shark
Shark HE600 Series User manual

Shark
Shark HE600 Series User manual

Shark
Shark HP100EU User manual

Shark
Shark HP100 Series User manual

Shark
Shark HE400 Series User manual
Popular Air Cleaner manuals by other brands

Panasonic
Panasonic ziaino F-JPU70A operating instructions

Lifa Air
Lifa Air LIFA HepaClean 2500 Operating and maintenance manual

CLIVET
CLIVET ELFOFresh2 CPAN-U 70-120 Series Technical bulletin

Lifa Air
Lifa Air LA503 user manual

Surgically Clean Air
Surgically Clean Air JADE Operation manual

Cosmo
Cosmo Pro instruction manual