Sharp MX-4140N User manual

QUICK START GUIDE
DIGITAL FULL COLOUR MULTIFUNCTIONAL SYSTEM
MX-4140N/MX-4141N/MX-5140N/MX-5141N
Keep this manual close at hand for reference whenever needed.

2
For the users of the fax function
nImportant safety instructions
• If any of your telephone equipment is not operating properly, you should immediately remove
it from your telephone line, as it may cause harm to the telephone network.
• Never install telephone wiring during a lightning storm.
• Never install telephone sockets in wet locations unless the socket is specifically designed for
wet locations.
• Never touch uninsulated telephone wires or terminals unless the telephone line has been
disconnected at the network interface.
• Use caution when installing or modifying telephone lines.
• Avoid using a telephone (other than a cordless type) during an electrical storm. There may
be a remote risk of electric shock from lightning.
• Do not use a telephone to report a gas leak in the vicinity of the leak.
• Do not install or use the machine near water, or when you are wet. Take care not to spill any
liquids on the machine.
• Save these instructions.
Caution!
For complete electrical disconnection, pull out the main plug.
The socket-outlet shall be installed near the equipment and shall be easily accessible.
Shielded interface cables must be used with this equipment to maintain compliance with EMC regulations.
The equipment should be installed near an accessible socket outlet for easy disconnection.
Each instruction also covers the optional units used with these products.
Notice for Users in Europe
Hereby, SHARP ELECTRONICS declares that this Digital Full Colour Mulrifunctional System MX-5141N/MX-5140N/MX-4141N/MX-4140N is in compliance with the essential
requirements and other relevant provisions of Directive 1999/5/EC.
The declaration of conformity may be consulted at:
"http://www.sharp.de/doc/MX-5141N_MX-5140N_MX-4141N_MX-4140N.pdf"

3
FAX interface cable and Line cable
These special accessories must be used with the device.
The Declaration of Conformity is included in optional Facsimile expansion kit (MX-FX11).
Notice for users in the UK
MAINS PLUG WIRING INSTRUCTIONS
The mains lead of this equipment is already fitted with a mains plug which is either a non-rewireable (moulded) or a rewireable type. Should the fuse need to be replaced, a BSI or ASTA approved
fuse to BS1362 marked or and of the same rating as the one removed from the plug must be used.
Always refit the fuse cover after replacing the fuse on the moulded plug. Never use the plug without the fuse cover fitted.
In the unlikely event of the socket outlet in your home not being compatible with the plug supplied either cut-off the moulded plug (if this type is fitted) or remove by undoing the screws if a rewireable
plug is fitted and fit an appropriate type observing the wiring code below.
DANGER: The fuse should be removed from the cut-off plug and the plug destroyed immediately and disposed of in a safe manner. Under no circumstances should the cut-off plug be inserted
elsewhere into a 13A socket outlet as a serious electric shock may occur.
To fit an appropriate plug to the mains lead, follow the instructions below:
IMPORTANT: The wires in this mains lead are coloured in accordance with the following code:
GREEN-AND-YELLOW: Earth
BLUE: Neutral
BROWN: Live
As the colours of the wires in this mains lead may not correspond with coloured markings identifying the terminals in your plug, proceed as follows:
The wire which is coloured GREEN-AND-YELLOW must be connected to the terminal in the plug which is marked with the letter E, or by the safety earth symbol , or coloured green or
greenand-yellow.
The wire which is coloured BLUE must be connected to the terminal which is marked with the letter Nor coloured black.
The wire which is coloured BROWN must be connected to the terminal which is marked with the letter Lor coloured red.
If you have any doubt, consult a qualified electrician.
WARNING: THIS APPARATUS MUST BE EARTHED.
EMC (this machine and peripheral devices)
nWarning:
This is a Class A product. In a domestic environment this product may cause radio interference in which case the user may be required to take adequate measures.
This machine contains the software having modules developed by Independent JPEG Group.
This product includes Adobe®Flash®technology of Adobe Systems Incorporated.
Copyright© 1995-2007 Adobe Macromedia Software LLC. All rights reserved.
This product includes the Adobe®PostScript®3™ of Adobe Systems Incorporated.
This product uses "InstantBoot" provided by IT Access Co., Ltd., Japan.

4
SOFTWARE LICENCE
The SOFTWARE LICENCE will appear when you install the software from the CD-ROM. By using all or any portion of the software on the CD-ROM or in the machine, you are
agreeing to be bound by the terms of the SOFTWARE LICENCE.
The explanations in this manual are based on American English and the North American version of the software.
Software for other countries and regions may vary slightly from the North American version.
• The explanations in this manual assume that you have a working knowledge of your Windows or Macintosh computer.
• For information on your operating system, please refer to your operating system manual or the online Help function.
• The explanations of screens and procedures in this manual are primarily for Windows Vista®in Windows®environments. The screens may vary depending on the version of the
operating system.
• Considerable care has been taken in preparing this manual. If you have any comments or concerns about the manual, please contact your dealer or nearest authorised service
representative.
• This product has undergone strict quality control and inspection procedures. In the unlikely event that a defect or other problem is discovered, please contact your dealer or nearest
authorised service representative.
• Aside from instances provided for by law, SHARP is not responsible for failures occurring during the use of the product or its options, or failures due to incorrect operation of the
product and its options, or other failures, or for any damage that occurs due to use of the product.
Products that have earned the ENERGY STAR®are designed to protect the environment
through superior energy efficiency.
The products that meet the ENERGY STAR®guidelines carry the ENERGY STAR®logo.
The products without the logo may not meet the ENERGY STAR®guidelines.
nWarranty
While every effort has been made to make this document as accurate and helpful
as possible, SHARP Corporation makes no warranty of any kind with regard to its
content. All information included herein is subject to change without notice. SHARP is
not responsible for any loss or damages, direct or indirect, arising from or related to
the use of this operation manual.
© Copyright SHARP Corporation 2012. All rights reserved. Reproduction, adaptation
or translation without prior written permission is prohibited, except as allowed under
copyright laws.
MATERIAL SAFETY DATA SHEET
The MSDS (Material Safety Data Sheet) can be viewed at the following URL address: http://www.sharp-world.com/corporate/info/index.html

Contents
5
OPERATION MANUALS AND HOW TO USE THEM ————————— 6
CAUTIONS ——————————————————————————— 7
Symbols in this manual ——————————————————————— 7
Power notes ———————————————————————————— 7
Installation notes —————————————————————————— 8
About consumables ————————————————————————— 9
Handling precautions ———————————————————————— 9
PART NAMES ————————————————————————— 11
TURNING THE POWER ON AND OFF —————————————— 12
HOME SCREEN ———————————————————————— 13
For operating the touch panel and functions the icon.
OVERVIEW OF COPY OPERATION ——————————————— 14
OVERVIEW OF OTHER OPERATIONS —————————————— 15
For functions other than copy.
MAINTENANCE ———————————————————————— 16
SPECIFICATIONS ——————————————————————— 17
SUPPLIES —————————————————————————— 23
OTHERS ——————————————————————————— 24
TO THE ADMINISTRATOR OF THE MACHINE —————————— 25
TRADEMARK ACKNOWLEDGMENTS ————————————— 26
INFORMATION ON DISPOSAL ———————————————— 27

6
OPERATION MANUALS AND HOW TO USE THEM
Quick Start Guide (this document)
Features important safety notes, names of parts and
components, information about the power-on procedure,
operation overviews, information for people who manage
the machine, and information about other aspects of this
machine.
Read this section before using the machine for the first time.
User's Manual
Can be downloaded from the machine to a computer and
viewed. Refer to this document to learn more about printer
mode and settings mode, and to learn about the details of
each type of mode.
Operation Guide
Can be viewed by touching the operation guide icon on the
machine’s touch panel. When you are using this machine,
use this document to see an overview of a particular mode or
when you are having trouble operating the machine.
Software Setup Guide (CD-PDF)
Explains how to install the various drivers needed when using
this machine as a printer, network scanner, or fax machine.
Refer to this document when using this machine from a
computer. The Software Setup Guide can be found on the
“Software CD-ROM”.
3Download the [User's Manual]
Click [Operation Manual Download] on the displayed page. Next, select the desired
language from the “Language to download” list, and then click the [Download] button.
4
Expand the downloaded "User's Manual".
When expansion is finished, the [User's Manual] folder is created.
5View the downloaded [User's Manual].
Open the [User's Manual] folder and double-click "index.htm".
2Insert the machine’s IP address into the address bar of your web browser to
access the machine.
http://machine’s IP address/
User verification may be required depending on the
machine’s settings.
Please check with the machine’s administrator to obtain the
account information necessary for verification.
1Confirm the machine’s IP address
First, tap the [Settings] key on the home screen, and then tap [System Settings] →[List
Print (User)] in the left menu.
Next, tap the [Print] key in the [All Custom Setting List], and confirm the IP address in the
printed list.
Downloading the User's Manual
You can download the [User's Manual] by following the procedures below while the machine is connected to the network.

7
When moving the machine, switch off the main power and remove the power plug from the outlet
before moving.
The cord may be damaged, creating a risk of fire or electrical shock.
CAUTION
When removing the power plug from the outlet, do not pull on the cord.
Pulling on the cord may cause damage such as wire exposure and breakage, and may result in fire or
electrical shock.
If you will not use the machine for a long time, be sure to remove the power plug from the outlet for
safety.
Power notes
WARNING
Be sure to connect the power cord only to a power outlet that meets the specified voltage and current
requirements. Also make certain the outlet is properly grounded. Do not use an extension cord or
adapter to connect other devices to the power outlet used by the machine. Using an improper power
supply may cause fire or electrical shock.
* For the power supply requirements, see the name plate in the lower left corner of the left side of the
machine.
Do not damage or modify the power cord.
Placing heavy objects on the power cord, pulling it, or forcibly bending it
will damage the cord, resulting in fire or electrical shock.
Do not insert or remove the power plug with wet hands.
This may cause electrical shock.
Meaning of the symbols
CAUTION!
HOT
PINCH
POINT
KEEP CLEAR
PROHIBITED
ACTIONS
DO NOT
DISASSEMBLE
MANDATORY
ACTIONS
Symbols in this manual
To ensure safe use of the machine, this manual uses various safety symbols. The
safety symbols are classified as explained below. Be sure you understand the
meaning of the symbols when reading the manual.
WARNING
Indicates a risk of death or serious injury.
CAUTION
Indicates a risk of human injury or property damage.
CAUTIONS

8
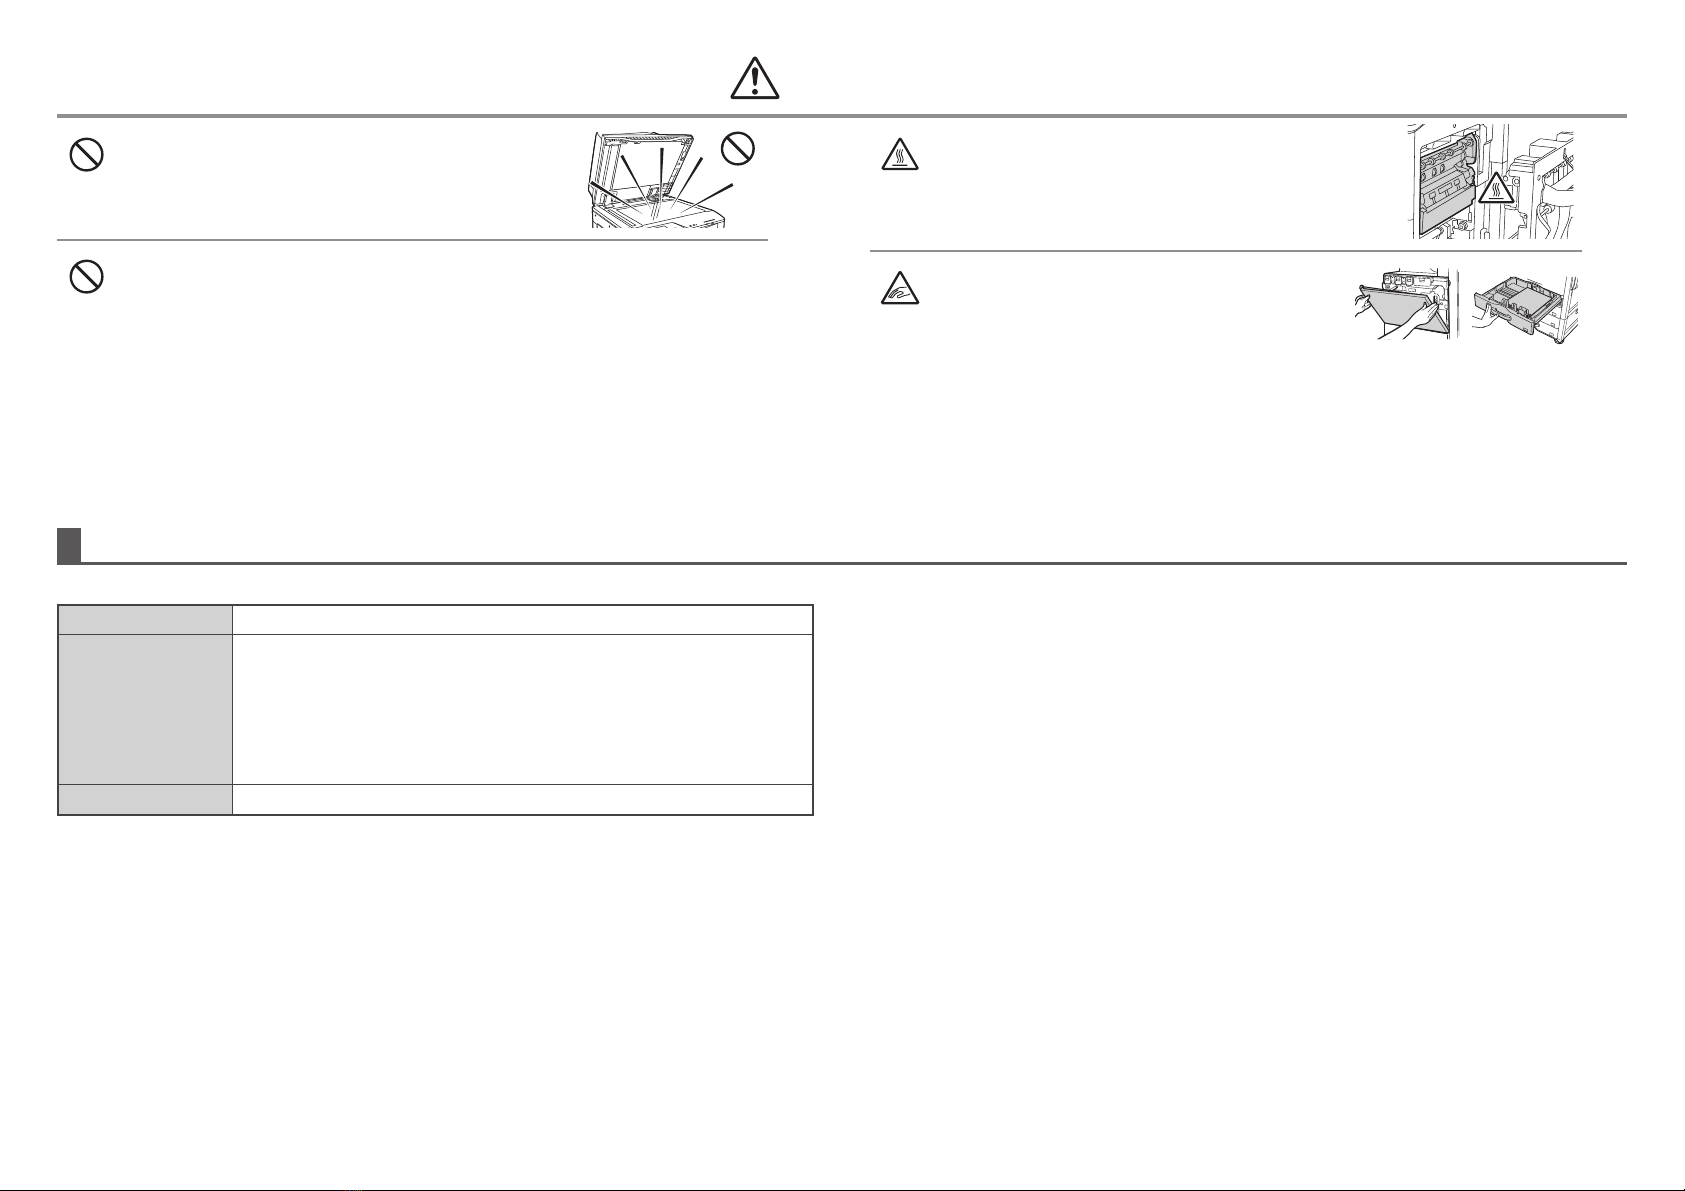
Do not install the machine on an unstable or slanted surface. Install the machine on a surface that can
withstand the weight of the machine.
Risk of injury due to the machine falling or toppling.
If peripheral devices are to be installed, do not install on an uneven floor, slanted surface, or otherwise
unstable surface. Danger of slippage, falling, and toppling. Install the product on a flat, stable surface that can
withstand the weight of the product.
Do not install in a location with moisture or dust.
Risk of fire and electrical shock.
If dust enters the machine, dirty output and machine failure may result.
Locations that are excessively hot, cold, humid, or dry
(near heaters, humidifiers, air conditioners, etc.)
The paper will become damp and condensation may form
inside the machine, causing misfeeds and dirty output.
SPECIFICATIONS (page 18)
If the location has an ultrasonic humidifier, use pure water
for humidifiers in the humidifier. If tap water is used, minerals
and other impurities will be emitted, causing impurities to
collect on the inside of the machine and create dirty output.
When the machine is installed, the adjusters (4) must be lowered to the
floor to secure the machine (prevent it from moving).
Rotate the adjusters in the locking direction until they are in firm contact
with the floor.
If you find it necessary to reposition the machine due to
rearrangement of your office layout or other reason, retract the
adjusters from the floor, turn off the power, and then move the
machine.
(After moving the machine, lower the adjusters again to secure the
machine.)
Locations exposed to direct sunlight
Plastic parts may become deformed and dirty output may result.
Installation notes
CAUTION
Locations with ammonia gas
Installing the machine next to a diazo copy machine may cause
dirty output.
Do not install the machine in a location with poor air
circulation.
A small amount of ozone is created inside the machine during
printing. The amount of ozone created is not sufficient to be
harmful; however, an unpleasant odor may be noticed during
large copy runs, and thus the machine should be installed in a
room with a ventilation fan or windows that provide sufficient air
circulation. (The odor may occasionally cause headaches.)
* Install the machine so that people are not directly exposed to
exhaust from the machine. If installed near a window, ensure
that the machine is not exposed to direct sunlight.
Near a wall
Be sure to allow the required space around the machine for
servicing and proper ventilation. (The machine should be no
closer than the distances indicated below from walls. The
indicated distances are for the case when a saddle finisher and
large capacity paper tray are not installed.)
Locations subject to vibration.
Vibration may cause failure.
CAUTION
The machine includes a built-in hard drive. Do not subject the machine to shock or vibration. In particular, never
move the machine while the power is on.
• The machine should be installed near an accessible power outlet for easy connection.
• Connect the machine to a power outlet which is not used for other electric appliances. If a lighting fixture is
connected to the same outlet, the light may flicker.
Lock
Release
30 cm
30 cm
45 cm

9
CAUTIONS
Do not throw a toner cartridge into a fire.
Toner may fly and cause burns.
About consumables
CAUTION
Store a toner cartridge out of the reach of children.
Do not place a container of water or other liquid, or a metal
object that might fall inside, on the machine.
If the liquid spills or the object falls into the machine, fire or electrical
shock may result.
Do not remove the machine casing.
High-voltage parts inside the machine may cause electrical shock.
Do not make any modifications to this machine.
Doing so may result in personal injury or damage to the machine.
Do not use a flammable spray to clean the machine.
If gas from the spray comes in contact with hot electrical components or the fusing unit inside
the machine, fire or electrical shock may result.
Handling precautions
WARNING
If you notice smoke, a strange odor, or other abnormality, do not
use the machine.
If used in this condition, fire or electrical shock may result.
Immediately switch off the main power and remove the power plug from
the power outlet.
Contact your dealer or nearest authorised service representative.
If a thunder storm begins, switch off the main power and remove the power plug from the outlet
to prevent electrical shock and fire due to lightning.
If a piece of metal or water enters the machine, switch off the main power and remove the
power plug from the power outlet.
Contact your dealer or nearest authorised service representative. Using the machine in this condition
may result in electrical shock or fire.

10
Do not look directly at the light source.
Doing so may damage your eyes.
Do not block the ventilation ports on the machine. Do not install the machine in a location that
will block the ventilation ports.
Blocking the ventilation ports will cause heat to build up in the machine, creating a risk of fire.
CAUTION
The fusing unit and paper exit area are hot. When removing a
misfeed, do not touch the fusing unit and paper exit area. Take care
not to burn yourself.
When loading paper, removing a misfeed, performing
maintenance, closing the front and side covers, and
inserting and removing trays, take care that your fingers
are not pinched.
The machine includes the document filing function, which stores document image data on the machine's hard drive. Stored documents can be called up and printed or transmitted as needed. If a hard drive failure occurs, it will no longer be
possible to call up the stored document data. To prevent the loss of important documents in the unlikely event of a hard drive failure, keep the originals of important documents or store the original data elsewhere.
With the exception of instances provided for by law, Sharp Corporation bears no responsibility for any damages or loss due to the loss of stored document data.
Laser information
Wave length 790 nm ± 10 nm
Pulse times
MX-4140N/MX-4141N
Normal paper mode (P/S = 178 mm/s) = 3.59 μs ± 0.014 μs / 7 mm
Heavy paper mode (P/S = 190 mm/s) = 3.36 μs ± 0.013 μs / 7 mm
MX-5140N/MX-5141N
Normal paper mode (P/S = 225 mm/s) = 2.84 μs ± 0.011 μs / 7 mm
Heavy paper mode (P/S = 190 mm/s) = 3.36 μs ± 0.013 μs / 7 mm
Output power Max 0.672 mW (LD1+LD2)
nCaution
Use of controls or adjustments or performance of procedures other than those
specified herein may result in hazardous radiation exposure.
This Digital Equipment is CLASS 1 LASER PRODUCT (IEC 60825-1 Edition 2-2007)

11
PART NAMES
Using the [Home Screen] button
Use your finger to touch the [Home Screen] button.
If you use a pen or other tool to touch the button, it may
not operate properly.
Risk of malfunctioning if you use with jewelry or other
accessories.
Tray 1
Tray 5 (when a large capacity
tray is installed)*
Tray 2
Tray 4
(when a stand/2000 sheet paper drawer is installed)*
Tray 3
(when a stand/2000 sheet paper drawer is installed)*
Tray 3 (when a stand/1x500/2x500
sheet paper drawer is installed)*
Tray 4 (when a stand/2x500 sheet
paper drawer is installed)*
Automatic
document feeder
Operation Panel
Finisher*
Right Tray*
USB port (A type)
Bypass tray
Front cover
Saddle finisher
(large stacker)*
Paper pass unit*
Punch module*
Main power switch
Output tray
(centre tray)
Keyboard*
Touch Panel [Home Screen] button ( )
Main power
indicator
[POWER SAVE] button/indicator Power button
Finisher (large stacker)* Saddle finisher* * Optional

12
This machine has a main power switch, found at the bottom left after the front cover is opened, and a power button ( ), located on the operation panel.
CAUTION
• When turning off the power, make sure that the indicators on the operation panel turn
off as well.
• If the machine suddenly turns off, such as in the event of a power failure, turn the
machine on again, and then turn off the machine following the correct procedure for
turning off the machine.
Switching off the main power switch or removing the power cord from the outlet while
any of the indicators are lit or blinking may damage the hard drive and cause data to
be lost.
• Switch off both the power button ( ) and the main power switch and unplug the
power cord if you suspect a machine failure, if there is a bad thunderstorm nearby, or
when you are moving the machine.
Turning on the power
• Switch the main power switch to the “ ” position.
• After the main power indicator lights in green, press the power button ( ).
Turning off the power
(1) Press the power button ( ) to turn off the power.
(2) Switch the main power switch to the “ ” position.
Restarting the machine
In order for some settings to take effect, the machine must be restarted. If a message in the
touch panel prompts you to restart the machine, press the power button ( ) to turn off the
power and then press the key again to turn the power back on.
• When using the fax or Internet fax function, always keep the main power switch in
the “ ” position.
• In some states of the machine, pressing the power button ( ) to restart will not
make the settings take effect. In this case, use the main power switch to switch
the power off and then on.
Main power switch
Power button Main power indicator
TURNING THE POWER ON AND OFF

13
Tap Touch and then quickly release
the finger.
Used to select keys, tabs,
checkboxes, etc.
Double tap Touch the screen twice.
Use this operation to enlarge
or reduce the image in the
preview.
Drag Drag (slide the finger in the
desired direction) to rotate or
delete original pages displayed
as a preview.
Pinch
Touch the screen with two fingers
and move them toward each
other. This is used to reduce the
browser and preview display.
Press Touch a key and keep the
finger on the key for a short
time.
Flick Flick (quickly swipe with the
finger) to scroll the preview
image.
Slide Slide the finger on the scroll
bar to move up or down
through a long list.
Spread
Touch the screen with two fingers
and move them away from each
other. This is used to enlarge the
browser and preview display.
The home screen is the first screen to be displayed. Touch an icon to display the
corresponding screen. When the button is touched on the operation panel, this home
screen is displayed.
* The actual screen displayed may vary depending on the model or how the machine
has been customized.
OPERATING THE TOUCH PANEL
In addition to the conventional "single tap" operation, you can also operate the touch panel using presses, flicks, and slides.
HOME SCREEN
Up to 10 icons are displayed.
Fixed area
Up to 12 icons are displayed.
Icons that are not displayed can be displayed
by scrolling horizontally.
Scroll area
HDD file retrieve
Operation Guide
Job status
System settings
The scanned original is saved.
Saved data can be edited and used again for
another operation.
E-mail
Fax
The scanned original is attached to an e-mail and sent.
The scanned original is sent using the telephone line.
FTP/Desktop
The scanned file is sent to a specified
directory of an FTP server or to a specified
folder on a computer connected to the
network.
Displays the status of the current job.
Allows various settings to be adjusted according to how the
machine will be used or its current state of use.
Refer to the Operation Guide when you have
questions about operating the machine. Page switch keys
Use these keys to view a hidden page in the scrolling area.
Action panel
Tap an item to edit Home Screen or other
operation.
Copy
The scanned original is printed.
CLOUD PORTAL
This service may not be available
in some regions.

14
Step 1
Select a
function
Step 2Step 3Step 4Step 5
Place the
original
Scan
Confirming while viewing the
preview
Start
Select the [Copy] key or Copy icon.
Output settings
Editing
Confirmation
Confirm the results of the scan and any
edits or settings.
Enter the number of prints and
start printing.
Face up/down, orientation, missing
pages, folded pages
Page editing,
deleting, etc.
OVERVIEW OF COPY OPERATION
Tap
Print 1 set of copies
Scan the original
Tap
Scan another original
Tap
Document filing
The scanned original and the settings are
saved on the hard disk and can be used again.
Print
Tap
Tap
Place the original in the automatic
document feeder
Insert all the way
Do not pass this line
Drag
Place the original on the document
glass
Align the edges
Upward
Adjust to original size
Align to corner
Lift open
Downward
Placing a thick book

15
Transmission
Storing
For functions other than copy.
OVERVIEW OF OTHER OPERATIONS
Step 1
Select a
function
Step 5
Step 2
Place the
original
Step 3
Select the address
Step 4
Confirmation
Start
HDD file
retrieve
Scan and store the file
E-mail
Fax Place the original in the automatic
document feeder
Insert all the way
Do not pass this line
Lift open
Downward
Tap
Tap
Select the address
Confirmation
Face up/down
Orientation
Missing pages
Folded pages
Scan the original
Select the folder
Tap
Place the original on the document
glass
Align the edges
Upward
Adjust to original size
Align to corner
Placing a thick book

16
• Do not dispose of used toner cartridges. Place them in a plastic bag and keep them. The technician will collect the used toner cartridges when performing maintenance.
• To view the approximate amount of toner remaining, continually touch the [Home Screen] key during printing or when the machine is idle. The percentage of toner remaining will
appear in the display while the key is touched.
• When the percentage falls to “25-0%”, obtain a new toner cartridge and keep it ready for replacement.
• Depending on your conditions of use, the colour may become faint or the image blurred.
MAINTENANCE
When toner runs low, the colour and the message “Prepare a new toner cartridge.” appears.
Prepare a new toner cartridge for the indicated colour.
When toner runs out, the colour and the message “Replace the toner cartridge.” appears.
Replace the toner cartridge for the indicated colour.
Example: Replacing the yellow toner cartridge
When a paper misfeed occurs, the message “A misfeed has occurred.” will appear in the touch
panel and printing and scanning will stop.
In this event, touch the [Check how to remove misfeeds] key in the touch panel.
When the key is touched, instructions for removing the misfeed will appear. Follow the
instructions. When the misfeed is cleared, the message will automatically clear.
Old toner cartridge
Shake 5 or 6 times Gently insert straight
into the machine
until it locks
CloseOpen
New toner cartridge
• Do not throw toner cartridges into a fire. Toner may
fly and cause burns.
• Store toner cartridges out of the reach of small
children.
• Always store toner cartridges on their sides. If toner
cartridges are stored on end, the toner may harden
and become unusable.
• Please use SHARP-recommended toner cartridges.
If toner cartridges other than SHARP-recommended
toner cartridges are used, the machine may not
attain full quality and performance and there is a risk
of damage to the machine.
• The fusing unit and the output unit are hot.
• Take care not to touch the fusing unit when
removing a misfeed.
• There is a risk of burning.
Replacing a toner cartridge
Removing misfeeds
Caution
Caution
Gently pull straight
out with both
hands
1 2 3 4 5

17
Basic Specifications / Copier specifications
Name MX-4140N/MX4141N/MX-5140N/MX-5141N
Type Desktop
Colour Full colour
Copier system Laser electrostatic copier
Scanning
resolution
Scan (B/W): 600 × 600 dpi, 600 × 400 dpi
Scan (full colour): 600 × 600 dpi
Print: 600 × 600 dpi, equivalent to 9,600 dpi × 600 dpi
Gradation Scan: equivalent to 256 levels / Print: equivalent to 256 levels
Original paper
sizes Max. A3 (11" x 17") for sheets and bound documents
Copy sizes
A3 wide (12" × 18") to A5R (5-1/2" × 8-1/2"R), Transparency film, Heavy paper, Envelopes
Tray 1-4*: A3, B4, A4, A4R, B5, B5R, A5R, 11" × 17", 8-1/2" × 14",
8-1/2" × 13-1/2", 8-1/2" × 13-2/5", 8-1/2" × 13", 8-1/2" × 11", 8-1/2" × 11"R,
7-1/4 × 10-1/2"R, 5-1/2" × 8-1/2"R
Multi-bypass tray: A3 wide (12" × 18") to A5R (5-1/2" × 8-1/2"R), Transparency film, Heavy paper,
Envelopes, Long size paper (90 to 297 mm × 433 to 1,200 mm (3-35/64" to 11-45/64" × 17-3/64" to
47-15/64"))
Lost margin (leading edge): 4 mm (11/64") ± 1 mm (± 3/64")
Lost margin (trailing edge): 2 mm (6/64") - 5 mm (- 13/64")
Leading edge / trailing edge: total 8 mm (21/64") or less
Near edge / far edge: total 4 mm (11/64") ± 2 mm (± 6/64") or less
* When the Stand/2000 sheet paper drawer is installed, only A4 (8-1/2" × 11") can be used in trays
3 and 4.
Warm-up time
MX-4140N / MX-4141N MX-5140N / MX-5141N
28 seconds 30 seconds
lThis may vary depending on the ambient conditions.
First-copy time
MX-4140N / MX-4141N MX-5140N / MX-5141N
Full colour: 6.7 seconds 5.7 seconds
B/W: 4.7 seconds 4.1 seconds
lThis may vary depending on the state of the machine.
Continuous
copying speeds*
(when shifter is
not in operation)
MX-4140N / MX-4141N
A4, 8-1/2" × 11" B5, 7-1/4" × 10-1/2" 41 copies/min.
A4R, 8-1/2" × 11"R B5R, 7-1/4" × 10-1/2"R 26 copies/min.
B4, 8-1/2" × 14" 22 copies/min.
A3, 11" × 17" 19 copies/min.
* Continuous speed for same original source. Output may be temporarily
interrupted to stabilize image quality.
MX-5140N / MX-5141N
51 copies/min.
31 copies/min.
26 copies/min.
23 copies/min.
Copy ratios
Same size: 1:1 ± 0.8 % Enlarge: 115 %, 122 %, 141 %, 200 %, 400 %
Reduce: 25 %, 50 %, 70 %, 81 %, 86 %, 100 %
Zoom range: 25 to 400 % (25 - 200 % using RSPF/DSPF) in 1 % increments,
total 376 increments. Can calculate zoom rate when mm is specified.
Paper feed / capacity 500 x 2 sheets in 2 trays plus 100-sheet multi-bypass tray
lUsing 80 g/m2(21 lbs. bond) weight paper
Max. paper feed / max. capacity
6,600 sheets in 4 trays (500 × 2 + 1,150 + 850) plus 100-sheet multi-bypass
tray plus 3,500 sheets in large capacity tray
lUsing 80 g/m2(21 lbs. bond) weight paper
Continuous copy Max. 999 copies
Memory
Standard: 4 GB HDD: 320 GB
l1 GB = One billion bytes when referring to hard drive capacity. Actual format
capacity is less.
Ambient
environment
Operating
environment 10 °C (54 °F) to 35 °C (91 °F) (20 % to 85 % RH) 590 - 1,013 hpa
Standard
environment 20 °C (68 °F) to 25 °C (77 °F) (65 ± 5 % RH)
Required power supply
Local voltage ± 10 % (For the power supply requirements, see the name plate
in the lower corner of the left side of the machine.)
Power consumption Max. 1.84 kW (including options such as the desk)
Dimensions
MX-4140N / MX-5140N
648 mm (W) × 764 mm (D) × 954 mm (H)
(25-33/64" (W) × 30-3/32" (D) × 37-9/16" (H))
MX-4141N / MX-5141N
648 mm (W) × 764 mm (D) × 960 mm (H)
(25-33/64" (W) × 30-3/32" (D) × 37-51/64" (H))
Weight
MX-4140N / MX-5140N
Approx. 119 kg (262 lbs.)
MX-4141N / MX-5141N
Approx. 125 kg (276 lbs.) /
Approx. 126 kg (278 lbs.)
Overall
dimensions
With multi-bypass
tray extended 987 mm (W) × 764 mm (D) (38-55/64" (W) × 30-3/32" (D))
With right side exit
tray extended 972 mm (W) × 764 mm (D) (38-9/32" (W) × 30-3/32" (D))
SPECIFICATIONS

18
Automatic document feeder
(Standard equipment)
Name MX-4140N / MX-5140N
Reversing Single Pass Feeder
MX-4141N / MX-5141N
Duplex Single Pass Feeder
Document feeder types Reversing Single Pass Feeder (RSPF) Duplex Single Pass Feeder (DSPF)
Original paper sizes A3 (11" × 17") to A5 (5-1/2" × 8-1/2")
Original paper types
Paper weight Thin paper 35 g/m2(9 lbs.) to 49 g/m2(13 lbs.)
Plain paper 50 g/m2(13 lbs.) to 128 g/m2(34 lbs.)
Two-sided 50 g/m2(13 lbs.) to 105 g/m2(28 lbs.) 50 g/m2(13 lbs.) to 128 g/m2(34 lbs.)
Paper storage capacity 100 sheets (80 g/m2(21 lbs.))
(or maximum stack height of 13 mm (1/2"))
150 sheets (80 g/m2(21 lbs.))
(or maximum stack height of 19.5 mm (50/64"))
B/W
Scan speed (copy) Colour
51 sheets/minute (600 × 600 dpi)
85 sheets/minute (600 × 400 dpi)
51 sheets/minute (600 × 600 dpi)
lWhen scanning one-sided, A4 (8-1/2" × 11") horizontal documents
Tray
Name Stand / 1 × 500 Sheet paper drawer
(MX-DE22)
Stand / 2 × 500 Sheet paper drawer
(MX-DE23)
Paper sizes A3 (11" × 17") to A5R (5-1/2" × 8-1/2"R)
Useable paper
60 g/m2(16 lbs.) to 220 g/m2(59 lbs.)
Paper capacity 500 sheets / 500 × 2 sheets
Dimensions
MX-DE22 / MX-DE23
615 mm (W) × 670 mm (D) × 272 mm (H)
(24-39/64" (W) × 26-52/64" (D) × 10-23/32" (H))
Weight Approx. 18.5 kg (40.8 lbs.) Approx. 22.9 kg (50.5 lbs.)
Large capacity tray/
Stand/2000 sheet paper drawer
Name
Large capacity tray
(MX-LC11) Stand/2000 sheet paper drawer (MX-DE21)
Paper sizes A4 (8-1/2" × 11") Tray 3/4: A4 (8-1/2" × 11")
Useable paper 60 g/m2(16 lbs.) to 105 g/m2(28 lbs.) Tray 3/4: 60 g/m2(16 lbs. bond) to
105 g/m2(28 lbs. bond)
Paper capacity 3,500 Tray 3: 1,150
Tray 4: 850
Dimensions 370 mm (W) × 575 mm (D) × 520 mm (H)
(14-9/16" (W) × 22-41/64" (D) × 20-15/32" (H))
615 mm (W) × 670 mm (D) × 272 mm (H)
(24-39/64" (W) × 26-52/64" (D) × 10-23/32" (H))
Weight Approx. 29.2 kg (64.37 lbs.) Approx. 26 kg (57.4 lbs.)

19
SPECIFICATIONS
Finisher
Name Finisher (MX-FNX9)
Paper sizes Depends on feeder specifi cations
Useable paper Paper weight 55 g/m2(13 lbs.) to 300 g/m2(110 lbs. Cover)
No. of trays 1
Tray capacity
(80g/m2(21 lbs.))
Non-stapled A3 wide (12" × 18") / A3 (11" × 17") /
B4 (8-1/2" × 14"): 250 sheets
A4 (8-1/2" × 11") / A4R (8-1/2" × 11"R) / B5 /
B5R (7-1/4" × 10-1/2"R) / A5R (5-1/2" × 8-1/2"R):
500 sheets
Staple function A3 (11" × 17") / B4 (8-1/2" × 14"): 30 units or 250 sheets
A4 (8-1/2" × 11") / A4R (8-1/2" × 11"R) / B5 /
30 units or 500 sheets
lOffset output is not available for A3 wide (12" × 18") /
B5R (7-1/4" × 10-1/2"R) / A5R (5-1/2" × 8-1/2"R).
Max. no. of stapled sheets
(90 g/m2(24 lbs.))
Max. no. of 50 sheets (A4 (8-1/2" × 11"), A4R (8-1/2" × 11"R), B5)
Max. no. of 30 sheets (A3 (11" × 17"), B4 (8-1/2" × 14"))
Staple position 1 bottom, 1 top, 2 middle
Required power supply Supplied from this machine
Weight Approx. 12 kg (26.5 lbs.)
Dimensions
When output paper tray is stored
428 mm (W) x 593 mm (D) x 198 mm (H)
(16-55/64" (W) x 23-11/32" (D) x 7-51/64" (H))
When output paper tray is extended
623 mm (W) x 593 mm (D) x 198 mm (H)
(24-17/32" (W) x 23-11/32" (D) x 7-51/64" (H))
Saddle stitch finisher (large stacker)
MX-FN18
Name Saddle Stitch Finisher (large stacker)
Paper sizes Depends on feeder specifications
Useable paper Paper weight 55 g/m2(13 lbs. bond) to 300 g/m2(110 lbs. Cover)
No. of trays 2
Tray capacity (80 g/m2(21 lbs.))
Upper tray
Non-stapled A3 wide (12" × 18") / A3 (11" × 17") / B4 (8-1/2" × 14") /
A4R (8-1/2" × 11"R) / B5R (7-1/4" × 10-1/2"R): 650 sheets
A5R (5-1/2" × 8-1/2"R): A4 (8-1/2" × 11") / B5: 1,550 sheets
Staple function A4 (8-1/2" × 11") / B5: 100 units or 1,550 sheets
A3 (11" × 17") / B4 (8-1/2" × 14") / A4R (8-1/2" × 11"R):
50 units or 650 sheets
Lower tray
Non-stapled A3 wide (12" × 18") / A3 (11" × 17") / B4 (8-1/2" × 14") /
A4R (8-1/2" × 11"R) / B5R (7-1/4" × 10-1/2"R): 650 sheets
A4 (8-1/2" × 11") / B5: 2,450 sheets
A5R (5-1/2" × 8-1/2"R): 1,700 sheets
Staple function A4 (8-1/2" × 11") / B5: 100 units or 1,550 sheets
A3 (11" × 17") / B4 (8-1/2" × 14") / A4R (8-1/2" × 11"R):
50 units or 650 sheets
Saddle stitch tray 10 units (11 to 15 sheets), 15 units (6 to 10 sheets),
25 units (1 to 5 sheets)
lOffset output is not available for A3 wide (12" × 18") / B5R (7-1/4" × 10-1/2"R) /
A5R (5-1/2" × 8-1/2"R).
Required power supply Supplied from this machine
Weight Approx. 73 kg (160.9 lbs.)
Dimensions
When output paper tray is stored
640 mm (W) × 641.5 mm (D) × 1100 mm (H)
(24-39/64" (W) × 25-1/4" (D) × 43-19/64" (H))
When output paper tray is extended
753 mm (W) × 641.5 mm (D) × 1100 mm (H)
(29-1/32" (W) × 25-1/4" (D) × 43-19/64" (H))
Max. no. of stapled sheets
(90 g/m2(24 lbs.))
Max. no. of 50 sheets (A4 (8-1/2" × 11"), B5)
Max. no. of 30 sheets (A3 (11" × 17"), B4 (8-1/2" × 14"), A4R (8-1/2" × 11"R))
Staple position 1 bottom, 1 top, 2 middle
Staple method (for saddle stitch) Centred fold with stapling in 2 centre places
Saddle stitch fold position Centred fold
Saddle usable sizes A3 (11" × 17") / B4 (8-1/2 × 14") / A4R (8-1/2" × 11"R) / A3 wide (12" × 18")
Saddle usable paper weight
60 g/m2(16 lbs.) to 220 g/m2(80 lbs. Cover)
Paper weighting 106 g/m2(28 lbs.) to 220 g/m2(80 lbs. Cover) is only able to be
used in cover mode and for single sheet fold.
Max. no. of saddle-stitched sheets
Max. no. of 15 sheets (80 g/m2(21 lbs.)):
14 sheets (80 g/m2(21 lbs.)) + 1 sheet (220 g/m2(80 lbs. Cover))
Max. no. of 10 sheets (90 g/m2(24 lbs.)):
9 sheets (90 g/m2(24 lbs.)) + 1 sheet (220 g/m2(80 lbs. Cover))

20
MX-FN10
Name Saddle Stitch Finisher
Paper sizes Depends on feeder specifications
Useable paper Paper weight 55 g/m2(13 lbs.) to 300 g/m2(110 lbs. Cover)
No. of trays 1
Tray capacity (80 g/m2 (21 lbs.))
Upper tray
Non-stapled A3 wide (12" × 18") / A3 (11" × 17") /
B4 (8-1/2" × 14") / A5R (5-1/2" × 8-1/2"R): 500 sheets
A4 (8-1/2" × 11") / A4R (8-1/2" × 11"R) / B5 /
B5R (7-1/4" × 10-1/2"R): 1,000 sheets
Staple function A3 (11" × 17") / B4 (8-1/2" × 14"): 30 units or 500 sheets
A4 (8-1/2" × 11") / A4R (8-1/2" × 11"R) / B5 / B5R:
30 units or 1,000 sheets (For A4 (8-1/2" × 11"), B5, 50 sets
only when stapled in a single location on the far side)
Saddle stitch tray 10 units (11 to 15 sheets), 15 units (6 to 10 sheets),
20 units (1 to 5 sheets)
lOffset output is not available for A3 wide (12" × 18") / A5R (5-1/2" × 8-1/2"R).
Required power supply Supplied from this machine
Weight Approx. 40 kg (88.2 lbs.)
Dimensions
When output paper tray is stored
497 mm (W) × 631 mm (D) × 988 mm (H)
(19-9/16" (W) × 24-27/32" (D) × 38-57/64" (H))
When output paper tray is extended
656 mm (W) × 631 mm (D) × 988 mm (H)
(25-53/64" (W) × 24-27/32" (D) × 38-57/64" (H))
Max. no. of stapled sheets
(90 g/m2(24 lbs.))
Max. no. of 50 sheets (A4 (8-1/2" × 11"), A4R (8-1/2" × 11"R), B5, B5R)
Max. no. of 25 sheets (A3 (11" × 17"), B4 (8-1/2" × 14"))
Staple position 1 bottom, 1 top, 2 middle
Staple method (for saddle stitch) Centred fold with stapling in 2 centre places
Saddle stitch fold position Centred fold
Saddle usable sizes A3 (11" × 17") / B4 (8-1/2 × 14") / A4R (8-1/2" × 11"R)
Saddle usable paper weight
60 g/m2(16 lbs.) to 220 g/m2(80 lbs. Cover)
Paper weighting 106 g/m2(28 lbs.) to 220 g/m2(80 lbs. Cover) is only able to be
used in cover mode and for single sheet fold.
Max. no. of saddle-stitched sheets
Max. no. of 15 sheets (80 g/m2(21 lbs.)):
14 sheets (80 g/m2(21 lbs.)) + 1 sheet (220 g/m2(80 lbs. Cover))
Max. no. of 10 sheets (90 g/m2(24 lbs.)):
9 sheets (90 g/m2(24 lbs.)) + 1 sheet (220 g/m2(80 lbs. Cover))
Saddle stitch finisher Finisher (large stacker)
Name Finisher (MX-FN11)
Paper sizes Depends on feeder specifications
Useable paper Paper weight 55 g/m2(13 lbs.) to 300 g/m2(110 lbs. Cover)
No. of trays 2
Tray capacity
(80g/m2(21 lbs. bond))
Upper tray
Non-stapled A3 wide (12" × 18") / A3 (11" × 17") / B4 (8-1/2" × 14") /
A4R (8-1/2" × 11"R) / B5R (7-1/4" × 10-1/2"R): 650 sheets
A5R (5-1/2" × 8-1/2"R): A4 (8-1/2" × 11") / B5: 1,550 sheets
Staple function A4 (8-1/2" × 11") / B5: 100 units or 1,550 sheets
A3 (11" × 17") / B4 (8-1/2" × 14") / A4R (8-1/2" × 11"R):
50 units or 650 sheets
Lower tray
Non-stapled A3 wide (12" × 18") / A3 (11" × 17") / B4 (8-1/2" × 14") /
A4R (8-1/2" × 11"R) / B5R (7-1/4" × 10-1/2"R): 650 sheets
A4 (8-1/2" × 11") / B5: 2,450 sheets
A5R (5-1/2" × 8-1/2"R): 1,700 sheets
Staple function A4 (8-1/2" × 11") / B5: 100 units or 1,550 sheets
A3 (11" × 17") / B4 (8-1/2" × 14") / A4R (8-1/2" × 11"R):
50 units or 650 sheets
lOffset output is not available for A3 wide (12" × 18") / B5R (7-1/4" × 10-1/2"R) /
A5R (5-1/2" × 8-1/2"R).
Required power supply Supplied from this machine
Weight Approx. 44 kg (97 lbs.)
Dimensions
When output paper tray is stored
515 mm (W) × 645 mm (D) × 1100 mm (H)
(20-9/32" (W) × 25-25/64" (D) × 43-19/64" (H))
When output paper tray is extended
645 mm (W) × 645 mm (D) × 1100 mm (H)
(25-25/64" (W) × 25-25/64" (D) × 43-19/64" (H))
Max. no. of stapled sheets
(90 g/m2(24 lbs.))
Max. no. of 50 sheets (A4 (8-1/2" × 11"), B5)
Max. no. of 30 sheets (A3 (11" × 17"), B4 (8-1/2" × 14"), A4R (8-1/2" × 11"R))
Staple position 1 bottom, 1 top, 2 middle
Punch module (for finisher)
Name
Punch module for MX-FNX9
MX-PNX1A, MX-PNX1B, MX-PNX1C,
MX-PNX1D
Punch module for MX-FN11
MX-PNX6A, MX-PNX6B, MX-PNX6C,
MX-PNX6D
Paper size for punch module A3 (11" × 17") to B5R (7-1/4" × 10-1/2"R)
Holes
MX-PNX1A 2 holes, MX-PNX1B 3 holes
MX-PNX1C 4 holes, MX-PNX1D 4 holes (wide)
MX-PNX6A 2 holes, MX-PNX6B 3 holes
MX-PNX6C 4 holes, MX-PNX6D 4 holes (wide)
Required power supply Supplied from Finisher
Dimensions
98 mm (W) × 477 mm (D) × 137 mm (H)
(3-55/64" (W) × 18-25/32" (D) × 5-13/32" (H))
115 mm (W) × 600 mm (D) × 995 mm (H)
(4-39/64" (W) × 24 (D) × 39-13/16" (H))
Weight Approx. 3 kg (6.6 lbs.) Approx. 8 kg (17.6 lbs.)
Other manuals for MX-4140N
2
This manual suits for next models
3
Table of contents
Other Sharp All In One Printer manuals

Sharp
Sharp MX-3050N User manual

Sharp
Sharp MX-C381 User manual

Sharp
Sharp MX-4141N Quick start guide

Sharp
Sharp DM-2000 User manual

Sharp
Sharp MX-M654N Guide

Sharp
Sharp MX-C380P User manual

Sharp
Sharp AM-400 User manual

Sharp
Sharp AR-BC320 Assembly instructions

Sharp
Sharp MX-2610N User manual

Sharp
Sharp MX-C402SC User manual

Sharp
Sharp AL-2030 User manual

Sharp
Sharp MX-M904 User manual

Sharp
Sharp MX-2310U Guide

Sharp
Sharp MX-C312 User manual

Sharp
Sharp FO-DC525 User manual

Sharp
Sharp MX-7001 User manual

Sharp
Sharp MX-1800N User manual

Sharp
Sharp MX-C528F User manual

Sharp
Sharp MX-7580N User manual

Sharp
Sharp AL-1661CS User manual