Sharp 28HW-57E User manual

COLOUR TELEVISION
OPERATION MANUAL
28HW-57E
32HW-57E
ENGLISH

1
ENGLISH
Contents
Since 1924, «SHARP» consumer electronic products have established a world-wide reputation for unsurpassed quality
and precision manufacturing techniques.
Your new SHARP Colour TV uses the very latest electronic circuitry and engineering advancements for the best possi-
ble performance. Given proper care, your new TV will provide many years of entertaining for the entire family.
Please read the following instructions before operating this set.
Dear SHARP Customers
This equipment complies with the requirements of Directives 89/336/EEC and 73/23/EEC as amended by 93/68/EEC
Safety precaution
Caution
The 5 cm in the drawing
indicates the minimum
ventilation distance.
CAUTION
Make sure that the
power is switched
off when going out.
Safety precaution ..................................................... ........1
Caution .............................................................. ...............1
Accessories .............................................................. ........2
Remote Control Battery Installation .......................... .......2
Antenna Connections .......................................................2
Controls & Terminals ................................................ ........5
Auto Installation ................................................................6
Switching on .....................................................................8
Menu Structures ...............................................................9
TV Operation (Channel Selection) ........................... .......11
Picture Adjustments ................................................. ......12
Wide Mode Fast Menu ................................................. ..14
100Hz Fast Menu ..................................................... ......16
Audio Adjustments ................................................... ......17
Sound Setting Mode ................................................. .....18
Features Setting Mode (ON/OFF Timer) .................. ......21
Child lock (Protection) .............................................. ......23
TV Channel Setting .........................................................26
Other features .......................................................... ......30
Teletext Mode..................................................................34
21-pin Euro-SCART and 21-pin Audio/Video ........... .....38
Typical connections .................................................. .....39
Troubleshooting ........................................................ .....41
General Specifications for Television Receiver ........ ......42
Index................................................................................43
The tube of your TV has a special coating. Do not knock or rub on the
tube face with sharp or hard surfaces, otherwise you will damage the
coating!
To prevent damaging the surface of the television screen, remove fin-
ger prints only with a soft cloth dampened with glass cleaner. Do not
use any abrasive cleaners!
Do not use thinner, benzene or other strong chemical cleaners.

NOTE: •Remove batteries if weak or if the unit is not in use for long periods.
•Do not mix old and new batteries.
•Incorrect installation of the batteries may damage the remote control.
2
Quick reference Guide
Antenna connections - TV set only -
Supplied Accessories
Remote Control Battery Installation
Before using the TV set for the first time, install the supplied dry batteries in the remote control.
Remote control Operation Manual Type-AA Dry Batteries
1. With your thumb nail, pull up
the slit as indicated by the arrow
to remove the back cover.
2. Insert two batteries 1.5 V (Size
«AA»). Be sure to match the bat-
tery K/Lterminals with the
K/L marks inside the compart-
ment.
3. Replace the battery cover.
COLOUR TELEVISION
BAREVNÝ TELEVIZOR
SZĺNES TELEVĺZIÓ
KOLORWY TELEWIZOR
ЦBETHOŇ TEлEBN3OP
RECEPTOR DE TELEVIZIUNE ÎN CULORI
FAREBNÝ TELEVĺZOR
OPERATION MANUAL
NÁVOD K OBSLUZE
HAS ZN ÁL ATI U TAS ĺTÁ S
INSTRUKCJA OBSŁUGI
CБOPHиK иHCTPУKЦия
INSTRUC©IUNI DE UTILIZARE
NÁVOD NA OBSLUHU
28HW-57C
32HW-57C
ENGLISHČESKYMAGYARPOLSKI
SLOVENČINA
Mains Socket Outlet
AC 220~240 V-50Hz

3
ENGLISH
Antenna connections - VCR and TV -
Note:See on - Typical connection - (page 39) for details of further connection possibilities.
AV-1:Connector with AV LINK
BACK OF TV
BACK OF VCR
Aerial Cable
(Not supplied)
SCART-Lead
(Not supplied)
Antenna
(Not supplied)
Antenna lead
(Not supplied)
Antenna in Audio/Video
RF
out
Mains Socket Outlet
AC 220~240 V, 50Hz
Mains Socket Outlet
AC 220~240 V, 50Hz

4
Remote control
TV 1. Stand-by ON/OFF switch (TV)
Videorecorder 2. Power ON / OFF switch (VCR)
TV 3. Digit buttons 0 ~ 9
4. Flashback button
Teletext 5. Colour button (green)
6. Colour button (red)
TV 7. Volume Down/Cursor control Left
8. Menu button
Teletext 9. Reveal button
10. List selector
11. Store button
12. Cancel button
13. Top/ Bottom/Full button
14. Reset button
Videorecorder 15. Rewind/picture search/reverse
16. Play button
17. Pause / Still button
18. Stop button
TV 19. TV / VIDEO selector
20. Call button
21. Single/Double entry
Teletext 22. Colour button (yellow)
23. Colour button (cyan)
TV 24. Channel Up/Cursor control Up
25. Volume Up/Cursor control Right
26. Channel Down/Cursor control Down
27. Wide Mode Selector
TV/Teletext 28. Time button
TV 29. Sound mode selector
Teletext 30. Hold button
TV 31. Sound Mute button
Teletext 32. Text/Mix/Picture button
33. Index button
Videorecorder 34. Channel Up selector
35. Fast forward/picture search/forward
36. Channel Down selector
37. Record button
1. 19.
23.
21.
24.
25.
26.
27.
28.
29.
30.
31.
32.
34.
37.
36.
35.
33.
22.
20.
4.
5.
6.
7.
8.
10.
11.
12.
13.
15.
18.
17.
16.
14.
9.
2.
3.

5
ENGLISH
HOW TO OPEN THE DOOR
Press the top of the door, opening it slightly.
hook your finger inside and pull open.
FRONT TV
1. Main Power On/Off Switch
2. Power Indicator
3. Remote Control Sensor
4. Volume Button (DOWN)
5. Volume Button (UP)
6. Program Selector (DOWN)
7. Program Selector (UP)
8. Door
Controls & Terminals
REAR TV
21-pin In/Out
1. 21-pin Audio/Video (AV-2) With
PAL/SECAM/NTSC Video Input
2. 21-pin Audio/Video (AV-1)
With PAL/SECAM/NTSC/S-Video
Input & AV LINK control signal
3. 21-pin Euro SCART (RGB) with
PAL/SECAM/NTSC Video Input
RF Input
4. Aerial terminal
13
24 5 678
10 11 12 13 9
Behind the door
9. Headphone Socket (3,5 mm ø, 16~600 ohms)
10. S-Video input terminal
11. Video input Terminal (PAL/SECAM/NTSC)
12. Audio Input Terminal (left)
13. Audio Input Terminal (right)

Auto Installation System
Your television set is provided with an Automatic Installation System which makes Installation easier.
This new system is activated when you turn on the TV for the first time.
Procedure:
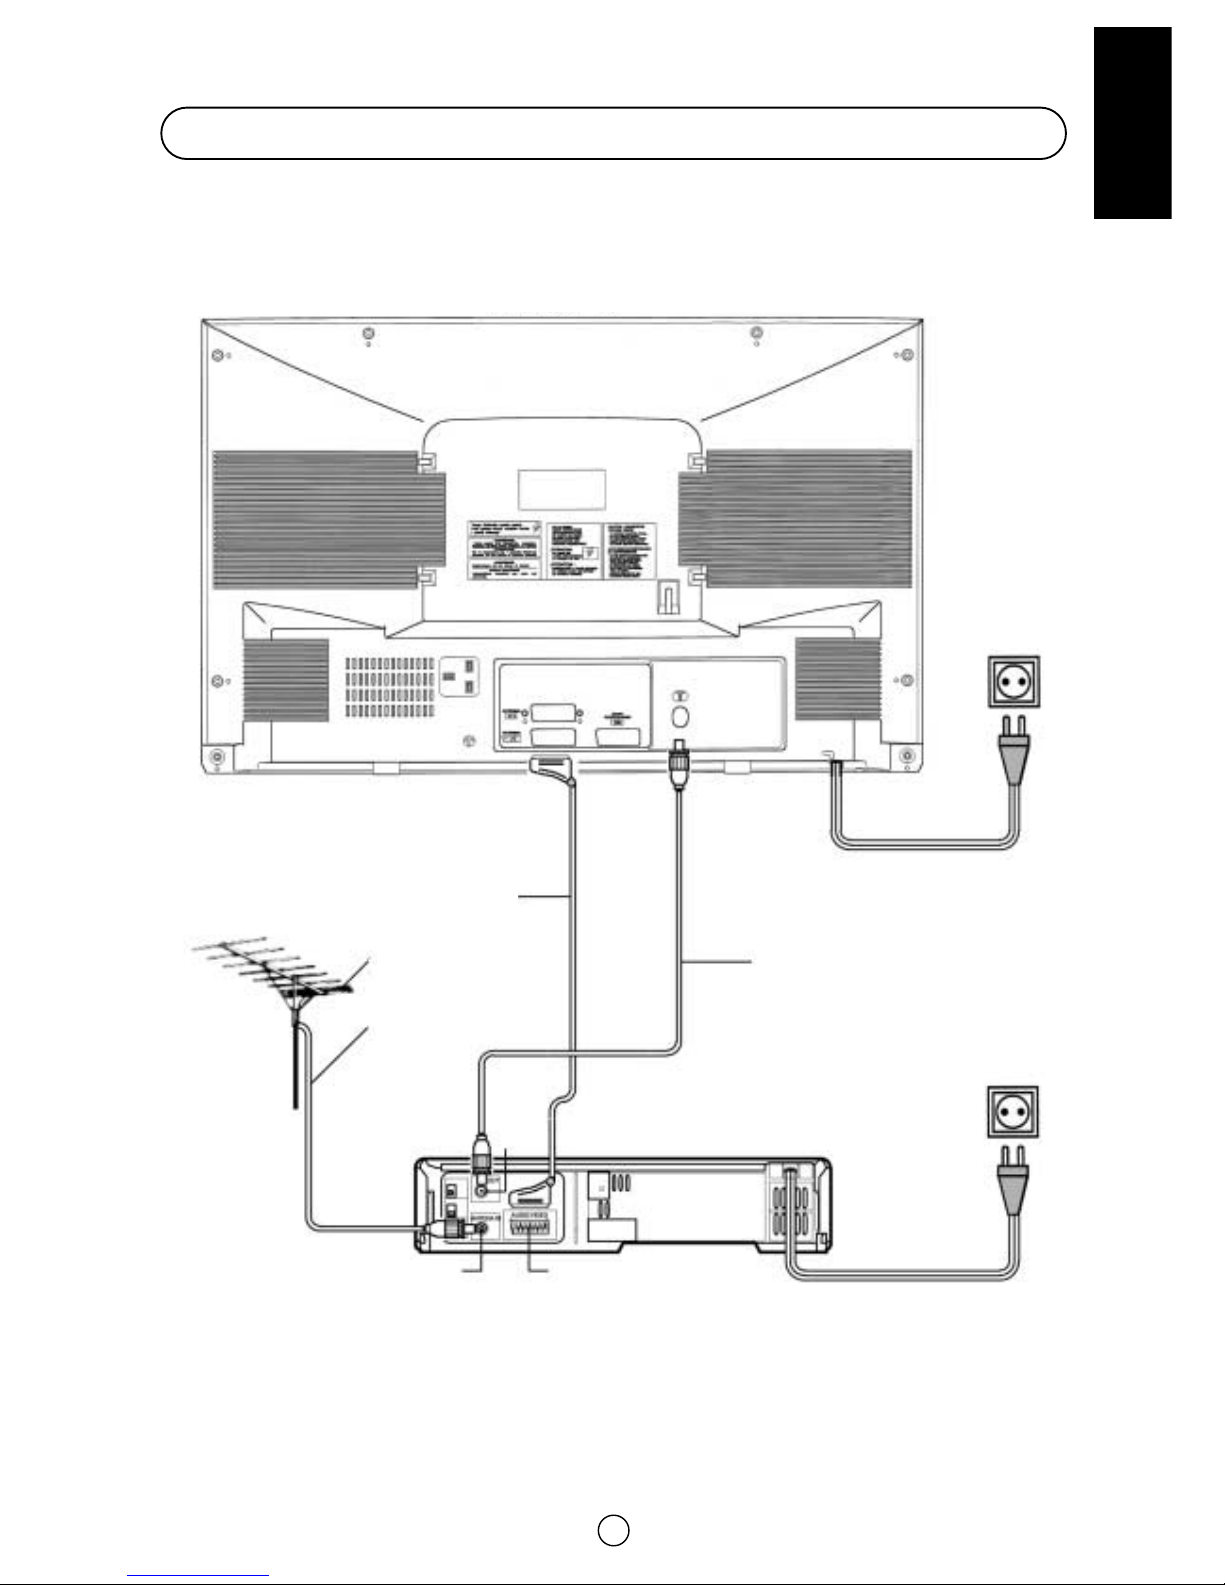
1. Put batteries into the remote control and Connect the antenna jack in the antenna input terminal on the rear side of
your TV-set, same as indicated on -Quick reference Guide- (page 2/3).
If you have a SCART lead, do not fit at this time.
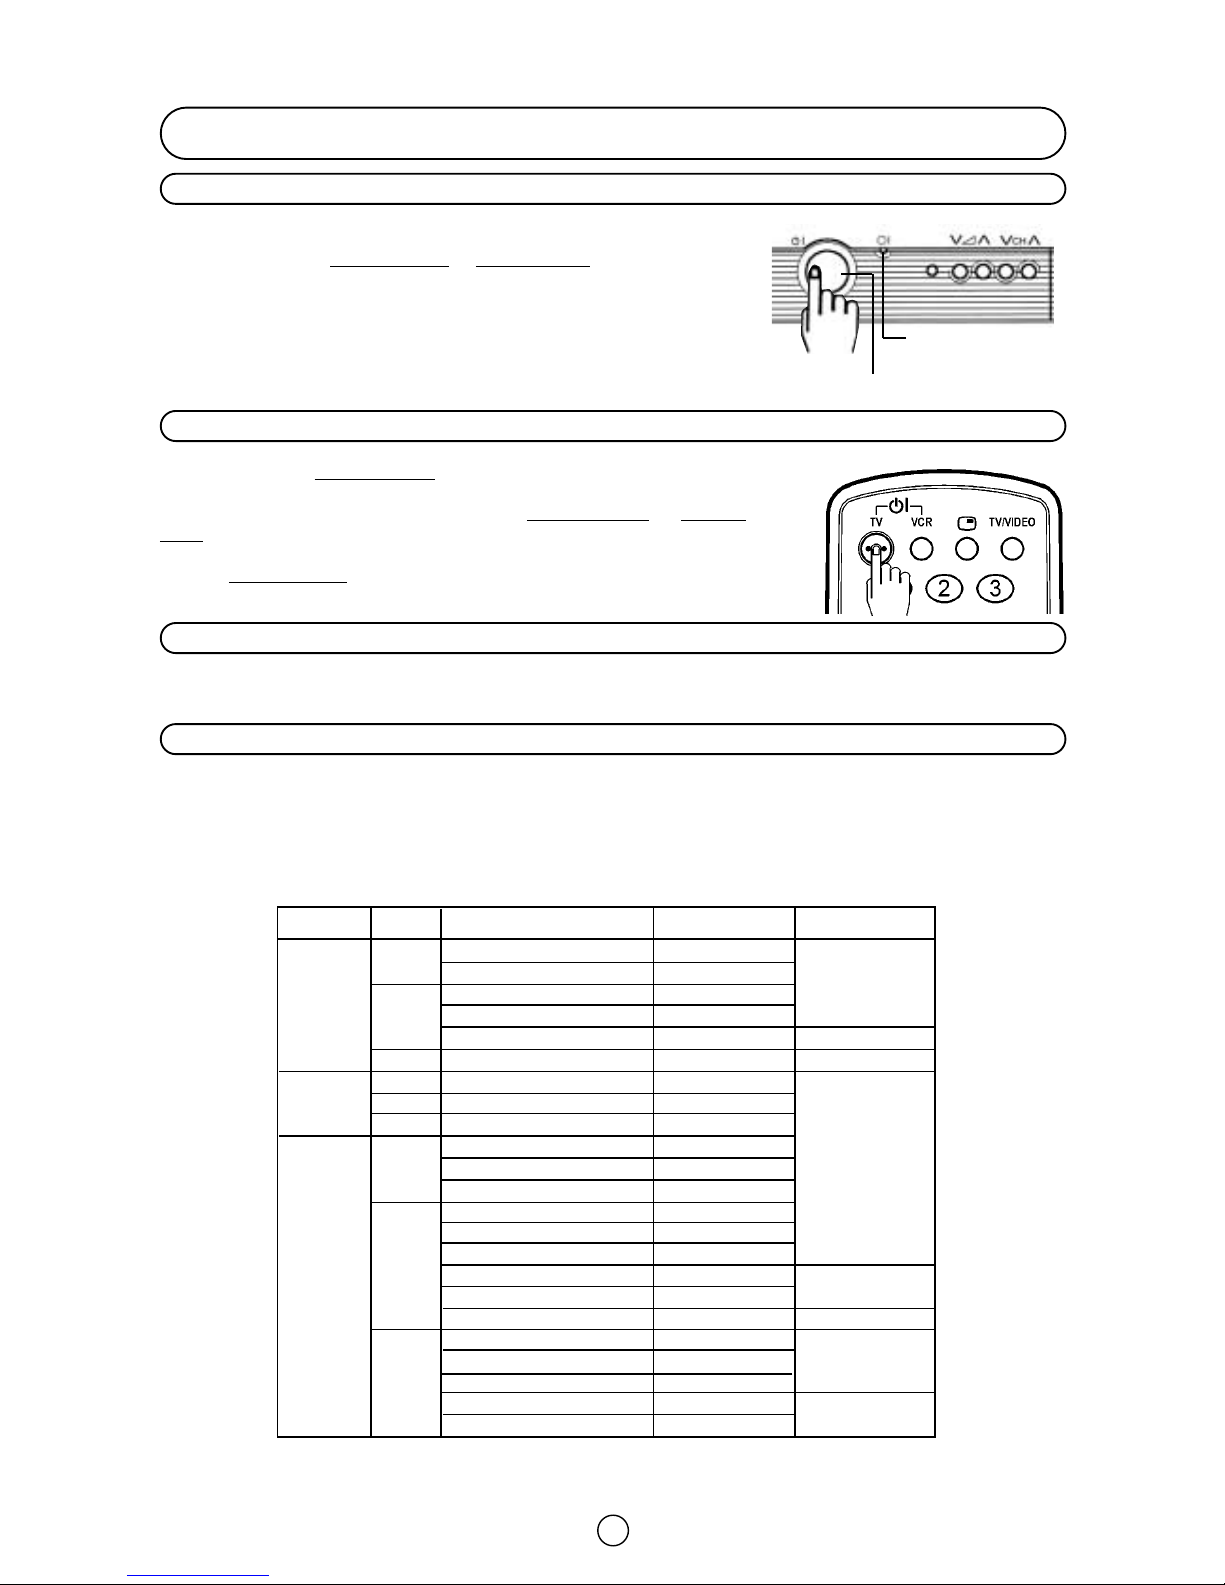
2. Connect the TV power cable to a 220 ~ 240 V system.
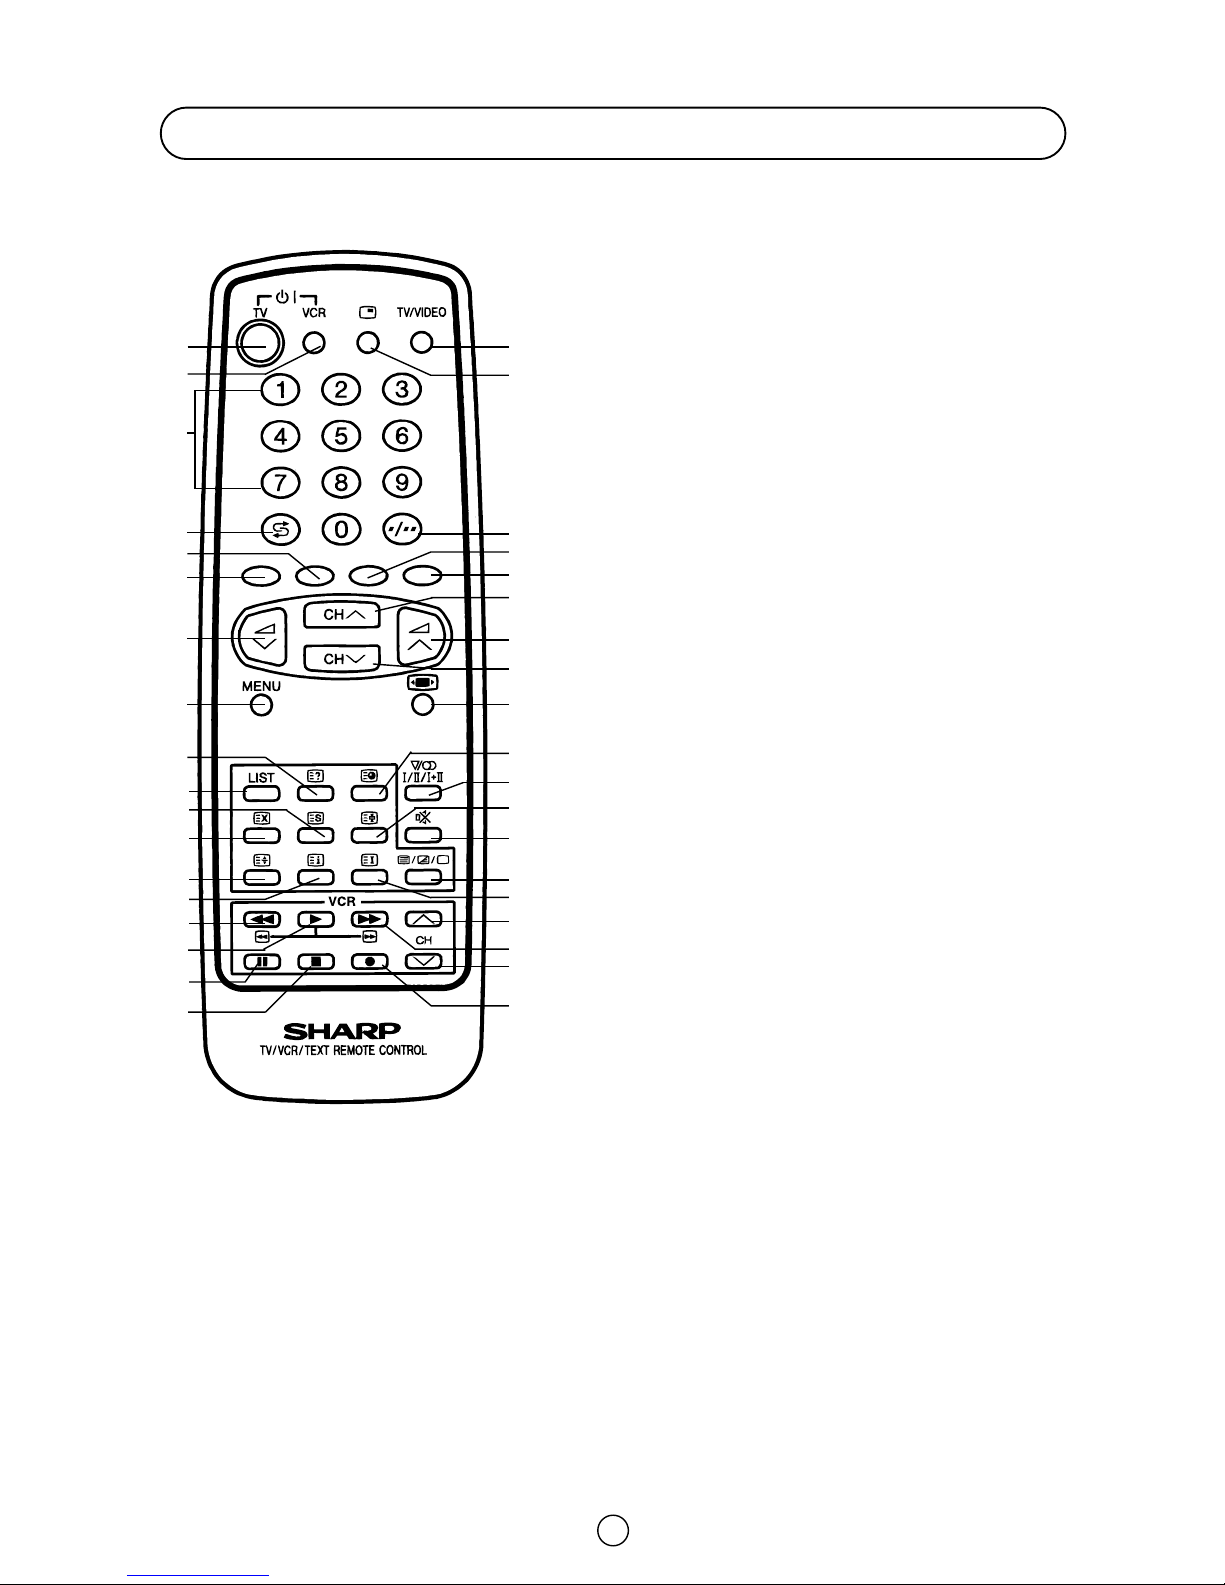
3. Press the main power button (I), on the right hand side of the TV set, to
start the “AUTO INSTALLATION”.
4. The red power indicator will light.
5. The “AUTO INSTALLATION” message will appear on your TV screen with a
list of the languages.
6. Press the RED button to select the language of the menus.
7. Press the BLUE button to confirm.
MThe TV is ready to preset automatically all local channels for you.
MIf the TV is being used with a VCR, turn on the VCR and play back a pre-
recorded tape.
8. Now, press any button on the TV remote control and follow the instructions
on the screen, to start Auto Channel Preset.
Automatic Channel Sorting System (ASS): The TV set SEARCHES FOR FRE-
QUENCIES, memorises the channels found, and sorts them (according to techni-
cal criteria) from Pr-01 of the TV, to a maximum of 99 programmes.
Note: This tuning process may take several minutes to perform.
If you need to repeat the “AUTO INSTALLATION”, read on
-TV Channel Setting- (page 26).
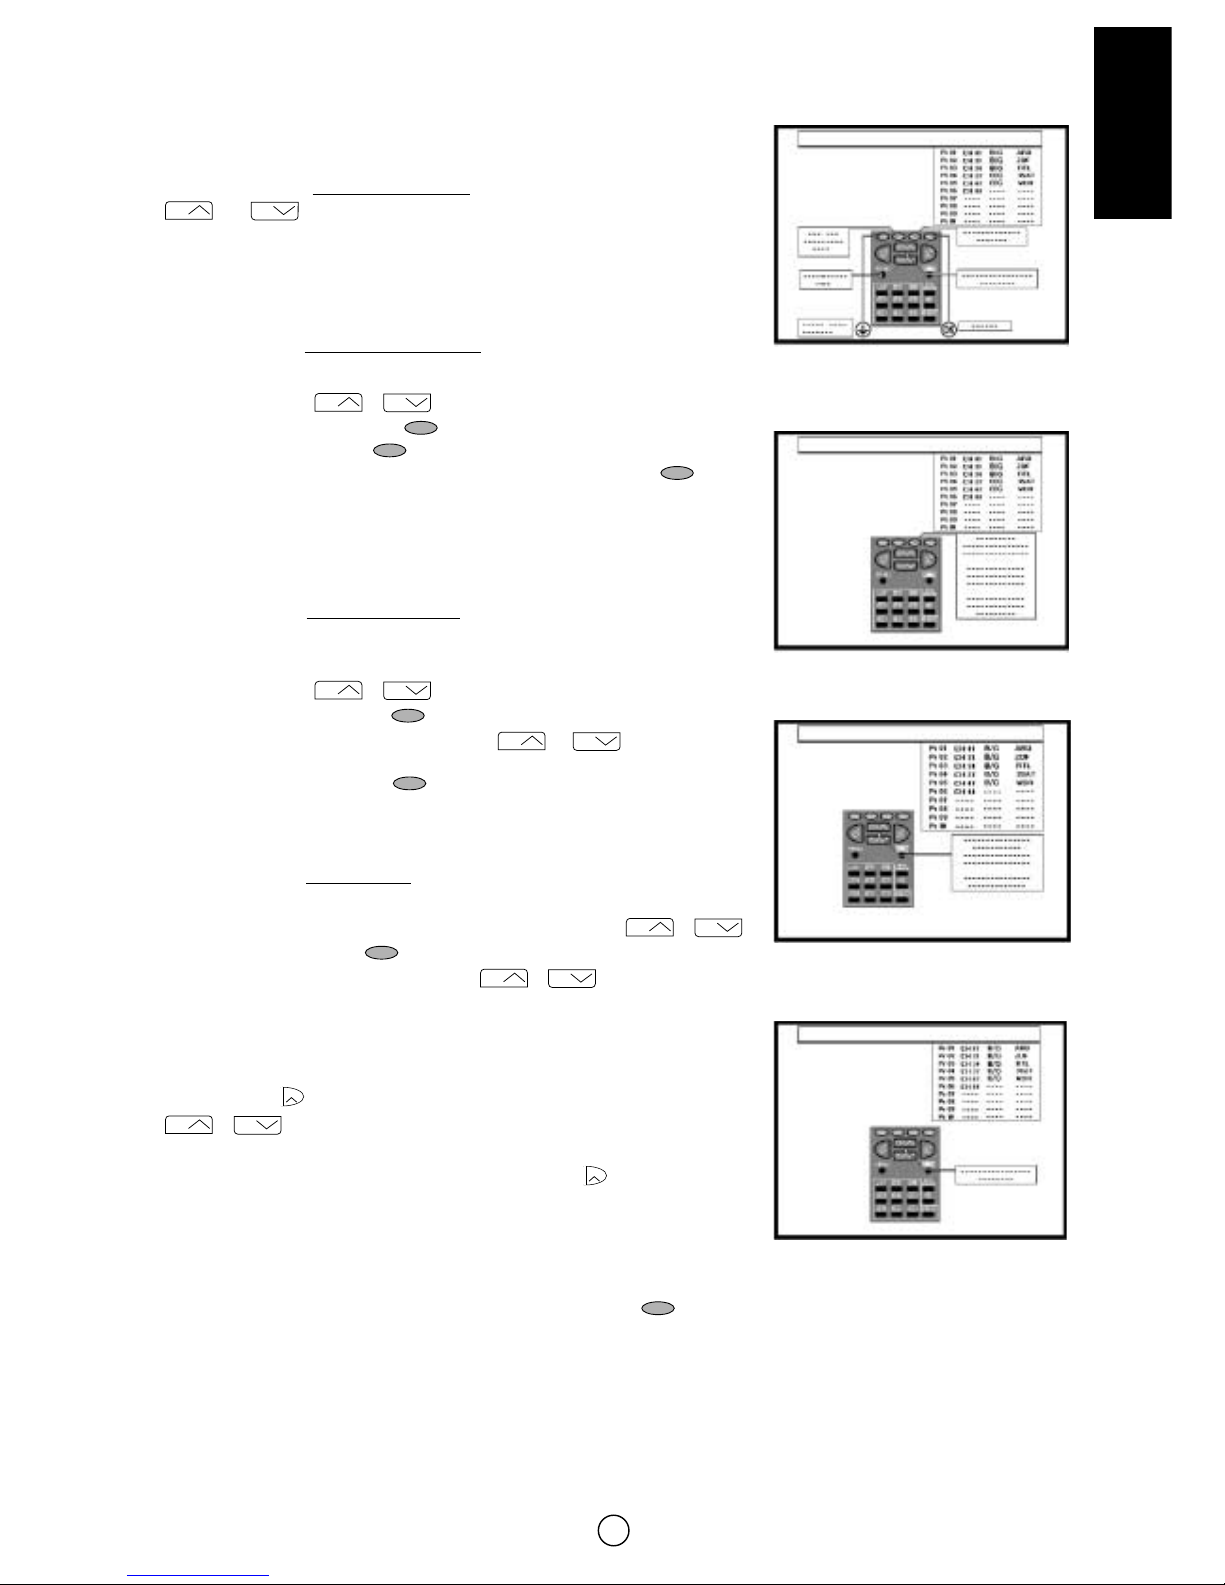
Stored programmes: When the TV has finished the automatic search, the
«Stored programmes» menu will appear on screen with a list of the channels
which have been memorised and a picture of the remote control with the avail-
able options:
a) CHANNEL UP/DOWN button: Select programme to be edited.
b) YELLOW button: Delete this programme.
c) GREEN button: Go to sorting mode.
d) RED button: Edit Name mode.
e) BLUE button: EXIT.
See more explanation on next page.
Note: It is advisable to use Pr 01, Pr 02, Pr 03 and Pr 04 for the most often used prgrames
with teletext and for those which contain their own programme information and information
on other channels in the Teletext pages.
For more explanation, please go on the section entitled TV-Guide.
Auto Installation
Automatic searching and sorting.
Press the menu button to cancel.
6
Stored programmes:
VCR
Power indicator
Main power button

7
ENGLISH
Stored programmes Menu
a) Select programme to be edited.
Use this option to select a programme from the list. Each time you press
or the memorised channel will be viewed and will remain
selected on the list by means of white background.
b) Delete this programme.
Use this option for cancelling programmes which are badly tuned or repeated.
b.1 Select the programme (Pr) you wish to delete using Cursor
UP/DOWN buttons / (marked with white background).
b.2 Press the YELLOW button to see the “Delete Menu”.
When the YELLOW button is pressed, the TV will ask for confirmation
that you wish to cancel, and you must press the YELLOW button again.
The channels that follow it on the list will automatically rearrange themselves
by moving up one programme (Pr) place, to restore the space of the cancelled
channel (CH).
c) Go to sorting mode
Use this option for sorting the channels (CH) into the desired programme (Pr),
as follows:
c.1 Select the programme (Pr) you wish to change using Cursor
UP/DOWN buttons / (marked with white background).
c.2 Press the GREEN button to see the “Sorting Menu”.
c.3 Press the Cursor UP/DOWN buttons / to move the
channel (CH) to the required position.
c.2 Press the GREEN button to finish.
d) Edit this programme
Use this option for giving a name made up of four digits to the channels or for
changing the one which appears on some channels, in the following way:
d.1 Select the channel using the Cursor UP/DOWN buttons /
d.2 Press the RED button to see the “Edit Menu”.
d.3 Press the Cursor UP/DOWN buttons / to change the first
letter. Letters A to Z of the alphabet, a blank space and the numbers 0 to 9
will appear sequentially. Some of the broadcasting stations names such as
ARD or WDR are already incorporated in the TV and appear among the
alphabet to make this task easier.
d.4 Press the button for changing the position of the cursor and the
/ buttons for changing the letters (repeat this action for other
letters).
d.5 When you have finished the fourth letter, press the button to quit the
“Edit Menu”option.
e) Exit
Use this option to quit the menu by pressing the BLUE button .
a
CH
CH
a
CH
CH
CH
CH
CH
CH
CH
CH
CH
CH
CH
CH
Stored programmes:
Stored programmes:
Stored programmes Menu
Delete Menu
Stored programmes:
Sorting Menu
Stored programmes:
Edit Menu

Blue back off timer
If noise appears in TV or VCR mode, the screen turns blue. The blue back off-timer is then engaged and will
automatically switch the set to Stand-by mode after 15 minutes.
8
Switching on
Power supply on/off button
Wen the main power button (I) is pressed ON, power indicator lights and
your TV set enters: In Stand-by mode or Program Mode. This TV memorizes
the Mode which has been memorized when it was switched OFF by main
power button.
On-Off/Stand-by button
When the TV is on Stand-by mode, to turn ON the TV press the Stand-by
button (BlTV) on the remote control, or one of the four buttons on the TV
(
V
a
/\, V
CH
/\
). The TV will change from Stand-by mode to Program
Mode, the sound indicator will light a few moments and an image will appear
on the screen. Press the Stand-by button (BlTV) again and the TV will
return to Stand-by mode.
Real Channel Number (terrestrial/cable TV Programmes)
Channel setting is mainly performed using the remote control. Please follow the instructions with the remote control in
hand.
Television broadcasting stations have channel numbers assigned to them (real channel numbers). You can assign your
own channel number to a real channel and store it in the programme preset memory.
CORRESPONDING REAL CHANNEL
L/L’
B/G
I
L /L’
B / G
I
L / L’
B / G
I
V
H
F
UHF
C
A
T
V
In Italy
In Holland
in Switzerland
F-2~F-4
F-5~F-10
E-2~E-4
E-5~E-12
A~H
I-1(A)~I-9(J)
F-21~F-69
E-21~E-69
I-21~I-69
B~Q
17~60
61~74
M1/S1~M10/S10
U1/S11~U10/S20
S-21~S-41
M-1~M-7
B-1~B-7
S’1/S21~S’5/S25
M1/S1~M10/S10
U-1/S-11~U-10/S-20
S-21~S 41
CH-02 ~CH-04
CH-05 ~CH-10
CH 02 ~CH-04
CH-05 ~CH-12
CH-13 ~CH-20
CH-01~CH-09
CH-21 ~CH-69
CH-21 ~CH-69
CH-21 ~CH-69
CC-01 ~CC-16
CC-17 ~CC-60
CC-61 ~CC-74
CC-01 ~CC-10
CC-11 ~CC-20
CC-21 ~CC-41
CC-42 ~CC-48
CC-49 ~CC-55
CH-75 ~CH-79
CC-01 ~CC-10
CC-11 ~CC-20
CC-21 ~CC-41
CC-42 ~CC-63
CC-64~CC-68
SYST. STATION SIGNALS SPECIALLY
AVAILABLE
REAL CHANNEL
NUMBER
Power indicator
Main power button

This TV set has: a MAIN MENU with four basic menus which permit
the entrance to the different functions of the TV, and a 100 Hz FAST
MENU with three functions.
These menus are figured out as indicated below.
MEMORIZE
9
ENGLISH
Menu Structures
By pressing the MENU button:
MENU Button
PICTURE
ADJUSTMENTS
(RED button) →
AUDIO
ADJUSTMENTS
(GREEN button) →
SET
OTHER
FUNCTIONS
(YELLOW button) →
INSTALL
AND
TUNE
(BLUE button) →
PICTURE MODE: Factory settings/ Cinema / Cinema plus / Soft /
Memorized / Sport / Rich / Films/ (Personal)
LEVELS: Contrast / Colour / Brightness / Sharpness
To memorize the “Personal”
levels in the “Memorized”
position of PICTURE MODE.
OSD contrast
Tint Control: Cool/Warm
NTSC Hue control
ECO mode: On / Off
Comb filter: On / Off
Noise reductor: Off / Auto /
Medium / High
Digital scan
D.Gamma
SVM:Off/Medium/High
ADVANCED 100 Hz
LEVELS NORM. EQUALIZER STEREO
Automatic volume correction: Short / Middle / Long / Off.
Current time / Programmed switch on
Off timer status / Help
AUDIO MODE: Bypass./ Spatial expander
SPEAKER LEVELS: Volume /
Balance / Loudness mode
HEADPHONES LEVELS: Volume/
Balance / Loudness mode / Bass
/ Treble
EXTERNAL LEVELS: SCART
volume / AV volume
Type of protection: NONE
ALWAYS, TIMER /
Start/ End
Language of the menus.
Country
Auto Channel Preset
Sorting mode
Delete programme
Edit programme
System
Erase all the
adjustments to
the CHILD-LOCK
function
Normal/
Only
autoinstallation
Programme
Type of protection: NONE,
ALWAYS, AUTO (VPS), TIMER
Start / End
Normalize
audio
levels to
default
factory
setting
Personal / Classic /
Jazz / Pop /
In concert/ Sport.
100 Hz / 330 Hz /
1KHz / 3.3 KHz /
10 KHz
Speakers matrix / Headphones
matrix / AV Matrix / Identificatión
CHILD LOCK
LOCK ALL LOCK PROGRAMME CLEAR LOCK
DEMO
SECRET NUMBER
Programme:
Channel number : (Real Channel)
Mode: TV / VCR / SKIP
Channel type: Aerial / Cable
Search (Frequency Tuning)
Fine tune
INSTALLATION EDIT
MENU FUNCTIONS

- BLUE BUTTON -
10
Menu Structures (Continuation)
By pressing the WIDE MODE Button:
By pressing the COLOUR Button:
WIDE MODE button
COLOUR buttons
100 HZ
FAST
MENU
STILL
SCAN
SCOPE
EXIT
STILL: Frozen Picture / Normal Picture - RED BUTTON -
SCAN ON / SCAN OFF - GREEN BUTTON -
ZOOM ON / ZOOM OFF - YELLOW BUTTON -
WIDE FAST MENU
MENU FUNCTIONS
AUTOMATIC
PANORAMA: V-SCROLL: UP/DOWN; V-SIZE: LARGE/SMALL, NORMALIZE
FULL
NORMAL
ZOOM 14:9: V-SCROLL: UP/DOWN; V-SIZE: LARGE/SMALL, NORMALIZE
CINEMA: V-SCROLL: UP/DOWN; V-SIZE: LARGE/SMALL, NORMALIZE

11
ENGLISH
Channel Selection
Operation TV
Channel selector buttons /
Select the programme channel number you want to see, using the
channel selector buttons or .
When you press this buttons the TV set frozen the current program, a
small screen appears within the main TV screen and the list of
programmes appears too.
Press the or again to select another program.
In the small screen you can watch the selected programme.
Note: The channels that are in SKIP mode can’t be seen with this
buttons. Use numerical buttons to display these channels.
Single/Double entry selector button
This button selects between one or two digit channel number entry.
0~9 Digit buttons ~
You can select channels by pressing the 0 ~ 9 digit buttons on the remote control.
(Single digit and double digit entry are available: refer to the Single/Double entry selector).
Flash-back button
Press this button to switch the currently-tuned channel to the previously-tuned channel. Press the button again to switch
back to the currently-tuned channel.
CH
CH
CH
CH
CH
CH
Single digit
entry mode
Double digit
entry mode
Previously
viewed channel
Currently
viewed channel
SELECTED
PROGRAM
Previously
viewed
channel
( still )

12
Picture quality are adjustable in this menu.
1. Press the MENU button Mto see the MAIN Menu.
2. Press the RED button to see the PICTURE MODE Menu.
3. Press the Cursor LEFT/RIGHT buttons / to select a
predetermined level: Factory settings / Cinema / Cinema plus / Soft/
/ Memorized / Sport / Rich / Films (Personal).
4. Press the RED button again to expand the menu and see
the LEVELS menu.
LEVELS menu
5. Press the Cursor UP/DOWN buttons / to select a
parameter from the list: Contrast, Colour, Brightness or Sharpness.
The red point mark indicate the selected parameter.
6. Adjust the picture quality to your liking with the Cursor LEFT/RIGHT
buttons / .
7. Press the GREEN button if you wish to memorize the
“Personal” levels in the “Memorized” position of PICTURE MODE.
In this menu you can switch to the following menus:
Press the YELLOW button to see the ADVANCED menu.
Press the BLUE button to see the 100 Hz menu.
8. Press the MENU button Mto close the PICTURE Menu.
a
a
CH
CH
a
a
Picture Adjustments
PICTURE MODE:
Factory Settings
MAIN Menu
PICTURE MODE Menu
RED
PICTURE MODE:
Contrast
Colour
Brightness
Sharpness
MEMORIZE ADVANCED
LEVELS:
LEVELS Menu
Factory Settings
GREEN YELLOW BLUE

ADVANCED menu
1. Press the Cursor UP/DOWN buttons / to select a
parameter from the list: OSD contrast, Tint control, Zoom or ECO
mode. The red point mark indicates the selected parameter.
2. Press the Cursor LEFT/RIGHT buttons / to adjust picture
quality to your liking.
Select OSD contrast to adjust the contrast level of the On Screen
Display menus.
Select Tint control to adjust your desired skin colour (Cool or Warm).
Select NTSC Hue control to adjust the skin colour (Green or Red)
during NTSc signal reception.
Select ECO mode “On” to attenuate the contrast in the excessively white areas of the picture.
In this menu you can switch to the following menus:
Press the RED button to return to the LEVELS menu.
Press the BLUE button to see the 100 Hz menu.
3. Press the MENU button Mto close the ADVANCED Menu.
100 Hz menu
1. Press the Cursor UP/DOWN buttons / to select:
Comb filter, Noise reduction, Digital scan, D.Gamma or SVM. The red
point mark indicate the selected item.
2. Press the Cursor LEFT/RIGHT buttons / to select ON /
OFF / AUTO / etc.
Select Comb filter (ON) to reduce the colour interference in picture
with fine details and the picture gets sharper.
Select Noise reductor (Auto, High or Medium) to reduce the noise
when receiving a weak signal and improve the picture quality.
Select Digital scan (ON) to reduce the line flicker and improve the
picture quality.
Select D. gamma (High or Medium) to increase the brightness of dark part of picture.
Select SVM (Scan Velocity Modulator) to change the resolution of the picture (Off, Medium or High). The TV is factory
pre-set to “Medium”.
In this menu you can switch to the following menus:
Press the RED button to return to the LEVELS menu.
Press the YELLOW button to return to the ADVANCED menu.
3. Press the MENU button Mto close the 100 Hz menu.
a
a
CH
CH
a
a
CH
CH
13
ENGLISH
ADVANCED menu
100 Hz menu
RED BLUE
RED YELLOW

With this menu you can select the width of the picture: AUTOMATIC,
PANORAMA, FULL, NORMAL, ZOOM 14:9 or CINEMA, by pressing
the WIDE MODE button.
Each time you press the WIDE MODE button, the width of the picture
changes as indicated:
AUTOMATIC *
v
PANORAMA
v
FULL
v
NORMAL
v
ZOOM 14:9
v
CINEMA ( 16:9 )
When you Select: PANORAMA, ZOOM 14:9 or CINEMA, 4 options
appear on the screen:
●V-SCROLL: Press the RED button to see the Vertical SCROLL
menu.
●V-SIZE: Press the GREEN button to see the Vertical SIZE menu.
●NORMALIZE: Press the YELLOW button to normalize the Vertical
SCROLL and SIZE.
●EXIT: Press the CYAN button to quit the menu.
●V-SCROLL menu: Press the Cursor LEFT/RIGHT buttons / to adjust the Vertical SCROLL (UP/DOWN).
●V-SIZE menu: Press the Cursor LEFT/RIGHT buttons
/ to adjust the Vertical SIZE (LARGE/SMALL).
* AUTOMATIC mode (VPS code): The VPS signal is sent by some broadcasting stations with information of the
original wide.
When the TV is in AUTO mode and receives the VPS signal, it changes the wide automatically as indicated below:
When the TV is receiving VPS code 16:9 the TV selects CINEMA (16:9) automatically.
When the TV is receiving VPS code 14:9 the TV selects ZOOM 14:9 automatically.
When the TV is receiving VPS code 4:3 the TV selects PANORAMA automatically.
When the TV does NOT receive VPS code the TV selects PANORAMA automatically.
External source: When you are watching the TV-set through the Euro-SCART AV-1 or AV-2 terminals and it receives
information of 16:9 format (through the audio-video control pin) the TV selects FULL automatically.
a
a
a
a
14
Wide Mode Fast Menu
WIDE MODE Button
Vertical SIZE menu
Vertical SCROLL menu
CYAN
CYAN
DOWN UP
CYAN
YELLOWGREENRED
SMALL
V-SIZE
LARGE
AUTOMATIC

15
ENGLISH
Wide Mode (Special detail information)
PANORAMA
The Panorama Mode adapts the broadcast
picture to 16:9 format without changing the
centre of view. This is specially useful for
programmes like the News when the speaker in
the centre of the picture needs to be seen
clearly.
FULL
With Full Mode you adapt the picture 16:9
format while also stretching the centre of view.
This is an advantage, for example, when
watching sports games where there is no real
fixed centre of the picture.
NORMAL
You can watch 4:3 programs in 4:3 format by
switching to Normal Mode function.
ZOOM 14:9
Adapts the 14:9 broadcast cinema movies to
the 14:9 Mode.
CINEMA (16:9)
Adapts the 16:9 broadcast cinema movies to
the 16:9 Mode, thereby getting rid of the black
borders.
Special detail information about PANORAMA, FULL, NORMAL, ZOOM 14:9 and CINEMA (16:9) .

16
1. Press a colour button to see 100 Hz FAST Menu.
2. Press the corresponding coloured button.
2.1. Press the RED button «STILL» to frozen picture.
2.2. Press the GREEN button «SCAN» programmes.
2.3. Press the YELLOW button «SCOPE» to enlarge picture.
2.4. Press the CYAN button «EXIT» to quit the menu.
STILL:
In this mode the TV set frozen the picture.
You can also enter to the following functions:
«STILL» ON/OFF by RED button.
«SCAN» by GREEN button.
«SCOPE» by YELLOW button.
«EXIT» by CYAN button.
SCAN:
In this mode the TV set display 12 programmes simultaneously
in still mode: 6 porgrammes after and 5 programmes before
from the current program, as indicated in the drawing.
Note: the channels that are in SKIP mode cannot be seen in
SCAN.
Press the GREEN button «SCAN» to stop the SCAN Mode.
SCOPE:
In this mode you can make bigger the picture and moving it by
pressing the Cursor UP/DOWN/LEFT/RIGHT buttons /
/ / .
In this mode you can enter to the followings functions:
«STILL» (frozen picture) by RED button.
«SCAN» by GREEN button.
«SCOPE» by YELLOW button.
«EXIT» by CYAN button.
a
a
CH CH
Pr.03Pr.03 Pr.04 Pr.05 Pr.06
Pr.10
Pr.14
Pr.13
Pr.12
Pr.11
Pr.09
Pr.08
PROGRAMMA
IN CORSO
Pr.07
100 Hz Menu
Pr.08
ACTUAL
PROGRAM
100 Hz FAST Menu
STILL Mode
SCOPE Mode
SCAN Mode
With this menu you can enter to the following functions: STILL (Frozen picture), SCAN (Scanning programmes) and
SCOPE (Enlarge picture).
SCOPE
SCOPE
SCOPE
SCOPE ON

17
ENGLISH
Loudspeakers Sound Volume /
Adjust the sound volume using the /buttons. Press the buttons
to decrease/increase the sound level. The sound volume indicator
appears on the screen.
Note: To Adjust the headphones sound volume, see the
-HEADPHONES LEVELS menu- (page 19).
Sound mute button (c)
Press the button to mute the sound. The symbol cappears on the screen. Press the button again to turn the sound
back on.
Sound Mode Selector button
Press the button to change the sound in the speakers. The sound mode will appear on the screen.
Depending on the sound transmission the sound reproduction can be chosen as indicated below :
When the TV set is receiving a STEREO programme, the TV selects STEREO automatically, and you can change:
STEREO MONO
When the TV is receiving a BILINGUAL programme, the TV selects DUAL CHANNEL A automatically, and you can
change:
DUAL CHANNEL A DUAL CHANNEL B DUAL CHANNEL A B MONO
When the TV is receiving a MONO NICAM programme, the TV set selects MONO NICAM and you can change.
MONO NICAM MONO ( FM )
When the TV is receiving a MONO (FM) programme, the TV st selects MONO automatically but the sound mode cannot
be change.
Note: See the -STEREO Menu- (page 20) to change the Sound Mode in the headphones or in the audio output of the
external connector (AV-1/AV-2).
External source: When you are watching the TV-set through the Euro-SCART, AV-1, AV-2, Front A/V or S-video
terminals, the Sound Mode Selector button is not operative.
/i
I/II/I+II
a
a
a
a
Audio Adjustments
STEREO MONO

18
Bypass: Normal sound without sound effect.
Spatial expander: The kind of Spatial expander effect depends on the source mode. If the incoming signal is
in mono mode, Pseudo Stereo Effect is active; for stereo signals, Pseudo Stereo Effect and Stereo Basewidth
Enlargement is effective.
Automatic volume correction: Different sound sources, fairly often do not have the same volume level, for
example the changing from movie to the advertisements.
The Automatic Volume Correction (AVC) solves this problem and equalizes the volume levels.
Select “Automatic volume correction” and press the Cursor LEFT/RIGHT button / to select three
different levels: Short, Middle or Long.
Spatial strength: when the AUDIO MODE is in Spatial expander effect, you can reduce or enlarge the
stereo image by SPATIAL STRENGTH control.
a
a
Sound quality are adjustable in this menu.
1. Press the MENU button Mto see the MAIN Menu.
2. Press the GREEN button to see the AUDIO MODE Menu
3. Press the Cursor LEFT/RIGHT buttons / to change the AUDIO
MODE (Bypass []./ Spatial expander [].) or press the RED button, to
expand the menu.
The successive menu depends on the AUDIO MODE (Bypass or Spatial
expander) as indicated below.
4. Press the Cursor UP/DOWN buttons / to select: Automatic volume correction [] or Spatial strength [].
The red point mark indicate the selected parameter.
5. Adjust the sound quality to your liking with the Cursor LEFT/RIGHT buttons / .
6. Press the GREEN button if you wish to normalize audio levels to default factory setting.
In both menus you can switch to the following menus:
Press the RED button to see the AUDIO LEVELS menus.
Press the YELLOW button to see the EQUALIZER menu.
Press the BLUE button to see the STEREO menu.
7. Press the MENU button Mto close the AUDIO Menu.
a
a
CH
CH
a
a
MAIN Menu
AUDIO MODE Menu
GREEN
RED
Bypass
GREEN YELLOW BLUE
AUDIO MODE:
Bypass
AUDIO MODE:
Automatic volume correction
Off
Automatic volume correction
Off
Bypass
AUDIO MODE:
Spatial strength
Spatial expander
LEVELS NORM. STEREO
EQUALIZER
RED GREEN YELLOW BLUE
LEVELS NORM. STEREO
EQUALIZER
Spatial expander
Sound Setting Mode

19
ENGLISH
1. Press the MENU button Mto see the MAIN Menu.
2. Press the GREEN button twice to see the AUDIO Menu (Main
completed).
AUDIO Menu (Main completed)
3. Press the RED button to see the SPEAKER LEVELS menu.
SPEAKER LEVELS menu
4. Press the Cursor UP/DOWN buttons / to select:
Volume, Balance or Loudness mode.
The red point mark indicate the selected item.
5. Adjust the sound quality to your liking with the Cursor LEFT/RIGHT
buttons / .
Select Loudness mode (NORMAL, SPECIAL or OFF) to improve the
sound quality [].
6. Press the RED button to see the HEADPHONES LEVELS
menu.
HEADPHONES LEVELS menu
7. Press the Cursor UP/DOWN buttons / to select:
Volume, Balance, Loudness mode, Bass or Treble.
The red point mark indicate the selected item.
8. Adjust the sound quality to your liking with the Cursor LEFT/RIGHT
buttons / .
9. Press the RED button to see the EXTERNAL LEVELS menu.
EXTERNAL LEVELS menu
Select SCART/AV volume to adjust the sound level output to the external
connector (SCART/AV) with the Cursor LEFT/RIGHT buttons / .
10. Press the MENU button Mto close the AUDIO LEVELS menu.
a
a
a
a
CH
CH
a
a
CH
CH
Audio Levels menus
Loudness increases the volume of low and high frequency signals according to the current volume setting.
In NORMAL mode keeping the amplitude of the 1 KHz reference frequency constant.
In SPECIAL mode keeping the amplitude of the 2 KHz reference frequency constant.
MAIN Menu
GREEN
AUDIO Menu (Main completed)
SPEAKER LEVELS menu
HEADPHONES LEVELS Menu
EXTERNAL LEVELS Menu
AUDIO MODE:
Automatic volume correction:
Bypass
Volume
Volume
Balance
Loudness mode
Bass
Treble
Balance
Loudness mode Normal
Normal
Off
RED
RED
EFFECTS STEREO
EQUALIZER
EFFECTS STEREO
EQUALIZER
LEVELS NORM. STEREO
EQUALIZER
HEADPHONES LEVELS:
SPEAKER LEVELS:
SCART volume
AV volume
EXTERNAL LEVELS
EFFECTS STEREO
EQUALIZER
This manual suits for next models
1
Table of contents
Other Sharp TV manuals

Sharp
Sharp 14A-30MT User manual

Sharp
Sharp LC-32LE240E User manual

Sharp
Sharp 21LF-90H User manual

Sharp
Sharp LC32LD135K User manual

Sharp
Sharp Aquos LC-20S5U User manual

Sharp
Sharp DV-3750S User manual

Sharp
Sharp 29H-FG3RU User manual

Sharp
Sharp 34N-WF5H User manual

Sharp
Sharp 21F-A30 User manual

Sharp
Sharp XFlat 20F650 User manual

Sharp
Sharp 25C340 User manual

Sharp
Sharp LC-32CHE5111K User manual

Sharp
Sharp 21LF-90H User manual

Sharp
Sharp 32UF5 User manual

Sharp
Sharp Aquos LC-52SE94U User manual

Sharp
Sharp 4T-C70BK2UD User manual

Sharp
Sharp 66GS-62H User manual

Sharp
Sharp 29H-FD1S User manual

Sharp
Sharp LC-40FG5241KF User manual

Sharp
Sharp LC-60LE822E User manual