Sharp VC-MH71SM User manual

GB-1
CON TEN TS
BEFORE USIN G YOUR VCR
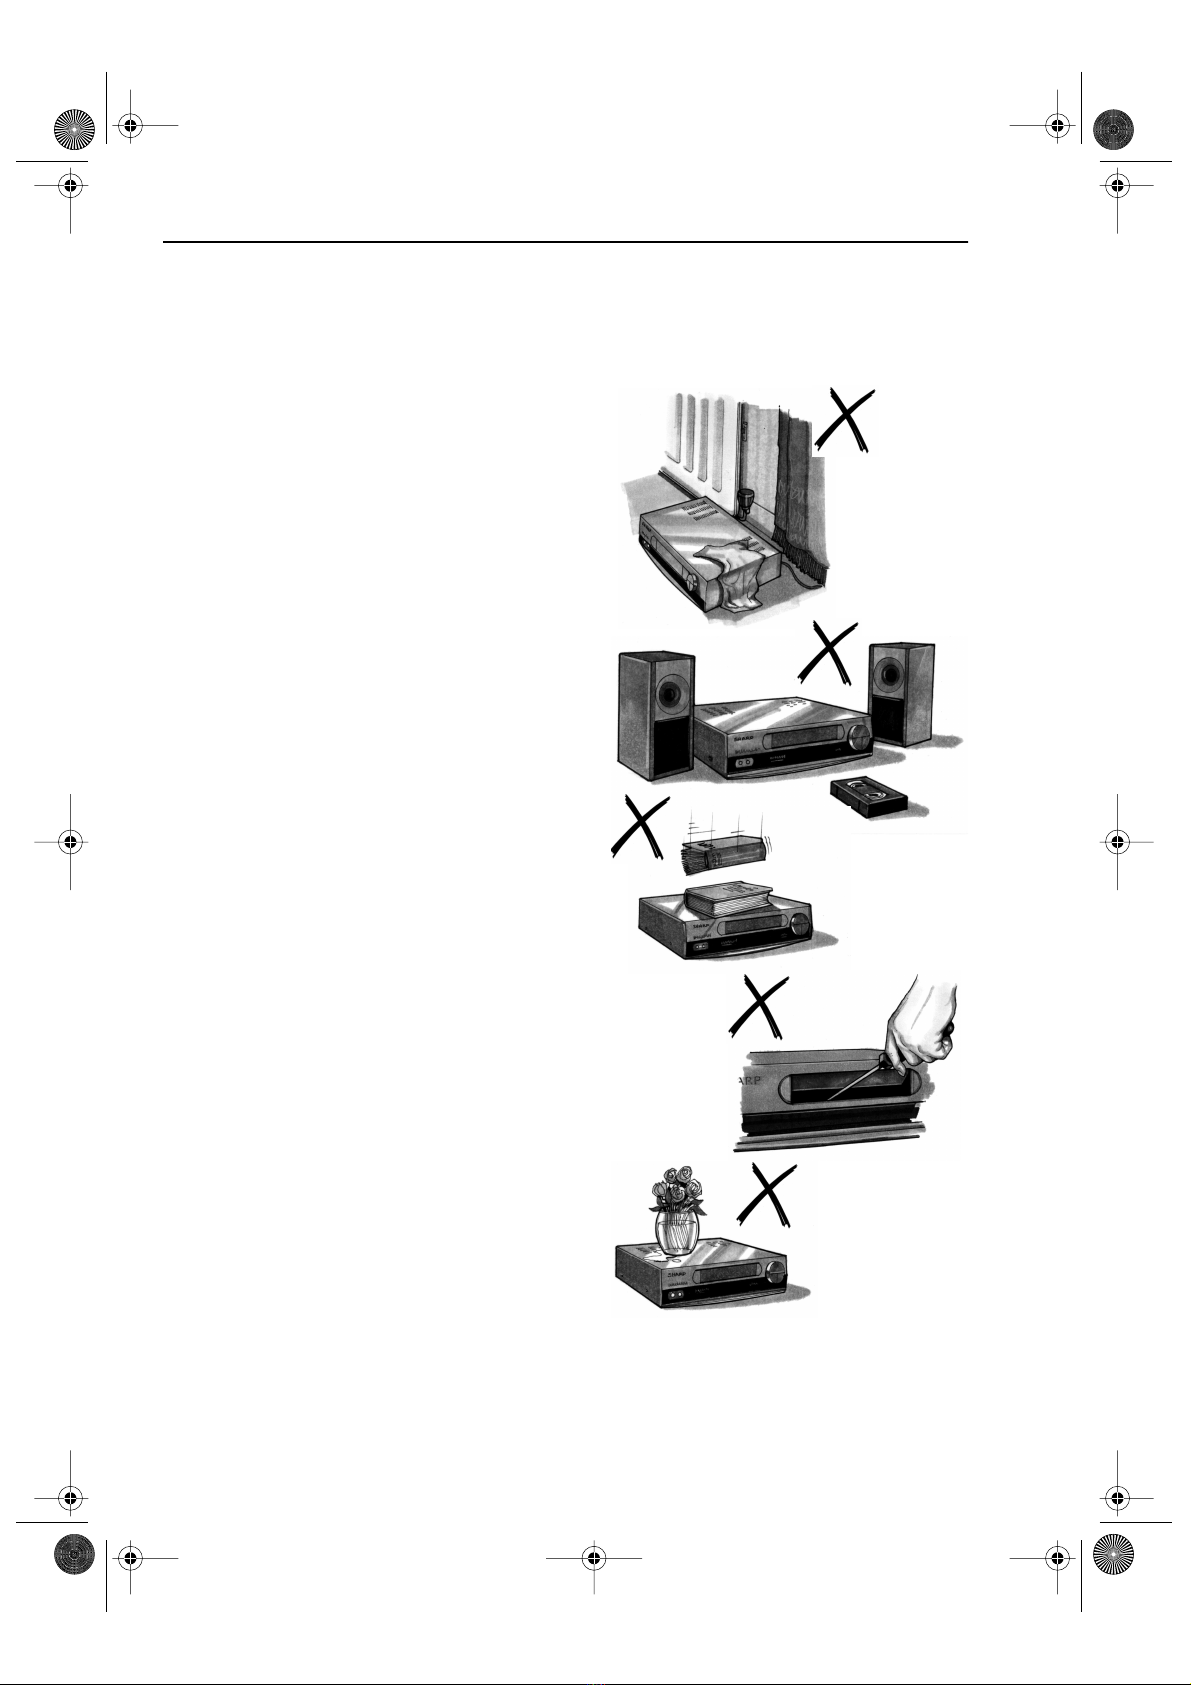
Important notes on your VCR ....................................................................................................... 2
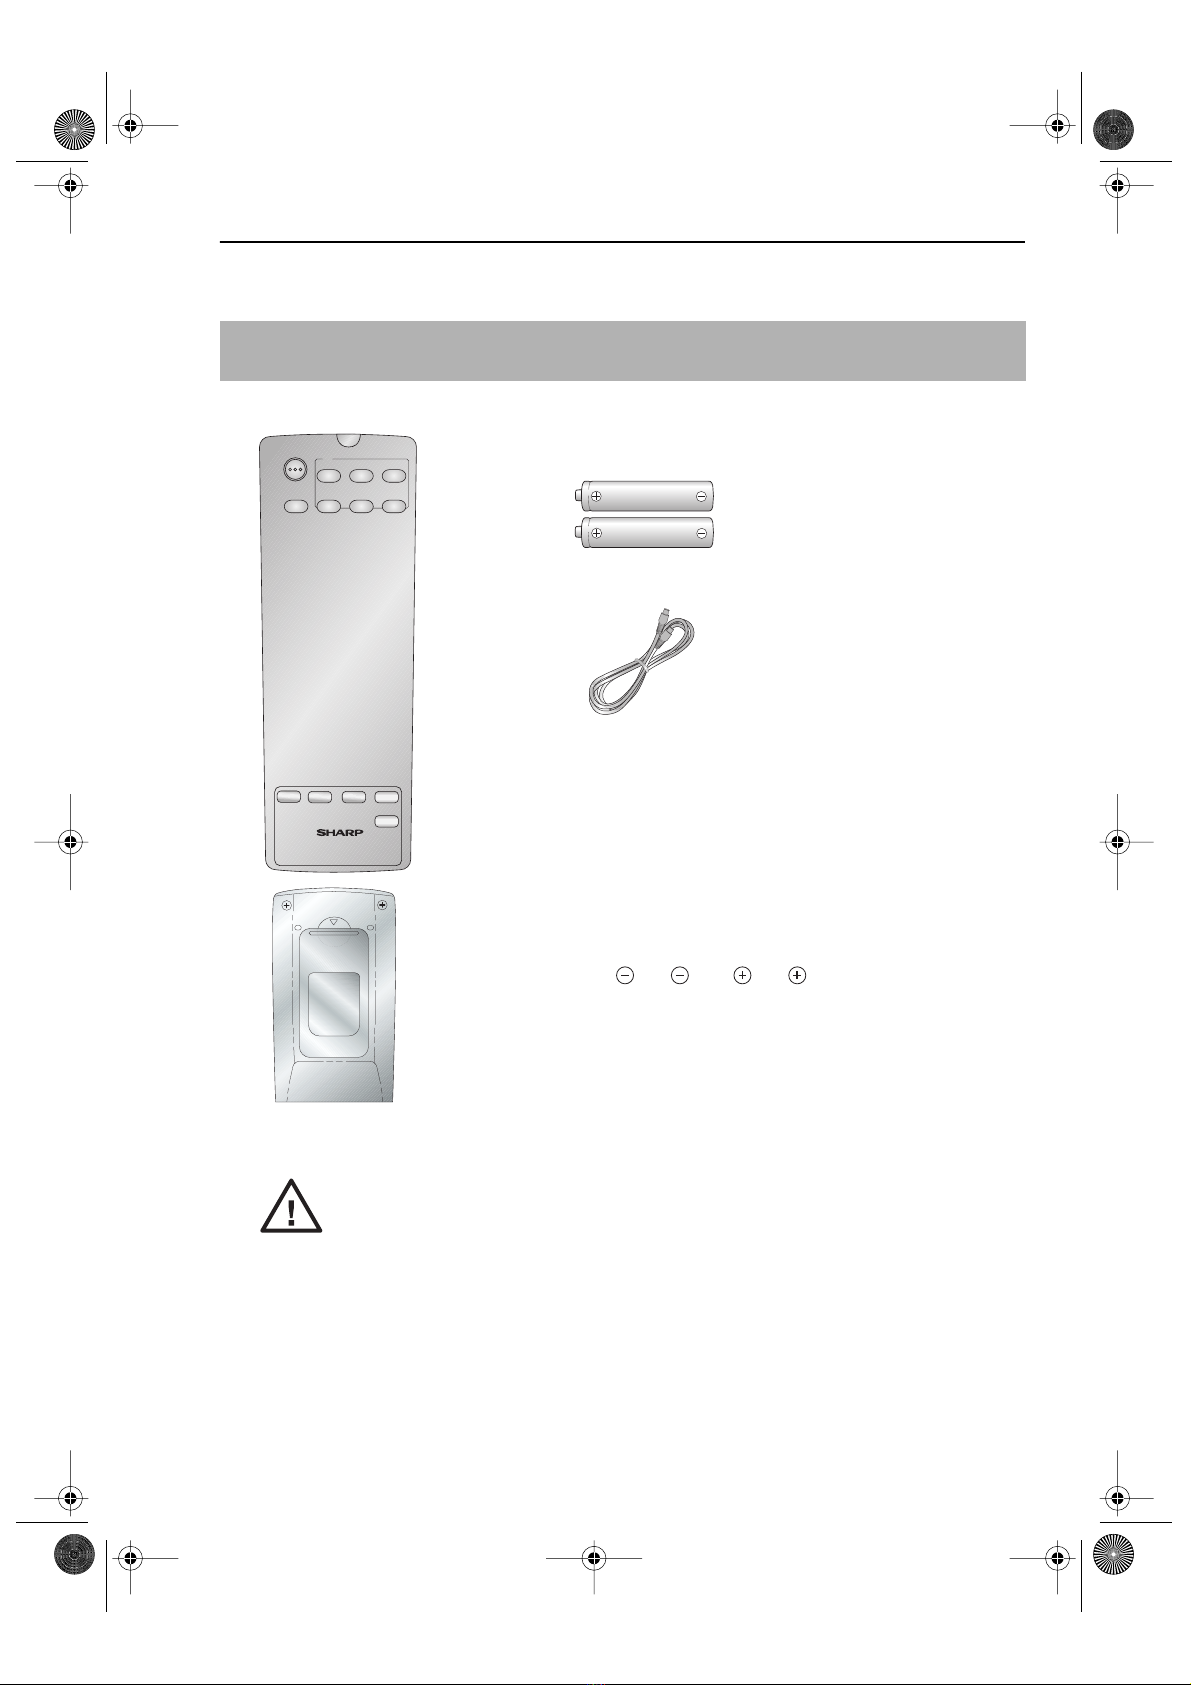
Unpacking the accessories ...........................................................................................................3
IN STA LLIN G YOUR VCR
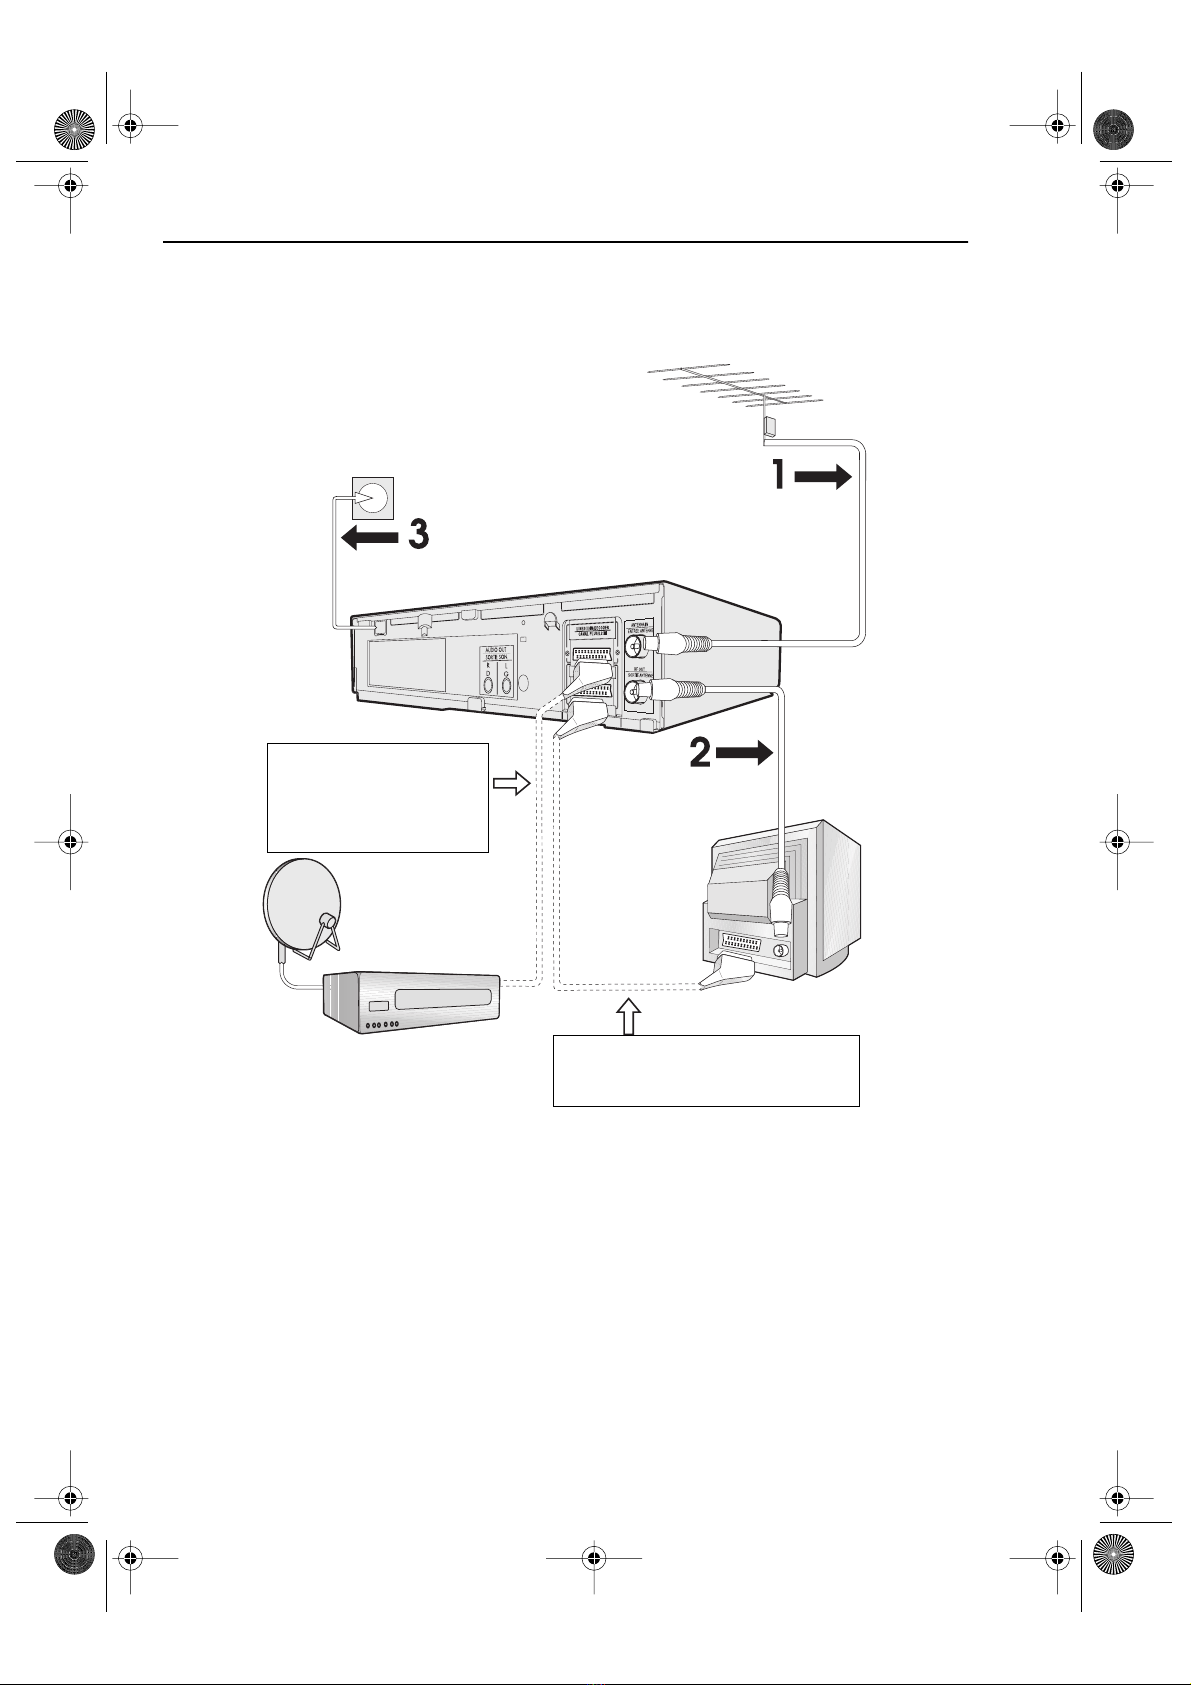
Connecting the cables ................................................................................................................. 4
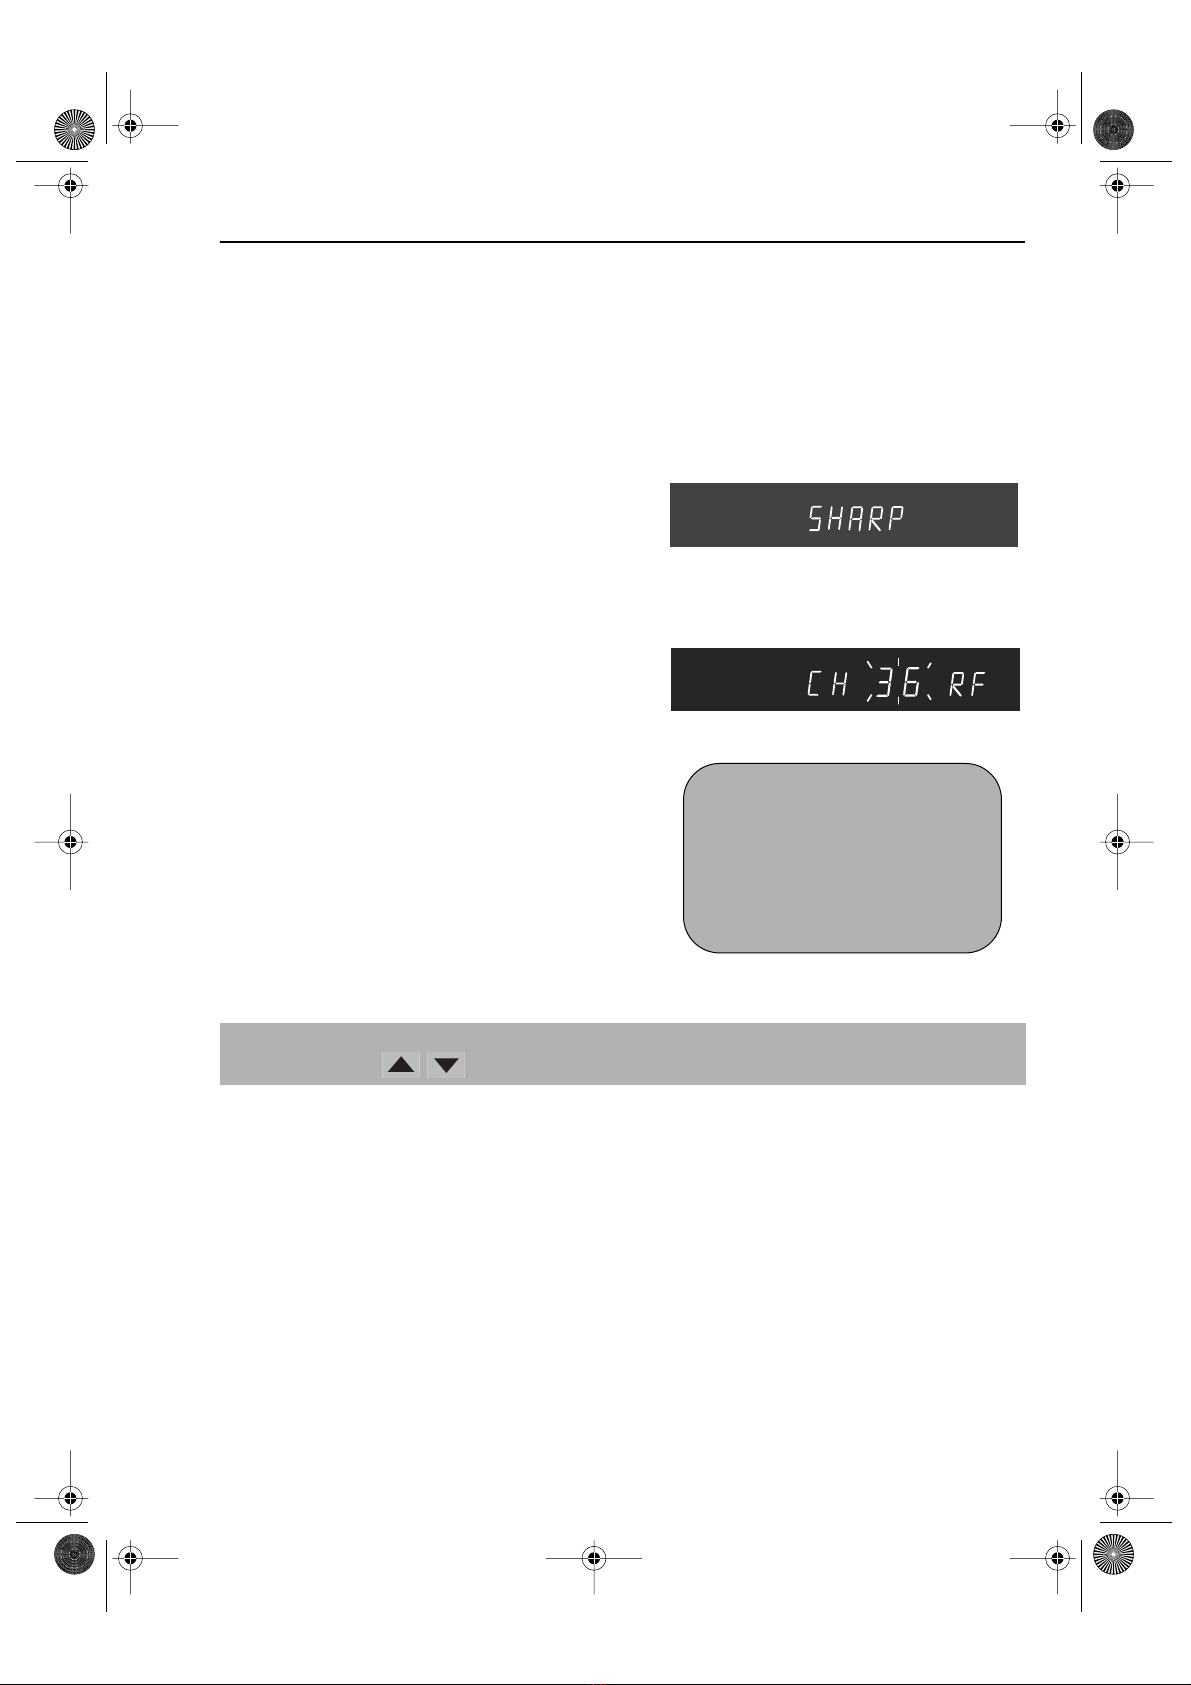
Tuning the TV into the VCR............................................................................................................ 5
Auto installation .............................................................................................................................. 6
BASIC OPERATION
Important notes on your VCR and video tapes .........................................................................7
How to playback a video tape ....................................................................................................7
Pausing and slow motion........................................................................................ 8
Fast forwarding/rewinding a video tape.............................................................. 9
Immediate recording................................................................................................................... 10
How to use to make a recording ............................................................................. 11
How to set a delayed recording ................................................................................................ 13
Checking, changing and cancelling a recording ............................................ 15
ADVA N CED OPERA TION
Audio and your VCR (Hi-Fi VCR’S ONLY) ................................................................................... 16
Connecting to audio equipment............................................................................................... 17
Playback of a video tape ........................................................................................................... 18
Checking the amount of tape remaining .......................................................... 18
Playing back a video tape repeatedly .............................................................. 18
Playing back an NTSC tape ................................................................................. 19
Digital Display................................................................................................................................ 20
Blue mute ...................................................................................................................................... 21
Colour ............................................................................................................................................ 21
Searching the video tape ........................................................................................................... 22
Skip searching the video tape ............................................................................. 22
Digital programme search system (DPSS) ................................................................................. 23
Recording from other equipment .............................................................................................. 24
SPECIAL FEATURES ON YOUR VCR
Low power feature....................................................................................................................... 25
Child lock....................................................................................................................................... 25
CUSTOMISED IN STALLATION
Manually tuning a channel ......................................................................................................... 26
Broadcast and CATV channels .................................................................................................. 27
Manually sorting channels........................................................................................................... 28
Sorting the channels into your preferred order.................................................. 28
Deleting channels.................................................................................................. 29
Re-naming channels ............................................................................................. 30
Changing the on-screen display language.............................................................................. 31
Manually setting the clock .......................................................................................................... 31
MORE IN FORMA TION ABOUT YOUR VCR
VCR digital display ...................................................................................................................... 32
Selecting the output from the VCR ............................................................................................ 32
On-screen display......................................................................................................................... 33
Specifications................................................................................................................................ 34
Troubleshooting ............................................................................................................................ 35
VC-MH71SM ENGLISH.book Page 1 Tuesday, April 20, 1999 10:52 AM
Downloaded from: http://www.usersmanualguide.com/

GB-2
BEFORE USIN G YOUR VCR
IMPORTA N T N OTES ON YOUR VCR
IDEAL VCR LOCATION
PLACE THE VCR..
• ... on a flat level surface away from radiators
or other heat sources and out of direct
sunlight.
• ... and video tapes away from magnetic
sources such as speakers or microwave ovens.
• ... at least 8” (20cm) away from the TV.
• ... away from curtains, carpets or other
materials and allow ventilation space around
the VCR.
DO NOT...
• ... block the air-vent openings.
• ... expose the VCR to excessive dust,
mechanical vibration or shock.
• ... place any heavy object or liquid on top of
the VCR. If liquid drops inside the VCR unplug
immediately and contact your SHARP dealer.
Do not use the VCR.
• ... insert or drop anything into the tape
compartment or through the
air-vents, as this could result in serious
damage, fire or an electric shock.
POWER SOCKETS
• To avoid overheating or even fire, insert the
plug correctly into the socket.
DO NOT...
• ... overload power sockets, this may cause a
fire or electric shock.
• ... pull the power cord to disconnect the plug
from the mains.
• ... bind the power cords together.
• This VCR is not equipped with a mains power
switch. Accordingly, nominal current to drive
the clock is drawn at all times when the AC
power cord is plugged into a wall socket. If
the VCR is not to be used for an extended
period be sure to unplug the cord.
VC-MH71SM ENGLISH.book Page 2 Tuesday, April 20, 1999 10:52 AM
Downloaded from: http://www.usersmanualguide.com/

GB-3
BEFORE USIN G YOUR VCR
UN PACKIN G THE A CCESSORIES
To fit the batteries into the remote control
Remove the battery cover on the back of the remote control.
Fit the batteries: to and to . terminals. Place the
battery cover back into position.
CHECK ALL THESE ACCESSORIES ARE SUPPLIED WITH YOUR VCR. CONTACT YOUR DEALER IF
ANY ARE MISSING.
(TYPE AA/R6/UM3)
BATTERIES (X 2)
for the remote control unit.
RF CONNECTION CABLE
connects the VCR to the TV.
Remote Control
• Remote Control must be pointed towards the VCR to operate.
• Do not expose to liquid or shock.
• May not function if the VCR is in direct sunlight or any other strong light.
• Replace both alkaline batteries (type AA/R6/UM3) if the remote control
fails.
• Remove the batteries and keep in a safe place if you do not plan to use
the VCR for several months.
• Remove and dispose of flat batteries safely and promptly.
• Incorrect use of batteries may cause them to leak or burst.
VIDEO CASSETTE RECORDER
REMOTE
CONTROL
For a more
detailed
picture of
your remote
control refer
to page (ii).
Battery cover
VC-MH71SM ENGLISH.book Page 3 Tuesday, April 20, 1999 10:52 AM
Downloaded from: http://www.usersmanualguide.com/

GB-4
IN STALLIN G YOUR VCR
CON N ECTIN G THE CABLES
✔
The VCR is correctly connected.
Connect your existing aerial
cable to the
A N TEN N A IN
socket on your VCR.
Opt ional:
Connect your
Satellite receiver or decoder to
the VCR using a scart lead to
LIN E 2 IN /DECODER
socket on the VCR.
Connect the VCR to the
mains
Opt ional
SCART (not supplied). If you
have a scart lead connect it to your TV and
LIN E 1 IN /OUT
socket on the VCR.
Connect your TV
to the VCR using
the supplied rf
connection cable,
i.e. connect the
VCR
RF OUT
socket to the TV
AERIAL IN
socket.
AERIAL OR
CATV CABLE
DECODER UN IT
OR SATELLITE SYSTEM
BACK OF
TELEVISION
VC-MH71SM ENGLISH.book Page 4 Tuesday, April 20, 1999 10:52 AM
Downloaded from: http://www.usersmanualguide.com/

GB-5
IN STALLIN G YOUR VCR
TUN IN G THE TV IN TO THE VCR
IMPORTAN T N OTE: By pressing t he STAN DBY but t on, t he VCR will t oggle
bet ween STAN DBY and LOW POWER modes. The VCR display will not be
illuminat ed in low power mode.
1.
Ensure your VCR is still in the STANDBY
mode (not low power).
2.
Switch on the TV. Select an unused
channel on your TV for your VCR (there
may be a dedicated video channel refer
to your TV operation manual).
3.
Press and hold the
MEN U
button for 3
seconds. The VCR will search and display
the ideal RF channel.
4.
Tune the selected channel on your TV
(refer to your TV manual) until the menu
screen appears.
5.
Press
SET
to store the RF channel and to
place the VCR back into STANDBY.
NOTE:
✔
The TV is tuned to the VCR.
• If you have a preferred channel, the RF channel can be set manually (21-69) after
Step 3 using [ / ] keys.
VCR
Example:
MEN U SCREEN
TIMER
MODE
GRUNDE INSTELLUNG
MN :WÄHLEN
SET :E INGABE MENU :ENDE
VC-MH71SM ENGLISH.book Page 5 Tuesday, April 20, 1999 10:52 AM
Downloaded from: http://www.usersmanualguide.com/

GB-6
IN STALLIN G YOUR VCR
AUTO IN STALLATION
Press
STOP
to switch on your VCR.
This model will automatically tune in the TV channels in your area, sort them into a standard
order and set the clock.
The screen opposite should be showing on your TV.
Follow the instructions from the screens.
(Auto sort will take a few minutes to complete)
On completion, the MOVE MENU will appear
showing the present channel order. Press
MEN U
to
exit.
If the clock is NOT automatically set, the clock
screen will appear., refer to
MA N UALLY
SETTIN G TH E CLOCK
. To check the clock has
been set correctly, press DISPLAY until the time
appears on the display.
If you wish to customise the channel order refer to
MA N UALLY SORTIN G CHAN N ELS
.
VCR RESET
1.
Press
STOP
to switch on the VCR.
2.
Press and hold
MEN U
and
CHAN N EL
buttons together on the front of the VCR
for 10 seconds.
3.
The AUTO INSTALLATION screen should now be showing on your TV.
4.
Follow the on-screen display to proceed with auto installation.
✔
All the programmes should now be correctly tuned in and the clock set.
Refer to the
CUSTOMISED IN STALLATION
chapter if
• Your VCR could not tune automatically - due to for example poor reception.
• You wish to re-arrange the channel order.
• You wish to change the time on the clock or if the VCR could not set the time.
• If the screen above does not
appear, follow the procedure
VCR RESET below.
AUTO INSTALLAT ION
PRESS SET KEY TO START
AUTOMAT ISCHE EINSTELLUNG
ZUM BEGINN,DIE SET-TASTE
DRÜCKEN .
SET : E I NGABE MENU : ENDE
VC-MH71SM ENGLISH.book Page 6 Tuesday, April 20, 1999 10:52 AM
Downloaded from: http://www.usersmanualguide.com/

GB-7
BASIC OPERATION
IMPORTA N T N OTES ON YOUR VCR A N D VIDEO
TAPES
VIDEO TAPES
• If you use only good quality video tapes, generally it will not be necessary to clean the
video heads.
• If poor quality tapes are used, or if a tape is loaded after changing VCR location, oxide
from the tape may "clog" the video heads. This will cause the playback picture to be
"snowy", or even disappear.
• To remove minor contamination run a video tape in visual search mode. If this fails, you
will need to have the heads cleaned by a SHARP Service Facility. Please note, if cleaning
is necessary it is not covered by the guarantee.
• Use video tapes which carry the mark.
HOW TO PLAYBACK A VIDEO TAPE
PLAYBACK
1.
Switch on your TV and select the video channel.
2.
Carefully push a pre-recorded video
tape into the tape compartment.
This will switch the VCR on.
• If the record-protection tab has
been removed, the VCR will start
playback as soon as the video tape
has been loaded.
3.
To start playback, press
PLAY/
X 2
().
BEFORE YOU PLAYBACK A VIDEO TAPE
Condensation forms in the VCR when it is moved out of or into a warm place.
If you try to playback or record, the video tape and VCR may be damaged.
Turn the VCR on and wait for about two hours until the VCR reaches room
temperature before operating.
SECAMPAL
Record protection tab
VC-MH71SM ENGLISH.book Page 7 Tuesday, April 20, 1999 10:52 AM
Downloaded from: http://www.usersmanualguide.com/

GB-8
BASIC OPERATION
HOW TO PLAYBACK A VIDEO TAPE
SHARP SUPER PICTURE
should enhance the picture quality during playback. It is
normally set to ON. To turn
SHARP SUPER PICTURE
on or off press
SUPER P.
on the
VCR front panel.
• For double speed playback (without sound), press
PLAY/X 2
( ) again.
• To revert to normal playback, press
PLAY/X 2
( ) again.
• To stop the video tape, press
STOP
().
• To eject the tape press
EJECT
on the VCR.
PICTURE DISTURBA N CE DURIN G PLAYBA CK
This VCR has an automatic tracking system which reduces picture disturbance when you start
to playback a video tape. When auto-tracking is in operation flashes on the on-screen
display. If the picture still has disturbance you may need to manually track the video tape:
During PLAYBACK of a video tape.
• Press
CH AN N EL
or to position picture interference off the TV screen. (Manual
Tracking)
• Press
CHAN N EL
and buttons together to start Auto Tracking.
PA USIN G A N D SLOW MOTION
1.
Press
PLAY/X 2
( ) to start the video tape playing.
2.
To pause the video tape, press
PAUSE/STILL
()
.
• To minimise jitter whilst in pause mode press
CHAN N EL
or .
• Press
PLAY/X 2
( ) to resume playback.
3.
To playback in slow motion (without sound) press
SLOW
on the remote control. Slow
motion speed can be adjusted using the or buttons next to the slow button.
Picture disturbance can be improved by using the
CHAN N EL
or during slow
motion playback.
• Press
PLAY/X 2
( )to resume playback.
NOTES:
• There will be picture interference and possibly a change to black and white picture
using Pause and Slow functions.
• PAUSE mode will disengage after about 5 minutes.
VC-MH71SM ENGLISH.book Page 8 Tuesday, April 20, 1999 10:52 AM
Downloaded from: http://www.usersmanualguide.com/

GB-9
BASIC OPERATION
HOW TO PLAYBACK A VIDEO TAPE
FAST FORWA RDIN G/REWIN DIN G A VIDEO TAPE
1. Press STOP ( ) to stop the video tape.
2. Press FAST FORWARD ()/REWIN D ( ) on the remote control or turn the
shuttle ring on the VCR to the Right/Left and release.
3. To stop fast forward/rewind, press STOP ().
FORWARD/REVERSE VISUAL SEARCH
1. During playback, press FAST FORWARD ()/REWIN D ( ) on the remote
control, or turn the shuttle ring fully to the Right/Left.
2. To lock search mode turn the shuttle far Right/Left and release.
3. To decrease the speed, press FAST FORWARD ()/REWIN D ( ) again, or
turn the shuttle to the halfway position.
4. Press PLAY/X 2 ( ) to resume playback.
NOTE:
• There will be picture interference and possibly a change to black and white picture
using Visual Fast Forward/Rewind functions.
VC-MH71SM ENGLISH.book Page 9 Tuesday, April 20, 1999 10:52 AM
Downloaded from: http://www.usersmanualguide.com/

GB-10
BASIC OPERATION
IMMEDIATE RECORDIN G
SELECTION OF A CHA N N EL
Select the channel by using the number buttons on the remote control, or select the
next/previous channel by pressing CHAN N EL [or].
To change between single digit and 2-digit channel numbers, press AM/PM .
For example, for channel 24, press AM/PM then press 24.
You can record the channel you are watching or a different channel.
1. Insert a video tape into your VCR.
2. Select the channel you wish to record on the VCR.
3. To start recording, press REC ().
4. To pause during recording, press PAUSE/STILL ().
5. To continue recording, press REC ().
6. To stop recording, press STOP ( ) once.
SIMPLE TIMED RECORDIN G:
1. To specify a stop time, press REC ().
2. Each additional press of REC ( ) will delay
the stop time by 10 minutes.
3. To stop recording at any time, press
STOP ( ) once.
NOTES:
• If the tape ends before the recording is complete the VCR will stop recording and
rewind, or eject if the VCR is in timer record mode.
• If the VCR ejects the video tape when you press REC ( ) the tape is record
protected. i.e. record protection tab has been removed.
STOP 15:30
VC-MH71SM ENGLISH.book Page 10 Tuesday, April 20, 1999 10:52 AM
Downloaded from: http://www.usersmanualguide.com/

GB-11
BASIC OPERATION
HOW TO USE TO MAKE A RECORDIN G
• If appears on the VCR display, press TIMER ON /OFF before starting.
• Check that the clock is displaying the correct time.
SHOWVIEW allows you to program the VCR to record up to eight programmes using the
SHOWVIEW numbers published in TV listings...
1. Press [SV/V+] on the remote control
2. Enter the SHOWVIEW number from the TV
listing using the N UMBER BUTTON S.
NOTE:
3. Press [ / ] to select ONCE, WEEKLY, DAILY
4. If you want to make additional recordings at the same time each day or week, then use
[ / ] to select the WEEKLY, or DAILY option as appropriate.
5. Press SET to confirm..
NOTE:
The first time that you use SHOWVIEW to make a
recording on each channel Preset, (PR) may be
highlighted on the menu.
6. Enter the channel you wish to record using
the N UMBER BUTTON S, for example if
you wish to record channel 2 press 0 2. The
VCR will remember this for the future.
NOTES:
• An ERROR message will appear if you have entered a number that is not a current
SHOWVIEW number. If this happens press CLEAR to delete the numbers as required
and enter the correct SHOWVIEW number
• Check that the menu list agrees with the times shown in the TV listing. If it does not press
CLEAR to return to the SHOWVIEW menu, and re-enter the correct SHOWVIEW number
You may also access the SHOWVIEW menu by the following procedure:
i. Press MEN U.
ii. The SHOWVIEW option will be highlighted. Press SET to confirm.
Continue from step 2 above.
1/2
DATE PR START STOP
21/06 02 12:00 13:00 SP*
--/-- -- -:-- -:-- ---
--/-- -- -:-- -:-- ---
--/-- -- -:-- -:-- ---
PR : BBC2
OP :SELECT MN :CHANGE
SET :ENTER MENU:EX I T
→SHOWVIEW NO. -
ONCE WE EKL Y DA I L Y
VC-MH71SM ENGLISH.book Page 11 Tuesday, April 20, 1999 10:52 AM
Downloaded from: http://www.usersmanualguide.com/

GB-12
BASIC OPERATION
HOW TO USE TO MAKE A RECORDIN G
7.
If your VCR has long play facility
and you wish
to change the RECORDIN G SPEED, use
the [ / ] to highlight SP. Press [ / ]
to select standard play (SP) or long play (LP)
as required.
8. [See N OTEbelow]. For VPS/PDC setting use
[ / ] to highlight the final column. Using
the [ / ] will select VPS/PDC ON or OFF
(✱= ON -= OFF).
9. Press SET to confirm the programme. The
SHOWVIEW menu will reappear. If you wish to
enterfurther SHOWVIEWrecordings repeatthis
procedure.
10. When you have completed entering timer
settings, press MEN U to remove the menu
from the TV screen.
11. Press TIMER ON /OFF once to place the VCR
in TIMER STANDBY mode. will be shown on
the display.
NOTES:
• VPS/PDC is a signal broadcast by some TV stations which adjusts the start and stop time
of your VCR recording. This ensures that if there is a change in broadcast time for your
programme the VCR will still record the whole programme. It is essential that the start
time as it appears in the TV listing is used to program the VCR, as this information is used
to identify the VPS/PDC signal corresponding to your programme.
• If flashes a video tape has not been inserted into the VCR.
• If the video tape is ejected when the VCR tries to record the record protection tab has
been removed.
• During recording, press STOP ( ) to cancel the recording. If there are further
recordings to be made, the VCR will return to TIMER STANDBY.
1/2
DATE PR START STOP
21/060212:0013:00SP*
--/-- -- -:-- -:-- ---
--/-- -- -:-- -:-- ---
--/-- -- -:-- -:-- ---
TAPE SPEED :SP/ LP
OP :SELECT MN :CHANGE
SET :ENTER MENU:EX I T
1/2
DATE PR START STOP
21/060212:0013:00SP-
--/-- -- -:-- -:-- ---
--/-- -- -:-- -:-- ---
--/-- -- -:-- -:-- ---
VPS/PDC ✱:ON - :OFF
OP :SELECT MN :CHANGE
SET :ENTER MENU:EX I T
VC-MH71SM ENGLISH.book Page 12 Tuesday, April 20, 1999 10:52 AM
Downloaded from: http://www.usersmanualguide.com/

GB-13
BASIC OPERATION
HOW TO SET A DELAYED RECORDIN G
You can make a maximum of eight delayed recordings up to a year in advance.
The example shown is for 24-hour clock operation. 12-hour clock operation can be selected
from the manual clock setting menu.
12-hour clock am/pm can be selected using the AM/PM button on the remote control.
• If appears on the VCR display, press TIMER ON /OFF before starting.
• Check that the clock is displaying the correct time.
SETTIN G A RECORDIN G
For example: Recording a programme on channel 3 from 21:05 to 22:30 on July 9th.
1. Press STOP ( ) to switch on the VCR.
2. Press MEN U .
3. Press [ / ] to select TIMER. Press SET to
confirm.
4. The position which is initially highlighted is the
next available timer record entry. Press SET to
confirm this.
• The display will automatically show today's
date.
Either:
If this is the date you wish to make the
recording on, press SET to confirm this.
Or:
enter the recording date using the[ /
] or the N UMBER BUTTON S. Enter two
digits for the day, then two for the month. For
example for July 9th, press 0 9 (9th), then 0 7
(July).
5. Then press SET to confirm.
6. If you want to make additional recordings at
the same time each day or week, use [ /
] or select D (daily) or W (weekly). Then
press SET to confirm.
7. Enter the channel using the [ / ] or the
N UMBER BUTTON S. For example to
record a programme on channel 3, press 0 3.
Then press SET to confirm.
MEN U SCREEN
TIMER
MODE
SET UP
MN :SELECT
SET :ENTER MENU:EX I T
1/2
DATE PR START STOP
21/060212:0013:00SP*
9/07 -- -:-- -:-- ---
--/-- -- -:-- -:-- ---
--/-- -- -:-- -:-- ---
1/2
DATE PR START STOP
21/060212:0013:00SP*
9/07
D-- -:-- -:-- ---
--/-- -- -:-- -:-- ---
--/-- -- -:-- -:-- ---
VC-MH71SM ENGLISH.book Page 13 Tuesday, April 20, 1999 10:52 AM
Downloaded from: http://www.usersmanualguide.com/

GB-14
BASIC OPERATION
HOW TO SET A DELAYED RECORDIN G
8. Enter the start time using the [ / ] or the
N UMBER BUTTON Shours first then minutes
(when entering less than 10 minutes add a '0'
before the number), for example for 21:05 start,
press 2 1 0 5. Then press SET to confirm.
9. Enter the stop time, for example for 22:30 stop,
press 2 2 3 0.
10.
If your VCR has long play facility
and you wish to
change the RECORDIN G SPEED, use the
[ / ] to highlight SP. Press [ / ] to
select standard play (SP) or long play (LP) as
required.
11. [See note below]. For VPS/PDC setting use the
[/]to highlight the final column. Using the
[ / ] will select VPS/PDC ON or OFF ( * =
ON - = OFF).
12. Press SET to confirm.
• The MENU now shows all the timer settings you
have entered. If you wish to make additional
timer recordings, repeat this procedure.
13. When you have completed entering timer
settings, press MEN U to remove the menu
from the TV screen.
14. Press TIMER ON /OFF once to place the VCR
in TIMER STAND-BY mode. will be shown on
the display.
NOTES:
• VPS/PDC is a signal broadcast by some TV stations which adjusts the start and stop time
of your VCR recording. This ensures that if there is a change in broadcast time for your
programme the VCR will still record the whole programme. It is essential that the start
time as it appears in the TV listing is used to program the VCR, as this information is used
to identify the VPS/PDC signal corresponding to your programme.
• If flashes a video tape has not been inserted into the VCR.
• If the video tape is ejected when the VCR tries to record the record protection tab has
been removed.
• During recording, press STOP ( ) to cancel the recording. If there are further
recordings to be made, the VCR will return to TIMER STANDBY.
1/2
DATE PR START STOP
21/060212:0013:00SP*
9/07D03 21:05 -:-- SP*
--/-- -- -:-- -:-- ---
--/-- -- -:-- -:-- ---
1/2
DATE PR START STOP
21/060212:0013:00SP*
9/07D03 21:05 -:-- LP*
--/-- -- -:-- -:-- ---
--/-- -- -:-- -:-- ---
1/2
DATE PR START STOP
21/060212:0013:00SP*
9/07D03 21:05 22:30 LP-
--/-- -- -:-- -:-- ---
--/-- -- -:-- -:-- ---
VC-MH71SM ENGLISH.book Page 14 Tuesday, April 20, 1999 10:52 AM
Downloaded from: http://www.usersmanualguide.com/

GB-15
BASIC OPERATION
HOW TO SET A DELAYED RECORDIN G
CHECKIN G, CHA N GIN G AN D CA N CELLIN G A RECORDIN G
CHECKIN G A RECORDIN G
1. If in TIMER STANDBY mode, press
TIMER ON /OFF to exit.
2. Press STOP to switch on the VCR.
3. Press MEN U.
4. Press [ / ] to select TIMER. Press SET to
confirm
• All the delayed recordings in the VCR’s memory
will be shown.
• You can check the settings and change or
cancel them.
CHAN GIN G A RECORDIN G
1. Follow steps 1 to 4 of CHECKIN G A
RECORDIN G.
2. If you wish to change a delayed recording,
press [ / ] to highlight the recording,
then press SET.
3. Press [ / ] to highlight the setting to be
changed and correct it by using the[ / ]
or the N UMBER BUTTON S.
4. When all corrections are complete press SET,
then press MEN U.
CAN CELLIN G A RECORDIN G
1. Follow steps 1 to 4 of CHECKIN G A
RECORDIN G.
2. If you wish to cancel a delayed recording, press
[ / ] to highlight the recording to be
cancelled, then press CLEAR.
3. Press MEN U.
NOTE:
• If there are some programmes to be recorded, do not forget to press TIMER ON /OFF
button to return the VCR to TIMER STAND-BY mode.
MEN U SCREEN
TIMER
MODE
SET UP
MN :SELECT
SET :ENTER MENU:EX I T
1/2
DATE PR START STOP
21/060212:0013:00SP*
--/-- -- -:-- -:-- ---
--/-- -- -:-- -:-- ---
--/-- -- -:-- -:-- ---
1/2
DATE PR START STOP
21/060212:0013:00SP*
--/-- -- -:-- -:-- ---
--/-- -- -:-- -:-- ---
--/-- -- -:-- -:-- ---
VC-MH71SM ENGLISH.book Page 15 Tuesday, April 20, 1999 10:52 AM
Downloaded from: http://www.usersmanualguide.com/

GB-16
ADVAN CED OPERA TION
AUDIO AN D YOUR VCR (Hi-Fi VCR’S ON LY)
HI-FI STEREO SOUN D
Stereo sound is possible from this VCR if you have a stereo TV connected to the VCR with a
scart lead, or audio equipment connected with audio phono leads. The VCR is normally set
so that stereo sound is possible. The sound output from the VCR is controlled by the
AUDIO OUT button on the remote control. If you wish to change the sound output you can
use the AUDIO OUT button as follows:
• Press AUDIO OUT once. The LEFT audio channel will be sent to BOTH speakers. L will
appear on the VCR display.
• Press AUDIO OUT twice. The RIGHT audio channel will be sent to BOTH speakers. R will
appear on the VCR display.
• Press AUDIO OUT three times. The MONO track will be sent to BOTH speakers. Land R
will disappear from the VCR display.
• Pressing AUDIO OUT a fourth time, normal Hi-Fi stereo sound will be heard. L and Rwill
appear on the VCR display.
N ICA M Hi-Fi STEREO SOUN D
Your VCR can receive and record programmes broadcast in NICAM or IGR sound (the factory
pre-set condition for NICAM is AUTO). NICAM or IGR sound may not be stereo, this depends
on the programme being received.
Audio is automatically recorded in two different ways:
(i) Hi-Fi: Using specialised rotary heads, two audio signals are recorded on to the tape. These
will be stereo, mono or bilingual depending on the sound being received.
(ii) Normal: A mono recording is also made on the conventional analogue audio track.
1. Press MEN U to display the main menu on the
screen.
2. Press [ / ] to select MODE.
3. Press SET. NICAM will be selected.
4. Press [ / ] to select OFF.
5. Press SET, to return to the menu screen.
6. Press MEN U, to exit to normal screen.
NOTES:
• If the tape being played back does not carry sound recorded on Hi-Fi tracks, L and R
will not appear on the display.
• lf the sound contains ‘crackling’ or ‘popping’ noises the sound quality may be
improved by adjusting the tracking using CHANNEL / .
• If the poor quality is for a long period the VCR will automatically select the mono track
and the sound will be in mono.
• Not all TV transmitters provide NICAM or IGR sound. In this case the VCR automatically
switches to receive the mono signal.
• NICAM sound may not be stereo.
➝NICAM AUTO OFF
COLOUR AUTO PAL MESECAM
VC-MH71SM ENGLISH.book Page 16 Tuesday, April 20, 1999 10:52 AM
Downloaded from: http://www.usersmanualguide.com/

GB-17
ADVAN CED OPERA TION
AUDIO AN D YOUR VCR (Hi-Fi VCR’S ON LY)
CON N ECTIN G TO AUDIO EQUIPMEN T
The diagram below shows how to connect your VCR to audio equipment. When connected
in this way stereo sound is possible from the speakers.
+
BACK OF
EXISTING AERIAL
CABLE
RF CONNECTION CABLE
RF-OUT
AUDIO OUT
AMPLIFIER
L and R
TELEVISION
AERIAL IN
AUDIO PHONO LEADS
(NOT SUPPLIED)
VC-MH71SM ENGLISH.book Page 17 Tuesday, April 20, 1999 10:52 AM
Downloaded from: http://www.usersmanualguide.com/

GB-18
ADVAN CED OPERA TION
PLAYBACK OF A VIDEO TAPE
CHECKIN G THE A MOUN T OF TAPE REMAIN IN G
When you load a video tape into the VCR it can calculate approximately the amount of
video tape remaining in hours and minutes. This is useful in determining whether or not there is
sufficient tape left to make a recording.
When a video tape is playing, the amount of tape remaining is calculated for you
automatically.
To display the amount of video tape remaining:
1. Load the video tape into the VCR
2. Press DISPLAY on the remote control as many times as necessary until “R” appears on
the VCR display. The tape will wind forward and then return to its original position. The
tape remaining will be shown on the VCR display in hours and minutes.
For example, if 1 hour 23 minutes is left on the tape:
NOTES:
PLAYIN G BACK A VIDEO TA PE REPEATEDLY
You can set your VCR to automatically rewind at the end of playing a video tape and replay
the entire tape again. REPEAT will appear on the on-screen display when selected.
To use this feature:
1. Press MEN U to display the main menu on the
screen.
2. Press [ / ] to select MODE.
3. Press SET.
4. Press [ / ] to select REPEAT.
5. Press [ / ] to select ON.
6. Press SET.
7. Press MEN U to return to normal screen.
• Do not interrupt the tape remaining calculation.
• If less than 5 minutes of tape remains the display will flash.
Pr
MODE MEN U SCREEN
BLUE MUTE AUTO OFF
➝REPEAT ON OFF
MN :SELECT OP :CHANGE
SET : ENTER MENU : EX I T
VC-MH71SM ENGLISH.book Page 18 Tuesday, April 20, 1999 10:52 AM
Downloaded from: http://www.usersmanualguide.com/

GB-19
ADVAN CED OPERA TION
PLAYBACK OF A VIDEO TAPE
PLAYIN G BACK AN N TSC TAPE
NTSC (National Television Standards Committee) is a different TV standard to PAL and is used
in some Non-European Countries. Your VCR can playback pre-recorded NTSC tapes onto a
PAL system TV, but cannot record an NTSC signal onto a video tape.
N ot e t hat ..
• You cannot record NTSC signals or dub NTSC tapes onto other VCR’s from this VCR.
• You cannot use Slow speed, Still frame, Double Speed, Frame Advance or Tape
Remaining with a pre-recorded NTSC tape.
• On some televisions, the picture may appear in black and white or there may be no
picture. This does not indicate a fault with your VCR.
• On some televisions, the picture may shrink vertically causing black bands to appear at
the top and bottom of your screen.
• On some televisions, the played-back picture may roll vertically, this does not indicate a
fault with your VCR.
VC-MH71SM ENGLISH.book Page 19 Tuesday, April 20, 1999 10:52 AM
Downloaded from: http://www.usersmanualguide.com/

GB-20
ADVAN CED OPERA TION
DIGITAL DISPLAY
TIME OF DAY
Shows current time of day, if the clock is set.
Press DISPLAY until the time of day appears. For
example, 21:20 appears:
OPERATION MODE
Shows status of tape. Press DISPLAY until the display
appears, for example:
TAPE COUN TER AN D Z ERO BA CK
Tape counter measures the current position of the video tape in real time. ZERO BACK uses the
tape counter to determine a specific point on a tape you may wish to return to.
1. Press DISPLAY until tape counter appears, for
example:
2. To identify the current position on a video tape
press CLEAR and the tape counter will appear:
When you wish to return to this position on the video tape, press ZERO BACK. The tape will
rewind/advance to this point.
NOTE:
• The tape counter will only operate on recorded sections of tape.
Pr
Pr
Pr
Pr
VC-MH71SM ENGLISH.book Page 20 Tuesday, April 20, 1999 10:52 AM
Downloaded from: http://www.usersmanualguide.com/
Other manuals for VC-MH71SM
1
Table of contents
Other Sharp VCR System manuals

Sharp
Sharp VC-S2000GM User manual

Sharp
Sharp VC-AA370 User manual

Sharp
Sharp VC-A422U User manual

Sharp
Sharp VC-H705X User manual

Sharp
Sharp VC-A50X User manual

Sharp
Sharp VC-H680X User manual

Sharp
Sharp VC-FH30GMS User manual

Sharp
Sharp VC-H730X User manual

Sharp
Sharp VC-A410U User manual

Sharp
Sharp VC-S2000HM Quick start guide

Sharp
Sharp VC-FH30FPM User manual

Sharp
Sharp VC-MH703HM User manual

Sharp
Sharp VC-GH611GM User manual

Sharp
Sharp VC-MH741SM User manual

Sharp
Sharp VC-488NS User manual

Sharp
Sharp VC-MH714HM User manual

Sharp
Sharp VC-FH300SM User manual

Sharp
Sharp VC-G20SM User manual

Sharp
Sharp DV-NC150U User manual

Sharp
Sharp VC-A598U User manual