SHELTER SSC150905 User manual
2013GK8005
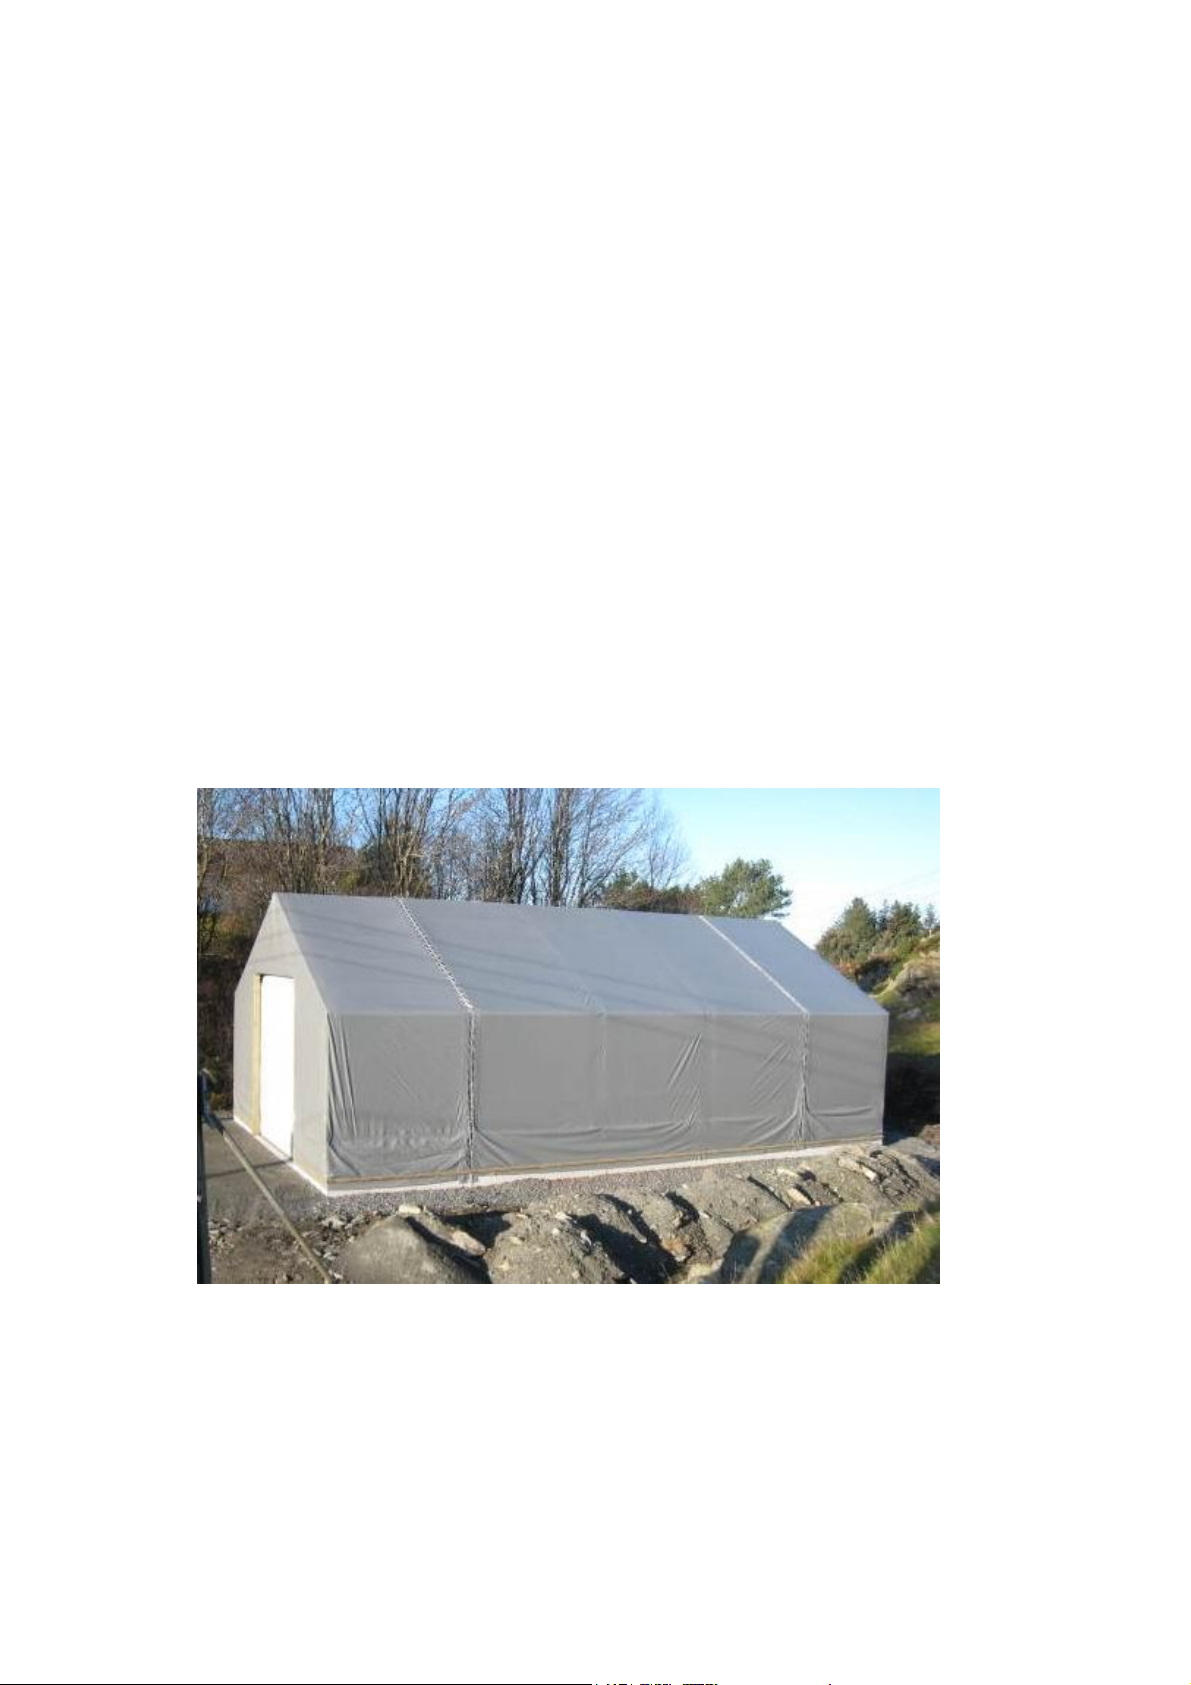
SHELTER
ASSEMBLY MANUAL
MODEL# SSC150905
L15.0 x W9.0 x H5.5m
with overhead door

2013GK8005 -1-
SPECIFICATION
Length: 15m Width: 9.0m Height: 5.5m
IMPORTANT-----READ MANUAL FIRST
Improper site preparation, assembly and maintenance may invalidate warranty and cause
unnecessary and costly mistakes. If you have any questions contact your local dealer.
For user friendly assembly we have identified each individual component with the part code
as indicated in the parts list. Please refer to the part code numbers and drawing to ensure
problem free assembly.
It’s necessary to tighten the roof fabric enough to avoid "hammocks" on the roof and also
re-tighten once or twice again after a few months of use. This is important when assembly
in cold weather (autumn and winter) because the fabric is stiff then and when we got the
sun and warm weather afterwards it will make the fabric "slack" again and need to be
re-tighten before next winter.
It’s the owners responsibility to take of snow immediately if not slide off by itself.
READ ALL INSTRUCTIONS BEFORE ASSEMBLY
1. Keep work area clean. Cluttered areas invite injuries. Do not set up near snow drifts, in
slippery places, in high winds, or wet location.
2. Keep children away. All children should be kept away from the work area.
3. Don’t over reach. Keep proper footing and balance at all times.
4. Do not assemble if under the influence of alcohol or drugs. Read warning labels on
prescriptions to determine if your judgment or reflexes are impaired while taking drugs.
If there is any doubt. Do not assemble.
5. Be aware of possible windy conditions; fasten the bases in concrete if these conditions
are likely to occur. Remove the cover during hurricane.
6. Be careful with power and heat sources. Do not keep heat sources near the tarpaulin. Do
not expose to open flame.
7. Be aware of personal safety during assembly and use. Be careful not to pinch fingers
with clips and tubes when assembling: when using makes sure there is adequate
ventilation for exhaust and other dangerous fumes.

2013GK8005 -2-
Part List
Part
Code Description Dimension
Quantity(pc)
A1 Upright 3000mm
2
A2 Upright 3000mm
2
A3 Upright 3000mm
2
A4 Upright 3000mm
2
A5 Upright 3000mm
2
A6 Upright 3000mm
2
B1L Rafter of front panel for electric motor fixing 5150mm
1
B1R Rafter 5150mm
1
B2 Rafter of front panel for door track connection 5150mm
2
B3 Rafter 5150mm
2
B4 Rafter 5150mm
2
B5 Rafter 5150mm
2
B6 Rafter 5150mm
2
D1L Door Frame of front panel for door track connection 4230mm
1
D1R Door Frame of front panel for door track connection 4230mm
1
D2 Door Frame for Back Panel 4230mm
2
E1 Purlin for Roof and Sidewall (middle) 2994mm
66
E2 Purlin for Roof and Sidewall (side) 2959mm
40
E4-A Purlin for Back Panel (side) 2389mm
6
E4-A1 Purlin for Front Panel (side) 2290mm
6
E4-B Purlin for Back Panel (middle) 4064mm
4
F1 Bracing Tube for Roof 4342mm
4
F2 Bracing Tube for Sidewall 3132mm
8
G1-A Tensioning Tube For Cover (Sidewall) 2990mm
6
G1-B Tensioning Tube For Cover (Sidewall) 2900mm
4
G2 Tensioning Tube For Cover (Back Panel) 3990mm
1
G3 Tensioning Tube For Cover (Front and Back Panel) 2400mm
4
H Overhead Door and parts 1 set
I1 Cover for front panel 1
I2 Cover for middle 1

2013GK8005 -3-
Part List
Part
Code Description Dimension
Quantity(pc)
I3 Cover for back panel 1
I4 Inner Cover 1
J "L" shape Stake for square tensioning tube 45
K High Strength Bolt M16 for connection of arch 108
L Bolt M12 for connection of purlin 270
M Tool for self driling bolt 1
N Steel Wire Rope (with parts) 4 sets
O Knitting Rope for Cover 1 bundle
P Nylon Tie for Front and Back Cover 360
Q Anchor for Foundation 44
S Bolt M14x30 for No.D1,D2 8
T Bolt M10x70 for shaft bracket of overhead door 8
C Bolt M10 x30 for electric motor fixing 20
V Cross Beam for front panel 1

2013GK8005 -4-

2013GK8005 -5-
INSTALLATION PROCESS
A--FOUNDATION INSTALLATION
1. Please refer to “Anchor Sketch” and “Foundation Sketch” to lay the foundations and fix
the Upright (No.A1 to A6). Please note the sequence number and direction of Upright
(the opening direction of C-shaped steel tube)
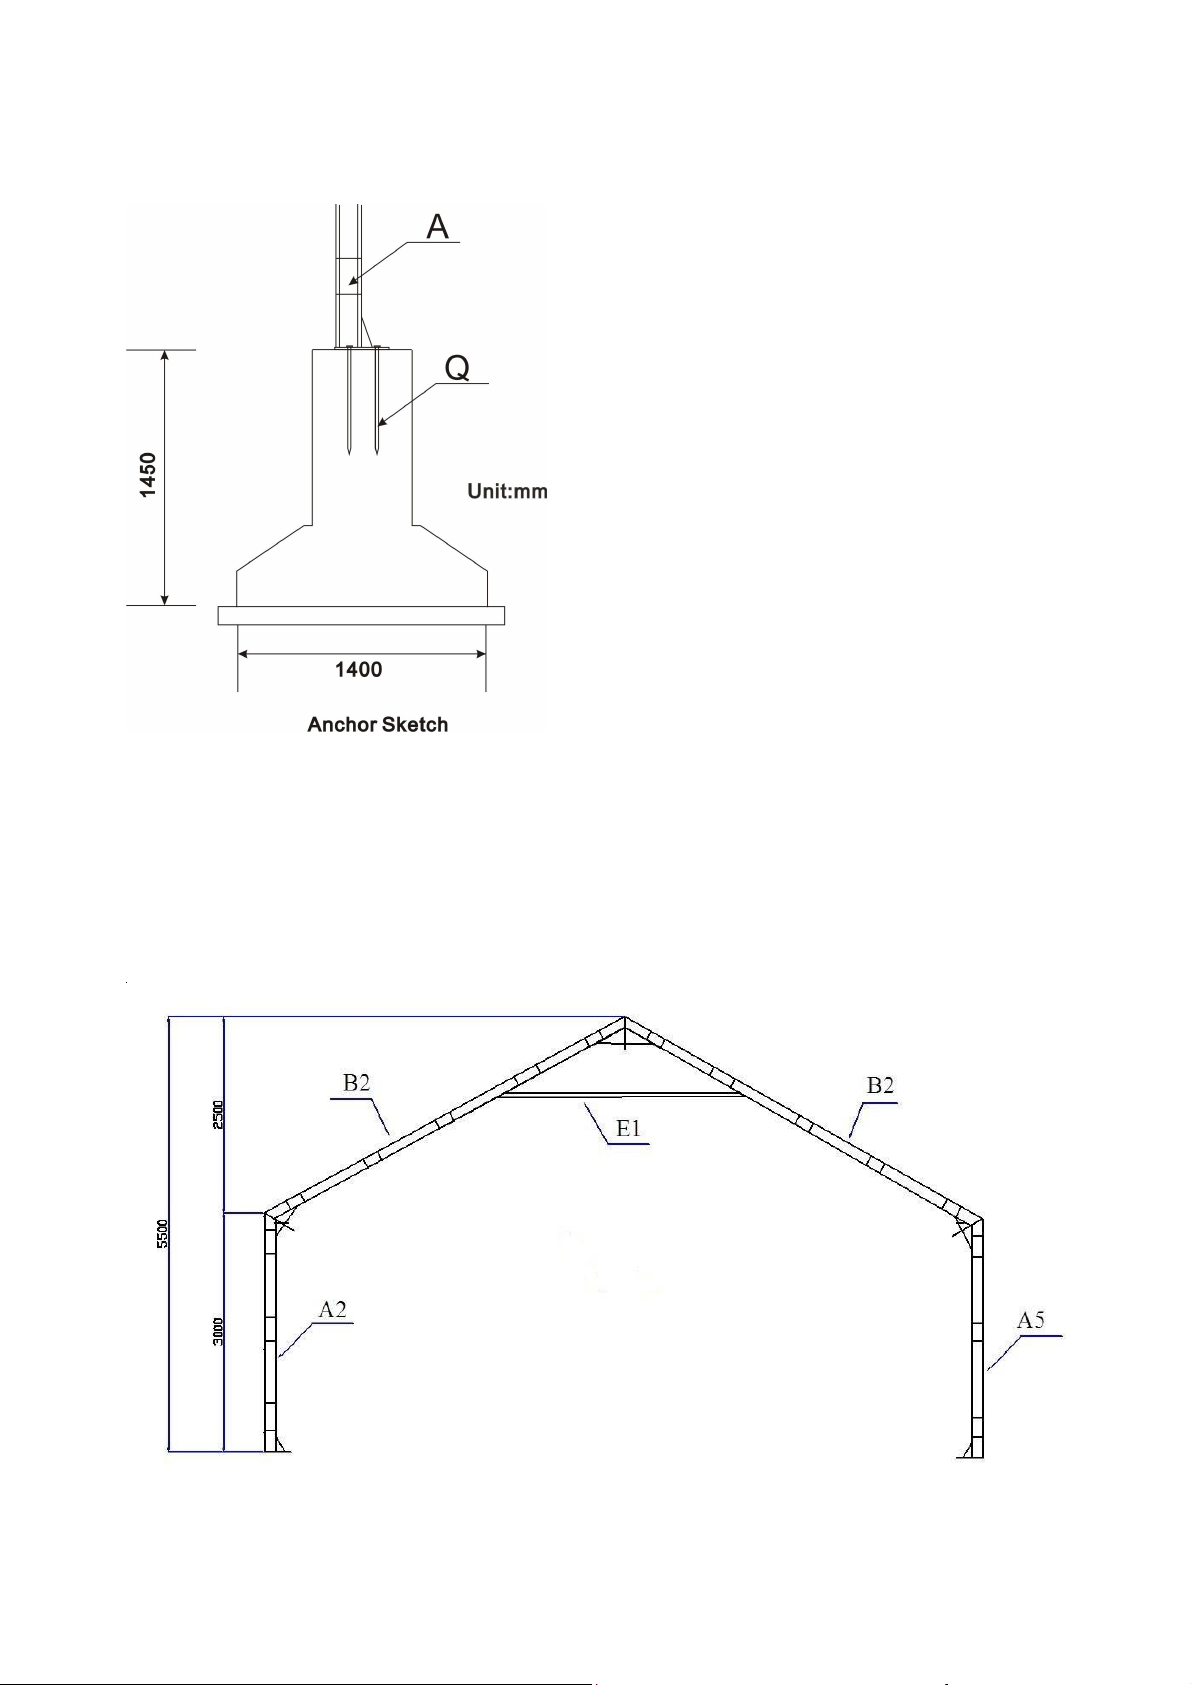
2013GK8005 -6-
2. In order to reach the wind load and snow load, our suggestion is to dig 1.5m deep hole
for the anchors. There are 3 Anchors (No. Q) for each hole (2 anchors for front and back
panel).
B--FRAME INSTALLATION
1. As “Main Arch Sketch” shows, connect Rafter (No.B1 to B6) to Upright (No.A1 to A6)
by Bolt M16 (No.K, the high strength bolt for steel structure) to be an arch. There are
6pcs of bolts for every two parts and 6 arches for 15m long tent.
Main Arch Sketch

2013GK8005 -7-
2. When finish installing all the 6 arches, connect the Front Door Frame (No. D1L, D1R) to
the front panel and Back Door Frame (No. D2) to back panel by Bolt M14x30 (No. S)
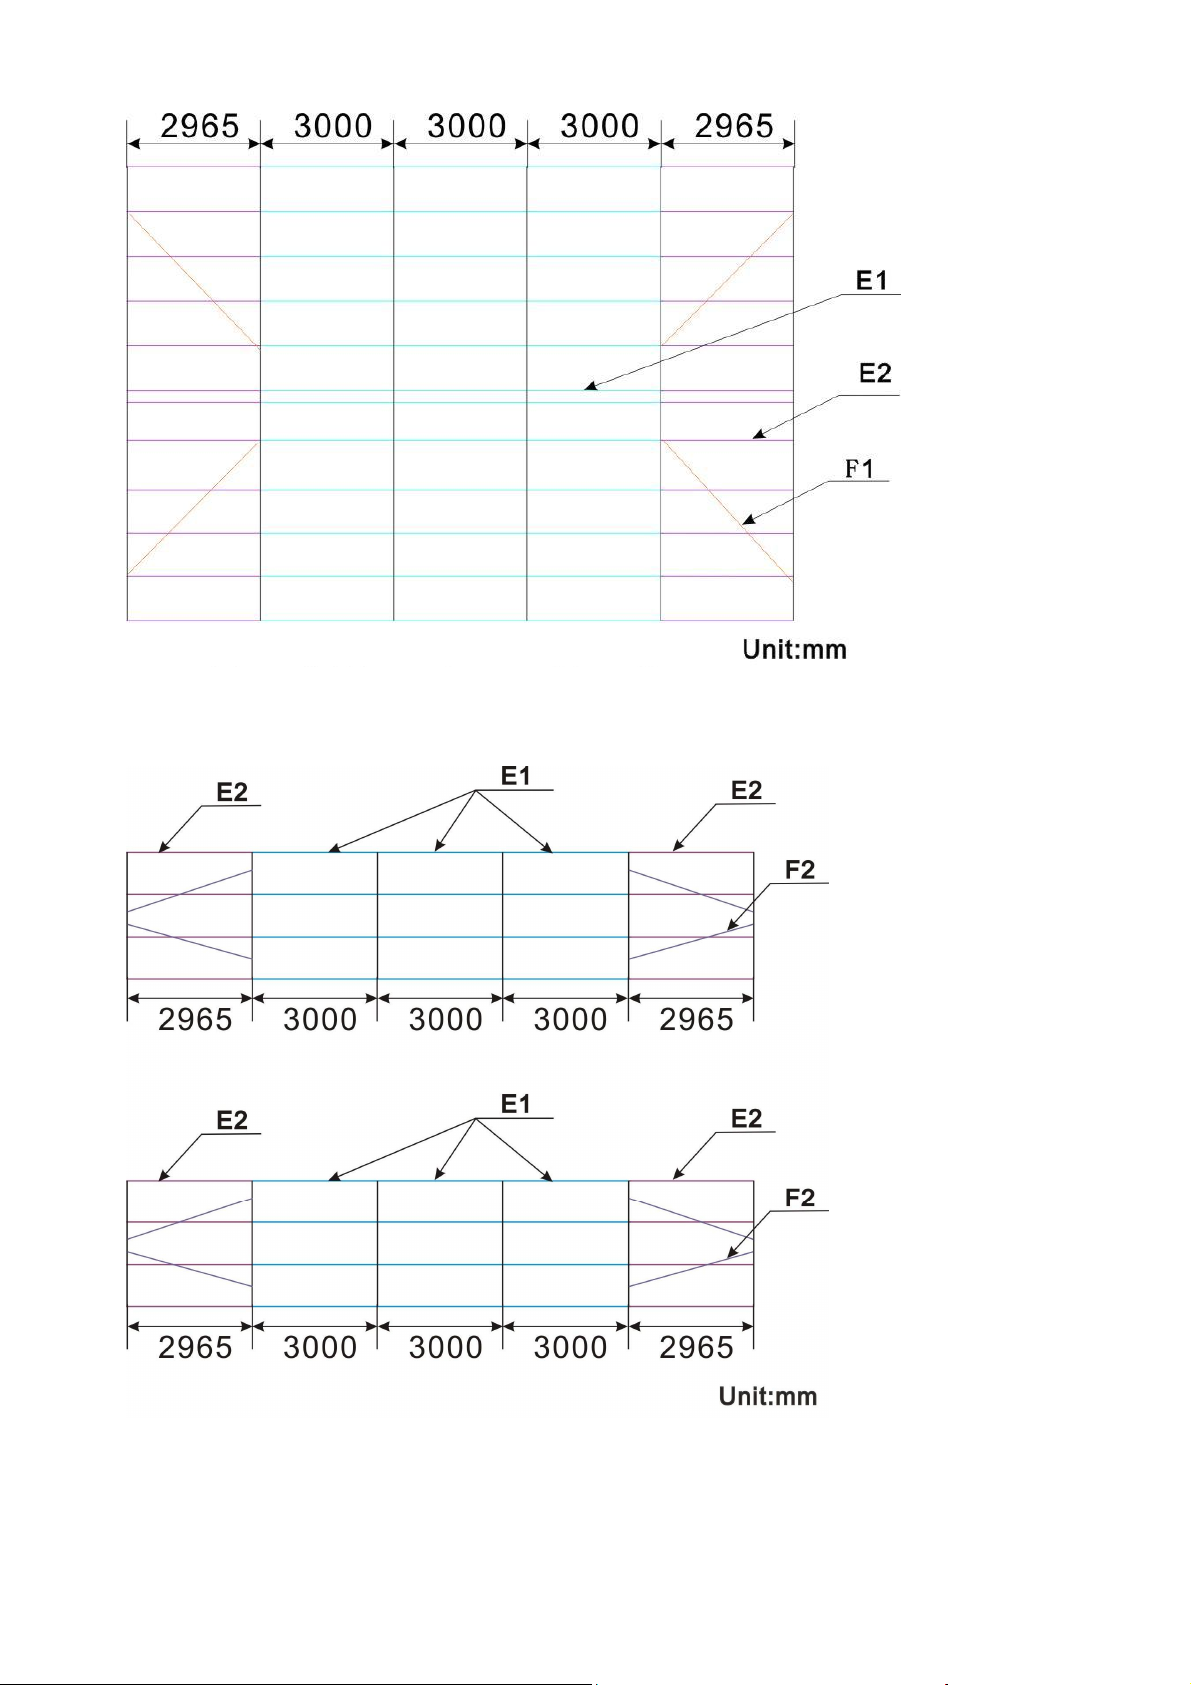
3. When finish installing the main arches and door frames, connect Purlins (No. E1, E2,
E4-A, E4-A1, E4-B) onto them by using Bolt M12. Connect the Bracing Tubes (No.F1&
F2) to the frame by Bolt M12. Please refer to “Front Panel Sketch”, “Back Panel Sketch”,
“Roof Structure Planform” and “Sidewall Sketch with Bracing Tube” for purlin and
bracing tube installation.
Front Panel Sketch
Back
Panel Sketch
2013GK8005 -8-
Roof Structure Planform
Sidewall Sketch with Bracing Tube

2013GK8005 -9-
Option: Steel Wire Rope Installation
Install the steel wire rope (No.N) between uprights according to your requirements.
2013GK8005 -10-
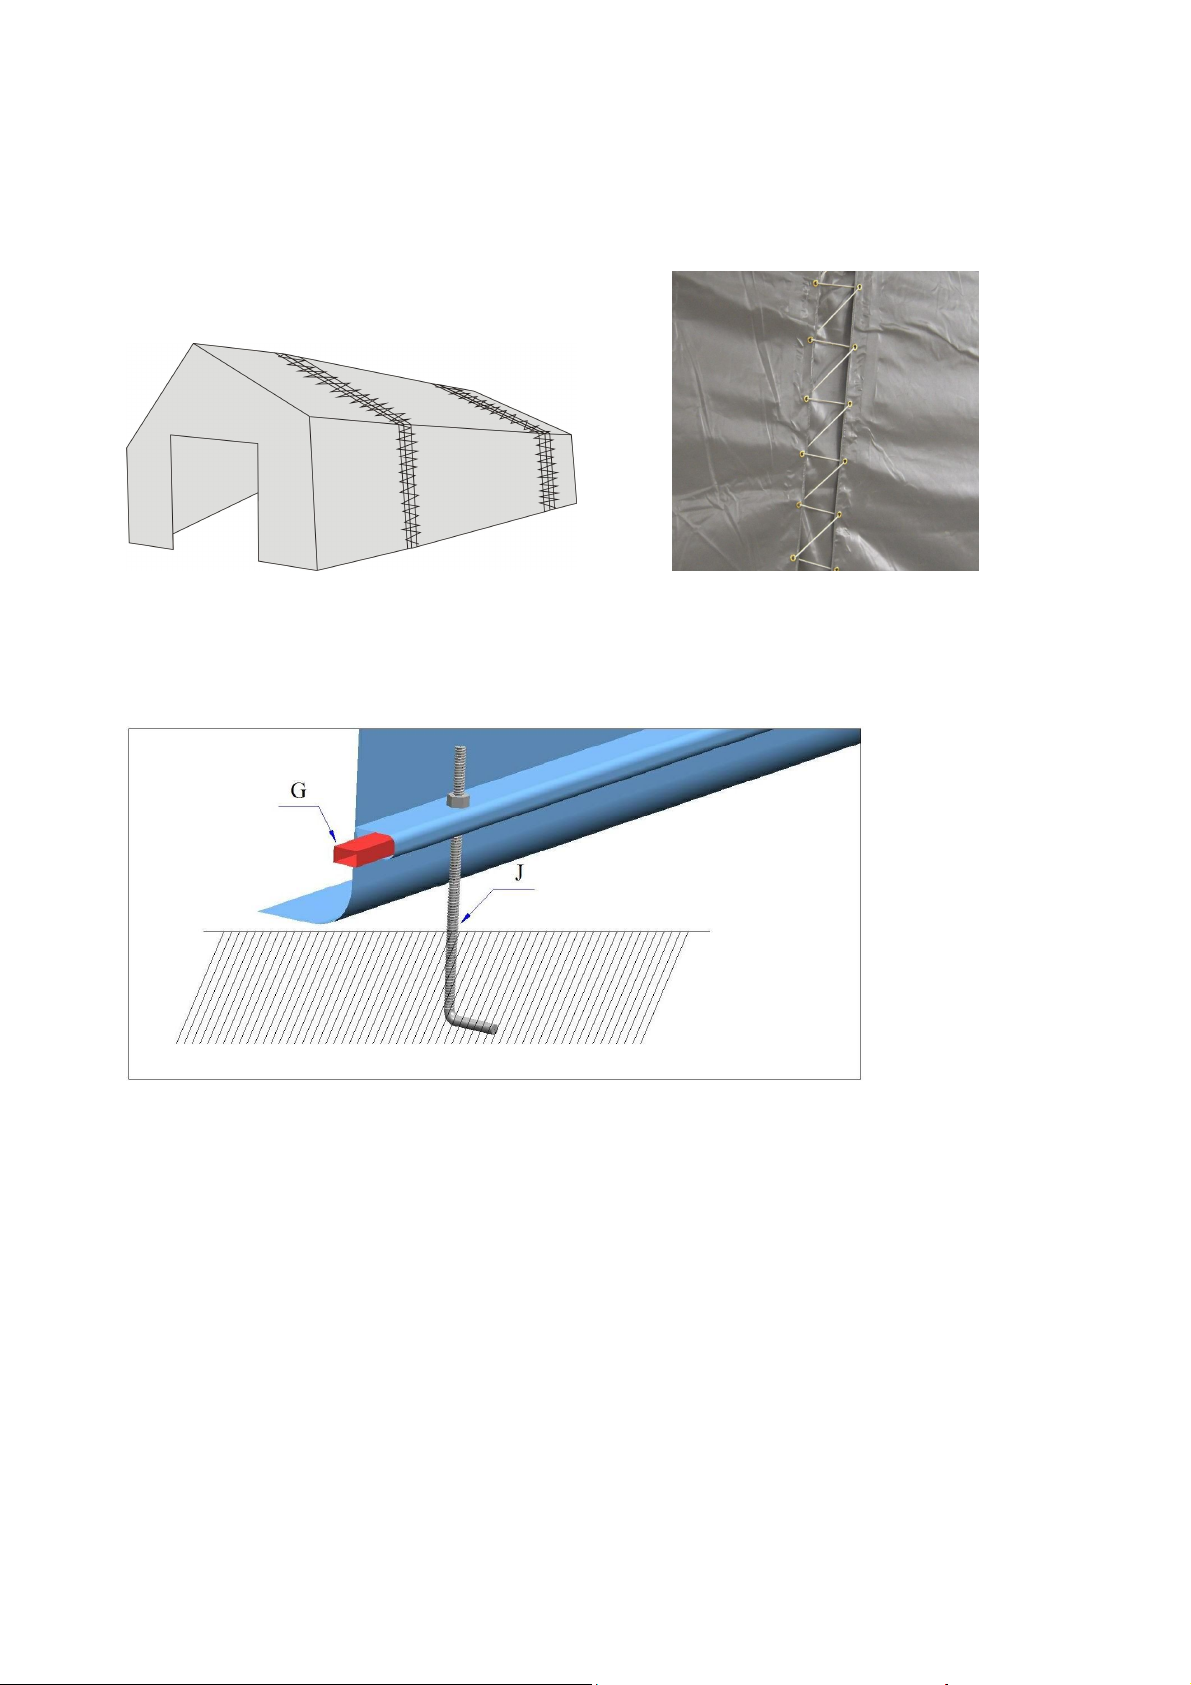
C--Cover Installation
1. There are three parts for the cover, which are front cover with front panel, mid cover and
back cover with back panel (No.I1, I2 and I3). They are connected by the supplied rope
(No.O) as Figure 1 shows.
2. Insert the square tensioning tubes (No.G1-A, G1-B, G2 and G3) into the Roof cover pipe
pockets and fix them by the “L” shaped stakes (No. J), then tension the cover. Each
tensioning tube is equipped with 3pcs of stakes for sidewall and front and back panel.
D—Overhead Door Installation
Please refer to the instruction for detail information.
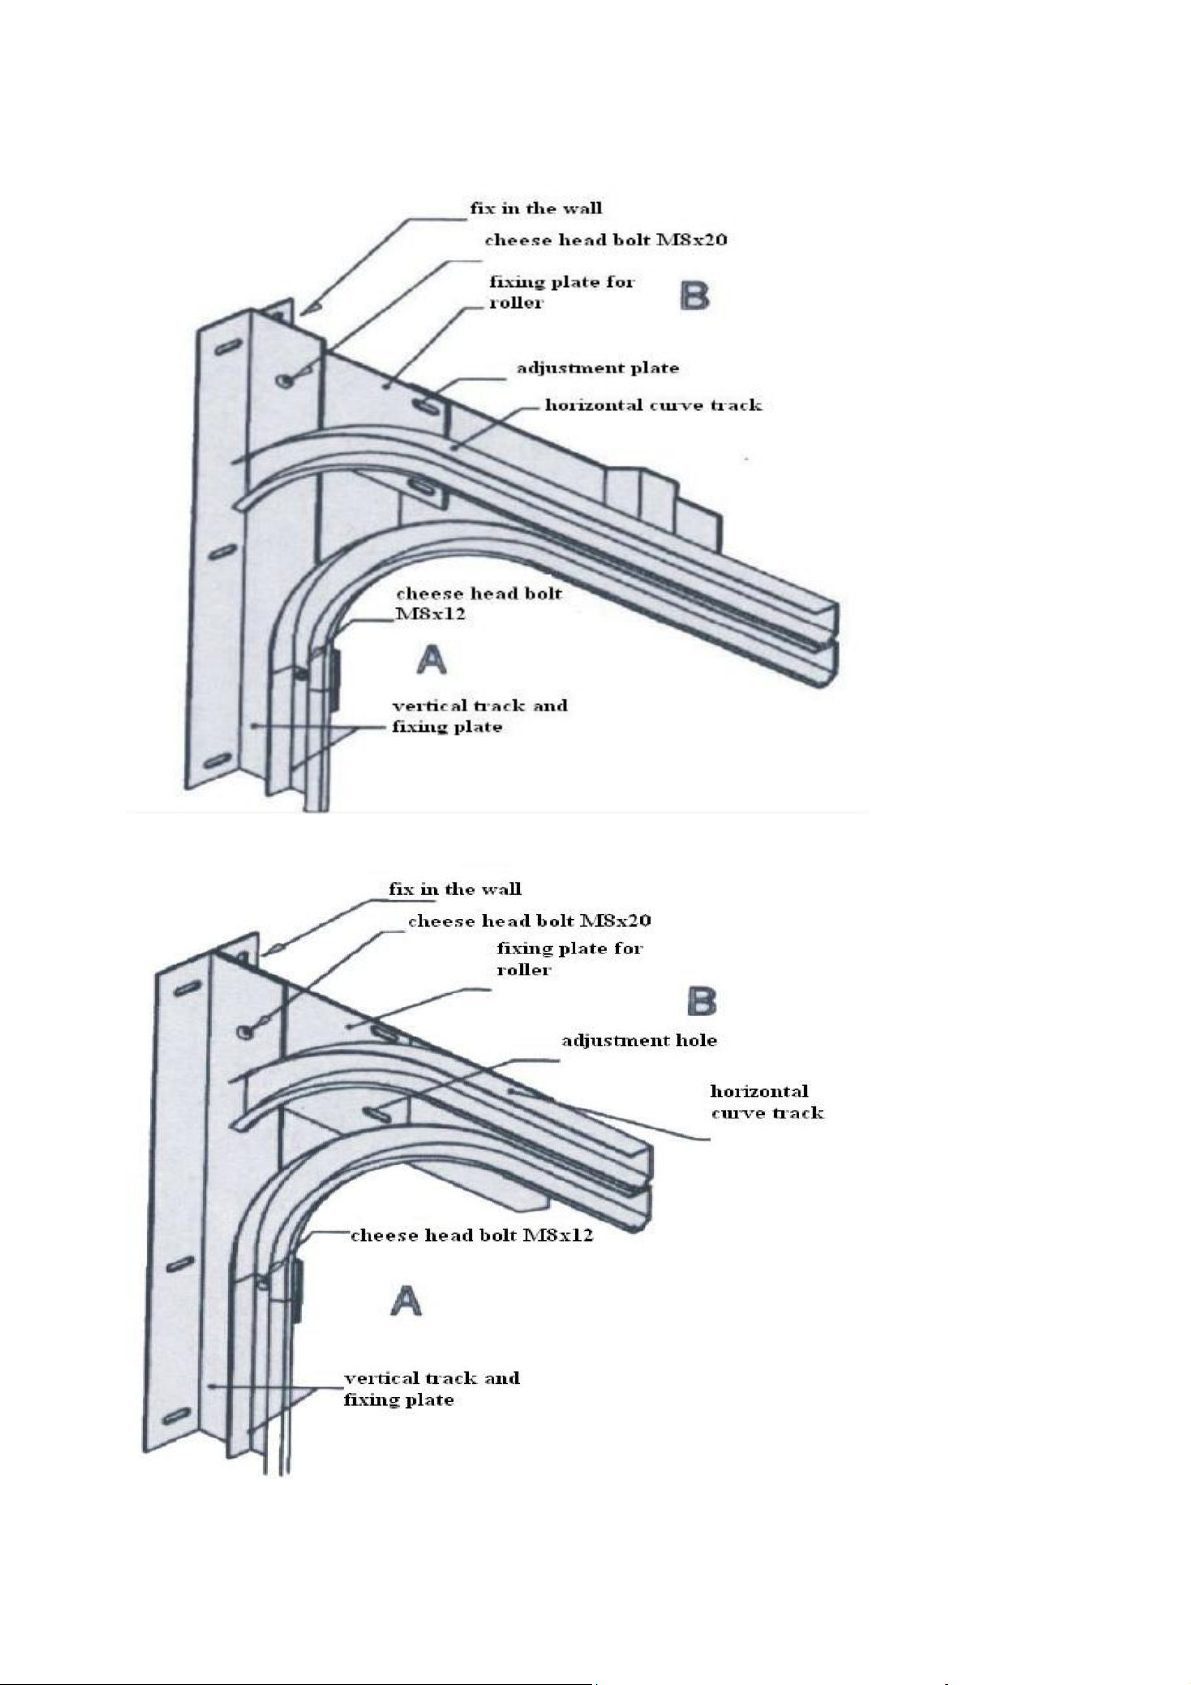
1. The side track and the vertical track have been riveted together. Install the side track to
front door frame (No.D1L and D1R) by self drilling bolt.
2. Install the horizontal curve track to rafter (No.B2) using perforated angle. Then connect
it to the vertical track by bolt.
3. Install the balance system.
4. Install the door panels and door hardware.
5. To adjust the whole door.
6. To install the motor.
NOW THE INSTALLATION IS FINISHED
Figure 1

2013GK8005 -11-
Instruction of Installing Garage Door
Contents
Ⅰ. Brief introduction of the garage door
Ⅱ. The ways and standard to install garage door
1. To make sure the gap size
2. To install the track
3. To install the track hanger and buffer
4. To install the balance system
5. To install the panels and door hardwares
6. To adjust the whole door
ENCLOSEMENT: the pass height for kinds of lift ways after installing
Brief introduction of garage door
Garage door can be widely and safely used in varied situation, such as, industrial door,
workshop door, housewares door, commercial door and residential door.
Garage door series (according to the lift ways):
1. The standard of PB/1 lift way
2. Larger space of door head, PB/2 lift way
3. Overhead lift, PB/3 lift way
4. Smaller space of door head, PB/4 lift way
5. Smaller space of door head, PB/5 lift way
The features of garage door:
1. Beautiful out design
2. Good warm keeping
3. Good quality seal
4. Aliable safety system
5. Kinds of optional function, to fulfill customers’ requirements
6. Kinds of RAL colours for customers to choose
7. Stable quality and reasonable design to make garage door can be used for long time.
2013GK8005 -12-
The ways and standard to install garage door
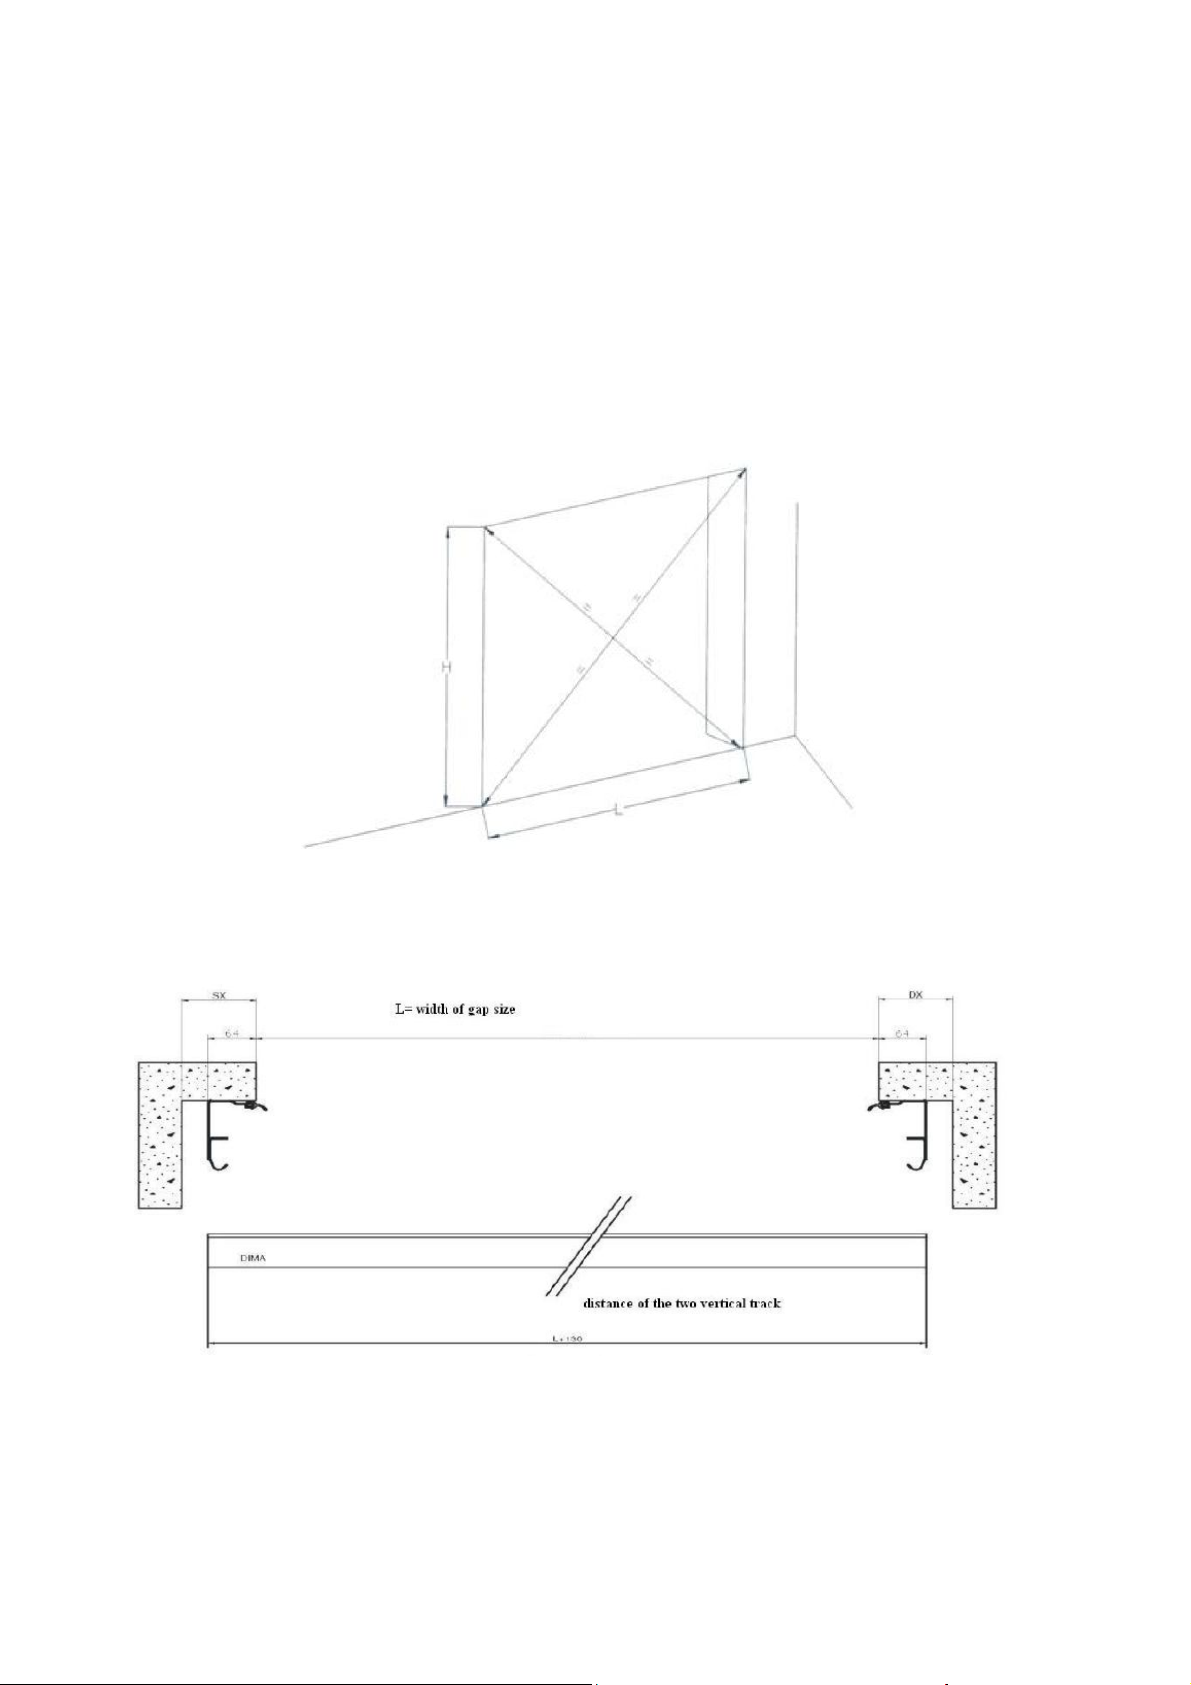
1. To make sure the gap size:
1.1. To measure the height and width of the both sides of gap size, to make sure it
matches the door panel, and to make sure the differences of the two diagonal lines is
less than 5mm.
1.2. If the measurement result is that the gap size does not matches the door panel, or
the differences of the two diagonal lines is over 5mm, please negotiate with the
professional installers.
2. To install the track
Please position and install according to the below pictures.
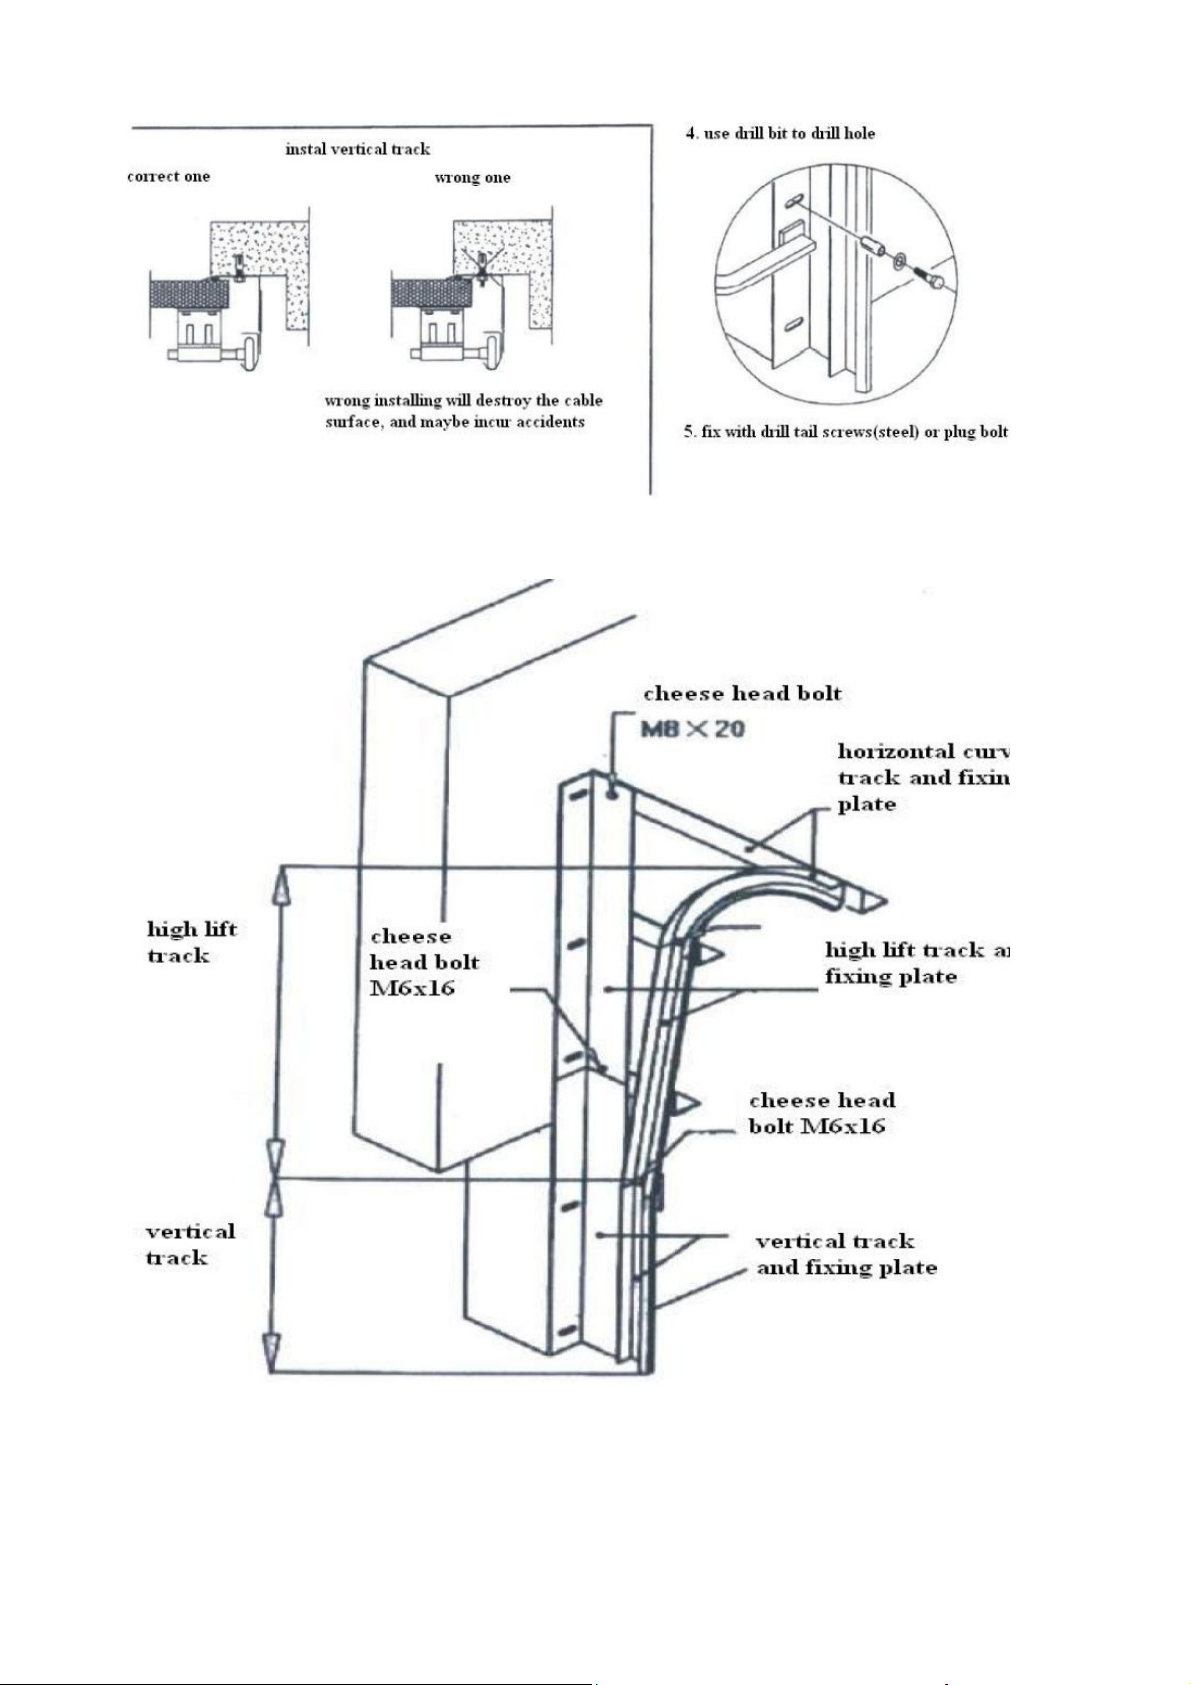
Piture 2-1 Position the vertical track

2013GK8005 -13-
Piture 2-1 Position the vertical track

2013GK8005 -14-
Piture 2-2 Fix the vertical track:
2013GK8005 -15-
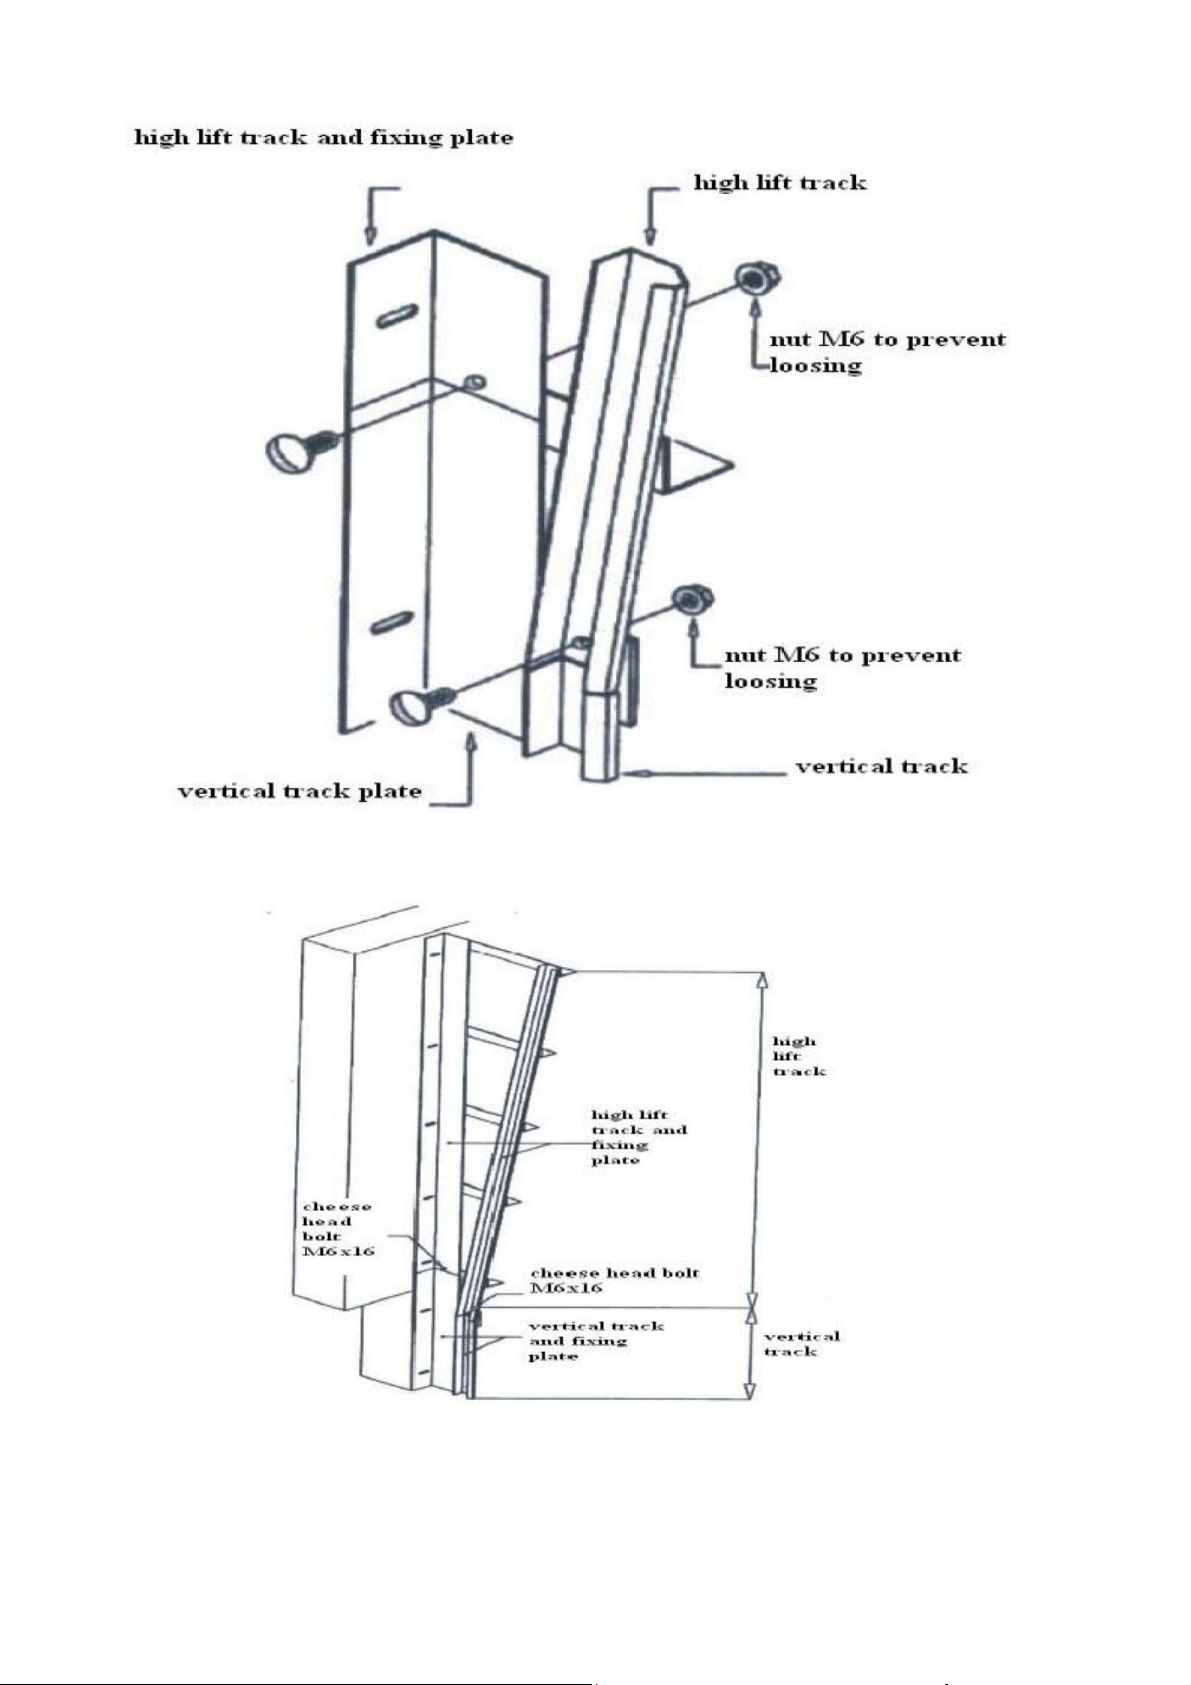
Piture 2-3 Fix the track of high lift parts for PB/2 and PB/3 lift way
To fix the track of high lift parts for PB/2 lift way
2013GK8005 -16-
To fix the track of high lift parts for PB/3 lift way
2013GK8005 -17-
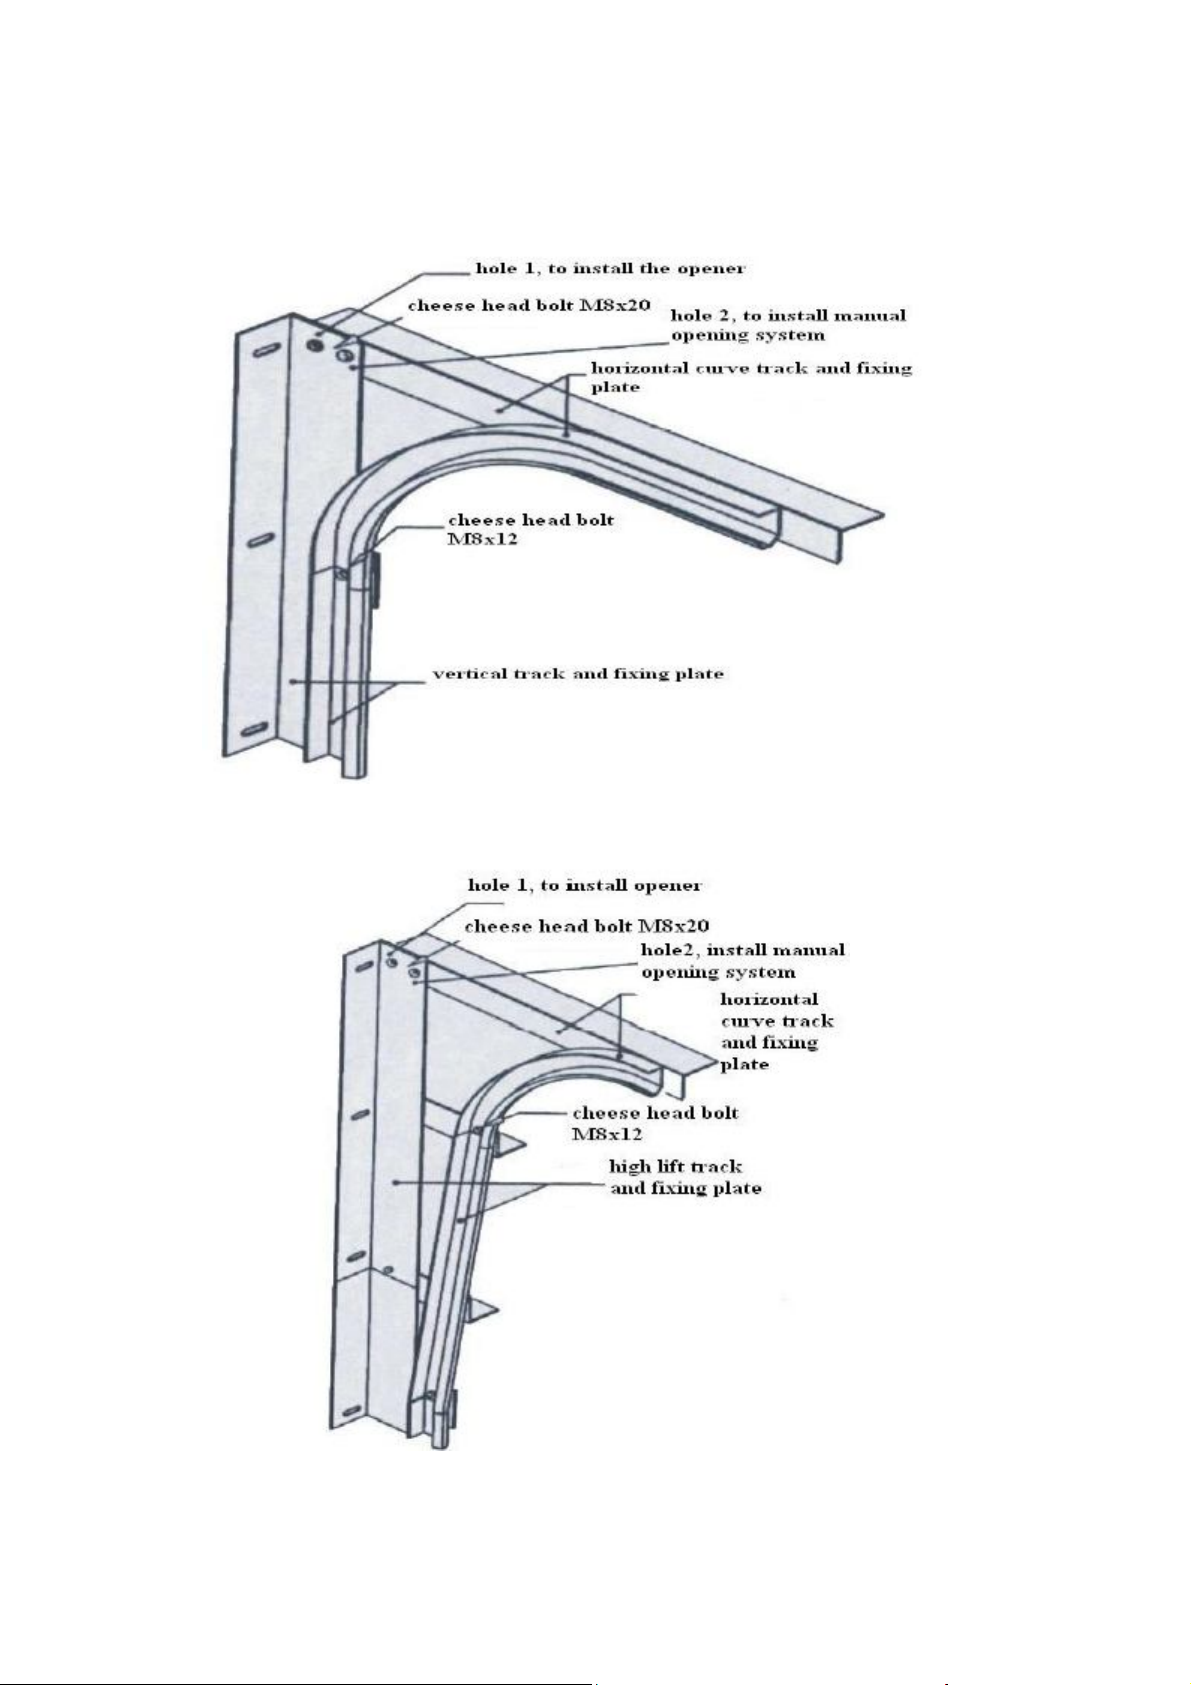
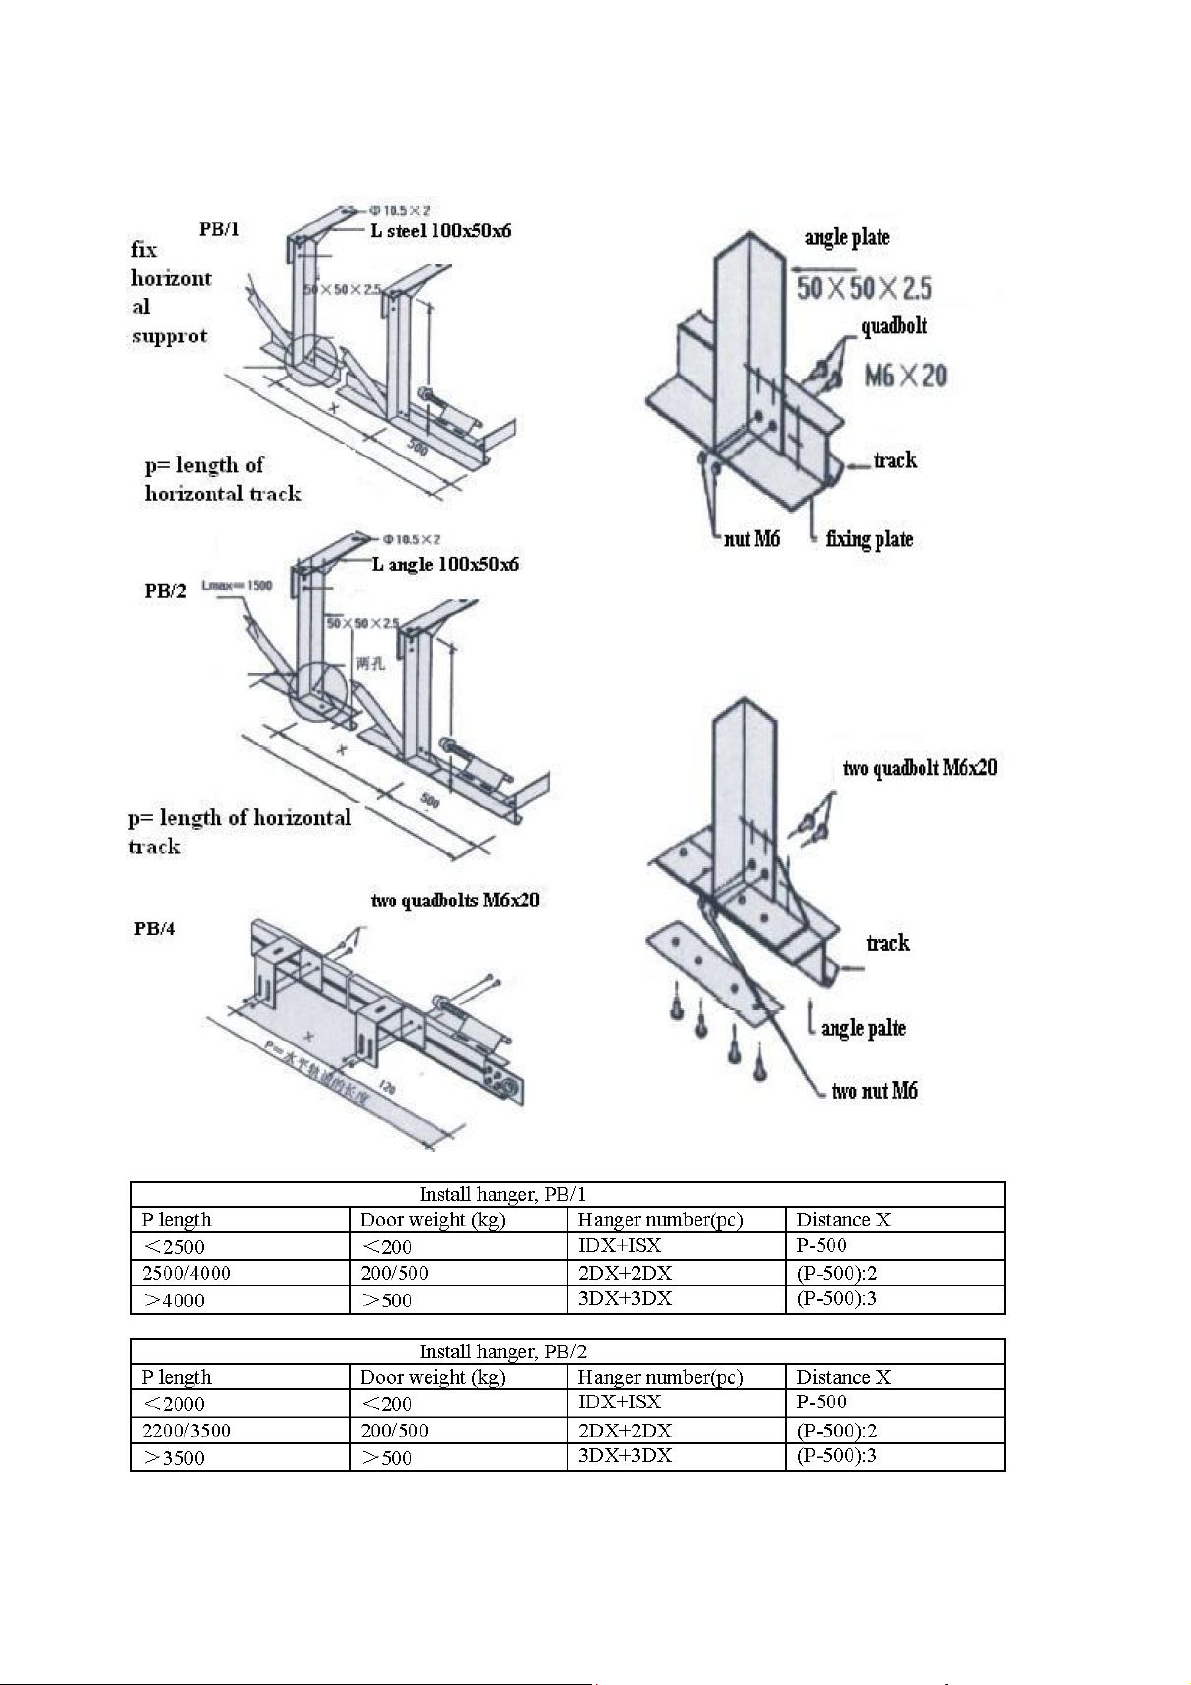
Piture 2-4 Fix the horizontal curvely track
PB/1 lift way
PB/2 lift way
2013GK8005 -18-
PB/4 lift way
PB/5 lift way
2013GK8005 -19-
3. To install the track hanger and buffer
Other SHELTER Tent manuals


