1. Fit the ring handle to the door inline with the
centre door framework using 4 x 25 mm black
screws.
2. Fit the false hinges to the outside of the door
at the top and bottom. Each is to fit as far as
possible onto the framework at the back of the
door. Secure using 2 x 25 mm black screws and
along the length of each hinge 2 x 10 mm black
screws per hinge.
3. Lay front panel on a flat clean surface. Re-
move protective film from door glazing and lay
over the diamond shape cut out in the door.
Position the four angled and rebated door bead-
ing on top of the glazing and secure using 8 x 20
mm screws, 2 per piece.
Remove all travel protection blocks from bottom
edge of panels.
1. Ensure that your base is firm and absolutely
level.
2. Lay floor of building on base ensuring the
solid framework is at the front of the building.
3. Place back panel onto the floor ensuring the
cladding has overhung the floor. Place side
panel next to this and join together from the
inside using 2 x 60 mm screws.
4. Place remaining side panel in position. Join
together from the inside using 2 x 60 mm
screws.
5. The front door panel is now ready to be
placed. Join to side panels using 2 x 60 mm
screws each side.
1. Slide one roof panel into position using the
cut-out of the ridge as a guide. Repeat for the
other panel.
Please note that a small amount of planning may
be necessary to the tops of the walls to ensure a
snug fit.
2. Drill then screw roof sections together at the
ridge using 4 x 60 mm screws.
3. Secure down from the inside using 2 x 60 mm
screws per wall, fixing from the framework of
roof to framework of the gable walls.
4. Fix along the length of the building using 2 x
60 mm screws per side.
1. Trim uprights of balustrade as required.
2. Place balustrade in position. Secure upright
post of balustrade to roof panel from the inside
using 1 x 60 mm screw. Secure balustrade to
front panel using 2 ‘L’ shaped brackets and 25
mm screws, one at the top and one at the
bottom. Repeat for other side.
3. Secure balustrade to floor using 2 x 60 mm
screws, one per side.
1. Open roll of felt and lay out on an even
surface. Measure and cut the required 3 lengths
allowing an overhang of approx 50 mm on all
sides. Starting at the lower edge (the eaves)
place one piece of felt along the length of the
building. Secure the felt using felt nails spaced
at 100 mm intervals. Repeat for other side, but
do not nail along centre of building until the
piece of felt covering the ridge is in place.
2. Place the last piece of felt at the ridge of the
building. This piece will overlap both of the other
pieces of felt. Nail into position along both edges
of this piece and at both ends.
1. Fix the corner
strips in position
where the panels
meet using 3 x 40
mm nails per strip.
1, Secure wall panels to the floor on the inside of
the building through framework into floor bearers
using 2 x 60 mm screws per panel.
1, Nail the 4 fascia boards to gable ends using 3
x 40 mm nails per piece.
2. Trim of any excess felt with cutting knife
against the edge of the fascia board.
3. Nail diamonds on top of and in the centre of
the fascia board using 2 x 40 mm nails per
diamond.
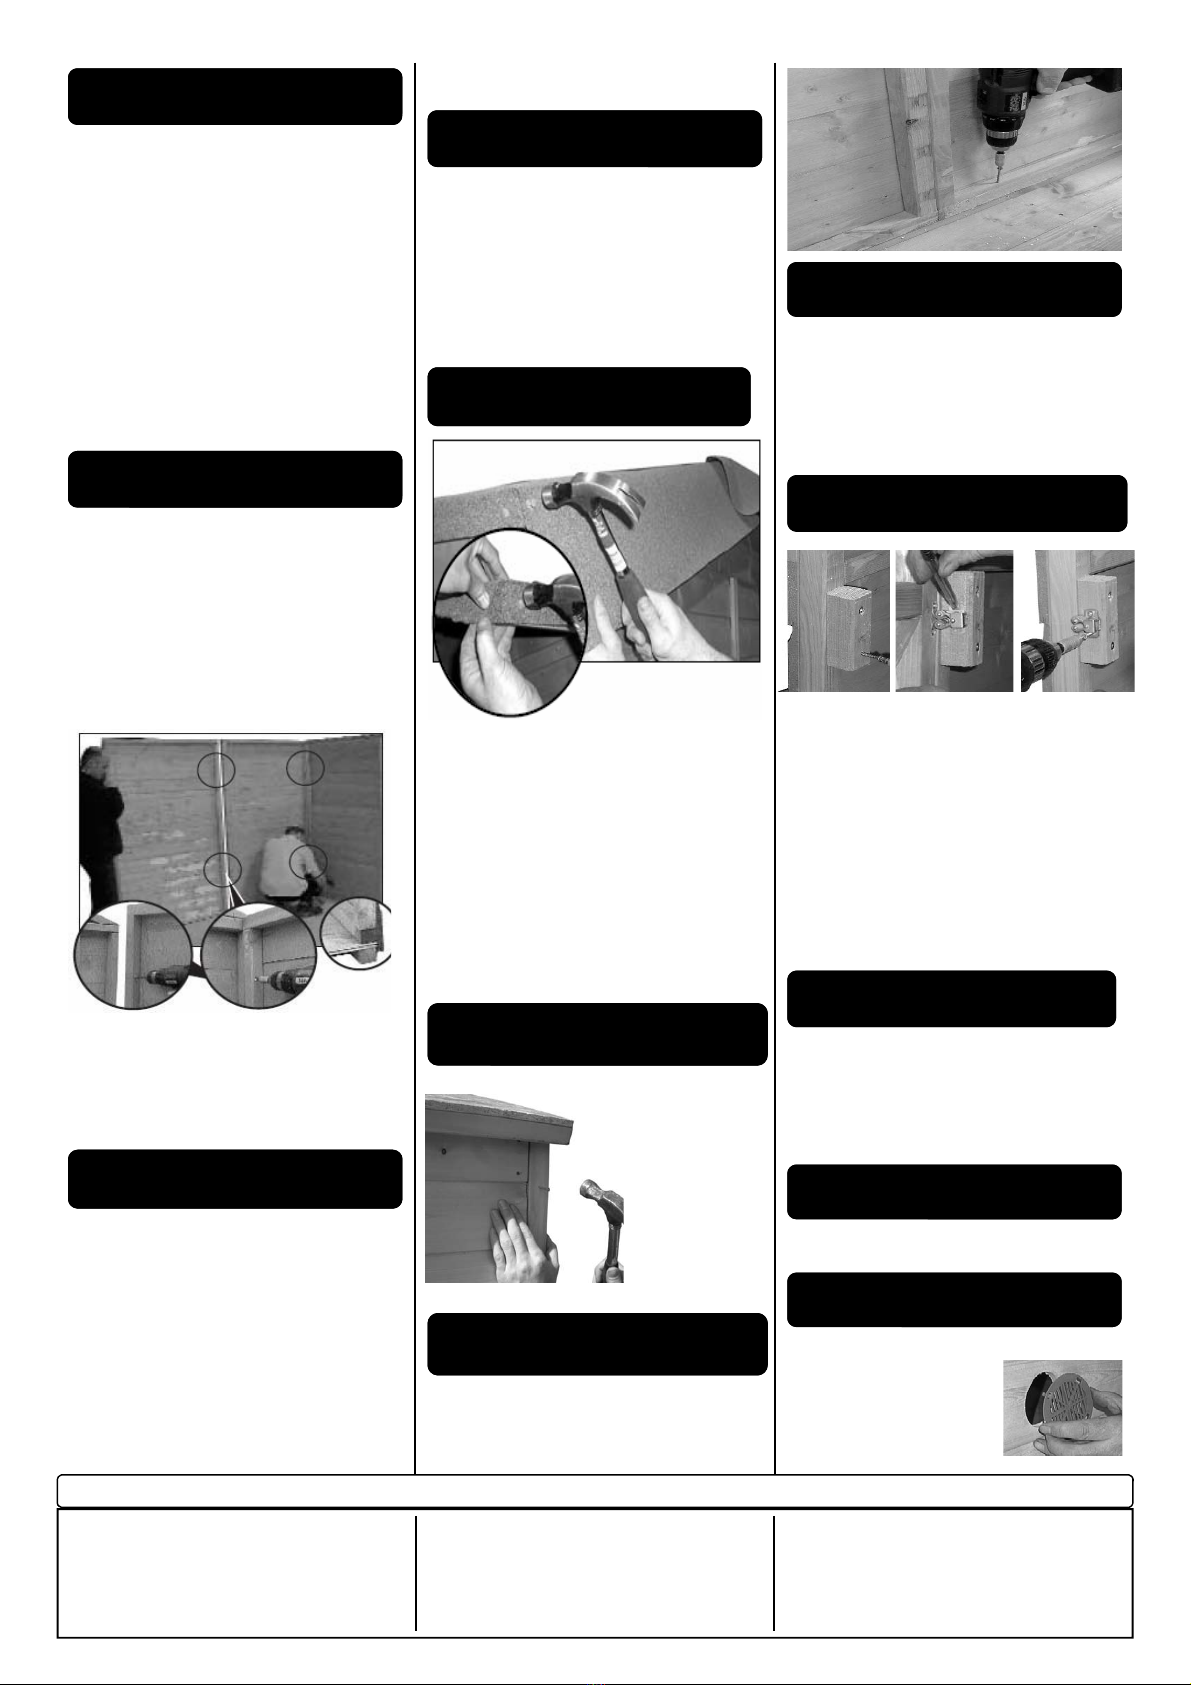
1. Drill 2 holes into the wood block and
secure to inside of door opening flush with
aperture using 2 x 60 mm screws.
2. Secure door catch to inside of door approx.
centrally alongside of the wood block and
secure using 2 x 25 mm screws.
3. Close the door and attach the door catch
together and mark the required position of the
door catch housing. Secure using 2 x 25 mm
screws.
1. Place glazing material into the aperture of
each window.
2. Hold into position with four pieces of beading.
Secure into position using 2 x 15 mm panel pins
per piece of beading. Repeat for all window
apertures.
1. Secure shutters to the building from the inside
using 2 x 25 mm screws per shutter.
1. Secure the window boxes to the building from
the inside using 2 x 25 mm
screws per box.
VENT - push fit vents into the
apertures of back panel.
A Front Panel
B Walls
C Roof Assembly
D Balustrade
E Felt Roof
F Corner strips
G Secure Walls to Floor
H Fascia & Diamonds
I Door Catch
J Glazing
K Shutters
LWindow Boxes
Assembly Completion Checklist
1Check and ensure that no raised grain or splinters
are evident on timber components. Sand down any
raised grain or splinters using fine grade sandpaper.
2Check that all screw, nail and pin heads are properly
tapped home and are not proud of the timber surface.
3Check and ensure that no screws, nails or pins
protrude through any panel.
4 Check and ensure that all parts are properly secured
against reasonable force.
5Do not apply decorative wood finish/treatments to wet
or damp timber. Please observe the instructions of
the wood finish/treatment manufacturer.
6 Adults need to check the playhouse regularly and
maintain the playhouse in good condition to provide a
safe environment. Do not use if damaged. If damaged
the playhouse should be properly and safely repaired
before further use by children.


