Shulz Krabi User manual

Manual


3
WARNING: THE SELLER IS NOT RESPONSIBLE FOR THE INTENTIONAL OR INCIDENTAL HARM CAUSED AS THE RESULT OF USE OR
NON-USE OF THE INFORMATION SPECIFIED IN THE PRESENT MANUAL. THIS IS A SHORT MANUAL ON THE USE, REPAIR AND MAIN-
TENANCE OF A BIKE. IF THERE ARE NO ANSWERS TO SOME OF YOUR QUESTIONS IN THIS INSTRUCTION, CONTACT SHULZ BIKES
LOCAL DEALER.
Thank you for choosing the Shulz bike! We hope that you will enjoy it. This manual will
help you to understand how the bike works and how to take care of it — here you will find
necessary information for the proper use, adjustment and maintenance of a new bike.
Please pay special attention to safety information — it will help you to avoid serious inju-
ries. If you have any questions, take responsibility for your own safety and see an expert.
This manual isn’t a textbook on cycling or its repair and maintenance. Even having care-
fully studied it, you will not learn all that is required for the repair, adjustment and main-
tenance of the bike, not to mention the acquisition of new skills of cycling. Nevertheless,
here you will find quite a lot of valuable tips that will definitely come in handy.
You can also go to www.shulzbikes.ru where you will always find the most up-to-date
information about Shulz® bikes, and our experts will give you all the necessary tips for
adjustment and repairing a bike.
If you bought a bike in a box and need to assemble it, we recommend appealing to a qual-
ified bicycle workshop. If you face problems that are not covered in this guide, please
contact with us or your nearest Shulz official dealer. A list of them can be found
at www.shulzbikes.ru.
www.shulz.ru
www.shulz.ru
www.shulz.ru

4
Introduction
All Shulz folding bicycles are meant to ride only on solid road surface (pavement, dirt roads, etc.) and
do not suit for cross-country riding. Stunt riding, jumps and extreme loads on Shulz bikes are not
recommended. The rider’s weight should not exceed the maximum permissible (technical specics
of a particular model are listed on the site www.shulzbikes.ru). Improper use of the bike can lead to its
breakage.
Before purchasing a bicycle, make sure it suits your size. Ask the seller about minimum and maximum
bicyclist’s height exactly for the model of Shulz bike you are going to buy.
Adjust your saddle to a comfortable height. Make sure it is well xed. All fastenings must be tightened
suciently so that the saddle cannot be moved from side to side.
Adjust your handlebar. Probably after that you will need to adjust the brake levers angle too so they
are comfortable to use.
If you are not sure how exactly this or that bicycle’s component works, before the rst ride it’s neces-
sary to consult a store manager regarding all those parts and components, the purpose of which is
not entirely clear to you.

5
Safety
WARNING: Remember that only you are responsible for ensuring that you have all the accessories
required by local laws — a head- and a taillight, special clothing with reflective elements, etc. Check
out all local laws regarding cycling. First of all, there could be information about mandatory lighting
equipment, registration of a bike, and the rules for cycling on public highways or for transporting
abike by public transport, etc. Examine information on your own to keep the law.
Before every ride perform a safety check of your bike. First of all, check the wheel attachment (p.
8-9). Make sure the wheels are correctly installed and firmly fixed; otherwise they may come off
on the way causing serious injury of the cyclist.
Make sure that your bike’s rims are not damaged or dirty, especially in the part where the brake pads
are in contact with the rim during braking. Also check regularly for the rim wear in these places. See
a dealer if you question the rims’ safeness.
Make sure that the seat and handlebar have proper alignment (in line with the longitudinal axis of
frame’s symmetry), and that they are tightened sufficiently so that their position won’t be suddenly
changed during the ride (p. 6-7). Check the handlebar grips are not too worn and don’t easily rotate,
otherwise contact your dealer for help.
Take a close look at the bike’s various components — brakes, shifter, etc.
Pay special attention to all bike’s moving parts (chain, pedals, crank arms and wheels), as well as
to sharp sprocket teeth.
Always use a helmet as said in its instruction. Avoid riding in loose clothing, sandals or bare-
foot. Choose shoes that don’t fall off. Make sure that the laces won’t get caught in moving parts
of the bike.
On the road
Remember that you are not alone on the road. Respect other road users — pedestrians and drivers.
Be careful and always remember that they may not notice you. Be prepared that:
— the car may brake or make a sharp turn right in front of you;
— the parked car’s door may open unexpectedly;
— pedestrians may cross the street without noticing you;
— children or animals may suddenly run out onto the road;
— there may be pits, open hatches, rails, garbage, road structures and other obstacles in your way.

6
Safety
Obey traffic laws, ride along special cycle lane or shared paths if there are any. Be extremely careful
at the intersection and always stop at red traffic light. Remember that a cyclist suffers the most when
involved in a collision with a car.
— Use hand signals to indicate your next move
— Avoid using headphones while you’re riding
— Never cycle with another person on the rack/ frame / handlebar
— Do not ride with items that interfere with visibility or riding the bike
— Never cycle holding onto vehicle driving nearby
— Ride in a predictable manner, don’t weaving in and out of the traffic
— Always yield the right-of-way to those who are on the right
— Don’t ride a bike under the influence of alcohol or drugs
— Cycle careful if you are tired or feel sick
— When replacing components and installing accessories, make sure that they are compatible
with your bike.
In wet weather
WARNING: In wet weather the chance of an accident is stronger, because water influences bike’s
handling and stability increasing its braking distances and worsens visibility.
Don’t cycle on a high speed, apply your brakes earlier and do it gentler. When it rains, brakes work
properly only in case if a bike has a rear hub with an integrated brake. Disc brakes suits better for
rainy weather.
At night
It is quite dangerous to cycle around urban areas in the dark because you are almost invisible for
drivers and pedestrians. Try not to ride at night time, but in case you do, make yourself noticeable
on the road — use reflectors, a headlight and a taillight, put on reflective apparel. Try choosing famil-
iar routes to ride, avoid places without streetlight and dense-traffic roads.
WARNING: Reflectors are not a substitute for lights.

7
Before the ride
Never use a defective bike and check its technical condition before each ride.
1. Check all threaded junctions
2. Make sure that everything is tightened properly — lift the bike 5-10 cm from the ground and
let it off. If there is an unusual noise, inspect the bike, fix loose parts on your own or take the bicycle
to your bike shop for service.
3. Check your tire pressure. Always maintain it in range recommended on the sidewall of the tire.
Check tire sidewall for cuts or cracks and replace it if necessary. Check the rims - they should be
as even as possible, without damage on theirs surface. When the wheel spins, it shouldn’t contact
with the brake pads of the rim brakes (if installed). You may need to repair or replace the wheel and/or
adjust the brakes.
4. Check the brakes for normal operation. Brake cables must be installed in place. When you press the
brake levers, the brakes should work when the brake lever is parallel to the handlebar. The brake pads
should equally touch the rim brake surface. Adjust the brakes if necessary.
5. Make sure that the front and rear wheels, the saddle, seat post, handlebar and grips are firmly fixed.
6. Ensure that the battery is fully charged (on Shulz models with an electric motor).
The first ride
It is better to take the first ride on a new bike away from traffic, other cyclists, various obstacles and
other dangers. Check out the operating principles of bike control elements and mechanisms.
Check the brakes riding the bike at slow speed — move the weight to the rear wheel and carefully try
to use both brakes in turn and simultaneously. Brake force applied suddenly or too fully could lead
to wheel lock-up and cause you to fall off the bike.
If there any questions left or you think something is wrong with the bike, before using it again, consult
a bicycle store or workshop.

8
Folding and unfolding
If you’ve bought the Shulz® folding bike , it’s important to learn how to fold it correctly so it takes up
little space during storage and transportation as it’s supposed to.
Fold the bike in the following order:
– fold the pedals (the design of the folding pedals may differ from the one in the figure, see the
bike shop);
— press the seat post clamp back and lower the saddle all the way (the seat post should tight
against the ground; Shulz Krabi model is an exception);
— press a headset clamp back and fold a handlebar down;
— press the joint clamp back on the frame and fold the frame.
To make the bike fold as compactly as possible, find the position of the cranks and pedals in which
they would not interfere with folding the frame.
Unfold the bike in the reverse order.
Handlebar position is important for control and comfort; even its minimal adjustment can affect
cycling. If you have not managed to adjust the handlebar on your own, see your dealer or any qualified
mechanic.
WARNING: The handlebar pin can be raised only to the maximum mark on it. This mark should remain
hidden in the bicycle headset and stay invisible. The handlebar raised above the mark can cause
serious damage to the bike.
WARNING: Handlebar mounts should be tightened sufficiently, otherwise it’s possible to lose control,
fall off the bike and get injuries of varying severity. To check the strength of the handlebar mounting,
stand right in front of the bike, grasp the handlebar with both hands and, while holding the wheel with
your feet, try to turn the handlebar to the right and left. The handlebar and wheel should be a single
rigid structure and should turn only simultaneously.
Handlebar adjustment

9
Saddle adjustment
It is important to adjust correctly the saddle for comfortable sitting and better pedaling.
There are:
1. Height adjustment. To check the height adjustment is correct, sit on the saddle with your heel on
the pedal, scroll the pedal until it is at the low point and the cranks stands parallel to the seat tube.
If your leg is bent more than slightly, your seat should be adjusted up. If you can’t reach the pedal,
your seat should be adjusted down. On most Shulz models there is a special scale on the seat post,
so it’s easy to remember the height that that suits you the best.
To adjust the seat height, do the following:
— open the quick-release lever of the seat post clamp;
— adjust the seat up or down;
— make sure the saddle is in line with the center of the bike;
— сlose the quick-release lever of the seat post clamp to the previous position; use the nut on the
back of the quick-release to adjust the force;
— check that the saddle doesn’t twist out of frame.
WARNING: Make sure that the saddle is not adjusted above the maximum or below the minimum
mark on the seat post - this can lead to bicycle breakage and serious injury!
2. Horizontal adjustment. By this adjustment of the saddle you can find the optimal position by
moving closer to the handlebar or away from it. This operation is best done in a professional bicycle
workshop.
3. The saddle angle. Most cyclists prefer sitting on a saddle that is mounted parallel to the ground.
However, some feel comfortable sitting on their saddles with slightly raised or lowered nose. This
operation is best done in a professional bicycle workshop.
Saddle position is important for control and comfort and even its minimal adjustment can affect cy-
cling. To find the ideal saddle position, change only one parameter at a time. If you have not managed
to adjust the saddle on your own, see your dealer or any qualified mechanic.
WARNING: After any saddle adjustment, make sure that all mounts are tightened sufficiently other-
wise it’s possible to lose control, fall off the bike and get injuries. A properly adjusted saddle must
be firmly in place and should not move in any direction even under heavy load. Check regularly the
strength of the saddle mounting.

10
Front wheel
It may become necessary to remove the wheel to transport the bike or repair.
1. Remove the front wheel:
— if you have front rim brake, open the brake, clipping the holding device off, this allows your brake
pads to be far enough from the rim for your tire to slide past them;
— if the wheel is attached with a quick release, flip the lever into the open position;
— if the wheel is fastened with bolts, loosen the two axle bolts using a 5 mm hexagon;
— if the wheel is fastened with nuts, loosen them using a 15 mm wrench;
— release the wheel from the dropouts.
2. Reinstalling the front wheel:
— turn the fork forward and guide your wheel back into it so that the wheel is settled completely
into the dropouts; make sure that the wheel is in line with the center of the fork;
— if the wheel is attached with a quick release:
а) make sure the quick release is on the non-drive side of the bike;
b) holding the lever in place, tighten the nut on the opposite side until it is pressed against
the dropout;
c) tighten the quick release lever from bottom to top; in the closed position it must be parallel
to the fork;
— if the wheel is fastened with bolts, loosen the two axle bolts using a 5 mm hexagon;
— if you have a rim brake, close the brake, clipping the holding device on;
— by spinning your wheel, make sure it doesn’t not rub the brake pads, then check the front brake;
if you have disc brakes, slight friction between the pads and the brake disc is allowed.
WARNING: The quick release should feel tight, but it should not be too difficult to close the lever, only
then the wheel will be fixed in the fork securely. If you can clamp the lever almost without any effort,
open it, tighten the nut slightly on the other side of the axis and then try one more time. Too much
force when tightening the quick release can cause it to burst.
If the quick release lever cannot be closed so that it is parallel to the fork, open it, slightly unscrew the
nut on the other side of the axis and try to tighten the lever again.
WARNING: If your bike has disc brakes, be careful not to damage the rotor, caliper and pads when
reinstalling the wheel. Never press the brake lever until the rotor is completely settled into the caliper.

11
Rear wheel
The rear wheel can be attached using a quick release, nuts or bolts.
1. Remove the rear wheel:
— if you have rear rim brake, open the brake, clipping the holding device off, this allows your brake
pads to be far enough from the rim for your tire to slide past them;
— if the shifting system is the derailleur, shift the rear one to the outermost gear and innermost
front chain ring;
— if the wheel is attached with a quick release, open its lever;
— if the wheel is fastened with bolts, loosen them using a 5 mm hexagon;
— if the wheel is fastened with nuts, (or planetary hub is installed):
а) if a planetary hub is installed, use a 10 mm wrench to loosen the bolt on the bell crank
of the planetary hub and remove it along with the internal gear shift axis;
б) if the wheel is fastened with nuts, loosen them using a 15 mm wrench and release the wheel
from the dropouts.
2. Reinstalling the rear wheel:
— if the shifting system is the derailleur, shift the rear one to the outermost gear and innermost
front chain ring;
— set the wheel into the frame so that the wheel axis fits tight into the dropouts and make sure
that the wheel is in line with the center of the frame;
— if the wheel is attached with a quick release:
а) make sure the quick release is on the non-drive side of the bike;
b) holding the lever in place, tighten the nut on the opposite side until it is pressed against
the dropout;
c) tighten the quick release lever from bottom to top; in the closed position it must be parallel
to the frame;
— if the wheel is fastened with bolts, loosen the axle bolts using a 5 mm hexagon;
— if the wheel is fastened with nuts, (or planetary hub is installed):
а) tighten the nuts with a 15mm open-end wrench;
b) if there is a planetary hub, install the internal gearshift axis and the planetary hub bell crank
onto the nut and tighten the bolt in the back of the planetary bell crank using
a 10 mm wrench;
— if you have a rim brake, close the brake, clipping the holding device on;
— by spinning your wheel, make sure it doesn’t not rub the brake pads, then check the rear brake;
if you have disc brakes, slight friction between the pads and the brake disc is allowed.
WARNING: The quick release should feel tight, but it should not be too difficult to close the lever, only
then the wheel will be fixed in the fork securely. If you can clamp the lever almost without any effort,
open it, tighten the nut slightly on the other side of the axis and then try one more time. Too much
force when tightening the quick release can cause it to burst.
12
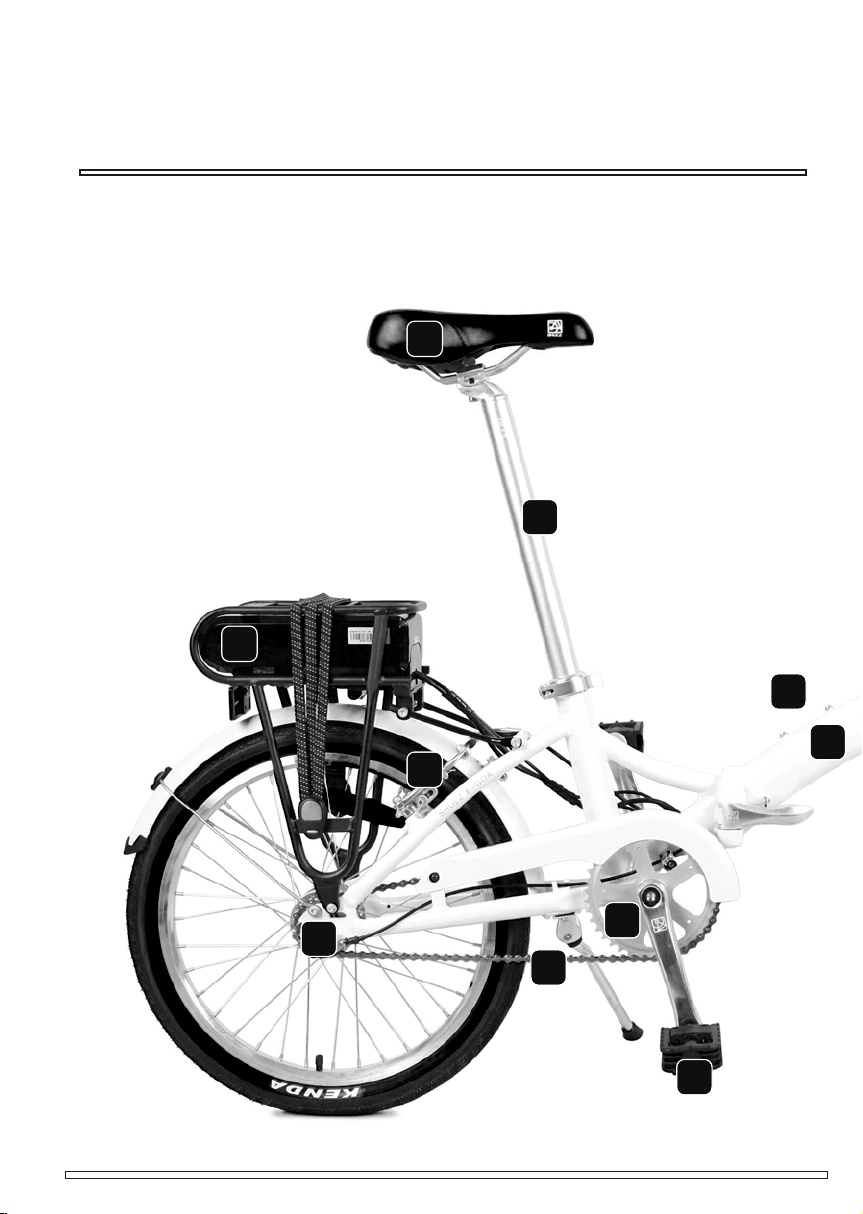
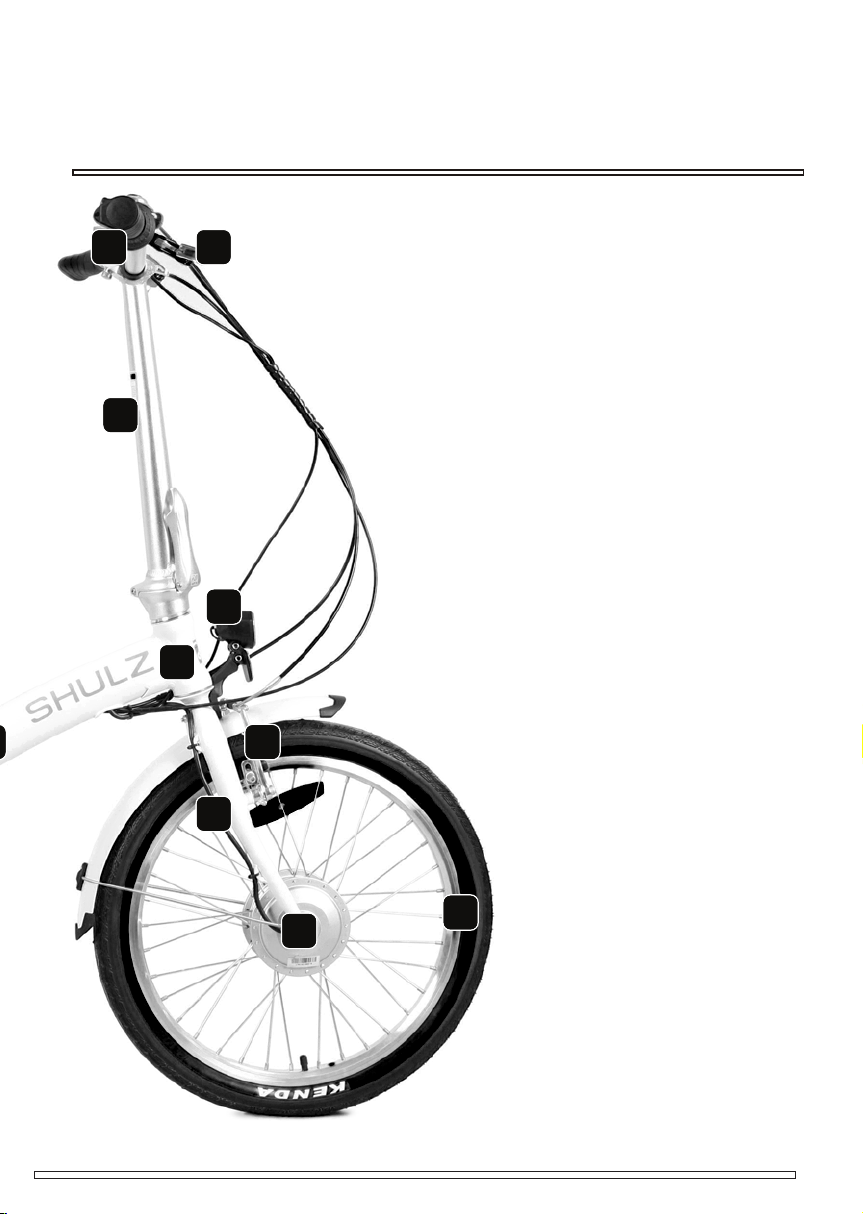
Bicycle components
Shulz E-GOA as an example
1
2
7
8
11
12
13
14
15
17
13
34
5
6
7
9
10
15
16
1. Saddle
2. Seat post
3. Handlebar and grips (handles)
4. Brake lever
5. Folding stem
6. Bicycle headset
7. Frame
8. Bottle cage fastening screws
9. Fork
10. Wheel (tire, tube, rim, spokes, hub)
11. Pedal
12. Crankset (bottom bracket, cranks,
sprocket)
13. Planetary hub
14. Chain
15. Brakes
16. Electric motor
17. Battery
18. Front light
18

14
Brakes
Shulz bikes can have rim or disc brakes. The rear brake can also be integrated into the rear hub. Rim
brakes work due to friction between the brake pads and rims that occurs when the brake lever is
pressed. That is why it is necessary to pay attention to the degree of wear of the brake pads and rims
and keep them clean — they should not have dirt and lube. Disc brakes work on a different principle
— pads are pressed on both sides of the rotor, which is attached to the wheel hub. Not every bike has
this kind of brakes. Disc brakes are low-maintenance in poor weather conditions and provide more
effective braking.
Remember that is dangerous to cycle with improperly set brakes or worn brake pads. The brake rotors
may become very hot during frequent or prolonged braking, so be careful and don’t touch them imme-
diately after the ride. Also keep in mind that the edges of the brake discs are quite sharp, so be careful
not to get hurt. For any questions regarding brakes, see your dealer or a qualified mechanic.
If your Shulz bike has two rim or disc brakes, it is important to remember which brake lever operates
the front brake and which the rear one. On Shulz bicycles, as on most other bicycles, the rear brake is
operated with the right hand and the front one with the left.
However, due to design features of a particular model (for example, if a rear hub with an integrated
foot brake is installed) the front brake handle can be moved to the right side of the handlebar. Make
sure that you easily reach the brake levers and press them, otherwise adjust the angle and position of
the brake levers along the handlebar. It’s better to do it in a professional bicycle workshop.
WARNING: Replace worn brake pads only with those recommended for your brakes. If in doubt, see
your dealer.
WARNING: Remember that brakes are needed not only to stop, but also to control speed. Try not to
brake too hard, otherwise the wheels may become locked and could decrease your control. Brake
force applied to the front wheel suddenly or too fully could lift the rear wheel off the ground
and cause you to fall.

15
Shifting gears
There are two shifting systems on Shulz bicycles: the derailleur or the rear planetary hub.
If your bike has a derailleur shifting system, the gear shift mechanism will include:
— a set of rear sprockets (cassette or ratchet);
— rear and front (not on all models) derailleur;
— one, two or three front sprockets;
— one or two shifters (shift levers or twist grip);
— chain;
A derailleur operating principle is that it moves your chain from one sprocket to another. Shifters
setup must be completed by an authorized dealer or a qualified mechanic.
How to shift
The rear derailleur is controlled by the right shifter on the handlebar (shifter or twist gear shifter), and
the front one – by the left shifter.
When downshifting to a lower gear, pedaling becomes easier, but the speed is low. It caused by the
chain’s movement to the biggest rear sprocket or to the smallest front sprocket. Choose lower gear
when, for example, riding up a hill or pedaling into a headwind. When shifting up, pedaling becomes
harder, but the speed is faster. It is caused by the chain’s movement to the smallest rear sprocket or
the biggest front sprocket. In other words, the gear is lower, the closer the chain is to the frame.
Shift gears with a derailleur only when the pedals are moving forward. Decrease the force on the
pedals as you shift gears and prevent excessive distortion when, for example, the chain is placed on
the leftmost rear sprocket and on the rightmost front sprocket.
WARNING: If you have doubts about proper work of derailleur, never move the chain to farthest
sprockets. The chain could come off, causing the bike to damage and you to lose control and fall.
16
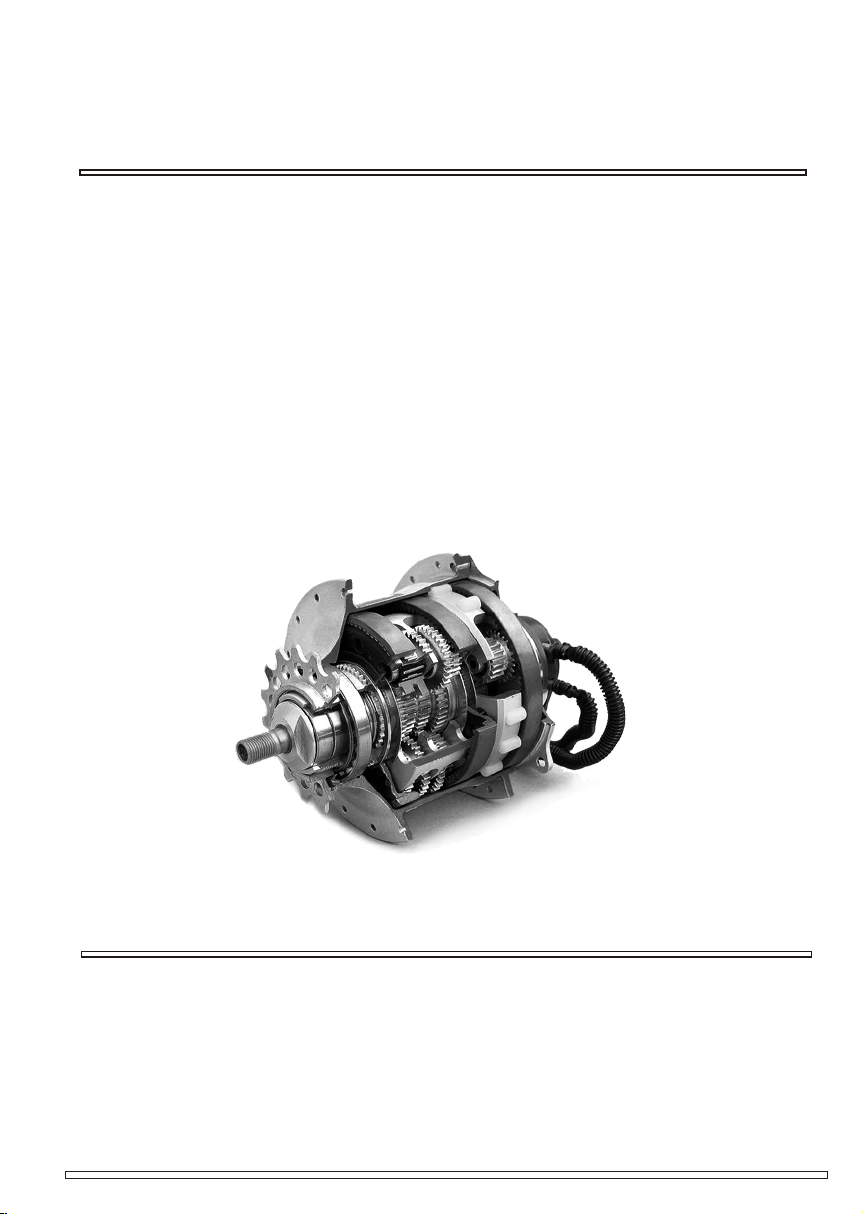
Planetary hub
If there is a rear planetary hub on your bike, the gearshift mechanism will consist of:
— 3-, 5-, 7- or 8-speed planetary hub;
— one twist grip for gear shifting;
— one rear sprocket;
— one front sprocket;
— chain;
The gear shift in the planetary hub is caused by changing the gear ratio inside the hub itself. This is
a complex, but very reliable mechanism. Moreover, it is low-maintenance compared to a derailleur.
If the pedals are idling or you can’t shift gears, adjustment of the planetary hub is required. To do this,
see a professional bicycle workshop.
Shulz single-speed bicycle models, as well as planetary hub models, is equipped a standard sin-
gle-speed 1/2 x 1/8 chain. Multi-speed models have narrow chains with a dimension of 1/2 x 3/32.
The chain service life is heavily dependent on the usage conditions of the bike, and a dealer or
a qualified mechanic will help you determine the degree of wear. If necessary, the mechanic is the one
who can help you to remove, replace and install the chain. Remember that too worn chain can lead to
increased wear of the sprockets.
Chain

17
Tires and inner tubes
Shulz bicycles are equipped with universal type of tires, which has a good coasting on paved roads
and also has good grip on soil roads. On the sidewall of the tire there are indications of its dimensions
and the range of working pressure. It is useful to know the size of the inner tube to replace it or the
tire. We recommend checking the wheel pressure at least once every two weeks.
Choosing the optimal pressure in the wheels depends on surface you will ride most often. The greater
the tire pressure, the easier to cycle due to the less road grip. It is enough to deflate the tires by
6—12 PSI (0.5—1 BAR), and the motion will become softer, the road grip will increase, but such a bike
will be harder to ride.
Never inflate wheels over the maximum pressure indicated on the sidewall. Over-inflation of the tires
may cause the inner tube to blow out, as well as damage to the tire and rim. If possible, use a pump
with a built-in air gauge.
There are several types of valves, but the most common of them is the Schrader valve (automatic
valve). Most pumps are suitable for this valve. To inflate an inner tube with an automatic valve remove
valve retaining cap and attach the pump tip to the end of the valve. Not every pump has an overpres-
sure relief valve, so if you need to deflate tires, just press on the small pin inside the valve with a thin
object.
18
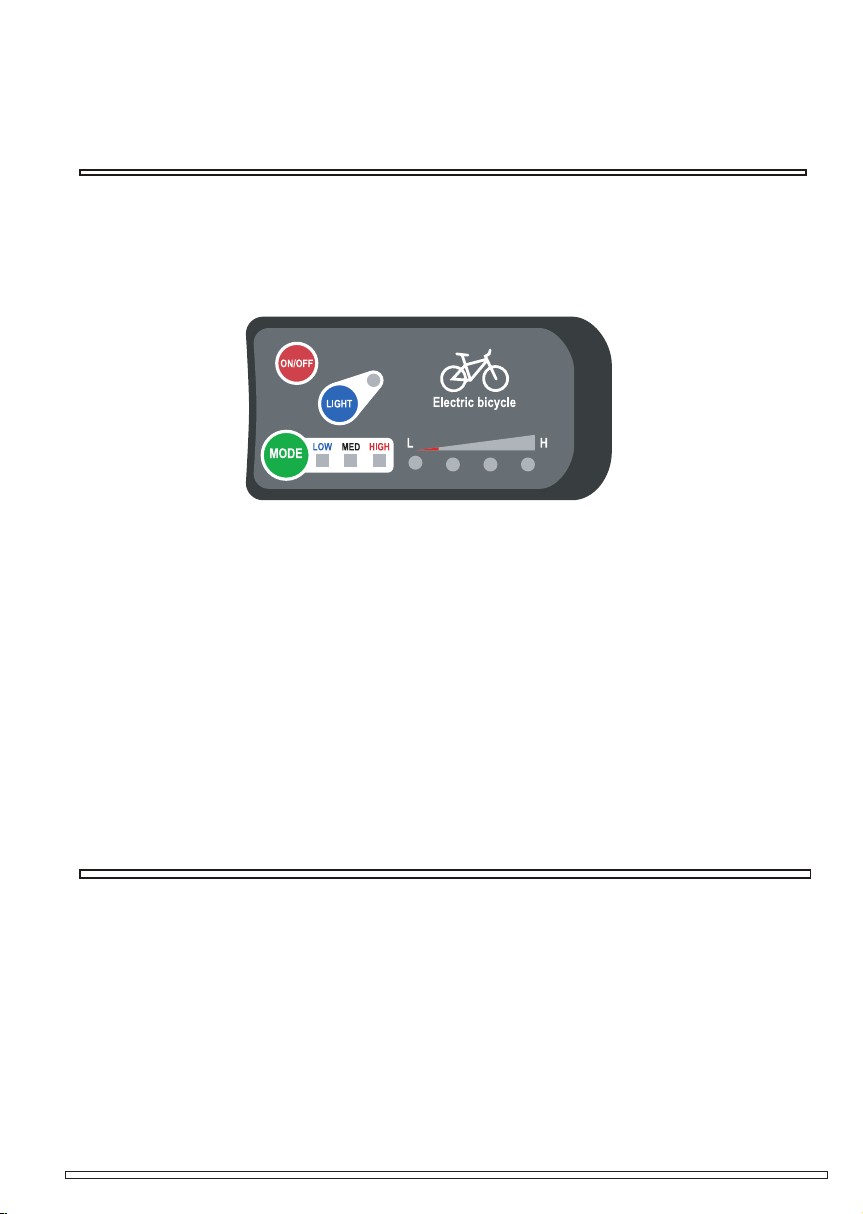
Electric bike control
If you have a Shulz bike with an electric motor, there are two usage options: you can ride it like a reg-
ular bike with the electric motor turned off or you chose electric mode with that the electric motor in
the front wheel will turn on itself and help you when you pedal. To control the electric motor, a control
unit is installed on the handlebar.
To turn on the electric mode, keep the red ON / OFF button pressed for 2-3 seconds. Then select one
of the three modes using the green MODE button - after that, each time you start pedaling, the electric
motor will turn on. If you stop pedaling, the electric motor will shut off until you start pedaling again.
To turn off the electric mode, press and hold the ON / OFF button again for 2-3 seconds. The blue
LIGHT button is used to turn the headlight on and off, and the battery level is displayed on the L – H
indicator. You can also check the charge level using the indicators on the battery itself by pressing the
special button.
WARNING: it is not recommended to use an e-bike at temperatures below + 5° C.
Charge the battery regularly. Use only the original charger, which goes with the electric bike. The red
indicator on the charger adapter means that the battery is charging. A green one indicates that the
battery is fully charged and the charger can be turned off. Avoid overcharging or excessive battery
discharge the battery. Make it a rule to charge the battery after every ride.
The battery should not heat up too much when you use or charge it. If it does, see a professional
workshop immediately. If you are not going to use the e-bike for a long time, store it in a dry, warm
room. Recharge the battery every 3 months to preserve it.
Battery charging

19
Maintenance
A bicycle, like any other mechanism, can wear out. Different bike components have a different service
life, so it is important to monitor even the new bike’s condition so that it does not let you down at the
most wrong time. It’s impossible for this manual to provide all the information required to repair and
maintain every bicycle. A bicycle will serve you long and steady if you regularly examine it not only on
your own, but also have a specialist to check it
The first maintenance should be done after the first 100 km of ride - the components will work some
time together and the bike may need additional diagnostics and adjustment.
The maintenance schedule is based on the intensity of bike use and riding style. If you ride a bike
just a couple of times a week, you can service it 1-2 times per season. If you ride 50-100 km daily, we
recommend that you perform diagnostics and the necessary maintenance every month.
The warranty covers all components of the bicycle; however, it should be understood that if way of rid-
ing and attitude to the bike do not meet the supposed loads, many components may wear out faster.
Damage caused by incorrect operation is not covered under warranty!
Some inspection and maintenance work can be done without assistance:
— check the bike before every ride (see page 7);
— clean the bike using a wet cloth every time it’s dirty after the ride or at least after cycling
every 100 km;
— lubricate shifters, brakes (at the point of attachment to the frame), brake hub, cables, pedals,
hubs at least once every 6 months; in case of intensive use, lubrication is carried out more
often than the specified period;
— after riding in rainy weather, on sand or mud, as well as about every 100-150 kilometers, wipe
the bike, clean and lube the chain with Teflon lubrication;
— watch for the occurrence of unusual sounds, squeaks and backlash; all rotating components
should turn easily and without vibration;
— every 150-300 kilometers, check the headset, wheels and bottom bracket for any backlash;
— watch for the brake operation, the state of the brake pads and the brake surface of the rims;
check the cables and braids of the brakes and transmission for signs of rust, bends or wear;
— regularly check for cracks on the frame, steering wheel, seat post and cranks;
— inspect tires for excessive scuffs, cuts or bulges;
— store the bike in a dry, heated room; complete technical inspection is recommended before
long-term storage.

20
Notes
Table of contents


