SICK WLL180T User manual

WLL180T
Sensor Configuration for Individual Applications
MANUAL
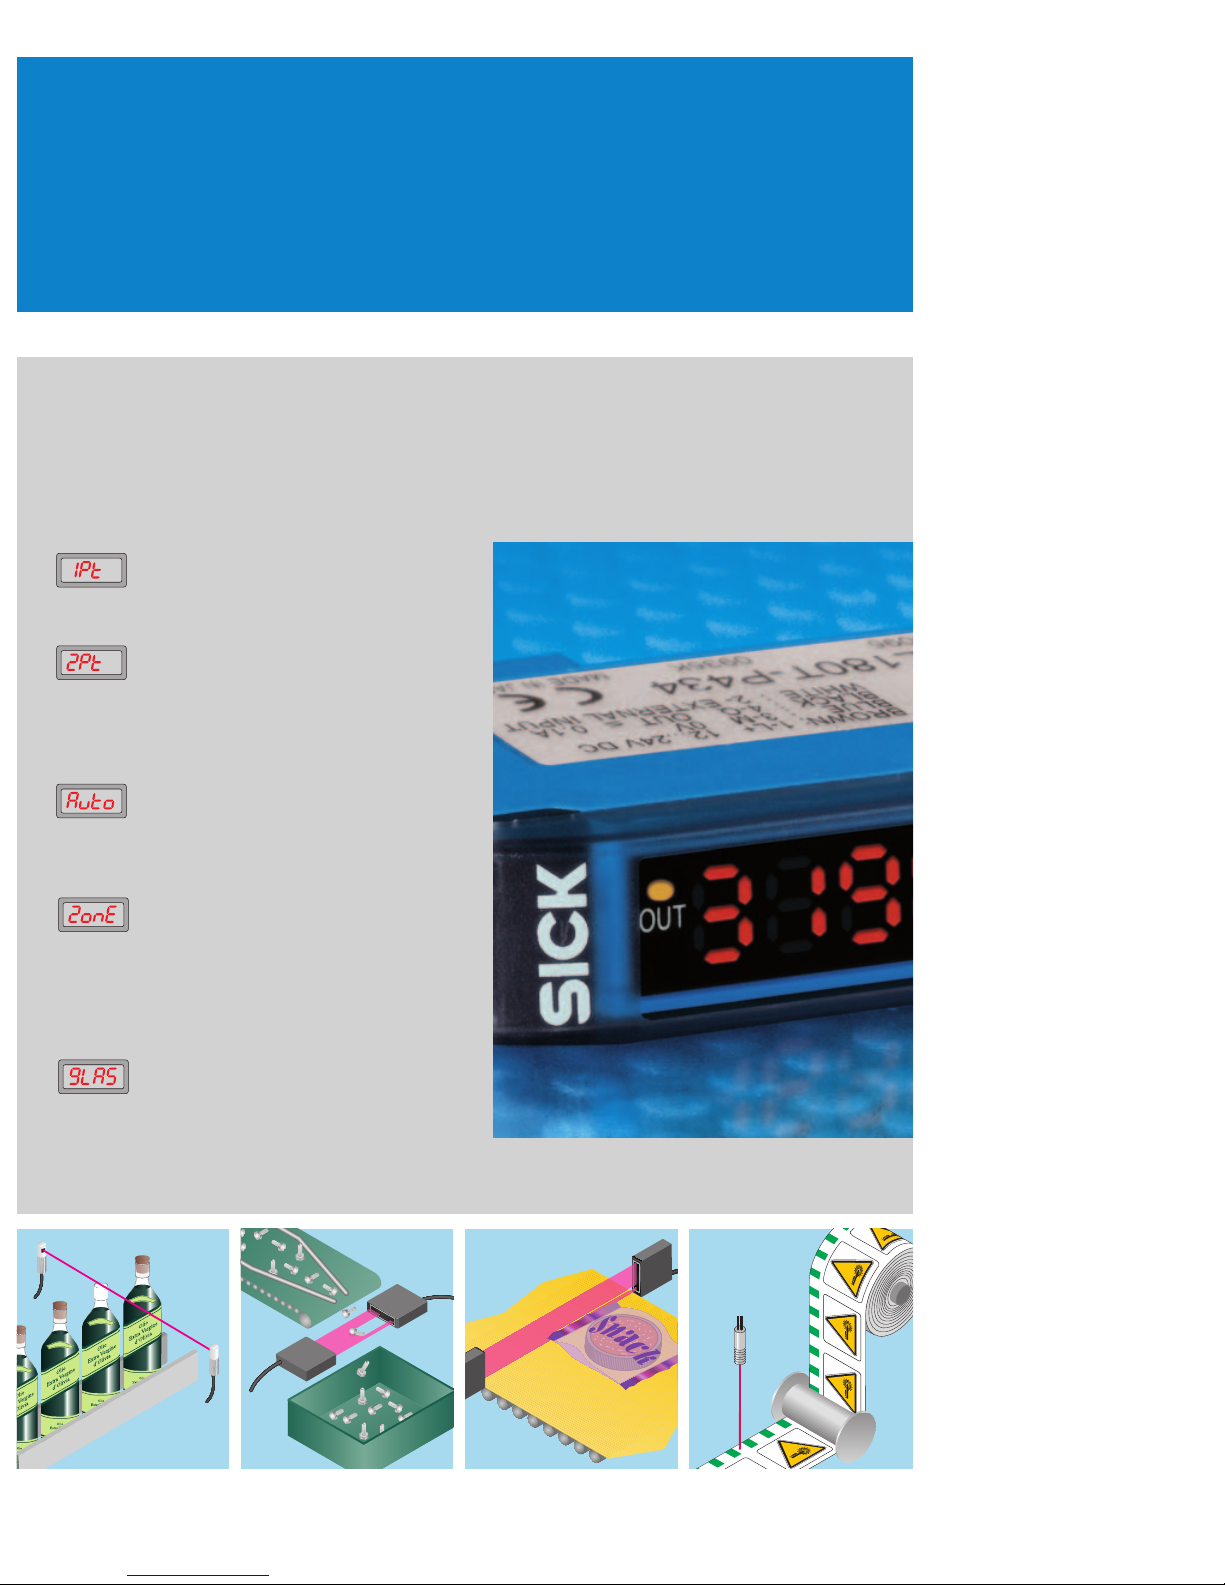
1-point Teach-in
Teach-in – quick and easy for standard
applications.
2-point Teach-in
Exact switching threshold adjustment
at the object and of the environment.
Ideal for applications with small system
reserves.
Auto Teach-in
Fully automatic switching threshold ad-
justment of moving objects. Even falling
or tiny objects are reliably detected.
Zone Teach-in
This so-called window technology learns
the object within a definable bandwidth
of the switching threshold. Ideal for the
detection of marks, or simultaneous
foreground and background suppression.
Teach-in of transparent objects
Teach-in with minimum sensitivity, reli-
ably detecting glass, films or small
objects.
Universal or individual –
application solutions.
Fast and reliable programming, menu driven and at the push
of a button: sensor properties and parameters are individually
programmed directly on the sensor.
Teach-in or manual adjustment? You decide!
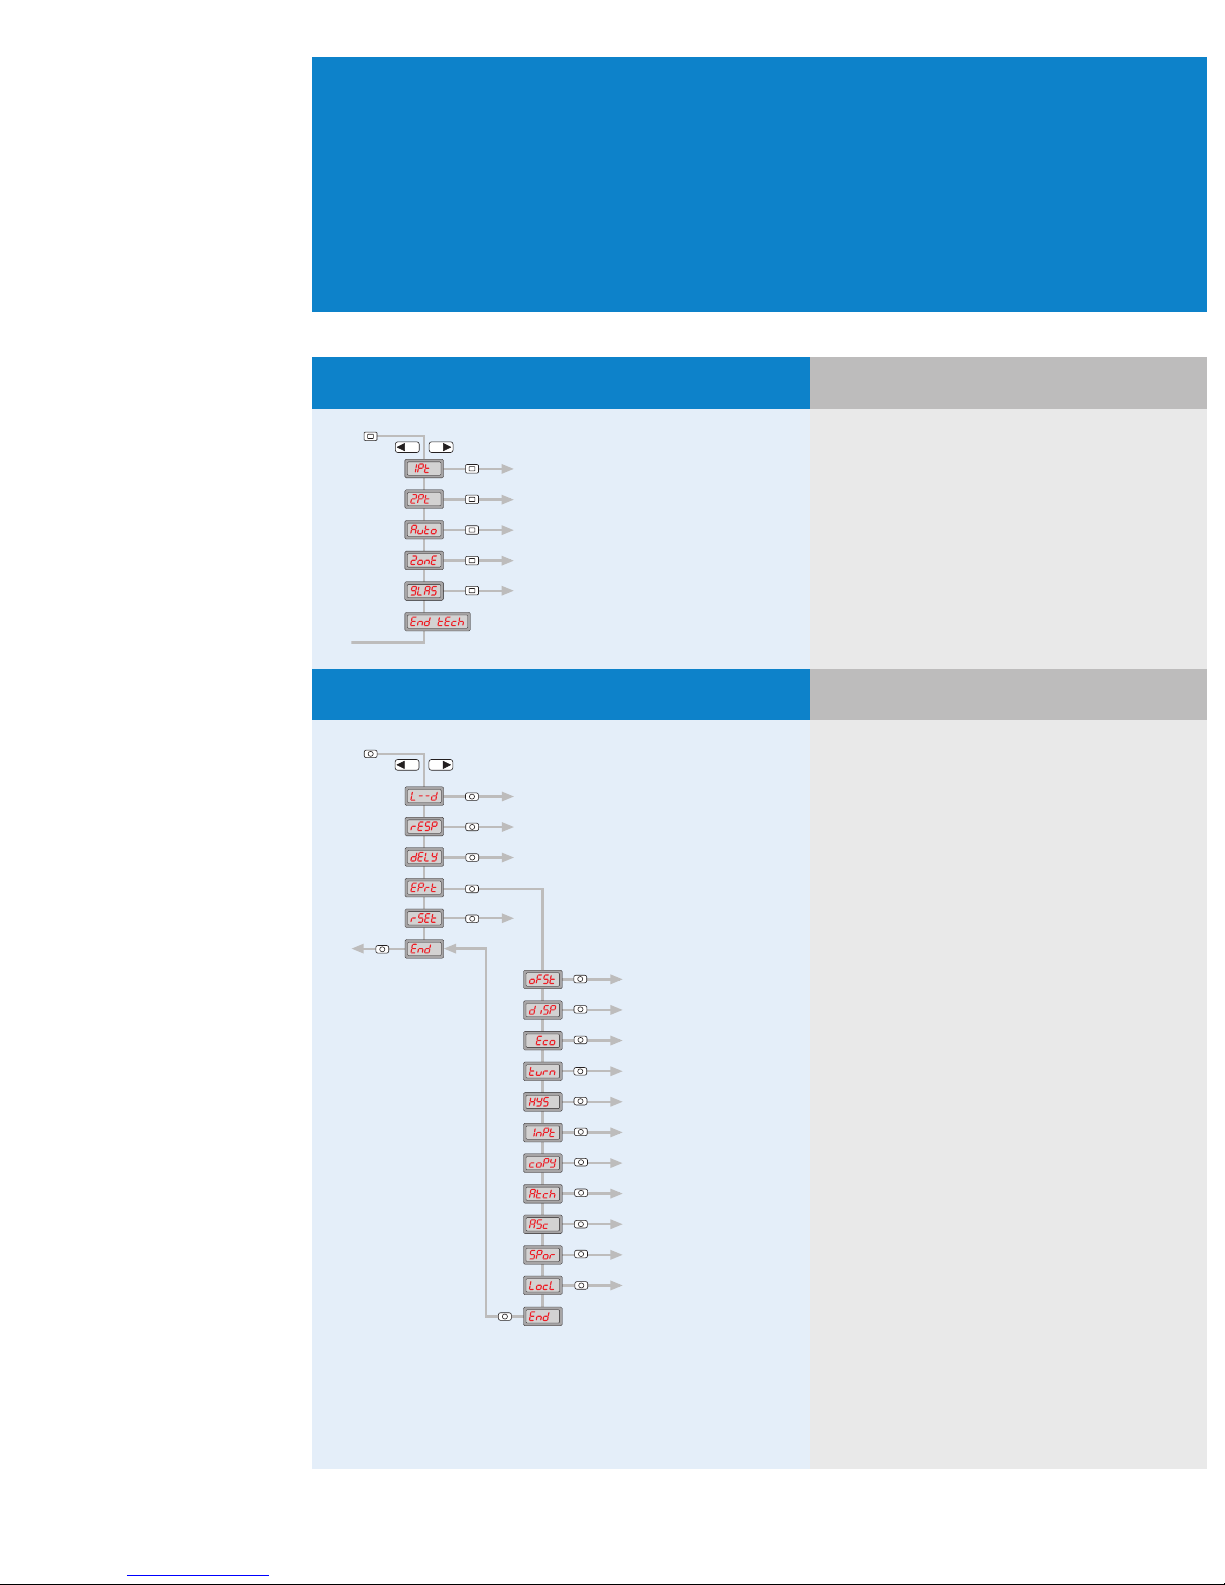
Teach-in
2 s –
+
Application specific configuration
–
+
2 s
1.1 1-point Teach-in
1.2 2-point Teach-in
1.3 Auto Teach-in
1.4 Zone Teach-in
1.5 Teach-in of transparent objects
End End teach mode
2.1 Switching mode
2.2 Response time
2.3 Time delay setting
2.4 Expert menu/detailed settings
2.5 Reset
End back to operating mode
3.1 Set display value to zero
3.2 Display settings
3.3 Energy-saving mode
3.4 Reverse display
3.5 Hysteresis setting
3.6 External input configuration
3.7 Copy mode
3.8 Master Teach-in
3.9 ASC setting
3.10 Power setting of the sender LED
3.11 Keylock
End back to Expert menu
P. 6
P. 7
P. 8
P. 9
P. 10
P. 11
P. 12
P. 13
P. 14
P. 15
P. 16
P. 17
P. 18
P. 19
P. 20
P. 21
P. 22
P. 23
P. 24
P. 25
P. 26
Selection of the menu levels

Photoelectric sensor for fiber-optic cables
WLL180T – Easy handling, structured functions
and optimum functionality.
The photoelectric sensor for fiber-optic cables WLL180T with the SICK fiber-optic
cables of the LL3 series is especially suited to detecting very small objects,
objects in front of reflective backgrounds, and transparent and moving objects.
Fiber-optic cables are ideal for use in installations where space is restricted.
Locking, fiber-
optic cable
Status LED for
switching output
Numeric display for
nominal value (green)
and actual value (red)
Mode/
Enter
key Teach-in key
Arrow keys
2SICK 2010-08-02
Subject to change without notice

2010-08-02 SICK 3
Subject to change without notice
L+
M
Q1
Ext. Input
brn
blu
blk
wht
Switching output and external input
The external input can be configured as
teach-in or test input.
2X4-DIGIT NUMERIC DISPLAY
Dual 7-segment display for simultaneously showing nomi-
nal/actual values and for interactive operator guidance.
ASC –
AUTOMATIC SENSITIVITY CONTROL
For instance, automatically adapting the switching
threshold to compensate for contamination when
detecting transparent objects.
SHORTEST RESPONSE TIME
Detection of fast processes is an easy task for the
worlds fastest photoelectric fiber-optic sensor. With a
response time of only 16 μs objects can be detected
precisely. A small jitter contributes to the accuracy of
the detection.
Smallest changes in the level of the received light are
already sufficient for a reliable detection.
HIGH RESOLUTION SIGNAL PROCESSING
The power of the sender LED can be adjusted in three
stages: saturation, e.g. in case of highly reflective
objects, is prevented.
ADJUSTING THE LIGHT INTENSITY
OF THE SENDER LED
From monitoring to power control.
Monitoring simplifies many things, and technical highlights
provide many options, always enabling easy commissioning
and permanently reliable operation.
WLL180T Photoelectric sensors for fiber-optic cables
4SICK 2010-08-02
Subject to change without notice
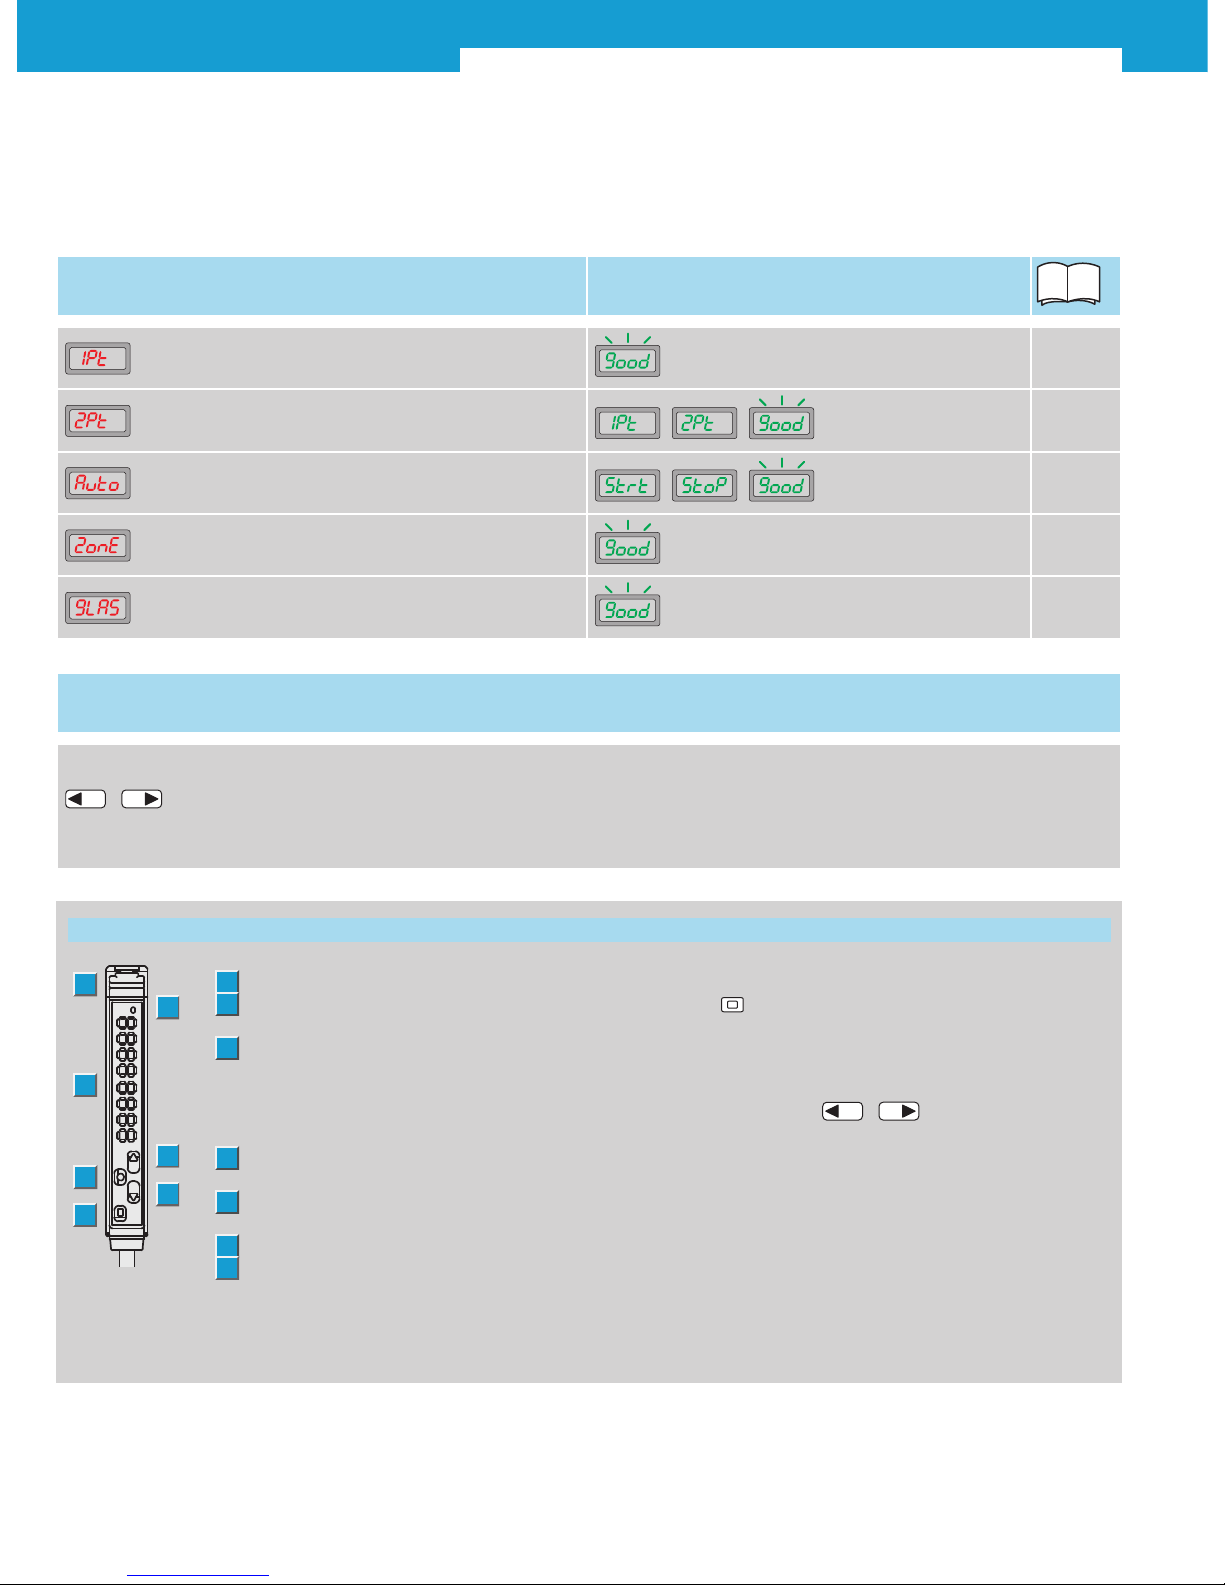
Teach-in Adjustment options
1-point Teach-in
to quickly learn the switching point
1.1
Page 6
2-point Teach-in
to safely learn the switching point , ,
1.2
Page 7
Auto Teach-in
for Teach-in without stopping the production process , ,
1.3
Page 8
Zone Teach-in
for learning an upper and lower switching threshold
1.4
Page 9
Transparent Teach-in
transparent objects such as bottles and films
1.5
Page 10
For standard applications: Teach-in and the commissioning is complete.
The manual or automatic adjustment with Teach-in is always the first step. The 5 different
Teach-in modes can be quickly and easily selected. Alternatively, the switching threshold can
be adjusted manually utilizing the display.
Manual adjustment of the switching threshold
–
+
Manual, step-by-step modification of the switching thresholds by operating the arrow keys.
After a few seconds, the display automatically jumps to the operating mode.
1Locking fiber-optic cable
2
Display LED orange: lights
when the switching output is active
3
Display, numeric: 4-digit
green: switching threshold, operating
mode,
red: current reception value, Teach-in/
function parameter
4
Arrow key < (manual switching threshold:
higher resp. next function parameter)
5
Arrow key > (manual switching threshold:
lower or previous parameter)
6Mode/Enter key (programming key)
7“Teach-in” key
Function keys of the sensor unit Further functions
Quick jump back from configuration mode to operating mode.
By pressing the -key for at least 2 seconds, the display
jumps from any position in the configuration menu back to the
main display.
Keylocks
Simultaneously pressing the –
+arrow keys for at
least 2 seconds in the RUN mode, locks or unlocks the keys
(display Loc/unloc).
1
2
3
4
6
5
7
WLL180T Photoelectric sensors for fiber-optic cables
2010-08-02 SICK 5
Subject to change without notice
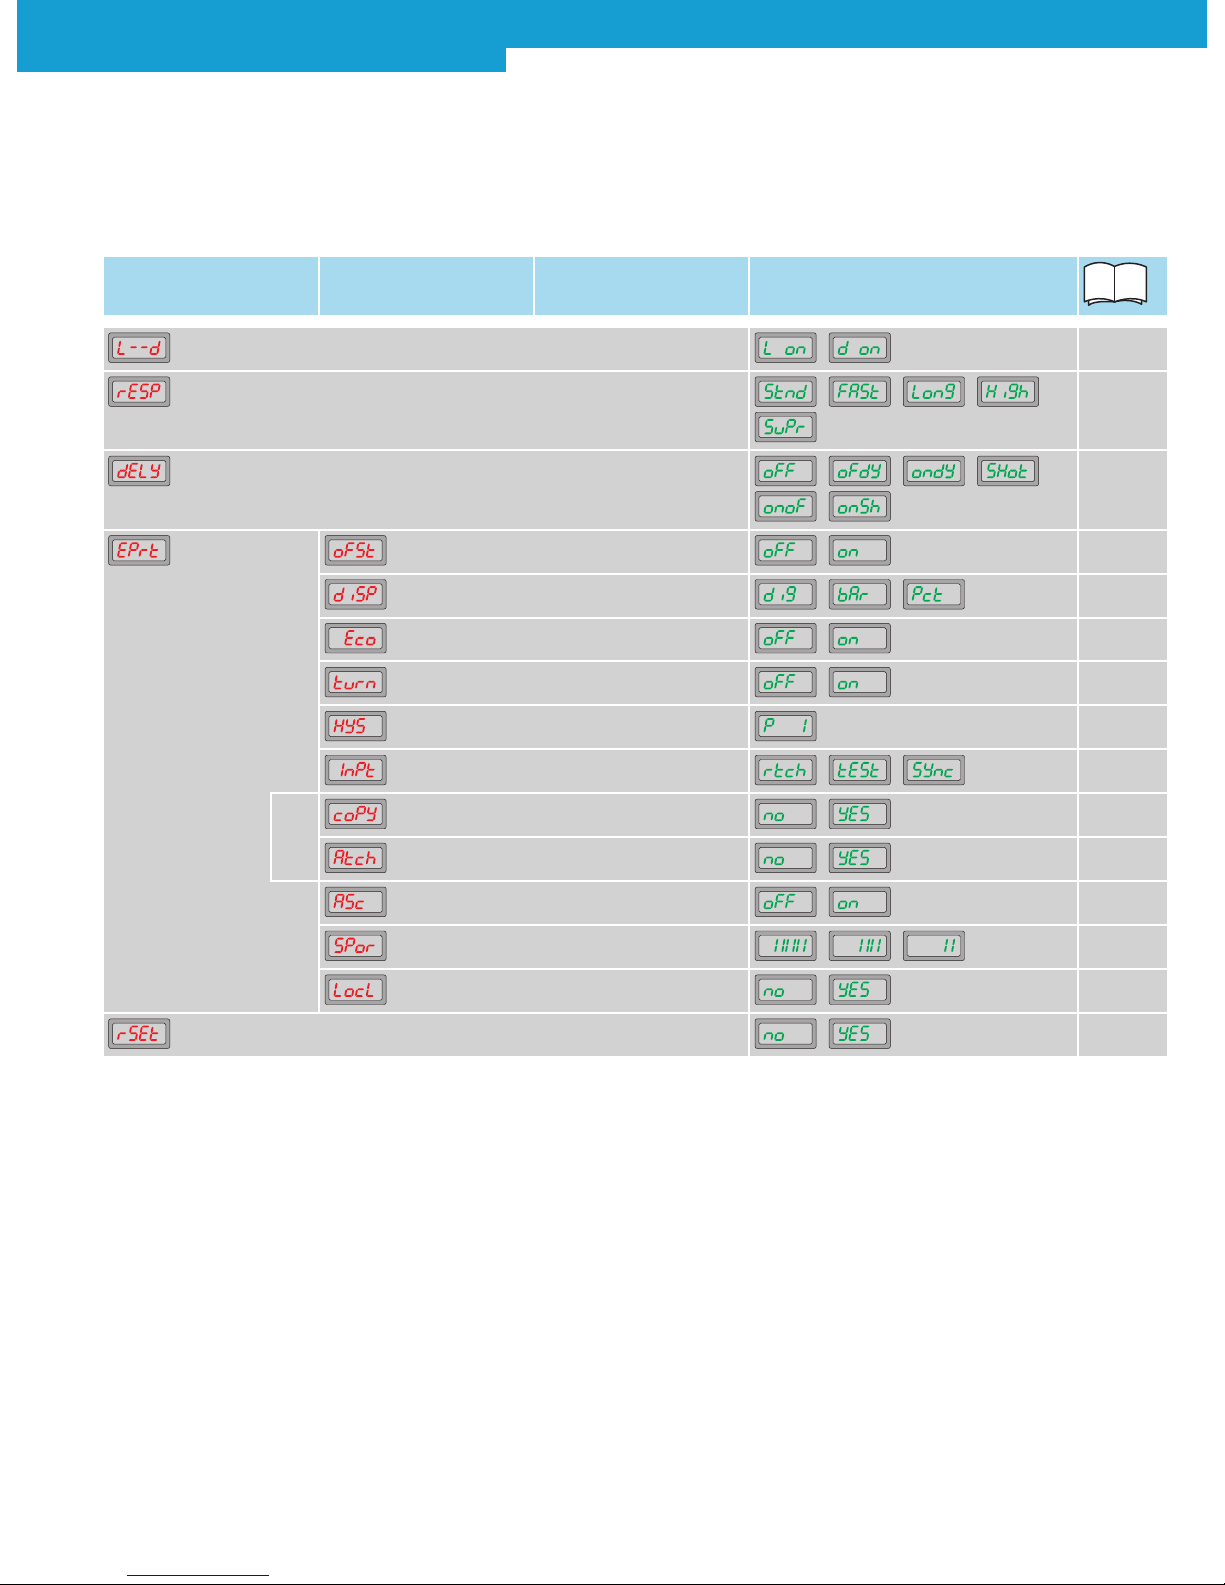
Application specific configuration: Utilising the entire functionality.
If further adjustments need to be made beyond the normal threshold adjustment, the entire
functionality can be selected via a comfortable menu.
Configuration Level I Level II Adjustment options
Switching mode , 2.1
Page 11
Response time , , , , 2.2
Page 12
Time delay setting , , , ,
,
2.3
Page 13
Expert menu/
detailed settings
Set display value to zero , 3.1
Page 16
Display settings , , 3.2
Page 17
Energy-saving mode , 3.3
Page 18
Reverse display , 3.4
Page 19
Hysteresis setting 3.5
Page 20
External input configuration , , 3.6
Page 21
Bus
versions
Copy mode , 3.7
Page 22
Master Teach-in , 3.8
Page 23
ASC setting , 3.9
Page 24
Power setting of the sender LED , , 3.10
Page 25
Keylock , 3.11
Page 26
Reset , 2.5
Page 15
WLL180T Photoelectric sensors for fiber-optic cables
6SICK 2010-08-02
Subject to change without notice
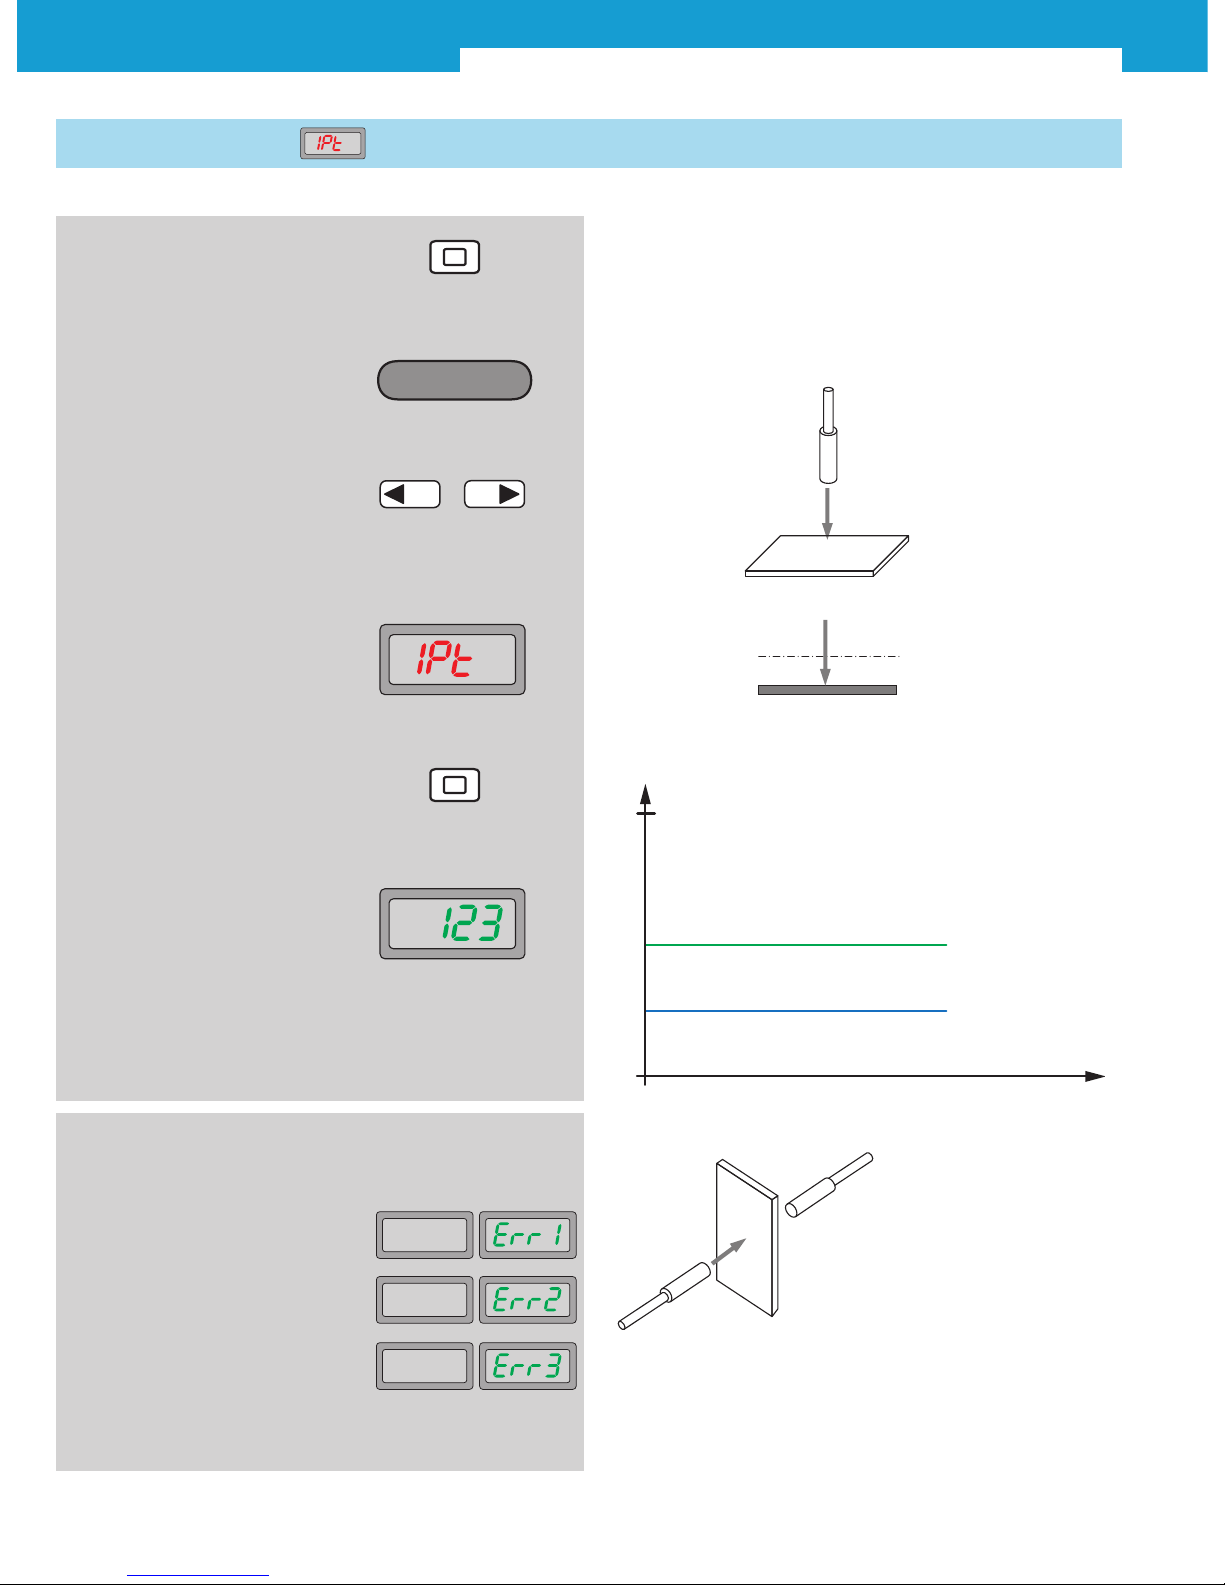
1.1 1-point Teach-in
1. Press Teach-in key for 2 s Easy setting of the switching threshold.
Secondary condition:
Diffuse type = object absent
Through-beam = object present
Adjust diffuse type to the background without object
2. Operating mode
Teach-in active
3. In the basic menu, select
required mode by pressing
the arrow keys
4. 1-point Teach-in is shown on
the display
5. Adjust diffuse type fiber to the
background without object and
press Teach-in key
6. Teach-in successful, set switch-
ing threshold blinks 3x and the
display returns to the main dis-
play
Teach-in
–
+
Adjusts the switching threshold with +10% according to the
light received.
Typical applications:
Standard applications,
no spurious effects expected,
max. system reserve.
Threshold level
Teach-in signal
+10%
0
t
Gain
}
In case of faulty input during Teach-in,
the following messages are shown:
Sensing level is too low
Sensing level is saturated
Difference of sensing level between
two points is too small
Switching threshold +10%
WLL180T Photoelectric sensors for fiber-optic cables
2010-08-02 SICK 7
Subject to change without notice
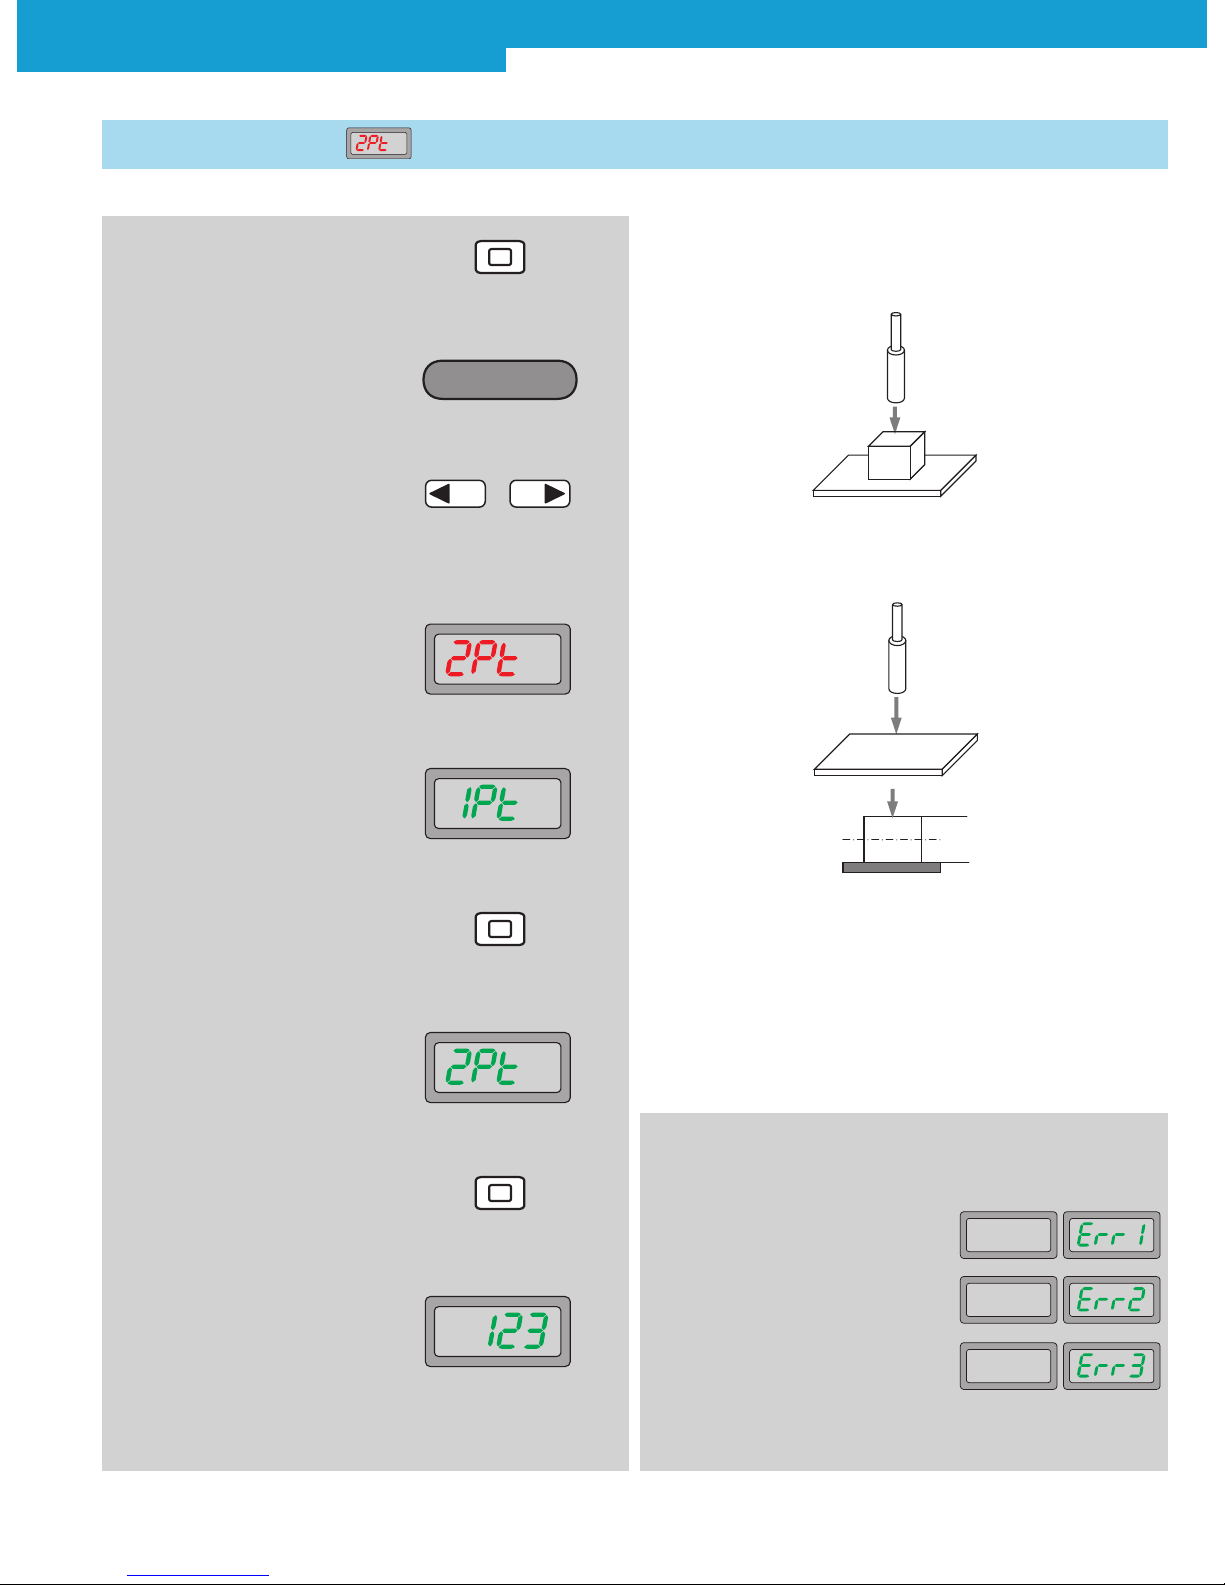
Exact adjustment of the switching threshold to object and ambient
conditions, in any order.
1st step: Teach-in with object
2. Operating mode
Teach-in active
3. In the basic menu, select
required mode by pressing
the arrow keys
4. 2-point Teach-in is shown on
the display
9. Teach-in successful, set switch-
ing threshold blinks 3x and the
display returns to the main dis-
play
Teach-in
–
+
6. Press Teach-in key
5. 1st point: adjust diffuse type
fiber with object present
8. Press Teach-in key
7. 2nd point: adjust diffuse type
fiber to the background with-
out object
2nd step: Teach-in without object
The switching threshold is defined between the 1st and 2nd point.
1.2 2-point Teach-in
Typical applications:
Exact switching point,
switching threshold is adapted to the object and ambient
conditions, create low system reserves.
1. Press Teach-in key for 2 s
In case of faulty input during Teach-in,
the following messages are shown:
Sensing level is too low
Sensing level is saturated
Difference of sensing level between
two points is too small
Switching threshold
1.
2.

WLL180T Photoelectric sensors for fiber-optic cables
8SICK 2010-08-02
Subject to change without notice
Automatic adjustment without stopping the production process.
1st step: start Teach procedure
2. Operating mode
Teach-in active
3. In the basic menu, select
required mode by pressing
the arrow keys
4. Auto Teach-in is shown on
the display
5. To start: press Teach-in key
Teach-in
–
+
6. Start
7. To stop: press Teach-in key
8. Stop
2nd step: stop Teach-in procedure
Allow one object or, even better, for several objects to pass.
1.3 Auto Teach-in
9. Teach-in successful, set switch-
ing threshold blinks 3x and the
display returns to the main dis-
play
Typical applications:
When objects can only be learned during the ongoing
process, e.g. ejection control.
1. Press Teach-in key for 2 s
In case of faulty input during Teach-in,
the following messages are shown:
Sensing level is too low
Sensing level is saturated
Difference of sensing level between
two points is too small
WLL180T Photoelectric sensors for fiber-optic cables
2010-08-02 SICK 9
Subject to change without notice
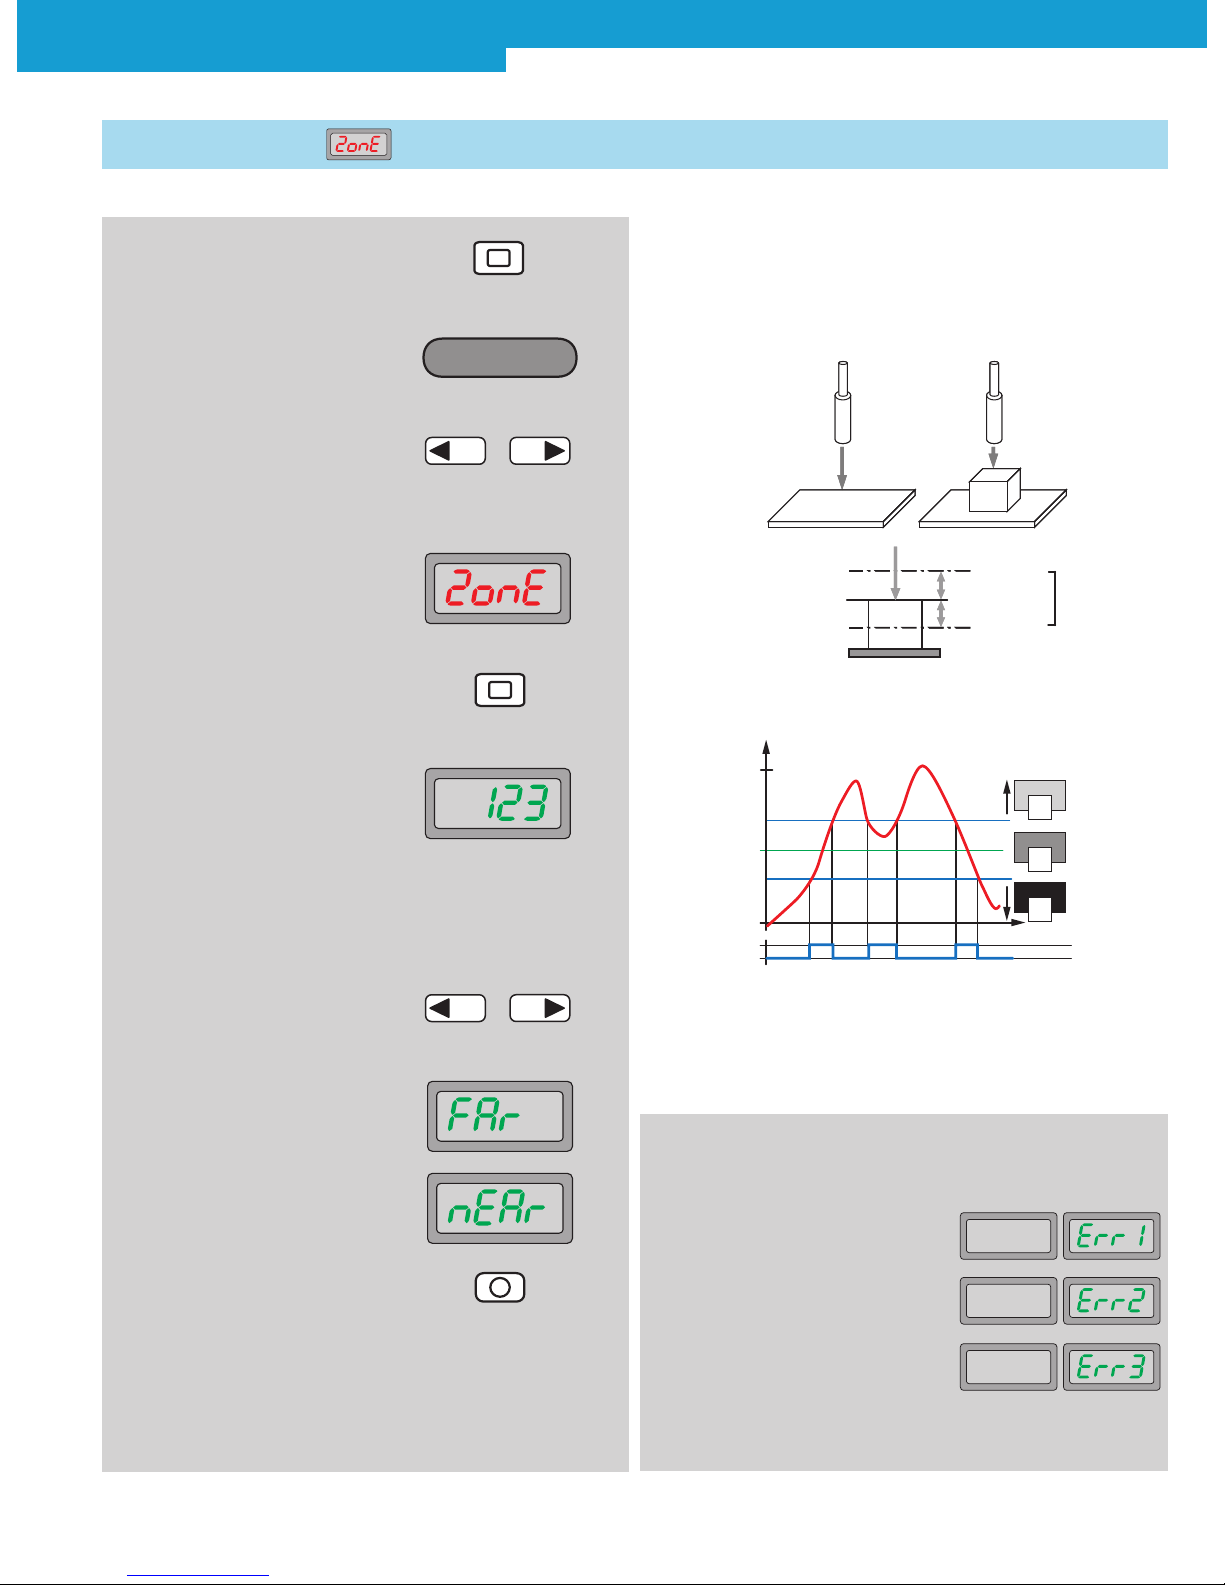
The switching point of the object is learned, and detected, within a
window. This window can be manually extended for the lower (far)
and higher (near) switching threshold, respectively.
Adjust diffuse type fiber to the background without and with object.
2. Operating mode
Teach-in active Teach-in
4. Zone Teach-in is shown on
the display
5. Press Teach-in key Adjusts the zone with ±10% according to the light received.
1.4 Zone Teach-in
Typical applications:
Ideal for mark detection, e.g. detecting no. 2 (see diagram above)
with variable window. Or “foreground suppression” and “back-
ground suppression” simultaneously.
3. In the basic menu, select
required mode by pressing
the arrow keys
–
+
1. Press Teach-in key for 2 s
Optionally, the switching thresholds for close and
far ranges can be readjusted, via the arrow keys.
9. Press arrow key in
main display
10. Range (FAr) or (nEAr)
can be selected with arrow keys
11. Select far (FAr) or near (nEAr) range
by pressing the mode key
12. The value of the received light (red display) then appears, and
the threshold value (green display) flashes for about 5 seconds.
During this time, the threshold value for the selected range can
be set via the arrow keys.
6. Teach-in successful, set switch-
ing threshold blinks 3x and the
display returns to the main dis-
play
–
+
Threshold
Zone
Near
Far
Upper limit
Lower limit
10%
10%
Zone
10%
10%
t
4096
Q = ON/OFF
0
Gain
WLL180T – Zone Detection
2000
~2200
~1800
}
}
Extendable (near zone)
Extendable (far zone)
Threshold level
Min: + 10 %
Min: - 10 %
1
2
3
In case of faulty input during Teach-in,
the following messages are shown:
Sensing level is too low
Sensing level is saturated
Difference of sensing level between
two points is too small
WLL180T Photoelectric sensors for fiber-optic cables
10 SICK 2010-08-02
Subject to change without notice
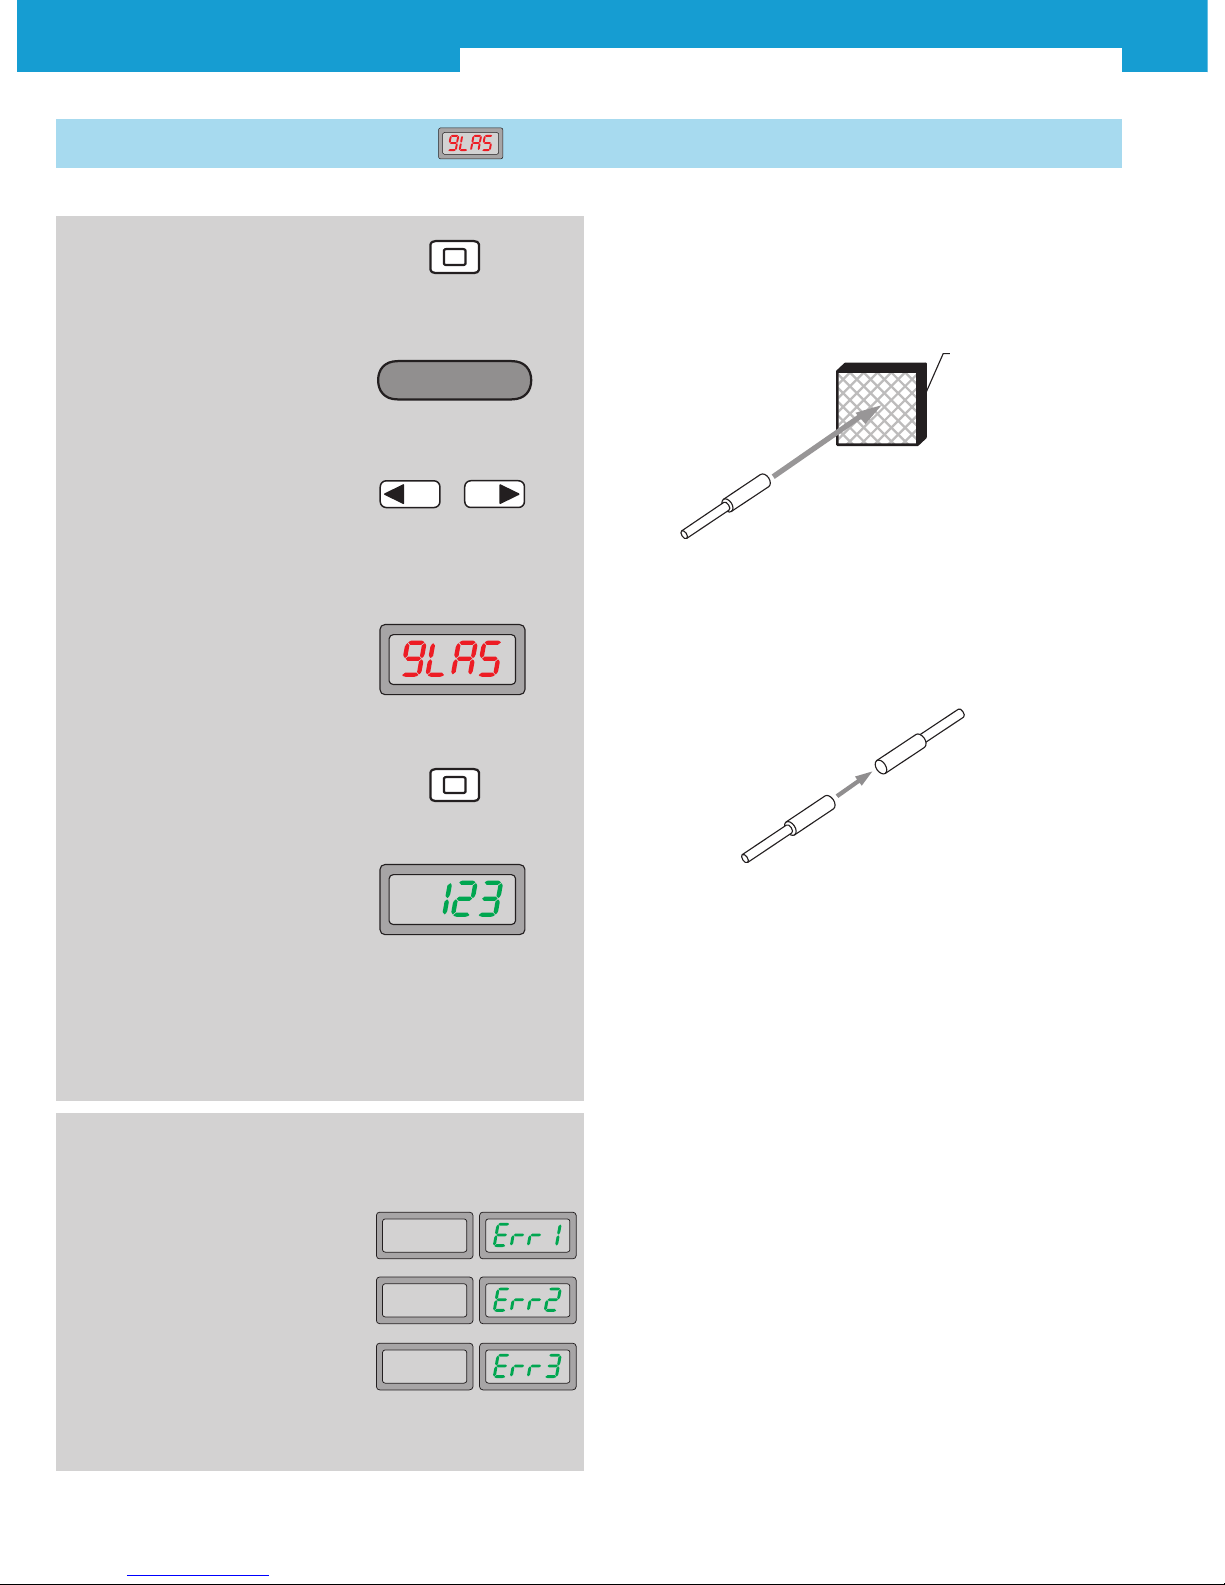
Mode is optimised for the detection of transparent objects.
Diffuse type:
Teach-in without object. Use reflector.
2. Operating mode
Teach-in active
3. In the basic menu, select
required mode by pressing
the arrow keys
4. Teach-in of transparent objects
is shown on the display
5. Press Teach-in key
Teach-in
–
+
Adjusts the switching threshold to 90% of the light received.
Through-beam system:
Perform Teach-in without object.
Adjusts the switching threshold to 90% of the light received.
1.5 Teach-in of transparent objects
Typical applications:
Detection of objects with low attenuation, such as glass, clear film
or very small objects.
1. Press Teach-in key for 2 s
6. Teach-in successful, set switch-
ing threshold blinks 3x and the
display returns to the main dis-
play
In case of faulty input during Teach-in,
the following messages are shown:
Sensing level is too low
Sensing level is saturated
Difference of sensing level between
two points is too small
Reflector
WLL180T Photoelectric sensors for fiber-optic cables
2010-08-02 SICK 11
Subject to change without notice
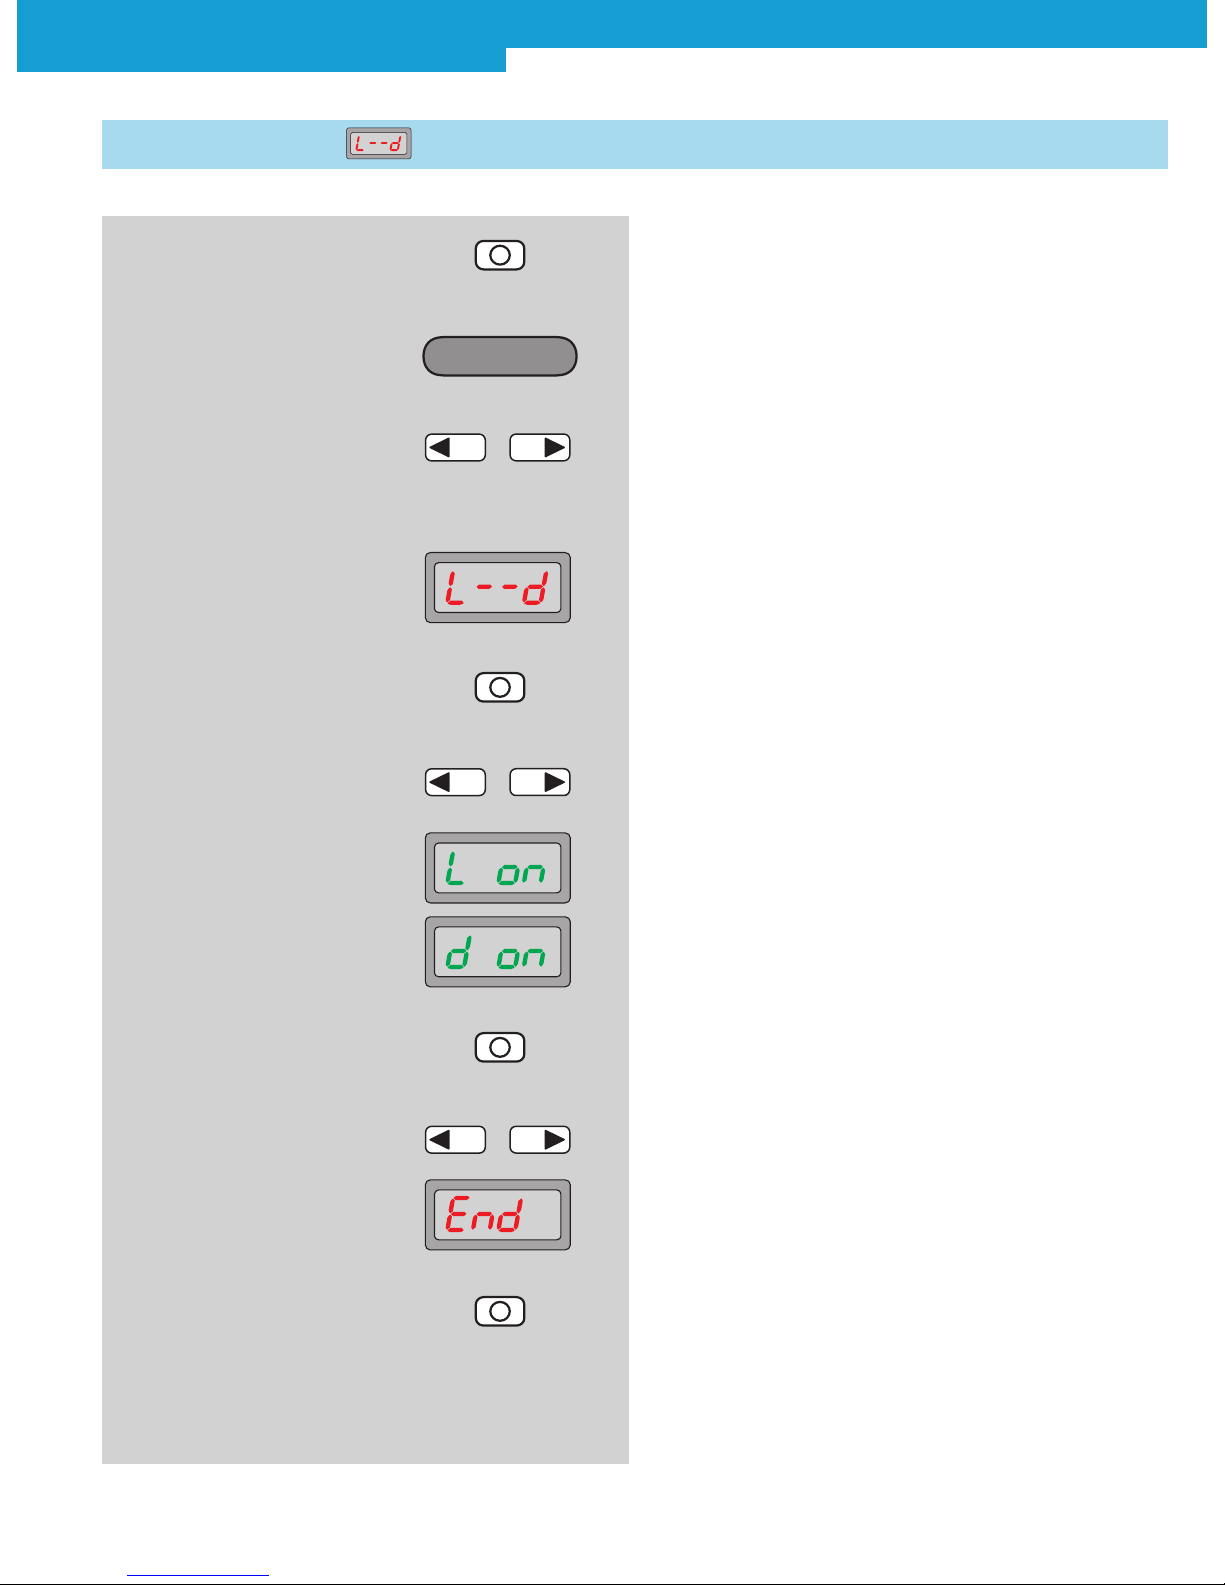
Switching mode (L--d),
L on: light-switching (factory setting),
d on: dark-switching.
2. Operating mode Configuring
active
4. Switching mode is shown on
the display
Configuring
1. Press Mode key for 2 s
6. Select between light-switch-
ing (L on) and dark-switching
(d on) by pressing the arrow
keys
–
+
2.1 Switching mode
7. Finish selection with Mode key
5. Press Mode key, setting option
flashes
8. Select ending the adjustment
(End)
–
+
9. Finish selection with Mode key
3. In the basic menu, select
required mode by pressing
the arrow keys
–
+
WLL180T Photoelectric sensors for fiber-optic cables
12 SICK 2010-08-02
Subject to change without notice
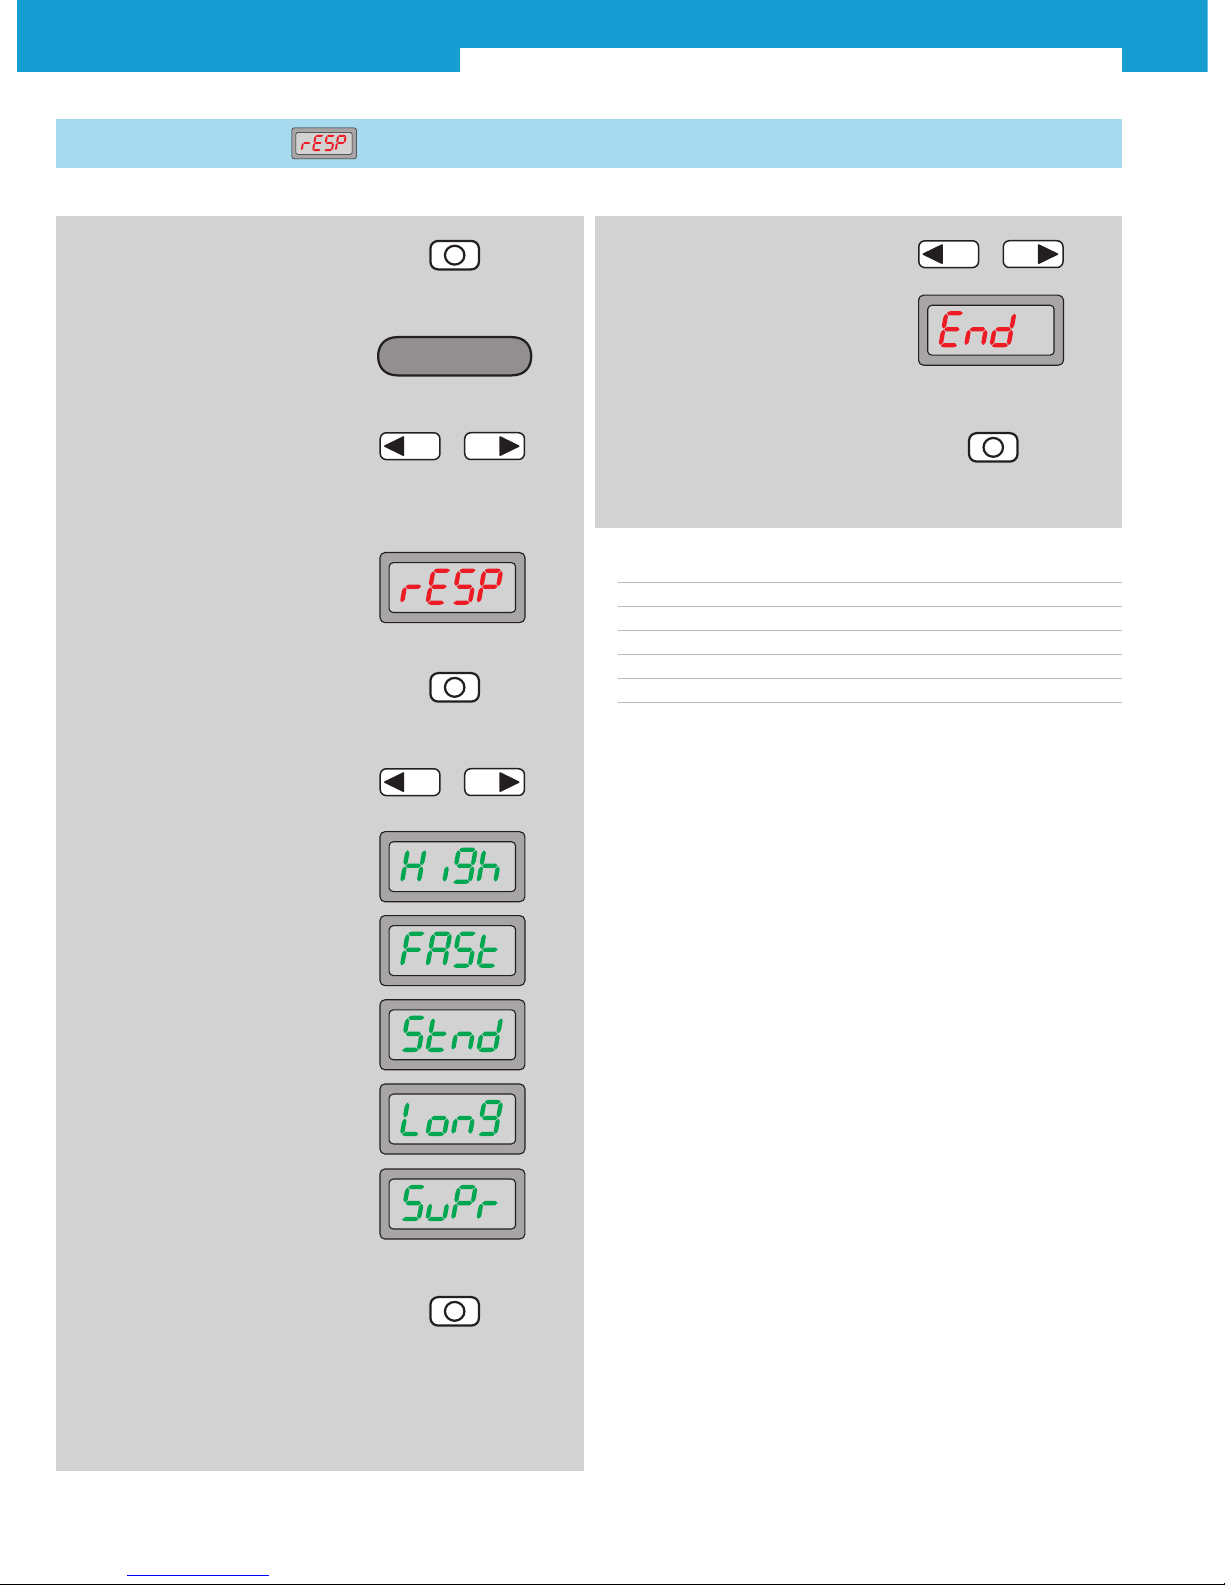
Response time switching frequency range
HiGh: 16 μs 31.25 kHz short
FASt: 70 μs 7.1 kHz reduced
Stnd: 250 μs 2 kHz standard (factory setting)
LonG: 2 ms 250 Hz high
SuPr: 8 ms 62.5 Hz super long
2.2 Response time
2. Operating mode Configuring
active
3. In the basic menu, select
required mode by pressing
the arrow keys
4. In the basic menu, select
required mode by pressing
the arrow keys
–
+
5. Response time is shown on
the display
–
+
6. Select between high-preci-
sion setting (LonG), stand-
ard setting (Stnd), fastest set-
ting (FASt), high speed setting
(HiGh) and super long setting
(SuPr) by pressing the arrow
keys
7. Finish selection with Mode key
9. Finish selection with Mode key
8. Select ending the adjustment
(End)
–
+
1. Press Mode key for 2 s
Configuring

WLL180T Photoelectric sensors for fiber-optic cables
2010-08-02 SICK 13
Subject to change without notice
2. Operating mode Configuring
active
4. In the basic menu, select
required mode by pressing
the arrow keys
5. Timer setting is shown
on the display
–
+
6. Press Mode key, setting option
flashes
7. Select between deactivation
(oFF), OFF delay (oFdY), ON
delay (ondY), One-Shot (SHot),
On-OFF-Delay (onoF) and On-
Shot (onSh) by pressing the
arrow keys
2.3 Time delay setting
3. Press Mode key
–
+
1. Press Mode key for 2 s
Option for various time delays and variable time range:
oFF = no time delay activated (factory setting),
oFdY = OFF delay (release delay),
ondY = ON delay (on delay),
SHot = One Shot (output active for set time window, regardless if
object is present),
onoF = ON and OFF delay (on and release delay),
onSh = ON delay One Shot (set time window (One Shot) is active
after response time (ON delay)).
Time delay selectable from 0,1 ... 9999 (0,1 ms ... 9999 ms)
Typical application:
Ignoring small variations of light intensity caused by dirt or
temperature and detecting only the objects. Slight differences
of light intensity can be detected without readjustment of the
sensitivity.
10. Finish selection with Mode key
11. Select ending the adjustment
(End)
–
+
12. Finish selection with Mode key
9. For activated time stage,
setting the time value
–
+
8. Finish selection
Configuring
WLL180T Photoelectric sensors for fiber-optic cables
14 SICK 2010-08-02
Subject to change without notice
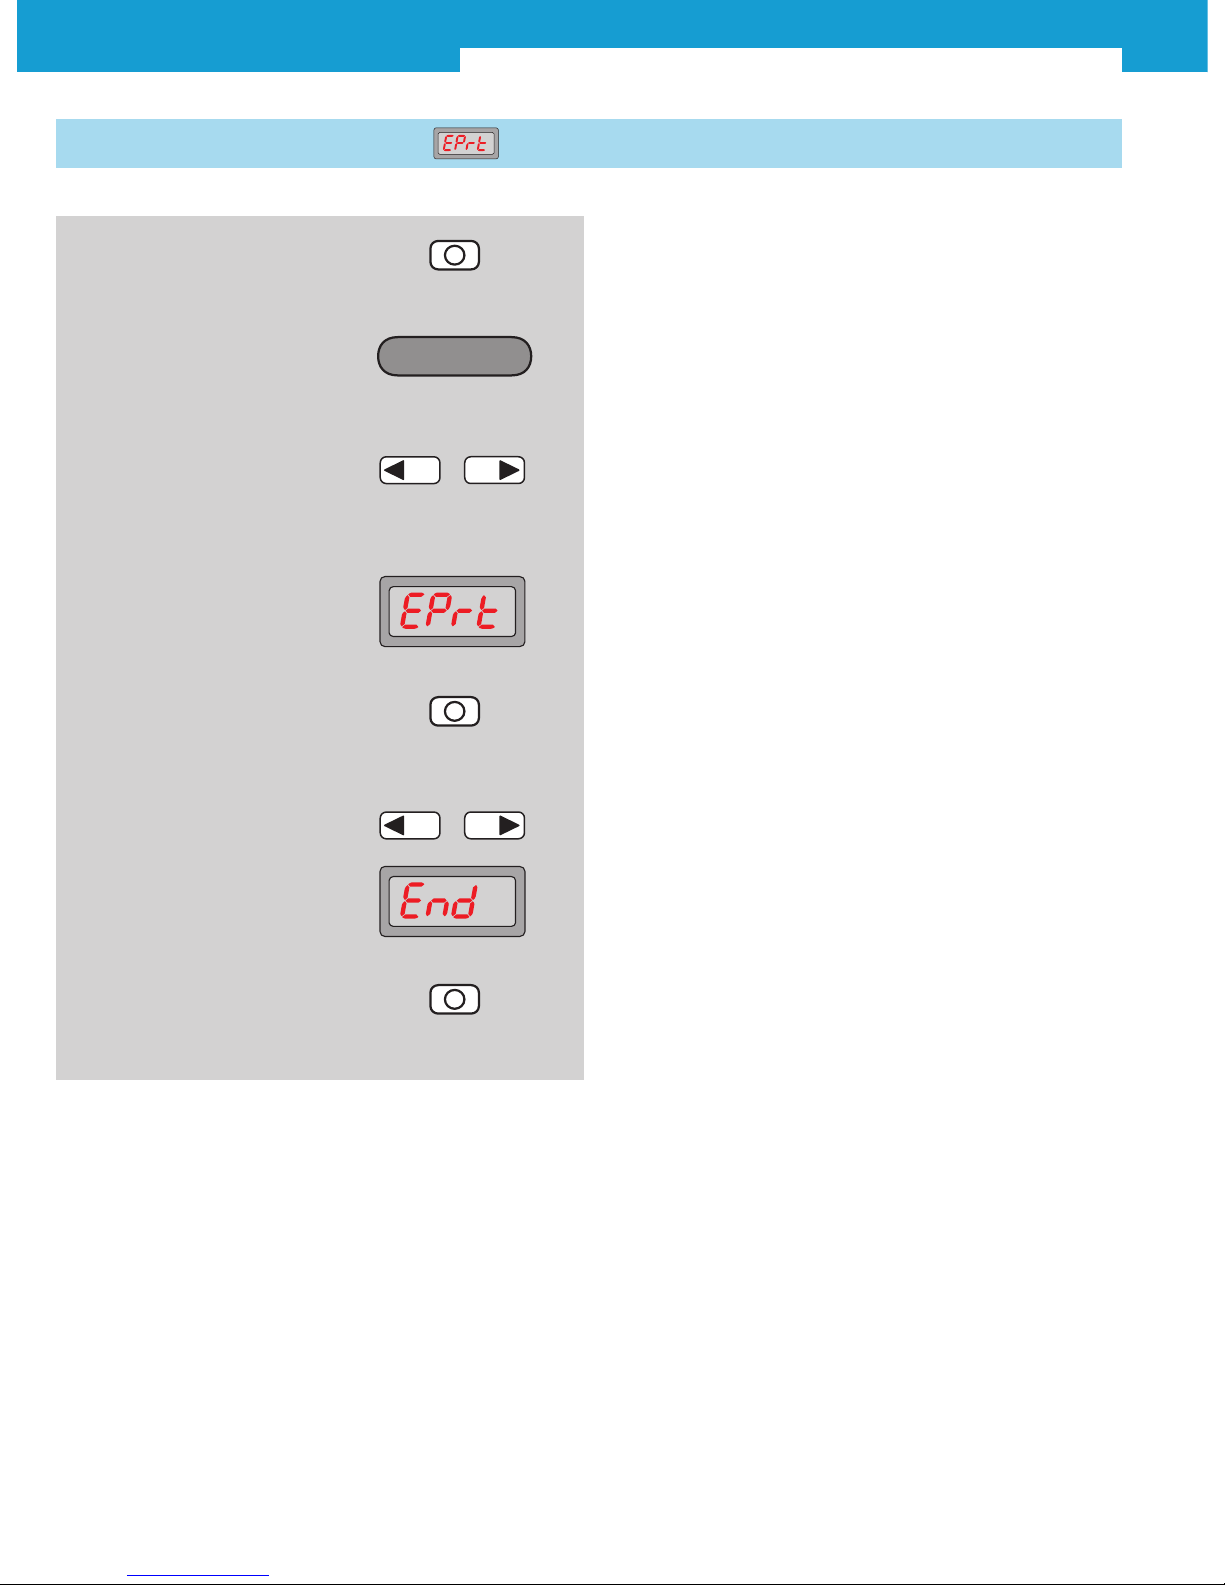
2.4 Expert menu/detailed settings
2. Operating mode Configuring
active
3. In the basic menu, select
required mode by pressing
the arrow keys
4. Detail adjustment is shown on
the display
5. Press Mode key.
Description of Expert menu
from page 16
–
+
6. Select ending the adjustment
(End)
–
+
7. Finish selection with Mode key
1. Press Mode key for 2 s
Configuring
WLL180T Photoelectric sensors for fiber-optic cables
2010-08-02 SICK 15
Subject to change without notice
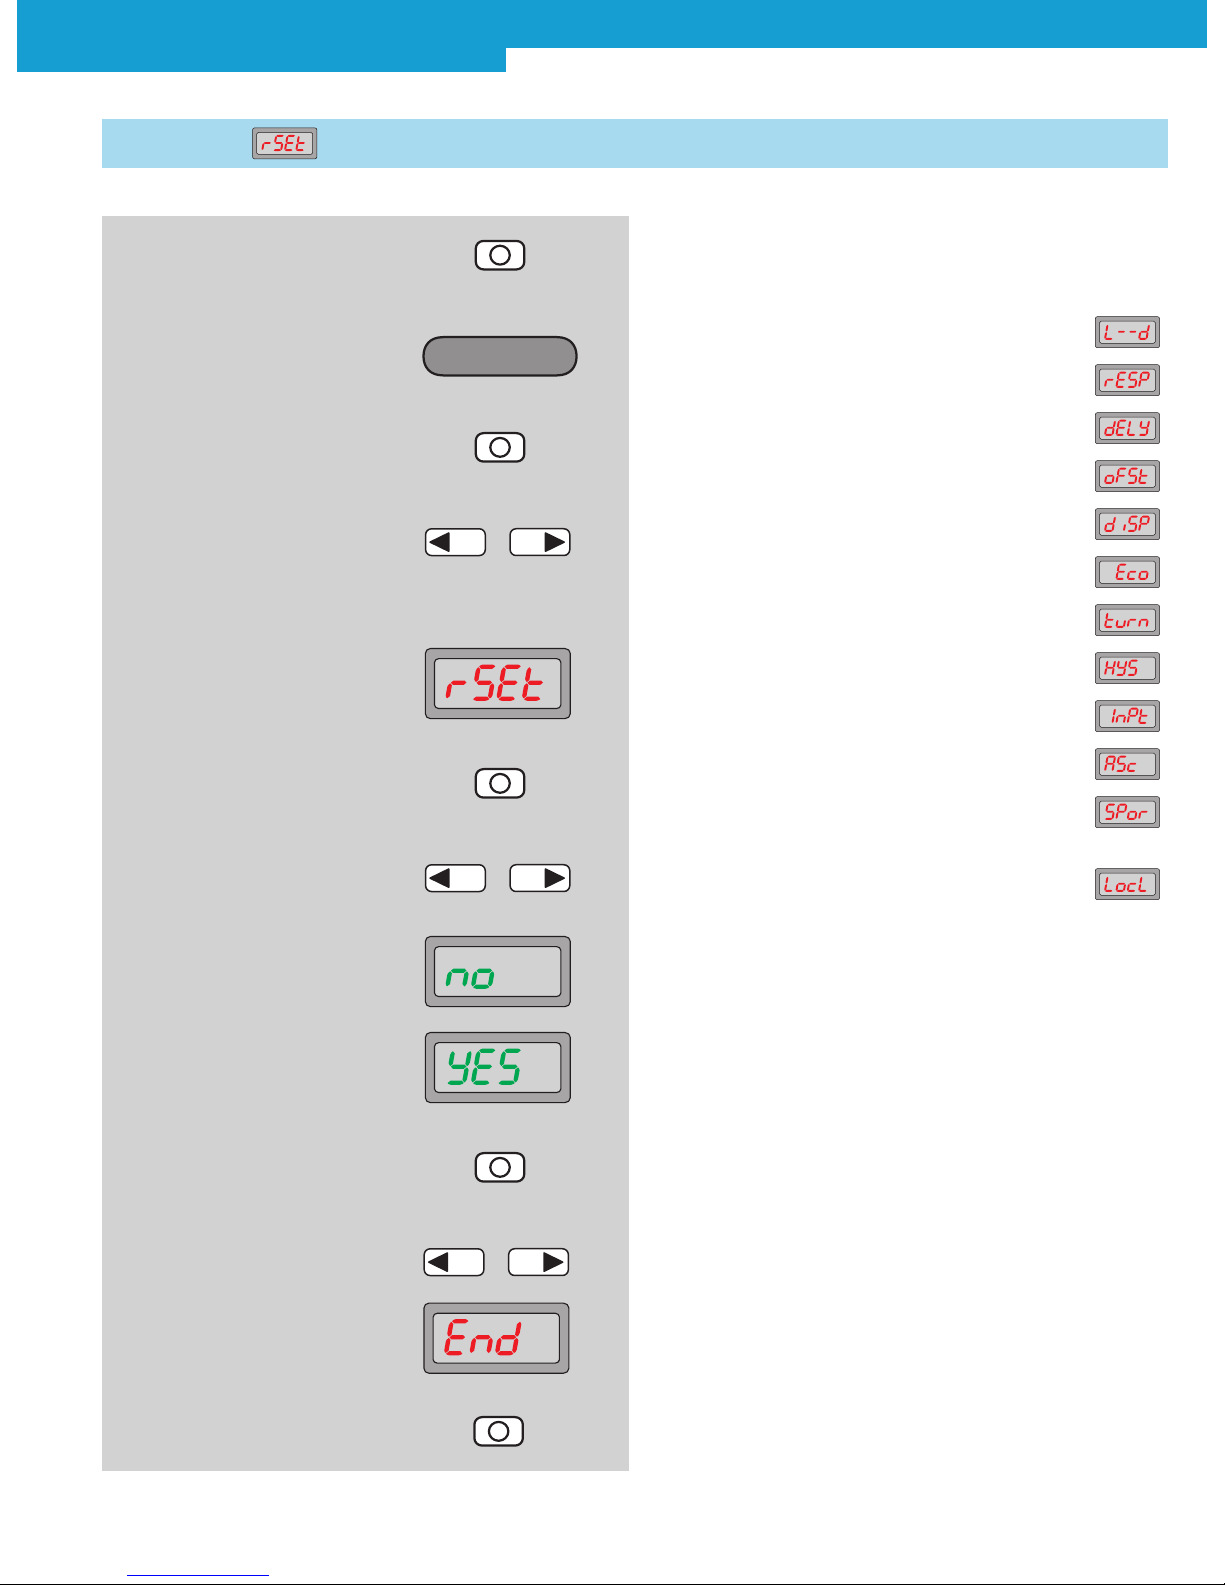
2.5 Reset
All operating modes are reset to the factory setting
“as-delivered ex works”.
Factory settings:
Switching mode: ON light-switching
Response time: Standard = 250 μs
Time stage: Off
Set display value to zero: Off
Display: Numeric display
Energy-saving mode: Off
Reverse Display: Off
Hysteresis setting: Standard = 5
Input setting: Teach-in input
ASC setting: Off
Power of the sender LED: Standard =
highest power
Keylock: Level 1
2. Operating mode Configuring
active
4. In the basic menu, select
required mode by pressing
the arrow keys
5. Reset is shown on the display
6. Press Mode key
7. Select between “no” and “YES”
by pressing the arrow keys
8. Finish selection with Mode key
–
+
–
+
9. Select ending the adjustment
(End)
–
+
10. Finish selection with Mode key
3. Press Mode key
1. Press Mode key for 2 s
Configuring

WLL180T Photoelectric sensors for fiber-optic cables
16 SICK 2010-08-02
Subject to change without notice
The current reception value is set to zero.
Adjusted switching threshold values are adapted.
on: Function active
oFF: Function deactivated (factory setting)
2. Operating mode Configuring
active
3. In the basic menu, select
Expert mode by pressing the
arrow keys
4. Expert mode is shown on
the display
Configuring
–
+
9. Select between “on” and “oFF”
by pressing the arrow keys
–
+
3.1 Set display value to zero
5. Press Mode key
10. Finish selection with Mode key
8. Press Mode key
6. In Expert mode, select
Set to zero by pressing the
arrow keys
7. Set to zero is shown on
the display
–
+
11. Close Expert mode with
arrow key
–
+
12. Finish selection with Mode key
13. Select ending the adjustment
(End)
14. Finish selection with Mode key
–
+
1. Press Mode key for 2 s
WLL180T Photoelectric sensors for fiber-optic cables
2010-08-02 SICK 17
Subject to change without notice
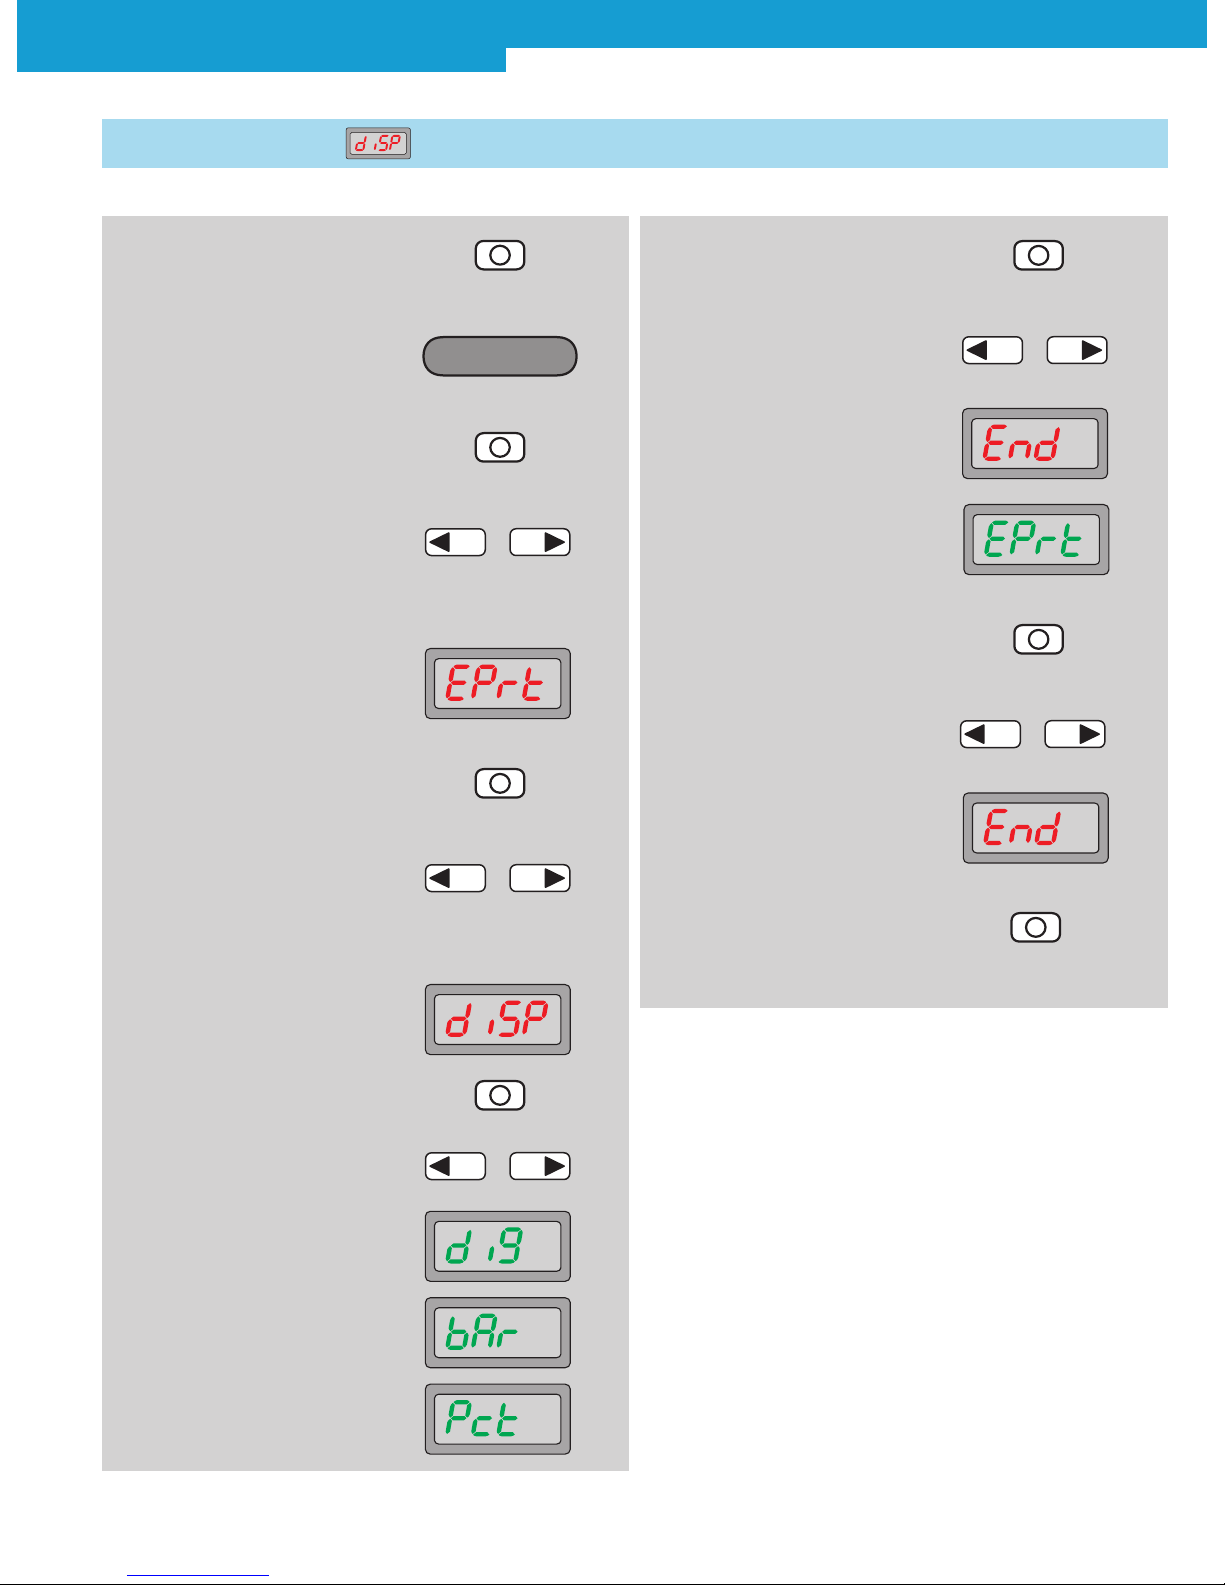
3.2 Display settings
2. Operating mode Configuring
active
4. In the basic menu, select
Expert mode by pressing the
arrow keys.
5. Expert mode is shown on
the display
Configuring
–
+
7. In Expert mode, select display
settings by pressing the arrow
keys
–
+
6. Press Mode key
8. Display settings are shown
10. Select between numeric
display (diG), bar display (bAr)
and percentage display (Pct)
using arrow keys
11. Finish selection with Mode key
12. Close Expert mode with arrow
key
–
+
9. Press Mode key
3. Press Mode key
–
+
diG: Numeric display (factory setting),
bAr: bar display,
Pct: Percentage display.
13. Finish selection with Mode key
14. Select ending the adjustment
(End)
15. Finish selection with Mode key
–
+
1. Press Mode key for 2 s

WLL180T Photoelectric sensors for fiber-optic cables
18 SICK 2010-08-02
Subject to change without notice
3.3 Energy-saving mode
Energy-saving mode is activated. Nominal value (green) display
will be switched off 20 seconds after a key has been pressed and
the actual value (red) display will be dimmed. Therefore the energy
consumption is reduced.
Pressing any key will activate the display.
14. Finish selection with Mode key
13. Select ending the adjustment
(End)
–
+
11. Close Expert mode with
arrow key
–
+
12. Finish selection with Mode key
2. Operating mode Configuring
active
6. In Expert mode, select
required mode by pressing
the arrow keys
7. Eco is shown on the display
8. Press Mode key
9. Select between “oFF” and “on”
by pressing the arrow keys
10. Finish selection with Mode key
–
+
–
+
5. Press Mode key
1. Press Mode key for 2 s
3. In the basic menu, select
Expert mode by pressing the
arrow keys
4. Expert mode is shown on
the display
–
+
Configuring
Table of contents
Popular Laboratory Equipment manuals by other brands

Waters
Waters ACQUITY UPLC M-Class System guide

Idexx
Idexx Quanti-Tray Sealer PLUS user manual

Elster Instromet
Elster Instromet EnCal 3000 Quad Hardware manual

dosatron
dosatron D14MZ10 Troubleshooting

Agilent Technologies
Agilent Technologies Intuvo 9000 Installation and First Startup

cytiva
cytiva Ettan IPGphor Cup Loading Manifold user manual


