IF.PUG.012 R3
TANGENX™ PRO PD CASSETTE INSTALLATION
1. Lift the end plate off the manifold of the TangenX™ PRO PD cassette holder.
2. Remove the protective blue sheet and rinse the EPDM gaskets with deionized
water or WFI. Place a rinsed gasket flat against the bottom manifold; ensure
that the holes in the gasket line up with the holes in the manifold.
3. Using scissors carefully open the cassette bag to remove cassette.
WARNING: Each cassette is stored in an aqueous solution containing
15-20% glycerin and 0.1% sodium azide, pH 7 – 10. Follow standard
safety procedures for handling aqueous glycerin/sodium azide,
including the use of gloves, safety goggles, and lab coat.
4. Place the cassette into the holder flat against the gasket. Place another gasket
on top of the cassette. Ensure that the holes in the manifold, gaskets, and
cassette are completely aligned. If you are using multiple cassettes, continue
the same gasket/cassette/gasket pattern, ending with a gasket between the
last cassette and the end plate.
5. Place the end plate on top of the last gasket of the cassette or cassette stack.
6. Install the tie-rod spacers (if used) and washers on each bolt leaving a
minimum of 18 mm (0.75 inch) of thread exposed on the rod. By hand, screw
the nut on each bolt and hand tighten evenly by alternating from one nut to
the other. Bolts must be further tightened to within the recommended
torque values using a calibrated manual torque wrench.
7. Proceed to step 8 for a two bolt hardware design or skip to step 9 for a four
bolt hardware design.
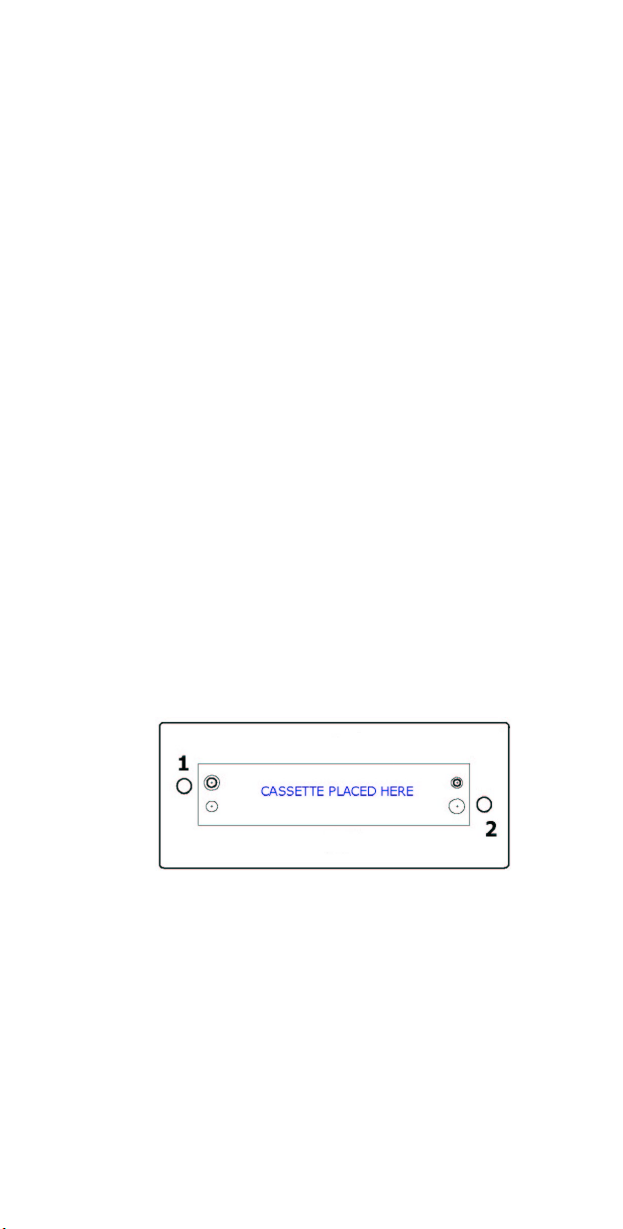
8. Using the calibrated torque wrench with a deep style socket, tighten each hex
nut ¼ turn following the torque sequence illustrated in Figure 2 for a two bolt
hardware. Tighten the first nut ¼ turn, and then tighten the second nut ¼
turn alternating back and forth until the torque wrench "clicks". Repeat this
sequence until the wrench "clicks" without turning the nut. The "click" of the
torque wrench indicates that the nut has reached the set point torque value.
9. Using the calibrated torque wrench with a deep style socket, tighten each hex
nut ¼ turn following the torque sequence illustrated in Figure 3 for a four bolt
hardware. In ¼ turn increments, tighten the first, second, third, and fourth
nut alternating back and forth until the torque wrench "clicks". Repeat this
sequence until the wrench "clicks" without turning the nut. The "click" of the
torque wrench indicates that the nut has reached the set point torque value.
CAUTION: Nuts must be tightened uniformly to avoid damaging
the cassette. Leakage may result from non-parallel plate
alignment or over compression of the cassettes at one end.
10. Wait 5-10 minutes and allow the gaskets to relax before re-torqueing.
Check each nut, per Figure 1 or 2 sequences, using the torque wrench at
its set point torque value.
11. Re-torque as needed, to create a liquid-tight seal.
NOTE: Torque may change during processing as the cassettes may
compress, or as the cassettes expand or contract with
temperature changes. Periodically check the torque of the bolts
and adjust torque as needed.
FIGURE 2
TORQUE SEQUENCE FOR TANGENX™ PRO PD CASSETTES
(2 Bolt Design)
FIGURE 3
TORQUE SEQUENCE FOR TANGENX™ PRO PD CASSETTES
Repligen Corporation warrants its TangenX™ products will meet their
applicable published specifications when used in accordance with their
applicable instructions for a period of one year from shipment of the
products. REPLIGEN MAKES NO OTHER WARRANTY, EXPRESSED OR
IMPLIED. THERE IS NO WARRANTY OF MERCHANTABILITY OR FITNESS
FOR A PARTICULAR PURPOSE. The warranty provided herein and the
data, specifications and descriptions of Repligen TangenX™ products
appearing in published catalogues and product literature may not be
altered except by express written agreement signed by an officer of
Repligen. Representations, oral or written, which are inconsistent with
this warranty or such publications are not authorized and if given,
should not be relied upon.
In the event of a breach of the foregoing warranty, Repligen’s sole
obligation shall be to repair or replace, at its option, the applicable
product or part thereof, provided the customer notifies Repligen
promptly of any such breach. If after exercising reasonable efforts,
Repligen is unable to repair or replace the product or part, then
Repligen shall refund to the customer all monies paid for such
applicable product or part. REPLIGEN SHALL NOT BE LIABLE FOR
CONSEQUENTIAL, INCIDENTAL, SPECIAL OR ANY OTHER DAMAGES
RESULTING FROM ECONOMIC LOSS OR PROPERTY DAMAGE
SUSTAINED.