Siemens A65 User manual

right page (1) of A65_PUMA en A31008-H5810-A1-1-7619 (22.07.2004, 13:32)
©
Siemens AG 2003, C:\Daten\Siemens\Produkte\A65\output\SUG\A65_SUG_en_040722_te_pk_druck_ohneSAR\PumaIVZ.fm
Table of Contents 1
VAR Language: en; VAR issue date: 040405
See also Index at the end of this User Guide
Safety precautions ............................. 2
Phone overview .................................. 3
Display symbols (selection) ................ 5
Getting started ................................... 6
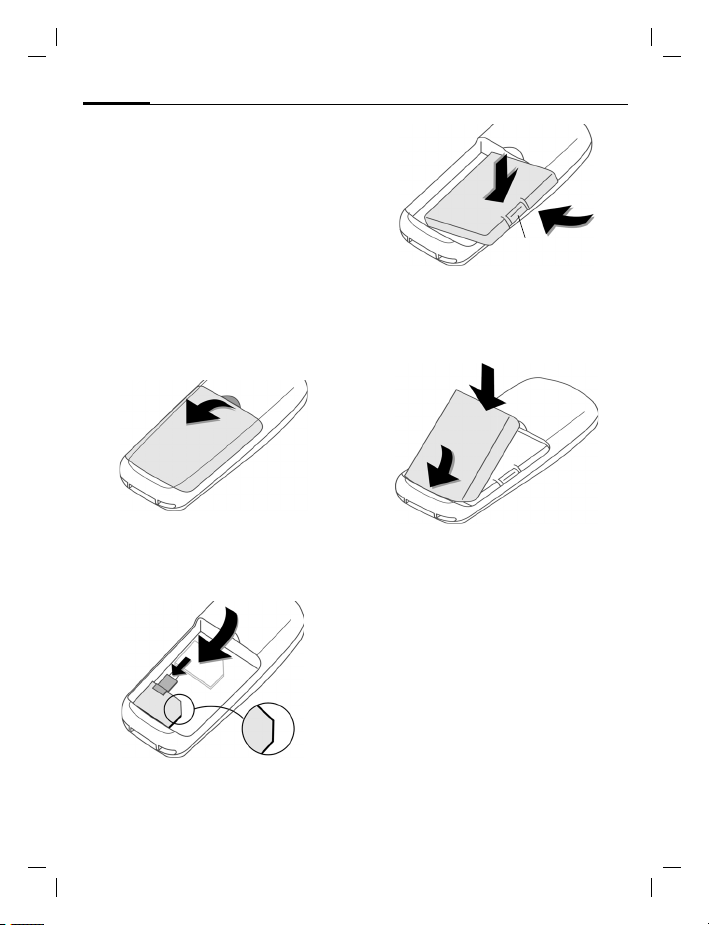
Using the SIM card/battery ...............6
Charging the battery ........................ 6
Switching on/off, PIN .......................... 7
Enter PIN .........................................7
Strong reception signal .................... 7
Emergency number (SOS) ................8
Without a SIM card .......................... 8
General information ........................... 8
User guide ....................................... 8
Menu control ...................................8
Standby mode ................................. 8
Security .............................................. 8
Codes ..............................................8
Clear SIM card barring ...................... 9
Making a phone call ........................... 9
Text entry ......................................... 10
Text entry without T9 .................... 10
Text entry with T9 ..........................11
Predef. texts .................................. 12
Phonebook ....................................... 12
<New entry> .................................. 12
Call (search for an entry) ................ 12
Edit entry ....................................... 12
Assign picture ................................ 13
Groups .......................................... 13
Records ............................................. 13
Durat/charges ................................... 13
Camera ............................................. 14
Voicemail/CB services ....................... 14
SMS ................................................... 15
MMS ................................................. 16
Message lists/
Message settings ............................. 17
Surf & fun ......................................... 17
Internet browser (WAP) ................. 17
Games & more .............................. 18
Setup ................................................ 19
Profiles .......................................... 19
Display .......................................... 19
Call setup ...................................... 20
Clock ............................................. 21
Connectivity .................................. 21
Security ......................................... 21
Network ........................................ 22
Accessories ................................... 22
Ring tones ........................................ 23
Extras ............................................... 23
Alarm clock ................................... 23
Calculator ...................................... 23
Stopwatch ..................................... 23
SIM services (optional) .................. 24
Fast access ....................................... 24
Own stuff ......................................... 24
Questions & Answers ....................... 25
Customer Care ................................. 28
Care and maintenance ..................... 29
Product data ..................................... 30
Battery quality statement ................ 30
Display quality declaration .............. 31
Guarantee certificate (UK) ............... 31
Guarantee certificate (IRL) ............... 32
Accessories ...................................... 34
Menu tree ........................................ 35
Index ................................................ 39
Table of
Contents
See also In-
dex at the end
of this User
Guide

©
Siemens AG 2003, C:\Daten\Siemens\Produkte\A65\output\SUG\A65_SUG_en_040722_te_pk_druck_ohneSAR\Puma_Security.fm
left page (2) of A65_PUMA en, A31008-H5810-A1-1-7619 (22.07.2004, 13:32)
Safety precautions
2
VAR Language: en; VAR issue date: 040405
Safety precautions
Important:
Information for parents
Please read the operating instructions and safety precautions carefully before use.
Explain the content and the hazards associated with using the phone to your children.
Remember to comply with legal re-
quirements and local restrictions
when using the phone. For example
in aeroplanes, petrol stations, hospi-
tals or while driving.
Mobile phones can interfere with the
functioning of medical devices such
as hearing aids or pacemakers.
Keep at least 20 cm/9 inches be-
tween phone and pacemaker. When
using the mobile phone hold it to the
ear which is further away from the
pacemaker. For more information
consult your doctor.
Small parts such as the SIM card,
sealing stop, lens ring and lens cap
can be dismantled and swallowed
by small children. The phone must
therefore be stored out of the reach
of small children.
The mains voltage specified on the
power supply unit (Volt) must not be
exceeded. Otherwise the charging
device may be destroyed.
The ringtone (S. 23), info tones and
handsfree talking are reproduced
through the loudspeaker. Do not
hold the phone to your ear when it
rings or when you have switched on
the handsfree function (S. 10). Oth-
erwise you risk serious permanent
damage to your hearing.
Only use original Siemens batteries
(100 % mercury-free) and – charg-
ing devices. Otherwise you risk seri-
ous damage to health and property.
The battery could explode, for
instance.
You may only open the phone to re-
place the battery (100 % mercury-
free) or SIM card. You must not
open the battery under any
circumstances. All other changes to
this device are strictly prohibited and
will invalidate the operating licence.
Please dispose of unwanted batter-
ies and phones as permitted by the
laws in your country.
The phone may cause interference
in the vicinity of TV sets, radios and
PCs.
Use only Siemens original accesso-
ries. This will avoid potential risks to
health or property and ensure com-
pliance with all relevant regulations.
Improper use will invalidate the guarantee! These
safety instructions also apply to Siemens original
accessories.

right page (3) of A65_PUMA en, A31008-H5810-A1-1-7619 (22.07.2004, 13:32)
©
Siemens AG 2003, C:\Daten\Siemens\Produkte\A65\output\SUG\A65_SUG_en_040722_te_pk_druck_ohneSAR\Puma_Overview.fm
3
Phone overview
VAR Language: en; VAR issue date: 040405
Phone overview
1ACall key (press lower part of button)
Dial phone number /name displayed, take
calls. Show last phone numbers dialled in
standby mode.
2BOn/Off/End key
(press lower part of button)
• Switched off: press and hold to
switch on.
• During a call or in use: press briefly
to finish.
• In menus: press briefly: one level back.
Press and hold: return to standby mode.
• In standby mode: Press and hold to
switch off phone.
3Control key
In lists and menus:
GScroll up and down.
DFunction call.
CBack a menu level.
During a call:
DOpen call menu.
In standby mode:
FOpen Phonebook.
DOpen menu.
CGPRS info.
_ªg
Service provider
01.10.2004 10:10
NewMMS Menu

©
Siemens AG 2003, C:\Daten\Siemens\Produkte\A65\output\SUG\A65_SUG_en_040722_te_pk_druck_ohneSAR\Puma_Overview.fm
left page (4) of A65_PUMA en, A31008-H5810-A1-1-7619 (22.07.2004, 13:32)
Phone overview
4
VAR Language: en; VAR issue date: 040405
1Integrated antenna
Do not interfere unnecessarily with the
phone above the battery cover. This re-
duces reception quality.
2Loudspeaker
3Display symbols
Signal strength/GPRS available/battery
level.
4Display keys (press upper part of button)
The current functions of these keys are
shown in the bottom line of the display
as §text§/symbol (e. g. d).
5Input keys
Numbers, letters.
6*Press and hold
• In standby mode: switch on/off all sig-
nal tones (except alarm).
• For incoming calls: switch off ring
tones only.
7Press and hold
In standby mode: switch key lock on/off.
8Microphone
9Plug socket
Connection for charger, headset,
camera etc.
_ªg
Service provider
01.10.2004 10:10
NewMMS Menu

right page (5) of A65_PUMA en, A31008-H5810-A1-1-7619 (22.07.2004, 13:32)
©
Siemens AG 2003, C:\Daten\Siemens\Produkte\A65\output\SUG\A65_SUG_en_040722_te_pk_druck_ohneSAR\Puma_DisplaySymbols.fm
5
Display symbols (selection)
VAR Language: en; VAR issue date: 040405
Display symbols (selection)
Display symbols
_Signal strength.
hCharging.
dBattery charging status, e.g., 50%.
èPhonebook
ZRecords
ÉSurf & fun
çRing tones
]Messages
Camera
yExtras
ÑOwn stuff
mSetup
nAll calls are diverted.
jRinger off.
kShort ring (beep) only.
lRing only if the caller is stored in the
Phonebook.
ØAlarm set.
ÖAlarm clock active.
µ
Key lock active.
Phone numbers/names:
¢On the SIM card
¡On the SIM card (PIN 2 protected).
vIn the phone memory.
²No network access.
p,oFunction activated/deactivated.
NPhonebook.
ABC/
Abc/abc
Indicates whether upper- or lower case
letters are active.
™Text input with T9.
«Activated and available.
ªRegistered.
Temporarily interrupted.
©GPRS download.
ÊWAP Online.
ËWAP via GPRS online.
ÌWAP No network.
Headset active.
±Auto answer feature on.
Depending on your service provider, some of the
symbols displayed here may differ from those on
the phone.
Soft keys
…Message received.
MMS received.
MMS notification.
\Voice mail received.
Data received.
—Picture received.
–Melody received.
Unanswered call.
Store in Phonebook.
·Retrieve from Phonebook.

©
Siemens AG 2003, C:\Daten\Siemens\Produkte\A65\output\SUG\A65_SUG_en_040722_te_pk_druck_ohneSAR\Puma_Main.fm
left page (6) of A65_PUMA en, A31008-H5810-A1-1-7619 (22.07.2004, 13:32)
Getting started
6
VAR Language: en; VAR issue date: 040405
Getting started
Using the SIM card/battery
Your phone's display is delivered with a
protective film. Remove this film before get-
ting started. To avoid damage to the dis-
play, the phone should not be used with-
out the front cover. The service provider
supplies you with a SIM card on which all
the important data for your account is
stored. If the SIM card is credit card-sized,
snap out the smaller segment and trim
any rough edges.
Remove the battery cover upwards 1.
Insert SIM card 2and push it fully into
the locating slot (make sure the angled
corner is in the correct position 3). Then
push the retaining catch over the top of
the SIM card 4.
Insert the battery sideways into the
phone 5, then press downwards 6
until it engages.
To remove, press the retaining tab 7
then lift the battery out.
Insert the battery cover by the tabs at the
bottom 8, then press downwards 9,
until it engages.
Always switch off phone before removing
the battery!
Only 3V SIM cards are supported. Please
contact your service provider if you have
an older card.
Functions without SIM card p. 8.
Charging the battery
The battery is not supplied fully charged.
Plug the charger cable into the bottom of
the phone, plug the power supply unit
into a mains power socket and charge for
at least two hours. The power supply unit
will become hot after extended use. This
is normal and is not dangerous.
1
2
4
3
6
7
5
8
9

right page (7) of A65_PUMA en, A31008-H5810-A1-1-7619 (22.07.2004, 13:32)
©
Siemens AG 2003, C:\Daten\Siemens\Produkte\A65\output\SUG\A65_SUG_en_040722_te_pk_druck_ohneSAR\Puma_Main.fm
7
Switching on/off, PIN
VAR Language: en; VAR issue date: 040405
Display when charging is in progress
h
Charging time
An empty battery is fully charged after
about 2 hours. Charging is only possible
within a temperature range of +5 °C to
+40 °C. If the temperature rises/falls 5 °C
above/below this, the charge symbol flash-
es a warning. The voltage specified on the
power supply unit must not be exceeded.
Charge icon not visible
If the battery was fully discharged, the
charging symbol will not be immediately
visible on connection to the power supply
unit. It will appear after up to two hours.
In this case the battery is fully charged af-
ter 3 - 4 hours.
Only use the power supply unit provided!
Display while in service
Charge level display during operation
(empty-full):
adg
A beep sounds when the battery is nearly
empty. The charge level of the battery is
displayed correctly only after uninterrupt-
ed charging/discharging. You should
therefore not remove the battery unnecessar-
ily and where possible not interrupt charg-
ing prematurely.
Switching on/off, PIN
Turning the phone on/off
Press and hold the On/Off/End key Bto
switch on or off.
Enter PIN
The SIM card can be protected with a 4- to
8-digit PIN.
Enter the PIN using the number keys. The
characters **** appear to ensure nobody
can read your PIN on the display. Correct
errors with §Clear§.
Confirm your input with §OK§. Logging on
to the network will take a few seconds.
Switching on your phone for the
first time
Time/Date
The clock must be set to the right time
once at start-up.
Press §Yes§. First enter the date (day/month/
year), then the time (24 hours, including
seconds). Press §OK§. The time and date
are updated.
If the battery is removed for longer than
30 seconds, the clock must be reset.
Time zones
Specify your current time zone.
Select the desired time zone from the list
with F. Apply it with §Set§.
Strong reception signal
_Strong receive signal.
^A weak signal reduces the call-
quality and may lead to loss of
the connection. Change your
location.

©
Siemens AG 2003, C:\Daten\Siemens\Produkte\A65\output\SUG\A65_SUG_en_040722_te_pk_druck_ohneSAR\Puma_Main.fm
left page (8) of A65_PUMA en, A31008-H5810-A1-1-7619 (22.07.2004, 13:32)
General information
8
VAR Language: en; VAR issue date: 040405
Emergency number (SOS)
Use only in real emergencies!
By pressing the soft key §SOS§ you can
make an emergency call on any network
without a SIM card and without entering a
PIN (not available in all countries).
Without a SIM card
If you switch on the phone without a
SIM card you can still use some phone
functions.
Press §Menu§. The functions are displayed
(f.e. Emergency, SOS).
General information
User guide
The following symbols are used to explain
operation:
JEnter numbers or letters
BOn/Off/End key
ACall key
DPress the control ley on the side
indicated
<Soft key left
>Soft key right
§Menu§ Displays a soft-key function
LFunction depends on the service
provider, special registration
may be necessary
Menu control
The steps needed to reach a function are
shown in concise form in this user guide.
E. g. to display call list for missed calls:
press §Menu§ ¢Z¢Calls missed
This corresponds to:
Open the main menu, select the Records
menu, then select the function Calls
missed. You have to confirm with §Select§.
Standby mode
When the name of the service provider
appears on the display, the phone is in
standby mode and ready for use.
The left soft key may have different func-
tions pre-assigned to it.
Press and hold the On/Off/End key Bto
return to standby mode from any menu
option.
Security
Codes
The phone and SIM card are protected
against misuse by several security codes.
Keep these confidential numbers in a safe
place where you can access them again if
required.
§Menu§ ¢m¢Security ¢Codes
¢Select a function
PIN control
The PIN is usually requested each time
the phone is switched on. You can deacti-
vate this feature but you risk unauthor-
ised use of the phone. Some service pro-
viders do not permit deactivating the
control.
Change PIN
You can change the PIN to any 4-8 digit
number you may find easier to
remember.
Change PIN2
(Display only if PIN 2 is available). Proceed
as with Change PIN.

right page (9) of A65_PUMA en, A31008-H5810-A1-1-7619 (22.07.2004, 13:32)
©
Siemens AG 2003, C:\Daten\Siemens\Produkte\A65\output\SUG\A65_SUG_en_040722_te_pk_druck_ohneSAR\Puma_Main.fm
9
Making a phone call
VAR Language: en; VAR issue date: 040405
Change phonecode
You define the phone code (4 to 8 digits)
when calling up a phone-code protected
function for the first time. It is then valid
for all phone-code protected functions.
Following the third unsuccessful attempt,
access to the phone code and the func-
tions that use it is denied. In such an in-
stance contact Siemens Service (p. 28).
Clear SIM card barring
If the PIN is entered incorrectly three
times, the SIM card is barred. Enter the
PUK (MASTER PIN), provided by your serv-
ice provider with the SIM card, according
to instructions. If the PUK (MASTER PIN)
has been lost, please contact your service
provider.
Preventing accidental activation
Even if PIN entry is deactivated (p. 8) con-
firmation is required to switch on phone.
This prevents accidental activation of the
phone, e.g. when you are carrying it in
a bag or when you are travelling in an
aircraft.
After long press of the On/Off/End key
Bto switch on the phone or abort the
operation with §Cancel§.
Making a phone call
Dialling with number keys
The phone must be switched on (standby
mode). Dial number (always with area
code, if necessary with international dial-
ling code). To dial International dialling
codes press and hold 0until a "+"-is dis-
played. Press §+List§ and select country.
Short press §Clear§ to clear the last digit, a
long press clears the entire phone
number. To dial press the Akey.
End call
Press the End key Bbriefly. Press this
key even if the person on the other end of
the line has hung up first.
Set volume
Use the control key Eto start adjusting
the volume during conversation. Set vol-
ume with Gand confirm with §OK§.
If a Car Kit is used, its volume setting will
not affect the usual setting on the phone.
Redial previous numbers
For redialling previously dialled numbers
press the Call key Aonce, pick out the
required phone number from the list
with G, then press Aagain.
If number busy
Press §Auto dial§ for automatically dialling
the phone number ten times at increas-
ing time intervalls or press §Call back§ ( L)
for phone ringing when the busy number
is free. Press §Prompt§ and a beep will re-
mind you to redial the dispayed phone
number after 15 minutes.
Accept call
The phone must be switched on (standby
mode). An incoming call will interrupt
any other use of the phone. Press §Answer§
or A.
Please make sure you have accepted the call
before holding the phone to your ear. This will
prevent a loud ring tone from damaging your
hearing!

©
Siemens AG 2003, C:\Daten\Siemens\Produkte\A65\output\SUG\A65_SUG_en_040722_te_pk_druck_ohneSAR\Puma_Main.fm
left page (10) of A65_PUMA en, A31008-H5810-A1-1-7619 (22.07.2004, 13:32)
Text entry
10
VAR Language: en; VAR issue date: 040405
If the phone number has been transmit-
ted by the network, it is displayed. If the
caller's name also appears in the Phone-
book, this will appear instead of the
number. If set, a picture can be displayed
instead of the bell icon.
Reject call
§Reject§ or Bpress briefly.
Handsfree
You can put the phone down during a
call. You can then hear the caller via the
loudspeaker.
Activate handsfree function with §Handsfr.§
and switch on with §Yes§.
Adjust the volume with G. Pressing
§Handsfr.§ switches off "handsfree talking".
Always switch off "handsfree talking" before
holding the phone to your ear! This will avoid
damage to your hearing!
Swapping between 2 calls
Make a new connection during a call with
ymenu§ ¢Hold ¢J(dial a new phone
number). With ymenu§ ¢Swap you can
swap back and forth between both calls.
If you are called during a phone call and
you can hear the "call waiting tone"
(p. 20), you can accept the waiting call
with §Swap§,putting the current call on
hold to do so. Swap back and forth be-
tween the calls as previously described or
end the current call with Band accept
the new call with §Answer§.
Conference
Make a new connection during a call with
ymenu§ ¢Hold ¢J(dial a new phone
number). With ymenu§ ¢Conference you
can join the held call.
Repeat this procedure until all participants
are linked together (up to 5 participants).
All calls in the conference are ended si-
multaneously when the End key Bis
pressed.
Text entry
Text entry without T9
Press number key repeatedly until the re-
quired letter appears. The cursor advanc-
es after a short delay. Example:
2Pressing briefly once types the
letter a, twice the letter b, etc.
Press and hold to write the
number.
Ä,ä,1-9 Umlauts and numbers are dis-
played after the relevant letters.
§Clear§ Press briefly to delete the letter
before the cursor, press and hold
to erase the whole word.
HMove the cursor
(forwards/back).
Press briefly: Switch between abc,
Abc, ABC, T9abc, T9Abc, T9ABC,
123. Status indicator in the top
line of the display.
Press and hold: All input modes
are displayed.
*Press briefly: Special characters
are shown.
Press and hold: Open input
menu.
0Press once/repeatedly:
. , ? ! ’ " 0 - ( ) @ / : _
Press and hold: Writes 0.
1Writes blank. Press twice = skip
line.

right page (11) of A65_PUMA en, A31008-H5810-A1-1-7619 (22.07.2004, 13:32)
©
Siemens AG 2003, C:\Daten\Siemens\Produkte\A65\output\SUG\A65_SUG_en_040722_te_pk_druck_ohneSAR\Puma_Main.fm
11
Text entry
VAR Language: en; VAR issue date: 040405
Special characters
Press briefly *. The character map is
displayed:
1) Line skip
Navigate to characters with G,Hand
press §Select§.
Input menu
Press and hold *with text input.
The input menu ist displayed:
Text format (SMS only)
Input language
Mark text
Copy/Add
Text entry with T9
T9 deduces the correct word from the in-
dividual key entries by making compari-
sons with an extensive dictionary.
Activate, deactivate T9
§Options§ ¢T9 input ¢T9 preferred
¢§Change§ (activate or deactivate T9)
Select Input language
Select the language in which you want to
compose your message.
§Options§ ¢T9 input ¢Input language
¢§Select§ (the new language can be se-
lected) or §Delete§ (T9 dictionary for the se-
lected language will be deleted).
Type a word using T9
The display changes as you proceed.
Therefore, it is best if you finish a word
without looking at the display.
Simply press the keys once only where the
relevant letter is located. For "hotel", for
example:
Press briefly for T9Abc then
46835
and 1(the blank ends a
word).
Do not use special characters such as Ä
but rather use the standard characters,
e.g. A; T9 will do the rest for you.
Additional notes
0Setting a full stop. Word is ended
when followed by a blank space.
Within a word, a full stop repre-
sents an apostrophe or hyphen:
e.g. §provider.s§ = provider’s.
DMove to the right. Ends a word.
Press briefly: Swap between: abc,
Abc, T9abc, T9Abc, 123. Status in-
dicator in the top line of the dis-
play.
Press and hold: All input modes
are displayed.
*Press briefly: Select special char-
acters.
Press and hold: Open input
menu.
T9 word suggestions
If several options are found in the diction-
ary for a key sequence (a word), the most
probable is displayed first. The word must
be highlighted as §inverted§. Then
press ». The displayed word is re-
placed with a different word. If this is also
incorrect, repeat until the correct word is
displayed.
To add a word to the dictionary,
select §Spell§. Now write the word without
T9-support and accept with §Save§ into the
dictionary.
1)¿¡_;.,?!+-
"’ :*/()¤¥$£
€@\ &#[ ] {}%~
<=>|^§Γ∆ΘΛΞ
ΠΣΦΨΩ

©
Siemens AG 2003, C:\Daten\Siemens\Produkte\A65\output\SUG\A65_SUG_en_040722_te_pk_druck_ohneSAR\Puma_Main.fm
left page (12) of A65_PUMA en, A31008-H5810-A1-1-7619 (22.07.2004, 13:32)
Phonebook
12
VAR Language: en; VAR issue date: 040405
Correct a word
Words written with T9:
With Hmove left or right, word by
word, until the required word is §inverted§.
With »scroll through the T9 word
suggestions again. §Clear§ deletes the char-
acter to the left of the cursor and displays
a new possible word!
Words not created using T9:
With Hmove letter by letter to the
left/right. §Clear§ deletes the letter to the
left of the cursor. New characters are in-
serted at the cursor position.
Predef. texts
The phone contains predefined texts that
you can add to your messages (SMS,
MMS). You can also create and store up to
5 personal stored texts. Each stored text
can contain up to 32 characters.
Unlike personal stored texts, predefined
texts cannot be changed or deleted.
Write personal stored texts
§Menu§ ¢]¢Predef. texts ¢§Options§
¢<New entry> ¢J(write personal
stored text) ¢§Save§
Use predefined texts
J(write message text) ¢§Options§
¢Predef. texts ¢G(select predefined
text from the list) ¢§Select§
The predefined text is inserted into the
text to the left of the cursor.
Phonebook
Enter frequently used phone numbers in
the Phonebook with a special name. To
dial them, simply highlight the name. If a
phone number is stored with a name, it
appears on the display when you are
called. Important numbers can be as-
signed to different groups.
<New entry>
Open Addressbook (in standby mode)
G¢§Select§ ¢Select entry fields
Number: Always enter phone number with
prefix.
Name: Enter first name or surname.
E-mail: Enter email address for MMS
(max. for 50 addresses).
Group: Organise entries in groups, select
with §Change§.
Location: Select location: Mobile, SIM or
Protected SIM.
Record no.: This is automatically assigned
to the entry.
Press §Save§ to store teh new entry.
Call (search for an entry)
Open phonebook F, select name and
select phone number withA.
Edit entry
F¢Select entry ¢§Options§ ¢Edit
¢Make changes ¢§Save§.
T9® Text Input is licensed under one or more of
the following: U.S. Pat. Nos. 5,818,437,
5,953,541, 5,187,480, 5,945,928, and 6,011,554;
Canadian Pat. No. 1,331,057; United Kingdom
Pat. No. 2238414B; Hong Kong Standard Pat.
No. HK0940329; Republic of Singapore Pat.
No. 51383; Euro.Pat. No. 0 842 463 (96927260.8)
DE/DK, FI, FR, IT, NL, PT, ES, SE, GB; and addi-
tional patents are pending worldwide.

right page (13) of A65_PUMA en, A31008-H5810-A1-1-7619 (22.07.2004, 13:32)
©
Siemens AG 2003, C:\Daten\Siemens\Produkte\A65\output\SUG\A65_SUG_en_040722_te_pk_druck_ohneSAR\Puma_Main.fm
13
Records
VAR Language: en; VAR issue date: 040405
Assign picture
Assign a maximum of 50 phone numbers
to an individual picture. This picture will
appear in the display when there is a call
from this number.
F¢Select entry ¢§Options§ ¢Picture
¢Select picture ¢§Open§ (the picture is
displayed) ¢§Select§
The picture is assigned to the
phone number and it appears with
a›symbol in the Phonebook.
Delete/change image
If a picture is assigned to a
phone number, it can be deleted
or replaced.
G¢Select entry with picture ›
¢§Options§ ¢§Select§ ¢pPicture
¢§Delete§
Groups
Four groups are specified in your phone
to enable you to arrange your Phonebook
entries clearly. You can rename these
groups.
Open Addressbook (in standby mode)
G¢<Groups> (the number of entries
is listed behind the group name)
¢Select a group ¢§Select§ (open group)
or §Rename§ (give group a name)
Ring tone for group
If you assign a ring tone to a group, it
sounds when one of the group members
rings.
§Menu§ ¢ç¢Group calls
¢Select a group ¢§Select§
¢Select ring tone ¢§Select§
Records
Your phone stores the phone numbers of
calls for convenient redialling.
§Menu§ ¢Z¢§Select§
¢Select call record ¢§Select§
¢Select phone number ¢A
Calls missed b
The phone numbers of calls that you have
not accepted are stored for call-back pur-
poses, if the network supports the "Caller
Identity" feature.
Symbol for acc. call.
Calls received b
Accepted calls are listed, if the network
supports the "Caller Identity" feature.
Calls dialled
In standby mode you have access to the
last numbers dialled with A.
Erase records
The records are deleted.
Call list menu
§Options§ ¢Edit entries.
Durat/charges
You can display the charges and the dura-
tion of a call and set a unit limit for outgo-
ing calls.
§Menu§ ¢Z¢Durat/charges ¢
Select a function: Last call, All outgoing,
All incoming, Remain. units
§Select§ Display data.
§Reset§ Clear display.
§OK§ End display.

©
Siemens AG 2003, C:\Daten\Siemens\Produkte\A65\output\SUG\A65_SUG_en_040722_te_pk_druck_ohneSAR\Puma_Main.fm
left page (14) of A65_PUMA en, A31008-H5810-A1-1-7619 (22.07.2004, 13:32)
Camera
14
VAR Language: en; VAR issue date: 040405
Charge sett.
§Menu§ ¢Z¢Durat/charges
¢Charge sett.
Currency b
(PIN 2 prompt)
Currency for charge display.
Personal rate b
(PIN 2 prompt)
Charges per unit/period.
A/c limit b
(PIN 2 prompt)
Fix a credit/usage period on a special
SIM card.
Auto display
Call duration and call charges are
automatically displayed for each call.
Camera
You can use the phone to immediately
view, save and send photos you have tak-
en with the "QuickPic Camera". Pictures
can be taken in two different formats:
• Low resolution:
QQVGA 160x120 pixels, memory size
up to 6 KB for sending as an MMS im-
age (p. 16).
• High resolution:
VGA 640x480 pixels, memory size of
one picture up to 40 KB – e.g. for fur-
ther editing on PC. To allow the picture
to be viewed on the phone display, a
QQVGA picture is created for every
VGA picture.
In standby mode press §Camera§
or §Menu§ ¢
First the number of shots still available is
shown (depends on resolution chosen).
Confirm with §OK§ (the last picture taken is
shown) and scroll through photos
with G.
Picture
A picture requires a few seconds to be
processed.
Press §Take§. You will hear an advisory tone
when the exposure time has expired. The
photo is shown on the display and saved
automatically.
Flashlight
In the option menu the flashlight func-
tion can be switched on/off.
If the flash is switched on, a command is
given to charge the flashlight before tak-
ing a picture:
Press §Load§ briefly. The flashlight is charged
(battery capacity at least approx. 30%).
Press §Take§ and the photo is taken.
Sending a photo by MMS
You can easily send a photo as an MMS
immediately after taking it.
§Options§ ¢Send via MMS ¢§Select§
(select the desired resolution) ¢§Skip§
(skip recording a melody, p. 16)
Voicemail/CB services
Voice mail/mailbox
§Menu§ ¢]¢Msg. setup
¢Voice message
Most service providers offer you an exter-
nal answering service. In this mailbox, a
caller may leave a voice message for you
• if your phone is switched off or not
ready to receive,
• if you do not want to answer,
• or if you are making a phone call.

right page (15) of A65_PUMA en, A31008-H5810-A1-1-7619 (22.07.2004, 13:32)
©
Siemens AG 2003, C:\Daten\Siemens\Produkte\A65\output\SUG\A65_SUG_en_040722_te_pk_druck_ohneSAR\Puma_Main.fm
15
SMS
VAR Language: en; VAR issue date: 040405
You may have to register for this service
with your service provider and perform
some manual settings.
Settings: b
Your service provider supplies you with
two phone numbers:
Save mailbox number
You call this phone number to listen to
the voice mails left for you.
§Menu§ ¢]¢Msg. setup
¢Voice message
Enter mailbox phone number and
confirm with §OK§.
Save call divert number
Calls are diverted to this phone number.
§Menu§ ¢m¢Divert ¢e. g. Unanswered
¢Set
Enter call divert number and log on §OK§ to
network. Divert will be confirmed after a
few seconds (see also p. 20).
Play back messages b
A new voice mail can be announced as
follows:
A \symbol with beep or ]an SMS
indicates a new voice mail or that you are
receiving an automatic announcement.
Dial into your mailbox and listen to your
message(s).
Press and hold 1(if necessary enter mail-
box number once only). Confirm with §OK§
and §Mailbox§ depending on your service
provider.
CB services
§Menu§ ¢]¢Msg. setup
¢CB services
Some service providers offer information
services (info channels,). If reception is
activated, your Topic list will supply you
with messages on the activated topics.
SMS
You can transmit and receive very long
messages (up to 760 characters) on your
phone. They are automatically composed
of several "normal" SMS messages (note
higher charges).
Additionally you can insert pictures and
sounds in an SMS.
Writing/sending SMS messages
§Menu§ ¢]¢New SMS ¢J(write
text) ¢A¢·/J(enter phone
number or select from Phonebook)
¢§OK§
The SMS is sent to the service centre for
transmission.
Receiving SMS
An arrival of a new SMS is announced on
display with …. To read the SMS, press
left soft key.
With Gyou scroll through message line
by line. Select §Reply§ for a direct reply.
SMS archive
§Menu§ ¢]¢SMS archive
The list of SMS messages stored in the
phone is displayed.
Special functions
SMS to group
Send SMS as a "circular" to a group.
§Options§ ¢Send ¢§Group§ ¢Select
group members and send SMS.
Picture&sound
Insert pictures and sounds into message.
§Options§ ¢Picture&sound select.
The menu contains:
Fix animations, Fix sounds, Own anim.,
Own pictures, Own sounds

©
Siemens AG 2003, C:\Daten\Siemens\Produkte\A65\output\SUG\A65_SUG_en_040722_te_pk_druck_ohneSAR\Puma_Main.fm
left page (16) of A65_PUMA en, A31008-H5810-A1-1-7619 (22.07.2004, 13:32)
MMS
16
VAR Language: en; VAR issue date: 040405
MMS
The Multimedia Messaging Service ena-
bles you to send texts, pictures (also pho-
tos) and sounds in a combined message
to another mobile phone or to an e-mail
address. All elements of an MMS message
are merged to form a "slide show".
Depending on your phone's settings, you
will receive either the complete message
automatically or notification that an MMS
has been saved in the network, giving
sender and size details. You may then
download it to your phone to read it.
Ask your service provider whether this
service is available. You may need to reg-
ister for this service separately.
Writing/sending MMS messages
An MMS consists of the address header
and the content.
§Menu§ ¢]¢New MMS
Input fields:
To: ·/JPhone number/
e-mail address of recipient/s.
Subject: Enter MMS heading (up to
40 characters)
Picture: §Insert§. The picture list is opened
for selection.
Additional information
You can also easily send an image by
MMS immediately after taking it with the
QuickPic Camera (p. 14).
Text: §Edit§. Write text with the help
of T9.
Sound: §Insert§. Select a melody or record
a new melody.
Slide duration:
Enter length of display for indi-
vidual pages
(minimum 0.1 seconds).
Record new melody (ring tone) for MMS
If you press §Insert§ in the Sound: field when
completing the input fields, you have the
option of recording a new melody for
sending messages by MMS.
Press §Record§. Recording starts, and the
maximum available time and recording
duration are displayed. To end recording,
press §Stop§.
Insert additional pages
§Options§ Open menu.
New slide Select.
Send MMS
§Options§ Open menu.
Send Select.
Receive/read MMS b
/Indicates reception or notifica-
tion of an MMS.
Depending on the profile setting (p. 17):
• Receive complete MMS
• Open the message. Press §Receiving§, in
order to receive the complete MMS,
with §Play§ automatic MMS presenta-
tion. Cancel with any key.
Functions for editing MMS can be found
under §Options§.

right page (17) of A65_PUMA en, A31008-H5810-A1-1-7619 (22.07.2004, 13:32)
©
Siemens AG 2003, C:\Daten\Siemens\Produkte\A65\output\SUG\A65_SUG_en_040722_te_pk_druck_ohneSAR\Puma_Main.fm
17
Message lists/ Message settings
VAR Language: en; VAR issue date: 040405
Message lists/
Message settings
All SMS/MMS messages are stored in one
of the following lists according to status.
Inbox
§Menu§ ¢]¢Inbox ¢SMS/MMS
The list of received SMS or MMS messag-
es is displayed.
Draft
§Menu§ ¢]¢Draft ¢SMS/MMS
The list of unsent SMS or MMS messages
is displayed.
Unsent
§Menu§ ¢]¢Unsent ¢SMS/MMS
The list of SMS or MMS messages not yet
successfully sent is displayed.
Sent
§Menu§ ¢]¢Sent ¢SMS/MMS
The list of sent SMS or MMS messages is
displayed.
T9 settings
§Menu§ ¢]¢Setup
¢Select a function
T9 preferred
Activate/deactivate intelligent text entry
(see also p. 11).
Input language
Select language for text entry. Languages
with T9 support are marked by the
T9 symbol.
SMS profiles, MMS profiles
§Menu§ ¢]¢Setup
¢SMS profiles/MMS profiles
Profiles have to be created for SMS and
MMS. The transmission characteristics are
defined in these. The data for these may
already have been entered. If not, your
service provider will supply you with the
relevant information. Additional informa-
tion is available in the comprehensive op-
erating instructions on the Internet at:
www.siemens-mobile.com/a65
Surf & fun
Internet browser (WAP)
§Menu§ ¢É¢Select a function
Get the latest information from the Inter-
net that is specifically adapted to the dis-
play options of your phone. Internet ac-
cess may required registration with your
service provider.
Home b
A connection is established with the In-
ternet provider’s portal (may be speci-
fied/configured by default by your service
provider).
Bookmarks
List of URLs for fast access.
Internet b
The browser is activated as soon as you
call up the function. The functions of the
soft keys vary, depending on the internet
page, for example "link" or "menu". The
contents of the option menus are also
variable. If necessary set how the Internet
access should be made. To this end open
the browser menu with Aand select
Setup/Start with... .

©
Siemens AG 2003, C:\Daten\Siemens\Produkte\A65\output\SUG\A65_SUG_en_040722_te_pk_druck_ohneSAR\Puma_Main.fm
left page (18) of A65_PUMA en, A31008-H5810-A1-1-7619 (22.07.2004, 13:32)
Surf & fun
18
VAR Language: en; VAR issue date: 040405
Additional notes
ÍBrowser menu.
ÉOffline.
ÊOnline.
ËGPRS online.
ÌNo network.
*Select special characters, such as
@,~,\ , see p. 11 or
0press repeatedly for:
. , ? ! ’ " 0 - ( ) @ / : _
End connection
Press and hold Bto end the connection
and close the browser.
WAP profiles
§Menu§ ¢É¢Internet ¢Profiles
Preparation of the phone for WAP Internet
access depends on your service provider.
If thesesettings have already been applied
by the service provider, select and acti-
vate profile. If you have to configure the
access profile manually, consult your
service provider if necessary.
Activate WAP profile
You can change the active profile each
time before you access the Internet (if the
profile has been set already). For this,
select profile, then §Select§.
WAP profile setting
Up to 5 WAP profiles can be configured
(may be limited by the service provider).
The specifications may vary according to
service provider. Select profile, then §Edit§
and fill in the data fields.
Select the connection profile: see p. 21.
Games & more
Download games and other applications.
You are advised about relevant applica-
tions on the Internet. Once you have se-
lected a game or application you can start
to download it immediately. Then you
can use the application. Most applications
include instructions. Applications and
games can be found at:
wap.siemens-mobile.com or on the Internet
at www.siemens-mobile.com
Additional information
To download applications, the WAP pro-
file, HTTP profile and access must be con-
figured (p. 21).
Depending on the service provider, the
access and functionality could differ from
the present description.
Games and applications
Applications and links that are already
stored on the phone are found under:
§Menu§ ¢É¢Games & more
Different functions are available
depending on which entry is highlighted:
Download new
§Internet§ The selected Internet page is
loaded.
§Carry out game/application offline
§Select§ Loadable application can be
started immediately.
¦Load game/application online
§Select§ Only description file, application
has still to be loaded.
You will find special instructions or infor-
mation for each game in the option
menu.

right page (19) of A65_PUMA en, A31008-H5810-A1-1-7619 (22.07.2004, 13:32)
©
Siemens AG 2003, C:\Daten\Siemens\Produkte\A65\output\SUG\A65_SUG_en_040722_te_pk_druck_ohneSAR\Puma_Main.fm
19
Setup
VAR Language: en; VAR issue date: 040405
Key control
The following key control is used for
many games (virtual joystick):
or use the key I.
Setup
Profiles
§Menu§ ¢m¢Profiles
Several settings can be stored in a phone
profile in order, for example, to adapt the
phone to the surrounding level of noise.
• Five profiles are standard with default
settings, they can be changed howev-
er: Normal envi., Quiet environ.,
Noisy environ., Car Kit, Headset
• You can set two personal profiles
(<No Title>).
• The special profile Aircraft mode cannot
be changed.
Activate
Select default profile or personal profile
¢§Activate§.
Setup
Select profile ¢§Options§ ¢Change sett.
The list of available functions is displayed:
Car Kit
The profile is only activated automatically
as soon as the phone is inserted into the
cradle if a Siemens original Car Kit is used.
Headset
The profile is only activated automatically
if used with an original Siemens headset.
Aircraft mode
The alarm tone is deactivated. An alarm is
only shown on the display. It is not possible
to modify this profile. The phone will auto-
matically switch off if you select this
profile.
Normal mode
The next time you switch on the phone
and return to normal operation the de-
fault profile will be activated.
Display
§Menu§ ¢m¢Display
¢Select a function
Language
Set the language of the display text. "Au-
tomatic" will set the language of your
home service provider. Reset to this lan-
guage in standby status:
*# 0 0 0 0 #
Wallpaper
Logo
Colour scheme
Own greeting
Big letters
Illumination
Contrast
Screensaver
The screensaver shows a picture on the
display as soon as a period that can be set
by you has elapsed. The function is ended
by an incoming call or by pressing
any key.
8
13
79
5
2
6
4
function
depends on
the game

©
Siemens AG 2003, C:\Daten\Siemens\Produkte\A65\output\SUG\A65_SUG_en_040722_te_pk_druck_ohneSAR\Puma_Main.fm
left page (20) of A65_PUMA en, A31008-H5810-A1-1-7619 (22.07.2004, 13:32)
Setup
20
VAR Language: en; VAR issue date: 040405
Call setup
§Menu§ ¢m¢Call setup
¢Select a function
Hide ID b
When switched on, the display of the call-
ing party shows your phone number (de-
pendent on service provider).
Call waiting b
If you are registered for this service, you
can check whether it is set and you can
activate/deactivate it with Call waiting.
Divert
You can set the conditions for which calls
are diverted to your mailbox or other
numbers.
Set up call divert (example):
• All calls
All calls are diverted. nis shown in the
top line of the display in standby mode.
•Unanswered
Includes Unanswered, Not reachable,
No reply, Busy.
§Select§ ¢Set ¢J(Enter the phone
number, to which the call should be
diverted) ¢§OK§
After a short pause, the setting is con-
firmed by the network.
Other divert options: Not reachable,
No reply, Busy
• Status check
After a short pause the current informa-
tion is shown.
pCondition set.
oNot set.
sDisplay if status is unknown
(e. g. with a new SIM card).
• Clear all
All set diversions are cleared.
Any to answer
Incoming calls can be accepted by press-
ing any key
(except for B
).
Minute beep
During the call, you will hear a beep after
each minute as a reminder of the time
elapsed. The recipient does not hear this
beep.
Other manuals for A65
2
Table of contents
Other Siemens Cell Phone manuals

Siemens
Siemens CX65 User manual

Siemens
Siemens SK65 Safety guide

Siemens
Siemens Gigaset SL55 User manual

Siemens
Siemens C62 User manual

Siemens
Siemens SL65 User manual

Siemens
Siemens C75 Setup guide

Siemens
Siemens CF75 User manual

Siemens
Siemens SL10 User manual

Siemens
Siemens S40 User manual

Siemens
Siemens CT56 User manual

Siemens
Siemens ME75 User manual

Siemens
Siemens C75 Setup guide

Siemens
Siemens PEGASUS-DTC AX72 User manual

Siemens
Siemens SF65 User manual

Siemens
Siemens A70 User manual

Siemens
Siemens S75 User manual

Siemens
Siemens S40 User manual

Siemens
Siemens C25 User manual

Siemens
Siemens M65 User manual

Siemens
Siemens S6 GSM User manual