Siemens MDACT User manual

INTRODUCTION
The Model MDACT from Siemens Industry, Inc. is a
multipoint serial dialer for use in MXL and FireFinder-
XLS systems where point identification of alarm,
supervisory, status or trouble indication is required at
central stations.
The MDACT has the following features:
• Multiple Data Protocols: Contact ID and SIA
• 100 Event History Buffer
• Dual Phone Line Interface
• Option Bus Interface for Built-in Programming
using DCT-P LCD Remote Keypad
• LEDs for Heartbeat, System Trouble and Phone
Line Trouble (one per line)
• Real Time Clock
NOTE: The NIM-2D Upgrade Kit, P/N 500-649576,
must be used.
The MDACT is compatible with the following:
• MMB ROM version 10.14 and higher
• SMB ROM version 6.14 and higher
• CSG-M version 11.05 and higher
• PMI version 4.0 and higher
• Zeus version 4.0 and higher
Installation Instructions
Model MDACT
MXL/FireFinder-XLS Multi-Point Digital Alarm Communicator
P/N 315-099351-6
Siemens Industry, Inc.
Building Technologies Division
Florham Park, NJ
Siemens Building Technologies, Ltd.
Fire Safety & Security Products
2 Kenview Boulevard
Brampton, Ontario
L6T 5E4 Canada
For MXL programming, refer to MXL Operation,
Installation, and Maintenance Manual, P/N 315-
092036, MXL-IQ Operation, Installation, and Mainte-
nance Manual, P/N 315-093624, CSG-M Manual,
P/N 315-090381, and CSG-M Version 11.05 Up-
date, P/N 315-099402, as applicable.
For FireFinder-XLS programming, refer to the
FireFinder-XLS Installation, Operation and Mainte-
nance Manual, P/N 315-033744, and the Zeus
Quick Start Manual, P/N 315-033875.
OPERATION
The MDACT delays the AC Fail trouble signal in
accordance with NFPA and UL requirements. Refer
to the MDACT Programming Manual, P/N 315-
099378 for further information.
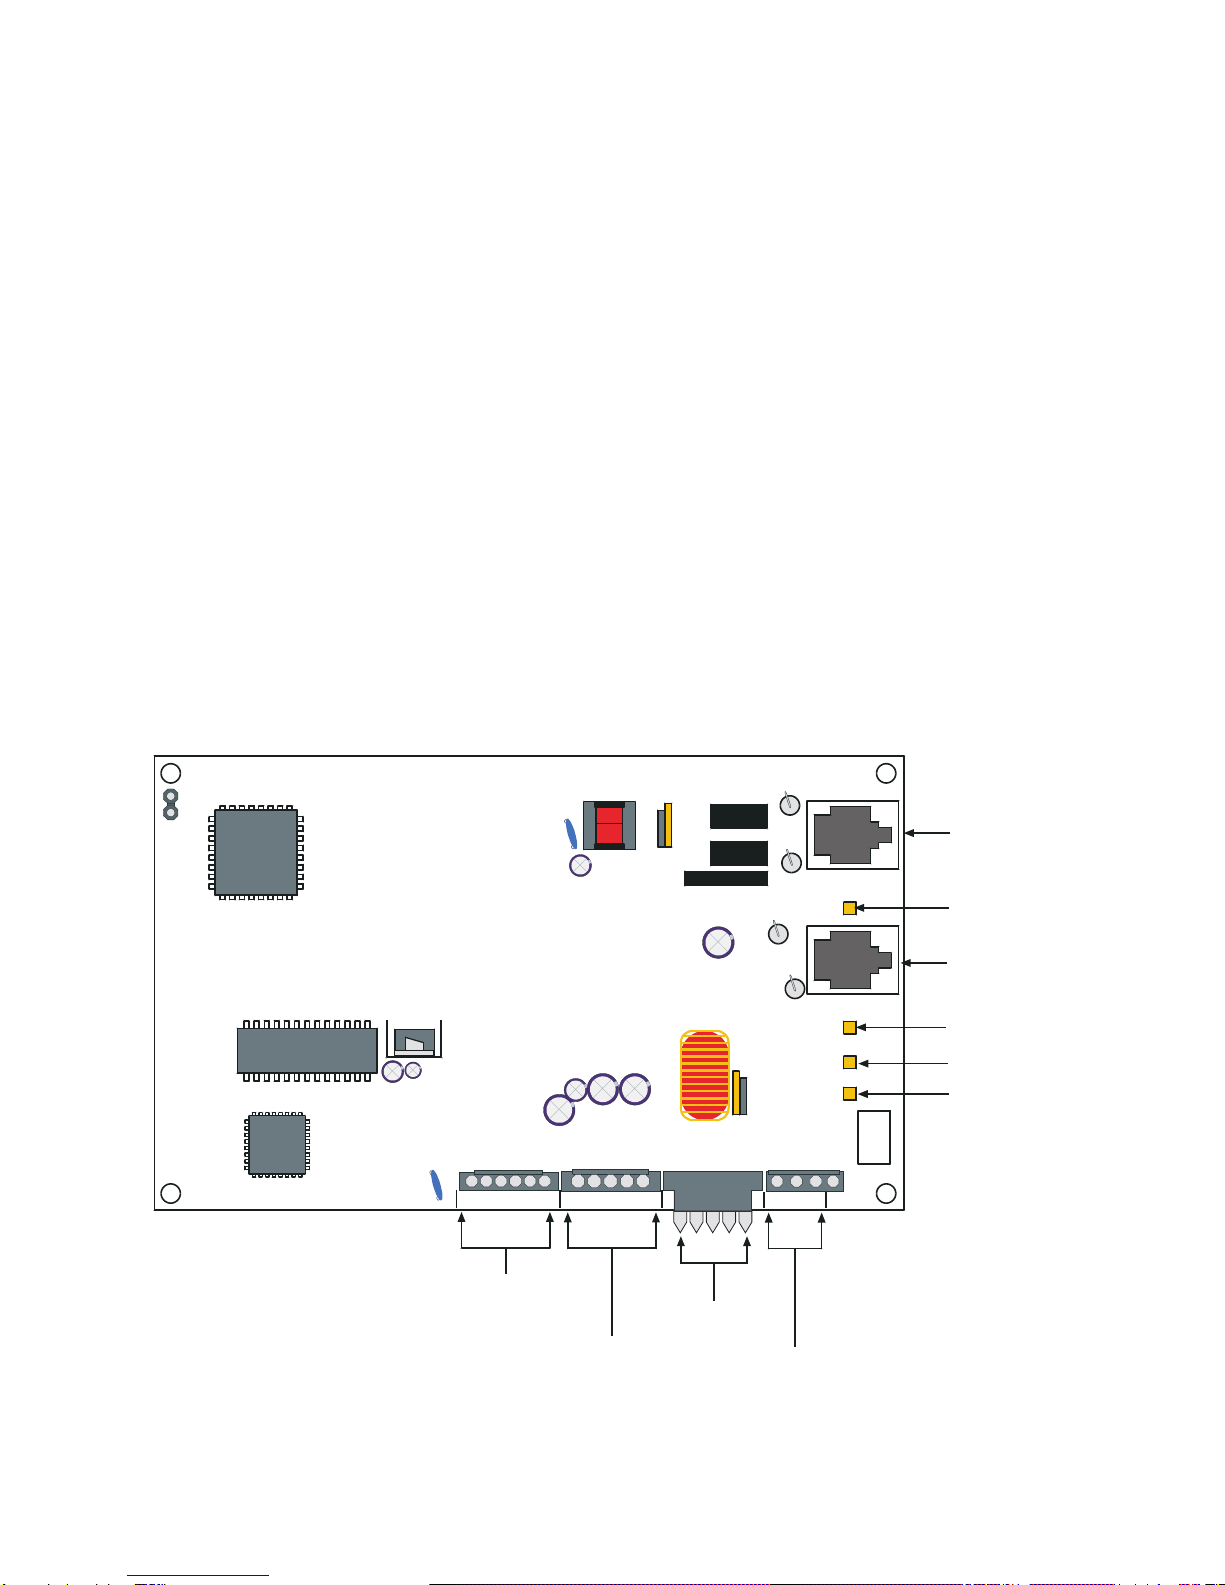
INSTALLATION
Remove all system power before installation,
first battery and then AC. (To power up, connect
the AC first, then the battery.)
The MDACT installs into the MXL optional MOM-4/-2
card cage where it occupies one half width slot. The
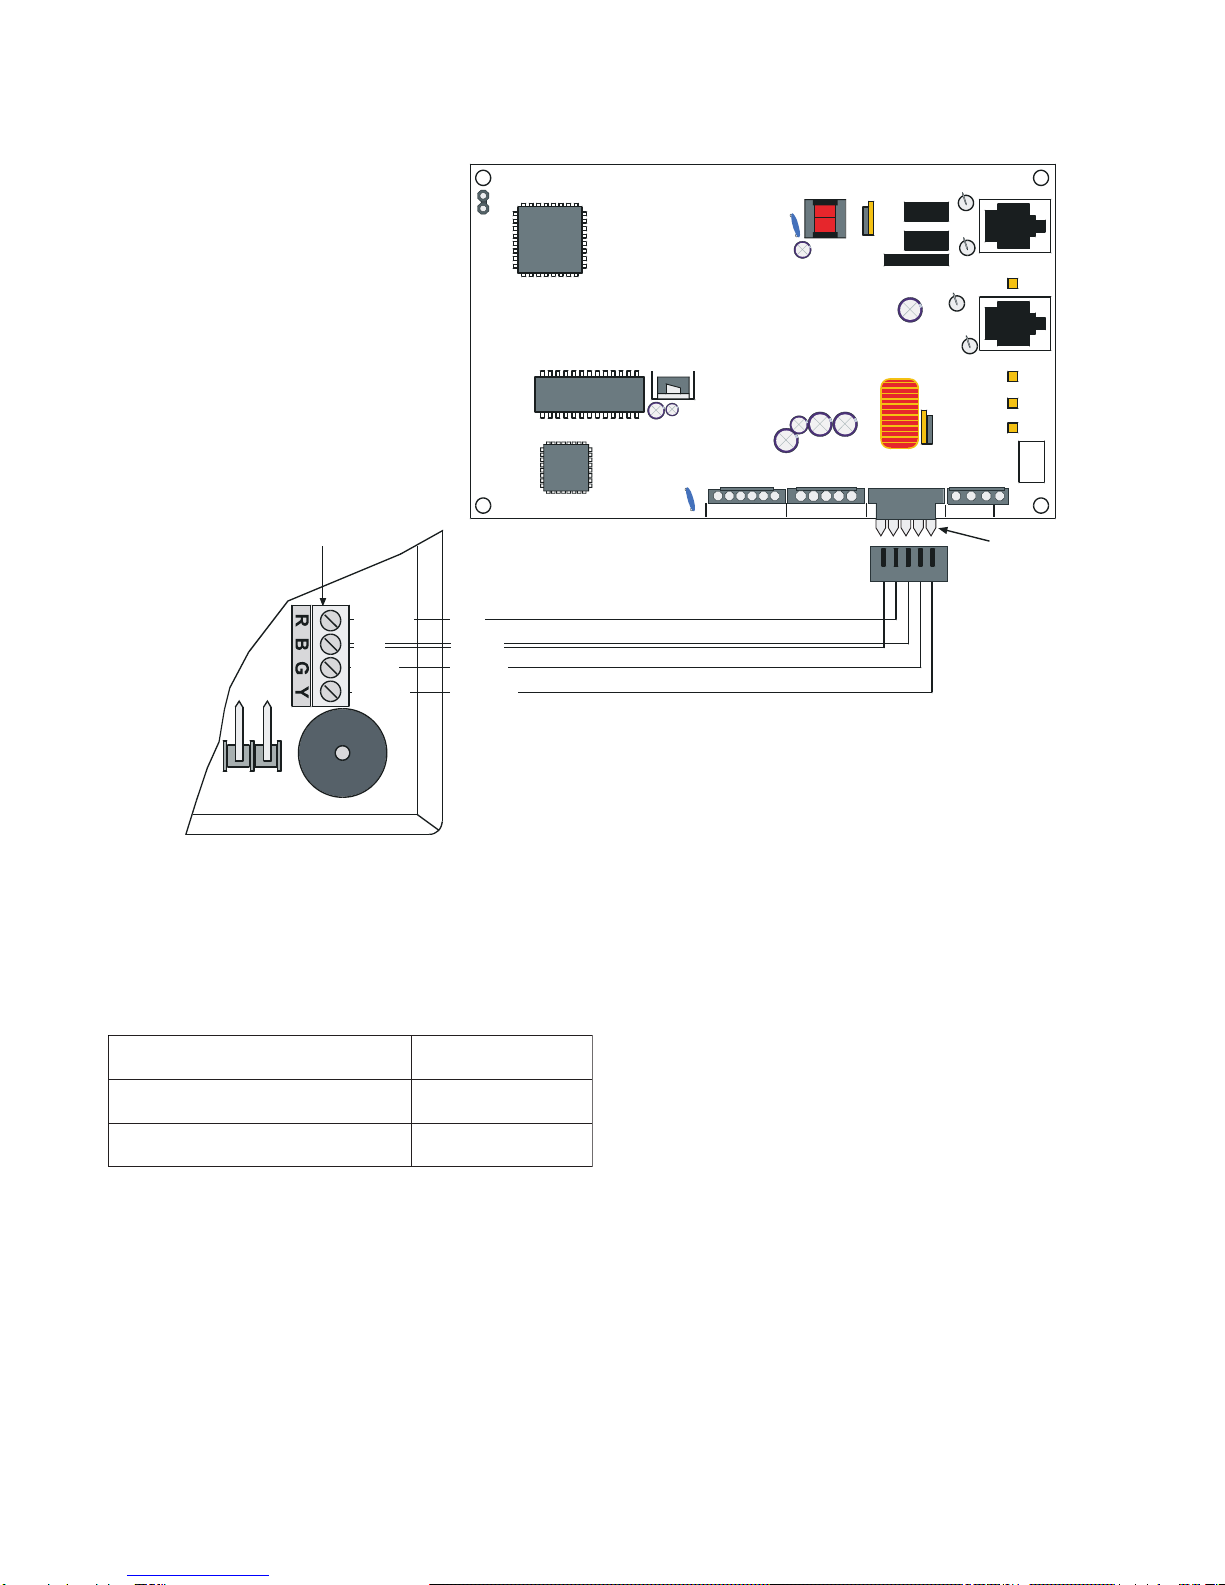
CABLE P/N 555-190967
TO MMB-2/-3, SMB-2/-3 OR PSR-1
TO MMB-2/-3, SMB-2/-3, PSR-1
24V
OR PSC-12
DO NOT USE
P7
P10
P5
P8
TB6
TB7
12
345678910111213141516
12
345678910111213141516
1
1
1
1
1
1
P3
TB3
MDACT
TB4
INSTALLED IN MXL PANEL
12
345678910111213141516
12
345678910111213141516
P4
DO NOT USE
TB1
P1
TB2
P2
MDACT
MOM-4
NOTE:
MDACT can only be installed
in MOM-4/-2 slots P2 or P4.
Figure 1
MDACT Installation In MXL Panel

2
Figure 3
NIM-2D Module Board
NIM-2D
P6
SW3
SW1
4321
87654321
WX
INSTALL JUMPER PLUGS
IN ORIENTATION
AS SHOWN.
JP4
MW
INSTALL JUMPER
PLUGS IN ORIENTATION
AS SHOWN. POSITION
SHOWN SELECTED.
M
P6
WX
JP4
MW
1
13 15
3
NOTE: Switch SW3 is factory set.
All switches must remain in
the ON position.
P7
P10
P5
P8
TB6
TB7
1
1
1
1
1
1
MDACT
TB4
INSTALLED IN FIREFINDER-XLS PANEL
12
345678910111213141516
12
345678910111213141516
P4
TB2
P2
XMI
DO NOT USE WITH FIREFINDER-XLS,
SEE XMI INSTALLATION INSTRUCTIONS,
P/N 315-034870
MOM-2*
*
FOR FIREFINDER-XLS, ONLY
MODEL MOM-2 IS AVAILABLE.
REQUIRES MOUNTING PLATE
MOM2-XMP.
TO
24V
PSC-12
DO NOT USE WITH FIREFINDER-XLS,
SEE XMI INSTALLATION INSTRUCTIONS,
P/N 315-034870
Figure 2
MDACT Installation In FireFinder-XLS Panel

3
Figure 4
Dialer PCB Layout
Dialer To NIM-2D
Factory Connection
LINE 1
LINE 2
++- -AB
Phone Line 2
Phone Line 1
No Connection
Keypad Molex
Connector Pins
SYS TROUBLE
HEARTBEAT
Phone Line 1 LED
Phone Line 2 LED
System Trouble LED
Heartbeat LED
KEYPAD
No Connection
MDACT can be installed in either slot P2 or slot P4 of
the MOM-4/-2. (See Figure 1.) For FireFinder-XLS,
only the MOM-2 can be used. (See Figure 2.)
Setting the Switches
Set all switches, configuration jumpers, and connec-
tion cables before installing them into the MOM-4/-2.
See Figure 3 for switch locations.
1. Use switch SW1 to set the MXL MNET or
FireFinder-XLS HNET network address. Set this
switch according to the address where the MDACT
is installed in the MXL or FireFinder-XLS network
map. Refer to the CSG-M or Zeus configuration
printout for the address of the module. See Table 1
for MXL (MNET) and XLS (HNET) settings.
2. Switch SW3 is factory set. All switches must
remain in the ON position.
3. Set jumper plugs on JP4 to the "M" position.
4. Set jumper plugs on P6 to the positions shown in
Figure 3.
Telephone Connectons
Telephone Cord Installation
Connect the primary phone line to the MDACT modu-
lar jack "Line1" using a phone cord. Connect the
secondary phone line to the MDACT jack "LINE2"
using another phone cord. See Figure 4 for phone line
connection.
NOTE: You must connect separate primary and
secondary phone lines to the MDACT for all
applications.
Location
To prevent jamming of alarm and other reports, wire
and locate the RJ31X or RJ38X jack so that normal
phone use is temporarily interrupted while the MDACT
transmits data (See Figure 5). After installation,
confirm that the MDACT seizes the line, acquires dial
tone and reports correctly to the receiver.

4
Figure 5
RJ31X Wiring
NOTE: Use the supplied telco cable assemblies to connect to an RJ31 jack. Make sure the RJ31 jacks are
mounted in a secure location to prevent false disconnections and/or tampering.
Notification
Do not connect registered equipment to party lines or
coin-operated telephones. If the local telephone
company requests notification before you connect the
MDACT to the telephone network, supply the following
information:
• the particular line to which you are connecting the
MDACT
• the make, model and serial number of the device
• the FCC registration number (ESVMUL-46514-AL-E)
and ringer equivalence (0.0B).
If the telephone company makes changes in its
communications facilities, equipment, operations or
procedures that may affect the performance of the
MDACT, the telephone company is obligated to notify
the user in writing.
The MDACT meets the requirements of UL 1950.
1
2
3
6
7
8
R1
T1
4
5
R
T
RJ31X Module
Full Modular Phone Jack To Dialer
Connecting the Keypad to the MDACT
NOTE: The DCT-P LCD Remote Keypad is used
strictly for programming and debugging
purposesonly.
A DCT-P LCD Remote Keypad can be used to
operate the MDACT Communicator. Plug the molex
connector from the DCT-P onto the connector pins on
the MDACT board as shown in Figure 6.
Use the following steps when programming the
MDACT from the DCT-P.
1. Set the DCT-P address between 1 and 15.
2. Use the wire connector supplied with the DCT-P to
connect the DCT-P to the MDACT. See Figure 6.
3. Program the MDACT as explained in the
programming section of the MDACT Programming
Manual, P/N 315-099378.
NOTE: If there is no keypad activity for three minutes,
the keypad is disabled. The keypad's buzzer
sounds and a "SYSTEM FAULT" message
will appear on the keypad. Disconnect the
keypad from the MDACT by removing the
wire harness plug from the MDACT's keypad
pins, then reconnect the wire plug harness to
re-enable the keypad.

5
ELECTRICAL RATINGS
Compatibilities
The following receivers and panels have been proven
to be compatible with the MDACT under the method
required by Underwriters Laboratories. Receivers that
are not listed as compatible should not be used with
the MDACT.
DCT-P
Terminal Strip
+12 VDC
RED
BLACK
Com
Data In
GREEN
Data Out
YELLOW
MDACT Fire Communicator
LINE 1
LINE 2
++- -AB 12345 NC C NO
SYS TROUBLE
HEARTBEAT
KEYPAD
KEYPAD
Figure 6
Keypad Connection to MDACT Fire Communicator
Available Reporting Formats
•Contact ID (CID): Is the preferred reporting
format. It provides a four digit account code
followed by a three digit event code, a two digit
group number, and a three digit contact number,
all of which are used to provide specific point
identification.
•SIA: Security Industry Association (SIA) Digital
Communication Standard. The DACT provides
level 1 compatibility which includes tonal
acknowledge, basic reports only, and fixed
reporting codes.
tnerruCeludoMCDV5evitcAAm0
tnerruCeludoMCDV42evitcAAm083
tnerruCeludoMCDV42ybdnatSAm023

6
Compatible Receivers (q= Available)
Report
Format Radionics
D6500 Radionics
D6600 Sur-gard
SG-SLR
Osborne/Hoffman
Quick Alert Model
II
Ademco
685
Silent
Knight
SK9000
Contact ID qq q q q
SIA300 qq q
SIA110 qq q
Figure 7
MDACT UL Listed Compatibility

7
TABLE 1
NETWORK ADDRESS PROGRAMMING (SW1)
NETWORK ADDRESS PROGRAMMING
ADDR 87654321 ADDR 87654321 ADDR 87654321 ADDR 87654321
000 ILLEGAL 064 OXOOOOOO 128 XOOOOOOO 192 XXOOOOOO
001 ILLEGAL 065 OXOOOOOX 129 XOOOOOOX 193 XXOOOOOX
002 ILLEGAL 066 OXOOOOXO 130 XOOOOOXO 194 XXOOOOXO
003
004
005
006
007
008
009
010
011
012
013
014
015
016
017
018
019
020
021
022
023
024
025
026
027
028
029
030
031
032
033
034
035
036
037
038
039
040
041
042
043
044
045
046
047
048
049
050
051
052
053
054
055
OOOOOOXX
OOOOOXOO
OOOOOXOX
OOOOOXXO
OOOOOXXX
OOOOXOOO
OOOOXOOX
OOOOXOXO
OOOOXOXX
OOOOXXOO
OOOOXXOX
OOOOXXXO
OOOOXXXX
OOOXOOOO
OOOXOOOX
OOOXOOXO
OOOXOOXX
OOOXOXOO
OOOXOXOX
OOOXOXXO
OOOXOXXX
OOOXXOOO
OOOXXOOX
OOOXXOXO
OOOXXOXX
OOOXXXOO
OOOXXXOX
OOOXXXXO
OOOXXXXX
OOXOOOOO
OOXOOOOX
OOXOOOXO
OOXOOOXX
OOXOOXOO
OOXOOXOX
OOXOOXXO
OOXOOXXX
OOXOXOOO
OOXOXOOX
OOXOXOXO
OOXOXOXX
OOXOXXOO
OOXOXXOX
OOXOXXXO
OOXOXXXX
OOXXOOOO
OOXXOOOX
OOXXOOXO
OOXXOOXX
OOXXOXOO
OOXXOXOX
OOXXOXXO
OOXXOXXX
067
068
069
070
071
072
073
074
075
076
077
078
079
080
081
082
083
084
085
086
087
088
089
090
091
092
093
094
095
096
097
098
099
100
101
102
103
104
105
106
107
108
109
110
111
112
113
114
115
116
117
118
119
OXOOOOXX
OXOOOXOO
OXOOOXOX
OXOOOXXO
OXOOOXXX
OXOOXOOO
OXOOXOOX
OXOOXOXO
OXOOXOXX
OXOOXXOO
OXOOXXOX
OXOOXXXO
OXOOXXXX
OXOXOOOO
OXOXOOOX
OXOXOOXO
OXOXOOXX
OXOXOXOO
OXOXOXOX
OXOXOXXO
OXOXOXXX
OXOXXOOO
OXOXXOOX
OXOXXOXO
OXOXXOXX
OXOXXXOO
OXOXXXOX
OXOXXXXO
OXOXXXXX
OXXOOOOO
OXXOOOOX
OXXOOOXO
OXXOOOXX
OXXOOXOO
OXXOOXOX
OXXOOXXO
OXXOOXXX
OXXOXOOO
OXXOXOOX
OXXOXOXO
OXXOXOXX
OXXOXXOO
OXXOXXOX
OXXOXXXO
OXXOXXXX
OXXXOOOO
OXXXOOOX
OXXXOOXO
OXXXOOXX
OXXXOXOO
OXXXOXOX
OXXXOXXO
OXXXOXXX
131
132
133
134
135
136
137
138
139
140
141
142
143
144
145
146
147
148
149
150
151
152
153
154
155
156
157
158
159
160
161
162
163
164
165
166
167
168
169
170
171
172
173
174
175
176
177
178
179
180
181
182
183
XOOOOOXX
XOOOOXOO
XOOOOXOX
XOOOOXXO
XOOOOXXX
XOOOXOOO
XOOOXOOX
XOOOXOXO
XOOOXOXX
XOOOXXOO
XOOOXXOX
XOOOXXXO
XOOOXXXX
XOOXOOOO
XOOXOOOX
XOOXOOXO
XOOXOOXX
XOOXOXOO
XOOXOXOX
XOOXOXXO
XOOXOXXX
XOOXXOOO
XOOXXOOX
XOOXXOXO
XOOXXOXX
XOOXXXOO
XOOXXXOX
XOOXXXXO
XOOXXXXX
XOXOOOOO
XOXOOOOX
XOXOOOXO
XOXOOOXX
XOXOOXOO
XOXOOXOX
XOXOOXXO
XOXOOXXX
XOXOXOOO
XOXOXOOX
XOXOXOXO
XOXOXOXX
XOXOXXOO
XOXOXXOX
XOXOXXXO
XOXOXXXX
XOXXOOOO
XOXXOOOX
XOXXOOXO
XOXXOOXX
XOXXOXOO
XOXXOXOX
XOXXOXXO
XOXXOXXX
195
196
197
198
199
200
201
202
203
204
205
206
207
208
209
210
211
212
213
214
215
216
217
218
219
220
221
222
223
224
225
226
227
228
229
230
231
232
233
234
235
236
237
238
239
240
241
242
243
244
245
246
247
XXOOOOXX
XXOOOXOO
XXOOOXOX
XXOOOXXO
XXOOOXXX
XXOOXOOO
XXOOXOOX
XXOOXOXO
XXOOXOXX
XXOOXXOO
XXOOXXOX
XXOOXXXO
XXOOXXXX
XXOXOOOO
XXOXOOOX
XXOXOOXO
XXOXOOXX
XXOXOXOO
XXOXOXOX
XXOXOXXO
XXOXOXXX
XXOXXOOO
XXOXXOOX
XXOXXOXO
XXOXXOXX
XXOXXXOO
XXOXXXOX
XXOXXXXO
XXOXXXXX
XXXOOOOO
XXXOOOOX
XXXOOOXO
XXXOOOXX
XXXOOXOO
XXXOOXOX
XXXOOXXO
XXXOOXXX
XXXOXOOO
XXXOXOOX
XXXOXOXO
XXXOXOXX
XXXOXXOO
XXXOXXOX
XXXOXXXO
XXXOXXXX
XXXXOOOO
XXXXOOOX
XXXXOOXO
XXXXOOXX
XXXXOXOO
XXXXOXOX
XXXXOXXO
XXXXOXXX
056 OOXXX OOO 120 OXXXXOOO 184 XOXXXOOO 248 ILLEGAL
057 OOXXXOOX 121 OXXXXOOX 185 XOXXXOOX 249 ILLEGAL
058 OOXXXOXO 122 OXXXXOXO 186 XOXXXOXO 250 ILLEGAL
059 OOXXXOXX 123 OXXXXOXX 187 XOXXXOXX 251 ILLEGAL
060 OOXXXXOO 124 OXXXXXOO 188 XOXXXXOO 252 ILLEGAL
061 OOXXXXOX 125 OXXXXXOX 189 XOXXXXOX 253 ILLEGAL
062 OOXXXXXO 126 OXXXXXXO 190 XOXXXXXO 254 ILLEGAL
063 OOXXXXXX 127 OXXXXXXX 191 XOXXXXXX 255 ILLEGAL
O = OPEN (or OFF) X = CLOSED ( or ON
)

P/N 315-099351-6
Siemens Industry, Inc.
Building Technologies Division
Florham Park, NJ
Siemens Building Technologies, Ltd.
Fire Safety & Security Products
2 Kenview Boulevard
Brampton, Ontario
L6T 5E4 Canada
Table of contents
Other Siemens Cell Phone manuals

Siemens
Siemens A70 User manual

Siemens
Siemens Gigaset S56 User manual

Siemens
Siemens S25 User manual

Siemens
Siemens SL45 User manual

Siemens
Siemens A50 User manual

Siemens
Siemens SL65 User manual

Siemens
Siemens A55 Operator's manual

Siemens
Siemens Mobile CF62T User manual

Siemens
Siemens C75 User manual

Siemens
Siemens GSM 900, GSM 1900 User manual

Siemens
Siemens S46 User manual

Siemens
Siemens Xelibri User manual

Siemens
Siemens S65 User manual

Siemens
Siemens M65 User manual

Siemens
Siemens S65 User manual

Siemens
Siemens A52 User manual

Siemens
Siemens S35i User manual

Siemens
Siemens SL10 User manual

Siemens
Siemens S55 User manual

Siemens
Siemens A75 User manual