manuals.online logo
Brands
  1. Home
  2. •
  3. Brands
  4. •
  5. Siemens
  6. •
  7. Temperature Controllers
  8. •
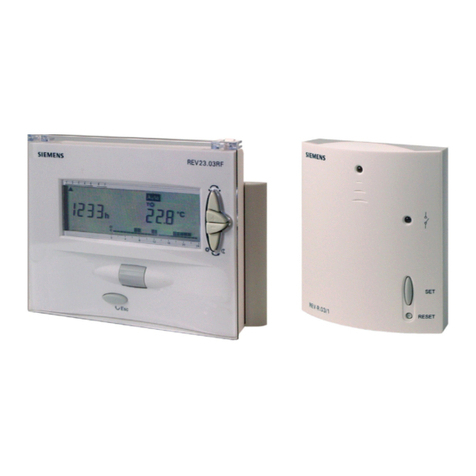
  9. Siemens REA23.03RF User manual

Siemens REA23.03RF User manual

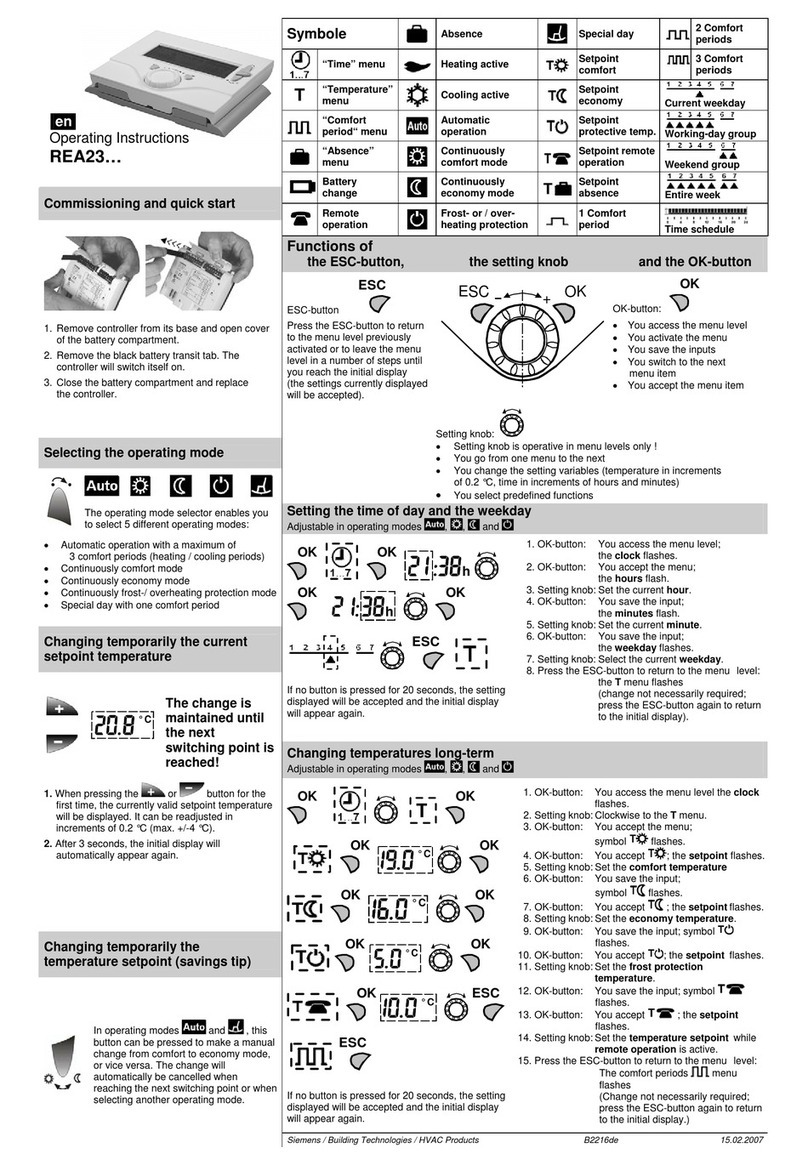
Commissioning and quick start
1. Receiver
REA-R.03/1
Switch on power and press
“RESET” button for about
4 seconds: Orange LED_2
flashes briefly. Then, press “SET”
button for about
4 seconds: Orange LED_2
flashes slowly; learning mode is
active.
Within 25 minutes press “ESC”
button on REA23.03RF for about
4 seconds: Orange LED_2
flashes fast and briefly; LED_1
changes from red to flashing
green.
After commissioning, the unit will
operate automatically.
2. Transmitter (REA23.03RF)
1. 2.
1. Remove controller from its base and open cover
of the battery compartment.
2. Remove the black battery transit tab. The
controller will switch itself on.
3. Close the battery compartment and replace the
controller.
Selecting the operating mode
The operating mode selector enables you
to select 5 different operating modes:
•Automatic operation with a maximum
of 3 heating / cooling periods
•Continuously comfort mode
•Continuously economy mode
•Continuously frost protection /
overheat protection mode
•Special day with one comfort period
Changing temporarily the current
setpoint temperature
° C
The change is
maintained until
the next switching
point is reached!
1. When pressing the or button for the
first time, the currently valid setpoint temperature
will be displayed. It can be readjusted in
increments of 0.2 °C (max. +/-4 °C).
2. After a short time, the initial display will
automatically appear again.
Changing temporarily the
temperature setpoint (savings tip)
In operating modes and , this
button can be pressed to make a manual
change from comfort to economy mode,
or vice versa.
The change will automatically be
cancelled when reaching the next
switching point or when selecting another
operating mode.
(Press button for approximately
4 seconds to transmit test telegrams.)
Symbols Special day 2 Comfort
periods
“Time” menu Heating active Setpoint
comfort 3 Comfort
periods
T“Temperature
” menu Cooling active Setpoint
economy Current weekday
“Comfort
period“ menu Automatic
operation Setpoint
protective
temp. Working-day group
“Absence”
menu Continuously
comfort mode Setpoint
absence Weekend group
Battery
change Continuously
economy mode Not used with
this unit Entire week
Absence Frost- or / over-
heating protection 1 Comfort
period Time schedule
Functions of
the ESC-button, the setting knob and the OK-button
ESC-button
ESC
- Press the ESC-button to return
to the menu level previously
activated or to leave the menu
level in a number of steps until
you reach the initial display
(the settings currently displayed
will be accepted).
- Press this button for approx.
4 seconds to transmit learning
telegram.
+
ESC OK
OK - button:
OK
•You access the menu level
•You activate the menu
•You save the inputs
•You switch to the next
menu item
•You accept the menu item
Setting knob:
•Setting knob is operative in menu levels only !
•You go from one menu to the next
•You change the setting variables (temperature in increments
of 0.2 °C, time in increments of hours and minutes)
•You select predefined functions
Setting the time of day and the weekday
Adjustable in operating modes , , and
OK
OK h
OK hOK
ESC
If no button is pressed for 20 seconds, the setting
displayed will be accepted and the initial display will
appear again.
1. OK-button: You access the menu level;
the clock flashes.
2. OK-button: You accept the menu;
the hours flash.
3. Setting knob: Set the current hour.
4. OK-button: You save the input;
the minutes flash.
5. Setting knob: Set the current minute.
6. OK-button: You save the input;
the weekday flashes.
7. Setting knob: Select the current weekday.
8. Press the ESC-button to return to the menu level:
the T menu flashes
(Change not necessarily required; press the
ESC-button again to return to the initial display).
Changing temperatures long-term
Adjustable in operating modes , , and
OK
OK
OK ° C
OK
OK ° C
OK
OK
° C OK
ESC
ESC
If no button is pressed for 20 seconds, the setting
displayed will be accepted and the initial display will
appear again.
1. OK-button: You access the menu level;
the clock flashes.
2. Setting knob: Clockwise to the T menu.
3. OK-button: You accept the menu;
symbol flashes.
4. OK-button: You accept ;
the setpoint flashes.
5. Setting knob: Set the comfort temperature
6. OK-button: You save the input;
symbol flashes.
7. OK-button: You accept ;
the setpoint flashes.
8. Setting knob: Set the economy temperature.
9. OK-button: You save the input;
symbol flashes.
10. OK-button: You accept ;
the setpoint flashes.
11. Setting knob: Set the frost protection /
overheat protection temperature.
12. OK-button: You save the input;
symbol flashes.
Adjustment not required;
not used with this unit.
13. Press the ESC-button to return to the menu level:
The comfort periods menu
flashes
(Change not necessarily required; press the
ESC-button again to return to the initial display)
Siemens / Building Technologies / HVAC Products B2218en 26.03.2007
en
Operating Instruction
REA23.03RF
Settings for automatic operation with 2 comfort periods
Adjustable in operating modes , , and
OK
OK
OK
OK
OK
h
OK h
OK ° C
OK
OK h
OK h
OK ° C
ESC
ESC
/ESC ESC
If no button is pressed for 20 seconds, the setting
displayed will be accepted and the initial display will
appear again.
1. OK-button: You access the menu level;
the clock flashes.
2. Setting knob: Clockwise to menu,
flashes.
3. OK-button: You accept the menu;
the day selection symbol
flashes.
4. Setting knob: Select the days, the working days,
the weekend or the week.
5. OK-button: You save the selection made;
heating period flashes.
6. Setting knob: Counterclockwise to
7. OK-button: Accept ;
comfort period 1 flashes.
7. OK-button: You accept comfort period 1;
start time of comfort period 1
flashes.
9. Setting knob: Set the start time of
comfort period 1.
10. OK-button: You save the input; end time of
comfort period 1 flashes.
11. Setting knob: Set the end time of
comfort period 1.
12. OK-button: You save the input; setpoint of
comfort period 1 flashes.
13. Setting knob: Set the setpoint of
comfort period 1.
14. OK-button: You save the input;
comfort period 2 flashes.
15. OK-button: You accept comfort period 2;
start time of comfort period 2
flashes.
16. Setting knob: Set the start time of
comfort period 2.
17. OK-button: You save the input; end time of
comfort period 2 flashes.
18. Setting knob: Set the end time of
comfort period 2.
19. OK-button: You save the input; setpoint of
comfort period 2 flashes.
20. Setting knob: Set the setpoint of
comfort period 2.
21. Press the ESC-button to return to the
comfort periods menu: Menu item
comfort periods flashes.
22. Setting knob: To menu item or
comfort periods
(Change not necessarily required; press the ESC-
button several times to leave the menu level in
several steps, thus returning to the initial display.)
Settings for automatic operation with 1 or 3 comfort periods
Adjustable in operating modes , , and
The procedure to be followed is the same as that for automatic operation with 2 comfort periods. The only
difference being that, in addition, a setpoint for comfort period 3 can be entered (standard setting 21 °C)
Absence / holidays
Adjustable in operating modes , , and
OK
OK
OK
OK
° C
ESC
ESC
If no button is pressed for 20 seconds, the setting
displayed will be accepted and the initial display
will appear again.
1. OK-button: You access the menu level;
the clock flashes.
2. Setting knob: To , menu ; flashes.
3. OK-button: Accept ;
symbol flashes.
4. Setting knob: Set the start (weekday) of your
absence.
5. OK-button: You save the input;
the number of days flash.
6. Setting knob: Set the duration of your absence;
number of days (max. 99 days)
7. OK-button: You save the input;
setpoint flashes.
8. Setting knob: Set the temperature.
9. Press the ESC-button to return to the menu level;
the clock flashes.
(Change not necessarily required; press the
ESC-button again to return to the initial display)
Siemens / Building Technologies / HVAC Products B2218en 26.03.2007
Special day
Adjustable when this operating mode is selected
Special day with 24-hour mode and one comfort
period.
Start of comfort period, end of comfort period and
temperature setpoint can be set individually by
OK-button and setting knob.
Press the ESC-button to return to the initial display
Retrieving the default values
Press the button behind the small opening for at
least one second, thus resetting the user-specific
settings to their default values
(the heating engineer settings will remain
unchanged).
The clock starts at 12:00.
When making a reset, all display fields will light up.
Default values
Factory settings for heating
Operating mode
Start of continuous operation 00:00 00:00 00:00
End of continuous operation 24:00 24:00 24:00
Setpoint of comfort mode 19 °C
Setpoint of economy mode 16 °C
Setpoint frost protection 5°C
Setpoint absence 12 °C
Operating mode
Selected periods
Start of period 1 07:00 06:00 06:00
End of period 1 23:00 08:00 08:00
Start of period 2 17:00 11:00
End of period 2 22:00 13:00
Start of period 3 17:00
End of period 3 22:00
Setpoint of period 1 19 °C 19 °C 19 °C
Setpoint of period 2 20 °C 20 °C
Setpoint of period 3 21 °C
Setpoint see above
Default values
Factory settings for cooling
Operating mode
Setpoint 23 °C 23 °C 29 °C 35 °C
Setpoint
absence 30 °C
Changing the batteries
2 Alkaline-Batteries Type AA 1,5 V
When this symbol appears, the batteries must
be replaced within 3 months.
1. Remove controller from its base.
2. Open battery compartment at the rear and
replace the batteries.
3. Close battery compartment and replace the
controller.
Note:
When changing the batteries, the current data are
maintained for a maximum of one minute.
Other manuals for REA23.03RF

2

Other Siemens Temperature Controllers manuals

Siemens Free Energy Band RCU61U Owner's manual

Siemens

Siemens Free Energy Band RCU61U Owner's manual

Siemens REV24RF Installation instructions

Siemens

Siemens REV24RF Installation instructions

Siemens RDX Series User manual

Siemens

Siemens RDX Series User manual

Siemens AVS13.399 User manual

Siemens

Siemens AVS13.399 User manual

Siemens POS8.4420/109 User manual

Siemens

Siemens POS8.4420/109 User manual

Siemens RLM162 User manual

Siemens

Siemens RLM162 User manual

Siemens 1000 series User manual

Siemens

Siemens 1000 series User manual

Siemens RDE series User manual

Siemens

Siemens RDE series User manual

Siemens RDH10RF User manual

Siemens

Siemens RDH10RF User manual

Siemens REV24 User manual

Siemens

Siemens REV24 User manual

Siemens Polygyr-Compact Owner's manual

Siemens

Siemens Polygyr-Compact Owner's manual

Siemens RCC30 User manual

Siemens

Siemens RCC30 User manual

Siemens RDU20U User manual

Siemens

Siemens RDU20U User manual

Siemens i-system UP 237K Service manual

Siemens

Siemens i-system UP 237K Service manual

Siemens RLE132 User manual

Siemens

Siemens RLE132 User manual

Siemens RDF300 Series Operator's manual

Siemens

Siemens RDF300 Series Operator's manual

Siemens RCC10U Owner's manual

Siemens

Siemens RCC10U Owner's manual

Siemens REV23 User manual

Siemens

Siemens REV23 User manual

Siemens RDF30U Owner's manual

Siemens

Siemens RDF30U Owner's manual

Siemens REV23RF16A User manual

Siemens

Siemens REV23RF16A User manual

Siemens RDH10RF/SET User manual

Siemens

Siemens RDH10RF/SET User manual

Siemens HZ39050 User manual

Siemens

Siemens HZ39050 User manual

Siemens RDD10.1DHW User manual

Siemens

Siemens RDD10.1DHW User manual

Siemens SITRANS TS100 Administrator guide

Siemens

Siemens SITRANS TS100 Administrator guide

Popular Temperature Controllers manuals by other brands

Maximum MYSTIC installation guide

Maximum

Maximum MYSTIC installation guide

Sub-Zero SZ-7510-P-DI operating instructions

Sub-Zero

Sub-Zero SZ-7510-P-DI operating instructions

Dynisco 1440 Installation and operation manual

Dynisco

Dynisco 1440 Installation and operation manual

Ranco ETC Series Installation data

Ranco

Ranco ETC Series Installation data

Lennox Zoning System LZP-4 owner's manual

Lennox

Lennox Zoning System LZP-4 owner's manual

AKO AKO-16523L manual

AKO

AKO AKO-16523L manual

Omron E5ZE-8 E Series manual

Omron

Omron E5ZE-8 E Series manual

EMKO ESM Series Introduction Brochure

EMKO

EMKO ESM Series Introduction Brochure

LEGRAND 5739 18/19 user manual

LEGRAND

LEGRAND 5739 18/19 user manual

OJ Electronics WLM2-1BA user manual

OJ Electronics

OJ Electronics WLM2-1BA user manual

Tool-Temp TT-181 Manual of Instruction

Tool-Temp

Tool-Temp TT-181 Manual of Instruction

Chromalox 1604 user manual

Chromalox

Chromalox 1604 user manual

Lubing Pad-Climate-System Assembly instruction and manual

Lubing

Lubing Pad-Climate-System Assembly instruction and manual

Honeywell WV4460E installation instructions

Honeywell

Honeywell WV4460E installation instructions

Tempco TEC-9300 instruction manual

Tempco

Tempco TEC-9300 instruction manual

PCB Piezotronics IMI SENSORS TO642A31 Installation and operating manual

PCB Piezotronics

PCB Piezotronics IMI SENSORS TO642A31 Installation and operating manual

Secco SUPERCOOL-1000 user manual

Secco

Secco SUPERCOOL-1000 user manual

Nibe ECS 40 Installer manual

Nibe

Nibe ECS 40 Installer manual

manuals.online logo
manuals.online logoBrands
  • About & Mission
  • Contact us
  • Privacy Policy
  • Terms and Conditions

Copyright 2025 Manuals.Online. All Rights Reserved.