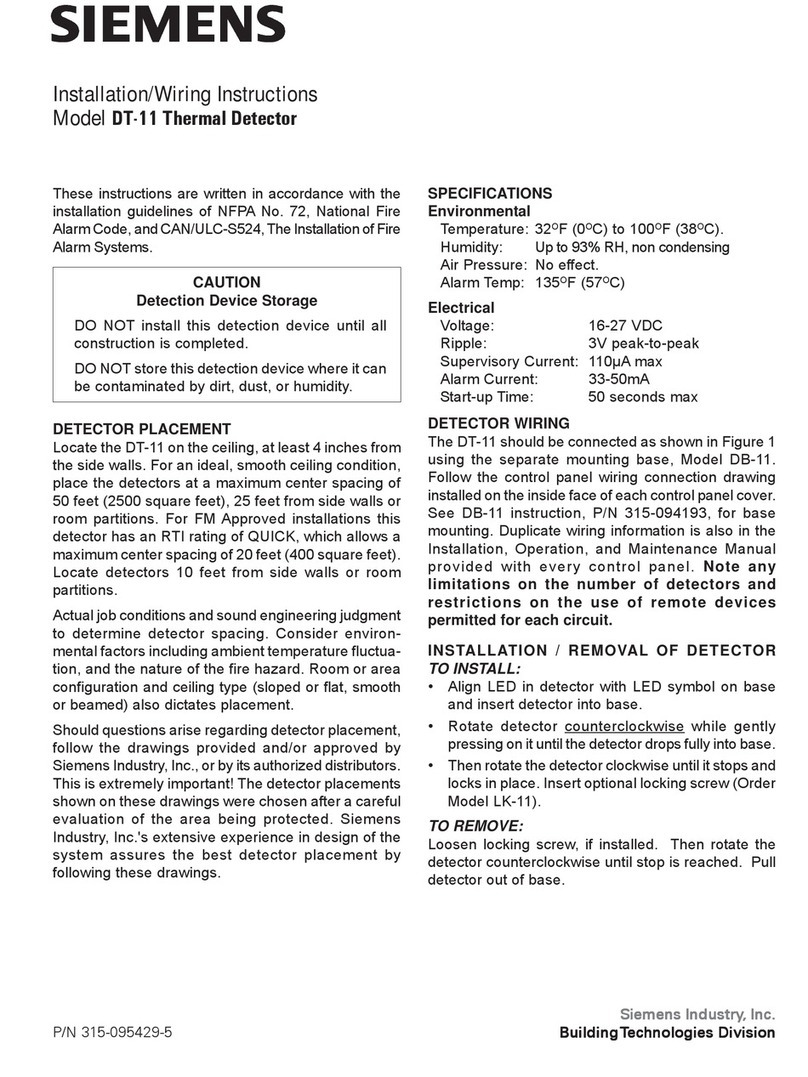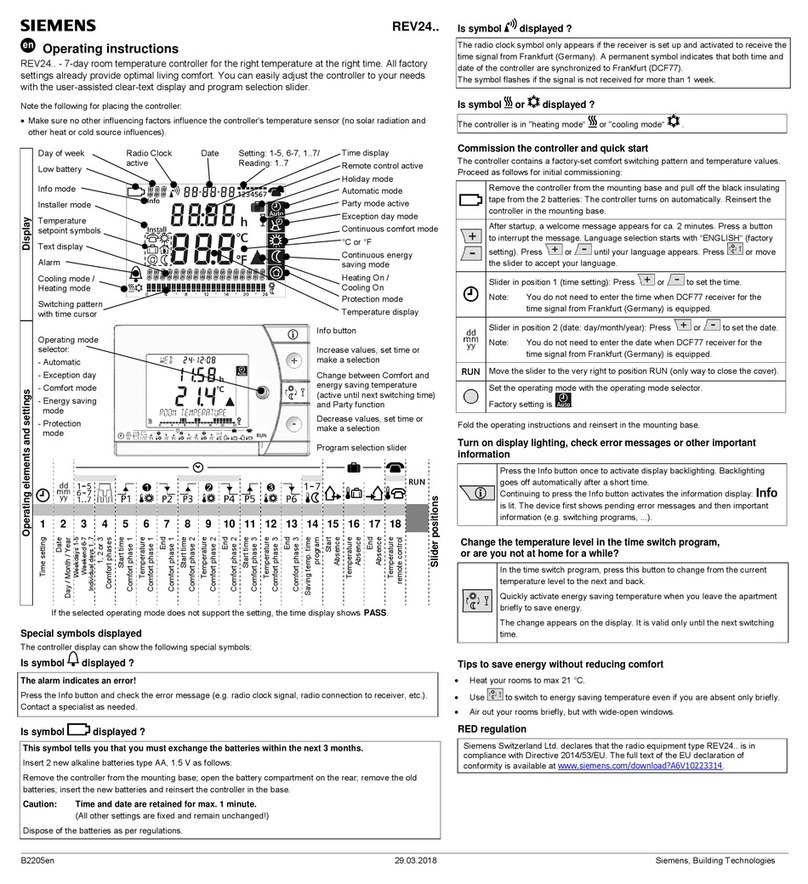
Settings for automatic operation with 2 comfort periods
Adjustable in operating modes , , and Special day
Adjustable when this operating mode is selected
Special day with 24-hour mode and one comfort
period.
Start of comfort period, end of comfort period and
temperature setpoint can be set individually by
OK-button and setting knob.
Press the ESC-button to return to the initial
display
Retrieving the default values
Press the button behind the small opening for at
least one second, thus resetting the user-specific
settings to their default values (the heating
engineer settings will remain unchanged).
The clock starts at 12:00.
When making a reset, all display fields will light
up.
Default values
Factory settings for heating
Operating mode
Start of continuous operation 00:00 00:00 00:00
End of continuous operations 24:00 24:00 24:00
Setpoint of comfort mode 19 °C
Setpoint of economy mode 16 °C
Setpoint frost protection 5 °C
Setpoint
remote operation 10 °C
Setpoint
absence 12 °C
Operating mode
Selected periods
Start of period 1 07:00 06:00 06:00
End of period 1 23:00 08:00 08:00
Start of period 2 17:00 11:00
End of period 2 22:00 13:00
Start of period 3 17:00
OK
OK
OK
OK
OK
h
OK h
OK ° C
OK
OK h
OK h
OK ° C
ESC
ESC
/ESC ESC
If no button is pressed for 20 seconds, the setting
displayed will be accepted and the initial display will
appear again.
1. OK-button: You access the menu level;
the clock flashes.
2. Setting knob: Clockwise to menu, flashes.
3. OK-button: You accept the menu; the day
selection symbol
flashes.
4. Setting knob: Select the days, the working days, the
weekend or the week.
5. OK-button: You save the selection made;
heating period flashes.
6. Setting knob: counterclockwise to
7. OK-button: Accept ; comfort period 1
flashes.
7. OK-button: You accept comfort period 1;
start time of comfort period 1 flashes.
9. Setting knob: Set the start time of comfort period 1.
10. OK-button: You save the input;
end time of comfort period 1 flashes.
11. Setting knob: Set the end time of comfort period 1.
12. OK-button: You save the input;
setpoint of comfort period 1 flashes.
13. Setting knob: Set the setpoint of comfort period 1.
14. OK-button: You save the input;
comfort period 2 flashes.
15. OK-button: You accept comfort period 2;
start time of comfort period 2 flashes.
16. Setting knob: Set the start time of comfort period 2.
17. OK-button: You save the input;
end time of comfort period 2 flashes.
18. Setting knob: Set the end time of comfort period 2.
19. OK-button: You save the input;
setpoint of comfort period 2 flashes.
20. Setting knob: Set the setpoint of comfort period 2.
21. Press the ESC-button to return to the comfort
periods menu: Menu item comfort
periods flashes.
22. Setting knob: To menu item or
comfort periods
(Change not necessarily required;
press the ESC-button several times to
leave the menu level in several
steps, thus returning to the initial
display.)
End of period 3
22:00
Setpoint of period 1 19 °C 19 °C 19 °C
Settings for automatic operation with 1 or 3 comfort periods
Adjustable in operating modes , , and Setpoint of period 2 20 °C 20 °C
Setpoint of period 3
21 °C
The procedure to be followed is the same as that for automatic operation with 2 comfort periods. The only
difference being that, in addition, a setpoint for comfort period 3 can be entered (standard setting 21 °C) Setpoints and see above
Absence / holidays
Adjustable in operating modes , , and Default values
Factory settings for cooling
Operating mode
Setpoint 23 °C 23 °C 29 °C 35 °C
Setpoint
remote operation 30 °C
Setpoint
absence 30 °C
Changing the batteries
2 Alkaline batteries type AA 1.5 V
1. OK-button: You access the menu level;
the clock flashes.
2. Setting knob: to , menu flashes.
3. OK-button: Accept ;
symbol flashes.
4. Setting knob: Set the start (weekday) of your
absence.
5. OK-button: You save the input;
the number of days flash.
6. Setting knob: Set the duration of your absence;
number of days (max. 99)
7. OK-button: You save the input;
setpoint
flashes.
8. Setting knob: Set the temperature.
9. Press the ESC-button to return to the menu level;
the clock flashes.
(Change not necessarily required;
press the ESC-button again to return to
the initial display.)
When this symbol appears, the batteries must
be replaced within 3 months.
1. Remove controller from its base.
2. Open battery compartment at the rear and
replace the batteries.
3. Close battery compartment and replace the
controller.
Note:
When changing the batteries, the current data
are maintained for a maximum of one minute.
OK
OK
OK
OK ° C
ESC
ESC
If no button is pressed for 20 seconds, the setting
displayed will be accepted and the initial display will
appear again.
Siemens / Building Technologies / HVAC Products B2216de 15.02.2007
