manuals.online logo
Brands
  1. Home
  2. •
  3. Brands
  4. •
  5. Siemens
  6. •
  7. Terminal Block
  8. •
  9. Siemens PTX6.H User manual

Siemens PTX6.H User manual

Installation Instructions
Document No. 545-404
December 17, 2003
Termination Block
Item Number: 545-404-06, Rev. 010 Page 1 of 2
Product Description
The Point Termination Module (PTM) consists of a
termination block and an electronic point module.
The termination block provides the wire connection
between the Modular Building Controller (MBC) or
Remote Building Controller (RBC) and the field input
or output device.
These procedures apply to termination block
installation only. See Installation Instructions
(545-405) for point module installation.
Product Numbers
Termination block part numbers end with an H or L
to indicate high or low voltage.
PTX6.H Replacement High Voltage Termination
Block
PTX6.L Replacement Low Voltage
Termination Block
See Installation Instructions (545-406) for the
Replacement AO-P Termination Block (545-020)
Caution Notation
CAUTION:
Equipment damage or loss of
data may occur if you do not
follow the procedures as
specified.
Required Tools
• None
Expected Installation Time
3 minutes per termination block (not including wiring)
Prerequisites
• MBC/RBC installed.
• Job layout sheet.
• A high/low voltage wire barrier may be
required by local codes. See Figure 1 and
Installation Instructions (545-420).
Installations Requiring CE Compliance
or the Equivalent
All termination block wiring must be twisted, shielded
pair cable. Follow the normal specification for BLN
and FLN network cables in the APOGEE Automation
Configuration and Sizing Guidelines on InfoLink.
Any permanently installed MMI cables must be
shielded cabling.
1. Locate one or more acceptable locations for
terminating the shields of the I/O and MMI cables:
• The mounting studs of the backplane, or any
location that is both earth grounded and
within 15 cm (6 inches) of the backplane,
are acceptable.
• If the backplane studs are not used, the
ground must be terminated directly to the
cabinet using self-tapping screws.
2. Peel back the insulation of the I/O cables to expose
the correct length of shield and terminate the shield
at the proper ground locations.
Figure 1. Termination Blocks Installed in MBC.
Document No. 545-404
Installation Instructions
December 17, 2003
Information in this publication is based on current specifications. The company reserves the right to make changes in specifications and
models as design improvements are introduced. Other product or company names mentioned herein may be trademarks of their respective
owners. © 2003 Siemens Building Technologies, Inc.
Siemens Building Technologies, Inc.
1000 Deerfield Parkway
Buffalo Grove, IL 60089-4513
U.S.A.
Your feedback is important to us. If you have
comments about this document, please send
them to technical.editor@siemens.com
Document No. 545-404
Printed in the U.S.A.
Page 2 of 2
Installation
The termination block and point module contain
mechanical keys that prevent assembly of blocks
and modules of unlike voltages.
• High voltage termination blocks are dark
gray and will only mate with high voltage
point modules.
• Low voltage termination blocks are light gray
and will only mate with low voltage point
modules.
NOTE: High voltage termination blocks also have
the symbol

printed next to the
termination block part number (PTX6.H).
CAUTION:
High Voltage (Class 1) PTMs must be placed
in the upper right corner of the panel. All other
PTMs must be on the left side of the panel or
below the high/low voltage wire barrier on the
right side.
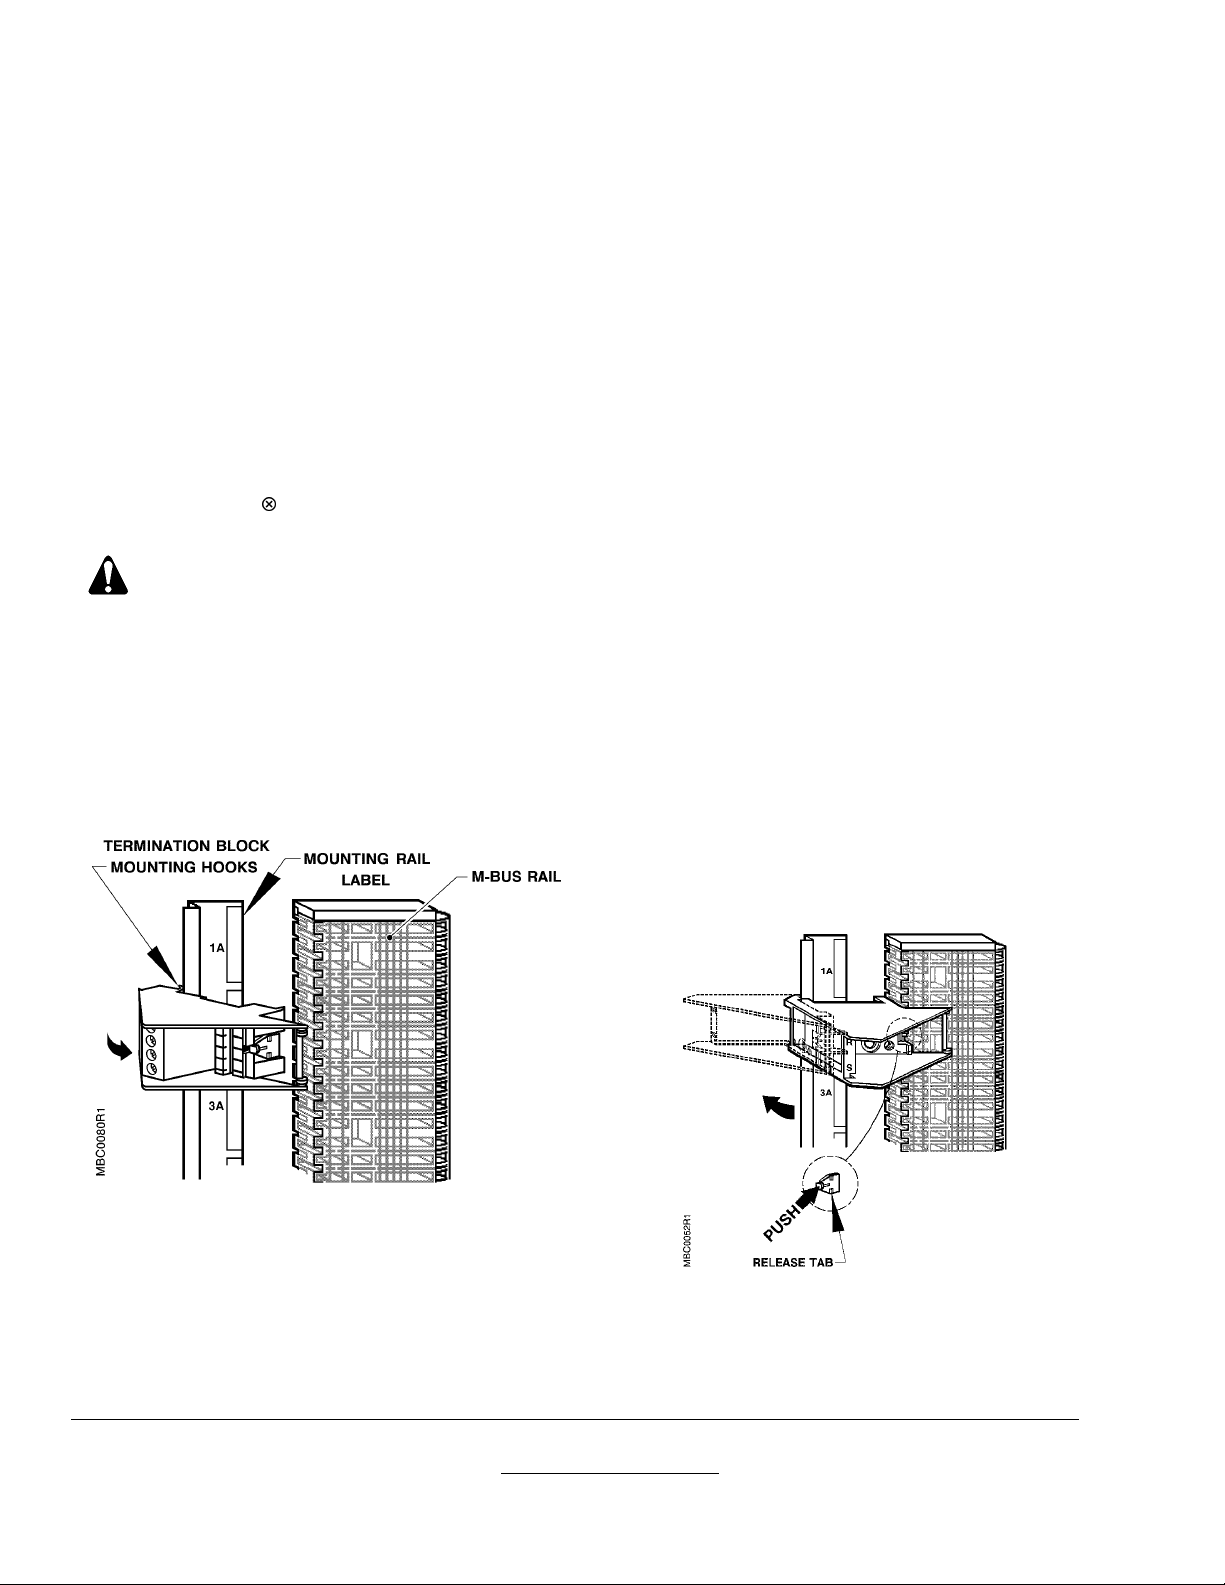
1. Use the MBC/RBC layout sheet to determine the
correct block position number.
The block position number is printed on the
mounting rail label as 1A, 2A, etc. (Figure 2).
Figure 2. Installing a Termination Block.
2. Remove the protective tape along the
perforations to uncover the slot where the
termination block attaches to the Module BUS
(M-BUS).
NOTE: Leave the unused rails covered by the
protective tape until all termination
blocks are wired.
3. Align the termination block mounting hooks with
the edge of the mounting rail (Figure 2).
4. Rotate the free end of the termination block into the
M-BUS rail.
5. Verify that the mounting guides on the
termination block are aligned with the mating M-
Bus rail slot (Figure 2).
6. Firmly press the termination block into the M-
Bus rail.
You will hear a light “click” when the termination
block is properly mounted.
7. Repeat Steps 1 through 6 until all termination
blocks have been installed.
The installation is now complete.
To Reposition or Remove a Termination Block
Remove the termination block from the mounting rail
by pushing and holding the release tab toward the
terminal screw end of the termination block while
rotating the block out of the M-BUS rail (Figure 3).
Figure 3. Removing a Termination Block.

This manual suits for next models

1

Other Siemens Terminal Block manuals

Siemens SINAMICS G130 User manual

Siemens

Siemens SINAMICS G130 User manual

Siemens 3VM91 0JC1 Series User manual

Siemens

Siemens 3VM91 0JC1 Series User manual

Siemens SICAM AK User manual

Siemens

Siemens SICAM AK User manual

Siemens MOBY FC 56 Parts list manual

Siemens

Siemens MOBY FC 56 Parts list manual

Popular Terminal Block manuals by other brands

National Instruments SCXI-1325 installation guide

National Instruments

National Instruments SCXI-1325 installation guide

National Instruments SCXI-1300 installation guide

National Instruments

National Instruments SCXI-1300 installation guide

NI TB-2706 installation guide

NI

NI TB-2706 installation guide

Quintex QV Series Operation manual

Quintex

Quintex QV Series Operation manual

Festo CPV GE-IB-8 Series manual

Festo

Festo CPV GE-IB-8 Series manual

Crestron CLTI- Function guide

Crestron

Crestron CLTI- Function guide

National Instruments CB-27T CALIBRATION PROCEDURE

National Instruments

National Instruments CB-27T CALIBRATION PROCEDURE

National Instruments PXIe-2527 installation instructions

National Instruments

National Instruments PXIe-2527 installation instructions

CommScope NGF-MPML0C112 user manual

CommScope

CommScope NGF-MPML0C112 user manual

TSYS VERIFONE VX 680 Quick reference guide

TSYS

TSYS VERIFONE VX 680 Quick reference guide

Omron NXR Series user manual

Omron

Omron NXR Series user manual

Crestron CLT-1DIM8 installation guide

Crestron

Crestron CLT-1DIM8 installation guide

manuals.online logo
manuals.online logoBrands
  • About & Mission
  • Contact us
  • Privacy Policy
  • Terms and Conditions

Copyright 2025 Manuals.Online. All Rights Reserved.