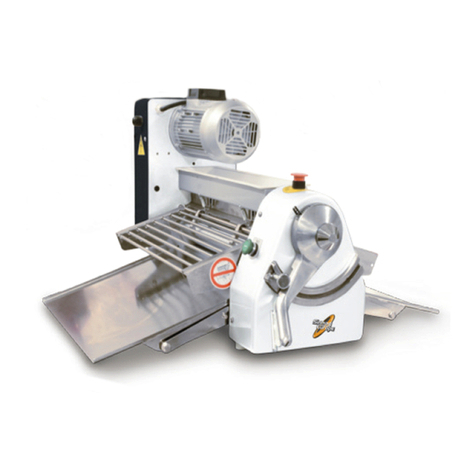
Sinmag Europe SM 520S User manual

Manual ●Mode d’emploi ●Handleiding ●Handbuch ●Manuale
Dough sheeter .Laminoir .Uitroltafel
Ausrollmaschine .Laminadora .Sfogliatrice
SM 520S .SM 520F
ENG

Congratulations with the purchase of this dough sheeter.
This machine has been tested thoroughly in our warehouse in Belgium
before delivery.
This way, Sinmag Europe is able to guarantee delivery of a machine
ready for installation.
For correct use and long service life of your dough sheeter, we recom-
mend that you read this manual attentively before starting to use the
machine.
Sinmag Europe thank you for your trust and wish you much job satis-
faction with this dough sheeter.
Sinmag Europe Team.
2
SINMAG EUROPE BVBA
ENG

1. INSTALLATION
After uncrating your dough sheeter, check for the following:
• Two conveyor tables
• One rolling pin
• Two conveyor table supports
Assemble the machine as follows:
1. Screwonoutriggerboltsandfastenscrewnunderframeboxrmly.
2. Attach the conveyor tables
3. Check whether the top and bottom scrapers are correctly attached.
4. Fittheplasticourbox
5. Have the machine connected by an electrician. Please follow the instructi-
ons below and the wiring diagram.
IMPORTANT:
It is very important to ensure that if the right button/lever is pressed, the con-
veyor belts operate to the right and that they operate to the left when the left
button/lever is pressed. The phase sequence set-up must be strictly observed.
If the machine is connected to different power outlet, check immediately that
the conveyor belts are operating in the proper direction. Safety check for the
proper functioning of the protective grid. When the grid on the feed side is
raised, the machine should stop immediately.
NOTE: Before attaching or removing the conveyor tables: always disconnect
the electrical power at main breaker or unplug the machine.
SINMAG EUROPE WILL NOT ACCEPT CLAIMS FOR DAMAGES
OR ACCIDENTS RESULTING FROM NON RESPECT OF THESE
INSTRUCTIONS.
2. ELECTRIC INSTALLATION
SINMAG EUROPE BVBA
3
ENG

NOTE: Before making any electrical connections, be sure that your electrical
supplysystemiscompatiblewiththeelectricalspecicationsofyourreversible
dough sheeter.
Thestandardspecicationsare:3Phase,50Hertz,8.0Amps.
The reversible dough sheeter is equipped with a factory installed six foot pow-
er cord. The sheeter is also equipped with a rotary ON/OFF switch actuates
a contactor with thermal and magnetic overload protection to disconnect the
motor automatically in the event of an electrical overload or malfunction. To
reset, turn the switch to the ON position.
3. OPERATION INSTRUCTIONS
3.1. Setting roller clearances
Depress locking lever on handle of roller adjustment lever. Turn roller adjust-
ment lever to alter position of top pressure roller. The scale dial indicates the
value of the roller clearance setting.
3.2. Dough thickness stop control
• Set the adjustment lever to the desired thickness.
• Undo the knurled knob and move the sliding block until it comes up against
the lever.
• Tighten up the knurled knob.
3.3. Attaching and detaching of the conveyor tables
Two persons will be necessary to have the machine properly installed.
1. Press the table against the conical bolt on the roller mounting until the
CONE on the opposite side of the machine engages.
The DRIVING LUG must catch in the coupling bolt.
4
SINMAG EUROPE BVBA
ENG

2. Attach the two conveyor table support brackets and screw tightly.
3. Push locking collar, located at the spring loaded conical bolt, tightly against
machine head. Then tighten two set screws.
2 3
4. Have the table rest on the supporting frame.
3.4. Detaching and attaching the scrapers
A. Attaching top scrapers
• Place scraper on top pressing roller.
• Pull out the spring - mounted retaining levers far enough to allow
angle to slide underneath.
• Position retaining levers to engage the scraper.
B. Detaching top scraper
• Lift up retaining levers to allow scraper to come away.
C. Attaching bottom scraper
• Place the t-scraper with the hooks pointed downwards in the
space between the pressure and conveyor rollers.
• Pushdown t-irons as far as they will go into the lateral guides.
• Fix spring-mounted rods under rolling table into the hooks.
D. Detaching bottom scraper
• Reverse procedure described in C.
SINMAG EUROPE BVBA
5
ENG

3.5. Protective safety grid
A. Raising:
• When you lift up the protective grid, the bar engages in the spring
catch.
B. Lowering:
• Take hold of the protective grid by the top bar and lower down.
3.6. Hand roller
The sheeted dough is wound up on the hand roller to remove dough for addi-
tional processing.
3.7. Winding sheeted dough
• Raise roller mounting into upright position.
• Place hand roller in the roller mountings.
• Operate machine in the direction of the arrow.
• Press the beginning of the dough strip onto the roller.
• Let the dough wind onto the roller.
• After winding, remove dough for further processing.
6
SINMAG EUROPE BVBA
ENG

4. CLEANING AND MAINTENANCE
CAUTION Always switch off and disconnect power to the machine before
opening end covers.
This machine has been designed for simple cleaning and easy sanitation
compliance. If you regularly and properly the service machine, it will remain in
good working order.
4.1. Dismantling conveyor belt
• Take off the machine table.
• Turn the two hand nuts to release tension on the belt using tool
provided.
• Remove belt from table.
• Cleaning conveyor belts
Belts must only be brushed clean when they are dry. Never clean belts when
they are wet.
Regulating tension of conveyor belts
• Before operating the machine always see to it that the belt tension is
properly regulated by appropriate adjustment of the hand nuts.
• Run the machine from left to right.
• The belts must always track straight. If a belt tends to run to one side, the
tension on that side must be increased, or the hand nuts on the opposite
side slackened off. Use nut tensioning tool provided.
• Run machine from right to left and regulate the same way.
• Do not stretch conveyor belts too tightly.
NOTE: By setting maintaining belts at the correct tension, you will greatly
extend belt service life.
4.2. How to proceed
1 3 42
1. Remove the two bolts on the side covers on both sides of the machine.
2. Unscrew the shaft bolt a bit.
SINMAG EUROPE BVBA
7
ENG

3. Turn the side cover down, you will now see the setting screw. By turning
this screw, you can adapt the tension of the conveyor belt.
4. In order to increase the tension, the screw is to be turned clockwise, to
reduce tension it is to be turned anticlockwise.
5.Aftersettingthetension,turnthesidecoverupagainandxthebolts.
4.3. Cleaning the scrapers
• Remove top and bottom scrapers for cleaning.
• Rub the scrapers with a damp cloth and replace.
IMPORTANT: Do not use any sharp or pointed instrument to scrape off bits of
dough that have hardened to the scraper.
4.4. Lubrication
Theheadofthemachineislledwithhighperformancesemi-
liquid grease. It has to be changed every 5 years (Based on a working
daywith8hours).
4.5.Cleaningourdispenser
Removealltheourfromthebox.Cleanthedispenserandputitback
on the machine. This must be done daily.
8
SINMAG EUROPE BVBA
ENG

5. TROUBLESHOOTING
5.1. Sheeter will not run.
• Verify if the main switch is on.
• Verify whether the conveyor belts and protective guards are in the
proper positions.
• Check power plug for proper insertion.
• Haveacertiedelectricianverifyallpowerconnections,anddouble
check proper connection of the neutral wire.
• Check all fuses in the circuit.
• Check micro switches.
5.2. Sheeter runs intermittently
• Check plug for poor contacts or loose wires.
• Check power cord for damage.
• Checkpowercircuitforcurrentuctuations.
• Check protective guards for proper adjustment, adjust limit switches
located under the back cover if necessary.
5.3. Rollers will not pull dough through
• Re-tension v-belts from the motor to the machine.
5.4. Conveyor belts slip
• Re-tension v-belts from the motor to the machine.
5.5. Reverse conveyor belt does not operate
• Check appropriate switches.
• Check v-belt tension.
5.6. Machine hums and does not operate or has low power
• Have an electrician verify if motor is operating on all 3 phases.
• Check all fuses in the circuit.
SINMAG EUROPE BVBA
9
ENG

Manual ●Mode d’emploi ●Handleiding ●Handbuch ●Manuale
SM 520S .SM 520F
Dough sheeter .Laminoir .Uitroltafel
Ausrollmaschine .Laminadora .Sfogliatrice
FR

Nousvousfélicitonspourl’achatdevotrelaminoir.
Avantl’expédition,cettemachineaétécontrôléedansnotredépôten
Belgique.Decettefaçon,nouspouvonsvousassurerlalivraisond’une
machineprêteàl’installation.
Pour une bonne utilisation et une longue durée de vie de la machine,
nousvousrecommandonsdelirecemoded’emploiavecattention
avantd’employerlamachine.
SinmagEuropevousremerciepourlaconanceetl’intérêtetnous
vous souhaitons beaucoup de joie au travail avec cette machine
L’équipedeSinmagEurope.
SINMAG EUROPE BVBA
11
FR

1. INSTALLATION
Aprèsavoirdéballélamachine,ilfautcontrôlersitouteslespiècessontlà.
Examinezlamachineetlestapispourvoirs’ilsn’ontpasétéendommagés
pendant le transport.
Assemblezlamachinecommesuit:
1. Attachezlestables(voyezlesinstructionssurpage2).
2. Vissezlessupportstélescopiquesetserrezlesvisfermementsurlaboîte
du châssis.
3. Vériezsilesracleurssupérieursetinférieurssontattachéscorrectement.
4. Fixezlefarineur.
5. Lamachinedoitêtrebranchéeparunélectricien.Veuillezrespecterleplan
de câblage.
IMPORTANT:
Vu que la machine a des contacteurs intégrés, un conducteur neutre est
nécessaire. Il est aussi important que, quand le levier de direction est tourné
à droite, les tapis fonctionnent à droite et vice versa. La séquence de phases
doit être respectée strictement.
Vériezl’opérationcorrectedelagrilledesécurité:quandlagrilleducôté
d’entréeestlevée,lamachinedoits’arrêtertoutdesuite.
NOUS N’ACCEPTERONS PAS DE RESPONSABILITÉ POUR DES DOM-
MAGES OU ACCIDENTS QUI PEUVENT SE PRODUIRE SI CES INSTRUC-
TIONS NE SONT PAS RESPECTÉES.
2. ALIMENTATION ÉLECTRIQUE
Avantdebrancherlamachine,ilfautcontrôlersilevoltagedelamachine,
commeilestindiquésurlaplaqued’identication,correspondauvoltagedu
réseau électrique.
12
SINMAG EUROPE BVBA
FR

3. INSTRUCTION POUR L’UTILISATION
3.1. Réglage des rouleaux
• Pressezlapoignéedulevierderéglagedesrouleaux.
• Bougezlelevierderéglagedesrouleauxpourchangerlapositiondu
rouleau de pression supérieur.
• L’indicationd’échelledonnelavaleurduréglagedel’espaceentreles
rouleaux.
3.2. Contrôledel’épaisseurdespâtons
•Positionnezlelevierderéglagedesrouleauxàlalargeursouhaitée.
•Dévissezlavisàtêtemoletéeetbougezleglissoirjusqu’àcequ’iltouchele
levier.
•Vissezlavisàtêtemoletée.
3.3. Attachement des tables de la machine
Ilfautdeuxpersonnespourl’installation
1.Insérezl’axedel’arrièredelatableaveclesergotsdanslacavitéde
l’axed’entraînement.Assurez-vousquelesergotssoientdanslamême
positionquelestrousprévuspourlesrecevoirsurl’axe.
SINMAG EUROPE BVBA
13
FR

2.Vissezl’écrouàl’autrecôtédelatablejusqu’àcequecederniersoit
contrel’axedelatable.
3.Serrezlecontre-écroudansl’autredirectionpourqu’ilbuttecontrele
châssis.
2 3
4.Attachezlatableavecsessupportsausocle.
3.4. Nettoyage des racleurs
A. Fixation des racleurs supérieurs(racleurincurvé)
• Positionnezleracleursurlerouleaudepressionsupérieur
• Retirezlesleviersderetenuesufsammentloinandepermettre
au racleur de coulisser dessous.
• Positionnezlesleviersderetenuepouremboîterleracleur.
B. Détachement du racleur supérieur
• Levezlesleviersderetenueandepermettreauracleurdese
détacher.
C. Fixation du racleur inférieur
• PositionnezleracleurTaveclescrochetsmisdansladirectiondu
soldansl’espaceentrelesrouleauxdepressionetlesrouleaux
de guidage.
• PressezlesbarresTauplusloinenbasdanslesguideslatéraux.
• Attachezlestigesmontéssurressortsousletabledanslescro-
chets.
D. Détachement du racleur inférieur.
• Procédure inversée de C.
14
SINMAG EUROPE BVBA
FR

3.5. Grille de sécurité
A. Levage
• Levezlagrilledesécuritéetpressez-lacontrelefarineurjusqu’à
cequelabarrechromées’engagedansleverrouàressort.
B. Descente
• Prenezlagrilledeprotectionparlabarresupérieureetdescen-
dez-la.
• Prenezsoinquelescôtésdelagrillenesedétachentpas!
3.6. Rouleau
Lapâtelaminéeestenrouléesurlerouleauand’êtretransportée.
3.7. Enroulage de la pâte laminée:
• Levezlessupportsdurouleaudanslapositiondroite.
• Placezlerouleaudanslessupportsdurouleau.
• Faitesfonctionnerlamachinedansladirectiondelaèche.
• Pressezlapremièrepartiedelapâtesurlerouleau.
• Enroulezlapâtesurlerouleau.
• Laissezlapâteaprèsl’enroulagesurlessupports
ouenlevez-lapouruntraitementadditionnel.
SINMAG EUROPE BVBA
15
FR

4. ENTRETIEN ET NETTOYAGE
Si votre machine est entretenue régulièrement et correctement, la durée de
vieseratrèslongue.Sivousavezbesoindepiècesdétachées,nousvous
recommandonsdelescommandercheznotreserviceaprès-vente,desorte
quevoussoyezsûrsqu’ellesontétéfabriquéesparnotresociété.
4.1. Démontage des tapis
• Enlevezlestablesdelamachine.
• Dévissezlesécrousàmainandedétendreletapis
• Enlevezletapisdelatable
• Nettoyage des tapis
Les tapis ne peuvent être brossés que quand ils sont secs. Ne jamais les net-
toyerpendantqu’ilssontencoremouillés.
Réglage de la tension des tapis
• Avantd’employerlamachine,vousdevezvérierquelatensiondutapisest
réglée correctement par un réglage correct des écrous.
• Utilisezlamachinedegaucheàdroite.
• Les tapis doivent toujours suivre un parcours droit. Si un tapis est incliné
d’uncôté,latensiondececôtédoitêtreaugmentéeoulesécrousàmain
ducôtéinversedoiventêtredétendus.
• Utilisezlamachinededroiteàgaucheetréglezlestapisdelamême
façon.
• Nechargezpaslestapisplusquenécessairepourletransportdelapâte.
4.2. Comment procéder
1 3 42
1.Dévissezles2visdelaplaquelatéraledelatable.
2.Dévissezleboulondanslerouleauàl’extrémitédelatable.
3.Eloignezlaplaquelatéralexeettournezlaplaquearrondieverslebas
vousverrezmaintenantl’écrouderéglage.Latensiondutapispeutêtre
réglée en tournant cet écrou.
4.Pouraugmenterlatensionilfauttournerl’écroudanslesensdesaiguilles
d’unemontre,pourladiminuerilfautletournerdanslesensinverse.
5.Montezlaplaquelatéralerondeetserrerlesécrous
16
SINMAG EUROPE BVBA
FR

Enréglantetentretenantlestapisàlatensioncorrecte,vousaugmenterez
leur durée de vie.
4.3. Nettoyer les racleurs
• Enlevezlesracleurssupérieursetinférieurspourlenettoyage.
• Frottezlesracleursavecunchiffonmouilléetreplacez-les.
IMPORTANT N’employezpasd’instrumentaiguiséoupointupourgratterles
restes de pâte endurcis.
4.4.Lubrication
La tête de la machine est remplie de graisse semiliquide à haute perfor-
mancequidoitêtrechangéeaprès5annéesd’utilisation,basésurun
jourdetravailde8heures.
4.5. Nettoyage du farineur
Enleveztoutelafarinerassembléedanslebac.Nettoyezlefarineur
etinstallez-ledenouveausurlamachine.Cenettoyagedoitêtrefait
journellement.
FR
SINMAG EUROPE BVBA
17
FR

5. DÉPANNAGE
5.1. La machine ne fonctionne pas:
• Vériezsil’interrupteurestenmarche.
• Contrôlersilestablesdelamachineetlagrilledesécuritésontdans
la position de fonctionnement.
• Vériezsilapriseestbranchée.
• Faitescontrôlerlapriseetlaboîtedecontactparunélectricien.
• Souvenez-vousqu’ildoityavoirunconducteurneutre!
• Contrôlezlesfusiblesdanslebâtiment.
5.2.Lamachines’arrêteparintermittance:
• Vériezs’iln’yapasdecontactdéfectueuxdanslaprise.
• Controlezlaligned’alimentation.
• Contrôlezs’iln’apasdeuctuationsdanslecourant.
• Adaptezl’interrupteurdesécuritépourlagrilleàl’arrièrelamachine.
5.3. Les tapis ne transportent plus de pâte:
• Reglezlatensiondestapis.
5.4. Les tapis glissent:
• Reglezlatensiondestapis.
5.5. La direction du tapis ne peut pas être inversée:
• Contrôlezd’abords’ilaétémisenmarche.
• ContrôlezlacourroieVetremplacez-lasinécessaire.
5.6. La machine ronronne:
• Faitescontrôlerlemoteurparunélectricien.Ellenefonctionneproba-
blement que sur deux phases.
• Contrôlezlesfusiblesdanslebâtiment.
18
SINMAG EUROPE BVBA
FR

Manual ●Mode d’emploi ●Handleiding ●Handbuch ●Manuale
SM 520S .SM 520F
Dough sheeter .Laminoir .Uitroltafel
Ausrollmaschine .Laminadora .Sfogliatrice
NL

Prociatmetdeaankoopvanuwuitroltafel.
De uitroltafel werd, voor de levering, getest in het Sinmag Europe
magazijnteBelgië.ZokanSinmagEuropegarantstaanvoorde
levering van een uitroltafel die klaar is voor installatie.
Voor een goede werking en lange levensduur van uw uitroltafel
radenwijuaandezehandleidinggrondigdoortenemenalvo-
rens aan de slag te gaan met de uitroltafel.
Sinmag Europe dankt u voor het vertrouwen en interesse.
Wij wensen u veel werkgenot met uw aankoop.
Het Sinmag Europe Team.
20
SINMAG EUROPE BVBA
NL
This manual suits for next models
1
Table of contents
Languages:
Other Sinmag Europe Kitchen Appliance manuals
