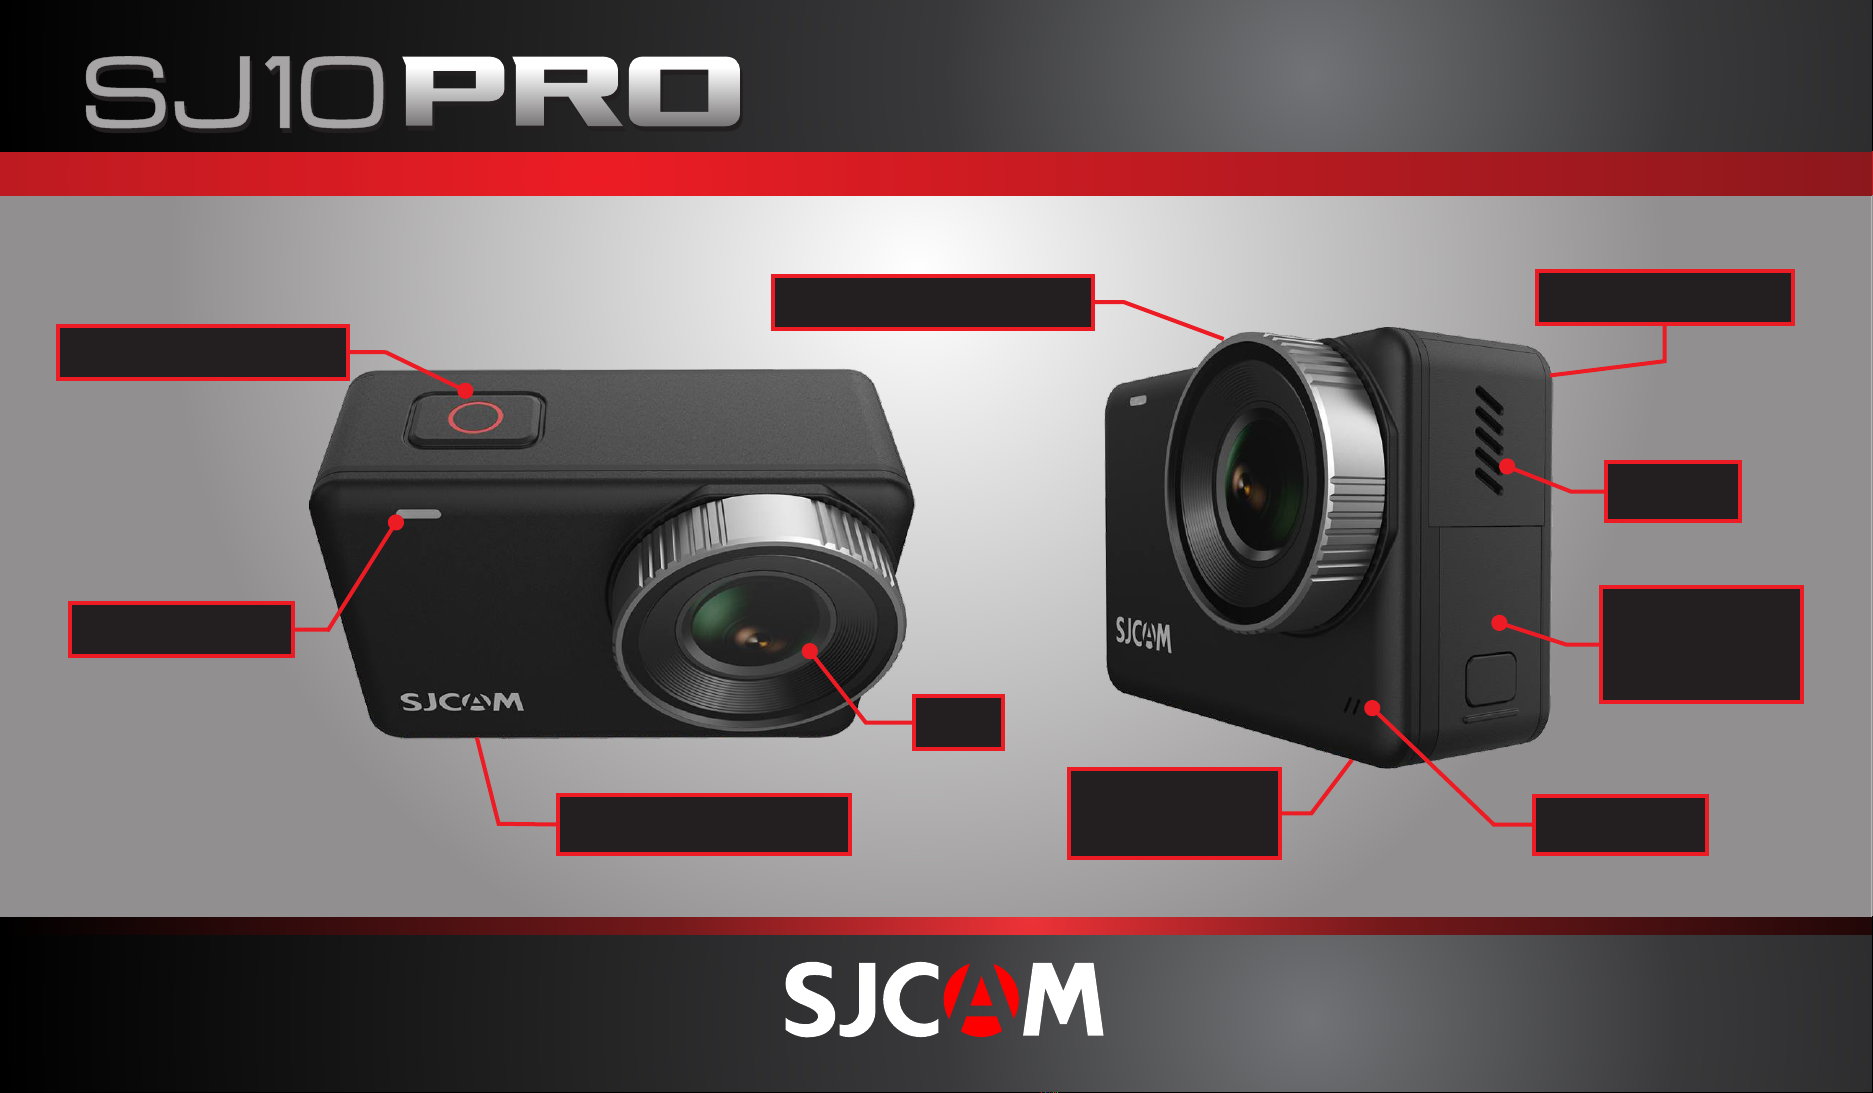
SJCAM SJ10PRO User manual

Dreams allow us to be bigger than who we currently are. Our mission is to bring you closer to what you
most dare to be, your passion, your greatness, and for you to be able to share them with others.
In our last decade of experience in advancing Product Research and Development, we have gained
the recognion and trust from customers and retailers all over the world,
making us realize what needs to be done in order to encourage people to create more,
explore further and farther, and make dreams happen.
Having our own factory and a facility of more than 500 employees, we have full control of overseeing all
the processes in every step of the way, giving us the freedom to be more versale and highly responsive to the
ever-growing demands of the market, all for the purpose of our commitment to empower your dreams.
-SJCAM CEO
INTRODUCTION
All graphics, words, and design by Troy Ferrer 2020 [email protected]

Congratulaons on your new SJCAM Acon Camera!
We know you’re excited to use your SJ9 STRIKE, please take me to read this manual before
doing anything with it. There’s plenty you can do, so you need to familiarize yourself with the
features now to get the most out of it.
It is important to keep your camera’s firmware up to date. You may connect your camera via
WiFi to the SJCAM ZONE app to automacally download and install the latest firmware, or visit
www.sjcam.com/firmware.
1. This is a high-precision product. Do not drop.
2. Do not expose the unit to strong magnec fields, such as electric motors, magnets
and machinery that use strong radio waves.
3. Never leave the unit in high-temperature areas. Electronics and opcs can be damaged
under prolonged exposure to heat.
4. Although this model is waterproof without needing an addional housing, it is important to check
that all seals are intact and all doors are properly closed before submerging the camera in water.
5. Always store extra baeries in a compartment away from any sharp metals and moisture.
6. Avoid extended periods of baery charging. Keep it away from children and pets while
charging to avoid accidents.
CAUTION!
All graphics, words, and design by Troy Ferrer 2020 [email protected]

CHIPSET: Ambarella H22 S85
SENSOR: SONY IMX377
SENSOR RESOLUTION: 12 MegaPixels
LCD SCREEN: 2.33” IPS Touch Screen
LENS: 7G ( 2 Aspheric Lens included)
ANGLE: 170°
APERTURE: F 2.8
FOCAL LENGTH: 2.8mm
VIDEO RESOLUTION: 4K:(3840×2160)25/30/50/60fps,
1440P:(1920×1440) 25/30/50/60fps,
1080P:(1920×1080) 24/25/30/50/60/120fps. 720P:(1280×720) 240fps
BATTERY CAPACITY : 1300mAh Detachable Baery
WEIGHT: 85 G
DIMENSIONS: 62.5 MM 41 MM 28.8 MM
SYSTEM: WINDOWS 7,8X or higher /OS X® 10.8 or higher
STORAGE SUPPORTED: MicroSD, UP TO 128GB
VIDEO FORMAT: MP4 (H264/H265)
DECODE FORMAT: H.264/H.265
VIDEO FORMAT: MOV, MP4
PHOTO RESOLUTIONS: 12M (4000×3000 4:3), 10M(3648×2736 4:3),8M 16:9 (3840×2160 16:9),
8M 4:3(3264×2448 4:3), 5M(2595×1944 4:3, 3M(2048×1536 4:3), 2MHD (1920X1080 16:9)
IMAGE FORMAT: JPG
WIFI : 2.4 G/5G (802.11 A/B/G/N)
GYRO STABILIZATION: 6-Axis Gyroscope
BATTERY DURATION (APPROX.): 100 Minutes for 4K@30fps
SPECIFICATIONS
All graphics, words, and design by Troy Ferrer 2020 [email protected]

PARTS OF YOUR CAMERA
2.33” Touchscreen
USB Port and
MicroSD Slot
Cover
Mircophone
1/4-inch Tripod
Mounting Hole
Power/Shutter Button
Status Indicator
Lens
Battery Compartment
Removable Lens Guard
Speaker
All graphics, words, and design by Troy Ferrer 2020 [email protected]

SJ SMART REMOTE (Oponal)
To pair your remote to your SJ8 PRO: Swipe down from the top > Select Remote Control
Tap the “YES” to start pairing. A picture instrucon will appear. Press the Video and Photo
buons on the Remote simultaneously. “Pairing Complete” will show when successful.
WIFI On/Off Switch
Record Video Start/Stop
Camera-Off Button
Shutter Button
Burst Shot Button
NO YES
*Shown here is SJ Remote Version2.
It can be momentarily submerged in water
up to 3 Meters (approx: 10feet).
Ver.1 has white icon labels, not waterproof,
and producon has been disconnued.
Once your Remote is paired,
you will never need to pair it
again with your camera.
When the SJ10 PRO is powered
on, SJ Remote can begin sending
commands to your camera.
The Remote is tested to work at
a maximum distance of 10 meters
(30 feet) away from your
SJ8 PRO unobstruced Line-Of-
Sight. Distance may be affected
severely by obstacles in the path
of the signal.
SJ REMOTE BATTERY:
The baery on your Remote
will last you a long me as
it only uses power when
you press any of the buons.
The remote is powered with a
Lithium CR2032 buon-cell
baery.
Pair the Remote?
WiFi Remote ControlFPVLock Screen
Pair the Remote?
Please press 2 keys
All graphics, words, and design by Troy Ferrer 2020 [email protected]

On the top right side of your camera
is the Power/Shuer Buon.
Press and hold it down to start your
camera.
The SJCAM splash-screen will briefly
show while the camera inializes,
and will immediately proceed to the
Main Screen.
Press and hold down the Power Buon
anyme to turn the camera off.
111222
The LED status indicator in front fo the camera will light blue while on standby.
Blinking blue LED means it is recording.
POWERING ON
All graphics, words, and design by Troy Ferrer 2020 [email protected]

Open the baery cover by holding the
lock buon down and sliding the cover
in the direcon shown above.
While pressing on the lock, swing the
baery door open.
Grab the pull-tab with your fingers.
Pull the baery out.
Insert a freshly-charged baery in.
NOTE: The baery will only go in in one
direcon. Check that the arrow printed on the
label at the boom points to the front of the
camera.
222111333
PULL TAB
REPLACING THE BATTERY
All graphics, words, and design by Troy Ferrer 2020 [email protected]

Locate the covered MicroSD card slot
on the le side of the camera.
Push the buon and slide the door down.
Swing the door outwards to expose the
USB Type C port and the MicroSD slot.
Align the MicroSD card to the slot with the
card face towards the front of the camera.
Gently push it in unl it clicks into place.
Never force the card in. Always double-check
the orientaon first.
222
SWING DOOR OUT
111
To remove the card: Push it in gently to release it, then pull the card out.
Never remove the card when the camera is powered on to prevent data corrupon.
INSERTING A MICROSD CARD
All graphics, words, and design by Troy Ferrer 2020 [email protected]

INSERTING A USB-C CABLE
Firmly insert the USB-C cable
included in the package all the way in.
Status indicator will light up RED when
charging, and PURPLE when connected
to a computer.
The USB-C port can be used for a variety of purposes.
For file transfers, baery charging, or to connect a microphone.
222
SWING DOOR OUT
111
Locate the covered USB Type-C port
on the le side of the camera.
Push the buon and slide the door down.
Swing the door outwards to expose the
USB Type C port and the MicroSD slot.
All graphics, words, and design by Troy Ferrer 2020 [email protected]

An indicator showing that the Gyro Sensor
is active. Will not show when turned off.
The Main Screen has many nested menus available by tapping or swiping.
You can also hide all the icons on screen to use the viewfinder without the
onscreen icons and indicator labels by tapping anywhere in the middle.
Elapsed Time | Time le on Card WiFi Acve | Frequency
The Main Screen
00:00:00 | 02:06:16
ISO:Auto
Video
2018-06-06 04:20:43 Shutter Time1/2
4K
60FPS
5G
5G
Microphone Acve
Baery Level Indicator
Gyro Stabilizaon (On)
Displays approximate power le on the
baery. Baery blinks when almost empty.
Current Mode Icon
Current Date & Time
Go to Playback Mode
Icon shows what mode you are currently in.
Tap this icon to go to the camera’s gallery and
view the videos and photos you have recorded.
Current Resoluon / Opons
Current ISO Details
+ Current Mode
Top displays the ISO Sengs,
boom shows the current mode you’re in.
Swipe up for Mode selecon.
Current Mode Sengs
Access and make changes to the sengs of
the mode you are currently in.
Tap the (+) or (-) magnifying glass icons to change
the digital zoom factor.
Tap this icon to access and make changes to
the General System Sengs.
Current Shuer Speed Details
Zoom Controls
Go to Sengs
All graphics, words, and design by Troy Ferrer 2020 [email protected]
Displays the system me.

Resoluon Opons
Toggles Screen
Mode Selecon
General Sengs
Mode Sengs
Playback Opons
Goes back to the Main Screen More informaon on Modes Common Quesons and Answers
Video Picture
4K (3840x2160)
4K Ultra (3840x2160)
2.7K (2720x1520)
60 fps
>
>
>
30 fps
30 fps
Video Slow RecVideoLapse
Photo PhotoLapse Burst Mode
00:00:00 | 02:06:16
ISO:Auto
Video
2018-06-06 04:20:43 Shutter Time1/2
4K
60FPS
Language
English
Format
WIFI
Off
Auto Power Off
3 Minutes
LCD Off Time
3 Minutes
Front Display
On
EV
+1/3
Color
Flat
White Balance
Cloudy
Metering Mode
Center
Gyro Sensor
On
Power On Record
Off
All graphics, words, and design by Troy Ferrer 2020 [email protected]
WiFi Remote ControlFPVLock Screen

FPV
WiFi
Remote Control
Swipe-up
Handle
FPV
Lock Screen
Lock Screen
Remote Toggle
WiFi Toggle
Swipe Up to return to Main Screen
Turns off the display and disables the touchscreen to avoid accidental taps.
Swipe the key icon to the lock to enable the touchscreen again.
Enable or disable FPV (First-Person View) via a special cable.
Cable sold separately.
Enable the remote by tapping this and seng it to ON.
You will also see the Pair SJRemote opon here.
Enable or disable the WiFi by tapping this and seng it.
Swipe this up to hide the Toggles Screen
Toggles Screen
To get here,
swipe down from top.
WiFi Remote ControlFPVLock Screen
00:00:00 | 02:06:16
ISO:Auto
Video
2018-06-06 04:20:43 Shutter Time1/2
4K
60FPS
All graphics, words, and design by Troy Ferrer 2020 [email protected]

Baery Status Indicator
Shows how much power is le.
Go to Next File
Tap or swipe le to get to the next file.
Back to File Gallery
Go to previous file
Returns to the file selecon screen.
Tap or swipe right to get to the previous file.
Elapsed Time
Shows how much of the file is being played
Playback Screen
File Type Selecon
Main Screen File Selecon
00:00:00 | 02:06:16
ISO:Auto
Video
2018-06-06 04:20:43 Shutter Time1/2
4K
60FPS
Video Picture
File name displayed here.
26/26
02:61
2018.06.08
02:61
2018.06.08
02:61
2018.06.08
02:61
2018.06.08
02:61
2018.06.08
00:00:00
2018080826_74.MP4
All graphics, words, and design by Troy Ferrer 2020 [email protected]

Mode Selecon
To get here,
tap this, or swipe up.
Mode for recording videos.
Exit to Main Screen
Hints, Tips, & FAQ
Tap the back-arrow icon to exit.
For more informaon, tap the
[ ? ] icon on the lower right.
Sll photograph mode.
For recording video in slow moon.
Timelapse photography stched on-cam
to produce a video.
For recording video while a sequence of photos
is taken at a set interval.
Automacally starts the camera and begins
recording once the engine is started
(Car Charger Cable Accessory required).
Fast mulple succession of snapshots,
choose the number of photos desired (Max: 10).
A series of sll photos for creang melapse.
Each photo will have its own file.
Swipe UP to access Video+Photo,
and Car Modes.
Video
VideoLapse
Slow Motion
Photo
PhotoLapse
Burst Mode
Car Mode
Video Slow MotionVideoLapse
Photo PhotoLapse Burst Mode
Video/photo
Car Mode
00:00:00 | 02:06:16
2018-06-06 04:20:43 Shutter Time1/2
4K
60FPS
ISO:Auto
Video
Photo+Video
All graphics, words, and design by Troy Ferrer 2020 [email protected]

You can switch to text-only menu by going
to General Sengs and choose “Classic” in
User Interface opons.
To get here, tap this.
Tap this arrow
icon to exit.
Scroll up for more Mode Sengs
Mode Sengs Screen
Current Menu Opons
Depending on what mode you are in,
the menu opons will vary. All the opons
for the parcular mode will appear by
scrolling down for other items.
Once set, the sengs will be the same for
that parcular Mode every me you go back
unl you change it again.
00:00:00 | 02:06:16
2018-06-06 04:20:43 Shutter Time1/2
4K
60FPS
ISO:Auto
Video
FOV
EV
+1/3
Color
Flat
White Balance
Cloudy
Metering Mode
Center
Gyro Sensor
On
Encoding
H264
12
34
User Interface
Classic
SJCAM
EV
White Balance
Color Profile
0.0
>
>
>
Auto
Flat
All graphics, words, and design by Troy Ferrer 2020 [email protected]

RESOLUTION SELECTION
Photo Modes
Video Modes
12MP 4000x3000 4:3
10MP 3468x2736 4:3
8MP 3840
4K (3840x2160)
4K Ultra (3840x2160)
2.7K (2720x1520)
60 fps
>
>
>
30 fps
30 fps
12MP • 4000x3000 • Aspect Ratio 4:3
10MP • 3648x2736 • Aspect Ratio 4:3
8MP • 3840x2160 • Aspect Ratio 16:9
8MP • 3624x2448 • Aspect Ratio 4:3
5MP • 2592x1994 • Aspect Ratio 4:3
3MP • 2048x1536 • Aspect Ratio 4:3
2MP • 1920x1080 • Aspect Ratio 16:9
4K • 3840x2160
- Framerates: 24, 25, 30, 50, & 60 fps
4K Ultra • 3840x2160
- Framerates: 24 & 30fps
2.7K • 2720x1520
- Framerates: 24, 25, 30, 50, & 60 fps
1440p • 2560x1440 •
- Framerates: 24, 25, 30, 50, & 60 fps
1080p • 1920x1080
- Framerates: 24, 25, 30, 50, 60, & 120 fps
1080p Ultra • 1920x1080
- Framerates: 50 & 60 fps
720p • 1280x720 • 240fps
IMPORTANT!
To ensure you get the full potenal
of your SJ10 PRO, it is very strongly
advised that you use at least a
Class-10 U3 microSD card of a
known brand, purchased from a
reputable seller.
This camera model uses a high-
performance processor which
requires wring image data at high
speeds.
Using a low-speed card may result
in errac camera performance;
the camera may overheat, and
photos/videos may have problems
being recorded.
SJ10 PRO supports microSD cards
up to 128GB, and can read and
write in either a FAT32 or ExFAT
filing system.
All graphics, words, and design by Troy Ferrer 2020 [email protected]

EV works by controlling how
much light is allowed in.
HINT: You will know if the
Gyro Sensor is acve when
you see hand icon near the
baery status display.
EV
+1/3
White Balance
Cloudy
Color Profile
Flat
Metering Mode
Center
Gyro Sensor
On
BRIGHTER
DARKER
Exposure
Value
+2.0+2.0+2.0
+5/3+5/3+5/3
+4/3+4/3+4/3
+1.0+1.0+1.0
+2/3+2/3+2/3
+1/3+1/3+1/3
0.00.00.0
-1/3-1/3-1/3
-2/3-2/3-2/3
-1.0-1.0-1.0
-4/3-4/3-4/3
-5/3-5/3-5/3
-2.0-2.0-2.0
Power On Record
Off
MODE SETTINGS - Page 1
EV • Exposure Value - Adjust the exposure for the amount of light allowed in.
Set this value low to compensate if the scene is too bright; set high when too dark.
High EV takes longer for images to be taken, and subject may blur if moving.
WHITE BALANCE • Adjusts the color temperature of the recording to
compensate for ambient lighting.
POWERON RECORD • Sets whether the camera automatically begins recording
once the camera is turned on. This feature is for video mode only.
COLOR PROFILE • You are given 2 preset choices: SJCAM - Vivid, and Flat.
Choose Flat to preserve color dynamics; SJCAM - Vivid to enhance colors.
METERING • Tells the camera which portion of the scene takes priority when setting the
brightness level of the whole image. Options: Average, Center Weighted, or Spot.
GYRO SENSOR • Enable the Gyro Sensor to smoothen out shakiness during recording.
Disable the Gyro Sensor when not needed, to gain full field-of-view of the set resolution.
All graphics, words, and design by Troy Ferrer 2020 [email protected]

A visual explanaon of how
Distoron Correcon works.
CAUTION: When using your camera
as a dashcam, use a car charger cable
and remove the internal baery to
avoid overcharging/overheang.
WARNING!
Operang your camera
while driving a vehicle is
potenally dangerous. It is strongly
advised that you setup your camera
BEFORE your trip.
Volume
8
Sharpness
Normal
Distortion Correc...
On
Loop Recording
Off
File Size
5 Minutes
!
1 2
34
Video Quality
Normal
MODE SETTINGS - Page 2
ENCODING • H.264 is a standard for writing video files, high compatibility with video players.
H.265 is a newer standard that compresses video much better for smaller file sizes and
faster streaming, may require you to update your video player’s codec.
VOLUME • Sets the microphone sensitivity for how loud or how soft sound is recorded
into the video.
CAUTION: Setting this too high in small, enclosed spaces may distort the recorded audio.
SHARPNESS • Sets how much image detail is saved.
A higher setting will produce sharper images at the expense of file size.
Setting this low will smoothen annoying closely-knit fine lines.
DISTORTION CORRECTION • Enable this setting to remove the fisheye effect that is inherent
in wide-angle lenses. NOTE: Minor cropping of the image will occur for this to be possible.
LOOP RECORDING • Allows continuous recording when the memory card is full by recording
over the oldest file in the folder.
FILE SIZE • Manually sets the limit of file size length..
NOTE: Cards formatted in FAT32 will have a maximum file size of 4GB, regardless of resolution
or length of recording. Your SJ8 PRO supports ExFAT file format which removes this limitation.
All graphics, words, and design by Troy Ferrer 2020 [email protected]

AVERAGE
Priorizes the whole scene’s lighng.
METERING OPTIONS
CENTER
Priorizes the middle part of the frame.
SPOT
Priorizes only a very small poron
of the center of the scene.
ISO
6400
Audio
On
Time Stamp
Off
Shutter Speed
1/500
Photo Quality
Fine
Encoding
H264
MODE SETTINGS - Page 3
VIDEO QUALITY • Gives you the option of recording video in high bitrate for more image detail
per frame, but will result in much bigger file sizes.
PHOTO QUALITY • Presets for making adjustments on how much detail is written in photos.
Options: Fine, Standard, and Economy.
ISO • Adjusts the image sensor’s sensitivity to light. A higher ISO will collect more light at
the expense of adding noise (grain) into the image when set too high.
AUDIO • Enables or disables sound recording on your video footage.
TIME STAMP • When enabled, will display the date and time of your recording.
Great when doing timelapse videos, or for making a documentary. Otherwise just turn it off.
SHUTTER SPEED • Controls how long the image sensor stays “open” to capture an image.
Fast shutter speeds allow less light, freezing movement better. Slow shutter speeds allow more
light but may blur moving objects. Very long exposure settings are best for night photography.
All graphics, words, and design by Troy Ferrer 2020 [email protected]
Table of contents
Other SJCAM Action Camera manuals

SJCAM
SJCAM SJ6 LEGEND User manual

SJCAM
SJCAM SJ5000 wifi User manual

SJCAM
SJCAM SJ8 AIR User manual

SJCAM
SJCAM SJ5000 wifi User manual

SJCAM
SJCAM SJ4000B User manual

SJCAM
SJCAM SJ5000 wifi User manual

SJCAM
SJCAM X1000 WIFI User manual

SJCAM
SJCAM SJ7 STAR User manual

SJCAM
SJCAM C200 User manual

SJCAM
SJCAM M10 Series User manual

SJCAM
SJCAM SJ4000 SERIES User manual

SJCAM
SJCAM C300 User manual

SJCAM
SJCAM SJ4000 SERIES User manual

SJCAM
SJCAM SJ4000 SERIES User manual

SJCAM
SJCAM SJ5000X ELITE User manual

SJCAM
SJCAM SJ4000 SERIES User manual

SJCAM
SJCAM M10 Series User manual

SJCAM
SJCAM SJ5000 wifi User manual

SJCAM
SJCAM SJ9STRIKE User manual

SJCAM
SJCAM SJ8 Plus User manual