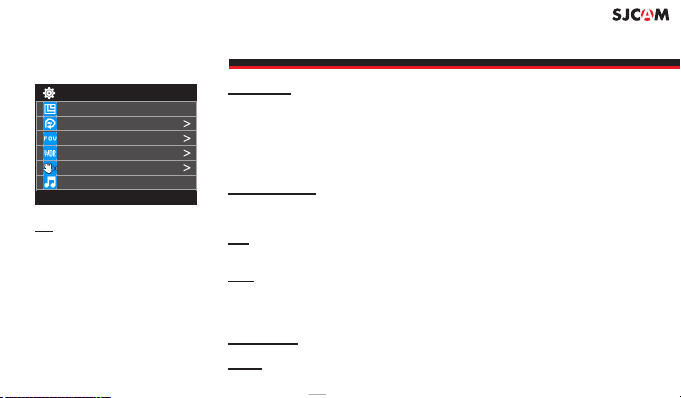
SJCAM SJ5000X-B User manual

User’s Manual
2K
SJ5000X
HD DV
2.0” LCD Screen
1 2 M P 30 FPS

We believe everyone has a dream. Our mission is to make you express yourself,
your vision and dreams in order to make them real, and share them with others.
In the last 10 years of experience in Research and Development and Commercialization,
we have gained world recognition from customers and retailers,
with the ambition to give people the possibility to create, explore and empower their dreams.
Having our own factory, controlling the whole production process, and a facility
with more than 500 employees, makes us more versatile and able to reach the market fast,
ensuring that the highest quality standards are met. It is all about dreams.
Dare to join the SJCAM Revolution.
-SJCAM CEO
INTRODUCTION

Congratulations on your new SJCAM Action Camera!
We know youre excited to use the SJ5000X, please take time to read this Manual before
doing anything with it. Theres plenty you can do, so you need to familiarize yourself with the
features now to get the most out of it.
It is important to keep your cameras rmware up to date.
Go to to download the rmware les and read through the www://sjcamhd.com/rmware/
latest performance improvements and feature updates.
CAUTION!
1. This is a high-precision product. Do not drop.
2. Do not expose the unit to strong magnetic elds, such as magnets, electrical motors,
and machinery that use strong radio waves.
3. Never leave the unit in high temperature areas, electronics and optics can be damaged
under prolonged exposure to heat.
4. Do not submerge the camera without putting it in the included waterproof case.
5. Avoid extended periods of battery charging. Keep it away from children and pets to avoid
accidents.

Wifi Button
Up Button
Down Button
Mode/Power Button
Lens
Indicator LEDs
Micro-USB Slot
MicroSD Card Slot
Mini HDMI Out Port
Opening for Microphone
PARTS OF YOUR CAMERA
Shutter/Select Button

Remove the camera from the
waterproof case by sliding the lock
on top ( ), then lifting the clasp by 1
following the steps shown above
( & ).2 3
When the backdoor is free, pull the
camera out of the waterproof case.
USB
MicroUSB Cable
2
3
Plug the MicroUSB cable to the slot
on the side of the camera as
indicated above, and the other end
to a USB wall charger with an output
of 5V 1A, or plug it to a computer.
Optionally, remove your battery by
sliding the lock at the bottom of the
camera to release the compartment
door. Pull the battery out by the ap,
then plug it to the External Battery
Charger Accessory (sold separately).
1
Clasp Release
Removing the camera from
the Waterproof Case
Charging your camera using
the MicroUSB cable.
Charging your battery using
an optional external charger.

<
1080FHD1080FHD1080FHD
HOME
Transfer your data by plugging your
camera to a computer via USB cable.
Select Mass Storage then your
camera will show as a drive.
Or, transfer data via the app. Turn on
WiFi and pair it to your smartphone
(Android or iOS), then tap Connect
Your Camera on the app.
Press the Power/Mode button to turn
your camera on. You will hear a beep,
indicator LEDs will light up, and the
screen will display the SJCAM logo.
Default Mode is Video.
To turn o your camera, long-press
the Power/Mode button.
Powering ON/OFF your
SJ5000X
Inserting / Removing
Memory Cards
Transferring Data From Your
Camera to a Computer.
Insert a MicroSD card as shown in the
illustration above, with the label
facing the LCD screen, until it clicks
into place. To remove, just push it in
gently and the card will eject.
To make sure you do not loseNOTE:
any data, only remove or insert your
card while the camera is o.
Class 10 or higher
MicroSD card.
Via USB cable.
Via WiFi

VIDEO/PHOTO: Mode to start taking videos or still photos.
For time-lapse recorded as a video. VIDEOLAPSE:
: For recording video in slow motion.SLOW REC
: Timelapse, with each frame its own picture le.PHOTOLAPSE
: Fast multiple succession of snapshots, choose BURST MODE
the number of photos desired (Max: 10 consecutive shots).
: Records a snapshot for long periods LONG EXPOSURE
to allow more light in through the lens.
ICONS MENU - Screen 1
Note: Screen arrangement and feature availability may vary depending on rmware version.
VideoLapse Slow Rec
Burst Mode
PhotoLapse Long
Exposure
Video /
Photo
SJ5000X

ICONS MENU - Screen 2
UNDERWATER: Adds missing colors when diving at depths.
Enables viewing the screen contents on a TV viaTV-OUT:
HDMI connection.
: Starts recording when motion is sensedMOTION DETECTION
in front of the camera.
: Automatically starts the camera and beginsCAR MODE
recording once the engine is started (Car Charger Cable
Accessory is required).
: For reviewing recorded videos and photos.PLAYBACK
: For changing camera settings.SETUP
Note: Screen arrangement and feature availability may vary depending on rmware version.
TV Out Motion
Detection
Playback Setup
Video+
photo
TV
Car Mode
SJ5000X

1/7
Setup
Resolution
Loop Recording
FOV
WDR
Gyro Sensor
Audio
Setup
>
>
RESOLUTION Changing to a higher resolution will have more detail in your
video at the expense of le size. A lower resolution has a smaller lesize
but will have less details in your video. Conversely, a higher resolution will
contain more detail. Available only in Video modes.
: FPS (Frames Per Second) is part of the options in video resolution: Note
The higher the FPS, the more images will be displayed per second,
and the smoother the movement in the video is, at the expense of lesize.
Auto-saves your video in small sections, depending on LOOP RECORDING
selected length. It will record over your oldest video once there is no more
space on your memory card.
Field Of View / Field Of Vision (also known as Focal Length) FOV
The higher the setting, the wider the angle of the recorded scene becomes.
Automatically adjusts the range of brightness-to-darkness that the WDR
camera will record. When turned on, it will help balance your pictures by
adjusting the contrasts. Many scenes do not require WDR to be activated,
use according to your preference. Available only in Photo modes.
Enables active video-stabilization to eliminate shake.GYRO SENSOR
Enable or disable recording of sound together with your video. AUDIO
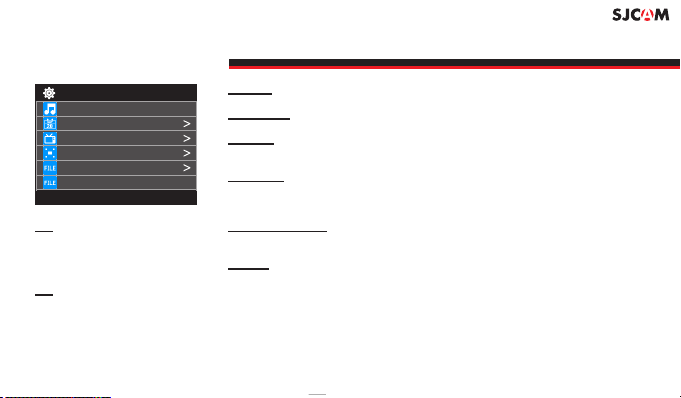
SETUP MENU - Screen 1 of 7
TIP: Up / Down Use the buttons
to navigate through the menu.
Use the button to selectShutter
an item.
To exit an item in the Setup
menu, or to get back to the main
Icons, press the button Mode
once.
Note: Screen arrangement and feature availability may vary depending on rmware version.

2/7
Setup
VOLUME Adjusts how soft or how loud sound is recorded with your video.
When enabled, will display the date and time of your recording.TIME STAMP
Options are NTSC or PAL. The color encoding and Framerate for video TV MODE
recording. Users in the US use NTSC, default is PAL.
On-Screen Display. When enabled, information and icons will be OSD MODE
displayed on the screen indicating what features are activated, current mode,
recording, elapsed time, number of photos left, battery status, etc.
Choose between .MOV or .MP4. VIDEO FILE FORMAT
If you are unsure which to use, choose MP4, as it is more widely used.
Changes how much information is included in each frame of video. BITRATE
Higher bitrates give more denition to your video at the expense of lesize.
SETUP MENU - Screen 2 of 7
TIP: Pressing the Mode button
once while recording a video
will take a quick snapshot. Try it!
Volume
TimeStamp
TV Mode
OSD Mode
Video File Format
Bitrate
Setup
>
>
Note: Screen arrangement and feature availability may vary depending on rmware version.
TIP: Save power consumption by
using a shorter Screensaver
setting. Youll get as much as
20 more minutes of recording
time.

Setup
DOUBLE FILE While connected through the SJCAM mobile app, 2 copies of your
recording/shots will be saved, one on the camera's MicroSD and one on your
mobile phones storage.
Recording starts immediately when the device is powered on.PowerON Record
Changes the size of still photos that will be recorded. Of course, Image Size
the bigger the size the more detailed your pictures are, at the expense of lesize.
Available only in Photo modes.
Quality Refers to how much compression the output image will be. The higher
the setting the bigger the le is, but will contain more detail.
SHARPNESS Changing the sharpness setting will make your images either crisper
or smoother, adjust according to your preference.
CONTRAST Change the strength of brights and darks of an image.
Options are high and low.
SETUP MENU - Screen 3 of 7
TIP: Pressing the Up button while
recording or framing a scene
will initiate the zoom function.
Use the Up/Down buttons to
adjust zoom level.
There are 8 zoom levels.NOTE:
To use the zoom function, FOV
must be turned OFF.
Double File
PowerOnRecord
Image Size
Quality
Sharpness
Contrast
3/7
Setup
Note: Screen arrangement and feature availability may vary depending on rmware version.
>
>

Setup
>
>
NOISE REDUCTION Decreases the amount of visual noise by removing the
graininess in the image or video, but may result in some loss of detail.
WHITE BALANCE Adjusts the color temperature of the snapshot/recording to
compensate for ambient lighting.
COLOR You are given 5 preset choices: Normal, B&W (Black and White),
Retro (aka: Sepia tone), Warm (slight reddish hue), and Cool (slight bluish hue).
ISO The image sensor's sensitivity to light. Choose Auto on your camera if you
are not familiar with this setting. Depending on the lighting conditions, use the
lowest ISO whenever possible, as higher settings will introduce more noise.
Adjust depending on your preference.
EV Exposure Value - Changing EV compensates for the amount
of light that is allowed in. You can change this value to a lower setting if the
scene is too bright to compensate, or higher, if it is too dark, but still depends
on your desired eect.
When turned on, an uncompressed le separate from the JPG image will RAW
be written on the card for the purpose of editing later. Use an external photo
editing software to make adjustments before saving to your intended letype.
Available only in Photo mode.
SETUP MENU - Screen 4 of 7
TIP: Long exposure for dark
nighttime shots gain more
detail when the Exposure Value
is raised.
Just dont forget to reset your EV
after the shot or your next
pictures will be too bright and
over-exposed.
Noise reduction
White Balance
Color
ISO
EV
RAW
4/7
Setup
>
>
Note: Screen arrangement and feature availability may vary depending on rmware version.

Setup
DISTORTION CORRECTION Since the lens of your action camera has a very
wide FOV (Field of View), your camera will try to t everything in, and will
result in the center appearing to be distorted or bulging.
Turning on Distortion Correction will force the image to make it appear atter
as compared to having a sheye eect.
LICENSE NO SET Displays your preset License Number at the bottom of your
video. Use when your camera is mounted as a dashcam.
Make adjustments to the cameras system date and time.DATE/TIME
AUTOPOWER OFF Automatically turns the camera o at a preset time.
Works only if the camera is on standby and not recording.
Beep sound when navigating and selecting items on camera.KEYPAD TONE
LIGHTSET To change the number of LED status-indicator lights that are active.
3 is to activate Front, Top, Back indicators, 2 is for Top and Back, 1 is for Back only.
0 turns o all status-indicator lights.
SETUP MENU - Screen 5 of 7
Distortion Correction
LicenseNo Set
Date/Time
AutoPower Off
Keypad Tone
LightSet
5/7
Setup
>
>
Note: Screen arrangement and feature availability may vary depending on rmware version.
TIP: Status lights are easy to read.
The front blue status-indicator
will blink when recording video,
steady when on standby.
Amber light will blink once when
the Wi is connected to a device.
Amber light will quick-ash twice
when it is not connected.

Setup
SCREENSAVERS Options for the duration to save Screen-On time.
For adjusting the framerate frequency to counter the icker-eect FREQUENCY
caused by TV systems with dierent refresh rates (PAL/NTSC).
Flips recording 180-degrees, use when mounting the camera in an ROTATE
upside-down position.
Adds the SJCAM logo at the bottom of your recording.LOGO WATERMARK
Options for system language.LANGUAGE
For changing the WiFi name of your camera. Default is 12345678, youWIFI SSID
can change this to anything anytime you wish.
SETUP MENU - Screen 6 of 7
Screensavers
Frequency
Rotate
LOGO Watermark
Language
WIFI SSID
6/7
>
>
Note: Screen arrangement and feature availability may vary depending on rmware version.
TIP: When using your camera as
a dashcam, use a car charger
cable and remove the internal
battery to make sure it does not
die out while you travel.
CAUTION: Operating your camera
while driving a vehicle is
potentially dangerous.
It is strongly advised to set up
your camera before your trip.

WIFI PASSWORD For changing your cameras WiFi password.
Erases currently selected item, or all photos and videos.DELETE
Completely erases everything on the memory card then sets it upFORMAT
as a new drive (in FAT32 ling system).
Restores the camera unit to its factory setting includingDEFAULT SETTING
WiFi Password. Does not erase any data on the memory card.
Firmware update version. Please check VERSION www.support.sjcamhd.com
regularly for newer versions for your camera model.
SETUP MENU - Screen 7 of 7
TIP: Sometimes new features are
rolled out in rmware updates,
adding more value to your
camera!
>
WIFI Password
Delete
Format
Default Setting
Version
7/7
Setup
Note: Screen arrangement and feature availability may vary depending on rmware version.

Included Accessories
More accessories available on the sjcamhd.com website, sold separately.

Follow Us
Get the app.
Download a more detailed version of this manual online.
Visit us at www.support.sjcamhd.com
This manual suits for next models
1
Table of contents
Other SJCAM Action Camera manuals

SJCAM
SJCAM SJ7 STAR User manual

SJCAM
SJCAM SJ5000 wifi User manual

SJCAM
SJCAM SJ5000 wifi User manual

SJCAM
SJCAM SJ11 Active User manual

SJCAM
SJCAM C200 User manual

SJCAM
SJCAM M10 Series User manual

SJCAM
SJCAM SJ5000 wifi User manual

SJCAM
SJCAM SJ8 Series User manual

SJCAM
SJCAM SJ7 STAR User manual

SJCAM
SJCAM SJ5000X ELITE User manual

SJCAM
SJCAM M20 SERIES User manual

SJCAM
SJCAM SJ5000 wifi User manual

SJCAM
SJCAM SJ4000B User manual

SJCAM
SJCAM SJ4000 SERIES User manual

SJCAM
SJCAM SJ9STRIKE User manual

SJCAM
SJCAM SJ4000 SERIES User manual

SJCAM
SJCAM SJ4000 SERIES User manual

SJCAM
SJCAM SJ10PRO User manual

SJCAM
SJCAM SJ4000 SERIES User manual

SJCAM
SJCAM M10+ User manual