Skov DA 17K Installation instructions manual

DA 17K Tunnel Inlet
Outside
Mounting Guide
604366 • 2022-02-03
English For other language variants of this document we refer to:
Español Para otras variantes del idioma de este documento, visite:
Français Pour les versions dans d'autres langues de ce document veuillez consulter:
http://docs.skov.com/1040

DA 17K Tunnel Inlet
2 Mounting Guide
Product and Documentation Changes
SKOV A/S reserves the right to change this document and the product herein described without further notice.
In case of doubt, please contact SKOV A/S.
The date of change appears from the front and back pages.
Note
• All rights belong to SKOV A/S. No part of this manual may be reproduced in any manner whatsoever without
the expressed written permission of SKOV A/S in each case.
• All reasonable efforts have been made to ensure the accuracy of the information contained in this manual.
Should any mistakes or imprecise information occur in spite of this, SKOV A/S would appreciate being noti-
fied thereof.
• Irrespective of the above, SKOV A/S shall not accept any liability with regard to loss or damage caused or
alleged to be caused by reliance on any information contained herein.
• Copyright by SKOV A/S.

DA 17K Tunnel Inlet
1 Product description........................................................................................................................................4
2 Product survey ...............................................................................................................................................5
3 Mounting guide...............................................................................................................................................7
3.1 Recommended tools.................................................................................................................. 7
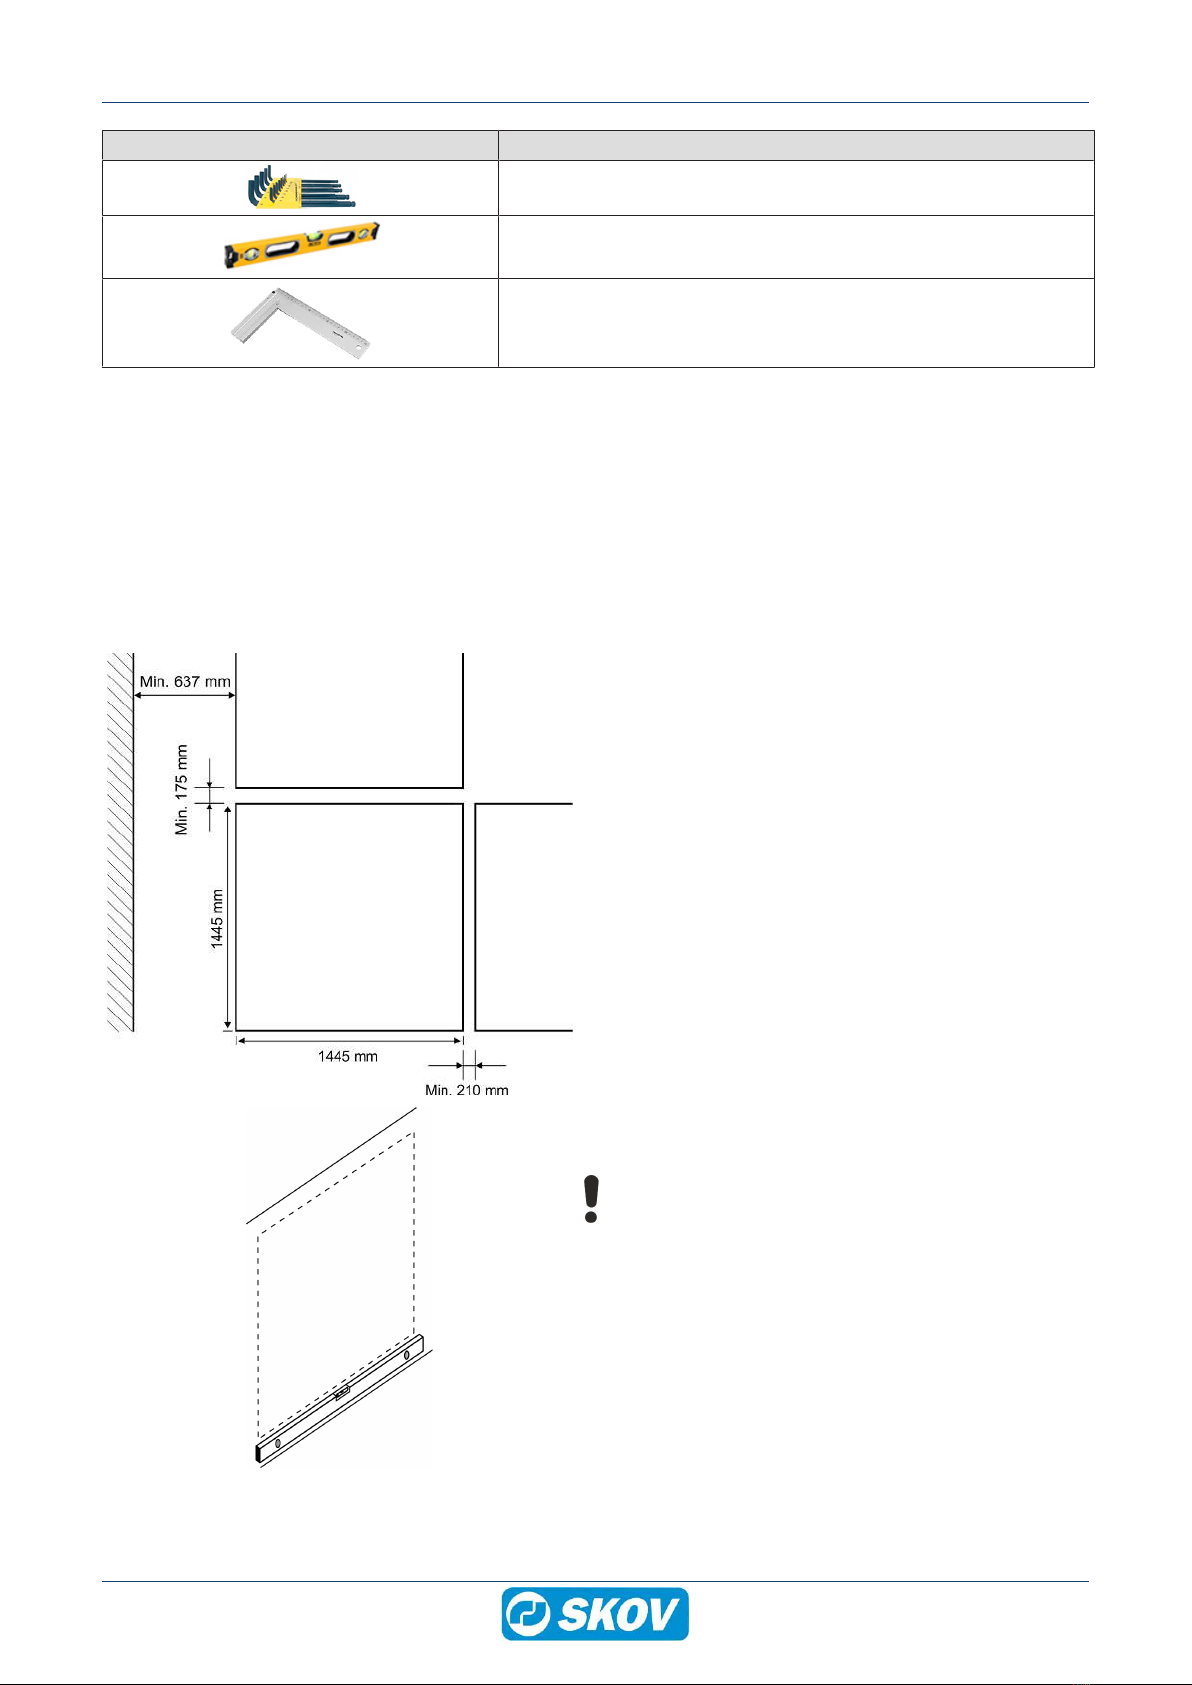
3.2 Wall inlet positioning................................................................................................................. 8
3.3 Mounting of tunnel inlet ............................................................................................................ 8
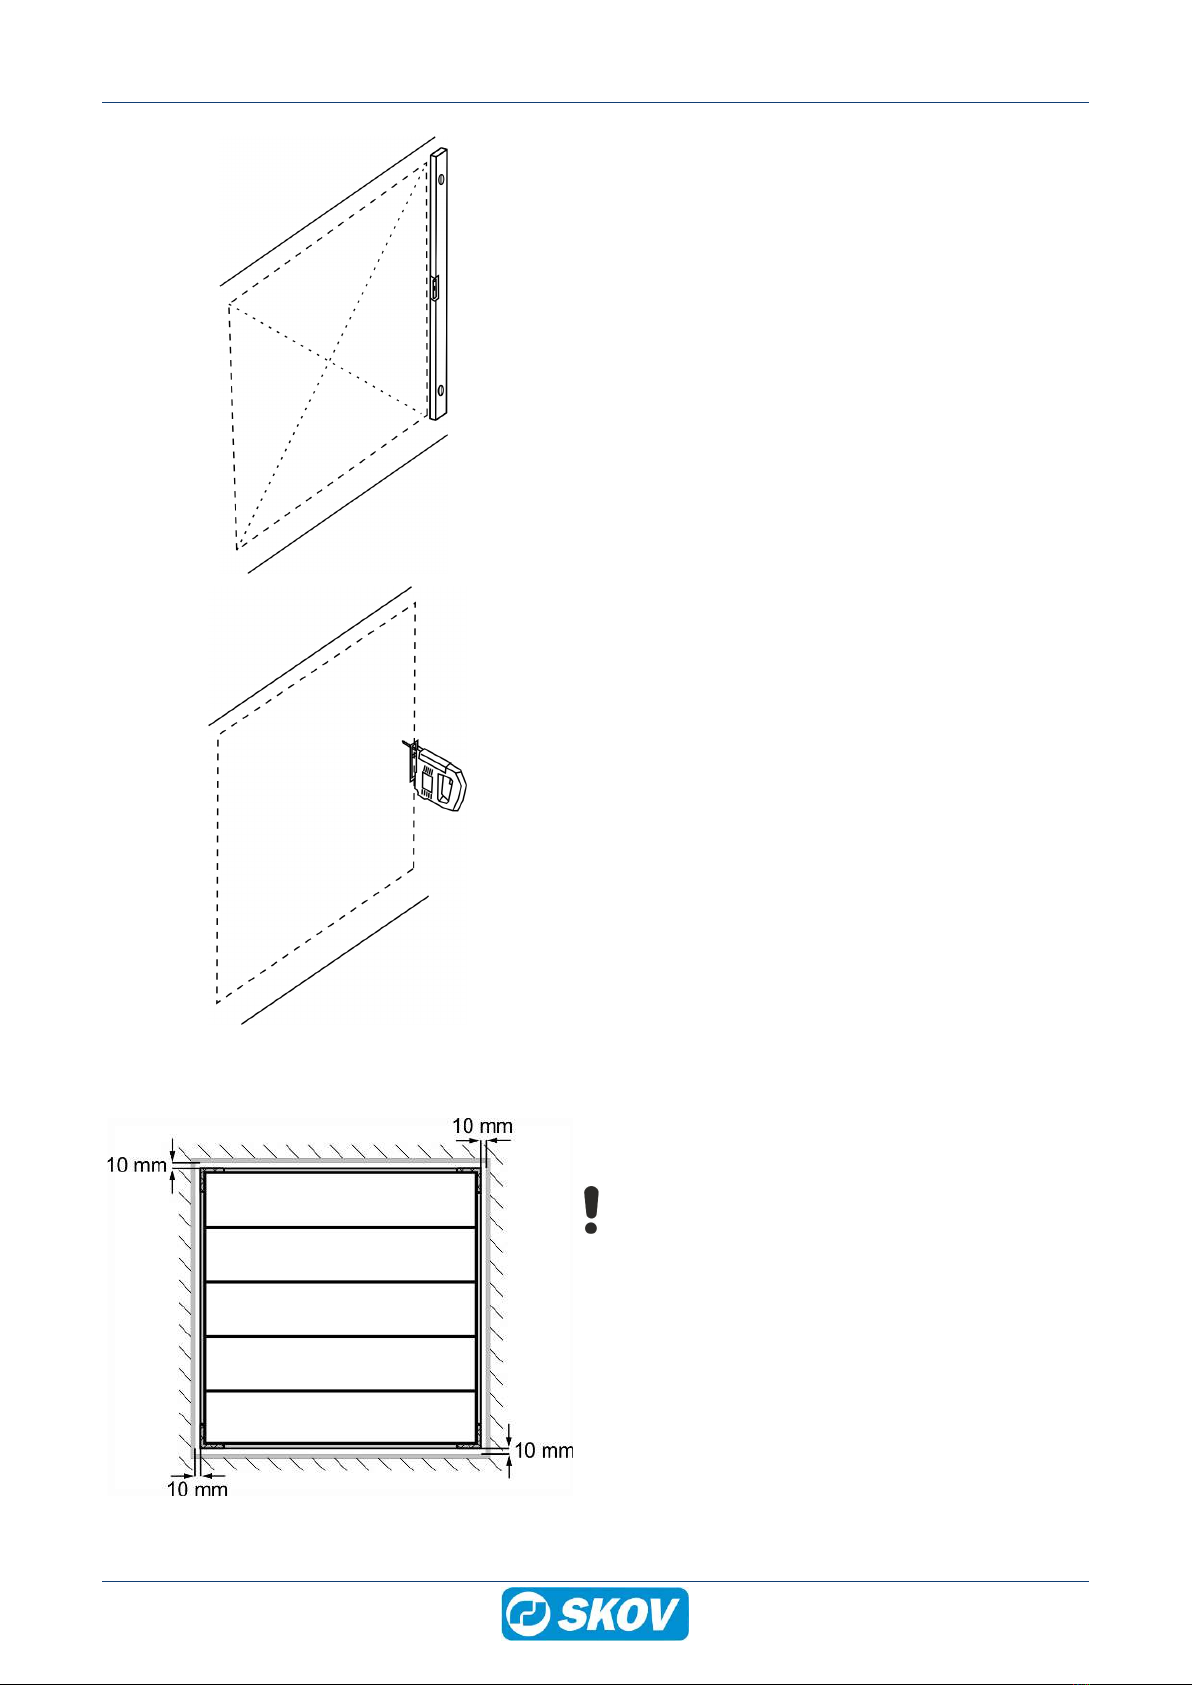
3.3.1 Preparing hole in wall................................................................................................................... 8
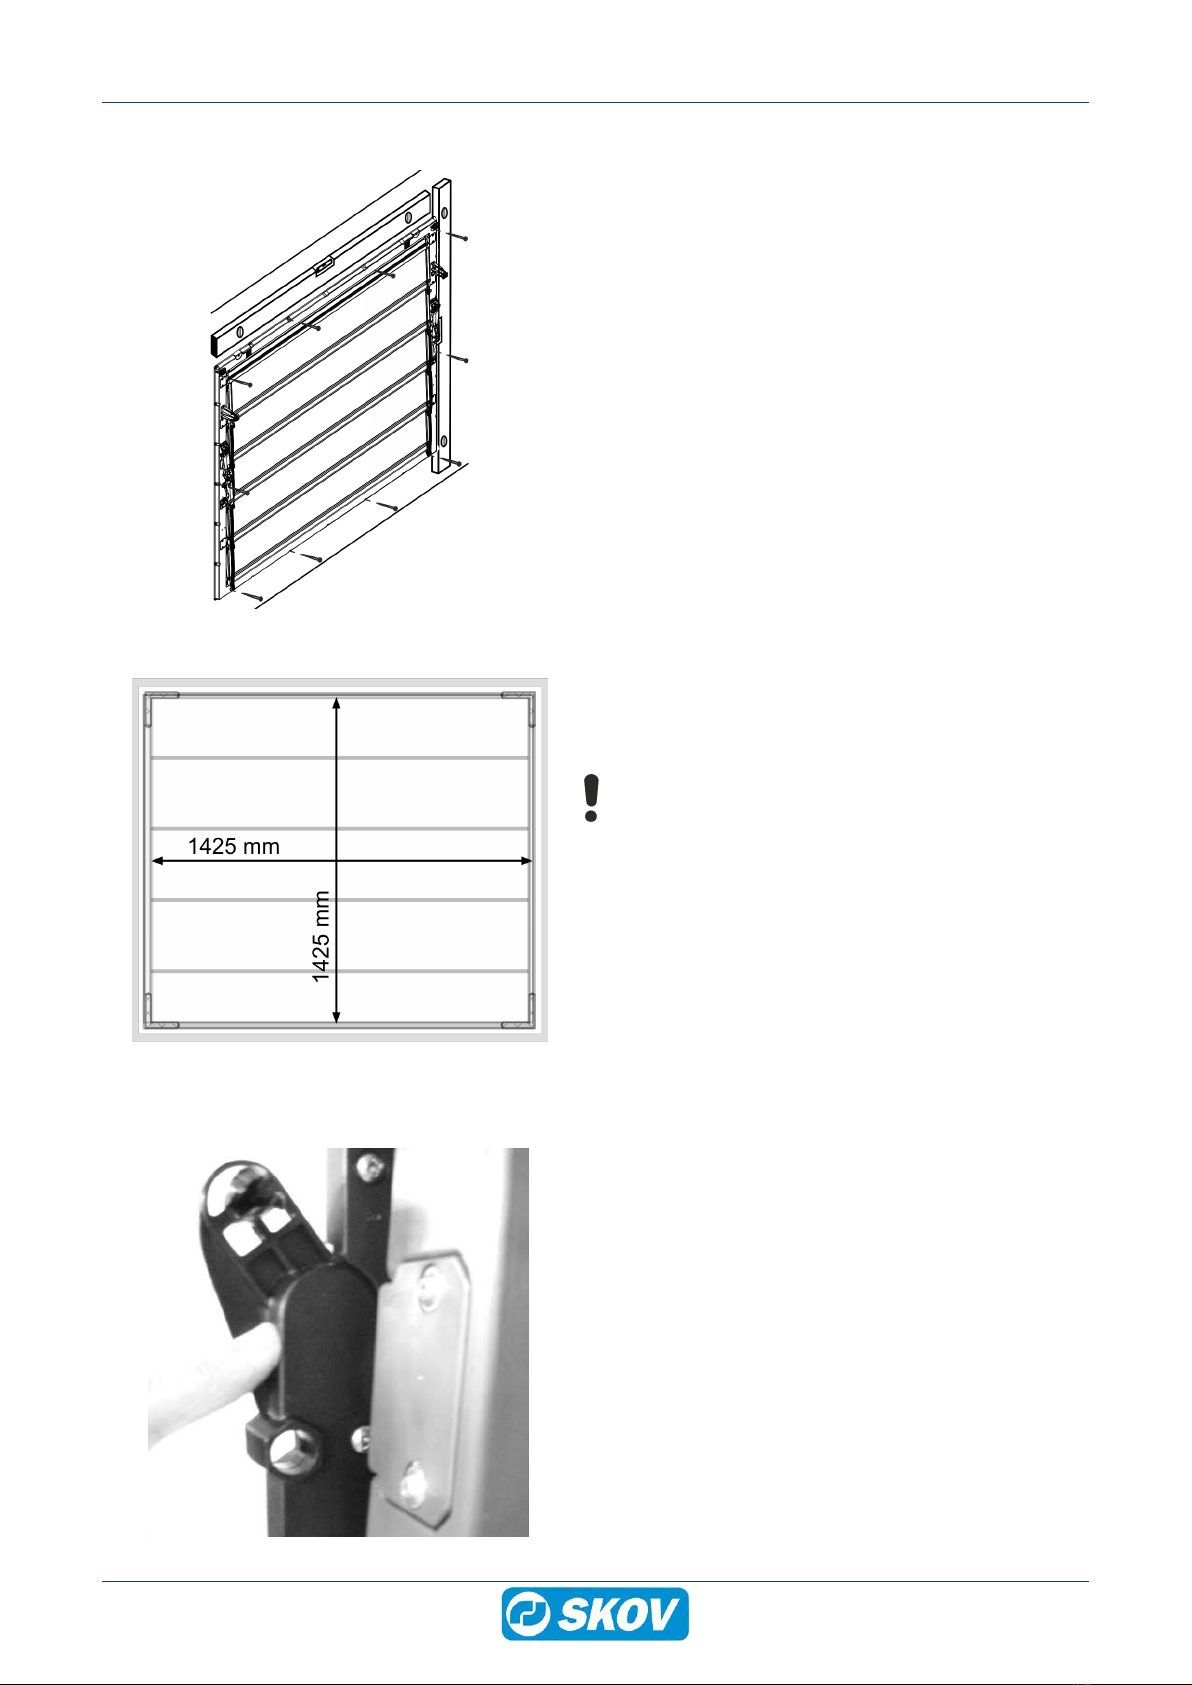
3.3.2 Mounting in wall ........................................................................................................................... 9
3.3.3 Check the tightness ................................................................................................................... 10
3.3.4 Foaming ..................................................................................................................................... 13
3.3.5 Jointing....................................................................................................................................... 13
3.4 Mounting of tunnel inlet parts ................................................................................................14
3.4.1 Wheel set ................................................................................................................................... 15
3.4.2 Brackets for single pull............................................................................................................... 15
3.4.3 Brackets for pull rod ................................................................................................................... 16
3.4.4 Pull rod....................................................................................................................................... 16
3.4.5 Pulley on pull rod ....................................................................................................................... 17
3.4.6 Coil spring .................................................................................................................................. 17
3.4.7 String.......................................................................................................................................... 18
3.5 Mounting of bird net ................................................................................................................ 19
3.6 Mounting examples ................................................................................................................. 20
4 Maintenance..................................................................................................................................................21
4.1 Recycling/Disposal .................................................................................................................. 21
5 Technical Data ..............................................................................................................................................22
5.1 Dimension drawing for tunnel inlet........................................................................................ 23
Mounting Guide

DA 17K Tunnel Inlet
4 Mounting Guide
1 Product description
The DA 17K Tunnel Inlet, outside is used as an air inlet in houses with Tunnel Ventilation or Combi-Tunnel Ven-
tilation.
The tunnel inlet can be mounted directly on walls or sandwich panels.
The tunnel inlet is made of PVC (polyvinyl chloride) with insulation.
The inlet is supplied with the inlet flaps installed. The regulation set is installed on-site.
When mounting externally, the inlet is turned in the opposite direction in relation to when mounting internally.

DA 17K Tunnel Inlet
Mounting Guide 5
2 Product survey
433716 DA 17K tunnel inlet, highly ins. outside
DA 17K tunnel inlet, outside is highly insulated and used for external as-
sembly on the wall.
When you mount the tunnel inlet on the outside the inlet does not take up
space inside the livestock house. It also prevents the animals from getting a
grip of the strings or connectors.
The mounting parts are used for assembling the DA 17K outside.
DA 17K outside must always be protected against wind and weathering –
e.g. by placing the tunnel inlets in combination with either cooling pads, light
trap flex or the like.
433717 DA 17K tunnel inlet, semi ins. outside
DA tunnel inlet, outside is used for external assembly on the wall where in-
sulation is not necessary.
When you mount the tunnel inlet on the outside, the inlet does not take up
space inside the livestock house. It also prevents the animals from getting a
grip of the strings or connectors.
The mounting parts are used for assembly of the DA 17K outside.
DA 17K outside must always be protected against wind and weathering –
e.g. by placing the tunnel inlets in combination with either cooling pads, light
trap flex or the like.
433702 Tunnel inlet screw kit
Used for mounting of tunnel inlet.
Contains 24 4.8 x 70 mm tapping screws.
1 set per inlet.
433703 DA 17K tunnel inlet, bird net
Net protects against birds.
Mesh size = 17 x 17 mm.
Dimensions = 1390 x 1390 mm
1 per inlet.

DA 17K Tunnel Inlet
6 Mounting Guide
433720 DA 17K insulation plate
The plate is used to minimize draft and heat loss during cold periods, when
the tunnel inlet is not in use.
The plate should always be used if the dimensioned outside temperature is
less than -10°C.
Supplied with mounting set and mounting guide.
One per inlet.

DA 17K Tunnel Inlet
Mounting Guide 7
3 Mounting guide
Check that the parts ordered are present and undamaged before starting work. Please read through the entire
guide before starting assembly and mounting.
3.1 Recommended tools
A list of tools recommended for the installation of the tunnel inlet can be seen below.
Item Description
Cordless drill
Screwdriver bits
Drill kit
Sealant gun
Hammer
Utility knife
Wedge
Marker pens
Tape measure
Foam gun
Chisel
Ladder
Screwdriver

DA 17K Tunnel Inlet
8 Mounting Guide
Item Description
Allen key
Spirit level
Try square
3.2 Wall inlet positioning
The positioning of the inlet in a wall depends on the layout of the building and house. The positioning may there-
fore only be made according to directions communicated by or representatives of SKOV A/S.
3.3 Mounting of tunnel inlet
3.3.1 Preparing hole in wall
Mark out the correct number of holes according to mea-
surements.
Remember to use a spirit level at all times.

DA 17K Tunnel Inlet
Mounting Guide 9
Make a diagonal measurement.
Cut the holes.
3.3.2 Mounting in wall
Ensure that the inlet is placed in the middle of the hole.
Center the inlet in the hole with wedges.
Avoid pressing the inlet into place when mounting.
Make sure that the inlet flaps close tightly.

DA 17K Tunnel Inlet
10 Mounting Guide
Pre-drill the holes according to the instructions be-
low
Use a spirit level to ensure that the inlet has a correct
position.
Screw all 24 screws into the pre-drilled holes and mount
the inlet on the wall.
Center mark or 2mm hole when mounting in a sandwich
panel. Material thickness ≤ 1mm.
4mm hole when mounting in steel profiles. Material thick-
ness >1mm ≤ 2mm.
4.5 mm hole when mounting in steel profiles. Material
thickness >2 mm ≤ 4 mm.
Recommended screw: Tapping screw 4.8x70 A2.
Recommended tightening: 5.1 Nm.
Please make sure not to over-tighten the screws as they
are tightened directly against plastic.
Make sure that the internal dimensions still correspond
to those on the drawing.
3.3.3 Check the tightness
Press on the 5 inlet flaps at both ends.
No gaps = OK

DA 17K Tunnel Inlet
Mounting Guide 11
If there is a gap, use wedges to straighten the frame.
If necessary, use wedges from stacking blocks.
Break off the wedge.
Loosen the screws and insert wedges behind the inlet
frame until all flaps close tightly.
Tighten the screws again.

DA 17K Tunnel Inlet
12 Mounting Guide
Check that there are no gaps on both sides of all five in-
let flaps.
If only one flap has gaps, it may be because the flap is
twisted.
The flap is corrected by twisting the flap in the opposite
direction.

DA 17K Tunnel Inlet
Mounting Guide 13
3.3.4 Foaming
The excess part of the wedges should be removed before foaming.
Wet the faces with water from a mist sprayer before proceeding with the foaming.
1 component Polyurethane foam is used for foaming.
A. Foam the entire depth of the inlet in the corners and approx. 100 mm to each side of the corners.
B. It is important to foam the edge only on the middle part of the inlet, otherwise the foam may cause the inlet to
warp.
Polyurethane foam
Polyurethane foam
The inlet from the back
3.3.5 Jointing
1 component elastic joint sealer with no added solvents is used for pointing.
C. Apply a sealing edge of joint sealer between the inlet and the wall – both externally and internally.
The inlet from the back Joint sealer externally
Joint sealer internally

DA 17K Tunnel Inlet
Mounting Guide 15
3.4.1 Wheel set
Mount the wheel set on both sides.
3.4.2 Brackets for single pull
Drill three 3 mm holes.
Mount the bracket for the single pull opposite the pulling
direction.

DA 17K Tunnel Inlet
16 Mounting Guide
3.4.3 Brackets for pull rod
Drill four 3 mm holes.
Mount the brackets for the pull rod on both sides.
3.4.4 Pull rod
Turn the top part of the bracket for the pull rod to sepa-
rate the two parts.
Mount the pull rod when all brackets for the pull rod have
been mounted.
Click the top part of the bracket for the pull rod.

DA 17K Tunnel Inlet
Mounting Guide 17
3.4.5 Pulley on pull rod
Mount the wire lock with snap hook and pulley on the
pull rod.
3.4.6 Coil spring
Mount the coil spring on the opposite end of the pull
drive.
See documentation for mounting set.

DA 17K Tunnel Inlet
18 Mounting Guide
3.4.7 String
1) Mount the wire lock on the string.
2) Pull the string as shown below, mount the wire lock.
3) Tighten the string by pulling the wire lock on the pull rod against the pulling direction.
(1)
(2)
(3)

DA 17K Tunnel Inlet
Mounting Guide 19
3.5 Mounting of bird net
Braid the rods into the net.
Note that an excess of net is supplied.
Mount the tubes as corners.
Mount three clips on each rod.
Mount the net on the inlet frame.
Cut off any excess net.

DA 17K Tunnel Inlet
20 Mounting Guide
3.6 Mounting examples
See also documentation for DA 175 mounting set.
The inlets can be mounted directly onto exterior walls.
The arrows show the direction of the air jet.
Table of contents
Other Skov Farm Equipment manuals
Popular Farm Equipment manuals by other brands

Ovlac
Ovlac CH-7 instructions

Cobi Rehab
Cobi Rehab XXL-Rehab user manual

New Holland
New Holland Harvester 1900 Service manual

greenhouse sensation
greenhouse sensation Hydrogrow NFT Assembly and maintenance instructions

KMC Controls
KMC Controls 56 Series Owner's manual and parts book

Unverferth
Unverferth PARKER 505 manual