Slime 40058 User manual

PART#40058 | REV031918ART
ATTENTION! READ ALL INSTRUCTIONS CAREFULLY
FAILURE TO FOLLOW WARNING INSTRUCTIONS CAN RESULT IN FIRE,
PERSONAL INJURY OR PROPERTY DAMAGE.
SEALANT/
AIR HOSE
ENGLISH
REMOVABLE
DEBRIS CANISTER
EXPANDABLE
VACUUM HOSE
• Expands to 32.25 in.
(820mm) long
• Crevice/dusting tool
attachment included
BALL
CAUTION:
1. DO NOT run vehicle while inflator is operating. You may need to be in “accessory” or “on”
position. Please make sure emergency brake is set and car is in park.
2. Always ensure the valve connector is fully seated to depress the core of the valve stem for
proper inflation.
3. DO NOT use inflator continuously for more than 10 minutes. Allow unit to cool approximately 10
minutes between uses. Do not leave inflator unattended.
4. ALWAYS use a pressure gauge to check tire pressure. DO NOT overinflate.
5. Soft inflatables (i.e. rafts, balls, etc.) may not have recommended pressure markings. Be careful
not to inflate items beyond their capacity.
6. While operating, never block the inflator input or output.
7. Keep inflator out of reach of children.
8. For use with 12 volt DC power outlets rated 15 amps or higher. Do not use with older 8 amp
cigarette lighter receptacles.
EASY GRIP HANDLE
DIGITAL GAUGE
• 0-99PSI range
INFLATE RIGHT™
TECHNOLOGY
• Inflator automatically
shuts off when the set
pressure level is achieved
• Perfect pressure with
every use
CANISTER
RELEASE BUTTON
CONVENIENT
CORD STORAGE
POWER SOURCE
• Plugs into 12 volt,
15 amp power outlet
• 10 ft. (3m) length
POWER SWITCH
• Toggle between Vacuum/OFF/Inflator
INFLATABLES
VACUUM HOSE STORAGE
• Wraps around inflator
for easy storage.
VACUUM HOSE PORT
INFLATOR HOSE
STORAGE
CARS • TRUCKS • BIKES • INFLATABLES

INFLATION INSTRUCTIONS:
Inflation can be used for auto tires, bicycle tires, sports balls, rafts and other inflatables.
Plug power cord into 12 volt accessory power outlet.
Screw air hose connector onto tire’s valve stem.
Use the toggle switch to power the inflator by sliding
it to the inflator icon. Inflate tire to manufacturer’s
recommended air pressure. Use the Inflate Right
Technology ™ (instructions below) for accurate inflation.
1
2
3
4
When desired pressure* is reached, slide toggle switch
to middle “OFF” position to turn off inflator. UNPLUG
POWER CORD AND REMOVE AIR HOSE CONNECTOR.
INFLATE RIGHT™ TECHNOLOGY INSTRUCTIONS:
1. Once inflator hose is attached to the valve stem, hold the + or – button for approximately 2
seconds until the display flashes. Set the required pressure using the + or – buttons, then
wait 3 seconds. The display will stop flashing and show the target pressure value to which
the tire will be inflated. (Continuously pressing the + or – button will enter into “Fast setting
mode”, increasing or decreasing the rate of target pressure at an increased speed.)
2. Use the toggle switch to power the inflator by sliding it to the inflator icon to begin inflation.
3. When the pressure gauge reaches the pre-set value, the inflator will automatically stop
inflation. Once desired tire pressure is reached, disconnect the air hose, and unplug the
power cord.
* NOTE: Recommended tire pressure can be found in vehicle owner’s manual or on the
driver’s side door jamb.

VACUUM USAGE INSTRUCTIONS:
Remove expandable vacuum hose from base of unit, and
insert open end of the vacuum hose into the green suction
port on the back of the vacuum unit.
Plug power cord into 12 volt accessory power outlet.
The crevice/dusting tool accessory comes attached to the hose.
To use crevice tool, push in button lever located on side of
dusting tool and slide tool down. The crevice/dusting tool may
be removed from the hose if needed by pulling directly off of
the hose at base of the dusting tool attachment.
Use the toggle switch to power the vacuum by sliding it to the
vacuum icon. When finished using the vacuum, slide the toggle
switch to the middle “OFF” position to turn vacuum off and
unplug power cord. Disconnect the expandable vacuum hose
and place in the hose storage area on the base of the unit.
1
3
4
2

To Remove and Empty Debris Canister:
1
Press the debris canister release button located
under the handle and pull the debris canister
straight out, away from the unit.
To empty the canister, hold it over a trash
receptacle, and locate the green release button
on the bottom front of the canister. Depress
the button and shake out the debris until
canister is empty.
Reinstall the canister into the vacuum unit by
sliding the canister straight into the unit until
seated. An audible click will be heard when the
canister is seated properly.
VACUUM CANISTER REMOVAL INSTRUCTIONS:
3
4
When debris is removed, close the canister door
until green release button snaps closed.
2

INFLATOR TROUBLESHOOTING:
Inflator does not turn ON (try one or all of the following):
1. Check to see if the tire pressure set point on the digital gauge
is set to a lower PSI than your tire currently is reading (i.e., the
digital gauge is set to 15PSI, but your tire is at 20PSI; in this
scenario, the inflator will not turn on). Refer to the digital
gauge operating instructions and set the PSI to the correct
tire pressure.
2. Check the power plug and push it firmly into the receptacle,
twist back and forth.
3. Check receptacle and plug terminals for dirt, or debris.
(Use a non-conductive probe, not fingers or metal).
4. Check vehicle power outlet fuse. It should be 15 amps minimum.
5. Check the fuse. It may have blown:
12V fuse is located in the plug adaptor:
unscrew the tip, remove fuse, and inspect.
If necessary, replace fuse with 15A 250V 5mm x 20mm.
Inflator runs but does not inflate:
1. Be sure the connector is fully tightened on the valve stem.
2. Check tire for leaks, and check hose for breaks and leaks at fittings.
Inflator runs slowly:
1. Overheated from excessive use. Shut if off and allow to cool for 25 minutes.
2. Voltage too low. Check condition of vehicle battery.
NOTE:
If tire is totally deflated, it is possible that the tire could separate from the rim allowing air to leak
out when trying to inflate. In the event this occurs, you will have to jack up the tire prior to inflation.
CAUTION: Keep inflator out of reach of children. Do not over-inflate.
Dispose of this product at an e-waste recycling collection point or facility. Do not place in the trash or
standard recycling receptacle.
IDEAL USES
TIRE INFLATION TIME
CUBIC INCHES PER MIN.
AIR HOSE LENGTH
POWER CORD LENGTH
POWER SOURCE
LIGHT
DIGITAL GAUGE
VACUUM HOSE LENGTH
TOTAL REACH
Tires, Inflatables, Sports Balls
6min*
1000 CIM (16.4LPM)
2ft. (0.6m)
10 ft. (3m)
12 accessory outlet
Single LED, 7lumens
Digital Gauge 0-99 PSI
32.25 in. (820 mm) expanded
Inflator 12 ft. (3.66m) Vacuum 12.5 ft. (3.81m)
TECH SPECS
* (0-35PSI, Standard Tire: P195/65 R15)

Warranty: For the period of one year from date of purchase, manufacturer guarantees that this
Product will meet the specifications when used as directed. Manufacturer’s sole liability and
Customer’s sole remedy under any warranty claim is limited to a Manufacturer’s coupon for a
replacement product upon return of unit and proof of purchase.
QUESTIONS OR COMMENTS: Call 1-888-457-5463 or visit www.slime.com
ITW Global Tire Repair • 125 Venture Drive, Suite 210, San Luis Obispo, CA 93401 USA
Slime® is a trademark of Illinois Tool Works, Inc., registered in the U.S. and other countries.
VACUUM TROUBLESHOOTING:
Vacuum does not turn ON (try one or all of the following):
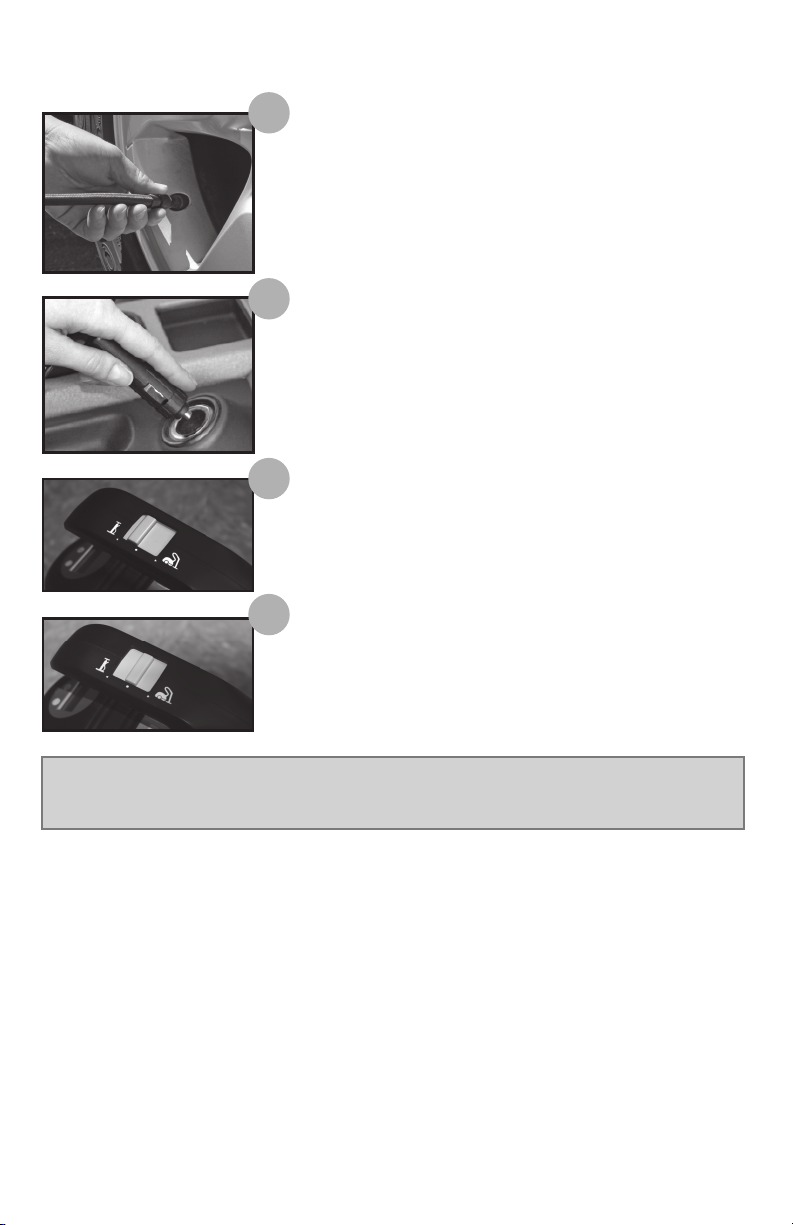
1. Check the power plug and push it firmly into the receptacle, twist back and forth.
2. Check receptacle and plug terminals for dirt, or debris. (Use a non-conductive probe, not fingers
or metal).
3. Check vehicle power outlet fuse. It should be 15 amps minimum.
4. Check the fuse. It may have blown: 12V fuse is located in the
plug adaptor: unscrew the tip, remove fuse, and inspect.
If necessary, replace fuse with 15A 250V 5mm x 20mm.
Vacuum is not picking up debris (try one or all of the following):
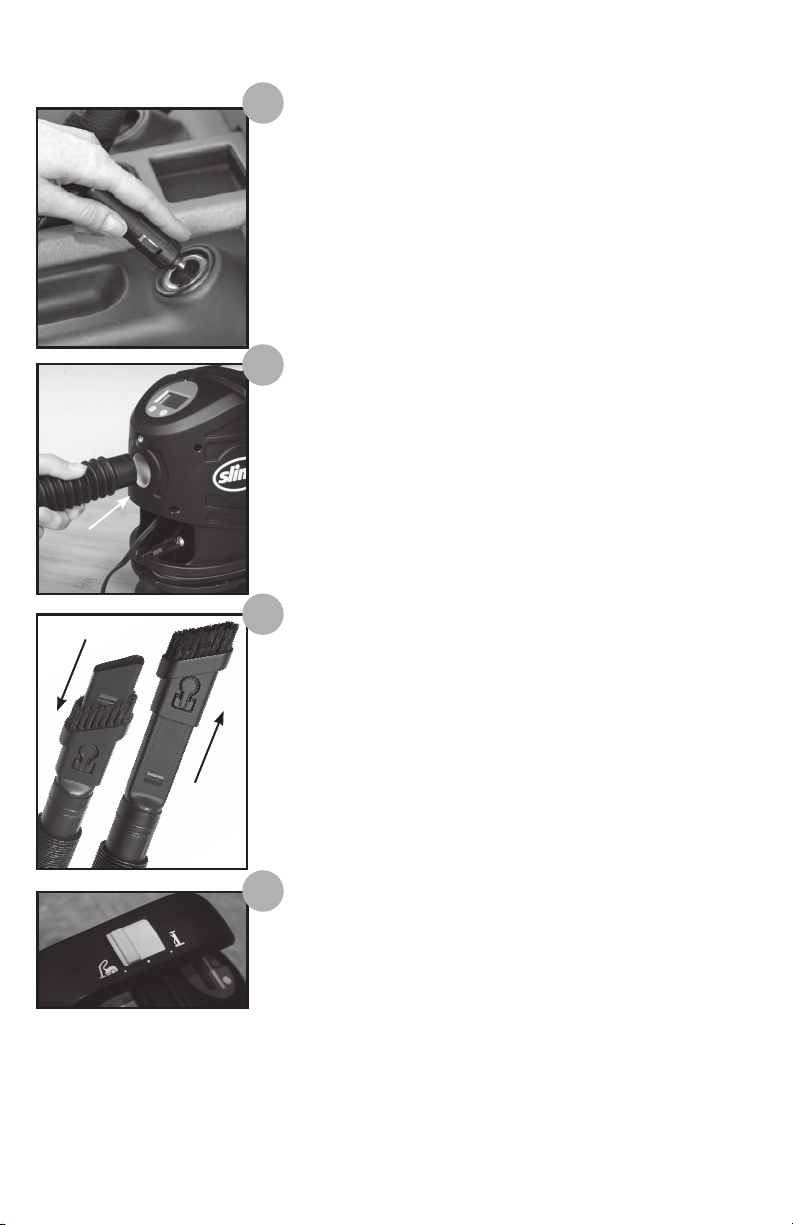
1. There may be an object lodged in the vacuum hose, vacuum accessory tip, or vacuum unit itself.
Unplug from power, remove the vacuum hose and inspect to ensure the unit is clear of blockages.
Check the vacuum accessory tip for blockage. If no blockage is found in the hose or tip, check the unit
itself for blockage. The debris canister should be removed, and the suction port inspected from both
sides. If debris is determined to be stuck in the unit, use a thin flexible item (such as a drinking straw)
to remove it. Do not use sharp objects that could damage the unit.
2. The debris canister may not be correctly seated in unit. Remove the debris canister from unit by
pulling the debris canister straight out, away from the unit. Reinstall the canister into the vacuum
unit by pushing the canister straight into the unit until seated. An audible click will be heard when
the canister is seated properly.
3. The vacuum filter may be dirty, restricting flow. To clean, remove the debris canister from unit by
pulling the debris canister straight out, away from the unit. Open the top lid, and pull out the green
filter retainer. Remove the foam filter from the filter retainer, and rinse both pieces thoroughly with
warm water until clean. Allow parts to fully dry, and reassemble.
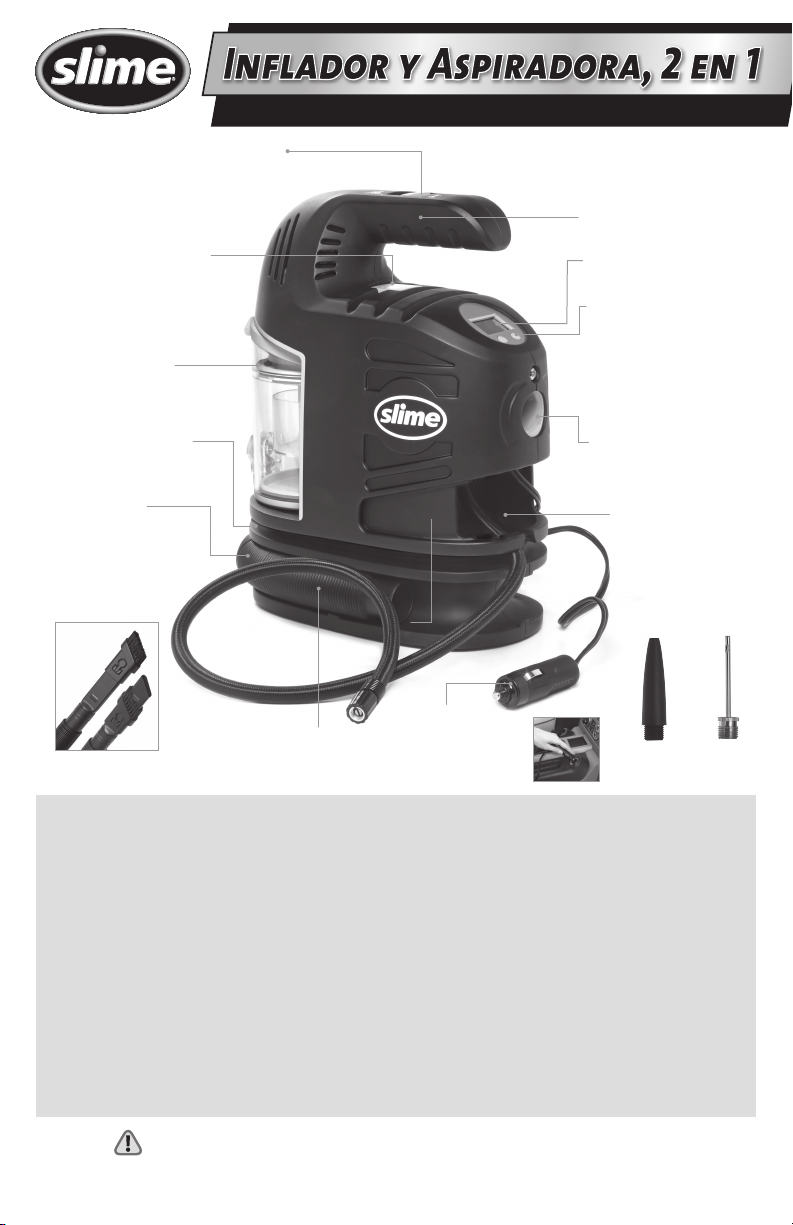
FILTER RETAINER
CANISTER

SEALANT/
AIR HOSE
SPANISH
CONTENEDOR DE
SUCIEDAD REMOVIBLE
MANGUERA
EXPANDIBLE
PARA LA
ASPIRADORA
• Expande hasta 820 mm
(32.25 pulgadas) de largo
• Herramienta para rendijas
y para sacudir incluida
BALÓN
PRECAUCIÓN:
1. NO conduzca el vehículo mientras esté funcionando el inflador. Es posible que deba estar en la posición
de “accesorios” o “encendido”. Asegúrese de colocar el freno de emergencia y que el vehículo esté en park
(estacionamiento).
2. Asegúrese siempre de que el conector de la válvula esté bien sellado y presione contra el vástago de la válvula
con el fin de inflar de la manera adecuada.
3. NO use el inflador de manera continua durante más de 10 minutos. Permita que el aparato se enfríe
durante unos 25 minutos entre usos. No deje el compresor sin supervisión.
4. Use SIEMPRE un medidor de presión para verificar la presión de las llantas. NO infle los artículos demasiado.
5. Los artículos inflables suaves (por ejemplo, balsas, balones, etc.) pueden no tener recomendaciones para el
nivel de presión. Tenga cuidado de no inflarlos demasiado.
6. Nunca bloquee la entrada ni la salida de aire del inflador mientras esté funcionando.
7. Mantenga el inflador fuera del alcance de los niños.
8. Para usarlo en tomacorrientes DC de 12 voltios para 15 amperios o más. No lo use con los toma corrientes
encendedores de cigarrillos más antiguos de 8 amperios.
MANIJA FÁCIL DE
AGARRAR
MEDIDOR DIGITAL
• Alcance de 0-99PSI
TECNOLOGÍA
INFLATE RIGHT™
• IEl inflador se apaga
automáticamente cuando se
ha alcanzado el nivel de presión
configurado
• Garantiza una presión perfecta
con cada uso
BOTÓN PARA LIBERAR
EL CONTENEDOR
CONVENIENTE
ESPACIO PARA
ALMACENAR EL CABLE
FUENTE DE ENERGÍA
• Se enchufa en un
tomacorriente de 12
voltios y de 15 amperios
• 10 pies (3 m) de largo
BOTÓN DE ENCENDIDO Y APAGADO
• Pasa de aspiradora a APAGADO a inflador
ARTÍCULOS
INFLABLES
PARA ALMACENAR LA
MANGUERA DE LA ASPIRADORA
• Se enrosca alrededor del inflador para
almacenarla fácilmente.
PORTAL PARA LA
MANGUERA DE LA
ASPIRADORA
ESPACIO PARA ALMACENAR
LA MANGUERA DEL
AINFLADOR
CARROS • CAMIONES • BICICLETAS • ARTÍCULOS INFLABLES
¡ATENCIÓN! LEA TODAS LAS INSTRUCCIONES CON ATENCIÓN
SI NO SIGUE LAS INSTRUCCIONES DE ADVERTENCIA, PUEDE CAUSAR
INCENDIO, LESIONES A PERSONAS O DAÑOS MATERIALES.

INSTRUCCIONES PARA LA INFLACIÓN:
La inflación se puede usar para llantas de automóviles y de bicicletas, para balones de deportes,
balsas
y otros artículos inflables.
Enchufe el cable eléctrico en el tomacorriente de 12 voltios
para accesorios.
Enrosque el conector de la manguera de aire en el
vástago de la válvula de la llanta.
Use el botón para encender el inflador deslizándolo
hasta el ícono del inflador. Infle la llanta hasta la presión
de aire recomendada por el fabricante. Use la tecnología
Inflate Right™ (instrucciones a continuación) para inflar
con precisión.
1
2
3
4
Cuando alcance la presión deseada*, deslice el botón
a la posición del medio “APAGADO” para apagar el
inflador. DESCONECTE EL CABLE ELÉCTRICO Y RETIRE EL
CONECTOR DE LA MANGUERA DE AIRE.
INSTRUCCIONES PARA LA TECNOLOGÍA INFLATE RIGHT™:
1. Cuando la manguera del inflador esté conectada al vástago de la válvula, sostenga el botón
+ o - aproximadamente 2 segundos hasta que la pantalla parpadee. Configure la presión
necesaria con los botones + o - y espere 3 segundos. La pantalla dejará de parpadear e
indicará el valor de la presión al cual se inflará la llanta. (Presionar los botones + o - de
manera continua empezará el “Modo de configuración rápida”, que aumenta o reduce más
rápido el valor de la presión que se piensa configurar.)
2. Use el botón para encender el inflador deslizándolo hasta el ícono del inflador para empezar a
inflar.
3. Cuando el indicador de presión alcanza la presión configurada, el inflador se apaga
automáticamente. Cuando se haya alcanzado la presión deseada, desconecte la manguera de
aire y el cable eléctrico.
IMPORTANTE: La presión recomendada para las llantas se puede encontrar en el manual del
propietario o en el marco de la puerta del conductor.

INSTRUCCIONES PARA EL USO DE LA ASPIRADORA:
Retire la manguera expandible para la aspiradora de la
parte inferior del aparato e introduzca el extremo abierto
de la manguera de la aspiradora en el portal verde de
succión en la parte de atrás de la aspiradora.
Enchufe el cable eléctrico en el tomacorriente de 12 voltios para
accesorios.
La herramienta para rendijas y para sacudir viene sujeta a la
manguera. Para usar la herramienta para rendijas, oprima la
manija botón al lado de la herramienta para sacudir y deslícela
hacia abajo. La herramienta para rendijas y para sacudir se
puede retirar de la manguera si es necesario, tirando de ella
para sacarla de la manguera en la base de la herramienta para
sacudir.
Use el botón para encender la aspiradora deslizándolo hasta
el ícono de la aspiradora. Cuando haya terminado de usar
la aspiradora, deslice el botón hasta la posición del centro
“APAGADO” para apagarla y desconecte el cable eléctrico.
Desconecte la manguera expandible de la aspiradora y
colóquela en el lugar de almacenaje en la parte inferior del
aparato.
1
2
3
4

Para retirar y vaciar el contenedor de suciedad:
1
Oprima el botón para liberar el contenedor
ubicado debajo de la manija y saque el
contenedor del aparato.
Para vaciar el contendor, sosténgalo sobre un
bote de basura y ubique el botón verde en
el frente de la parte inferior del contenedor.
Oprima el botón y sacuda para sacar la
suciedad del contenedor.
Vuelva a instalar el contenedor en la aspiradora
deslizándolo hasta que quede asentado. Se oye
un sonido cuando el contenedor ha quedado bien
asentado.
INSTRUCCIONES PARA RETIRAR EL CONTENEDOR DE LA
ASPIRADORA:
2
3
4
Cuando haya sacado la mugre, cierre el contenedor
hasta que el botón verde suene y quede cerrado.

RESOLUCIÓN DE PROBLEMAS CON EL INFLADOR:
El inflador no enciende (pruebe una o todas las siguientes sugerencias):
1. Verifique que la presión de la llanta configurada en el medidor digital para determinar si ha
quedado a un valor PSI inferior a la lectura actual de la llanta (por ejemplo, el medidor digital está
configurado a 15 psi, pero la llanta se encuentra a 20 psi; en este caso, el inflador no enciende).
Consulte las instrucciones del medidor digital y configure el valor psi a la presión correcta para la
llanta.
2. Inspeccione el enchufe y empújelo firmemente dentro del tomacorriente, gírelo de un lado a otro.
3. Inspeccione las terminales del receptáculo y del enchufe en busca de suciedad. (Use un elemento
que no conduzca electricidad, no use los dedos ni nada de metal).
4. Inspeccione el fusible del tomacorriente. Este debe tener 15 amperios, como mínimo.
5. Inspeccione el fusible. Se puede haber fundido:
El fusible de 12V está ubicado en el adaptador del enchufe: destornille la punta del adaptador,
retire el fusible e inspecciónelo. Si es necesario,
reemplácelo con un fusible de 15A 250V 5mm x 20mm.
El inflador funciona, pero no infla:
1. Asegúrese de que el conector esté bien enroscado sobre el vástago de la válvula.
2. Inspeccione la llanta para comprobar que no tenga escapes y que la manguera no tenga roturas ni
escapes en las juntas.
El inflador funciona muy despacio:
1. Se ha sobrecalentado debido al uso excesivo. Apáguelo y permita que se enfríe durante 25 minutos.
2. El voltaje está demasiado bajo. Inspeccione la condición de la batería del vehículo.
IMPORTANTE:
Si la llanta está desinflada por completo, es posible que se separe del rin y permita el
escape de aire mientras está tratando de inflarla. En este caso, deberá usar un gato para levantar la llanta
antes de inflarla.
PRECAUCIÓN: Mantenga el inflador fuera del alcance de los niños. No la infle demasiado.
Deseche este producto en un lugar o establecimiento de colección o reciclaje de desechos electrónicos.
No lo coloque en la basura ni en el recipiente normal para el reciclaje.
USOS IDEALES
TIEMPO DE INFLADO DE LLANTAS
CENTÍMETROS CÚBICOS POR MINUTO
LONGITUD DE MANGUERA DE AIRE DE ROLLO
LONGITUD DEL CORDÓN DE CORRIENTE
FUENTE DE ENERGÍA
LUZ
INDICADOR
LARGO DE LA MANGUERA DE LA ASPIRADORA
DISTANCIA COMPLETA
Llantas, artículos inflables, balones para deportes
6 min*
1000 CIM (16.4LPM)
2 ft. (0.6m)
10 ft. (3m)
Toma de corriente para accesorio de 12 voltios
Lámpara LED única, de 7 lúmenes
Medidor digital 0-99PSI
820 mm (32.25 pulgadas) extendida
Inflador 12 ft. (3.66m) Aspiradora 12.5 ft. (3.81m)
ESPECIFICACIONES
* (0-35PSI, Llanta Estándar: P195/65 R15)

FILTRO RETENEDOR
CONTENEDOR
Garantía: Por el periodo de un año desde la fecha de compra, el fabricante garantiza que este producto
cumplirá las especificaciones si se usa de acuerdo con las instrucciones. La única responsabilidad del
fabricante y la única solución para el cliente bajo cualquier reclamación de garantía se limita a un cupón
del fabricante para el reemplazo del producto cuando se haya devuelto el artículo con el comprobante de
compra.
PREGUNTAS O COMENTARIOS: Llamar al (888)457-5463 o visitar www.slime.com
ITW Global Tire Repair • 125 Venture Drive, Suite 210, San Luis Obispo, CA 93401 USA
Slime® es una marca registrada de Illinois Tool Works, Inc., registrada en Estados Unidos y en otros países.
RESOLUCIÓN DE PROBLEMAS CON LA ASPIRADORA:
La aspiradora no enciende (pruebe una o todas las siguientes sugerencias):
1. Inspeccione el enchufe y empújelo firmemente dentro del tomacorriente, gírelo de un lado a otro.
2. Inspeccione las terminales del receptáculo y del enchufe en busca de suciedad. (Use un elemento que
no conduzca electricidad, no use los dedos ni nada de metal).
3. Inspeccione el fusible del tomacorriente. Este debe ser de 15
amperios, como mínimo.
4. Inspeccione el fusible. Se puede haber fundido: El fusible de 12V
está ubicado en el adaptador del enchufe: desenrosque la punta,
retire el fusible e inspecciónelo.
Si es necesario, reemplácelo con un fusible de 15 A 250 V 5 mm x 20 mm
La aspiradora no recoge la suciedad (pruebe una o todas las siguientes sugerencias):
1. Puede haber un objeto atascado en la manguera de la aspiradora, en el extremo del elemento para
accesorios o la aspiradora en sí. Desconecte la aspiradora, retire la manguera de la aspiradora e
inspeccione todo para asegurarse que el aparato no esté bloqueado. Inspeccione el extremo del
elemento para accesorios para asegurar que no esté bloqueado. Si no encuentra ningún bloqueo en la
manguera ni en el extremo del elemento para accesorios, inspeccione el aparato en sí. El contenedor
para suciedad se debe retirar y se debe inspeccionar el portal de succión por ambos lados. Si se
determina que hay suciedad atascada en el aparato, use un elemento delgado (como un popote) para
retirarla. No use objetos punzantes que puedan dañar el aparato.
2. El contenedor de suciedad puede no estar bien asentado dentro del aparato. Retire contenedor tirando
hacia atrás, sacándolo del aparato. Vuelva a instalar el contenedor en la aspiradora deslizándolo hasta
que quede asentado. Se oye un clic cuando el contenedor ha quedado bien asentado.
3. El filtro de la aspiradora puede estar sucio y restringir el flujo de aire. Para limpiarlo, retire el
contenedor de suciedad tirando hacia atrás, sacándolo del aparato. Abra la tapa de la parte superior y
saque el elemento verde que contiene el filtro. Retire el filtro de espuma del elemento que lo contiene
y enjuague bien ambas piezas con agua tibia hasta que estén limpias. Permita que se sequen por
completo y vuelva a ensamblarlos.
Other manuals for 40058
1
Table of contents
Languages:
Other Slime Power Tools manuals

Slime
Slime 40020 User manual

Slime
Slime 42012 User manual

Slime
Slime 40045 User manual

Slime
Slime DUAL POWER 40052 User manual

Slime
Slime 40050 User manual

Slime
Slime 40047 User manual

Slime
Slime GARAGE INFLATION STATION User manual

Slime
Slime 40050 User manual

Slime
Slime PRO POWER User manual

Slime
Slime 40030 User manual

Slime
Slime PRO POWER User manual

Slime
Slime Power Sport 40001 User manual

Slime
Slime 40065 User manual

Slime
Slime 40058 User manual

Slime
Slime 40052 User manual

Slime
Slime 40030 User manual

Slime
Slime 40050 User manual

Slime
Slime Expert Heavy-Duty Tire Inflator User manual

Slime
Slime 40046 User manual

Slime
Slime 40059 User manual