Smeg LEV341XV User manual

English | 1
01-10-2012
ENGLISH (Translation of the original instructions)
CONTENTS: page
INSTRUCTIONS FOR THE INSTALLER
I. WARNING 2
II. PRELIMINARY OPERATIONS 2
III. INSTALLATION AREA 2
IV. PREPARING FOR INSTALLATION 3
V. ELECTRICAL CONNECTION 3
VI. SPECIFICATIONS 6
INSTRUCTIONS FOR THE USER
I. WARNING 7
II. FIRST USE 8
III. ORDINARY MAINTENANCE 8
IV. EXTRAORDINARY MAINTENANCE 9
V. MAINTENANCE IN CASE OF BREAKAGE 9
VI. CONTROL PANEL 10
VII. ADVICE DURING COOKING 10

English | 2
INTRODUCTION
Dear client, thank you and congratulations for buying this appliance; we are confident that this is the
beginning of a positive and long-lasting collaboration.
This manu al has all t he necessa ry information for the correct use, maintena nce and in stallation of
this appliance. The objective of this manual is to enable the technician and user to tak e all measures
and precautions necessary for the safe, efficient, long-term use of the appliance.
Keep this booklet in a safe place, over the entire life cycle of the product for subsequent reference by
the operators designated to use and specialized technicians.
Where doc uments are lost or da maged the replacement documentation must be requested directl y
from the manufacturer or retailer.
The manufacturer is not held liable for an y damage caused b y people or things or for inappropriate
use of the appliance, modifications or repai rs carried out b y unauthorized personnel or used w ith
spare parts not recommended by the manufacturer and not intended for use with this model.
This appliance complies with the EEC directives in force.
INSTRUCTIONS FOR THE INSTALLER
I. WARNING
Read this instructions booklet carefully before starting the installation and start-up operations.
All installation, assembly, assistance and extraordinary maintenance shall be carried out by qualified
personnel and supplied with necessary professional (authorisations by the manufacturer or retailer),
in accordance with l ocal la ws in effect where installation takes place regarding product an d
workplace safety.
Incorrect installation, assistance , maintenance, cleaning, tampering or modifications can cause malfunction,
damage and breakage.
The applian ce must only be used f or cooking or heating of foods in industrial kit chens. Any other use is
inappropriate and dangerous.
II. PRELIMI NARY OPERATIONS
On receipt of the produ ct, make sure it has not been damaged during transport and that the p ackaging has
not been tampered with . In the case of damage or missing parts inform the carrier and retaile r/manufacturer
immediately, indicating the code (Art.) and serial number (Ser N°) and attach a photo.
Check installation area is kept clear so that doors, corridors and passageways are accessible.
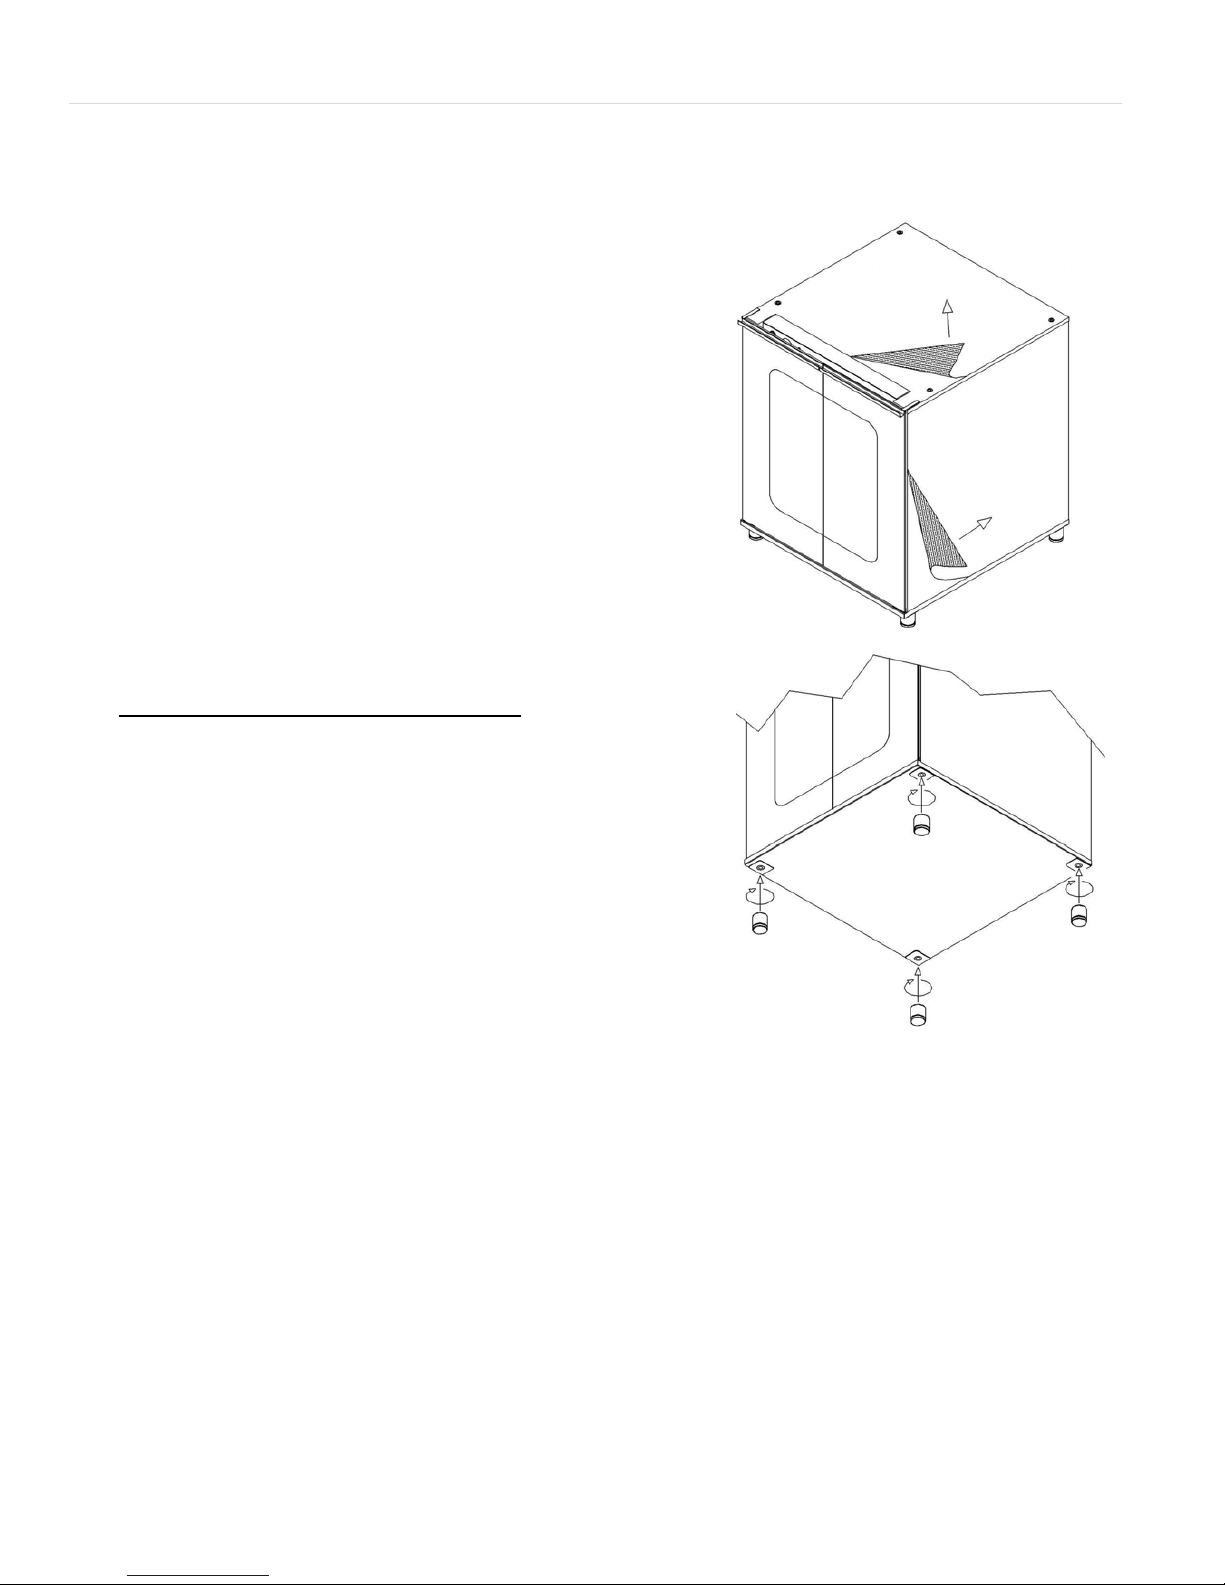
WARNING: the appliance may fall over during transport leading to breakage and damage t o things and
people. Use suitab le transport capable of taking the weight of the appliance. Do no t drag or lean the device
for any reason. Lift it up straight from the ground and place horizontally.
III. INSTALLATION AREA
The appliance shall be installed in enclosed and well ventilated areas (not outdoors).
Before positioning the appliance, ch eck the overall dim ensions and the exact position of the electrical, wat er
connections.
Make sure that it is placed so that the door may be fully opened.
The appliance is not meant to be fitted and a 5 cm space must be left all round it.
It is not advised to place it near he at, fryers or other hot liquids. If this is not possible at least respect th e
following distances from machinery: 50 cm from the sides and above the appliance and 70 cm from behind.
Do not place the device near materials or containers of inflammable liquids (such as walls, furniture, screens,
gas can isters) as it can be a f ire h azard. If this is not po ssible, cover the inf lammable parts with fire and
heatproof material and by checking fire hazard regulations.

English | 3
IV. PREPARING FOR INSTALLATION
Remove the outer packaging (wooden caging a nd/or carton box) and dispose it in compliance with the laws
in force in the country of installation.
REMOVING PROTECTIVE FILM ETC.
Remove th e protection film from the external and
internal walls. (See image)
Remove all informatio n covering from the in side,
and take off all plastic packaging.
STANDS ADJUSTMENT
Do not use the appliance without stands.
Take the st ands from inside, raise the device on one
side and screw them in the positions shown. They
have threaded inserts ( see image).
If they are not used, this prevents airflow from cooling
the electr ic parts and outsides of t he device which
causes over-heating and damage to components.
By placing the applian ce flat it will ensure correct
functioning. This can be achieved by fitting the stands
correctly and using a spirit level.
V. ELECTRI CAL CONNECTION
WARNING: Mains connection must be carried out by a qualified and authorised technician accordin g
to national, international and local laws in the country where it is installed.
Before mains connection, ensure that the frequency (…..V) and voltage (….Hz) meet the requirements
indicated in the in the information tag on the back of the appliance.
WARNING: if the device does not come with a trolley to facilitate tra nsport, it is advisable to connect it first
then place it in position in the work area ensuring the cable is not damaged during placement. This enable s
easy and safe connection. Ensure that the cable is uniformly exposed to a room temperature no higher than
50°.
PROOFERS WITH CABLE AND SINGLE PHASE PLUGS
For appliance with cable and plug (single phase 220-240V) the plug merely needs to go into the appropriate
socket (the socket must be adapted for the sup plied plug a nd must withstand the voltage required by th e

English | 4
appliance indicated on t he information plate). The product must be positioned so that the plug is always
accessible.
The appliance comes with certified cable and plug therefore they must not be tampered with or modified.
Only the cable can be substituted: this must be carried out b y a q ualified authorized technician. The
earth wire must always be yellow green.
APPLIANCE NOT SUPPLIED WITH CABLE WITH THREE PHASE TERMINALS
Articles supplied by us come with t erminals such as
in the imag e. To conne ct to the mains see the label
in the manual and stuck to the lower part of the back
of the appliance near the Information plate.
The device must be connected to th e electricity with
a rubber cable such as H07RN-F.
WARNING: the yellow/green voltage w ires in the
earth cable must be 3cm longer than the others.
The device must be connected directly to the mains and must have an easily accessible switch from the start,
installed for the device according to the national, internat ional and local laws in the country where it is
installed. This switch must separate polarization guaranteeing complete disconnection in accordance with the
overvoltage III category.
Correct earthing is obligatory and the earth wire must not be operated by the protection switch.
CABLE CONNECTION
Proceed as follows to co nnect the power supply wire to the
terminal board:
• ( A1 ) Loosen the tops of the cable gland and open
the bottom part of th e back of the appliance by
loosening the screws.
• ( A2 ) Feed the new cable through the cable gland.
Connect the cable voltage to the terminal strips
following the connectio n diagram o n the label on the
back of the appliance. Only connect what is indicated
inserting th e copper bridge and the electricity cable
together under the screws, in the tightening direction,
so the cab le and the bridge are tightly fixed by
tightening t he screw. T he type of cable to be used
(HO7RN-F) is indicat ed on the label for each
connection and the voltage sections in mm².
• ( A4 ) Clo se the bott om part of the back of the
appliance b y tightening the screws and fit the cable
by tightening the cable gland top.

English | 5
Erroneous connection could lead to overheati ng of the t erminal board which could lead to blowout an d
electric shock.
Check that all the connections are tight before connecting the device to the mains.
PE = Yellow/Green: “EARTH” protection conductor.
N = Blue: neutral conductor.
L = Brown, Grey, Black: live conductors
Check there is no static discharge between live and earth . Check the limit switch continuity between th e
external casing and the earth wire of the mains. It is advised to u se a multi t ester to carry out thes e
operations.
CABLE SUBSTITUTION
This must be carried out by a qualified authorized technician. The earth wire must always be yellow green.
WARNING: the yellow/green voltage wires in the earth cable must be 3cm longer than the others.
Proceed as follows to connect the power supply wire to the terminal board:
• ( A1 ) Loosen the tops of the cable gland and open the bottom part of the back of the applian ce by
loosening the screws.
• ( A3 ) Loosen the terminal screws and feed the cable conductors through. Take out the old cable from
the cable gland.
• ( A2 ) Feed the new cable through the cable gland. Connect the new cable’s conductors to the terminal
following the connectio n diagram on the label at the lower part of t he back of the appliance. Only

English | 6
connect wh at is indicat ed inserting the copper bridge and the electr icity cable to gether unde r the
screws, in the tightening direction, so the cable and the bridge are tigh tly fixed by tightening the screw.
The type of cable to be used (HO7RN-F) is indicated on th e label for e ach connection and the voltage
sections in mm².
• ( A4 ) Close the bottom part of the back of the appliance by tightening th e screws and fit the cable by
tightening the cable gland top.
Check that all the connections are tight before connecting the device to the mains.
WARNING: wrong connection could lead to o verheating of the terminal board which could lead to blowou t
and electric shock.
Check there is no static discharge between live and earth . Check the limit switch continuity between th e
external casing and the earth wire of the mains. It is advised to use a multitester to carry out these operations
The appliance must be connected to the mains using a H07RN-F cable.
EQUIPOTENTIAL CONNECTION
This conne ction sha ll b e carried be tween the different appliances with the
terminal marked by the symbol: (see image).
This termin al enables t he connection of Yello w/Green cable with a section
between 2.5 and 10mm² .
The appliance shall be included in an equipotential system whose efficie ncy
shall be duly verified according to the provisions of the laws in force.

English | 7
INFORMATION
POWER
CONSUMPTI
SUPPLY
WEIGHT SUPPLY
FREQUENCY
INFORMATION PLATE
I. WARNING
Read this instructions booklet carefully in that it provides indications regarding safety and use of the
appliance.
Keep carefully for reference at all times.
Incorrect i nstallation, assistence, maintenance, cleaning, tampering or m odifications can cau se
malfunction, damage and breakage.
The leavening cabinet must only be used for leavening of foods in industrial and professional kitchens. A ny
other use is inappropriate. The manufacturer is not liable where it is used inappropriately.
INSTRUCTIONS FOR THE USER

English | 8
The appliance is intended for professional use and qualified personnel shall use it.
The applian ce is not suitable for use by people with lo w physical or mental abilitie s or lacking
experience, unless instructed regarding the operation of the device by the personnel in charge of safety
their safety.
Do not leave the applia nce unattended in presence of ch ildren and en sure that th e latter do not have
access to the appliance.
It is thus strongly recommended not to position sources of heat near the apparatus.
Do not under any circumstance, leave flammable material near a appliance: it can be a fire hazard.
Food container temperatures, accessories or other obje cts can be very hot; beware of b urns when
moving them. Only touch them with relevant thermal protection. Scalding danger!
Use fingers to regulate t he digital pa nel options; any other object may damage the device hence nullify
the validity of the warranty.
Damage or breakage of door glass components must be substituted immediatel y (contact the
Assistence Centre).
If it is not in use for long periods (many days), it is advisable to turn it off at the mains.
The producer shall not be deeme d liable for any damage incurred b y persons or properties, caused
by non-co mpliance w ith the af orementioned instructions of deriving from tampering w ith even a
single part of the appliance and use of non-genuine spare parts.
This appliance complies with the EU directives in force.
II. USING FOR THE FIRST TIME
Make sure all ch ecks r equired to ascertain st rict adheren ce with th e soundness of the systems and the
installation of the appliance with the law regulations as well as technica l and safety i nstructions provided for
by this manual are as well are carried out before operating the appliance.
There should not be plastic bags inside it, instruction manuals, plastic film or anything else.
All packag ing should ha ve been entirely remove d, includ ing the protect ive film applied on the w alls of the
product purchased.
TESTING
Thoroughly verify the conditions listed below:
On reaching the set temperature, the cooking temperature thermostat turns off the heating elements.
FIRST CLEANING OF THE CHAMBER
Disconnect electrical power from the appliance and w ait until the device is cooled completel y before
cleaning.
WARNING: the appliance should never be cleaned with high pressure water sprays.
There should never be any residue of solvents or detergents. They should be removed by rinsing thoroughly
using a damp cloth. Appropriate eye, mouth and hand protection should be used. Possib le danger of
corrosion.
Turn on the appliance and set the temperature to 60°C and leave it on for 10 minutes on steam.
Turn off the appliance and let it cool down and clean the walls of the chamber using hot water and soap, then
rinse; never use aggressive or acid products.
III. ORDINARY MAINTENANCE
The user is solely responsible for ordinary ma intenance. The Assiste nce Centre must be contacted for
extraordinary maintenance which requires a specialized authorized technician.

English | 9
CLEANING: GENERAL RULES
Disconnect electrical power from the appliance and w ait until the device is cooled completel y before
cleaning.
WARNING: the appliance should never be cleaned with high pressure water sprays.
ORDINARY CLEANING OF CHAMBER
It is advisable to clea n the chamber daily so as to ma intain corre ct levels of hygiene and avoid th e
deterioration of steel.
Do not use high pressu re water steam lances or steamers for cleanin g. Acidic, a brasive, corrosive sand-
based or caustic soda based detergents are prohibited.
For manual cleaning follow the procedure below:
• Turn on the appliance and set the temperature to 60°C.
• Leave it on for 10 minutes on steam
• Turn off the appliance and let it cool down
• Clean with hot water and soap then rinse.
Only use products recommended by the manufacturer of the appliance.
EXTERNAL CLEANING
Only use a damp cloth with warm water or pro ducts suitable for cleaning stainless steel. Do n ot use acidic
products or ammonia.
WARNING: the appliance should never be cleaned with high pressure water sprays.
IV. EXTRAORDINARY MAINTENANCE
It is advisable to have the appliance subjected to periodical checks (at l east once per year) by a specialized
authorized technician.
Any maintenance, inst allation or r epair work must be carried out by qualified a uthorized p ersonnel by
contacting the Assistance Centre. Before carrying out any operation the appliance must be plugged out at the
mains, turn off the water mains taps and wait for it to cool down.
Before moving the appliance from p osition, check that the electricity and water co nnections (electric cables
water pipe and drainage) are correctly plugged out.
If the appliance is on wheels check that electric cables, pipes or anything else are not damaged while moving
it. Ensure the break is on. Avoid placing the device near heat (such as fryers etc.).
After carrying out the task and repla cing the appliance in its initial position, check that the electric and wate r
are connected correctly.
V. MAINTENANCE IN CASE OF BREAKAGE
If the appliance breaks, disconnect it from the mains and turn off water.
Before ringing Customer Service, check the chart below).
PROBLEM CAUSE SOLUTION
The leavening cabinet isn’t
heating
Supply voltage failure Restore power supply voltage
Incorrect connection to the power
supply network Check connection to the power supply network
Broken resistance Contact specialised technician for repair
(Assistance Service ).
Broken thermostat temperature Contact specialised technician for repair
(Assistance Service ).

English | 10
Thermostat knob
Thermostat light
ON/0FF button
If the problem persists we advise you to consult a reta iler of manufacturer asking for Assista nce Service
specifying t he problem and sup plying your code (Art.) and serial n umber (Ser N°) This information is
provided on the INFORMATION PLATE on the back of the machine.
SPARE PARTS
Use only a uthorized p arts for product repair. All interventions shall be carried out by aut horized and
specialized technical personnel. Contact the Assistance Centre to request spare parts.
VI. CONTROL PANEL
ON/OFF BUTTON
This button turn the the leavening cabinet on and off.
• THERMOS TAT KNOB
This knob allows selecting the desired coking temperature.
THERMOS TAT LIGHT
When the heating elements are lit they are on because the internal leavening cabinet temperature is le ss
than the set by the thermostat value dial. When the light goes off it means that the inside of the leavening
cabinet has reached the set temperature.
VII. ADVICE FOR USE
Press ON/OFF and turn the temperature dial to the desired value.
HUMIDIFIER
For leavening or to conserve any food, fill the container at the bottom of the leavening cabinet with water and
turn on the appliance, setting the desired temperature. The water will become steam thanks to the heating of
components on the underside of the container.
Only fill to the container up to the line indicated “---------“.
Table of contents
Other Smeg Kitchen Appliance manuals

Smeg
Smeg A11A-5 User manual

Smeg
Smeg A1AU6 User manual

Smeg
Smeg Cooker with Electric Oven User manual

Smeg
Smeg HBFP01 User manual

Smeg
Smeg SMRM01 User manual

Smeg
Smeg CPF9IPAN User manual

Smeg
Smeg MFF01 User manual

Smeg
Smeg KLF05 User manual

Smeg
Smeg SCV115A User manual

Smeg
Smeg Gas/Electric Slot-In Cooker SNZ634E User manual