Snuza HERO User manual

Instruction Manual
READ INSTRUCTIONS IN FULL BEFORE USE
Important: Hero is a baby-care aid, not a medical device. It is not intended for the diagnosis, prevention
or monitoring of a disease, injury or handicap, including SIDS.
08/2014
ENGLISHFRANÇAISESPAÑOL
Moniteur portatif de mouvements
abdominaux pour bébé
Manuel d’utilisation
LISEZ ENTIÈREMENT ET ATTENTIVEMENT LES INSTRUCTIONS AVANT L’UTILISATION
Important: Hero n’est pas un dispositif médical ni un jeu. Il n’est pas destiné au diagnostic,
à la prévention ou à la surveillance d’une maladie, d’un accident ou d’un handicap,
y compris le syndrome de mort subite du nourrisson (SMSN).
Monitor Portatíl del Movimiento del Bebé
Manual de instrucciones
LEER ATENTAMENTE TODAS LAS INSTRUCCIONES ANTES DE SU USO
Importante: Snuza Hero es una ayuda para el cuidado del bebé, no es un dispositivo médico.
No está diseñado para diagnosticar, prevenir o monitorizar enfermedades, lesiones o discapacidades,
incluyendo SMSL.
Portable Baby Movement Monitor
HERO TYPE USA.indd 1
2014/11/11 12:52 PM

SNUZA is a registered trademark of
Made in South Africa
US Patent No.: 8,461,996
ENGLISH
HERO TYPE USA.indd 2
2014/11/11 12:52 PM

CONTENTS
1. IMPORTANT – READ FIRST! ....................................................... 2
2. Introduction .............................................................................. 4
3. Parts Identification .................................................................... 5
4. Quick Start Guide ...................................................................... 6
5. Diaper (Nappy) Fitment ............................................................. 6
6. Fitting your Hero ....................................................................... 6
7. Operation ................................................................................. 7
7.1 Startup ............................................................................ 7
7.2 Monitoring ....................................................................... 8
7.3 Travelling ......................................................................... 9
7.4 Clothing ........................................................................... 9
7.5 Baby Sound and Video Monitors ........................................ 9
8. Settings .................................................................................... 9
8.1 Audible Tick ..................................................................... 9
8.2 Rouse Warning ............................................................... 10
8.3 Movement-Rate Warning ................................................ 10
9. Battery ................................................................................... 11
9.1 Battery Indicator ............................................................. 11
9.2 Battery Life .................................................................... 11
9.3 Replacing the Battery ..................................................... 11
9.4 Disposal ........................................................................ 12
10. Maintenance .......................................................................... 12
10.1 Precautions .................................................................... 12
10.2 Cleaning and Storage ..................................................... 12
11. Troubleshooting ...................................................................... 13
12. Disclaimer .............................................................................. 13
13. Guarantee .............................................................................. 13
ENGLISH
HERO TYPE USA.indd 1
2014/11/11 12:52 PM
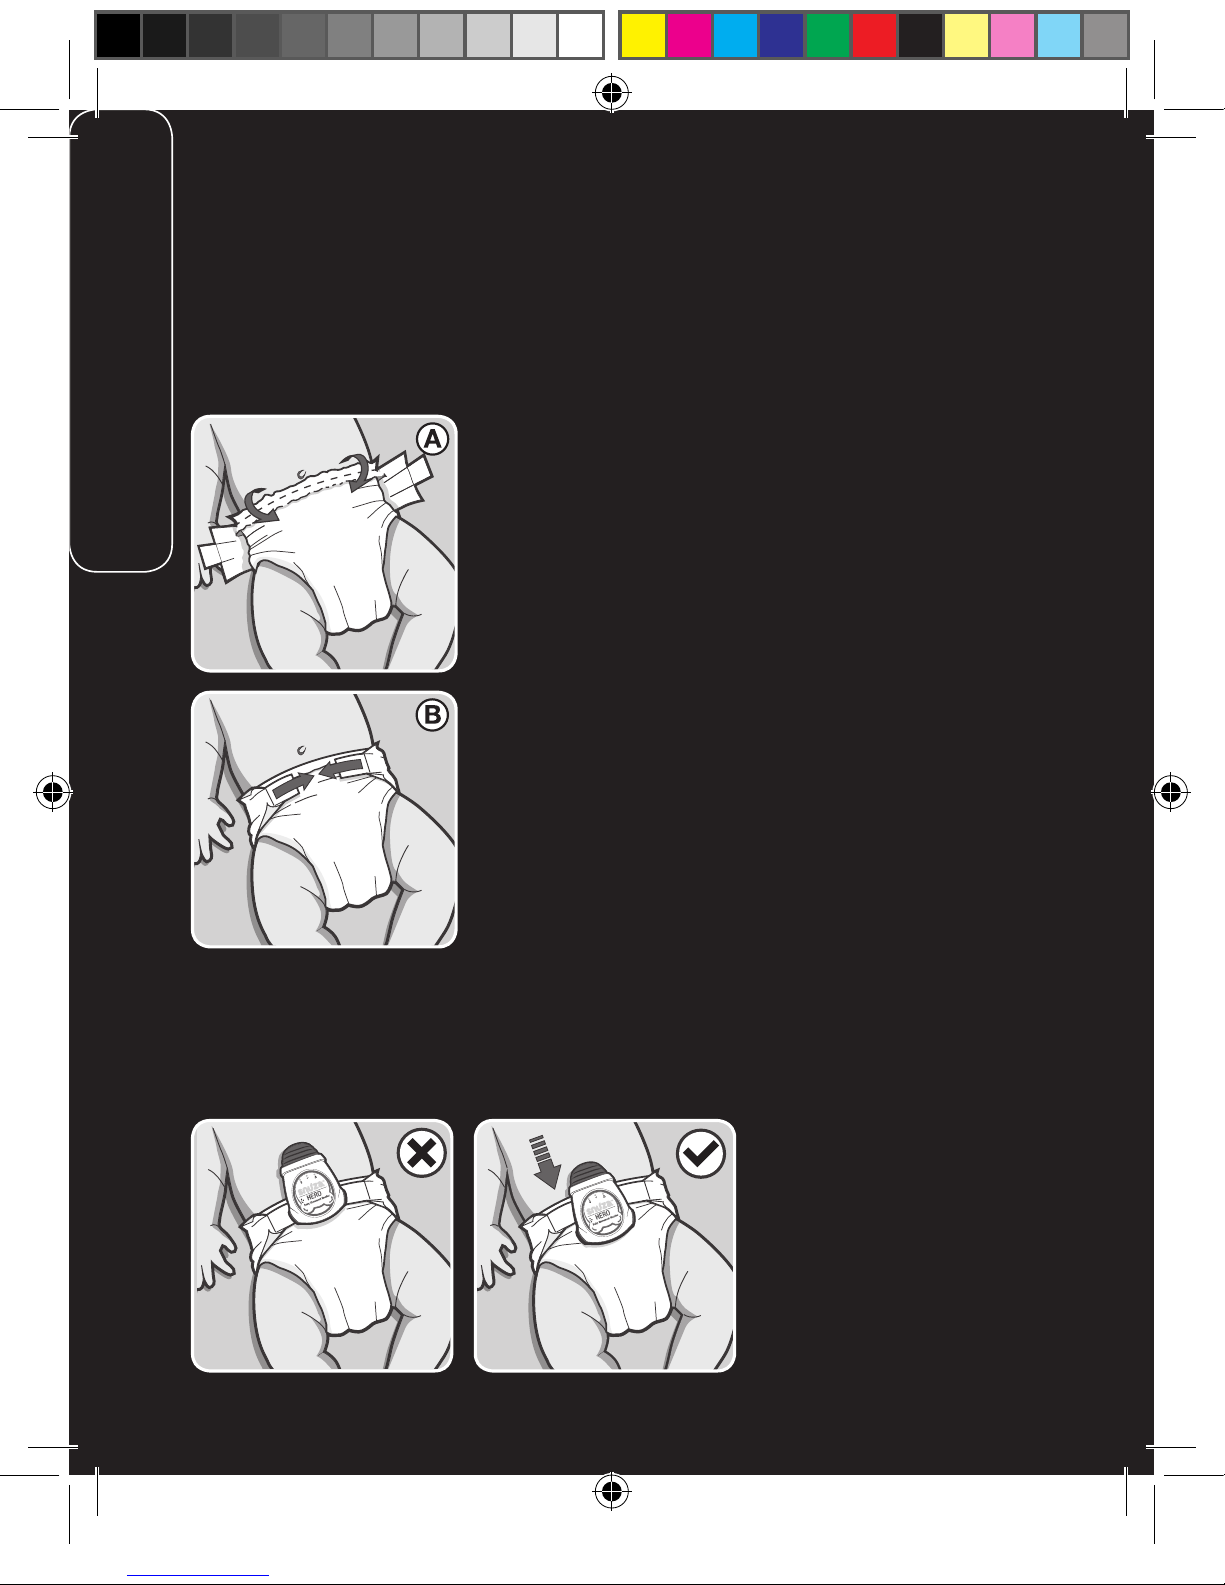
ALWAYS:
Use the correct size diaper (nappy). If it is
too loose, Hero may lose contact.
Fold the top of the diaper over before
attaching Hero, to ensure a firm grip.
Use the diaper adjusters to provide a snug
fit around the tummy.
It is essential that Hero’s coloured flexible tip maintains
constant contact with baby’s tummy.
Firmly clip Hero onto the folded diaper waistband, using the full
extent of the clip.
1. IMPORTANT - READ FIRST!
2
ENGLISH
HERO TYPE USA.indd 2
2014/11/11 12:52 PM

Ensure that Hero sits squarely on the diaper,
and that the Movement Sensor (1) is in
contact with baby’s tummy.
Press the ON/OFF button (6) to start
monitoring.
Always follow the above procedure to ensure
that your baby’s abdominal movement is
being monitored, and to prevent false alarms
caused by lack of contact with the baby.
NOTE:
Handle Hero with care to prevent damage to clip or sensor.
3
ENGLISH
HERO TYPE USA.indd 3
2014/11/11 12:52 PM

** Snuza Hero is not suitable for co-sleeping babies or bed sharing.

5
(10) Battery Cover
Release Clip (11) Clip Guard Rail
3. PARTS IDENTIFICATION
Front
Reverse
(1) Movement Sensor
(2) Battery Indicator Light (4) Alarm Indicator Light
(5) Speaker Hole
(6) ON/OFF Button (7) MODE/OFF Button
(3) Movement Indicator Light
(8) Diaper/Nappy Clip
(9) Battery Cover
ENGLISH
HERO TYPE USA.indd 5
2014/11/11 12:52 PM

6
4. QUICK START GUIDE
1. Important: Use the correct diaper size and make sure it fits snugly (see Section 5
Diaper/Nappy Fitment ).
2. Switch on by briefly pressing the ON/OFF button (6).
3. A start-up test will illuminate the indicator lights, vibrate the stimulator, play the
start-up tone and perform a battery test.
4. Clip Hero onto the diaper so that the Movement Sensor (1) is in direct
contact with the baby’s tummy (see Section 6 Fitting your Hero).
5. The Movement Indicator Light (3) flashes on each abdominal movement. See
Section 7.2 Monitoring for a full description of what it signifies.
6. If abdominal movement is not detected for 15 seconds, the vibrating stimulator will
attempt to rouse the baby.
7. If further abdominal movement is detected within 5 seconds after a vibration, the
Movement Indicator Light (3) will flash red to indicate that there has been a
15-second period of no abdominal movement.
8. After three vibrations, the Rouse Warning is activated – Hero beeps every 2
seconds and the Movement Indicator Light (3) flashes red with every beep.
9. If the period of no abdominal movement reaches 20 seconds, the full audible
alarm will sound and the Alarm Indicator Light (4) will flash red.
10. The alarm can be deactivated by briefly pressing the MODE/OFF button (7) and
monitoring will continue.
11. To switch off the monitor, press both the ON/OFF (6) and MODE/OFF (7) buttons
simultaneously. A shutdown tone will be heard.
5. DIAPER/NAPPY FITMENT
Important: Correct diaper fitment is essential for the operation of Hero. The thin flap of
material at the top of the diaper must
be folded over the thicker part before
the diaper is closed (this is the section
to which Hero will be attached). The
diaper should fit snugly on the baby
with the top of the diaper just below the
belly button. Loose fitting diapers will
ENGLISH
HERO TYPE USA.indd 6
2014/11/11 12:52 PM

7
6. FITTING YOUR SNUZA
Ensure that the Battery Cover (9) is secure. Clip your Hero all the way onto the diaper to
the full extent of the clip, as shown:-
Make sure that the Movement Sensor
(1) is in contact with the baby’s tummy
around the belly button area, although
closer to the sides may suit different
sleeping positions.
The World Health Organisation (WHO)
recommends that babies be placed to
sleep on their back unless advised
otherwise by a doctor
7. OPERATION
7.1 Startup
Switch on by briefly pressing the ON/OFF button (6).
A startup-test will run which will turn on (in sequence) all indicator lights, vibration
stimulator and audible alarm. The Battery Indicator Light (2) will flash briefly as follows:-
Green Battery OK
Orange Battery nearing depletion – replace battery
Red Battery flat – Hero will not monitor, replace battery
Warning: Ensure that all lights, vibrator and alarm are working properly and that the
battery level is high enough for proper operation (i.e. green or orange light). Otherwise,
DO NOT use the monitor. If the battery is too flat to operate, the Battery Indicator
Light (2) will flash red accompanied by a short beep every second. Change the
battery before further use (see Section 9.3 Replacing the Battery ).
To switch OFF, press both the ON/OFF button (6) and the MODE/OFF button (7)
simultaneously.
gape, causing the monitor to lose contact with the baby and false alarm. A very ‘full’ or
wet diaper may also cause it to gape.
ENGLISH
HERO TYPE USA.indd 7
2014/11/11 12:52 PM
8
7.2 Monitoring
During monitoring, the Movement Indicator Light (3) provides information about your baby’s
abdominal movements, while the Alarm Indicator Light (4) alerts you to potential problems.
The Movement Indicator Light (3) flashes with each abdominal movement:-
Green Normal abdominal movements.
Orange Very small or weak abdominal movements (eg very shallow
breathing).
Orange and Movement rate below 8 abdominal movements per
Movement-rate minute. If the abdominal movement rate increases to over
Warning sounds 8 movements per minute, the Movement Indicator Light
(dual-tone beep will reset to green (normal) and the warning will stop. To
every second) disable this function, see Section 8.3 Movement-Rate
Warning.
Red There has been at least one incident of no abdominal
movement for 15 seconds, where abdominal movement
was again detected after the vibration (see below).
Red and Rouse The Rouse Warning indicates that there have been 3
Warning sounds (beep vibration/rousing incidents. To disable this function, see
every 2 seconds) Section 8.2 Rouse Warning.
The Alarm Indicator Light (4) signifies the following:-
Flashes red with If no abdominal movement at all is detected for 15 seconds,
vibrating stimulus Hero gently vibrates in an attempt to rouse the baby. The
Alarm Indicator Light (4) flashes red simultaneously. If
abdominal movement is detected again within the next 5
seconds, the Movement Indicator Light (3) will flash red on
each subsequent abdominal movement. This is an
indication that there has been an incident of no abdominal
movement for 15 seconds.
Flashes red and If no abdominal movement at all is detected for a further 5
alarm sounds seconds after the vibration stimulus (20 seconds in total),
♪
♪
X))
(())
ENGLISH
HERO TYPE USA.indd 8
2014/11/11 12:52 PM

9
the Alarm Indicator Light (4) flashes red and the full
audible alarm sounds.
The alarm can be deactivated by briefly pressing the
MODE/OFF button (7) or by turning Hero off completely
(press ON/OFF (6) and MODE/OFF (7) buttons
simultaneously). If the MODE/OFF button is used to
deactivate the alarm, monitoring will continue.
7.3 Travelling
Movement from external sources such as being pushed in a pram or travelling in a
vehicle or aircraft may be detected by Hero’s sensor. Hero should not be relied upon
where external sources of movement are present.
7.4 Clothing
• Herocanbeclippedontothefoldedwaistbandofthediaperorthewaistbandof
elasticated pants, as long as the Movement Sensor (1) touches the baby in the
tummy area.
• Theremayalsobeathinlayerofclothing(egavest)betweentheSensorandthe
skin, but ensure that the Sensor maintains contact.
• Themonitorcanalsobeusedifbabyisdressedinlightclothing(forexample,a
Babygro) over the nappy or pants to which the Hero is attached.
• Toomuchclothingmayattenuateormufethealarm.Makesurethealarmcanbe
heard if baby is covered in clothing and/or blankets.
7.5 Baby Sound and Video Monitors (Optional)
Hero can be used together with a baby sound or video monitor to extend the distance at
which the alarm can be heard.
8. SETTINGS
8.1 Audible Tick
This feature causes Hero to emit an audible ‘tick’ on each abdominal movement. To
enable the Audible tick, ensure that Hero is switched ON, and press the MODE/OFF
button (7) briefly (less than 1 second). To increase the volume of the tick, press the
MODE/OFF button once again for medium volume and again for high volume.
ENGLISH
HERO TYPE USA.indd 9
2014/11/11 12:52 PM

10
To turn off, briefly press the MODE/OFF button a fourth time – Hero will give a louder
beep. This feature may be used with a baby sound monitor to enable you to ‘hear’
baby’s movements from a distance.
8.2 Rouse Warning
During monitoring, if no abdominal movement is detected for 15 seconds, Hero vibrates
gently in an attempt to rouse the baby. If abdominal movement resumes within the next
5 seconds, the Movement Indicator Light (3) will flash red on each subsequent
abdominal movement as an indication that there has been an incident of no movement
for 15 seconds.
With the Rouse Warning enabled, after 3 such vibration/rousing incidents, the
Movement Indicator Light (3) will change to flash red every 2 seconds and Hero will
emit an audible beep every 2 seconds. This alerts you to the fact that your baby has
stopped all abdominal movement for 15 seconds on three occasions and has then
resumed abdominal movement after Hero has vibrated.
Note:- If abdominal movement does not resume within 5 seconds after a vibration, the
full audible alarm will sound and the Alarm Indicator Light (4) will flash red.
The Rouse Warning is automatically enabled each time Hero is switched ON. To disable
this warning, ensure that Hero is switched ON, and press and hold the MODE/OFF
button (7) for at least 1 second until a tone is heard and the unit vibrates briefly.
If you want to enable the warning again, switch Hero off completely (press both ON/OFF
(6) and MODE/OFF (7) buttons simultaneously), then switch it ON again (the rouse
warning is enabled by default when Hero is switched on).
8.3 Movement-Rate Warning
The Movement-rate Warning alerts you if the baby moves less than 8 times per minute
– the Movement Indicator Light (3) flashes orange and the Movement-rate Warning
sounds (dual-tone beep every second). This feature is automatically enabled each time
Hero is switched ON.
To disable this warning during monitoring, ensure that Hero is switched ON, and
press and hold the ON/OFF button (6) for more than 1 second until the unit beeps.
If you want to enable the warning again, switch Hero off completely (press both
ON/OFF (6) and MODE/OFF (7) buttons simultaneously), then switch it ON again.
The Movement-rate Warning is enabled by default when Hero is switched on.
ENGLISH
HERO TYPE USA.indd 10
2014/11/11 12:52 PM
11
9. BATTERY
9.1 Battery Indicator
If the battery becomes depleted during monitoring, the Battery Indicator Light (2) will
flash as follows:-
Red flash on each abdominal Nearing depletion – replace battery before
movement further use.
Red flash on each abdominal Battery flat – No monitoring will take place.
movement and the low battery Replace battery before further use.
alarm beeps every 2 seconds
If the battery is nearing depletion or depleted, change the battery before further use of
the monitor (see Section 9.3 Replacing the Battery).
9.2 Battery Life
The life of the replaceable battery depends entirely on usage. Battery life will vary
significantly depending on the average daily duration of use and/or alarm duration and/
or number of alarms. Turning on and off unnecessarily shortens the battery life. If the
number of alarms is high, check diaper fitment.
Please note that the product guarantee does not apply to the battery.
9.3 Replacing the Battery
For all SE models: use a CR2 (CR15270) battery available from most retail outlets.
For all other models: use only a 14250 battery that delivers 3V 600mAh, available
from a specialist battery supplier or your national Snuza distributor. Please see our
website www.snuza.com for information about batteries and details of your national
distributor.
♪
** The serial number is located inside the battery housing (it can also be found
on the original Snuza packaging). To locate the serial number, remove the
battery cover and battery as per the instructions below:
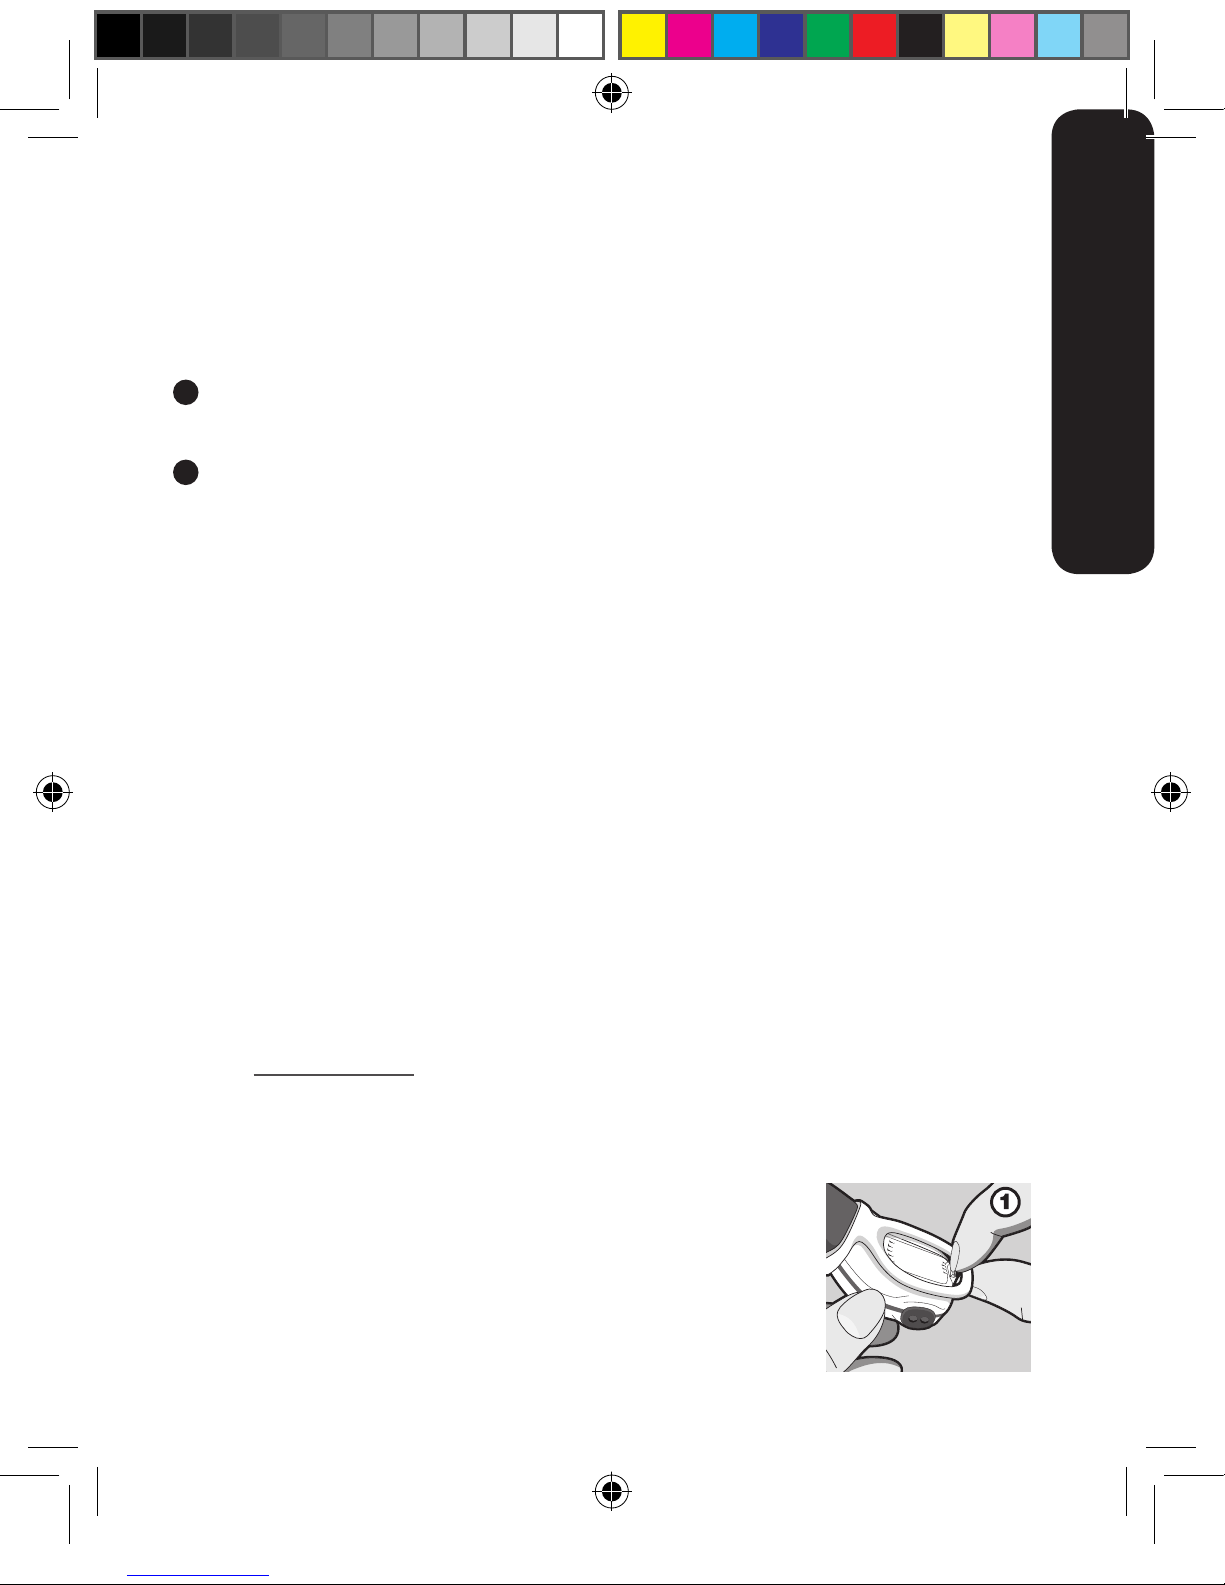
1. Use your fingernail or a small flat implement. With a pinching
action (Figure 1), gently pull back the Battery Cover Release Clip
(10) on the underside of the monitor and lift the Battery Cover at
the same time (Figure 2).
ENGLISH
HERO TYPE USA.indd 11
2014/11/11 12:52 PM
12
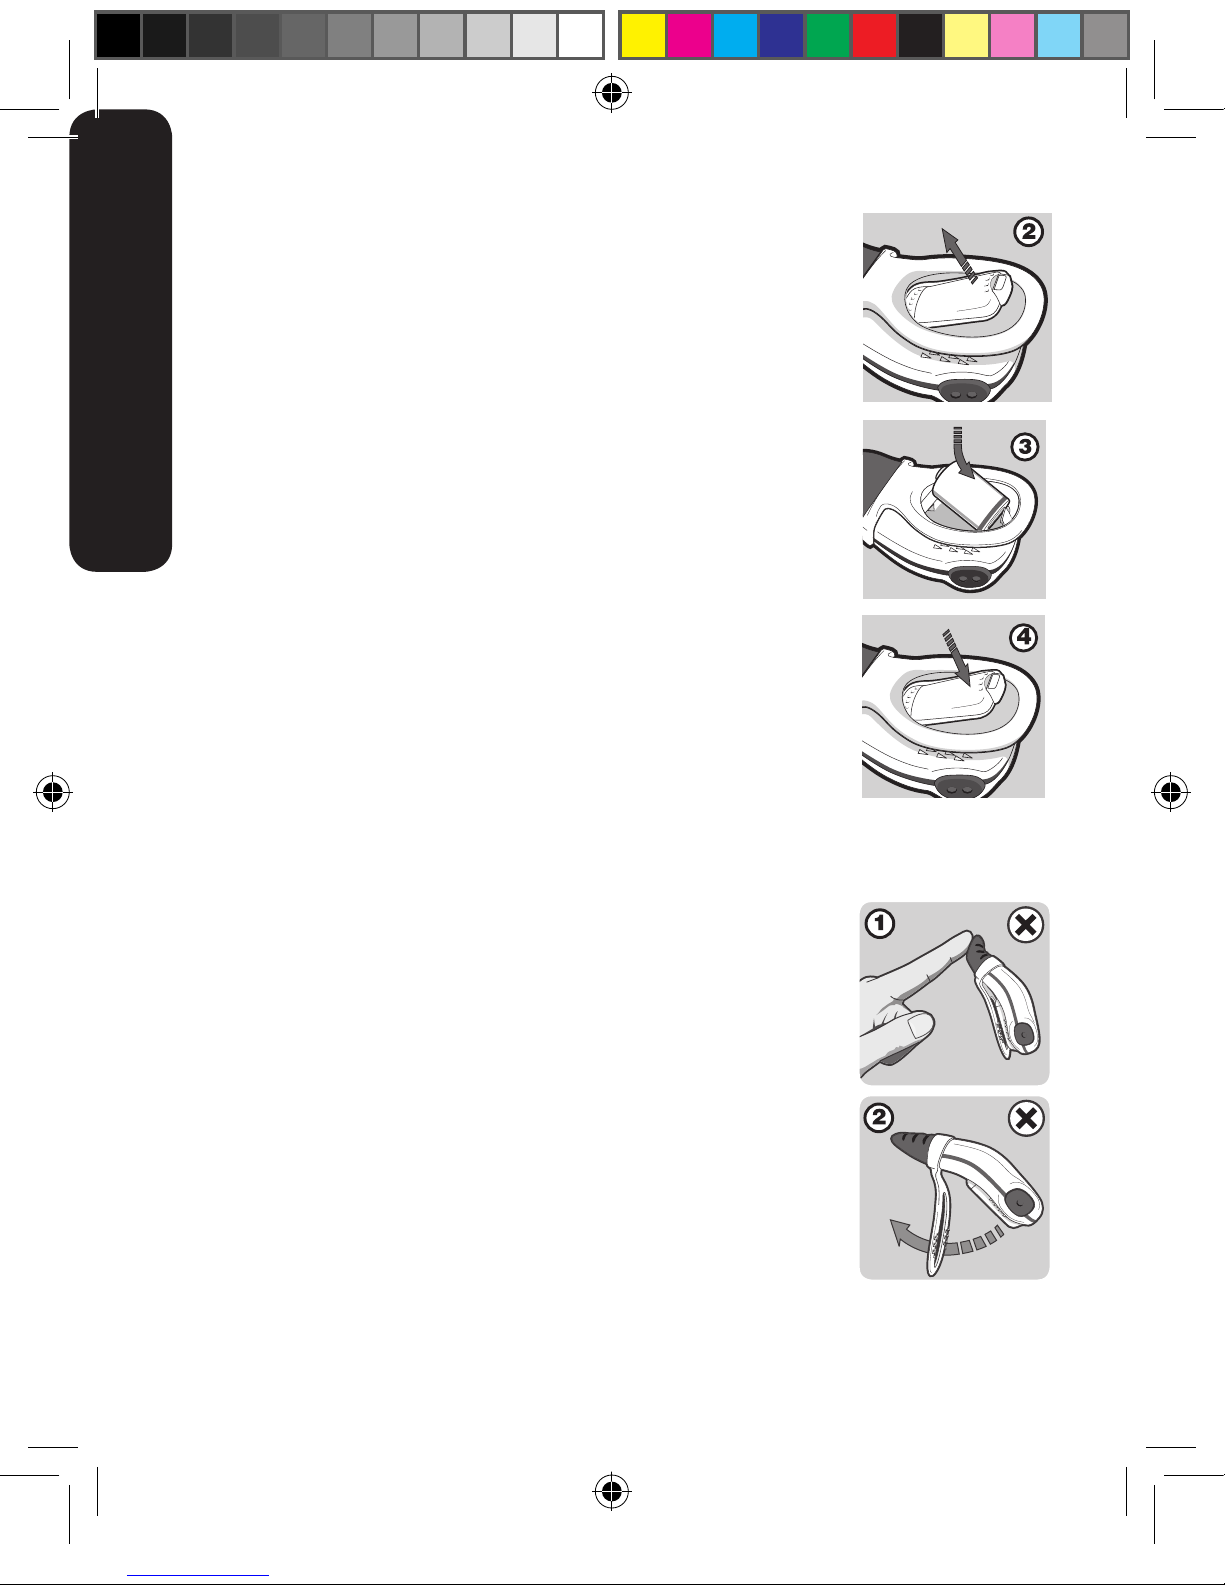
2.The Clip Guard Rail (11) prevents the clip from bending too far.
Do not try to bend the clip beyond this point.
3. Remove the depleted battery. The serial number is located
beneath the battery.
4. Insert the new battery, negative end first, as shown in Figure 3.
Ensure that the polarity is correct (align the positive end ‘+’ of the
battery with the ‘+’ symbol in the battery housing). Replace the
Battery Cover and ensure that it is correctly closed (Figure 4).
Do not use the monitor without the Battery Cover in place.
5. Test the unit by switching on and ensuring that the Battery
Indicator Light (2) flashes green.
6. If the unit starts emitting a beep after the battery has been
replaced, simply press the ON/OFF and MODE/OFF buttons
simultaneously to turn it off.
9.4 Disposal
The battery must be disposed of in accordance with your country’s laws governing the
disposal and recycling of batteries.
10. MAINTENANCE
10.1 Precautions
• DonotinsertanythingintotheSpeakerHoles(5).
• DonotallowanyliquidtoentertheSpeakerHoles.
• Avoidbendingthesensorunnecessarily(g1).
• Donotuseundueforcetobendtheclip(g2).
• DonotpulltheBatteryCoverReleaseClip(10)beyondthe
Guard Rail (11).
10.2 Cleaning and Storage
• Gentlywipewithadampclothtoremoveanydirt.Amildsoapmaybeusedfor
stubborn dirt.
• Donotuseanyothercleaningagentsastheymaycontaindamagingchemicals.
ENGLISH
HERO TYPE USA.indd 12
2014/11/11 12:52 PM
1313
• Themonitorissplashresistant,notwaterproof.Donotimmerseinwater.Ifitgets
wet, dry it off immediately.
• Whenchangingthebattery,dirtthatistrappedbetweenthebatteryreplacement
hatch and the case may be cleaned with a dry cotton bud once the Battery Cover (9)
has been removed. Be sure that the rubber seal is free of dirt before replacing the
Battery Cover, as this could compromise the seal.
• Whennotinuse,keepyourHeroinitsprotectivecase.Donotstoreinadamparea.
11. TROUBLESHOOTING
1. Check incorrect fitment and placing of Hero on baby’s diaper (see Section 5
Diaper/Nappy Fitment and Section 6 Fitting your Hero).
2. Battery failure. The Battery Indicator Light (2) will show red (see Section 9.3
Replacing the Battery).
Please visit our website www.snuza.com for further information.
12. DISCLAIMER
Customers use this monitor at their own risk and Biosentronics cc, its members,
employees, agents, contractors, representatives, manufacturers, distributors and
associates (“SNUZA”) shall not be held liable for any loss, damage or injury suffered by
the customer or any other person arising from, or in connection with, the use or
manufacture of the monitor, including loss, damage or injury suffered by the customer
or any other person as a result of any defects in respect of the monitor, and all
warranties, and any other liability from whatsoever cause arising, are hereby excluded
and the customer hereby indemnifies Biosentronics cc in respect of any such liability.
13. GUARANTEE
Biosentronics cc guarantees this product to be free from defects in materials and
workmanship for a period of 12 months from the original date of purchase, verified by a
sales receipt.
Our guarantee liability shall be limited to replacing the unit free of charge and does not
include transport costs. Our guarantee extends to all countries in which this product is
supplied. By the act of operating this product, the user accepts all resulting liability. We
reserve the right to modify the provisions of this guarantee at any time without notice.
This guarantee does not cover the battery, incorrect application, tampering, misuse or
transport damage.
ENGLISH
HERO TYPE USA.indd 13
2014/11/11 12:52 PM

14
Snuza est une marque déposée de
Fabriqué en Afrique du Sud
US Patent No.: 8,461,996
FRANÇAIS
HERO TYPE USA.indd 14
2014/11/11 12:52 PM

15
CONTENU
1. IMPORTANT – LIRE AVANT TOUTE UTILISATION ! ...................... 16
2. Introduction ............................................................................ 18
3. Identification des pièces .......................................................... 19
4. Guide de démarrage rapide ..................................................... 20
5. Ajustement de la couche ......................................................... 20
6. Positionnement de votre Hero .................................................. 21
7. Fonctionnement ...................................................................... 21
7.1 Démarrage ...................................................................... 21
7.2 Surveillance ................................................................... 22
7.3 Déplacements ................................................................ 23
7.4 Vêtements ..................................................................... 23
7.5 Moniteur de son et vidéo ................................................ 24
8. Réglages ................................................................................ 24
8.1 « Tic » sonore ................................................................. 24
8.2 Indicateur de réveil par stimulation .................................. 24
8.3 Indicateur de mouvements faibles ................................... 25
9. Pile ........................................................................................ 25
9.1 Indicateur d’état de la pile .............................................. 25
9.2 Durée de vie de la pile .................................................... 26
9.3 Remplacement de la pile ................................................ 26
9.4 Mise au rebut ................................................................. 27
10. Entretien ................................................................................ 27
10.1 Précautions .................................................................... 27
10.2 Nettoyage et entreposage ............................................... 27
11. Résolution de problèmes ......................................................... 28
12. Avis de non-responsabilité ...................................................... 28
13. Garantie ................................................................................. 28
FRANÇAIS
HERO TYPE USA.indd 15
2014/11/11 12:52 PM

16
VOUS DEVEZ TOUJOURS :
Utiliser une couche de la bonne taille. Un
format trop grand risque d’empêcher ou
de diminuer le contact entre le ventre et
le moniteur Hero.
Plier la partie supérieure de la couche
avant d’installer le Hero afin d’assurer
une fixation solide.
Utiliser la bande-ceinture pour bien
ajuster la couche autour du ventre.
Le détecteur de mouvements du Hero doit toujours rester en
contact avec le ventre du bébé.
1. IMPORTANT – LIRE AVANT TOUTE UTILISATION !
Fixer solidement le moniteur sur la bande-ceinture de la couche
pliée en enfonçant complètement la pince du Hero.
FRANÇAIS
HERO TYPE USA.indd 16
2014/11/11 12:52 PM

17
Vérifier que le moniteur est placé au centre
de la couche et que le détecteur (1) est en
contact avec le ventre du bébé.
Appuyer sur le bouton ON/OFF (6) pour
activer le moniteur.
Toujours suivre la procédure ci-dessus
pour vous assurer que les mouvements
abdominaux de votre bébé sont captés et
pour prévenir les fausses alarmes causées
par un mauvais contact entre le détecteur et
le ventre du bébé.
AVERTISSEMENT: Manipulez le moniteur Hero avec précaution afin
d’éviter d’endommager le détecteur ou la pince d’attache.
FRANÇAIS
HERO TYPE USA.indd 17
2014/11/11 12:52 PM

Other manuals for HERO
5
Table of contents
Languages:
Other Snuza Baby Monitor manuals


