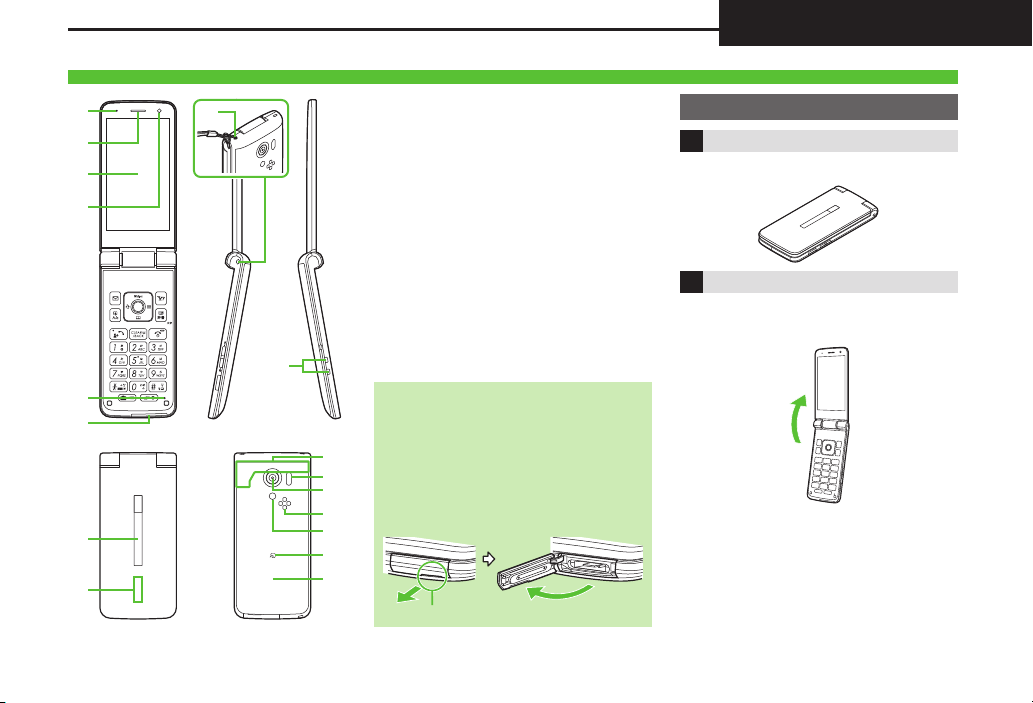
SoftBank 301SH Quick start guide

i
Guide Usage Notes
Thank you for purchasing SoftBank 301SH.
Read "Quick Tips" (in お願いとご注意 ) and this guide thoroughly
beforehand for proper usage.
.Accessible services may be limited by contract conditions.
.
SoftBank 301SH is compatible with 3G and GSM network
technologies.
.Most operation descriptions are based on default settings*with
handset open (P. 1 - 1 ) in Standby (P. 1 - 6 ).
.Operations and results may differ by handset status.
.Sample screenshots, etc. are provided for reference only; actual
handset windows, menus, etc. may differ in appearance.
.In this guide and on handset, "abroad" means "outside Japan" with
regard to handset/service usage.
*With the exception that Handset Code and Administrator Code are saved.

ii
Table of Contents
Guide Usage Notes ............................i
Table of Contents..............................ii
Handset Parts................................ 1-1
Battery & USIM Card..................... 1-3
Charging Battery........................... 1-5
Power On/Off ................................. 1-6
Display & Indicators ..................... 1-7
Sub-display.................................. 1-11
Touchscreen................................ 1-12
Menu Operations......................... 1-15
Menu List ..................................... 1-17
Security Codes............................ 1-19
Mobile Manners........................... 1-21
My Details & Basic Settings....... 1-22
World Clock ................................. 1-23
Memory Card ............................... 1-24
Text Entry....................................... 2-1
Fonts .............................................. 2-6
Wallpaper....................................... 2-7
Sounds & Alerts............................ 2-8
Emergency Calls ........................... 3-1
Voice Calling.................................. 3-2
Video Calling ................................. 3-4
Optional Services ......................... 3-5
Phone Book ................................... 3-7
Customizing Handset Address.... 4-1
Sending Messages........................ 4-2
Customizing Message Retrieval
... 4-5
Handling Messages ...................... 4-6
PC Mail ........................................... 4-8
Internet Services ........................... 5-1
Yahoo! Keitai ................................. 5-2
PC Site Browser ............................ 5-3
Browsing........................................ 5-4
Infrared........................................... 6-1
Bluetooth®...................................... 6-5
PC Connection .............................. 6-9
Backup ......................................... 6-10
Using Camera................................ 7-1
Photo Camera................................ 7-5
Video Camera .............................. 7-15
Album........................................... 7-21
TV ................................................... 8-1
Media Player .................................. 8-7
Mobile Widget.............................. 8-12
Standby Shortcuts ...................... 8-14
Icon View...................................... 8-15
Customer Service ......................... 9-1
Software Updates.......................... 9-2
1Getting Started
2Universal Operations, Etc.
3Calling
4Messaging
5Internet
6Connectivity & File Backup
7Camera
8Additional Functions
9Customer Support
10 Safety Precautions

1-1
Handset Parts
Getting Started
1Pressure Vent
2Earpiece
3Display
4Light Sensor
5Mic
6External Device Port
7Sub-display
8Notification Lamp
9
Strap Eyelet
a
Charging Terminals (for Desktop Holder)
bInternal Antenna Area
cInfrared Port
dCamera (Lens Cover)
eSpeaker
fMobile Light
gmLogo
hBattery Cover
Keep handset closed when not in use.
Open handset to place or answer calls,
enter text, etc.
Parts & Functions
7
8
1
2
4
3
5
6
g
b
h
d
c
9
a
f
e
.Do not cover or place stickers, etc. over
Light Sensor or Internal Antenna area.
.Close External Device Port Cover
(hereafter "Port Cover") after use.
.Avoid metal Straps; may affect signal
reception.
Opening Port Cover
.Pull at notch to open Port Cover.
Notch
Handset Positions
Handset Closed
Handset Open

Handset Parts
1-2
.Keys are indicated in this guide as shown.
.Change assigned functions indicated *with
Set Key Shortcut.
1Multi Selector (right) d
Open Icon View. Long Press to access
last opened Icon View page*.
2Multi Selector (up) a
Open Mobile Widget window. Long Press
to open PC Site Browser menu*.
3Center Key %
Open Main Menu. Long Press to activate/
cancel Keypad Lock.
4Multi Selector (left) c
Open Call Log (All). Long Press to enable/
disable Bluetooth®*.
5Mail Key B
Open Messaging menu. Long Press to
open S! Mail Composition window*.
6Shortcuts & A/a Key '
Open Shortcuts.
7Clear/Back Key $
Play Answer Phone messages. Long
Press to activate/cancel Answer Phone.
8Start & Rakutomo Link Key !
Open Rakutomo Link.
9Dialpad 0- 9
Enter numbers to place calls or access
functions. Long Press to open Phone
Book.
anKey (
Enter
n
, +, P, ?and -.
bCamera Key |
Activate Camera.
cYahoo! Keitai Key A
Open Yahoo! Keitai portal. Long Press to
open Bookmarks list*.
dTV & Dictionary Key &
Activate TV. Long Press to open
Dictionary.
eMulti Selector (down) b
Open Phone Book. Long Press to open
Exchange Profile*.
fPower On/Off & End Key "
Long Press to power off.
g# Key #
Enter #. Long Press to activate/cancel
Manner mode.
hMulti Job & Manner Key )
Select handset mode. Long Press to
activate/cancel Manner mode.
iVolume Up Key E
Handset Closed: Long Press to
illuminate Mobile Light.
jVolume Down Key F
Handset Open: Show/hide Softkeys.
Long Press to enable/disable VeilView.
kShutter Key I
Handset Closed: Toggle Clock view.
Handset
Open:
Long Press to activate
Video Camera.
Handset Keys
1
2
3
4
5
d
h
e
f
c
6
8
7
9
b
ag
i
j
k
Side Keys
Multi Selector & Side Keys
.In this guide, Multi Selector and Side Key
operations are indicated as follows:
Press aor b e
Press cor d f
Press a, b, cor d g
Press Eor F L

1-3
Battery & USIM Card
Do not apply excessive force to Battery or USIM Card.
USIM Card must be inserted to use handset.
1Remove Battery Cover
.
Use notch to lift Battery Cover. Push up
Battery Cover along edges to remove it.
2
Use tab to pull out USIM Tray
3Slide in USIM Card with
metal contacts facing up
4Secure USIM Tray
5Insert Battery
.With logo side facing up, align
Battery terminals with contacts.
6Replace Battery Cover
.If Battery Cover is not closed
properly, debris may get trapped
between gasket and base, or liquid/
dust may enter.
Always power off first.
1Remove Battery Cover
2Remove Battery
.Lift Battery as shown.
3Pull out USIM Tray
4Lift and slide out USIM Card
.Secure USIM Tray, insert Battery and
replace Battery Cover.
.
Take care not to lose removed USIM Card.
Battery & USIM Card Installation
Inserting
Notch
Battery Cover
Ta b
USIM Tray
Notch
USIM Card
Fit top into
slot, then
press firmly
along edges
Removing
After USIM Card Removal (Contract
Termination, Handset Upgrade/
Replacement, Repairs, Etc.)
.
Some files on handset and Memory Card may
be inaccessible. Inserting another USIM Card
may disable S! Appli and BookSurfing
®
.

Battery & USIM Card
1-4
.Charge Battery at least once every six
months; uncharged Battery may die or
affect files/settings.
.Depending on usage, bulges may appear
near end of battery life; this does not affect
safety.
.Replace Battery if operating time shortens
noticeably.
.Clean Battery terminals and charging
terminals with a dry cotton swab, etc.
.To maintain water/dust resistance, close
Battery Cover properly. Debris trapped
between gasket and base may allow
ingress of liquid/dust.
.If Battery Cover is damaged, replace it with
a new one. Use of damaged Battery Cover
may allow ingress of water, causing electric
shock, battery corrosion, etc.
.Battery is not water or dust proof.
USIM Card is an IC card containing
customer and authentication information,
including handset number. Save contacts
on USIM Card Phone Book to use them
on other SoftBank handsets. Depending
on USIM Card in use, some entry items
may not be supported, and some limits
(character entry, etc.) may be lower.
9999 by default; activate PINEntry to
restrict handset use.
About Battery
Lithium-ion Battery
.This product requires a
lithium-ion battery.
Lithium-ion batteries are
recyclable.
,To recycle a used
lithium-ion battery, take it
to any shop displaying the
recycling symbol.
,To avoid fire or electric shock, do not
short-circuit or disassemble Battery.
About USIM Card
Precautions
.Do not insert USIM Card into any other
IC card device. SoftBank Mobile Corp. is
not liable for resulting damages.
.
Keep metal contacts clean; debris may cause
malfunction. Clean with a soft dry cloth.
.Do not attach labels to USIM Card.
Malfunction may result.
Important
.USIM Card is the property of SoftBank
Mobile Corp.
.USIM Card will be reissued for a fee if
lost or damaged, etc.
.Return USIM Card to SoftBank Mobile
Corp. upon contract termination.
.Returned USIM Cards are recycled.
.USIM Card specifications may change
without prior notice.
.
Keep a copy of information saved on
USIM Card in a separate place. SoftBank
Mobile Corp. is not liable for loss of information.
.If USIM Card or handset (with USIM Card
inserted) is lost or stolen, suspend your
service immediately. For details, contact
SoftBank Customer Support, General
Information (P. 9 - 1 ).
USIM PIN
PIN Lock
.
Entering incorrect PINthree consecutive times
activates PINLock, limiting handset use.
Canceling PIN Lock
.Contact SoftBank Customer Support,
General Information (P. 9 - 1 ) for your
Personal Unblocking Key (PUK) and
follow these steps:
Enter PUK S%SEnter new PIN S
%SRe-enter new PIN S%
,Do not forget PUK; write it down if
necessary.
PUK Lock
.
Entering incorrect PUK ten consecutive
times activates PUK Lock, disabling
handset. For recovery, USIM Card must be
reissued at a SoftBank Shop (fees apply).

1-5
Charging Battery
Battery must be inserted in handset to
charge it.
Use Desktop Holder with AC Charger
ZTDAA1 (optional accessory).
.In this guide, ZTDAA1 is referred to as "AC
Charger."
.AC Charger and Desktop Holder are not
water or dust proof. Do not charge
Battery while handset is wet.
.Handset/AC Charger may become warm
while charging.
1Insert Charger connector
into Desktop Holder
.Insert Charger connector in the
correct orientation until it clicks.
2Extend blades and plug AC
Charger into AC outlet
3Place handset into Desktop
Holder
.Push down handset until it clicks into
place.
.Notification Lamp illuminates red
while charging.
.Notification Lamp goes out when
Battery is full.
4Remove handset from
Desktop Holder
5Unplug AC Charger
6Remove Charger connector
from Desktop Holder
.Squeeze release tabs and pull
straight out.
Charging Battery (Desktop Holder)
Charging Battery Outside Japan
.SoftBank Mobile Corp. is not liable for
problems resulting from charging Battery
abroad.
Important AC Charger Usage Note
.Retract blades after charging. Do not
pull, bend or twist cord.
When Notification Lamp is Flashing
.
Battery is unchargeable; may be defective
or simply at the end of its life; replace it.
31
2
Notification Lamp
Release
Ta bs
AC 100 VOutlet
Blades
Charger
Connector
Connector Port
AC Charger
Arrows Down
Charger Terminals
Charger
Terminal Lever
Important Desktop Holder Usage Notes
.Do not subject to force/pressure.
.Do not attempt to open handset.
.Do not get Straps caught between
handset and Desktop Holder.

1-6
Power On/Off
Described for initial power on.
1"(Long Press)
.After Power On Graphics, water/dust
proofing information appears; follow
these steps:
"S"S%SbS%S
設定
S%SLanguage S%SEnglish
S%S"(Long Press) S"
(Long Press) SChange Menu opens
2Select option S%
Guide descriptions are based on
Standard Menu.
.After Change Menu guidance, My
Details setup starts.
3Enter last name S%S
Enter first name S%
.
Change Menu display option appears.
4Yes or No S%
Standby
.Choose No to enter Standby
immediately after powering on.
A prompt appears when %, a, d, Bor
Ais Pressed for the first time.
To use Network-related services:
(Clock will be set automatically.)
1Yes S%SRetrieval starts
2%
1"(Long Press)
.After Power Off Graphics, handset
shuts down.
Power On/Off
Power On
When USIM Card is Not Installed
.Insert USIM Card appears; handset is
unusable.
Retrieving Network Information
Power Off

1-7
Display & Indicators
Hereafter, most screenshots omit Mobile
Widgets and other icons.
Check active indicators and their
descriptions. (Status Icon List)
1Tap indicator
.Active indicators are enlarged;
description for selected indicator
appears.
.After 1, Touch & Hold other
indicators to view their descriptions.
.After 1, Tap indicator to access
corresponding function (e.g., Battery
Meter window from battery strength
indicator); may be unavailable for
some indicators.
Opens at the bottom for missed calls, new
mail, etc.
Information Window
Information label (e.g., Message, etc.)
and count appear. Select an item and
Press %to open it.
Display
Standby
Indicator Area
Mobile Widget
Indicator Descriptions Information Window
Opening Information List Manually
%
S
Phone
S
%
S
Information
S
%
Clearing Information List
%SPhone S%SInformation S
%SBSYes S%

Display & Indicators
1-8
Motion Control sensor detects handset
orientation. Display orientation changes
with handset orientation in TV, Internet
and some other functions.
Function/operation labels appear at the
bottom of Display; see key assignments
below. Alternatively, Tap Touchscreen to
execute the assigned function/operation.
[Portrait Orientation
[Landscape Orientation
Some key assignments may vary with
window content.
Display goes completely dark after set
Display Saving time elapses. Press any
key (except "during a call) to cancel
Display Saving and reilluminate Display.
Display Rotation
Portrait
Orientation
Landscape
Orientation
Softkeys
%B A
$"' B % A )
Display Saving
Backlight
.Backlight turns off after Time Out time
elapses. Press 0- 9to illuminate it
(key press may affect active function).
.Display goes completely dark during a
call. (Backlight does not turn off first.)

1-9
Display & Indicators
[Basic Status
1More bars indicate stronger signal.
2Flashes while charging; battery strength %
(appears when Display activates, etc.) is an
approximation.
[Function Status
*Appears gold for some S! Appli.
[Notifications
[Warnings
Indicators
Display Indicators
1
Within 3G Network
Within GSM Network
Roaming
2Signal Strength1
3Battery Strength2
31
2
1
S! Appli Active*
S! Appli Paused*
Music Playback
TV Recording (handset)
TV Recording (Memory Card)
2
Memory Card Inserted
Accessing Memory Card
Reading Memory Card
Formatting Memory Card
TV Timer/TV Recording Timer Set
3Compass Indicator
4
Music Playback (using Bluetooth
®
)
5
Multiple Functions (Multi Job) Active
31
2 4
5
1Unread Mail
Unread Delivery Report
2
Answer Phone Active & Message
Recorded
Answer Phone Canceled &
Message Recorded
3New Voicemail
4S! Appli Notification
5Contents Key Received
6
Unread S! Information Channel Info
Software Update Result
Unread S! Quick News Info
7Unread Urgent News
1Mail Memory Low
2Message Delivery Failure
3
Memory Card Unusable/Misinserted
4
5
1
6
7
3
2
31
2

Display & Indicators
1-10
[Transmissions
1Hidden while Mobile Widget is in use.
2Flashes while sending location information.
[Settings
*Indicator does not appear when Call
Forwarding is set to Video Calls only, with
Voicemail unset.
1SSL Browsing1
Packet Transmission Active
2Receiving Mail
Sending Mail
3Positioning2
4Updating Software
5RSS-compatible Site
6Weather Indicator
7
USB Cable Connected
USB Transmission Active
Infrared Transmission Active
Infrared File Transfer
Bluetooth®Active
Bluetooth®Transmission Active
(for multiple connections)
Bluetooth®Talk Active
IC Transmission Active
S! Addressbook Back-up
Transmission Active
PC Site Browser in Use
8Infrared Active
5
6
1
7
8
3
4
2
1Offline Mode
2Answer Phone Active
3
Call Forwarding or Voicemail Active
(forwarding condition:
Always
)
*
4Calendar/Task (Alarm Set)
Calendar/Task (Alarm Unset)
5Alarm Set
6Hour Minder Active
7
Manner Mode
Drive Mode
Original Mode
VeilView Active
8Keypad Lock Active
IC Card Lock Active
9
Ringtone (Silent)
Ringtone (Increasing Volume)
Vibration for Incoming Voice/
Video Calls Active
7
8
1
9
b
c
a
3
5
4
6
2
aAuto Answer or Remote Monitor
Active
bShow Secret Data Active
Function Lock (Once) Active
cWakeup TV Set

1-11
Sub-display
View date/time and the following
indicators with handset closed.
1I
.Press Ito toggle view.
[Basic Status
1More bars indicate stronger signal.
2Flashes while charging.
[Notifications [Warnings
[Handset Status
Sub-display
Activating Sub-display
Indicators
1Signal Strength1
2Battery Strength2
1
2
Missed Call
Answer Phone Message Recorded
Missed Call Notification
New Voicemail
Unread Mail
Unread Delivery Report
Contents Key Received
Unread S! Information Channel info
Weather Indicator Update
Location Information Request
Pedometer Target Achieved
S! Appli Notification
Auto Backup Complete
Auto Backup Canceled
Unread Urgent News
Message Delivery Failure
S! Information Channel Info
Reception Failure
Weather Indicator Update Failure
Auto Backup Failure
Alarm
Calendar Alarm
Ta s k A l ar m
TV Alarm (Watch)
TV Alarm (Record)

1-12
Touchscreen
Touch Display to select menu items, open functions, scroll pages, etc.
Tap item or key to open or execute
corresponding function/operation.
[Double Tap
Tap Display twice in rapid succession
(within approximately 0.6 seconds).
Touch item for 1+ seconds to move icon,
open menu, etc.
Drag to move item or scribble/sketch.
Flick to scroll.
Pinch or Spread to zoom in or out on
images, etc.
Using Touchscreen
Basic Operations
Tap
Touch & Hold
Drag
Flick
Pinch & Spread
Spread
Pinch

1-13
Touchscreen
.Touchscreen may not respond in these
situations:
,Use with gloves/long fingernails
,Use of pens, pencils or sharp objects
,Use with objects on/against Display
,When Display is wet
.To prevent malfunctions, do not:
,Touch Display with wet fingers
,Use if Display is wet
,Subject Display to force/pressure
,Place labels or stickers over Display
.Calibrate Touchscreen (P. 1 - 1 4 ) to improve
response.
Tap item to open or execute corresponding
function/operation.
Ta p Data Folder
.The result is the same as selecting an item
with gand Pressing %.
[Two Taps
When Tapping item only selects
(highlights) it, Tap the item again to
execute function/operation.
Tap Music twice
Music folder opens
For hidden items, Flick/Drag in opposite
direction.
Important Touchscreen Usage Notes
Usage Examples
Selection & Execution
V
Screen Scroll
Left portion appears
Flick right

Touchscreen
1-14
Pinch or Spread to zoom in or out on
images, etc.
.Double-Tapping images, etc. may also
zoom in/out them.
.
In Internet page or before saving captured
photo, Touch & Hold area/portion to zoom it in.
Touch & Hold Display to open menu.
Calibrate Touchscreen to improve response.
Hold handset normally during calibration.
1% S Settings S % S f
Phone/G
2Touch Panel S %
3Correct Touch Panel S %
4Yes S %
.Follow onscreen instructions.
Zoom In & Zoom Out
Spread
Zoomed in
Pinch
Zoomed out
Open Menus
Menuopens
Touch & Hold
Calibrating Touchscreen
Undo Calibration
.
If calibration does not improve response,
restore default setting as follows:
After
4
,
$

1-15
Menu Operations
Main Menu
%
■Touchscreen
■Handset Key
OpeningMain Menu
Menu Layout
Main Menu Items
Messaging
Yahoo!
S! Appli
Entertainment
Camera
Media
Tools
Data Folder
Widget
TV
Phone
Settings
Open/create messages, etc.
Access the Internet.
Use S! Appli including games.
Read e-Books, receive news updates, etc.
Shoot photos or videos.
Play/download media files.
Manage schedules, set Alarm, etc.
Open files saved to handset/Memory Card.
Use Mobile Widgets.
Watch/record TVprograms.
Add/search contacts, etc.
Customize handset interface, sounds, etc.

Menu Operations
1-16
Handset
Keys
Touchscreen
To open World Clock using handset keys or Touchscreen:
Menu Navigation
Open Main Menu Select Item Open Tab Select Item
Press %
Use gto select Tools
and Press %
Use fto select
Clock/Gaugetab
Use eto select
World Clock and Press %
Tap MENU Tap World ClockTap Clock/GaugetabTap Tools
Example: After opening World Clock
Escape/Return
Go Back Return to Standby
Press $Press "
UsingTouchscreen
.If available, Tap corresponding Softkey
(CLEAR/BACK, END, etc.) to escape
function or return to previous window.

1-17
Menu List
[PIM/Life
[Clock/Gauge
[Doc./Rec.
[Connectivity
Menu List
Messaging
Received Msg.
Create Message
Retrieve New Msg.
Drafts
Templates
Sent Messages
Unsent Messages
Chat Folder
Server Mail Box
Create New SMS
Settings
Memory Status
Yahoo!
Yahoo! Keitai
Menu List
Bookmarks
Saved Pages
Web Search
Enter URL
History
PC Site Browser
Browser Settings
S! Appli
S! Appli Library
Osaifu-Keitai
Settings
Information
Entertainment
S! Information Channel/Weather
S! Quick News
Blog Tool
BookSurfing
e-Book Viewer
Camera
Easy Auto Camera
Pro Auto Camera
Quick Camera
Rapid Shooting Camera
Best Select Photo
Fish-eye Camera
Miniaturize Camera
HD Video Camera
Pro Auto Video Camera
Album
Scan Receipt
Barcode Reader
Scan Card
Kanji/English Grabber
Review
Set Camera Key
Media
Music
Videos
MTP Mode
Tools
Calendar
Exchange Profile
Alarms
Wakeup TV
Relaxation Time
Tasks
Disaster Tools
Household Accounts
Calculator
Expenses Memo
Osaifu-Keitai
Simulated Call
Stopwatch
Countdown Timer
World Clock
Hour Minder
Pedometer
Compass
S! GPS Navi
Battery Meter
Dictionary
Search
Notepad
Scratch Pad
ASCII Art
Voice Recorder
Barcode/Scan
Phone Help
Bluetooth
Infrared
IC Transmission
USB Mode
USB Charge
Memory Card
Backup/Restore

Menu List
1-18
[Sound/Display
[Phone/G
[Call
[Network
Data Folder
Pictures
DCIM
Ring Songs·Tones
S! Appli
Widget
Music
Videos
Lifestyle-Appli
Books
Customized Screen
Flash®
Other Documents
Memory Status
Widget
Widget Contents
Settings
TV
TV
TV Player
TV-Image Folder
TV Link
Reservation List
Recorder Contents
Settings
Phone
Phone Book
Add New Entry
Information
Call Log
Play Messages
Play Voicemail
S! Addressbook Back-up
My Details
Set Category
Mail Groups
Rakutomo Link
Speed Dial/Mail
Touch-Tone Signal List
Settings/Manage
Settings
Mode Settings
Display
Customized Screen
Sounds & Alerts
Date & Time
言語選択 (Language)
Ringer Output
Earpiece Volume
Change Menu
User Dictionary
Set Key Shortcut
Motion Control
Touch Panel
Set Key Light
Memory Card
Backup/Restore
Locks
Software Update
Master Reset
Call Time/Data Counter
Answer Phone
Voicemail/Call Forwarding
Video Call
Caller ID
)Missed Calls
Int'l Calling
Call Barring
Auto Answer
Call Waiting
Select Network
Select Service
Re-search Signal
Offline Mode
Retrieve NW Info
Network Info
External Device
Technical Regulations
Conformity Certification
Table of contents
Other SoftBank Cell Phone manuals

SoftBank
SoftBank 841SH User manual

SoftBank
SoftBank 810P User manual

SoftBank
SoftBank 911T User manual

SoftBank
SoftBank 821P User manual

SoftBank
SoftBank 942P User manual

SoftBank
SoftBank 812SH s II User manual

SoftBank
SoftBank 830P User manual

SoftBank
SoftBank 934SH User manual

SoftBank
SoftBank 009Z User manual

SoftBank
SoftBank Libero3 User manual

SoftBank
SoftBank 811SH User manual

SoftBank
SoftBank 101K User manual

SoftBank
SoftBank 945sh User manual

SoftBank
SoftBank 840P User manual

SoftBank
SoftBank 830SH User manual

SoftBank
SoftBank 830SH User manual

SoftBank
SoftBank 102SH User manual

SoftBank
SoftBank 002P User manual

SoftBank
SoftBank 707SC User manual

SoftBank
SoftBank 821SC User manual