SOMFY 2400625 User manual
- 1 -
Copyright © 2008 Somfy SAS. All rights reserved.
IP 54
433.42 MHz
3 Vdc
+
3V
CR 2450
+ 60°C
- 20°C
Australia : SOMFY
PTY LTD
(61) 2 9638 0744
Austria : SOMFY GesmbH
(43) 662 62 53 08
Belgium : SOMFY BELUX
(32) 2 712 07 70
Brasil : SOMFY BRASIL
STDA
(55 11) 6161 6613
Canada : SOMFY ULC
(1) 905 564 6446
Cyprus : SOMFY MIDDLE
EAST
(357) 25 34 55 40
Czech Republic : SOMFY
Spol s.r.o.
(420) 296 372 486-7
Denmark : SOMFY AB
DENMARK
(45) 65325793
Finland : SOMFY AB
FINLAND
(358) 957 13 02 30
France : SOMFY FRANCE
Actipro : (33) 820 374 374
Germany : SOMFY GmbH
(49) 7472 9300
Greece : SOMFY HELLAS
(30) 210 614 67 68
Hong Kong : SOMFY
Co. Ltd
(852) 25236339
Hungary : SOMFY Kft
(36) 1814 5120
India : SOMFY INDIA
PVT Ltd
(91) 11 51 65 91 76
Italy : SOMFY ITALIAs.r.l
(39) 024 84 71 84
Japan : SOMFY KK
+81-45-475-0732
Lebanon : cf. Cyprus -
somfy middle east
(961) 1 391 224
Mexico : SOMFY MEXICO
SA de CV
(52) 55 5576 3421
Morocco : SOMFY MAROC
(212) 22 95 11 53
Netherlands : SOMFY BV
(31) 23 55 44 900
Norway : SOMFY
NORWAY
(47) 67 97 85 05
Poland : SOMFY SP Z.O.O
(48) 22 618 80 56
Portugal : SOMFY
PORTUGAL
(351) 229 396 840
Russia : cf. Germany -
SOMFY GmbH
(7) 095 781 47 72, (7) 095
360 41 86
Singapore : SOMFY
PTE LTD
(65) 638 33 855
Slovaquia : cf. Czech
Republic - SOMFY Spol
s.r.o.
(420) 296 372 486-7
South Korea : SOMFY
JOO
(82) 2 594 4333
Spain : SOMFY ESPANA
SA
(34) 934 800 900
Sweden : SOMFY AB
(46) 40 165900
Switzerland : SOMFY A.G.
(41) 18 38 40 30
Taïwan : SOMFY TAIWAN
(886) 2 8509 8934
Turkey : SOMFY TURKEY
+90 216 651 30 15
UAE : SOMFY GULF
+971 4 88 32 808
United Kingdom : Somfy
LTD
(44) 113 391 3030
United States : SOMFY
SYSTEMS Inc
(1) 609 395 1300
Somfy SAS dans un souci constant d’évolution et d’amélioration peut modifier le produit sans préavis.
Photos non contractuelles.
Somfy SAS in a constant concern of evolution and improvement may modify the product without prior
notice. Non contractual pictures.
Somfy SAS, capital 20.000.000 Euros, RCS Annecy 303.970.230 12/2009
FR
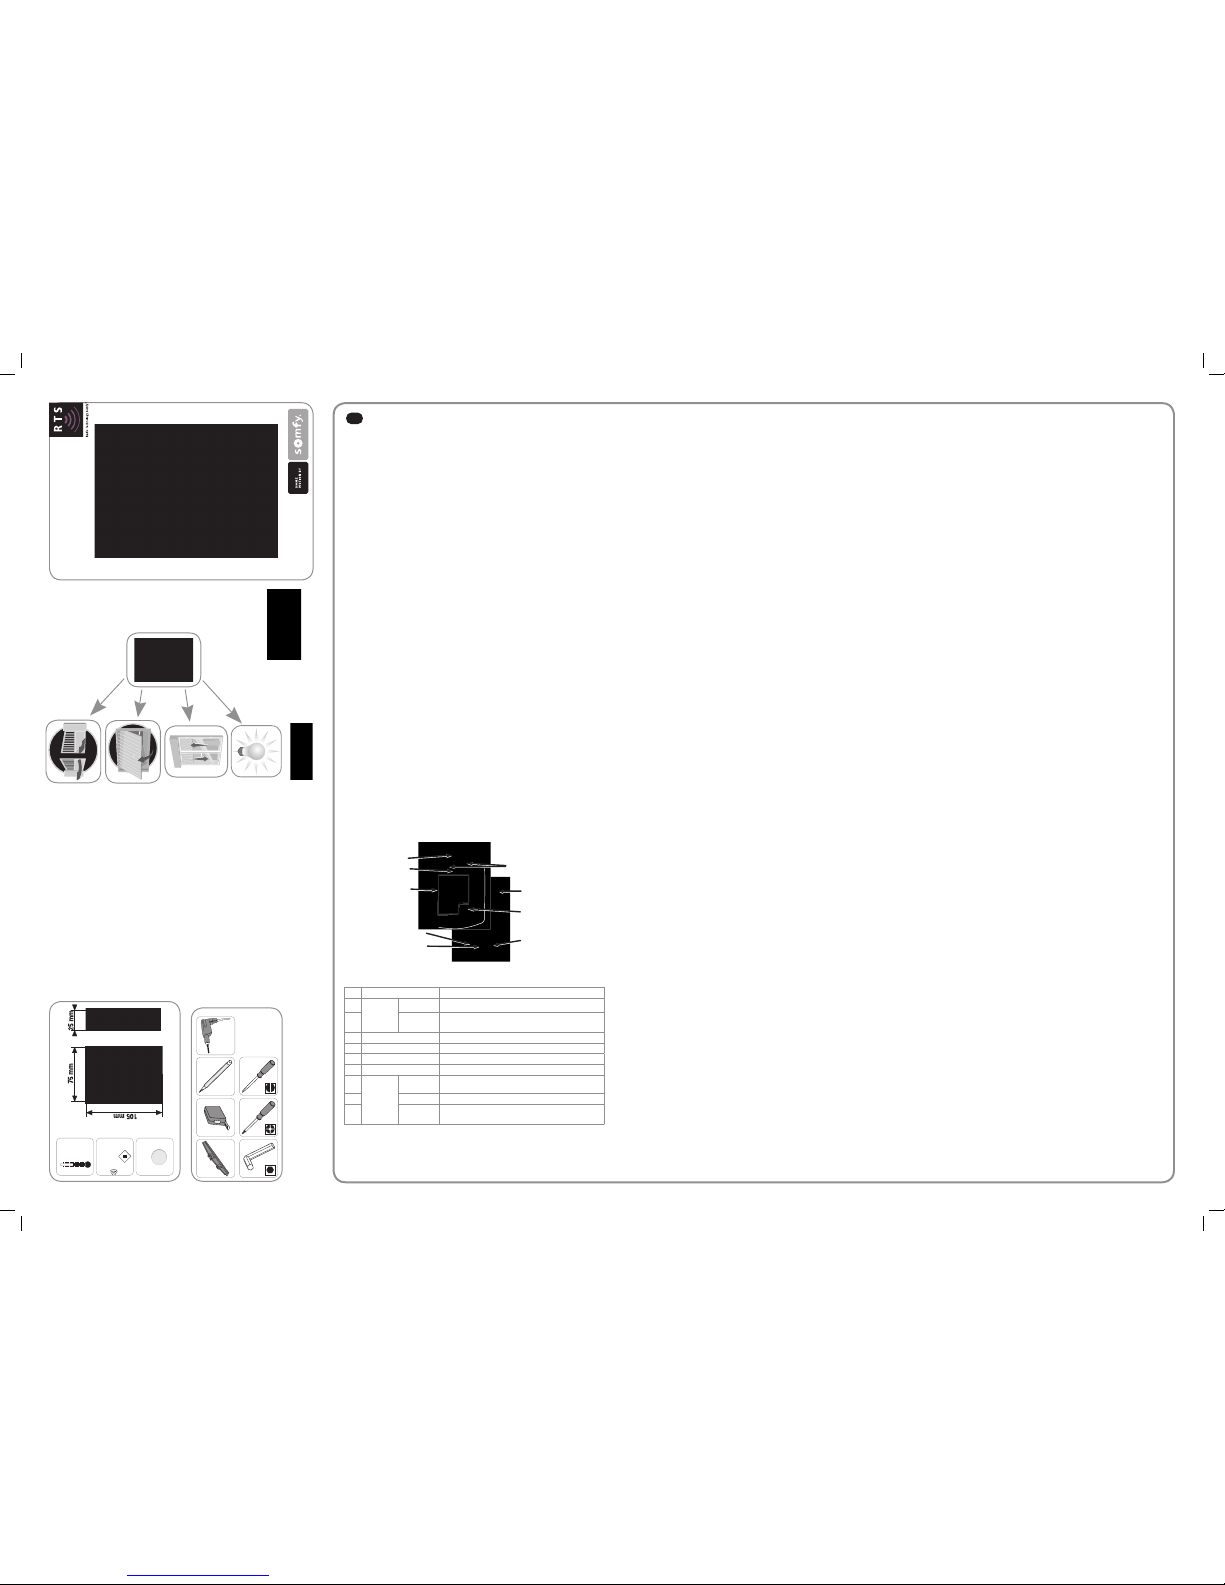
Principes de fonctionnement
Le Digipad radio RTS est une commande murale sans fil à accès codé.
Le Digipad permet de commander 2 moteurs distincts à l’aide de 2 touches de
commande. Il est compatible avec tous les moteurs, même ceux antérieurs à 2006
(cf. paragraphe 2.2.).
Des codes utilisateurs limitent l’usage des touches de commande aux personnes
autorisées :
1 code principal valable pour les 2 touches de commande,• 2 codes secondaires par touche de commande pour donner un accès•
partiel et momentané à la propriété (l’enregistrement de codes secondaires
est optionnel).
Les codes utilisateurs de 4, 5 ou 6 caractères, au choix, se composent avec les
chiffres de 0 à 9 et le A.
Le Digipad est muni d’une fonction rétro-éclairage des touches en cas de faible
luminosité.
Le Digipad fonctionne avec une pile 3V, type CR 2450.
Conformité
Par la présente, Somfy déclare que l’appareil est conforme aux exigences
essentielles et aux autres dispositions pertinentes de la directive 1999/5/
CE. Une déclaration de conformité est mise à disposition à l’adresse internet
www.somfy.com/ce. Utilisable en UE, CH et NO.
Sécurité
Généralité
Toujours lire cette notice d’installation et les consignes de sécurité avant de
commencer l’installation de ce produit Somfy.
Avant toute installation, vérifier la compatibilité de ce produit avec les équipements
et accessoires associés.
Cette notice décrit l’installation, la mise en service et le mode d’utilisation de ce
produit.
Toute utilisation hors du domaine d’application défini par Somfy est non conforme.
Elle entraînerait, comme tout irrespect des instructions figurant dans cette notice,
l’exclusion de la responsabilité et de la garantie Somfy.
Somfy ne peut être tenu responsable des changements de normes et standards
intervenus après la publication de cette notice.
Consignes générales de sécurité
Ne pas laisser les enfants jouer avec le système de commande.
Conditions d’utilisation
Ne jamais installer le produit à proximité de surfaces métalliques.
Contrôler la portée radio avant de fixer le produit. La portée radio est limitée par les
normes de régulation des appareils radio.
L’utilisation d’appareil radio (par exemple un casque radio hi-fi) utilisant la même
fréquence peut réduire les performances du produit.
Description
N° Nom Fonction
1
Voyant haut Information sur l’émission d’une commande radio
2bas Information sur l’état du Digipad
(clignotant = verrouillé)
3Touches de commande Commande de moteur (1 touche par moteur)
4Touches alpha-numériques Saisie de code
5Antenne
6Touche SET Accès au mode programmation
7
Touches
RESET Mise en service du Digipad (pour une 1ère utilisation)
Verrouillage du Digipad
8PROG Mémorisation d’un moteur pour store ou volet roulant
9ADR Changement de radio (pour un moteur antérieur à 2006)
Réinitialisation du Digipad (retour à la configuration usine)
1. Mettre en service (pour une 1ère utilisation) [fig.A]
Ouvrir le Digipad avec la clé fournie.1.Appuyer sur la touche RESET.2.Vérifier que le Digipad soit mis en service en appuyant sur une touche du3.
clavier. Si le voyant du bas s’allume, le Digipad est mis en service. S’il ne s’allume
pas, appuyer à nouveau sur la touche RESET et vérifier qu’il soit mis en service.
2. Mémoriser le Digipad
LeDigipadfonctionne commeunémetteurclassique(parexempleunetélécommande),
la notice du moteur peut donc être utilisée pour mémoriser le Digipad.
2.1. Préconisations
Ne pas toucher l’antenne pendant les opérations de mémorisation.
Pour mémoriser le Digipad sur l’électronique d’un moteur Axovia, poser le Digipad
sur la cible pendant l’opération.
Le Digipad se verrouillant automatiquement au bout de 30 s, l’appui sur la touche
de commande à mémoriser sur l’électronique du moteur doit être réalisé avant la fin
de ce délai.
2.2. Mémoriser le Digipad sur un moteur postérieur à 2006 [fig.B]
Réaliser l’opération décrite page Iou II selon le moteur concerné.
Suite à cette opération, un apprentissage des courses est nécessaire pour les
moteurs Axovia, SGS, SGA, SLD (début de l’apprentissage vantaux entre-ouverts
pour vérifier le démarrage en ouverture).
2.3. Cas des moteurs Axovia et Axorn antérieurs à 2006 [fig.C]
En 2006, Somfy a changé son protocole radio pour moteurs de portail et porte de
garage.
Le Digipad est compatible avec les protocoles radio antérieur et postérieur à 2006.
Chaque touche de commande peut être configurée individuellement.
a) Changer de protocole radio sur une touche de commande du Digipad
Taper le code principal (000000 sur un Digipad neuf ou réinitialisé) et valider1.
avec la touche SET.
Appuyer sur la touche ADR.2. Pendant que le voyant clignote (10 s), appuyer sur la touche de commande3.
souhaitée. Le protocole radio est changé pour cette touche de commande du
Digipad.
b) Mémoriser le Digipad sur le moteur antérieur à 2006
Taper le code principal (000000 sur un Digipad neuf ou réinitialisé) et valider1.
avec la touche SET.
Se référer ensuite aux instructions de mémorisation de télécommandes de2.
la notice du moteur Axovia ou Axorn antérieur à 2006. Pour les autres moteurs
antérieurs à 2006, nous consulter.
Astuce [fig.D]
Pour savoir dans quel protocole radio est une touche, taper le code principal et faire
un appui long (20 s) sur la touche.
Si le voyant du haut clignote 10 s puis :
s’éteint => le protocole radio est postérieur à 2006,• reste allumé => le protocole radio est antérieur à 2006.•
3. Changer le code principal [fig.E]
Par défaut, le code principal est 000000 sur un Digipad neuf.
Pour changer le code principal :
Taper le code principal et valider avec la touche SET.1.Appuyer sur la touche SET jusqu’à ce que le voyant du bas s’allume (environ 72.
s). Le voyant du bas reste allumé.
Taper le code de votre choix et valider avec la touche SET. Le voyant du bas3.
s’éteint puis se rallume.
Taper à nouveau ce code et valider avec la touche SET. Le voyant du bas4.
s’éteint.
Le code principal est enregistré.
4. Utiliser le Digipad
Les commandes ne sont actives que si les touches de commande sont
déverrouillées.
4.1. Déverrouillage
Le code principal permet de déverrouiller les 2 touches de commande pour autoriser
la commande de 2 moteurs.
Un code secondaire permet de déverrouiller une seule touche de commande à la
fois.
4.2. Verrouillage
Le Digipad se verrouille automatiquement 30 s après le dernier appui sur une touche
de commande.
4.3. Utiliser le Digipad
Taper le code principal ou secondaire.1.Appuyer sur la touche de commande du moteur à actionner. Le voyant du haut2.
clignote.
Les appuis successifs sur une même touche de commande entraînent le
fonctionnement suivant du moteur : Ouverture, Stop, Fermeture, Stop, Ouverture ...
Pour les moteurs de portail ou de porte de garage dotés d’une fonction ouverture
totale ou partielle, si elle est programmée, chaque touche de commande permet le
fonctionnement en ouverture partielle (appui court < 1 s) ou totale (appui long > 2 s).
5. Fixer le Digipad [fig.F]
Avant de fixer le Digipad, vérifier son bon fonctionnement depuis l’emplacement de
fixation prévu.
Coller le joint néoprène à l’arrière du Digipad.1.Maintenir le fond du Digipad contre le mur et repérer les trous de perçage.2.Fixer le fond du Digipad au mur.3.Refermer le Digipad.4.
6. Codes secondaires
L’attribution d’un code secondaire à une touche de commande permet d’autoriser
l’accès à une partie seulement de la propriété (par exemple en attribuant le code
secondaire à la touche de commande du portail de la propriété). L’autorisation
d’accès peut être temporaire, le code secondaire pouvant être effacé à tout moment
par le propriétaire.
6.1. Enregistrer un code secondaire [fig.G]
Taper le code principal et valider avec la touche SET.1.Appuyer sur la touche SET jusqu’à ce que le voyant du bas s’allume2.
(environ 7 s). Le voyant du bas reste allumé.
Appuyer sur la touche de commande à laquelle un code secondaire doit être3.
attribué.
Taper un code secondaire et valider avec la touche SET. Le voyant du bas4.
s’éteint puis se rallume.
Taper à nouveau ce code et valider avec la touche SET. Le voyant du bas5.
s’éteint.
Pour vérifier la validité du code secondaire :6. attendre 30 s le verrouillage automatique du Digipad (ou ouvrir le Digipad et•
appuyer sur la touche RESET),
déverrouiller le Digipad avec le code secondaire,• appuyer sur la touche de commande associée à ce code :•
si le voyant du haut clignote, le code secondaire est valide,–si le voyant du bas clignote, le code secondaire n’est pas valide.–
Recommencer la procédure d’enregistrement d’un code secondaire.
6.2. Effacer un code secondaire connu [fig.H]
Taper le code principal et valider avec la touche SET.1.Appuyer sur la touche SET jusqu’à ce que le voyant du bas s’allume (environ 7 s).2.Appuyer sur la touche de commande à laquelle le code secondaire est3.
attribué.
Taper le code secondaire à effacer.4.Appuyer sur la touche SET jusqu’à ce que le voyant du bas s’éteigne (environ 10 s).5.
6.3. Effacer tous les codes secondaires [fig.I]
Taper le code principal et valider avec la touche SET.1.Appuyer sur la touche SET jusqu’à ce que le voyant du bas s’allume (environ 7 s).2.Appuyer sur la touche SET jusqu’à ce que le voyant du bas s’éteigne (environ 10 s).3.
7. Dépannages
7.1. Aucun mouvement
Le voyant du haut reste éteint => pile usée : la changer. [fig. J]
Le voyant du haut clignote à l’appui => changer le protocole radio sur la touche de
commande. [fig. C]
7.2. Code principal oublié et réinitialisation complète [fig. K]
Le Digipad doit être réinitialisé : effacement des mémorisations, retour des codes et
du protocole radio en configuration d’usine.
Pour réinitialiser le Digipad :
Ouvrir le Digipad avec la clé fournie.1.Appuyer sur la touche ADR (environ 10 s). Le voyant du haut s’allume pendant2.
l’appui puis les 2 voyants clignotent 7 fois. Le Digipad est réinitialisé.
Refermer le Digipad.3.Recommencer l’installation complète : mémorisations, changement de code4.
principal, etc.
7.3. Erreurs de saisie de code
7.3.1. Début de saisie de code incorrect
Poursuivre en saisissant le bon code et valider avec la touche SET ou appuyer sur
une touche de commande. Seuls les derniers chiffres tapés seront pris en compte.
7.3.2. Plusieurs saisies de codes erronés
Le voyant du bas clignote rapidement à l’appui sur n’importe quelle touche.
5 codes erronés différents ont été saisis successivement. Par sécurité, le Digipad est
verrouillé pendant 5 min.
Attendre 5 min.
PROG ADR RESET
1
23
45
6
7
89
www.somfy.com
5046086D

- 2 -
Copyright © 2008 Somfy SAS. All rights reserved.
EN
Operating principles
The RTS radio Digipad is a wireless, wall-mounted control with
coded access.
The Digipad enables 2 different motors to be operated with
2 control buttons. It is compatible with all motors, even those
manufactured before 2006 (see paragraph 2.2.).
User codes limit the use of the control buttons to authorised
persons: 1 main code for the 2 control buttons,• 2 secondary codes for each control button to give partial,•
brief access to the property (recording secondary codes is
optional).
User codes with a choice of 4, 5 or 6 characters, can be composed
using numbers 0 to 9 and the letter A.
In the event of a low level of luminosity, the Digipad buttons are
fitted with backlighting.
The Digipad is fitted with a 3V, CR 2450 type battery.
Conformity
Somfy hereby declares that this product complies with the essential
requirements and other relevant provisions of Directive1999/5/EC.
A Declaration of Conformity is available at the web address
www.somfy.com/ce. Suitable for use in EU, CH and NO.
Safety
General information
Always read this installation guide and safety instructions before
installing this Somfy product.
Never begin installing without first checking the compatibility of this
product with the associated equipment and accessories.
This guide describes how to install, commission and operate this
product.
Any usage outside of applications defined by Somfy constitutes
non-compliance, and is therefore not covered by the guarantee. In
this event, as for all usage not consistent with the instructions given
herein, Somfy accepts no responsibility for harm or damage.
Somfy cannot be held responsible for any changes in standards
which come into effect after the publication of this guide.
General safety advice
Do not let children play with the control system.
Operating conditions
The product should never be installed close to metal surfaces.
Check the radio range before securing the product. The radio range
is limited by the radio appliance control standards.
The use of a radio appliance (e.g. a set of Hi-Fi radio headphones)
operating on the same frequency might be detrimental to the
product’s performance.
Description
No. Name Function
1
Indicator
light
upper Information on the transmission
of a radio command
2lower Information on the Digipad
status
(flashing = locked)
3Control buttons Motor control
(1 button per motor)
4Alpha-numeric buttons Entering the code
5Aerial
6SET button Access to programming mode
7
Buttons
RESET Commissioning the Digipad
(for first use)
Locking the Digipad
8PROG Memorisation in a blind or roller
shutter motor
9
ADR Changing the radio (for a motor
manufactured before 2006)
Resetting the Digipad
(restoring factory settings)
1. Commissioning (for first use) [fig.A]
Open the Digipad with the key provided.1. Press the RESET button.2. Check that the Digipad has been commissioned by pressing3.
on one of the keypad buttons. If the lower indicator light comes
on, the Digipad has been commissioned. If it does not come
on, press the RESET button again and check that it has been
commissioned.
2. Memorising the Digipad
The Digipad works like a standard transmitter (for example a
remote control), therefore, the guide for the motor can be used to
memorise the Digipad.
2.1. Recommendations
Do not touch the aerial during memorisation operations.
To memorise the Digipad in the electronics of an Axovia motor,
place the Digipad on the target during the operation.
The Digipad automatically locks after 30 seconds, therefore, the
control button to be memorised in the motor electronics must be
pressed before the end of this time delay.
2.2. Memorising the Digipad in a motor manufactured
after 2006 [fig.B]
Carry out the operation described on page Ior II depending on the
motor in question.
After this operation, it is necessary to program the travel for the
Axovia, SGS, SGA, SLD motors (begin auto learning with gate
leaves in intermediate position to check they start opening).
2.3. Pre-2006 Axovia and Axorn motors [fig.C]
In 2006, Somfy changed its radio protocol for gate and garage
door motors.
The Digipad is compatible with radio protocols from before and
after 2006. Each control button can be configured individually.
a) Changing the radio protocol on a control button of the
Digipad
Enter the main code (000000 on a new or reset Digipad) and1.
confirm with the SET button.
Press the ADR button.2. While the light is flashing (10 s), press the required control3.
button. The radio protocol is changed for this control button on
the Digipad.
b) Memorising the Digipad in a pre-2006 motor
Enter the main code (000000 on a new or reset Digipad) and1.
confirm with the SET button.
Then refer to the remote control memorising instructions in2.
the guide for the Axovia or Axorn pre-2006 motor. For other
pre-2006 motors, please consult us.
Tip [fig.D]
To find out the radio protocol of a button, enter the main code and
press and hold the button (20 seconds).
If the upper light flashes for 10 seconds then:
turns off => the radio protocol is post-2006,• stays on => the radio protocol is pre-2006.•
3. Changing the main code [fig.E]
By default, the main code is 000000 on a new Digipad.
To change the main code:
Enter the main code and confirm with the SET button.1. Press the SET button until the lower light turns on2.
(approximately 7 seconds). The lower light remains on.
Enter the chosen replacement code and confirm with the SET3.
button. The lower light will turn off then come on again.
Enter the code again and confirm with the SET button.4.
The lower light will turn off.
The main code is recorded.
4. Using the Digipad
The controls are only active if the control buttons are unlocked.
4.1. Unlocking
The main code allows the 2 control buttons to be unlocked to allow
control of 2 motors.
A secondary code allows one control button to be unlocked at a
time.
4.2. Locking
The Digipad locks automatically 30 seconds after a control button
is last pressed.
4.3. Using the Digipad
Enter the main or secondary code.1. Press the control button of the motor to be actuated. The2.
upper light will flash.
Successive presses of the same control button will lead to the
following movements of the motor: Open, Stop, Close, Stop,
Open, etc.
For gate or garage door motors equipped with total or
partial opening function, if programmed, each control button
allows operation of partial (short press < 1 second) or total
(long press > 2 seconds) opening.
5. Mounting the Digipad [fig.F]
Before mounting the Digipad, check it operates correctly from its
intended mounting location.
Stick the neoprene seal to the back of the Digipad.1. Hold the base of the Digipad against the wall and mark the2.
drilling holes.
Mount the Digipad base to the wall.3. Close the Digipad.4.
6. Secondary codes
Allocation of a secondary code to a control button makes it
possible to authorise partial access to the property (for example,
by allocating the secondary code to the control button for the gate
of the property). Access authorisation can be temporary as the
secondary code can be cleared by the owner at any time.
6.1. Programming a secondary code [fig.G]
Enter the main code and confirm with the SET button.1. Press the SET button until the lower light turns on2.
(approximately 7 seconds). The lower light remains on.
Press the control button to which a secondary code must3.
be allocated.
Enter a secondary code and confirm with the SET button.4.
The lower light will turn off then come on again.
Enter the code again and confirm with the SET button.5.
The lower light will turn off.
To check the validity of the secondary code:6. wait for 30 seconds for automatic locking of the Digipad•
(or open the Digipad and press the RESET button),
unlock the Digipad with the secondary code,• press the control button associated with this code.• if the upper light flashes, the secondary code is–
correct,
if the lower light flashes, the secondary code is–incorrect. Restart the programming procedure for a
secondary code.
6.2. Clearing a known secondary code [fig.H]
Enter the main code and confirm with the SET button.1. Press the SET button until the lower light turns on2.
(approximately 7 seconds).
Press the control button to which the secondary code is3.
allocated.
Enter the secondary code to be cleared.4. Press the SET button until the lower light turns off5.
(approximately 10 seconds).
6.3. Clearing all secondary codes [fig.I]
Enter the main code and confirm with the SET button.1. Press the SET button until the lower light turns on2.
(approximately 7 seconds).
Press the SET button until the lower light turns off3.
(approximately 10 seconds).
7. Repairs
7.1. No movement
The upper light stays off => worn battery: replace it. [fig. J]
The upper light flashes when a control button is pressed => change
the radio protocol of the control button. [fig. C]
7.2. Main code forgotten and full reset [fig. K]
The Digipad must be reset: stored settings cleared, codes and
radio protocol reset to factory settings.
To reset the Digipad:
Open the Digipad with the key provided.1. Press the ADR button (approximately 10 seconds). The2.
upper light will come on when the button is pressed and then
the 2 lights will flash 7 times. The Digipad is reset.
Close the Digipad.3. Repeat the full installation procedure: programming,4.
changing main code, etc.
7.3. Code entry errors
7.3.1. Beginning of code entry incorrect
Continue by entering the correct code and confirm with the SET
button or press a control button. Only the last digits entered will
be taken into account.
7.3.2. Several incorrect code entries
The lower light flashes quickly whenever any button is pressed.
5 different incorrect codes have been entered successively. As a
safety measure, the Digipad will remain locked for 5 minutes.
Wait 5 minutes.
PROG ADR RESET
1
23
45
6
7
89
DE
Funktionsweise
Das RTS Funk-Digipad ist eine schnurlose Wandbedieneinheit mit
Codezugang.
Mit dem Digipad können 2 verschiedene Antriebe über
2 Bedientasten gesteuert werden. Es ist mit allen Antrieben
kompatibel, auch mit denen, die vor 2006 gebaut wurden
(siehe Abschnitt 2.2.).
Die Benutzercodes beschränken den Zugriff auf die Bedientasten
auf berechtigte Personen:
1 Hauptcode für die 2 Bedientasten,• 2 Sekundärcodes für jede Bedientaste, um nur begrenzt•
und vorübergehend Einlass zu gewähren (die Speicherung
von Sekundärcodes ist optional).
Die wahlweiseaus 4,5 oder6 Zeichenbestehenden Benutzercodes
setzen sich aus den Zahlen von 0 bis 9 und dem Azusammen.
Die Tastenhinterleuchtung ermöglicht es, das Digipad auch bei
geringer Helligkeit zu bedienen.
Das Digipad funktioniert mit einer 3V-Batterie, Typ CR 2450.
Konformitätserklärung
Hiermit erklärt Somfy, dass das Gerät den wichtigsten
Anforderungen und anderen maßgeblichen Bestimmungen der
Richtlinie 1999/5/EG entspricht. Die Konformitätserklärung ist unter
der Internetadresse www.somfy.com/ce verfügbar. Verwendbar in
der EU, der Schweiz und Norwegen.Sicherheitshinweise
Sicherheitshinweise
Allgemeines
Lesen Sie unbedingt diese Montageanleitung und die
Sicherheitshinweise bevor Sie mit der Installation dieses Somfy-
Produkts beginnen.
Vor der Montage muss die Kompatibilität dieses Produkts mit den
dazugehörigen Ausrüstungs- und Zubehörteilen geprüft werden.
Diese Anleitung beschreibt die Installation, die Inbetriebnahme und
die Bedienung dieses Produkts.
Jede Verwendung, die nicht dem von Somfy bestimmten
Anwendungsbereich entspricht, gilt als nicht bestimmungsgemäß.
Im Falle einer nicht bestimmungsgemäßen Verwendung, wie auch
bei Nicht-Befolgung der Hinweise in dieser Anleitung, entfällt die
Haftung und Gewährleistungspflicht von Somfy.
Somfy kann für Norm- und Standardänderungen, die nach
Veröffentlichung dieser Anleitung vorgenommen wurden, nicht zur
Verantwortung gezogen werden.
Allgemeine Sicherheitshinweise
Lassen Sie Kinder nicht mit dem Bediensystem spielen.
Installationsbedingungen
Installieren Sie das Produkt nie in der Nähe von
Metalloberflächen.
Kontrollieren Sie die Funkreichweite, bevor Sie das
Produkt festschrauben. Die Funkreichweite wird durch die
Regulierungsnormen für Funkgeräte eingeschränkt.
Die Verwendung von Funkgeräten (z.B. eines Hifi-Funkkopfhörers)
mit derselben Frequenz kann die Leistungen des Produkts
einschränken.
Beschreibung
Nr. Name Funktion
1
Kontrollleuchte
oben Information zur Absendung
eines Funkbefehls
2unten Information zum Zustand des
Digipad
(Blinken = verriegelt)
3Bedientasten Antriebsbedienung
(1 Taste pro Antrieb)
4Alphanumerische Tasten Code-Eingabe
5Antenne
6SET-Taste Zugang zum
Programmierungsmodus
7
Tasten
RESET Inbetriebnahme des Digipad
(bei der ersten Nutzung)
Sperrung des Digipad
8PROG Speicherung eines Markisen-
bzw. Rollladenantriebs
9
ADR
Änderung der Funkfrequenz
(bei Antrieben, die vor 2006
gebaut wurden)
Rücksetzung der
Einstellungen des Digipads auf
Werkeinstellungen
1. Erste Inbetriebnahme [Abb.A]
Öffnen Sie das Digipad mit dem mitgelieferten Schlüssel.1. Drücken Sie die RESET-Taste.2. Überprüfen Sie, ob das Digipad eingeschaltet ist, indem3.
Sie auf eine Taste der Tastatur drücken. Leuchtet die untere
Kontrollleuchte auf, ist das Digipad eingeschaltet. Leuchtet
Sie nicht auf, drücken Sie erneut auf die RESET-Taste und
überprüfen Sie, ob es eingeschaltet ist.
2. Einlernen des Digipads
Das Digipad funktioniert wie ein herkömmlicher Funksender
(z.B. eine Fernbedienung); die Betriebsanleitung des Antriebs kann
somit zum Einlernen des Digipads verwendet werden.
2.1. Empfehlungen
Die Antenne während des Einlernvorgangs nicht berühren.
Im Falle des Antriebs Axovia, das Digipad während des
Einlernvorgangs auf dem Zielobjekt platzieren.
Da die automatische Sperre des Digipads nach 30 Sek. aktiv
wird, muss vor Ablauf dieser Zeit auf die zu programmierende
Bedientaste gedrückt werden.
2.2. Einlernen des Digipads bei Antrieben die nach
2006 gebaut wurden [Abb.B]
Befolgen Sie, je nach Motor, dieAnweisungen auf Seite Ibzw. II .
Nach diesem Vorgang müssen für folgende Motoren die Laufwege
eingelernt werden Axovia, SGS, SGA, SLD (Lernvorgang mit
halboffenen Torflügeln beginnen, um den Startvorgang in geöffneter
Stellung zu überprüfen).
2.3. Antriebe Axovia undAxorn, Baujahr vor 2006
[Abb.C]
2006 hat Somfy das Funkprotokoll für Garten- und
Garagentorantriebe geändert.
Das Digipad ist mit den vor und nach 2006 gültigen Funkprotokollen
kompatibel. Jede Bedientaste kann individuell programmiert
werden.
a) Änderung des Funkprotokolls für eine Bedientaste des
Digipads
Geben Sie den Hauptcode ein (000000 auf einem neuen1.
Digipad oder nach einem Reset) und bestätigen Sie mit der
SET-Taste.
Drücken Sie die ADR-Taste.2. Drücken Sie auf die gewünschte Bedientaste, solange die3.
Kontrollleuchte blinkt (10 Sek.). Das Funkprotokoll wird für
diese Bedientaste des Digipads geändert.
b) Einlernen des Digipads bei Antrieben die vor 2006 gebaut
wurden
Geben Sie den Hauptcode ein (000000 auf einem neuen1.
Digipad oder nach einem Reset) und bestätigen Sie mit der
SET-Taste.
Siehedann dieAnweisungen zumEinlernenvon Funksendern2.
in den Anleitungen derAntriebe Axovia bzw.Axorn, Baujahr vor
2006. Bei allen anderen Antrieben mit einem Baujahr vor 2006,
wenden Sie sich bitte an uns.
Tipp [Abb.D]
Um zu erfahren, welches Funkprotokoll für eine Taste eingestellt
ist, den Hauptcode eingeben und die Taste 20 Sek. gedrückt
halten.
Wenn die obere Kontrollleuchte 10 Sek. blinkt und dann:
erlischt => nach 2006 gültiges Funkprotokoll,• weiterhin leuchtet => vor 2006 gültiges Funkprotokoll.•
3. Änderung des Hauptcodes [Abb.E]
Bei einem neuen Digipad ist standardmäßig der Hauptcode 000000
eingestellt.
Um den Hauptcode zu ändern:
Geben Sie den Hauptcode ein und bestätigen Sie mit der1.
SET-Taste.
Drücken Sie auf die SET-Taste, bis die untere Kontrollleuchte2.
aufleuchtet (ca. 7 Sek.). Die untere Kontrollleuchte bleibt an.
Geben Sie einen Code Ihrer Wahl ein und bestätigen Sie mit3.
der SET-Taste. Die untere Kontrollleuchte erlischt und leuchtet
dann wieder auf.
Geben Sie erneut den gewünschten Code ein und bestätigen4.
Sie mit der SET-Taste. Die untere Kontrollleuchte erlischt.
Der neue Hauptcode ist gespeichert.
4. Bedienung des Digipad
Die Bedienelemente sind erst nach Freigabe der Bedientasten
aktiv.
4.1. Freigabe
Mit dem Hauptcode können die 2 Bedientasten entsperrt werden,
um die Steuerung von zwei Antrieben zu ermöglichen.
Ein Sekundärcode ermöglicht es, nur eine Bedientaste auf einmal
zu entsperren.
4.2. Tastensperre
Die Tasten des Digipad werden 30 Sek. nach der letzten Betätigung
einer Bedientaste automatisch gesperrt.
4.3. Bedienung des Digipad
Geben Sie den Haupt- oder Sekundärcode ein.1. Drücken Sie auf die Bedientaste des betreffenden Antriebs.2.
Die obere Kontrollleuchte blinkt.
Auf mehrfaches Drücken ein und derselben Taste reagiert der
Antrieb wie folgt: Öffnen, Stopp, Schließen, Stopp, Öffnen ...
Bei Garten- oder Garagentorantrieben, die über eine Voll-
oder Teilöffnungsfunktion verfügen, ermöglicht jede Taste, bei
entsprechender Programmierung, die Teilöffnung (kurzes Drücken
< 1 Sek.) oder die Vollöffnung (langes Drücken > 2 Sek.) des
Tores.
5. Anbringung des Digipad [Abb.F]
Überprüfen Sie, bevor Sie es anbringen, ob das Digipad an der für
die Montage vorgesehen Stelle richtig funktioniert.
Kleben Sie die Neoprendichtung auf die Rückseite des1.
Digipads.
Halten Sie den Boden des Digipads an der Wand an und2.
markieren Sie die Bohrlöcher.
Befestigen Sie den Boden des Digipads an der Wand.3. Schließen Sie das Digipad wieder.4.
6. Sekundärcodes
Durch die Zuweisung eines Sekundärcodes, kann der Zugang auf
nur einen Teil des Grundstücks beschränkt werden (z.B. indem
der Bedientaste des Gartentores ein Sekundärcode zugewiesen
wird). Die Zutrittsberechtigung kann zeitlich begrenzt werden, da
der Sekundärcode jederzeit durch den Besitzer gelöscht werden
kann.
6.1. Speichern eines Sekundärcodes [Abb.G]
Geben Sie den Hauptcode ein und bestätigen Sie mit der1.
SET-Taste.
Drücken Sie auf die SET-Taste, bis die untere Kontrollleuchte2.
aufleuchtet (ca. 7 Sek.). Die untere Kontrollleuchte bleibt an.
Drücken Sie auf die Bedientaste, der ein Sekundärcode3.
zugewiesen werden soll.
Geben Sie den Sekundärcode ein und bestätigen Sie mit4.
der SET-Taste. Die untere Kontrollleuchte erlischt und leuchtet
dann wieder auf.
Geben Sie erneut den gewünschten Code ein und bestätigen5.
Sie mit der SET-Taste. Die untere Kontrollleuchte erlischt.
Um die Gültigkeit des Sekundärcodes zu überprüfen:6. warten Sie 30 Sek., bis die automatische Sperre des•
Digipad aktiv ist (oder öffnen Sie das Digipad und drücken
Sie auf die RESET-Taste),
entsperren Sie das Digipad mit dem Sekundärcode,• drücken Sie auf die Taste, der der Code zugewiesen•
wurde:
blinkt die obere Kontrollleuchte, ist der Sekundärcode–
gültig,
blinkt die untere Kontrollleuchte, ist der Sekundärcode–
nicht gültig. Beginnen Sie erneut den Vorgang zur
Speicherung eines Sekundärcodes.
6.2. Löschen eines bekannten Sekundärcodes
[Abb.H]
Geben Sie den Hauptcode ein und bestätigen Sie mit der1.
SET-Taste.
Drücken Sie auf die SET-Taste, bis die untere Kontrollleuchte2.
aufleuchtet (ca. 7 Sek.).
Drücken Sie auf die Bedientaste, der der Sekundärcode3.
zugewiesen wurde.
Geben Sie den zu löschenden Sekundärcode ein.4. Drücken Sie auf die SET-Taste, bis die untere Kontrollleuchte5.
erlischt (ca. 10 Sek.).
6.3. Löschen aller Sekundärcodes [Abb.I]
Geben Sie den Hauptcode ein und bestätigen Sie mit der1.
SET-Taste.
Drücken Sie auf die SET-Taste, bis die untere Kontrollleuchte2.
aufleuchtet (ca. 7 Sek.).
Drücken Sie auf die SET-Taste, bis die untere Kontrollleuchte3.
erlischt (ca. 10 Sek.).
7. Problembehebungen
7.1. Keine Bewegung
Die obere Kontrollleuchte bleibt aus => Batterie leer: Batterie
austauschen. [Abb. J]
BeiBetätigung blinktdie obereKontrollleuchte =>dasFunkprotokoll
für die Bedientaste ändern. [Abb. C]
7.2. Hauptcode vergessen und vollständiges Reset
[Abb. K]
Die Einstellungen des Digipad müssen zurückgesetzt werden:
Löschung der Programmierung, Rückkehr zu den werkseitig
eingestellten Codes und Funkprotokoll.
Für ein Reset des Digipads:
Öffnen Sie das Digipad mit dem mitgelieferten Schlüssel.1. Drücken Sie auf die ADR-Taste (ca. 10 Sek.). Die obere2.
Kontrollleuchte leuchtet während der Betätigung auf, danach
blinken beide Kontrollleuchten 7 Mal. Der Reset wurde
durchgeführt.
Das Digipad wieder schließen.3. Beginnen Sie erneut mit der Installation: Programmierungen,4.
Änderung des Hauptcodes, etc.
7.3. Fehler bei der Code-Eingabe
7.3.1. Anfang des eingegebenen Codes falsch
Fahren Sie fort, indem Sie den richtigen Code eingeben und
bestätigen Sie mit der SET-Taste oder drücken Sie auf eine
Bedientaste. Es werden nur die Zahlen, die zuletzt eingegeben
wurden, berücksichtigt.
7.3.2. Wiederholte falsche Code-Eingaben
Die untere Kontrollleuchte blinkt schnell, wenn eine der Tasten
gedrückt wird.
5 verschiedene falsche Codes wurden nacheinander eingegeben.
Zur Sicherheit wird das Digipad 5 Min. lang gesperrt.
5 Min. warten.
PROG ADR RESET
1
23
45
6
7
89

- 3 -
Copyright © 2008 Somfy SAS. All rights reserved.
ES
Principios de funcionamiento
El Digipad radio RTS es un control mural de acceso
codificado inalámbrico.
El Digipad permite gestionar dos motores distintos gracias
a dos teclas de control. Es compatible con todos los
motores, incluso los anteriores a 2006 (cf. apartado 2.2.).
Los códigos de usuario restringen el uso de las teclas de
control únicamente a las personas autorizadas:
1 código principal válido para las dos teclas•
de control,
2 códigos secundarios para cada tecla de•
control para dar acceso parcial y momentáneo a
la propiedad (el registro de códigos secundarios
es opcional).
Los códigos de usuario de 4, 5 o 6 caracteres, a elegir, se
marcan con las cifras del 0 al 9 y la letra A.
El Digipad incorpora una función de retroiluminación de
las teclas en caso de luminosidad escasa.
El Digipad funciona con una pila de 3 V tipo CR 2450.
Conformidad
Por la presente, Somfy declara que el aparato cumple con
los requisitos básicos y todas las disposiciones aplicables
de la Directiva 1999/5/CE. La pertinente declaración
de conformidad puede encontrarse en Internet en la
dirección: www.somfy.com/ce. En vigor en la UE, Suiza
y Noruega.
Seguridad
Aspectos generales
Lea siempre la presente guía de instalación y las
instrucciones deseguridadantes deempezar lainstalación
de este producto Somfy.
Antes de su utilización, compruebe la compatibilidad de
este producto con los equipos y accesorios asociados.
Esta guía describe la instalación, la puesta en marcha y el
funcionamiento del producto.
Cualquier uso diferente del ámbito de aplicación definido
por Somfy se considera un uso inadecuado. Esto
conllevará, al igual que cualquier otra inobservancia de
las instrucciones que figuran en este manual, la exclusión
de responsabilidad y la anulación de la garantía por parte
de Somfy.
Somfy no podrá ser considerada responsable de los
cambios de normas y estándares producidos después de
la publicación de la presente guía.
Normas generales de seguridad
No deje que los niños jueguen con el sistema de control.
Condiciones de uso
El producto no debe instalarse jamás cerca de superficies
metálicas.
Compruebe el alcance del radiocontrol antes de colocar el
producto. El alcance del radiocontrol está limitado por las
normativas que regulan los dispositivos de radio.
El uso de un dispositivo de radio (por ejemplo un casco
de radio de alta fidelidad) que utilice la misma frecuencia
podría reducir el rendimiento del producto.
Descripción
N.° Nombre Cargo
1
Indicador
superior Información sobre la
emisión de un control
de radio
2inferior Información sobre el estado
del Digipad
(parpadea = bloqueado)
3Teclas de control Control de motor
(1 tecla por motor)
4Teclas
alfanuméricas Introducción del código
5Antena
6Tecla SET Acceso al modo
programación
7
Teclas
RESET
Puesta en servicio del
Digipad
(para la primera utilización)
Bloqueo del Digipad
8PROG Memorización de un motor
para toldo o persiana
enrollable
9
ADR
Cambio de radio (para un
motor anterior a 2006)
Reinicialización del Digipad
(volver a la configuración
de fábrica)
1. Puesta en servicio (para la primera
utilización) [fig. A]
Abra el Digipad con la llave suministrada.1. Pulse la tecla RESET.2. Compruebe que el Digipad esté operativo pulsando3.
una tecla del teclado. Si se enciende el indicador
inferior, el Digipad está operativo. Si no se enciende,
pulse de nuevo la tecla RESET y compruebe que
está operativo.
2. Cómo memorizar el Digipad
El Digipad funciona como un emisor clásico (por ejemplo
un telemando), por lo que se puede usar la guía del motor
para memorizar el Digipad.
2.1. Recomendaciones
No toque la antena durante las operaciones de
memorización.
Para memorizar el Digipad en la electrónica de un motor
Axovia, coloque el Digipad en el objetivo durante la
operación.
El Digipad se bloquea automáticamente transcurridos
30 s, por lo que la pulsación de la tecla de control que
se quiere memorizar en la electrónica del motor se debe
realizar antes de que finalice dicho plazo.
2.2. Cómo memorizar el Digipad en un motor
posterior a 2006 [fig. B]
Realice la operación descrita en la página Io II según el
tipo de motor.
Tras la operación, se requiere un aprendizaje de las
carreras para los siguientes motores : Axovia, SGS, SGA,
SLD (inicio del aprendizaje con las hojas entreabiertas
para comprobar el inicio de apertura).
2.3. Caso de los motores Axovia y Axorn
anteriores a 2006 [fig. C]
En 2006, Somfy cambió su protocolo de radio para
motores de pórticos y puertas de garaje.
El Digipad es compatible con los protocolos de radio
anterior y posterior al 2006. Cada tecla de control puede
configurarse individualmente.
a) Cambio de protocolo de radio en una tecla de
control del Digipad
Introduzca el código principal (000000 en un1.
Digipad nuevo o reinicializado) y acepte pulsando la
tecla SET.
Pulse la tecla ADR.2. Mientras parpadea el indicador (10 s), pulse la tecla3.
de control deseada. El protocolo de radio se cambiará
para esta tecla de control del Digipad.
b) Memorización del Digipad en el motor anterior a
2006 Introduzca el código principal (000000 en un1.
Digipad nuevo o reinicializado) y acepte pulsando la
tecla SET.
Consulte las instrucciones de memorización de2.
telemandos de la guía del motor Axovia o Axorn
anteriores a 2006. Para el resto de motores anteriores
a 2006, consúltenos.
Truco [fig. D]
Para saber en qué protocolo de radio está una tecla,
introduzca el código principal y realice una pulsación
sostenida (20 s) en dicha tecla.
Si el indicador superior parpadea 10 s y luego:
se apaga => el protocolo de radio es posterior•
a 2006,
se mantiene encendido => el protocolo de radio•
es anterior al 2006.
3. Cómo cambiar el código principal
[fig. E]
Por defecto, el código principal de un Digipad nuevo es
000000.
Para cambiar el código principal:
Introduzca el código principal y acepte pulsando1.
la tecla SET.
Pulse la tecla SET hasta que se encienda el2.
indicador inferior (unos 7 s). El indicador inferior se
mantiene encendido.
Introduzca el código de su elección y acepte3.
pulsando la tecla SET. El indicador inferior se apaga y
luego se vuelve a encender.
Introduzca de nuevo el código y acepte pulsando la4.
tecla SET. El indicador inferior se apaga.
El código principal está registrado.
4. Cómo usar el Digipad
Los controles sólo están activos si las teclas de control
están desbloqueadas.
4.1. Desbloqueo
El código principal permite desbloquear las dos teclas de
control para autorizar el control de los dos motores.
Un código secundario permite desbloquear una única
tecla de control cada vez.
4.2. Bloqueo
El Digipad se bloquea automáticamente transcurridos 30 s
desde la última pulsación de una tecla de control.
4.3. Cómo usar el Digipad
Introduzca el código principal o secundario.1. Pulse la tecla de control del motor que se quiere2.
activar. El indicador superior parpadea.
Las pulsaciones sucesivas de una misma tecla de control
activan el siguiente funcionamiento del motor: Apertura,
Stop, Cierre, Stop, Apertura ...
Para los motores de pórticos o de puertas de garaje
dotados con una función de apertura total o parcial, si la
misma está programada, cada tecla de control permite el
funcionamiento en apertura parcial (pulsación breve < 1 s)
o total (pulsación larga > 2 s).
5. Fijación del Digipad [fig. F]
Antes de fijar el Digipad, compruebe su buen
funcionamiento desde el lugar de fijación previsto.
Pegue la junta de neopreno en la parte trasera1.
del Digipad.
Apoye la base del Digipad contra la pared y marque2.
los agujeros para los taladros.
Fije la base del Digipad a la pared.3. Vuelva a cerrar el Digipad.4.
6. Códigos secundarios
La asignación de un código secundario a una tecla de
control permite autorizar el acceso sólo a una parte de la
propiedad (por ejemplo, asignando el código secundario
a la tecla de control del pórtico de la propiedad). La
autorización de acceso puede ser temporal, el código
secundario puede ser borrado por el propietario en
cualquier momento.
6.1. Registro de un código secundario [fig. G]
Introduzca el código principal y acepte pulsando1.
la tecla SET.
Pulse la tecla SET hasta que se encienda el2.
indicador inferior (unos 7 s). El indicador inferior se
mantiene encendido.
Pulse la tecla de control a la que quiere asignar el3.
código secundario.
Introduzca un código secundario y acepte pulsando4.
la tecla SET. El indicador inferior se apaga y luego se
vuelve a encender.
Introduzca de nuevo el código y acepte pulsando la5.
tecla SET. El indicador inferior se apaga.
Para comprobar la validez del código secundario:6. espere 30 s a que se produzca el bloqueo•
automático del Digipad (o abra el Digipad y pulse
la tecla RESET),
desbloquee el Digipad con el código•
secundario,
pulse la tecla de control asociada a dicho•
código:
si parpadea el indicador superior, el código–
secundario es válido,
si parpadea el indicador inferior, el código–
secundario no es válido,
Repita elprocedimiento deregistrode uncódigo
secundario.
6.2. Cómo borrar un código secundario conocido
[fig. H]
Introduzca el código principal y acepte pulsando1.
la tecla SET.
Pulse la tecla SET hasta que se encienda el2.
indicador inferior (unos 7 s).
Pulse la tecla de control que tiene asignado el3.
código secundario.
Introduzca el código secundario que se quiere4.
borrar.
Pulse la tecla SET hasta que se apague el indicador5.
inferior (unos 10 s).
6.3. Cómo eliminar todos los códigos
secundarios [fig. I]
Introduzca el código principal y acepte pulsando1.
la tecla SET.
Pulse la tecla SET hasta que se encienda el2.
indicador inferior (unos 7 s).
Pulse la tecla SET hasta que se apague el indicador3.
inferior (unos 10 s).
7. Soluciones
7.1. Ningún movimiento
El indicador superior está apagado => pila gastada:
cámbiela. [fig. J]
El indicador superior parpadea al pulsarlo => cambie el
protocolo de radio en la tecla de control. [fig. C]
7.2. Código principal olvidado y reinicialización
completa [fig. K]
El Digipad se tiene que reinicializar: borrado de las
memorizaciones, recuperación de los códigos y el
protocolo de radio de la configuración de fábrica.
Para reinicializar el Digipad:
Abra el Digipad con la llave suministrada.1. Pulse la tecla ADR (unos 10 s). El indicador superior2.
seenciende alpulsarlo ylosdosindicadores parpadean
siete veces. El Digipad se ha reinicializado.
Vuelva a cerrar el Digipad.3. Repita la instalación completa: memorizaciones,4.
cambio del código principal, etc.
7.3. Errores al introducir el código
7.3.1. Principio de introducción del código incorrecto
Siga introduciendo el código correcto y acepte pulsando
la tecla SET o pulse una tecla de control. Sólo se tendrán
en cuenta las últimas cifras introducidas.
7.3.2. Varias introducciones de códigos erróneos
El indicador inferior parpadea rápidamente al pulsar
cualquier tecla.
Se han introducido sucesivamente cinco códigos
erróneos. Por seguridad, el Digipad queda bloqueado
durante 5 min.
Espere 5 min.
PT
Princípios de funcionamento
O Digipad radio RTS é um comando de parede sem fios com acesso codificado.
O Digipad permite comandar 2 motores distintos com 2 botões de comando. É compatível
com todos os motores, mesmo os anteriores a 2006 (cf. parágrafo 2.2.).
Os códigos de utilizador restringem a utilização dos botões de comando às pessoas
autorizadas:
1 código principal válido para 2 botões de comando,• 2 códigos secundários por botão de comando para dar um acesso parcial e•
momentâneo à propriedade (a memorização dos códigos secundários é opcional).
Os códigos de utilizador de 4, 5 ou 6 caracteres, à escolha, são compostos por algarismos
de 0 a 9 e pela letra A.
O Digipad possui uma função de retro-iluminação dos botões em caso de baixa
luminosidade.
O Digipad funciona com uma pilha de 3 V, tipo CR 2450.
Conformidade
A Somfy não poderá ser responsabilizada por eventuais alterações às normas, posteriores
à edição deste manual. A Somfy declara que este aparelho está conforme os requisitos
essenciais e outras disposições da Directiva 1999/5/CE. Uma Declaração de Conformidade
encontra-se disponível na Internet em www.somfy.com/ce. Utilizável na UE, CH e NO.
Segurança
Generalidades
Ler sempre o guia de instalação e as instruções de segurança antes de começar a
instalação deste produto Somfy.
Antes de qualquer instalação, verificar a compatibilidade deste produto com os
equipamentos e acessórios associados.
Estas instruções descrevem a instalação, a entrada em funcionamento e o modo de
utilização deste produto.
Qualquer utilização fora do âmbito de aplicação definido pela Somfy é não conforme.
Ela acarretaria, como qualquer outro incumprimento das instruções dadas neste guia, a
anulação da responsabilidade e da garantia da Somfy.
A Somfy não assume qualquer responsabilidade por eventuais modificações às normas
efectuadas após a publicação deste guia.
Instruções gerais de segurança
Não deixar o sistema de comando ao alcance das crianças.
Condições de utilização
Nunca instalar o produto próximo de superfícies metálicas.
Controlar o alcance rádio, antes de fixar o produto. O alcance rádio é limitado pelas normas
de regulamentação dos aparelhos rádio.
A utilização de aparelhos rádio (por exemplo, auscultadores de rádio hi-fi) que utilizem a
mesma frequência pode diminuir a eficiência do produto.
Descrição
N° Nome Função
1
Testemunho superior Informação sobre a emissão de um
comando rádio
2inferior Informação sobre o estado do Digipad
(intermitente = bloqueado)
3Botões de comando Comando do motor (1 botão por motor)
4Botões alfanuméricos Introdução de código
5Antena
6Botão SET Acesso ao modo de programação
7
Botões
RESET Entrada em funcionamento do Digipad
(para uma 1ª utilização)
Bloqueamento do Digipad
8PROG Memorização de um motor para toldo ou
estore
9
ADR Mudança de rádio
(para um motor anterior a 2006)
Reinicialização do Digipad
(retorno à configuração de fábrica)
1. Entrada em funcionamento (para uma 1ª utilização) [fig.A]
Abrir o Digipad com a chave fornecida.1. Carregar no botão RESET.2. Verificar se o Digipad entra em funcionamento carregando num botão do teclado. Se3.
o testemunho inferior se acender, o Digipad está a funcionar. Se não se acender, voltar
a carregar no botão RESET e verificar se o aparelho está a funcionar.
2. Memorizar o Digipad
O Digipad funciona como um emissor clássico (por exemplo um comando à distância), por
conseguinte o guia do motor pode ser utilizado para memorizar o Digipad.
2.1. Preconizações
Não tocar na antena durante as operações de memorização.
Para memorizar o Digipad na electrónica de um motor Axovia, apontá-lo para o alvo
durante a operação.
NL
Principes van de werking
De Digipad radio RTS is een draadloze wandbediening
met toegangscode.
De Digipad kan met 2 bedieningstoetsen 2
motoren afzonderlijk aansturen. Hij is compatibel
met alle motoren, zelfs die van vóór 2006
(zie paragraaf 2.2.).
Dankzij gebruikerscodes kunnen alleen bevoegde
personen de toetsen gebruiken:
1 hoofdcode voor de 2 bedieningstoetsen,• 2 secondaire codes per bedieningstoets geven•
gedeeltelijk en tijdelijk toegang tot het eigendom
(het opslaan van secondaire codes is optioneel).
De gebruikerscodes van 4, 5 of 6 tekens, naar keuze,
worden samengesteld met de cijfers van 0 t/m 9 en de A.
De toetsen van de Digipad zijn verlicht voor gebruik in
het donker.
De Digipad werkt met een batterijtje van 3 V, type CR
2450.
Conformiteit
Somfy erklærer med dette at verktøyet er i samsvar med
hovedkravene og andre relevante paragrafer i direktivet
1999/5/CE. En samsvarserklæring er tilgjengelig på
internettadressen www.somfy.com/ce. Kan brukes i UE,
CH og NO.
Veiligheid
Algemeen
Lees altijd deze installatiegids en de bijgevoegde
veiligheidsvoorschriften voordat u begint met de installatie
van dit Somfy product.
Vóór installatie moet gecontroleerd worden of dit
product compatibel is met de aanwezige apparatuur en
accessoires.
Deze handleiding geeft instructies voor het installeren, het
in bedrijf stellen en het gebruik van dit product.
Elk gebruik buiten het door Somfy bepaalde
toepassingsgebied is niet conform. Hierdoor en door het
negeren van de instructies in deze handleiding, vervalt
iedere aansprakelijkheid en garantie van Somfy.
Somfy is niet aansprakelijk voor veranderingen van
normen en standaards die van kracht zijn geworden na
publicatie van deze handleiding.
Algemene veiligheidsvoorschriften
Laat kinderen niet met het bedieningssysteem spelen.
Gebruiksomstandigheden
Plaats het product nooit in de buurt van metalen
oppervlakken.
Controleer het draadloze bereik voordat u het product
definitief bevestigt. Het draadloze bereik wordt beperkt
door de regelgeving inzake draadloze apparaten.
Het gebruik van een draadloos apparaat (bijvoorbeeld
een draadloze hifi hoofdtelefoon) dat op dezelfde
frequentie werkt kan de prestaties van het product
negatief beïnvloeden.
Beschrijving
Nr. Naam Functie
1
Lampje
boven Informatie over de
verzending van een
radiocommando
2onder Informatie over de
status van de Digipad
(knipperend =
vergrendeld)
3Bedieningstoetsen Bediening van de
motor
(1 toets per motor)
4Alfanumerieke toetsen Invoeren van de code
5Antenne
6SET-toets Toegang tot de
programmatiemode
7
Toetsen
RESET
In bedrijf stellen van de
Digipad
(voor een 1e gebruik)
Vergrendelen van de
Digipad
8PROG Inlezen van een motor
voor een zonnescherm
of rolluik
9
ADR
Veranderen van het
radiosignaal
(voor een motor van
vóór 2006)
Resetten van de
Digipad
(terug naar de
fabrieksconfiguratie)
1. In bedrijf stellen (voor een 1e gebruik)
[fig.A]
Open de Digipad met de meegeleverde sleutel.1. Druk op de RESET-toets.2. Controleer of de Digipad in bedrijf is gesteld door3.
op een toets van het toetsenbord te drukken. Als
het onderste lampje oplicht, is de Digipad in bedrijf
gesteld. Als het niet oplicht, druk dan opnieuw op de
RESET-toets en controleer de inbedrijfstelling.
2. Inlezen van de Digipad
De Digipad werkt als een klassieke zender (bijvoorbeeld
een afstandsbediening), gebruik daarom de handleiding
van de motor voor het inlezen van de Digipad.
2.1. Voorschriften
Raak de antenne niet aan tijdens het inlezen.
Leg de Digipad bij het inlezen van een Axovia-motor op
de ontvanger.
Omdat de Digipad zich automatisch vergrendelt na 30 s,
moet u voordat deze tijd verstreken is, op de inleestoets
van de ontvanger van de motor drukken.
2.2. Inlezen van deDigipad opeenmotorvanna 2006
[fig.B]
Voer de handelingen uit die staan op pagina Iof II
naargelang de betreffende motor.
Na deze handelingen, moeten de bewegingen van de
motoren worden ingelezen: Axovia, SGS, SGA, SLD
(begin het inlezen met half geopende hekken voor het
controleren van het starten van het openen).
2.3. Axovia- en Axorn-motoren van vóór 2006 [fig.C]
In 2006 heeft Somfy het radioprotocol voor motoren van
hekken en garagedeuren gewijzigd.
De Digipad is compatibel met de radioprotocollen van
voor en na 2006. Elke bedieningstoets kan apart worden
geconfigureerd.
a) Veranderen van het radioprotocol op een
bedieningstoets van de Digipad
Toets de hoofdcode in (000000 op een nieuwe of1.
geresette Digipad) en bevestig deze met de SET-
toets.
Druk op de ADR-toets.2. Druk tijdens het knipperen van het lampje (10 s)3.
op de gewenste bedieningstoets. Het radioprotocol is
gewijzigd voor deze bedieningstoets van de Digipad.
b) Inlezen van de Digipad op een motor van vóór 2006
Toets de hoofdcode in (000000 op een nieuwe of1.
geresette Digipad) en bevestig deze met de SET-
toets.
Raadpleeg de instructies voor het inlezen van2.
zenders in de handleiding van de Axovia- of Axorn-
motor van vóór 2006. Neem contact op met ons voor
de andere motoren van vóór 2006.
Tip [fig.D]
Om het radioprotocol van een toets te zien, toetst u de
hoofdcode in en drukt u lang (20 s) op de toets.
Als het bovenste lampje 10 s knippert en daarna:
dooft => het radioprotocol is van na 2006,• blijft branden => het radioprotocol is van vóór 2006.•
3. Veranderen van de hoofdcode [fig.E]
De standaard hoofdcode is 000000 op een nieuwe
Digipad.
Om de hoofdcode te veranderen:
Toets de hoofdcode in en bevestig deze met de1.
SET-toets.
Druk op de SET-toets tot het onderste lampje oplicht2.
(ongeveer 7 s). Het onderste lampje blijft branden.
Toets de door u gekozen3.
hoofdcode in en bevestig deze met de
SET-toets. Het onderste lampje gaat uit en weer aan.
Toets deze code nogmaals in en bevestig deze met4.
de SET-toets. Het onderste lampje gaat uit.
De hoofdcode is opgeslagen.
4. Gebruiken van de Digipad
De commando’s zijn pas actief als de bedieningstoetsen
zijn ontgrendeld.
4.1. Ontgrendeling
Met de hoofdcode worden de 2 bedieningstoetsen
ontgrendeld om de 2 motoren te kunnen bedienen.
Met een secondaire code kan één bedieningstoets worden
ontgrendeld.
4.2. Vergrendeling
De Digipad vergrendelt zich automatisch 30 s na de
laatste druk op een bedieningstoets.
4.3. Gebruiken van de Digipad
Toets de hoofdcode of de secondaire code in.1. Druk op de bedieningstoets van de te gebruiken2.
motor. Het bovenste lampje knippert.
Door het achtereenvolgens drukken op dezelfde
bedieningstoets werkt de motor als volgt: Openen, Stop,
Sluiten, Stop, Openen ...
Voor motoren van een hek of een garagedeur met een
functie voor het geheel of gedeeltelijk openen en als deze
functie is geprogrammeerd, zorgt elke bedieningstoets
voor het gedeeltelijk openen (korte druk < 1 s) of geheel
openen (lange druk > 2 s).
5. Bevestigen van de Digipad [fig.F]
Controleer voordat u de Digipad bevestigt, of deze goed
werkt vanaf de plaats waar u hem wilt bevestigen.
Plak de neopreen afdichting op de achterkant van1.
de Digipad.
Houd de grondplaat van de Digipad tegen de muur2.
en markeer de boorgaten.
Bevestig de grondplaat van de Digipad aan de muur.3. Sluit de Digipad.4.
6. Secondaire codes
Door het toewijzen van een secondaire code aan
een bedieningstoets kan hiermee een gedeelte van
het eigendom geopend worden (bijvoorbeeld door de
secondaire code toe te wijzen aan het toegangshek). De
toestemming voor de toegang is tijdelijk, de eigenaar kan
de secondaire code op elk gewenst moment wissen.
6.1. Opslaan van een secondaire code [fig.G]
Toets de hoofdcode in en bevestig deze met de1.
SET-toets.
Druk op de SET-toets tot het onderste lampje oplicht2.
(ongeveer 7 s). Het onderste lampje blijft branden.
Druk op de bedieningstoets waaraan een3.
secondaire code moet worden toegewezen.
Toets een secondaire code in en4.
bevestig deze met de SET-toets.
Het onderste lampje gaat uit en weer aan.
Toets deze code nogmaals in en5.
bevestig deze met de SET-toets.
Het onderste lampje gaat uit.
Om de geldigheid van de secondaire code te6.
controleren:
wacht 30 s tot de Digipad automatisch•
vergrendelt (of open de Digipad en druk op de
RESET-toets),
ontgrendel de Digipad met de secondaire code,• druk op de bij deze code behorende toets:• als het bovenste lampje knippert, is de–
secondaire code geldig,
als het onderste lampje knippert, is de–
secondaire code niet geldig. Voer het opslaan
van een secondaire code opnieuw uit.
6.2. Wissen van een bekende secondaire code
[fig.H]
Toets de hoofdcode in en bevestig deze met de1.
SET-toets.
Druk op de SET-toets tot het onderste lampje2.
oplicht (ongeveer 7 s).
Druk op de bedieningstoets waaraan de secondaire3.
code is toegewezen.
Toets de te wissen secondaire code in.4. Druk op de SET-toets tot het onderste lampje dooft5.
(ongeveer 10 s).
6.3. Wissen van alle secondaire codes [fig.I]
Toets de hoofdcode in en bevestig deze met de1.
SET-toets.
Druk op de SET-toets tot het onderste lampje oplicht2.
(ongeveer 7 s).
Druk op de SET-toets tot het onderste lampje dooft3.
(ongeveer 10 s).
7. Verhelpen van storingen
7.1. Geen enkele beweging
Het bovenste lampje blijft uit => batterijtje leeg:
vervangen. [fig. J]
Het bovenste lampje knippert bij het indrukken => verander
het radioprotocol van de bedieningstoets. [fig. C]
7.2. Hoofdcode vergeten en compleet resetten
[fig. K]
De Digipad moet worden gereset: wissen van de
inlezingen, teruggaan naar de codes en het radioprotocol
van de fabrieksconfiguratie.
Om de Digipad te resetten:
Open de Digipad met de meegeleverde sleutel.1. Druk op de ADR-toets (ongeveer 10 s). Het2.
bovenste lampje licht op tijdens het indrukken en
daarna knipperen de 2 lampjes 7 keer. De Digipad
is gereset.
Sluit de Digipad.3. Voer de complete installatie opnieuw uit: inlezingen,4.
veranderen van de hoofdcode, enz.
7.3. Fouten bij het invoeren van de code
7.3.1. Begin van de ingevoerde code incorrect
Ga verder door de goede code in
te voeren en te bevestigen met de
SET-toets of te drukken op een bedieningstoets.Alleen de
laatste ingevoerde cijfers worden verwerkt.
7.3.2. Verschillende verkeerde codes ingevoerd
Het onderste lampje knippert snel bij het indrukken van
ongeacht welke toets.
5 verschillende verkeerde codes zijn na elkaar ingevoerd.
Voor de veiligheid wordt de Digipad gedurende 5 minuten
vergrendeld.
Wacht 5 minuten.
PROG ADR RESET
1
23
45
6
7
89
PROG ADR RESET
1
23
45
6
7
89
PROG ADR RESET
1
23
45
6
7
89

- 4 -
Copyright © 2008 Somfy SAS. All rights reserved.
IT
Principi di funzionamento
Il Digipad radio RTS è un comando a parete senza fili ad
accesso codificato.
Il Digipad permette di comandare 2 motori distinti
attraverso 2 pulsanti di comando. È compatibile
con tutti i motori, anche con quelli anteriori al 2006
(vedi paragrafo 2.2.).
L’utilizzodei pulsantidi comandoè limitatoesclusivamente
alle persone autorizzate attraverso dei codici utenti:
1 codice principale valido per i 2 pulsanti di•
comando,
2 codici secondari per ogni pulsante di comando•
per fornire un accesso parziale e momentaneo alla
proprietà (la registrazione di codici secondari è
opzionale).
I codici utenti da 4, 5 o 6 caratteri, a scelta, si compongono
con le cifre da 0 a 9 e la lettera A.
Il Digipad è dotato di una funzione di retro-illuminazione
dei pulsanti in caso di luminosità ridotta.
Il Digipad funziona con una pila 3V, tipo CR 2450.
Conformità
Con la presente, SOMFY dichiara che il dispositivo è
conforme ai requisiti essenziali e alle altre disposizioni
pertinenti stabilite dalla Direttiva 1999/5/CE. Un’apposita
dichiarazione di conformità è stata messa a disposizione
all’indirizzo internet www.somfy.com/ce. Utilizzabile in
EU, CH e NO.
Avvertenze
Informazioni generiche
Leggere sempre la presente guida di installazione e le
istruzioni di sicurezza prima di cominciare l’installazione
di questo automatismo Somfy.
Prima di qualsiasi installazione, verificare la compatibilità
di questo prodotto con le apparecchiature e con gli
accessori installati.
Questa guida descrive l’installazione, la messa in opera e
la modalità di utilizzo del prodotto.
Ogni utilizzo diverso dall’ambito di applicazione definito
da Somfy non è conforme e comporta, così come il
mancato rispetto delle istruzioni riportate nel presente
manuale, l’annullamento della responsabilità e della
garanzia Somfy.
Somfy non può essere ritenuta responsabile dei
cambiamenti di norme e standard intervenuti in seguito
alla pubblicazione della presente guida.
Istruzioni generali di sicurezza
Non permettere ai bambini di giocare con il sistema di
comando.
Condizioni di utilizzo
Non installare mai il prodotto in prossimità di superfici
metalliche.
Controllare il range radio prima di fissare il prodotto. Il
range radio è limitato dalle norme di regolazione degli
apparecchi radio.
L’utilizzo di apparecchi radio (ad esempio cuffie radio
hi-fi) che utilizzano la stessa frequenza può ridurre le
prestazioni del prodotto.
Descrizione
N. Nome Funzione
1
Spia
superiore Informazione sull'emissione
di un comando radio
2inferiore Informazione sullo stato del
Digipad
(lampeggiante = bloccato)
3Pulsanti di comando Comando del motore
(1 pulsante per motore)
4Pulsanti
alfanumerici Inserimento codice
5Antenna
6Pulsante SET Accesso alla modalità di
programmazione
7
Pulsanti
RESET Messa in funzione del
Digipad (per un 1° utilizzo)
Blocco del Digipad
8PROG Memorizzazione di un
motore per tenda o
tapparella
9
ADR
Cambio di protocollo radio
(per un motore anteriore
al 2006)
Reinizializzazione del
Digipad (ritorno alla
configurazione di fabbrica)
1. Mettere in funzione (per un 1° utilizzo)
[fig.A]
Aprire il Digipad usando la chiave fornita.1. Premere il pulsante RESET.2. Verificare che il Digipad sia in funzione premendo3.
un pulsante qualsiasi della tastiera. Se la spia inferiore
si accende, il Digipad è in funzione. Se non si
accende, premere nuovamente il pulsante RESET e
verificare la messa in funzione.
2. Memorizzazione del Digipad
Il Digipad funziona come un emettitore classico (ad
esempio un telecomando), pertanto la guida del motore
può essere utilizzata per memorizzare il Digipad.
2.1. Raccomandazioni
Non toccare l’antenna durante le operazioni di
memorizzazione.
Per memorizzare il Digipad sull’elettronica di un motore
Axovia, appoggiare il Digipad sul bersaglio di memoria
durante l’operazione.
Il Digipad si blocca automaticamente dopo 30 secondi,
pertanto la pressione del pulsante di comando da
memorizzare sull’elettronica del motore deve avvenire
prima della fine di tale intervallo di tempo.
2.2. Memorizzazione del Digipad su un motore
posteriore al 2006 [fig.B]
Eseguire l’operazione descritta a pagina Io II , a seconda
del motore interessato.
In seguito a tale operazione, è necessario un
apprendimento delle corse per i motori Axovia, SGS,
SGA, SLD (inizio dell’apprendimento con le imposte
socchiuse per verificare l’avvio in apertura).
2.3. Caso dei motori Axovia e Axorn anteriori al
2006 [fig.C]
Nel 2006, Somfy ha cambiato il suo protocollo radio per
motori di cancelli e porte di garage.
Il Digipad è compatibile con i protocolli radio anteriori e
posteriori al 2006. Ogni pulsante di comando può essere
configurato singolarmente.
a) Cambiare protocollo radio su un pulsante di
comando del Digipad
Digitare il codice principale (000000 su un Digipad1.
nuovo o reinizializzato) e confermare usando il
pulsante SET.
Premere il pulsante ADR.2. Mentre la spia lampeggia (10 sec.), premere il3.
pulsante di comando desiderato. Il protocollo radio
viene cambiato per questo pulsante di comando del
Digipad.
b) Memorizzazione del Digipad sul motore anteriore
al 2006
Digitare il codice principale (000000 su un Digipad1.
nuovo o reinizializzato) e confermare usando il
pulsante SET.
Farepoiriferimentoalleistruzioni dimemorizzazione2.
dei telecomandi riportate nella guida del motore
Axovia o Axorn anteriore al 2006. Per gli altri motori
anteriori al 2006, consultare i nostri uffici.
Consiglio [fig.D]
Per sapere in quale protocollo radio è un pulsante,
digitare il codice principale e premere il pulsante a lungo
(20 sec.).
Se la spia superiore lampeggia per 10 sec. e poi:
si spegne => il protocollo radio è posteriore•
al 2006,
resta accesa => il protocollo radio è anteriore•
al 2006.
3. Modifica del codice principale [fig.E]
Il codice principale preimpostato su un Digipad nuovo
è 000000.
Per modificare il codice principale:
Digitare il codice principale e confermare usando1.
il pulsante SET.
Premere il pulsante SET fino a quando la spia2.
inferiore si accende (circa 7 sec.). La spia inferiore
resta accesa.
Digitare il codice di vostra scelta e confermare3.
usando il pulsante SET. La spia inferiore si spegne
e poi si riaccende.
Digitare nuovamente tale codice e confermare4.
usando il pulsante SET. La spia inferiore si spegne.
Il codice principale viene registrato.
4. Utilizzo del Digipad
I comandi sono attivi solo se i pulsanti di comando sono
sbloccati.
4.1. Sblocco
Il codice principale permette di sbloccare i 2 pulsanti di
comando per autorizzare il comando di 2 motori.
Un codice secondario permette di sbloccare un solo
pulsante di comando alla volta.
4.2. Blocco
Il Digipad si blocca automaticamente 30 sec. dopo l’ultima
pressione su un pulsante di comando.
4.3. Utilizzo del Digipad
Digitare il codice principale o secondario.1. Premere il pulsante di comando del motore da2.
azionare. La spia superiore lampeggia.
Le pressioni successive su uno stesso pulsante attivano il
seguente funzionamento del motore: Apertura, Arresto,
Chiusura, Arresto, Apertura ...
Per i motori di cancelli o porte di garage dotati di una
funzione di apertura completa o parziale, se programmata,
ogni pulsante di comando permette il funzionamento in
apertura parziale (pressione breve < 1 sec.) o completa
(pressione prolungata > 2 sec.).
5. Fissaggio del Digipad [fig.F]
Prima di fissare il Digipad, verificare il suo corretto
funzionamento dalla posizione di fissaggio prevista.
Incollare la guarnizione in neoprene sul retro1.
del Digipad.
Tenere fermo contro la parete il fondo del Digipad e2.
segnare i punti nei quali sarà eseguita la foratura.
Fissare il fondo del Digipad alla parete.3. Richiudere il Digipad.4.
6. Codici secondari
L’attribuzione di un codice secondario a un pulsante
di comando permette di autorizzare l’accesso ad una
parte soltanto della proprietà (ad esempio, attribuendo
il codice secondario al pulsante di comando del cancello
della proprietà). L’autorizzazione di accesso può essere
temporanea, perché il codice secondario può essere
cancellato in qualsiasi momento dal proprietario.
6.1. Registrazione di un codice secondario [fig.G]
Digitare il codice principale e confermare usando1.
il pulsante SET.
Premere il pulsante SET fino a quando la spia2.
inferiore si accende (circa 7 sec.). La spia inferiore
resta accesa.
Premere il pulsante di comando al quale deve3.
essere attribuito un codice secondario.
Digitare un codice secondario e confermare4.
usando il pulsante SET. La spia inferiore si spegne
e poi si riaccende.
Digitare nuovamente tale codice e confermare5.
usando il pulsante SET. La spia inferiore si spegne.
Per verificare la validità del codice secondario:6. attendere 30 sec. il blocco automatico del•
Digipad (oppure aprire il Digipad e premere il
pulsante RESET),
sbloccare il Digipad usando il codice•
secondario,
premere il pulsante di comando associato a•
tale codice:
se la spia superiore lampeggia, il codice–
secondario è valido,
se la spia inferiore lampeggia, il codice–
secondario non è valido. Ricominciare
la procedura di registrazione di un codice
secondario.
6.2. Cancellazione di un codice secondario
conosciuto [fig.H]
Digitare il codice principale e confermare usando1.
il pulsante SET.
Premere il pulsante SET fino a quando la spia2.
inferiore si accende (circa 7 sec.).
Premere il pulsante di comando al quale è3.
attribuito il codice secondario.
Digitare il codice principale da cancellare.4. Premere il pulsante SET fino a quando la5.
spia inferiore si spegne (circa 10 sec.).
6.3. Cancellazione di tutti i codici secondari [fig.I]
Digitare il codice principale e confermare usando1.
il pulsante SET.
Premere il pulsante SET fino a quando la spia2.
inferiore si accende (circa 7 sec.).
Premere il pulsante SET fino a quando la spia3.
inferiore si spegne (circa 10 sec.).
7. Manutenzione
7.1. Nessun movimento
La spia superiore resta spenta => pila scarica: sostituirla
[fig. J]
La spia superiore lampeggia alla pressione => cambiare il
protocollo radio sul pulsante di comando. [fig. C]
7.2. Codice principale dimenticato e
reinizializzazione completa [fig. K]
Il Digipad deve essere reinizializzato: cancellazione delle
memorizzazioni, ripristino dei codici e del protocollo radio
secondo la configurazione di fabbrica.
Per reinizializzare il Digipad:
Aprire il Digipad usando la chiave fornita.1. Premere il pulsante ADR (circa 10 sec.). La2.
spia superiore si accende durante la pressione, poi
le 2 spie lampeggiano 7 volte. Il Digipad è stato
reinizializzato.
Richiudere il Digipad.3. Ricominciare l’installazione completa:4.
memorizzazioni, modifica del codice principale, ecc.
7.3. Errori di inserimento di codice
7.3.1. Inizio di inserimento codice scorretto
Proseguire inserendo il codice corretto e confermare
usando il pulsante SET, oppure premere un pulsante di
comando. Solo le ultime cifre digitate saranno prese in
considerazione.
7.3.2. Inserimenti successivi di codici errati
La spia inferiore lampeggia rapidamente alla pressione di
un pulsante qualsiasi.
5 codici errati diversi sono stati inseriti in successione. Per
sicurezza, il Digipad viene bloccato per 5 min.
Attendere 5 min.
EL
Αρχές λειτουργίας
Το ασύρματο ραδιο-χειριστήριο Digipad είναι
ένα επίτοιχο ασύρματο χειριστήριο με κωδικό
πρόσβασης.
Το Digipad προσφέρει τη δυνατότητα ελέγχου 2
ξεχωριστών μοτέρ με τη χρήση 2 πλήκτρων ελέγχου.
Είναι συμβατό με όλα τα μοτέρ, ακόμη και με τα μοτέρ
που είναι προγενέστερα του 2006 (βλ. παράγραφο
2.2.).
Υπάρχουν κωδικοί χρηστών που περιορίζουν
τη χρήση των πλήκτρων ελέγχου μόνο για τα
εξουσιοδοτημένα άτομα:
1 πρωτεύων κωδικός που ισχύει για τα 2 •
πλήκτρα ελέγχου,
2 δευτερεύοντες κωδικοί ανά πλήκτρο •
ελέγχου για μερική και στιγμιαία πρόσβαση
στο κτίριο (η αποθήκευση των δευτερευόντων
κωδικών είναι προαιρετική).
Οι κωδικοί χρηστών 4, 5 ή 6 χαρακτήρων, κατ’
επιλογή, αποτελούνται από τα ψηφία 0 έως 9 και
το A.
Το Digipad διαθέτει μια λειτουργία οπισθοφωτισμού
των πλήκτρων, σε περίπτωση ασθενούς φωτός.
Το Digipad λειτουργεί με μια μπαταρία 3V, τύπου
CR 2450.
Συμμόρφωση
Με τον παρόν έγγραφο, η Somfy δηλώνει ότι η
συσκευή συμμορφώνεται με τις ουσιώδεις απαιτήσεις
και τις λοιπές διατάξεις της οδηγίας 1999/5/ΕΕ. Μια
δήλωση συμμόρφωσης διατίθεται στην ιστοσελίδα
www.somfy.com/ce. Μπορεί να χρησιμοποιηθεί στην
ΕΕ, την Ελβετία και τη Νορβηγία.
Ασφάλεια
Γενικές Πληροφορίες
Διαβάζετε πάντοτε αυτό τον οδηγό εγκατάστασης
και τις οδηγίες ασφαλείας πριν ξεκινήσετε την
εγκατάσταση αυτού του προϊόντος Somfy.
Πριν από οποιαδήποτε εγκατάσταση, ελέγξτε τη
συμβατότητα αυτού του προϊόντος με τους σχετικούς
εξοπλισμούς και εξαρτήματα.
Το παρόν έγγραφο περιγράφει την εγκατάσταση,
τη λειτουργία και τον τρόπο χρήσης αυτού του
προϊόντος.
Οποιαδήποτε άλλη χρήση πέραν του τομέα
εφαρμογής που έχει ορίσει η Somfy είναι ακατάλληλη.
Σε περίπτωση άλλης χρήσης, συνεπάγεται ότι δεν
τηρήθηκαν οι οδηγίες που περιγράφονται στο παρόν
έγγραφο, και επιφέρει τον αποκλεισμό οποιασδήποτε
ευθύνης και εγγύησης από τη μεριά της Somfy.
Η Somfy δεν θα θεωρηθεί υπεύθυνη για oποιαδήποτε
αλλαγή των νόμων και κανονισμών που θα
πρωτοπαρουσιασθούν μετά από την έκδοση αυτού
του εντύπου.
Γενικές οδηγίες ασφαλείας
Μην επιτρέπετε σε παιδιά να παίζουν με το σύστημα
ελέγχου.
Συνθήκες χρήσης
Μην εγκαθιστάτε ποτέ το προϊόν κοντά σε μεταλλικές
επιφάνειες.
Ελέγξτε την εμβέλεια πριν στερεώσετε το προϊόν.
Η εμβέλεια περιορίζεται από τους κανονισμούς που
διέπουν τις ασύρματες ράδιο-συσκευές.
Η χρήση άλλης ράδιο-συσκευής (για παράδειγμα
ασύρματα ακουστικά hi-fi) που χρησιμοποιεί την
ίδια συχνότητα μπορεί να μειώσει τις επιδόσεις του
προϊόντος.
Περιγραφή
Αρ. Ονομασία Λειτουργία
1
Ενδεικτικό
επάνω Πληροφορία εκπομπής
ασύρματης εντολής
2κάτω Πληροφορία κατάστασης
του Digipad
(αναβοσβήνει = κλειδωμένο)
3Πλήκτρα ελέγχου Έλεγχος μοτέρ (1
πλήκτρο ανά μοτέρ)
4Αλφαριθμητικά
πλήκτρα Καταχώρηση κωδικού
5Κεραία
6Πλήκτρο SET Πρόσβαση στη λειτουργία
προγραμματισμού
7
Πλήκτρα
RESET Ενεργοποίηση του
Digipad (για 1η χρήση)
Κλείδωμα του Digipad
8PROG Απομνημόνευση ενός
μοτέρ ανά στόρι ή ρολό
9
ADR
Αλλαγή πρωτοκόλλου
ραδιοεπικοινωνιών (για
μοτέρ προγενέστερο του
2006)
Επαναρχικοποίηση του
Digipad (επαναφορά
εργοστασιακών
ρυθμίσεων)
1. Ενεργοποίηση (για 1η χρήση) [εικ.A]
Ανοίξτε το Digipad με το κλειδί που παρέχεται.1.
Πιέστε το πλήκτρο RESET.2.
Βεβαιωθείτε ότι το Digipad είναι 3.
ενεργοποιημένο, πιέζοντας ένα πλήκτρο του
πληκτρολογίου. Εάν το κάτω ενδεικτικό ανάβει,
το Digipad έχει ενεργοποιηθεί. Εάν δεν ανάβει,
πιέστε ξανά το πλήκτρο RESET και βεβαιωθείτε
ότι ενεργοποιήθηκε.
2. Απομνημόνευση του Digipad
Το Digipad λειτουργεί ως κλασικός πομπός (για
παράδειγμα ένα τηλεχειριστήριο), συνεπώς μπορεί
να χρησιμοποιηθεί ο οδηγός χρήσης του μοτέρ για
την απομνημόνευση του Digipad.
2.1. Συστάσεις
Μην αγγίζετε την κεραία ενώ λαμβάνουν χώρα οι
διαδικασίες απομνημόνευσης.
Για να απομνημονεύσετε το Digipad στη μνήμη ενός
μοτέρ Axovia, τοποθετήστε το Digipad στο δέκτη κατά
τη διαδικασία.
Επειδή το Digipad κλειδώνει αυτόματα μετά από
30 δευτ., το πάτημα του πλήκτρου ελέγχου προς
απομνημόνευση στη μνήμη του μοτέρ πρέπει να
πραγματοποιηθεί προτού παρέλθει αυτό το χρονικό
διάστημα.
2.2. Απομνημόνευση του Digipad σε μοτέρ
μεταγενέστερου του 2006 [εικ.B]
Εφαρμόστε τη διαδικασία που περιγράφεται στη
σελίδα I ή II ανάλογα με το μοτέρ που έχετε στη
διάθεσή σας.
Μετά από αυτή τη διαδικασία, είναι απαραίτητο να
πραγματοποιηθεί εκμάθηση των διαδρομών για τα
μοτέρ Axovia, SGS, SGA, SLD (έναρξη της εκμάθησης
με τα φύλλα μισάνοιχτα για να ελεγχθεί η εκκίνηση
ανοίγματος).
2.3. Περίπτωση των μοτέρ Axovia και Axorn
προγενέστερων του 2006 [εικ.C]
Το 2006, η Somfy άλλαξε το πρωτόκολλο
ραδιοεπικοινωνιών που χρησιμοποιεί στα μοτέρ για
αυλόπορτες και γκαραζόπορτες.
Το Digipad είναι συμβατό με τα πρωτόκολλα
ραδιοεπικοινωνιών πριν και μετά το 2006. Κάθε
πλήκτρο ελέγχου μπορεί να ρυθμιστεί ξεχωριστά.
α) Αλλαγή πρωτοκόλλου ραδιοεπικοινωνιών σε
ένα πλήκτρο ελέγχου του Digipad
Πληκτρολογήστε τον πρωτεύοντα κωδικό 1.
(000000 σε καινούργιο ή επαναρχικοποιημένο
Digipad) και επικυρώστε με το πλήκτρο SET.
Πιέστε το πλήκτρο ADR.2.
Ενώ το ενδεικτικό αναβοσβήνει (10 δευτ.), 3.
πιέστε το πλήκτρο ελέγχου που θέλετε. Το
πρωτόκολλο ραδιοεπικοινωνιών αυτού του
πλήκτρου ελέγχου του Digipad έχει αλλάξει.
β) Απομνημονεύστε το Digipad στο μοτέρ που
είναι προγενέστερο του 2006
Πληκτρολογήστε τον πρωτεύοντα κωδικό 1.
(000000 σε καινούργιο ή επαναρχικοποιημένο
Digipad) και επικυρώστε με το πλήκτρο SET.
Ανατρέξτε στη συνέχεια στις οδηγίες 2.
απομνημόνευσης τηλεχειριστηρίων του οδηγού
του μοτέρ Axovia ή Axorn που είναι προγενέστερο
του 2006. Για άλλα μοτέρ προγενέστερα του 2006,
συμβουλευθείτε την εταιρεία μας.
Κόλπο [εικ.D]
Για να μάθετε το πρωτόκολλο ραδιοεπικοινωνιών ενός
πλήκτρου, πληκτρολογήστε τον πρωτεύοντα κωδικό
και πιέστε παρατεταμένα (20 δευτ.) το πλήκτρο.
Εάν το επάνω ενδεικτικό αναβοσβήνει για 10 δευτ.
και μετά:
σβήνει => το πρωτόκολλο ραδιοεπικοινωνιών •
είναι μεταγενέστερο του 2006,
παραμένει αναμμένο => το πρωτόκολλο •
ραδιοεπικοινωνιών είναι προγενέστερο του
2006.
3. Αλλαγή του πρωτεύοντα κωδικού
[εικ.E]
Από προεπιλογή, ο πρωτεύων κωδικός είναι 000000
σε καινούργιο Digipad.
Για να αλλάξετε τον πρωτεύοντα κωδικό:
Πληκτρολογήστε τον πρωτεύοντα κωδικό και 1.
επικυρώστε με το πλήκτρο SET.
Πιέστε το πλήκτρο SET έως ότου το κάτω 2.
ενδεικτικό ανάψει (περίπου 7 δευτ.). Το κάτω
ενδεικτικό παραμένει αναμμένο.
Πληκτρολογήστε τον κωδικό της επιλογής σας 3.
και επικυρώστε με το πλήκτρο SET. Το κάτω
ενδεικτικό σβήνει και μετά ανάβει ξανά.
Πληκτρολογήστε ξανά αυτόν τον κωδικό 4.
και επικυρώστε με το πλήκτρο SET. Το κάτω
ενδεικτικό σβήνει.
Ο πρωτεύων κωδικός έχει καταχωρηθεί.
4. Χρήση του Digipad
Οι εντολές ενεργοποιούνται μόνο εάν τα πλήκτρα
ελέγχου είναι ξεκλειδωμένα.
4.1. Ξεκλείδωμα
Ο πρωτεύων κωδικός επιτρέπει το ξεκλείδωμα των 2
πλήκτρων ελέγχου, ώστε να είναι δυνατός ο έλεγχος
των 2 μοτέρ.
Ένας δευτερεύων κωδικός δίνει τη δυνατότητα
ξεκλειδώματος ενός μόνο πλήκτρου ελέγχου κάθε
φορά.
4.2. Κλείδωμα
Το Digipad κλειδώνει αυτόματα 30 δευτ. μετά από το
τελευταίο πάτημα ενός πλήκτρου ελέγχου.
4.3. Χρήση του Digipad
Πληκτρολογήστε τον πρωτεύοντα ή το 1.
δευτερεύοντα κωδικό.
Πιέστε το πλήκτρο ελέγχου του μοτέρ που 2.
θέλετε να ενεργοποιήσετε. Το επάνω ενδεικτικό
αναβοσβήνει.
Με διαδοχικά πατήματα ενός ίδιου πλήκτρου ελέγχου,
το μοτέρ περνάει διαδοχικά από τις ακόλουθες
λειτουργίες: Άνοιγμα, Διακοπή, Κλείσιμο, Διακοπή,
Άνοιγμα ...
Για τα μοτέρ αυλόπορτας ή γκαραζόπορτας που
διαθέτουν λειτουργία ολικού ή μερικού ανοίγματος,
εφόσον έχει προγραμματιστεί, κάθε πλήκτρο ελέγχου
δίνει τη δυνατότητα λειτουργίας σε άνοιγμα μερικό
(στιγμιαίο πάτημα < 1 δευτ.) ή ολικό (παρατεταμένο
πάτημα > 2 δευτ.).
5. Στερέωση του Digipad [εικ.F]
Πριν στερεώσετε το Digipad, βεβαιωθείτε ότι
λειτουργεί σωστά από τη θέση που θέλετε να το
στερεώσετε.
Κολλήστε την τσιμούχα νεοπρενίου στο πίσω 1.
μέρος του Digipad.
Κρατήστε το πίσω μέρος του Digipad πάνω 2.
στον τοίχο και σημαδέψτε τις τρύπες που πρέπει
να ανοιχτούν.
Στερεώστε το πίσω μέρος του Digipad στον 3.
τοίχο.
Ξανακλείστε το Digipad.4.
6. Δευτερεύοντες κωδικοί
Η αντιστοίχιση ενός δευτερεύοντα κωδικού σε ένα
πλήκτρο ελέγχου δίνει τη δυνατότητα έγκρισης
πρόσβασης σε ένα μέρος μόνο του κτιρίου (για
παράδειγμα, αντιστοιχίζοντας το δευτερεύοντα κωδικό
στο πλήκτρο ελέγχου της αυλόπορτας του κτιρίου). Η
έγκριση πρόσβασης μπορεί να είναι προσωρινή, ο
δευτερεύων κωδικός μπορεί να διαγραφεί ανά πάσα
στιγμή από τον ιδιοκτήτη.
6.1. Καταχώρηση δευτερεύοντα κωδικού
[εικ.G]
Πληκτρολογήστε τον πρωτεύοντα κωδικό και 1.
επικυρώστε με το πλήκτρο SET.
Πιέστε το πλήκτρο SET έως ότου το κάτω 2.
ενδεικτικό ανάψει (περίπου 7 δευτ.). Το κάτω
ενδεικτικό παραμένει αναμμένο.
Πιέστε το πλήκτρο ελέγχου στο οποίο πρέπει 3.
να αντιστοιχιστεί δευτερεύων κωδικός.
Πληκτρολογήστε ένα δευτερεύοντα κωδικό 4.
και επικυρώστε με το πλήκτρο SET. Το κάτω
ενδεικτικό σβήνει και μετά ανάβει ξανά.
Πληκτρολογήστε ξανά αυτόν τον κωδικό 5.
και επικυρώστε με το πλήκτρο SET. Το κάτω
ενδεικτικό σβήνει.
Για να επαληθεύσετε την εγκυρότητα του 6.
δευτερεύοντα κωδικού:
περιμένετε 30 δευτ. έως ότου το Digipad •
κλειδώσει αυτόματα (ή ανοίξτε το Digipad και
πιέστε το πλήκτρο RESET),
ξεκλειδώστε το Digipad με το δευτερεύοντα •
κωδικό,
πιέστε το πλήκτρο ελέγχου, στο οποίο έχει •
αντιστοιχιστεί αυτός ο κωδικός:
εάν αναβοσβήνει το επάνω ενδεικτικό, ο –
δευτερεύων κωδικός είναι έγκυρος,
εάν αναβοσβήνει το κάτω ενδεικτικό, ο –
δευτερεύων κωδικός δεν είναι έγκυρος
Επαναλάβετε τη διαδικασία καταχώρησης
δευτερεύοντα κωδικού από την αρχή.
6.2. Διαγραφή ενός γνωστού δευτερεύοντα
κωδικού [εικ.H]
Πληκτρολογήστε τον πρωτεύοντα κωδικό και 1.
επικυρώστε με το πλήκτρο SET.
Πιέστε το πλήκτρο SET έως ότου το κάτω 2.
ενδεικτικό ανάψει (περίπου 7 δευτ.).
Πιέστε το πλήκτρο ελέγχου στο οποίο έχει 3.
αντιστοιχιστεί ο δευτερεύων κωδικός.
Πληκτρολογήστε το δευτερεύοντα κωδικό που 4.
θέλετε να διαγράψετε.
Πιέστε το πλήκτρο SET έως ότου το κάτω 5.
ενδεικτικό σβήσει (περίπου 10 δευτ.).
6.3. Διαγραφή όλων των δευτερευόντων
κωδικών [εικ.I]
Πληκτρολογήστε τον πρωτεύοντα κωδικό και 1.
επικυρώστε με το πλήκτρο SET.
Πιέστε το πλήκτρο SET έως ότου το κάτω 2.
ενδεικτικό ανάψει (περίπου 7 δευτ.).
Πιέστε το πλήκτρο SET έως ότου το κάτω 3.
ενδεικτικό σβήσει (περίπου 10 δευτ.).
7. Επισκευή βλαβών
7.1. Καμία μετακίνηση
Το επάνω ενδεικτικό παραμένει σβηστό =>
αποφορτισμένη μπαταρία: αντικαταστήστε την.
[εικ. J]
Το επάνω ενδεικτικό αναβοσβήνει κατά το πάτημα
=> αλλάξτε το πρωτόκολλο ραδιοεπικοινωνιών στο
πλήκτρο ελέγχου. [εικ. C]
7.2. Ξεχάσατε τον πρωτεύοντα κωδικό και
έχει ολοκληρωθεί η επαναρχικοποίηση
[εικ. K]
Πρέπει να πραγματοποιηθεί επαναρχικοποίηση
του Digipad: διαγραφή των απομνημονευμένων
ρυθμίσεων, επαναφορά των κωδικών και του
πρωτοκόλλου ραδιοεπικοινωνιών στις εργοστασιακές
ρυθμίσεις.
Για να επαναρχικοποιήσετε το Digipad:
Ανοίξτε το Digipad με το κλειδί που παρέχεται.1.
Πιέστε το πλήκτρο ADR (περίπου 10 δευτ.). 2.
Το επάνω ενδεικτικό ανάβει κατά το πάτημα
και μετά και τα 2 ενδεικτικά αναβοσβήνουν 7
φορές. Η επαναρχικοποίηση του Digipad έχει
ολοκληρωθεί.
Ξανακλείστε το Digipad.3.
Επαναλάβετε ολόκληρη την εγκατάσταση από 4.
την αρχή: απομνημονεύσεις, αλλαγή πρωτεύοντα
κωδικού κ.λπ.
7.3. Σφάλματα καταχώρησης κωδικού
7.3.1. Έναρξη καταχώρησης κωδικού εσφαλμένη
Συνεχίστε καταχωρώντας το σωστό κωδικό και
επικυρώστε με το πλήκτρο SET ή πιέστε ένα πλήκτρο
ελέγχου. Θα ληφθούν υπόψη μόνο τα τελευταία
ψηφία που πληκτρολογήθηκαν.
7.3.2. Πολλές εσφαλμένες καταχωρήσεις
κωδικών
Το κάτω ενδεικτικό αναβοσβήνει γρήγορα με το
πάτημα οποιουδήποτε πλήκτρου.
Καταχωρήθηκαν διαδοχικά 5 διαφορετικοί εσφαλμένοι
κωδικοί. Για λόγους ασφαλείας, το Digipad κλειδώνει
για 5 λεπτά.
Περιμένετε 5 λεπτά.
PROG ADR RESET
1
23
45
6
7
89
PROG ADR RESET
1
23
45
6
7
89
O Digipad bloqueia-se automaticamente ao fim
de 30 s, por conseguinte o botão de comando
a memorizar na electrónica do motor deve ser
carregado antes do fim deste intervalo.
2.2. Memorizar o Digipad num motor
posterior a 2006 [fig.B]
Realizar a operação descrita na página Iou II em
função do motor em causa.
Após esta operação, é necessário efectuar
uma inicialização dos cursos para os motores
Axovia, SGS, SGA, SLD (começo da inicialização
batentes entreabertos para verificar o arranque
em abertura).
2.3. Caso dos motores Axovia e Axorn
anteriores a 2006 [fig.C]
Em 2006, a Somfy mudou o seu protocolo rádio
para motores de cancelas de jardim e portas de
garagem.
O Digipad é compatível com os protocolos rádio
anteriores e posteriores a 2006. Cada botão de
comando pode ser configurado individualmente.
a) Mudar o protocolo rádio num botão de
comando do Digipad
Introduzir o código principal (000000 num1.
Digipad novo ou reinicializado) e validar com
o botão SET.
Carregar no botão ADR.2. Enquanto o testemunho estiver a piscar (103.
s), carregar no botão de comando pretendido. O
protocolo rádio é modificado para este botão de
comando do Digipad.
b) Memorizar o Digipad no motor anterior a 2006
Introduzir o código principal (000000 num1.
Digipad novo ou reinicializado) e validar com
o botão SET.
De seguida, consultar as instruções de2.
memorização de comandos à distância do guia
do motor Axovia ou Axorn anterior a 2006.
Para os outros motores anteriores a 2006,
consulte-nos.
Dicas [fig.D]
Para saber em que protocolo rádio está um
botão, introduzir o código principal e carregar
prolongadamente (20 s) no botão.
Se o testemunho superior piscar 10 s e, depois:
se apagar => o protocolo rádio é posterior•
a 2006,
continuar aceso => o protocolo rádio é•
anterior a 2006.
3. Modificar o código principal [fig.E]
Por defeito, o código principal é 000000 num
Digipad novo.
Para modificar o código principal:
Introduzir o código principal e validar com1.
o botão SET.
Carregar no botão SET até que o testemunho2.
inferior se acenda (aproximadamente 7 s). O
testemunho inferior continua aceso.
Introduziro códigoàsua escolhaevalidar com3.
o botão SET. De seguida, o testemunho inferior
apaga-se e depois acende-se novamente.
Introduzir novamente o código e validar com4.
o botão SET. O testemunho inferior apaga-se.
O código principal é memorizado.5.
4. Utilizar o Digipad
Os comandos só estão activos se os botões de
comando estiverem desbloqueados.
4.1. Desbloqueamento
O código principal permite desbloquear os 2
botões de comando para autorizar o comando de
2 motores.
Um código secundário permite desbloquear um só
botão de comando de cada vez.
4.2. Bloqueamento
O Digipad bloqueia-se automaticamente 30 s após a
última pressão num botão de comando.
4.3. Utilizar o Digipad
Introduzir o código principal ou secundário.1. Carregar no botão de comando do motor2.
a accionar: O testemunho superior começa
a piscar.
As pressões sucessivas num mesmo botão de
comando desencadeiam o seguinte funcionamento
do motor: Abertura, Paragem, Fecho, Paragem,
Abertura...
Para os motores de cancelas de jardim ou de
portas de garagem equipados com uma função de
abertura total ou parcial, se estiver programada,
cada botão de comando permite o funcionamento
em abertura parcial (pressão breve < 1 s) ou total
(pressão prolongada > 2 s).
5. Fixar o Digipad [fig.F]
Antes de fixar o Digipad, verificar o seu
funcionamento e, em seguida, o alojamento de
fixação previsto.
Colar a junta de neopreno à entrada do1.
Digipad.
Manter a base do Digipad encostada à2.
parede e marcar os orifícios de furação.
Fixar a base do Digipad na parede.3. Voltar a fechar o Digipad.4.
6. Códigos secundários
A atribuição de um código secundário a um botão
de comando permite a autorização do acesso só a
uma parte da propriedade (por exemplo atribuindo
o código secundário ao botão de comando da
cancela de jardim da propriedade). Aautorização de
acesso pode ser temporária, podendo ser o código
secundário apagado a qualquer momento pelo
proprietário.
6.1. Memorizar um código secundário [fig.G]
Introduzir o código principal e validar com1.
o botão SET.
Carregar no botão SET até que o testemunho2.
inferior se acenda (aproximadamente 7 s).
O testemunho inferior continua aceso.
Carregar no botão de comando ao qual deve3.
ser atribuído um código secundário.
Introduzir um código secundário e validar com4.
o botão SET. De seguida, o testemunho inferior
apaga-se e depois acende-se novamente.
Introduzir novamente o código e validar com5.
o botão SET. O testemunho inferior apaga-se.
Para verificar a validade do código6.
secundário:
aguardar 30 s pelo bloqueamento•
automático do Digipad (ou abrir o Digipad e
carregar no botão RESET),
desbloquear o Digipad com o código•
secundário,
carregar no botão de comando associado•
a este código:
se o testemunho superior começar a–
piscar, o código secundário é válido,
se o testemunho inferior começar a–
piscar, o código secundário não é válido,
Repetir o procedimento de memorização
de um código secundário.
6.2. Apagar um código secundário conhecido
[fig.H]
Introduzir o código principal e validar com1.
o botão SET.
Carregar no botão SET até que o testemunho2.
inferior se acenda (aproximadamente 7 s).
Carregar no botão de comando ao qual é3.
atribuído um código secundário.
Introduzir o código secundário a apagar.4. Carregar no botão SET até que o testemunho5.
inferior se apague (aproximadamente 10 s).
6.3. Apagar todos os códigos secundários
[fig.I]
Introduzir o código principal e validar com1.
o botão SET.
Carregar no botão SET até que o testemunho2.
inferior se acenda (aproximadamente 7 s).
Carregar no botão SET até que o testemunho3.
inferior se apague (aproximadamente 10 s).
7. Desempanagens
7.1. Nenhum movimento
O testemunho superior continua apagado => pilha
gasta: substitui-la. [fig. J]
O testemunho superior pisca aquando da pressão
=> mudar o protocolo rádio no botão de comando.
[fig. C]
7.2. Código principal esquecido e
reinicialização completa [fig. K]
O Digipad deve ser reinicializado: apagamento das
memorizações, retorno dos códigos e do protocolo
rádio à configuração de fábrica.
Para reinicializar o Digipad:
Abrir o Digipad com a chave fornecida.1. Carregar no botão ADR (aproximadamente2.
10 s). O testemunho superior acende-se durante
a pressão e, depois, os 2 avisadores piscam
7 vezes. O Digipad é reinicializado.
Voltar a fechar o Digipad.3. Recomeçar a instalação completa:4.
memorizações, mudança de código principal, etc.
7.3. Erros de introdução de código
7.3.1. Início de introdução de código incorrecto
Prosseguir introduzindo o código correcto e validar
com o botão SET ou carregar num botão de
comando. Só os últimos algarismos introduzidos
serão tidos em conta.
7.3.2. Várias introduções de códigos incorrectas
O testemunho inferior pisca rapidamente quando se
pressiona os botões.
5 códigos incorrectos diferentes foram introduzidos
sucessivamente. Por defeito, o Digipad é bloqueado
durante 5 min.
Aguarde 5 min.

- I -
Copyright © 2008 Somfy SAS. All rights reserved.
...
<1s
>1s
...2mn
FR
LÉGENDE
EN
KEY
DE
LEGENDE
NL
VERKLARING
ES
LEYENDA
PT
LEGENDA
EL
ΛΕΖΑΝΤΑ
IT
LEGENDA
Code principal Main code Hauptcode Hoofdcode Código principal Código principal Πρωτεύων κωδικός Codice principale
Code secondaire Secondary code Sekundärcode Secondaire code Código secundario Código secundário Δευτερεύων κωδικός Codice secondario
Voyant/lampe : éteint Light/lamp: off Kontrollleuchte/LED: aus Lampje: uit Indicador/lámpara: apagado Testemunho/lâmpada: apagado Ενδεικτικό/λυχνία: σβηστό(-ή) Spia/lampadina: spenta
Voyant/lampe : allumé Light/lamp: on Kontrollleuchte/LED: an Lampje: brandt Indicador/lámpara: encendido Testemunho/lâmpada: aceso Ενδεικτικό/λυχνία: αναμμένο(-η) Spia/lampadina: accesa
Voyant/lampe : clignotant Light/lamp: flashing Kontrollleuchte/LED: blinkt Lampje: knippert Indicador/lámpara: parpadea Testemunho/lâmpada: intermitente Ενδεικτικό/λυχνία: αναβοσβήνει Spia/lampadina: lampeggiante
Voyant/lampe : clignotant lentement Light/lamp: flashing slowly Kontrollleuchte/LED: blinkt langsam Lampje: knippert langzaam Indicador/lámpara: parpadeo lento Testemunho/lâmpada: pisca lentamente Ενδεικτικό/λυχνία: αναβοσβήνει αργά Spia/lampadina: lampeggiamento lento
Appui court Short press Kurzes Drücken Korte druk Pulsación breve Pressão breve Στιγμιαίο πάτημα Pressione breve
Appui long Long press Langes Drücken Lange druk Pulsación sostenida Pressão prolongada Παρατεταμένο πάτημα Pressione prolungata
Appui jusqu’à Press until Drücken bis Drukken tot Pulsación hasta Pressão até à Πάτημα μέχρι Pressione fino a
Ouverture totale du portail Gate fully open Vollöffnung des Tores Geheel openen van het hek Apertura total del pórtico Abertura total da cancela de jardim Πλήρες άνοιγμα της αυλόπορτας Apertura completa del cancello
Ouverture partielle du portail Gate partially open Teilöffnung desTores Gedeeltelijk openen van het hek Apertura parcial del pórtico Abertura parcial da cancela de jardim Μερικό άνοιγμα της αυλόπορτας Apertura parziale del cancello
À faire dans les deux minutes Carry out within the next two minutes Innerhalb von zwei Minuten vorzunehmen Binnen twee minuten te doen Debe realizarse en menos de dos minutos A realizar em dois minutos Να πραγματοποιηθεί εντός δύο λεπτών Da effettuare entro due minuti
3
2
+
2 s
1
Elixo, Ixengo
B
PROG ADR RESET
>1s
123
A
F0
c
1
-.-
00
01
1s
1236
5
4
+
Ax24NS, Ax230NS
B
3 s
2
3
5s
X1
X1X2
3 s
...
1
3 s
12
3
4
2
+
3
+
Axorn 50NS, 70NS, 90NS
GDK 3000, GDK 4000
B
1
2
34
>1s
>1s
... ...
>1s
>1s
... .........10s
... ...
+
2
23
1
+
1
+
Axovia 160NS, 170NS, SGS
Axovia 220NS, 300NS, SGA
Axovia 400NS, SLD
B
Table of contents
Other SOMFY Keypad manuals

SOMFY
SOMFY DECOFLEX DIGITAL WALL SWITCH SDN User manual

SOMFY
SOMFY KEYPAD 2 io Original operating instructions

SOMFY
SOMFY VSYSTEMPRO User manual

SOMFY
SOMFY DecoFlex WireFree Surface 1871025 User manual

SOMFY
SOMFY 2 RTS Original operating instructions

SOMFY
SOMFY KEYPAD METAL io User manual

SOMFY
SOMFY FUNKCODETASTER RTS User manual

SOMFY
SOMFY 2 RTS Original operating instructions

SOMFY
SOMFY CODETASTER 5014046 User manual

SOMFY
SOMFY DecoFlex WireFree 1870908 User manual


