manuals.online logo
Brands
  1. Home
  2. •
  3. Brands
  4. •
  5. SOMFY
  6. •
  7. Remote Control
  8. •
  9. SOMFY Harmoic Design System II User manual

SOMFY Harmoic Design System II User manual

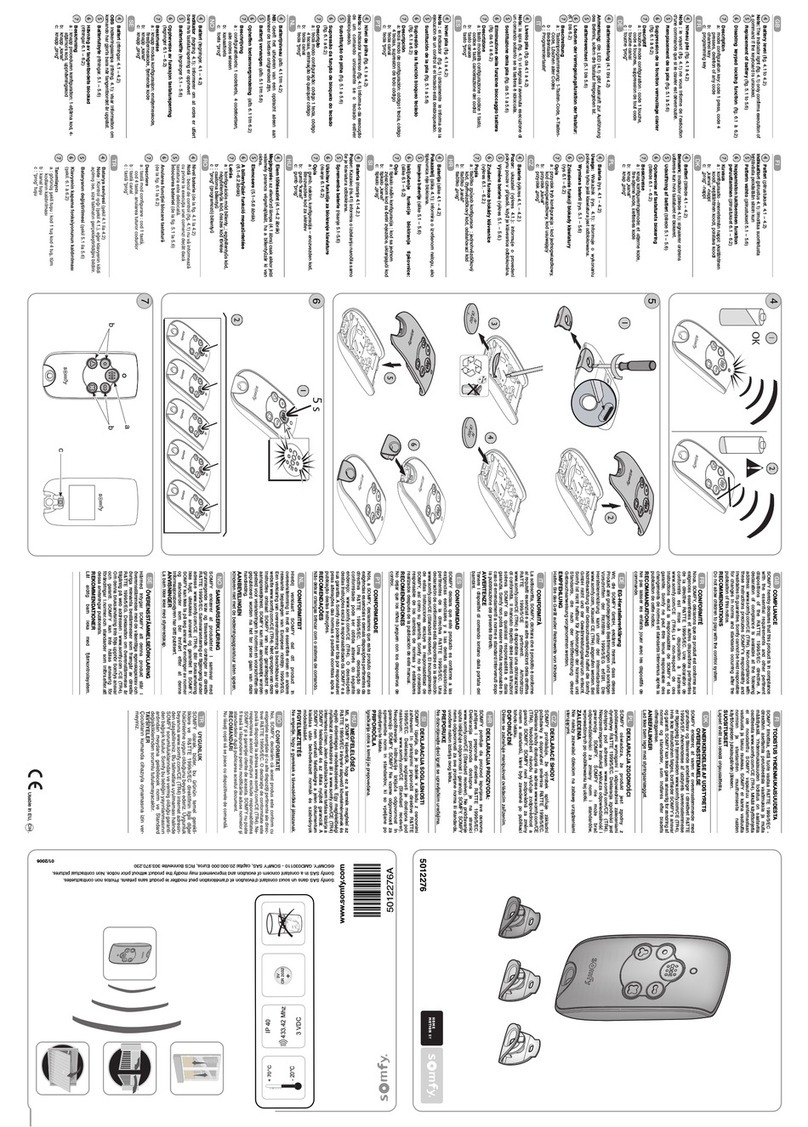
Programming & Operation Instructions
System II - IR Remote Control
Before You Begin
1. Install window shading complete with HDI motorization into window frame following manufacturers instructions.
2. Install desired battery pack or optional wand as directed. You will notice the green LED flashing.
3. The “memory” is stored in the motor allowing for 1 remote control to program multiple shades.
4. Once programming is complete, should power be removed, the shade will do a long jog once power has been restored and a
command received.
Step 1
Remove “pull tab” from back of
remote control.
Step 2
Using a small paperclip depress the
“MODE BUTTON” located on the
back of the remote control.
The red indicator light on the front of
the remote control should start
flashing in a single-flash pattern.
Step 4 - Set Upper Limit
Hold down the “MIDDLE” button till you see a
double-flashing pattern on the indicator light.
1. Press and hold the “UP” button until shade
reaches desired upper limit.
2. Press and hold the “MIDDLE” button till you
receive a “jog” confirming the upper limit.
Step 5 - Set Lower Limit
1. Press and hold the “BOTTOM” button until
shade reaches desired lower limit.
2. Press and hold the “MIDDLE” button till you
receive a long “jog” confirming the
lower limit.
Step 6 - Set Intermediate Position (IP)
(optional)
(If you choose to do this step later, see Step 9)
1. Press and hold the “UP” button until shade
reaches desired “preferred” position.
2. Press and hold the “OUTER LEFT and/or
RIGHT” button(s) till you receive a “jog”
confirminig the IP.
Step 7 - Exit Installation
Using a small paperclip depress the “MODE BUTTON”
located on the back of the remote control. The red
indicator light on the front of the remote control should stop
flashing. Programming complete!
Continued on reverse
Step 8 - Resetting The Motor
1. At the same time, depress the “MODE” button on the back of
the remote control as well as the “MIDDLE” button on
the front of the remote control and hold for 7+ seconds,
aiming the remote at the motor.
2. The green indicator light on the motor should flash rapidly to
confirm the reset to factory mode.
3. Using the small paperclip depress the
“MODE BUTTON” located on the back of the remote
control. The red indicator light on the front of the remote
control should stop flashing. Begin again at Step 2.
Step 3 - Check/Set Polarity
Aim the remote control at the motor and press the “DOWN” button once and the shade should
“jog” down then up.*
- If it “jogs” up then down, hold down the “UP” button and it will jog down then up.
* If the unit does not respond to check polarity and green LED blinks three (3) times,
reset the motor (Step 8)
www.HarmonicDesignInc.com
DGLYLVLRQRI
Operation Of Remote Control
There are 5 preset limits already programmed into the System II motor once the upper and lower
limits have been set. As well there is the “preferred position” allowing for up to 6 programmed limits.
Point the remote control at the motor and select desired limit based on the guide below:
Continued from front Programming & Operation Instructions ~ System II IR Remote Control
HSYS-7029 © Harmonic Design, Inc. 3/2005
Set to desired
position.
Step 9 - Setting Intermediate Position (IP)
(optional)
1. Using a small paperclip depress the “MODE BUTTON” located on the back of the remote control. The red
indicator light on the front of the remote control should start flashing in a single-flash pattern.
2. Hold down the “MIDDLE” button on the front of the remote control till you get a double-flash pattern.
3. Using the “UP” or “DOWN” buttons, set your shade to the desired position.
4. Press and hold the “OUTER LEFT and/or RIGHT” button(s) till you receive a “jog” confirming the IP.
5. Using a small paperclip depress the “MODE BUTTON” located on the back of the remote control. The red
indicator light on the front of the remote control should stop flashing. Programming complete!
Upper Limit 1/4 Limit Middle Limit
3/4 Limit Lower Limit Preferred Position
-
use the OUTER LEFT, RIGHT or
LEFT & RIGHT button(s) to reach preferred
position.
Additional Feature - Step Tilting
- Position the shade at the lower limit and hold the DOWN button for 1.5 seconds. The shade will “step” backwards
allowing for tilting of vanes in horizontal sheer products. Release when desired position has been reached.
Option 1 - Reset Upper/Lower Limit
- Using the UP or DOWN button, move to limit to be changed.
- Using a small paperclip depress the “MODE BUTTON” located on the back of the remote control. The red
indicator light on the front of the remote control should start flashing in a single-flash pattern.
- Hold down the MIDDLE button until you see a double-flashing pattern on the indicator light.
- Hold down the UP or DOWN button (depending on which limit being changed) for 1.5 seconds until LED blinks
- Move the shade to new desired limit
- Hold down the MIDDLE button until the shade jogs, confirming new limit
- Using a small paperclip depress the “MODE BUTTON” located on the back of the remote control. The red
indicator light on the front of the remote control should stop flashing. Programming complete!
Option 2 - Reset Intermediate Position (IP)
- Using a small paperclip depress the “MODE BUTTON” located on the back of the remote control. The red
indicator light on the front of the remote control should start flashing in a single-flash pattern.
- Hold down the MIDDLE button until you see a double-flashing pattern on the indicator light.
- Using the “UP” or “DOWN” buttons, set your shade to the desired position.
- Press and hold the “OUTER LEFT and/or RIGHT” button(s) till you receive a “jog” confirming the IP.
- Using a small paperclip depress the “MODE BUTTON” located on the back of the remote control. The red
indicator light on the front of the remote control should stop flashing. Programming complete!

Other SOMFY Remote Control manuals

SOMFY INTEO TELIS 1 RTS User manual

SOMFY

SOMFY INTEO TELIS 1 RTS User manual

SOMFY Nina Timer io User manual

SOMFY

SOMFY Nina Timer io User manual

SOMFY Easy Sun io User manual

SOMFY

SOMFY Easy Sun io User manual

SOMFY Telis Soliris 4 RTS Patio User manual

SOMFY

SOMFY Telis Soliris 4 RTS Patio User manual

SOMFY FREEROLL RTS User manual

SOMFY

SOMFY FREEROLL RTS User manual

SOMFY KEYTIS 2 User manual

SOMFY

SOMFY KEYTIS 2 User manual

SOMFY SITUO 1 VARIATION User manual

SOMFY

SOMFY SITUO 1 VARIATION User manual

SOMFY Telis 16 RTS User manual

SOMFY

SOMFY Telis 16 RTS User manual

SOMFY FREEROLL RTS User manual

SOMFY

SOMFY FREEROLL RTS User manual

SOMFY Terminal 3600 W User manual

SOMFY

SOMFY Terminal 3600 W User manual

SOMFY Telis 5 Modulis RTS Silver 1810663 User manual

SOMFY

SOMFY Telis 5 Modulis RTS Silver 1810663 User manual

SOMFY Situo 5 io User manual

SOMFY

SOMFY Situo 5 io User manual

SOMFY Telis 1 io User manual

SOMFY

SOMFY Telis 1 io User manual

SOMFY Centralis RTS User manual

SOMFY

SOMFY Centralis RTS User manual

SOMFY CENTRALIS RECEIVER User manual

SOMFY

SOMFY CENTRALIS RECEIVER User manual

SOMFY SITUO 5 io/RTS PURE Installation guide

SOMFY

SOMFY SITUO 5 io/RTS PURE Installation guide

SOMFY Situo 1 RTS Operating and maintenance instructions

SOMFY

SOMFY Situo 1 RTS Operating and maintenance instructions

SOMFY nina User manual

SOMFY

SOMFY nina User manual

SOMFY Situo 1 RTS Installation guide

SOMFY

SOMFY Situo 1 RTS Installation guide

SOMFY Situo 1 Soliris RTS II User manual

SOMFY

SOMFY Situo 1 Soliris RTS II User manual

SOMFY Rollixo Optimo RTS User manual

SOMFY

SOMFY Rollixo Optimo RTS User manual

SOMFY 1810632 Telis 1 RTS Pure User manual

SOMFY

SOMFY 1810632 Telis 1 RTS Pure User manual

SOMFY INTEO TELIS 4 RTS User manual

SOMFY

SOMFY INTEO TELIS 4 RTS User manual

SOMFY Oximo RTS User manual

SOMFY

SOMFY Oximo RTS User manual

Popular Remote Control manuals by other brands

Magnavox MRU1301 Universal Specifications

Magnavox

Magnavox MRU1301 Universal Specifications

LightwaveRF JSJS LW106 Operation manual

LightwaveRF

LightwaveRF JSJS LW106 Operation manual

Hitachi SPX-RCKA manual

Hitachi

Hitachi SPX-RCKA manual

Anderic RRH100 user manual

Anderic

Anderic RRH100 user manual

taranis F3J Setup guide

taranis

taranis F3J Setup guide

RFHERO Falcon Pro System Set up and operation guide

RFHERO

RFHERO Falcon Pro System Set up and operation guide

Sony UPA-P100MD user guide

Sony

Sony UPA-P100MD user guide

URC MX-1200 owner's manual

URC

URC MX-1200 owner's manual

August PCR500 user manual

August

August PCR500 user manual

Community Controls Firefly 3 Use

Community Controls

Community Controls Firefly 3 Use

iNels RFWB-20/G manual

iNels

iNels RFWB-20/G manual

NEC KT-RC3 Setup manual

NEC

NEC KT-RC3 Setup manual

Pixapro M-060006 instruction manual

Pixapro

Pixapro M-060006 instruction manual

Clean Remote CR3BCB Instructions for

Clean Remote

Clean Remote CR3BCB Instructions for

Sony RM-AV2500T operating instructions

Sony

Sony RM-AV2500T operating instructions

Elvox ETT01 Installation and operatioin manual

Elvox

Elvox ETT01 Installation and operatioin manual

PDMOVIE REMOTE AIR quick start guide

PDMOVIE

PDMOVIE REMOTE AIR quick start guide

Scientific Atlanta AT8550TM user guide

Scientific Atlanta

Scientific Atlanta AT8550TM user guide

manuals.online logo
manuals.online logoBrands
  • About & Mission
  • Contact us
  • Privacy Policy
  • Terms and Conditions

Copyright 2025 Manuals.Online. All Rights Reserved.