SOMFY PROTEXIOM GSM Installation guide

PROTEXIOM GSM
Wireless radio alarm system
EN Installation and operating guide
121348D 05/2018

2
WELCOME
Copyright © 2018 Somfy Activités SA. All rights reserved.
Thank you for choosing a SOMFY alarm system.
Who is SOMFY?
SOMFY develops, manufactures and markets automatic devices for the openings in the home. Central alarm units, automatic
devices for blinds, shutters, garages and gates – all of SOMFY’s products meet your expectations in terms of day-to-day
safety, comfort and time-saving.
At SOMFY, the quest for quality is a continuous improvement process. It is thanks to the reliability of its products that
SOMFY has achieved such renown and become synonymous with innovation and technological expertise throughout the
world.
Regulation
Somfy hereby declares that the radio equipment covered by these instructions is in compliance with the requirements of
Radio Directive 2014/53/EU and the other essential requirements of the applicable European Directives.
The full text of the EU declaration of conformity is available at www.somfy.com/ce.
Please read before beginning installation
SOMFY would like to point out that the main function of an alarm is to deter intruders and burglars and provide a warning.
The presence of an alarm cannot under any circumstances prevent a break-in or burglary.
We recommend that you install an opening detector on each opening (door, window, garage door) in your home, as well as
an opening and glass breakage detector on each window or an audiosonic glass breakage detector in the case of external
windows.
By deciding to install an alarm yourself, you become solely responsible for the consequences of an installation which
is incorrect or does not comply with the instructions in the guide. SOMFY cannot be held liable for any direct or indirect
consequence of incorrect operation or installation of the alarm by you.
We also strongly recommend that you:
Read this installation manual carefully and make absolutely sure that you follow all the mounting and operating
instructions in order to get the best possible use from your Somfy alarm system.
Keep this manual in a safe place for the entire lifetime of the product. It could be useful if you decide to add
devices to your installation.
Your installation may comprise up to 40 devices (excluding automatic devices).
Do not clean the central unit, the LCD keypad or the sirens with alcohol. Use a slightly damp cloth to clean
the products.
In the event of an incident, disconnect the mains cable.

3
CONTENTS
Copyright © 2018 Somfy Activités SA. All rights reserved.
INTRODUCTION...................................................................................................................................................... 4
How does my alarm system work?................................................................................................................. 4
A fully upgradeable system ............................................................................................................................ 6
INSTALLATION........................................................................................................................................................ 7
Installation recommendations......................................................................................................................... 7
Assigning zones to the intrusion detectors..................................................................................................... 8
Inserting the batteries..................................................................................................................................... 10
Storing the devices......................................................................................................................................... 11
Fixing the devices........................................................................................................................................... 12
Connecting the central unit ............................................................................................................................ 23
Conguring the alarm system using a computer............................................................................................ 29
Setting up and using the free Somfy alarm application for smartphone......................................................... 50
Conguring the alarm system using the LCD keypad .................................................................................... 52
Memo sheet.................................................................................................................................................... 66
Testing the installation .................................................................................................................................... 67
What to do if the customised authentication................................................................................................... 68
USE ....................................................................................................................................................................... 69
Arming the alarm............................................................................................................................................ 69
Disarming the alarm ....................................................................................................................................... 69
In the event of intrusion or attack ................................................................................................................... 70
Operation with the GSM module in the event of intrusion.............................................................................. 70
Information sent in SMS form by GSM........................................................................................................... 71
Controlling your SOMFY automatic devices and receivers from the LCD keypad......................................... 71
Viewing stored information............................................................................................................................. 72
when the orange indicator ashes on the LCD keypad.................................................................................. 72
Remote control by SMS with the GSM module.............................................................................................. 73
MAINTENANCE....................................................................................................................................................... 74
Summary of system operation........................................................................................................................ 74
Replacing the batteries................................................................................................................................... 76
Resetting the system...................................................................................................................................... 77
Troubleshooting.............................................................................................................................................. 78
TABLE OF SPECIFICATIONS................................................................................................................................. 80
INDEX....................................................................................................................................................................... 82

Copyright © 2018 Somfy Activités SA. All rights reserved.4
IntroductIon — How does my alarm system work?
IntroductIon
How does my alarm system work?
Alarm system performance
Up to . All the devices in your installation are battery powered.
Secure dual frequency radio technology
Exclusive, patented process: radio transmission is performed using two alternating frequencies which constantly
take over from one another to ensure that 100% of the information is transferred.
Regular system self-monitoring - Management of loss of radio link
The devices (with the exception of the remote controls) periodically send their operating status to the central unit: battery
level, door open, etc.
Tamper switch vandalism protection
If any of the devices in the installation are vandalised, the sirens are activated for 2 minutes and the central unit sends you
an alarm message.
The central unit, sirens and keypad are protected by tamper switches if they are removed from the wall or their covers are
opened.
The detectors are protected if their front panel is opened.
For your convenience on installation, the tamper switches only work as of the rst arming of the alarm.

Copyright © 2018 Somfy Activités SA. All rights reserved. 5
How does my alarm system work? — IntroductIon
Activation
The keypads, remote controls and badge are used to control your
alarm system either by individual zone or as a whole. They provide a
visual display of the status of the system during operation.
The LCD keypad and the multi-application remote control are used
to control the Somfy automatic devices (motorised gate, garage door,
lighting or roller shutters or blinds with Somfy motor).
You can also control your alarm, roller shutters and a light remotely
by telephone. Multi-application
reMote control
on/off reMote
control
on/off + zones reMote
control
lcD keypaD+ BaDge
BaDge (solD
in pairs)
control keypaD + BaDge
Intrusion detection
The movement detectors detect any movement and any
temperature variation caused by a moving body.
The 2 pet movement detectors make it possible to protect
a room when a pet is present.
The movement detector with photo capture takes up to
four photos to conrm that an intrusion has taken place and
monitor your home.
The opening detectors detect when a door or window is
opened. They emit a chime on the indoor siren when such
an action is detected (see Kiela function on page 34).
MoveMent
Detector
MoveMent
Detector for
Big Dogs
MoveMent
Detector with
photo capture
outDoor
MoveMent
Detector
MoveMent Detector
for sMall pets
opening
Detector
auDiosonic
glass
Breakage
Detector
opening anD glass
Breakage Detector
garage Door opening Detector
roller shutter opening
Detector
Domestic fault detection
The domestic detectors detect the presence of water,
smoke or a power failure.
sMoke Detector
power Detector
water leakage
Detector
Deterring, Alerting, Signalling
The increasing volume of the sirens deters intruders.
The outside siren with ash alerts and signals an intrusion to anyone nearby and the
phone dialer sends one or more alarm messages.
The central unit/phone dialer/siren (which will be referred to as the central unit in the rest
of this manual) analyses the information sent by the detectors, triggers the sirens and sends
one of the following to 4 telephone numbers:
– An SMS alarm, using the GSM (Global System for Mobile communications) module
– An alert to a remote monitoring centre (if you have a subscription to a remote monitoring
service)
Note: the central unit is not compatible with the PSTN module.
A SIM card is afxed inside a leaet supplied with this kit.
If you have roller shutters (with a SOMFY RTS motor), it is possible to program these to come
down automatically when an intrusion is detected or to come up automatically if smoke is
detected, by means of a SOMFY receiver for roller shutters.
To further discourage intruders, it is also possible to control a light (using RTS) when intrusion
is detected, using a SOMFY light receiver.
inDoor siren
outsiDe siren
with flash
central unit/gsM phone
Dialer/siren

Copyright © 2018 Somfy Activités SA. All rights reserved.6
IntroductIon — A fully upgradeable system
A fully upgradeable system
You can add further equipment to your kit, such as remote controls, movement detectors, additional opening detectors
(white or brown) or the following specic devices:
You want to control one or
two Somfy automatic devices
(motorised gate, garage door
or lighting) and your alarm
from your car.
Multi-application
remote control
You want to arm the alarm by
zone or fully, or to control two
SOMFY automatic devices
LCD keypad
You have a number of
different access points to
your home.
Control keypad +
badge
You want to deter intruders
from entering your home,
alert people nearby and
indicate that your system has
been triggered.
Outside siren
with ash
You want to extend intruder
deterrence to another part of
your home.
Indoor siren
You want to be alerted
if something is detected
outside your house. Somfy’s
motorised roller shutters can
be closed in the event of
intrusion.
Outdoor
movement
detector
You want to be alerted by
images if there is an intruder
in your home, or monitor
property or people.
Movement
detector with
photo capture
You have a cat, a dog (height
less than 40 cm) or a rodent.
Movement
detector for small
pets
You have a big dog (height
more than 40 cm).
Movement
detector for big
dogs
You have roller shutters. Roller shutter
opening detector You want to protect doors or
windows.
Opening detector
(white or brown)
You have French windows
and bay windows.
Opening and
glass breakage
detector (white or
brown)
You want your system to
trigger if smoke is detected.
Your SOMFY motorised
roller shutters can be opened
if smoke is detected.
Smoke detector
Audiosonic
glass breakage
detector
You want to be warned if
there is a ood (e.g. washing
machine).
Water leakage
detector
You have a garage. Garage door
opening detector You want to be alerted if
there is a power failure. Power detector

Copyright © 2018 Somfy Activités SA. All rights reserved. 7
Installation recommendations — InstallatIon
InstallatIon
As the devices in the kit are already stored in the central unit, your kit is ready to use once the following six steps
have been completed:
1. Determine the location of the devices and the detection zones.
2. Insert the batteries into the devices.
3. Store any devices that have been purchased separately (not part of the kit).
4. Fix to the wall, close the covers and test the devices.
5. Adjust the installation settings.
6. Test the installation.
Installation recommendations
To ensure optimum operation of the system, the correct location for each device should be chosen carefully.
Ensure good radio transmission
The correct propagation of radio waves depends on the nature of the material through which they pass.
The range of the waves will vary depending on the type of construction (wooden building, types of walls or partitions,
apartment with metal structure, etc.).
Plasterboard/Plaster/Wood
90 to 100%
Brick/Breeze block
65 to 95%
Reinforced concrete
10 to 70%
Metal
0 to 10%
When a radio wave is unable to pass through a material, it is reected. This impairs reception, in particular at the central unit.
It is often enough to move the central unit by just a few centimetres in order to avoid a zone with no coverage.
Optimising the radio range
The central unit is the heart of the installation. Place it in a clear area in the centre of the home.
Position the devices and the central unit more than 60 cm above the oor.
To improve the propagation of the radio waves, ensure the central unit is more than a metre away from:
– An electrical fuse board or a cable bundle
– Any earth or metal plate
– Sources of radio interference (such as a TV with hi- surround system).
Do not x detectors and keypads on metal sections or in conned areas.
Fix sirens to clear areas and as high as possible.
Before xing the central unit, make sure that the various devices transmit properly. In the event of transmission problems,
move the central unit.
Ensuring the correct operation of the tamper switch system
For each of the products (central unit or LCD keypad), choose a wall space with a good surface condition in order to ensure
the efciency of the tamper switches (protection against vandalism).

Copyright © 2018 Somfy Activités SA. All rights reserved.8
InstallatIon — Assigning zones to the intrusion detectors
Assigning zones to the intrusion detectors
You can protect up to three areas of your home, referred to as zones.
A zone consists of intrusion detectors which are located in various parts of your home. With your SOMFY alarm system
you can dene 3 separate zones. You can therefore activate the alarm in one zone only, in 2 zones or in all 3 zones (= full
arming).
In the following example, the intrusion detectors in zone A monitor the front door and garage door while those in zones B
and C monitor different oors of the house. All congurations are possible and depend on the nature of your home and how
you use it.
ZoneA– Delayed triggering (AD) or immediate triggering
(A) of the alarm in the event of intrusion
The home’s access points (entry doors)
A separate annex (for example the garage)
Zone B – Immediate triggering of the alarm in the event
of intrusion
A part of the building that is not used during the night, the
living room or all of the ground oor.
Zone C – Immediate triggering of the alarm in the event
of intrusion
Another part of the building that is not used during the day,
a oor or the basement.
Full arming (zones A + B + C)
Part or full arming
Part – 1 or 2 zones armed (A, B, C, A+B, A+C or B+C)
Independent arming of the monitored zones, zone A, B or C
Full – all 3 zones armed (A+B+C)
FULL arming of the alarm system: all the alarms in the house are armed.
Sous surveillance
Sous surveillance
Sous surveillance

Copyright © 2018 Somfy Activités SA. All rights reserved. 9
Assigning zones to the intrusion detectors — InstallatIon
It is also possible to assign a zone to an intrusion detector via your computer.
In this case, the zone settings congured by computer overrule the switch settings inside the intrusion
detectors.
Separate the detectors included in the kit (already stored in the central unit) from those purchased separately
(not yet stored).
These must be stored in the central unit.
a. Opening the covers of the intrusion detectors
(opening detectors and movement detectors)
b. Determining the locations of the devices and setting up the zones of the detectors
For each intrusion detector (movement detectors and opening detectors), the monitored zone and triggering mode are
dened using switches located inside these products. They must be congured when the corresponding device is installed.
Movement detectors are supplied set for zone C, immediate triggering.
Opening detectors are supplied set for zone AD, triggering delayed by 45 seconds before activation of the alarm to allow
sufcient time to enter and disarm the system if there is an opening detector positioned at the front door.
We recommend that when the keypad is installed near the front door, you do not protect it with a movement
detector in zone AD if the front door is already protected by an opening detector in zone AD.
To customise this option, position switches 1 and 2 as follows:
Select zone – trigger mode Switch positions What happens in the event of intrusion (in partly or fully armed
mode)
AD - delayed triggering
Activation of the sirens is delayed (after the entry delay).
+
Telephone transmission of one or more alarm messages.
A- immediate triggering The indoor siren is activated immediately.
+
The outside siren with ash is activated after 10 seconds.
+
Telephone transmission of one or more alarm messages.
B- immediate triggering
C- immediate triggering
c. Adjust the switches on the intrusion detectors to assign them to a zone
Record the zone selection on the memosheet page 66.
Do not touch the switches on the water leakage detector.
locations of switches
Copyright © 2018 Somfy Activités SA. All rights reserved.10
InstallatIon — Inserting the batteries
Inserting the batteries
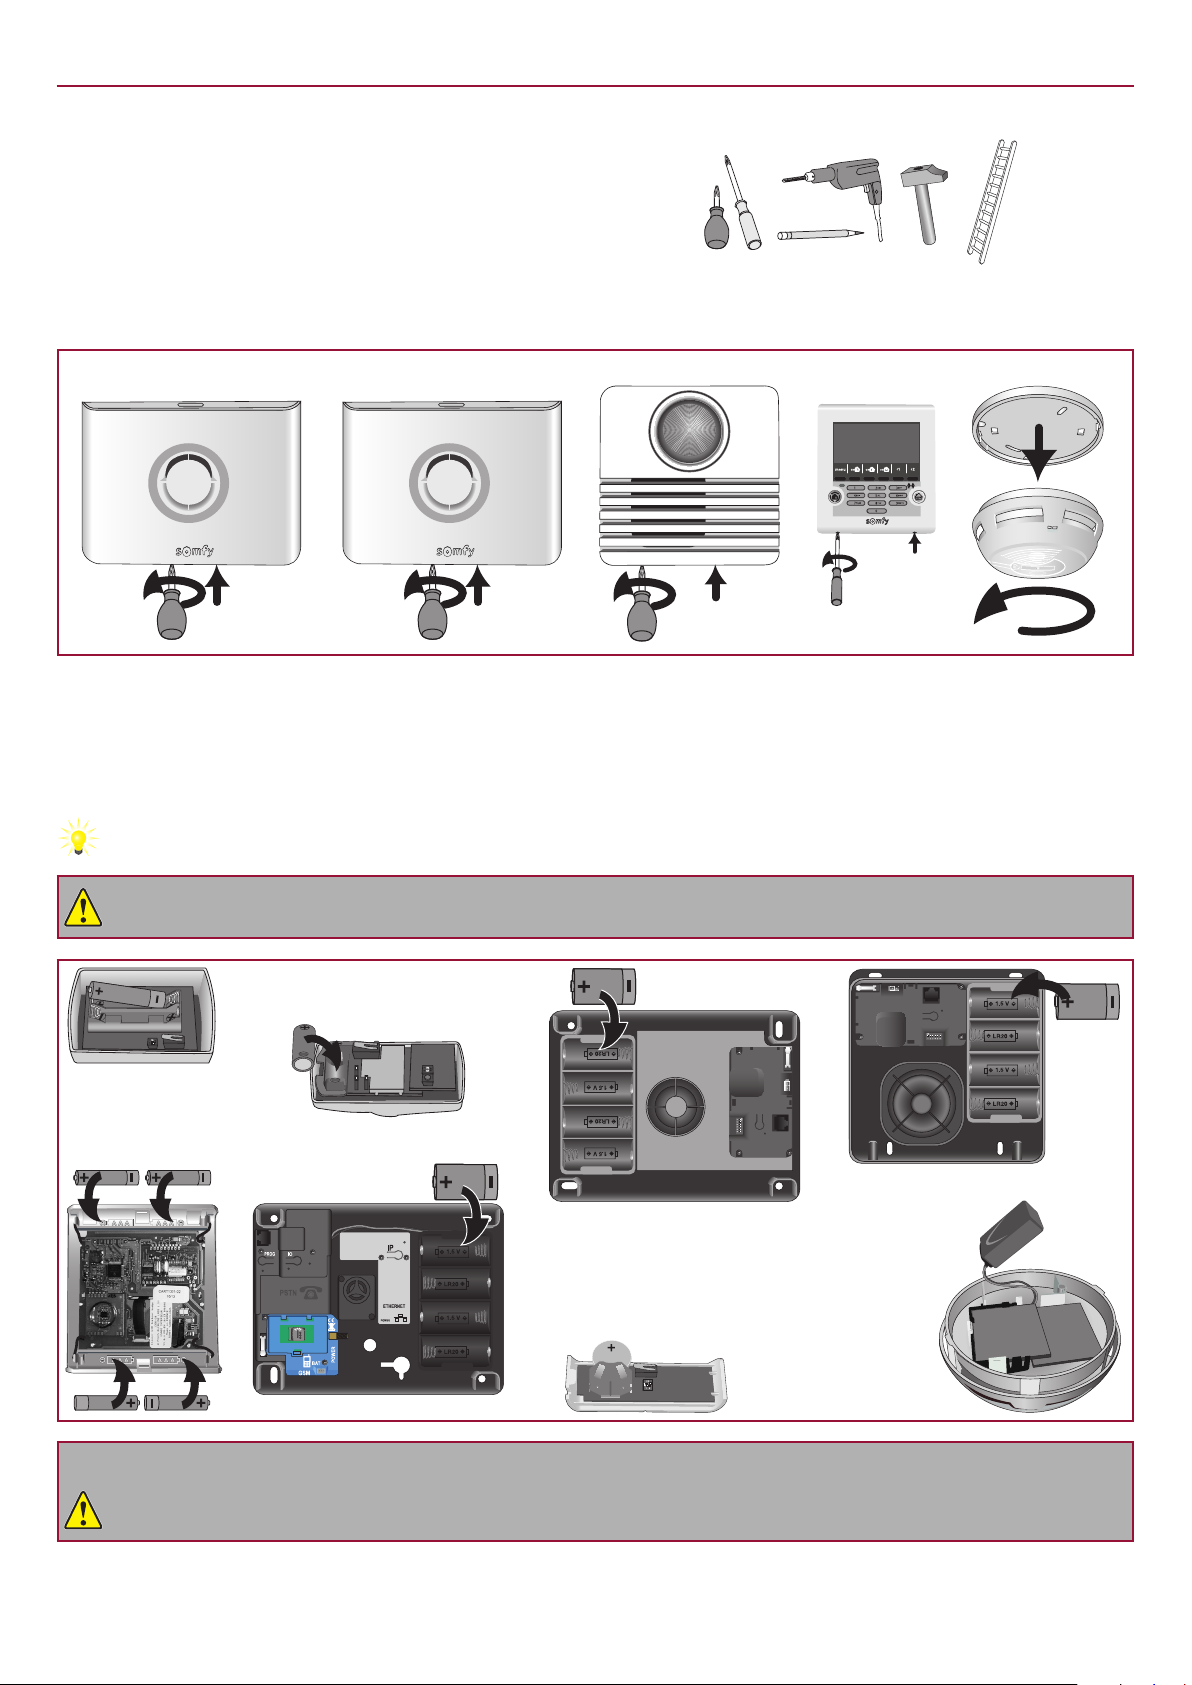
Equipment needed to install the devices
Crosshead screwdriver, drill, hammer, pencil, ladder for outdoor siren.
a. Open the covers of the other devices
central unit inDoor siren
outsiDe siren with flash sMoke Detector
b. Insert the batteries provided in all the devices
The batteries are already inserted in the remote controls.
A beep sounds when the batteries are installed in the central unit and in the indoor siren.
The siren may be triggered when the batteries are installed if you accidentally press the ON button on the remote
control. In this case, just disarm the alarm by pressing OFF on the remote control.
Make sure the batteries are inserted the right way round (+/-). Make sure that the ends of the batteries are
touching the battery contacts.
9V
Pile alcalin
e
central unit
inDoor siren
outsiDe siren with flash
Lithium battery in the bag with the
spacers.
Slide the battery in, with the +on
the top.
Do not close the covers straight away.
If the wall installation of the products has to be postponed, remove one battery from the products that are
still open to prevent them from draining.

Copyright © 2018 Somfy Activités SA. All rights reserved. 11
Storing the devices — InstallatIon
Storing the devices If your installation does not have all the devices in
the kit, go to page 12
Devices that have been purchased separately must be stored in the central unit.
Reminder: the devices in the kit are already stored in the central unit.
a. Activating central unit storage mode
On the central unit:
– Open the memory by pressing the PROG button
– The red indicator comes on with a steady light
– ... BEEP on the central unit.
You have 2 minutes to store one or more devices.
The 2-minute period is restarted as soon as a device has been stored. The beep indicates that the device has been
stored in the central unit.
After this 2-minute period, you must return to storage mode by pressing the PROG button on the central unit again.
During this 2-minute period (indicator lit), it is not possible to test the installation.
If you want to add devices when the central unit has already been installed and the system is already
operational, to avoid having to open the central unit, you can enter simplied storage mode via the IP address of
the central unit by going to the bottom of the “Device list” page. It only possible to activate storage mode when the
system is disarmed.
If you open the central unit, then you must deactivate the tamper switch by pressing OFF on the remote
control until the indicator goes off.
b. Storing the devices
In 2-minute storage mode, you have 2 minutes to store one or more devices. Maximum: 40 devices per central unit.
Outside siren with ash
– Open the siren.
– Short press on the button.
– ... BEEP on the central unit.
– ... BEEP on the outdoor siren.
Indoor siren
– Open the siren.
– Short press on the button.
– ... BEEP on the central unit.
– ... BEEP on the outdoor siren.
Badge
– Press the OFF button once: BEEP
– Pass the badge in front of the LCD
keypad reception area: BEEP
To store a 2nd badge, repeat the
operation.
Keypad
– Press OFF.
– ... BEEP on the central unit.
Remote control
– Press OFF.
– ... BEEP on the central unit.
Detector
– Press.
– ... BEEP on the central unit.

Copyright © 2018 Somfy Activités SA. All rights reserved.12
InstallatIon — Fixing the devices
Fixing the devices
Place the central unit preferably at the centre of the dwelling close to the broadband router/modem in order
to test for correct radio range following the installation of each device.
Each product has a serial number on the self-adhesive label on the outside of the product. Before performing any
installation, you must use this number to identify the detectors in your installation and record them on the memosheet
page 66.
Opening detector
Do not x the opening detector on a metal part.
Place the detector inside the house on the upright of the
opening part, either horizontally or vertically, on the
opening side (opposite the hinges).
The detector and its magnet-holder must be perfectly
aligned between the two markings.
Spacers
Spacers Alignment
Max. 10 mm
Detector
Magnet
Use one or more of the spacers
supplied in the packaging to adjust
the magnet-holder and/or the
detector.
It is also possible to raise the
detector using 2 spacers xed
side by side underneath it.
If the gap between the opening part and the xed part is too large, it is
possible to invert the 2 parts of the product.
Take the necessary precautions to avoid damage to the detector due
to the door being opened! This type of mounting is not recommended.
2 Close the cover.
3 Test the device:
Press the button on
the detector: BEEP!
For a period of
2 minutes, the indicator
on the detector lights
each time the door is
opened/closed.
Ø 4 mm
1
Copyright © 2018 Somfy Activités SA. All rights reserved. 13
Fixing the devices — InstallatIon
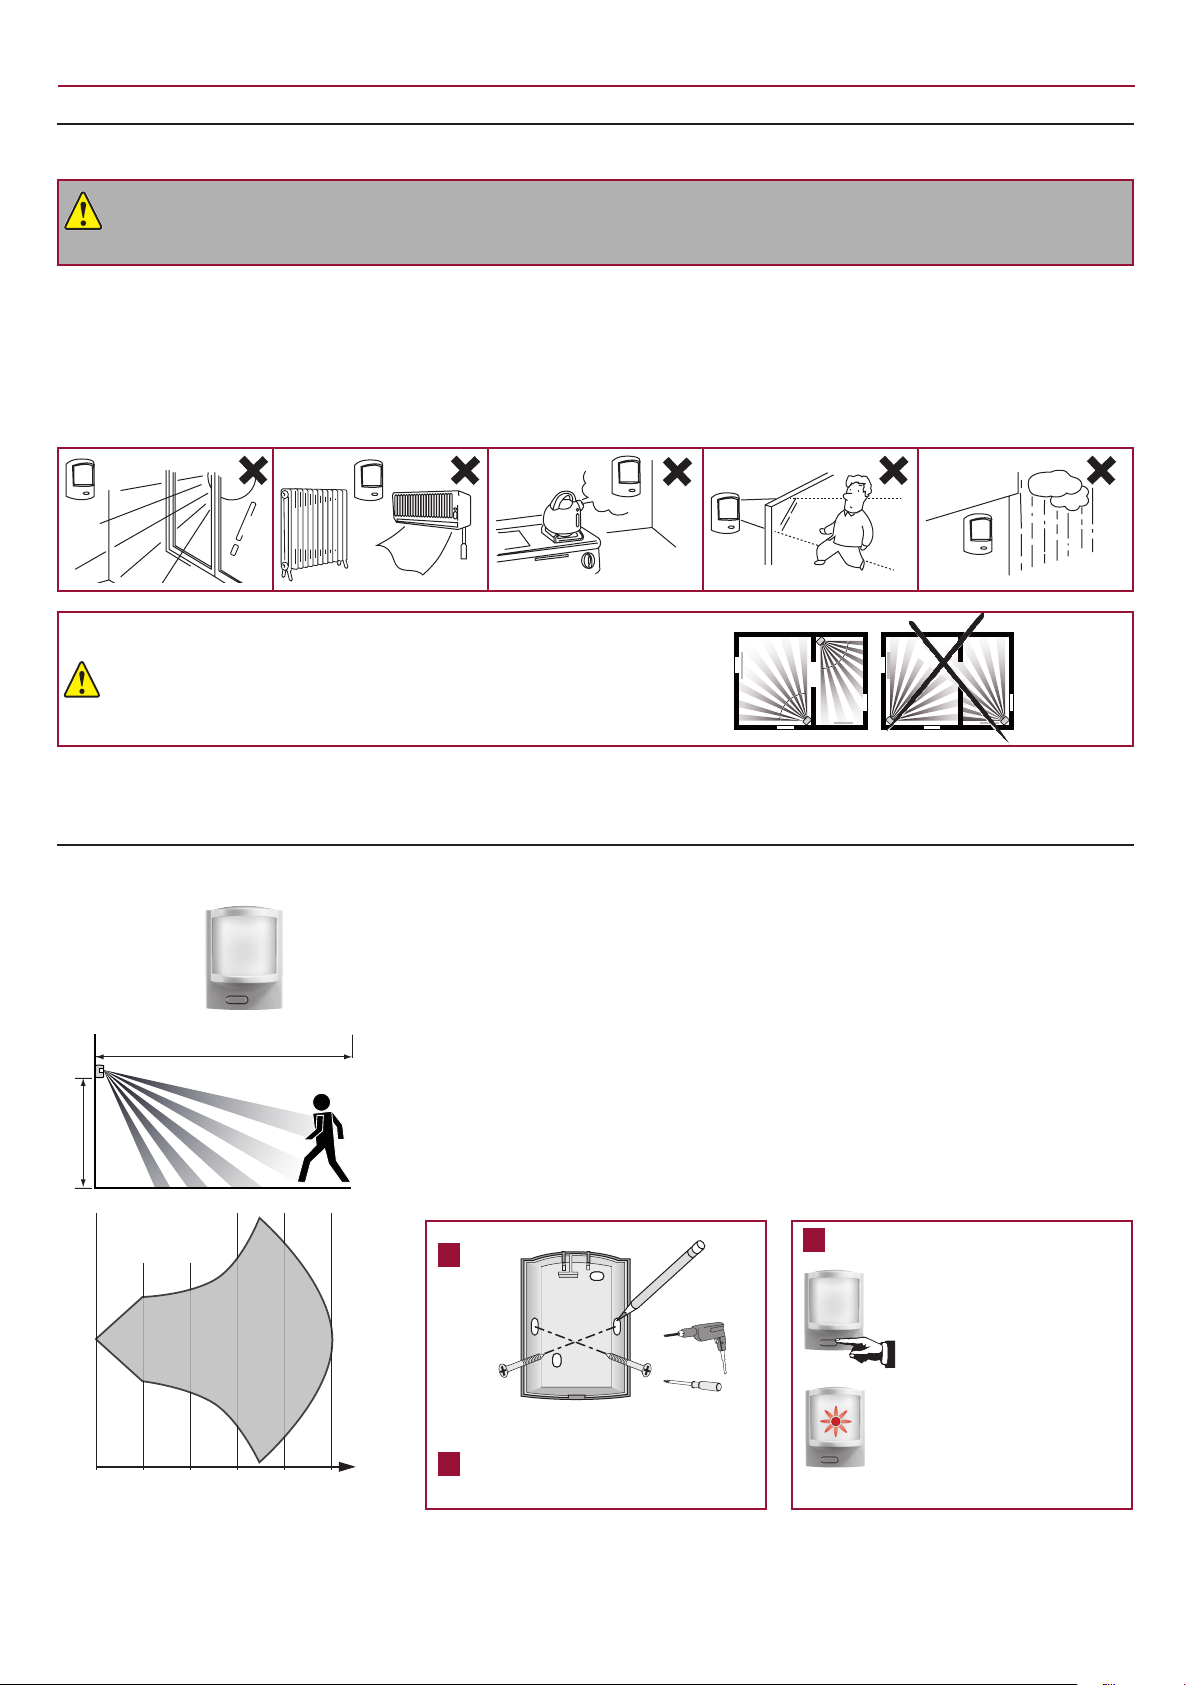
Operating precautions common to all three movement detectors
All Somfy movement detectors detect any movement and any temperature variation caused by a moving
body (human or animal) or by a heat source (radiator, convection heater, replace, robotic vacuum cleaner,
etc.).
Movement detectors are sensitive to heat: never position the movement detector:
directly facing a window, mirror, curtains, shrub or blind,
above or opposite a heat source (radiator, convection heater or replace),
on a veranda,
in a draught,
in a damp room, to avoid accidental triggering.
The beams of the movement detectors should not
intersect. 90°
90°
Movement detector
This movement detector detects any movement and any temperature variation
caused by a moving body.
To protect the largest possible area, the detector can be placed in the corner of a
room 2.30 m above the oor.
This type of detector is not recommended for use in a garage due to the presence
of rodents, which could cause accidental triggering. In this case, it is better to
choose the movement detector for small pets.
The detection lobe is designed for lateral movement.
Detection varies depending on the speed of movement, the temperature difference
between the moving body and the ambient temperature, and the direction of
movement.
1
top
BottoM
Ø 6 mm
3 Test the device:
Press the button on the
detector: BEEP!
For a 2-minute period,
the indicator on the
detector lights every
time something moves in
front of it.
2 Close the cover.
up to 10 m
2.30 m
0 2 4 6 8 10m
Detection
lobe

Copyright © 2018 Somfy Activités SA. All rights reserved.14
InstallatIon — Fixing the devices
Movement detector for big dogs
This movement detector detects any movement and any temperature variation
caused by a moving body.
This type of detector is intended to protect a room in which there is a dog more
than 40 cm tall that does not jump on the furniture.
This type of detector is not recommended for use in a garage due to the presence
of rodents, which could cause accidental triggering. In this case, it is better to
choose the movement detector for small pets.
The detection lobe is designed for lateral movement.
Detection varies depending on the speed of movement, the temperature difference
between the moving body and the ambient temperature, and the direction of
movement.
1
110°
2 top
BottoM
Ø 6 mm
The remainder of the installation
and testing are identical to those for
the movement detector (see above).
It should preferably be wall-
mounted at a height of
1.20 m above the oor.
Movement detector for small pets
This movement detector detects any movement and any temperature variation
caused by a moving body.
This detector makes it possible to detect the presence of any human in a room in
the presence of a small pet less than 40 cm tall.
For dogs over 40 cm tall, it is better to choose the movement detector for houses
with big dogs.
The detection lobe is designed for lateral movement.
Detection varies depending on the speed of movement, the temperature difference
between the moving body and the ambient temperature, and the direction of
movement.
1
2
Ø 6 mm
It should preferably be wall-mounted
at a height of between 2.10 and 2.40 m
above the oor.
Do not lose the
nut which is
in the bag with
the screws.
For medium-sized dogs, it is better to mount the
detector at a height of 2.40 m. Make sure that
the detector is mounted at least 80 cm above
any piece of furniture that a cat can climb on.
Do not close the detector.
up to 10 m
1.20 m
0 2 4 6 8 10m
Detection
lobe
up to 12 m
2.40 m
0 2 4 6 8 10 12m
Detection
lobe

Copyright © 2018 Somfy Activités SA. All rights reserved. 15
Fixing the devices — InstallatIon
Movement detector for small pets (continued)
3 Customising the operation of the detector
The detector has 3 jumpers:
Jumper
position ON : both contacts are
covered OFF : one free
contact
1Indicator
light
The indicator light on the front
comes on if movement is detected.
This will affect the life of the
detector’s battery.
The indicator light does not
come on if movement is
detected.
2Detection
mode Detection by 2beams (the most
sensitive).
Detection by 4beams: if
several pets are present.
3TEST
mode
For how to test the detector
(see 4 )
For everyday use of the
detector.
4 Testing the range of the detector:
– The detector is positioned with its base xed to the wall but not screwed in
– Set jumper 3 to test mode (ON)
– The indicator light comes on when someone passes into the eld of the
detector
Once the test has been successfully completed, jumper 3 must be
returned to the OFF position in order to switch to everyday operating
mode.
5 Position the nut in its housing and insert the
locking screw.
Close the detector. Tighten the screw at the base of
the detector.
Do not lose the nut when opening the detector to change the
battery.
Opening and glass breakage detector
Do not x the opening and glass breakage detector on a metal part.
This detects the opening of a window, the vibration of the glass in the event of
attempted intrusion and the breakage of the glass.
The detector and its magnet are mounted in the same way as for the opening
detector: see page 12.
Use the double-sided adhesive strip to afx the glass breakage sensor 25 mm
from the corner of the window. The window should be dry and clean and preferably
at a temperature of between 21°C and 35°C. Press rmly on the glass breakage
sensor to ensure that it is adheres properly.
Test the detector on its own: see page 12.
Audiosonic glass breakage detector
This detects the acoustic frequency of breaking glass and the difference in
pressure between the inside and outside of the house. It only protects external
windows.
It must be located at least 1.20 m from sources of noise disturbance (such as
TVs, loudspeakers, drainpipes, doors, etc.) or air disturbance (wall-mounted and/
or built-in air conditioning units).
Jumper positions for normal
operating mode
1
1
2
3
2
3
LED ON/OFF PULSE COUNT
TEST
25 mm
25 mm
sensor
Detector

Copyright © 2018 Somfy Activités SA. All rights reserved.16
InstallatIon — Fixing the devices
Glass breakage will be detected within a radius of:
6 m in the case of windows made of ordinary glass or double-glazing
(2.4 to 6 mm thick)
3.65 m in the case of toughened or laminated glass (3.2 to 6.4 mm)
or any other type of glass
Do not position the audiosonic detector on the same wall as the
windows that are to be protected.
1 Mount the detector on the wall
approximately 2 m above the oor.
2 Close the cover.
Roller shutter opening detector
Do not x the roller shutter opening detector on a metal part.
This is installed inside the shutter frame.
1 Use at least 3 of the 4 screws
provided to x the square module
at in the centre of the frame in
such a way that the cord can travel
freely with no risk of shearing.
Detector square MoDule
2 The brass outlet cylinder on
the cord must be located as close
as possible to the opening in the
frame in order to avoid any risk of
shearing.
corD
cylinDer
3 The end of the cord must be
attached using a screw inserted
through the eyelet of the last
shutter strip.
It is advisable to locate the detector remotely on a wall, using the 1 m
cable, in order to avoid xing it on a metal part, which would impair the
correct propagation of the radio waves.
4 Fix the detector:
70 mm
Ø 6 mm
5 Close the cover.
6 Test the detector:
Press the button on the detector:
BEEP!.
For a period of 2 minutes, the
indicator on the detector lights each
time there is a tension of more than 5 cm on the
cord.
Min. 3 m
Min. 1 m from
a window
Max. 6 m
from a
window
Min. 3 m
Detector square
MoDule
Brass cylinDer

Copyright © 2018 Somfy Activités SA. All rights reserved. 17
Fixing the devices — InstallatIon
Garage door opening detector
1 Fit the protective
sheath on the cable.
2 Fix the detector to the oor, avoiding xing it to any metal parts.
The type of xing will depend on the oor material. Use different
screws if necessary.
Fix the magnet to the garage door between the two oor detector markings.
K ≤ 25 mm
J ≤ 35 mm
3 Fix the electronic unit to the wall
and not to any metal part.
70 mm
Ø 6 mm
4 Connect the detector’s 2 stripped
wires to the electronic unit.
5
Close the
cover.
6
Test the electronic
unit:
Press the button
on the detector:
BEEP!
For a 2-minute period,
the indicator lights up
every time the garage
door is opened/closed.
electronic unit
electronic unit
Magnet
Detector
Magnet
Detector

Copyright © 2018 Somfy Activités SA. All rights reserved.18
InstallatIon — Fixing the devices
Power detector
1 Set the switches according to the required
detector triggering time:
Switch positions Triggering of the detector after a
maximum period of
5 minutes
10 minutes
15 minutes
20 minutes
2 Fix the detector:
On a wall close to a mains socket
(230 V).
As high as possible (for the correct
propagation of the radio waves) while
taking account of the length of the wire
required for connection.
Ø 6 mm
Take care not to drill through any electric wires in the wall.
Close the cover and connect the mains adapter.
Water leakage detector
1 Fix the sensor mount to the wall at oor level. Mount
sensor
2 Mount the detector casing on the wall approximately
1 m above the oor.
3 Slide the sensor between the lugs on the mount
until you hear a click, and pass the wire through the
slots.
4 Close the cover.
5 Test the detector:
Pour water between the sensor's 2 electrodes.
The indoor siren sounds quietly for 2 minutes.
To stop the alarm, press OFF on the remote control.
At the end of the test, remove the water and dry the electrodes.
Detector
Detector

Copyright © 2018 Somfy Activités SA. All rights reserved. 19
Fixing the devices — InstallatIon
LCD keypad
This must be inside the house. It is advisable to install it near the front door.
If you want to control a motorised garage door or gate, it is essential
to install the keypad where you can see these automatic devices for
safety reasons.
1 Fix the electronic unit to the wall and not
to any metal part.
66 mm
BAS - DOWN
HAUT - UP
67,5
opening for taMper
protection strip
Ø 6 mm
Afx the tamper protection strip rmly
to the wall.
2
Close the
product.
Tighten
the 2
screws at
the base
of the
casing.
Control keypad
This must be inside the house. It is advisable to install it near the front door or
inside the garage.
1 Fix the electronic unit to the wall and not to
any metal part.
51 mm
HAUT TOP
47
BAS DOWN
opening for taMper
protection strip
Ø 6 mm
Afx the tamper protection strip rmly
to the wall.
2
Close the
product.
Tighten
the 2
screws
on the
sides.

Copyright © 2018 Somfy Activités SA. All rights reserved.20
InstallatIon — Fixing the devices
Indoor siren
The sound power of the sirens can cause hearing problems. We
therefore recommend that you take the necessary precautions
when installing and changing batteries and during installation and
testing.
This should preferably be installed in the centre of the house to ensure better
sound propagation, at a high level and where it is difcult to access (e.g. in a
stairwell, on top of a wardrobe).
1
2 Customise the BEEPs on the indoor siren
Each time the alarm is armed or disarmed, the indoor siren emits one or more
BEEPs to acknowledge that the instruction has been received successfully.
Before closing the product, you can cancel the BEEPs on the siren.
Set the microswitches according to the required operation:
PROG
Default position of the
switches
Switch positions ON (up position) OFF (down position)
2No acknowledgement beeps
on the indoor siren on arming/
disarming
With acknowledgement
beeps
3With loud acknowledgement
beeps
With quiet
acknowledgement beeps
Do not touch the other switches.
To be better informed of the functioning of your system, we recommend
that you leave the BEEPs on at least one device.
3 Close the cover.
Ø 6 mm
Table of contents
Other SOMFY Security System manuals

SOMFY
SOMFY TaHoma Serenity User manual

SOMFY
SOMFY Home Alarm User manual

SOMFY
SOMFY 2401453 User manual

SOMFY
SOMFY 5013494 User manual

SOMFY
SOMFY Home Alarm User manual

SOMFY
SOMFY 2401491 User manual

SOMFY
SOMFY HOME ALARM ADVANCED User manual

SOMFY
SOMFY One+ User manual

SOMFY
SOMFY One User manual

SOMFY
SOMFY Home Keeper User manual

SOMFY
SOMFY Protexial User manual

SOMFY
SOMFY Outdoor camera User manual

SOMFY
SOMFY One User manual

SOMFY
SOMFY Home Alarm User manual

SOMFY
SOMFY Home Keeper User manual

SOMFY
SOMFY Home Alarm Essential User manual

SOMFY
SOMFY HOME ALARM ADVANCED User manual

SOMFY
SOMFY Home Alarm User manual

SOMFY
SOMFY Home KEEPER Series User manual


