• pentru acumulatorul din auto, moto, vapor, autoutilitară • pentru acumulatoare cu plumb-acid și electrolit
gelifiat ori fibră de sticlă • program automat de încărcare SMART în 5 trepte • încărcare delicată, la curent
continuu, în mai multe nivele • desulfatare automată prin impulsuri • regenerarea acumulatorului
îmbătrânit • conector de încărcare detașabil (clemă sau papuc inelar) • ecran LCD cu voltmetru și lumină
de fundal albastră • protecție la polaritate inversă • protecție la scurtcircuit • protecție la supraîncărcare •
protecție la acumulator defect • alimentare: prin cablu de conectare la rețea
PREGĂTIREA ÎNCĂRCĂRII
Dispozitivul este destinat exclusiv încărcării acumulatoarelor de 6 sau 12 Volți, cu capacitate de 1,4-120 Ah
(plumb-acid, electrolit gelifiat fără întreținere, fibră de sticlă, calciu – AGM, VRLA). Nu se va folosi la
acumulatoare defecte, neglijate, uzate sau înghețate.
Recomandăm încărcarea acumulatoarelor sigilate doar cu încărcătoare automate, în caz contrar
supraîncărcarea poate provoca defecțiuni iremediabile sau explozie. În cazul încărcării acumulatoarelor
tradiționale se vor îndepărta dopurile de umplere cu electrolit, pentru a facilita eliminarea gazelor ce se emană în
timpul procesului de încărcare.
În stare încărcată, acumulatoarele tradiționale cu plumb-acid sulfuric, pot fi depozitate cca. 4-6 luni, în mediu
uscat, ferit de îngheț, după care se recomandă încărcarea. Bateriile sigilate de calitate bună pot fi depozitate timp
de câțiva ani, fără a fi reîncărcate. Dacă tensiunea în gol scade sub valoare de 12,3-12,4 V, se declanșează
procese chimice, care deteriorează acumulatorul. Astfel acumulatorul trebuie încărcat preventiv. Acest
încărcător nu permite descărcarea acumulatorului sub 12,8V.
Curățați bornele acumulatorului cu o lavetă moale, ușor umezită, după care ștergeți-le cu o lavetă uscată. În
cazul acumulatoarelor tradiţionale cu plumb-acid, îndepărtaţi dopurile de pe celule şi umpleţi elementele cu apă
distilată până la nivelul specificat de producător. Nu reatașați dopurile, pentru a permite eliminarea gazelor care
se emană pe parcursul procesului de încărcare. În schimb, acumulatoarele sigilate cu valvă regulatoare sunt de
construcţie compactă şi nu permit asemenea intervenţii. Urmaţi întotdeauna instrucţiunile producătorului.
Așezați încărcătorul la distanța maximă permisă de cablurile conductoare, deoarece gazele emanate în timpul
procesului de încărcare sau eventuala revărsare a acidului pot deteriora încărcătorul. Nu așezați încărcătorul
niciodată sub/deasupra/lângă acumulator! Nu puneți nimic pe încărcător și nu-l acoperiți, respectiv asigurați circulația
liberă a aerului în jurul acestuia! ATENȚIE! Pericol de explozie! Gazele toxice emanate pot exploda din cauza unei
scântei sau a unei flacăre. Preveniți astfel de situații! Nu mișcați cablurile conductoare în timpul procesului de
încărcare și nu cuplați nici un aparat electric în apropiere! Asigurați aerisirea necesară și potrivită în timpul încărcării!
CONECTAREA ACUMULATORULUI LA ÎNCĂRCĂTOR
Înainte de conectarea sau îndepărtarea clemelor scoateți încărcătorul de sub tensiunea de rețea, și îndepărtați
fișa cablului de alimentare din priză! Evitați contactul dintre cleme sau atingerea acestora de diverse obiecte
metalice! Nu stați cu fața la acumulator și îndepărtați-vă de acesta înainte de cuplarea încărcătorului la tensiunea
de rețea. În general așezarea unei cleme deschise pe bornă se realizează mai ușor de deasupra, decât din
lateral. Cod de culori: roșu: pozitiv (+), negru: negativ (-).
Dacă acumulatorul este în vehicul***
Îndepărtaţi conectoarele acumulatorului pentru a întrerupe legătura electrică dintre acumulator şi autovehicul
(prima dată se va decupla borna legată la caroserie, care este de regulă polul negativ). Procedând astfel puteţi
proteja aparatura electronică instalată în autovehicul şi reduce durata încărcării. Asiguraţi-vă că aţi oprit toate
dispozitivele electronice cuplate la bordul autovehiculului şi aţi scos cheia de contact din locaşul acestuia. Gazele
toxice emanate în decursul încărcării pot exploda dacă vin în contact cu o scânteie. Din această cauză
încărcarea acumulatorului fără îndepărtarea acestuia din autovehicul implică riscuri deosebit de mari. Pe durata
încărcării nu mişcaţi nici cablurile conductoare şi nici capota motorului sau uşile maşinii, nu porniţi motorul ori
vreun un aparat electric cuplat la bordul autovehiculului. Aveţi grijă la piesele ascuţite, precum şi la cele rotative
sau aflate în mişcare; la cabluri, la curelele de transmisie şi la ventilatoare! Amplasaţi încărcătorul la o distanţă
maximă de autovehicul, ce vă permit cablurile conductoare!
Verificați polaritatea bornelor acumulatorului. De regulă, diametrul polului pozitiv (+ / roșu) este mai
mare decât diametrul celui negativ (- / negru).
1. Conectați cablul de alimentare cu clemă de cablul încărcătorului.
2. Conectați clema polului pozitiv (+ / roșu) de borna pozitivă a acumulatorului.
3. Conectați clema polului negativ (+ / negru) de borna negativă a acumulatorului.
4. Conectați cablul de alimentare la rețeaua electrică și astfel încărcătorul este pregătit pentru
funcționare.
5. Aprinderea LED-ului roșu (5.) semnalează conectarea inversă sau defectarea acumulatorului.
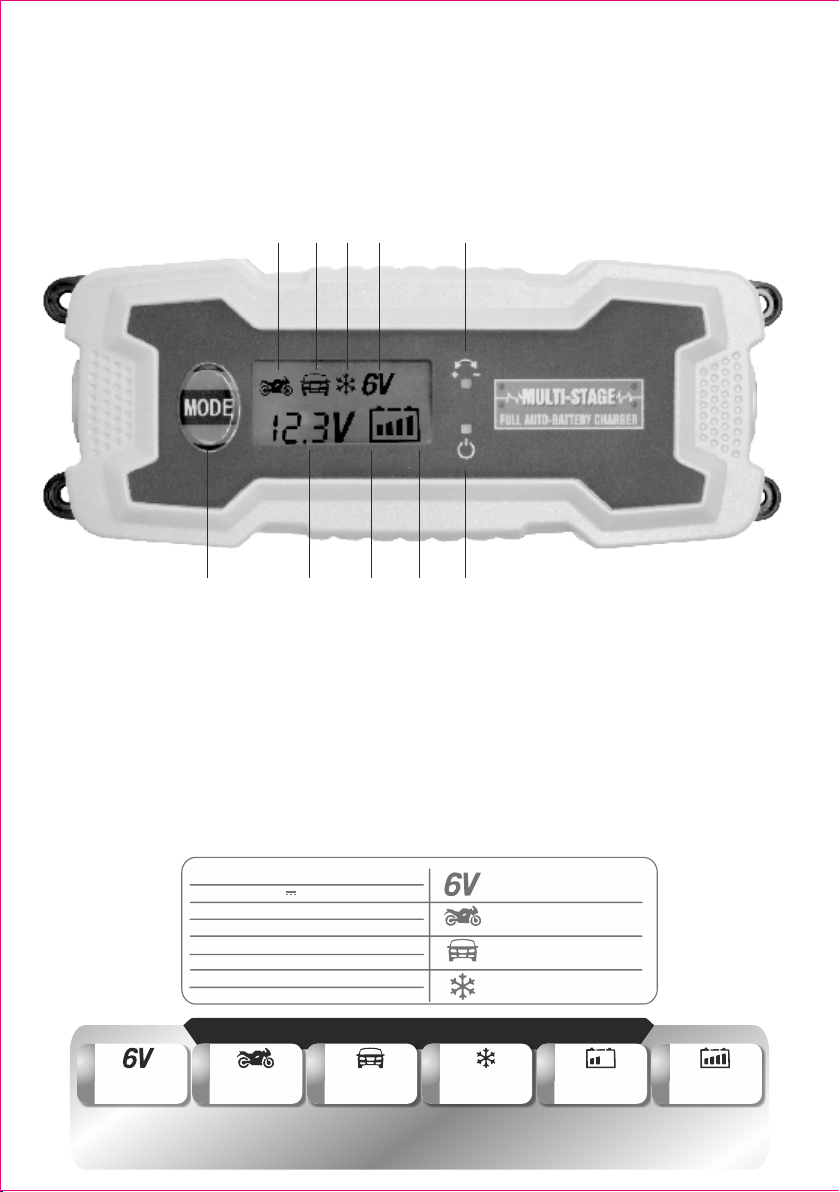
6. Selectați programul dorit prin apăsarea fermă, repetată a butonului MODE (10.). Pentru efectuarea aceastei
operațiuni veți avea ocazia imediat după conectarea la rețea, când de încărcător este conectat un
acumulator. În caz contrar pe ecran va apărea mesajul „Err”. Dacă doriți să modificați programul selectat în
timpul procesului de încărcare, scoateți încărcătorul de sub tensiune, așteptați câteva minute și reconectați-l
la rețea.
7. La finalizarea procesului de încărcare toate cele patru linii vor fi luminate în iconița de acumulator (7.)
de pe ecran. În funcție de condiții, acest proces poate dura până la 25-30 de ore. La finalizarea încărcării
deconectați fișa cablului de încărcare din priza de rețea și îndepărtați clemele în ordine inversă. Prima
dată detașați clema polului negativ (- / negru), iar ulterior cel aferent polului pozitiv (+ / roșu).
După conectarea la rețeaua electrică, încărcătorul va rula un program de diagnosticare. Va verifica polaritatea
acumulatorului conectat, eventuala stare de sulfatare, condiția actuală și starea de funcționare a încărcătorului.
În caz de nevoie va iniția automat procesul de desulfatare, urmat de 3+1 încărcări ciclice.
***Recomandăm paşii de mai sus – în calitate de producător – în vederea sporirii siguranţei în exploatare. Interzicem încărcarea
acumulatorului fără îndepărtarea acestuia din autovehicul în situaţia în care acumulatorul a rămas conectat la circuitele electrice ale
vehiculului. În schimb, conform prevederilor standardului în vigoare (EN 60335-2-29), instrucţiunile de utilizare trebuie să cuprindă şi metoda
prezentată în cele de mai jos: Prima dată, încărcătorul trebuie cuplat la borna care nu este conectată la caroserie. Celălalt pol trebuie
conectat ulterior la caroserie astfel încât locul conectării să fie cât mai departe de acumulator şi de sistemul de alimentare cu carburant.
Numai după efectuarea acestor operaţiuni încărcătorul va putea fi conectat la reţeaua de alimentare cu tensiune electrică. După încheierea
procesului de încărcare, se va scoate prima dată fişa cablului de alimentare din priza de perete, urmată de deconectarea polului cuplat la
caroserie şi numai la sfârşit de deconectarea polului care vine în contact cu acumulatorul.
Dacă acumulatorul a fost îndepărtat din vehicul
Pașii conectării sunt identici cu cei descriși mai sus. Procesul de încărcare poate fi oricând întrerupt. Scoateți fișa
cablului de conectare din priza de perete, apoi îndepărtați clema neagră, urmată de cea roșie. La următoarea
încărcare trebuie setat din nou modul de lucru cu ajutorul butonului MODE (10.).
ETAPELE DE ÎNCĂRCARE
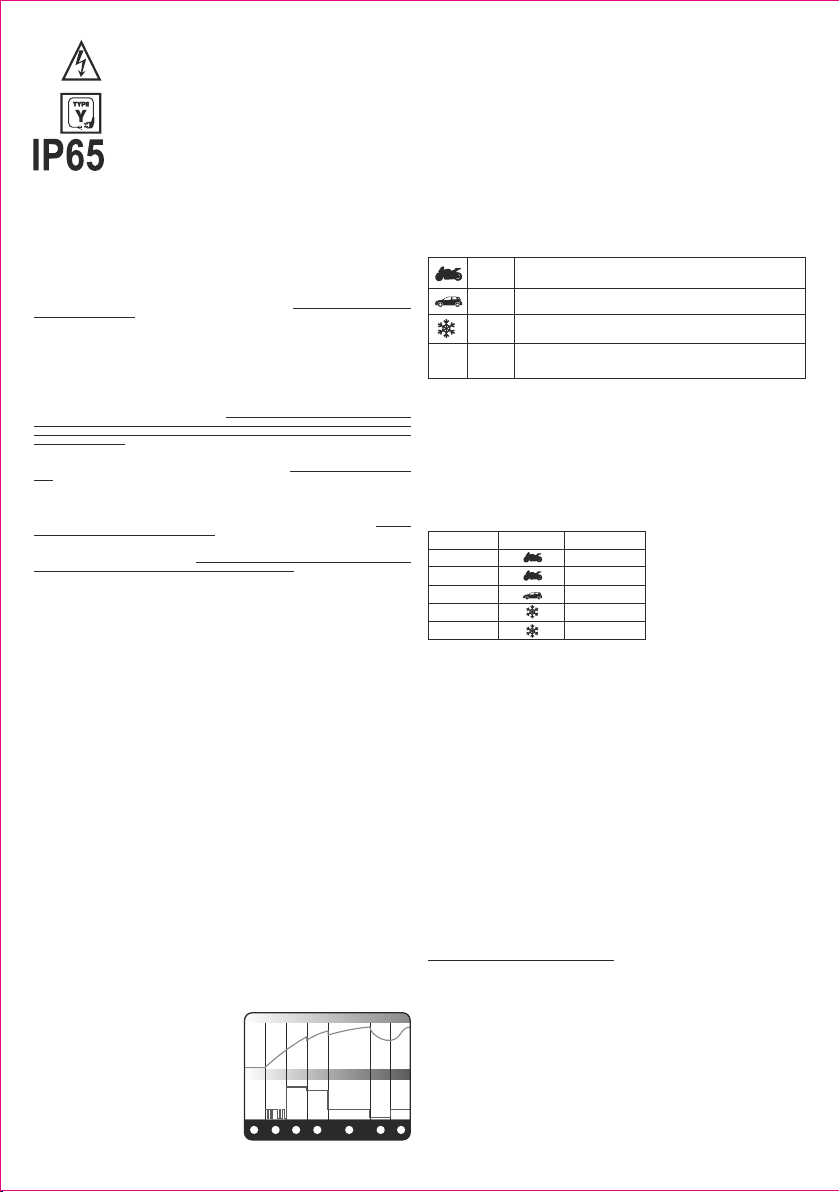
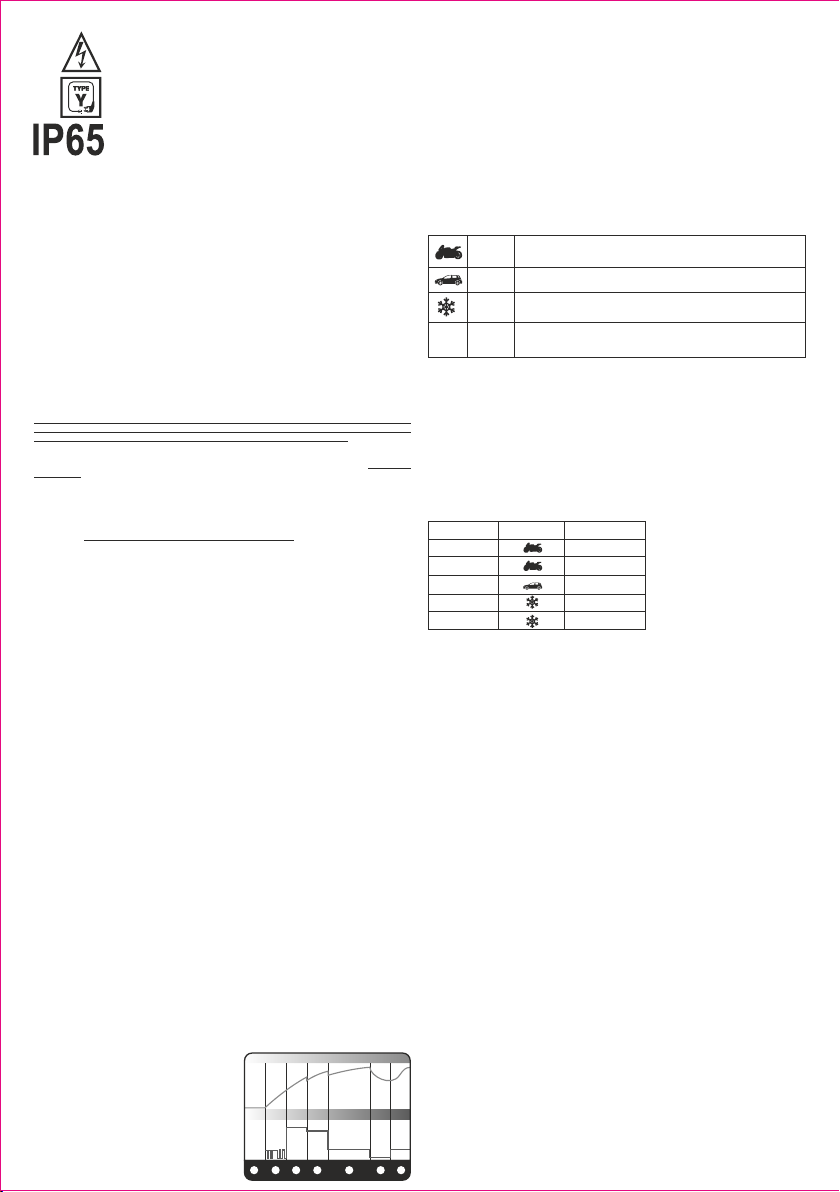
Acest aparat profesional de încărcare funcționează complet automat, cu 4+1 moduri de încărcare, în 5 etape. La
punerea în funcțiune, după finalizarea testelor de diagnosticare, procesul de încărcare a unui acumulator uzat
începe cu desulfatarea. În urma impulsurilor de curent cu o intensitate de 0,8A tensiunea acumulatorului va
crește la 7,5…10,5V. După acest pas încărcarea se realizează prin curent constant (3,8A±0,3A), până la
atingerea tensiunii prescrise (12,8V±0,2V). La acest punct aparatul va comuta pe încărcare delicată, la un curent
mai mic (3,0A±0,2A), în timp ce tensiunea crește treptat până la 14,1V±0,2V. În următoarea fază curentul de
încărcare este de 0,8A. La atingerea capacității maxime a acumulatorului, va începe o încărcare de
întreținere/mentenanță la un curent de 0,1-0,2A. Astfel procesul de încărcare s-a finalizat.
Dacă păstrați acumulatorul conectat de încărcător pe perioadă lungă, în urma autodeclanșării tensiunea
acestuia va scădea treptat. În cazul în care scade până la valoarea de 12,8 Volți, în locul încărcării de întreținere
se va cupla modul de încărcare ca curent mărit (0,8A), până se ajunge la din nou la capacitate maximă. Această
metodă asigură faptul, că acumulatorul va putea fi pus în funcțiune pe o perioadă mai lungă de timp după
încărcare. Timpul de încărcare depinde de tipul, capacitatea, starea actuală a acumulatorului, precum de modul
de încărcare și de temperatura de mediu.
Nivelul de încărcare, conform semnelor iconiței de acumulator:
0. bețișor: 12,5V
I. bețișor: 12,5-13V
II. bețișor: 13-13,9V
III. bețișor: 13,9V
IV. bețișor: încărcat
1. diagnoză, verificare polaritate și sulfați
2. regenerare, îndepărtare automată sulfați după caz
3. încărcare normală la curent continuu mare (3,8A)
4. încărcare delicată la curent redus până la capacitatea
de 80% (3,0A)
5. încărcare de adâncime la curent mic până
la capacitatea de 100% (0,8A)
6. încărcare de întreținere și monitorizare (0,2A)
7. încărcare la curent redus sub 12,8V până
la capacitatea de 100% (0,8A)
TIPURI DE ACUMULATOR ȘI SETĂRI
Încărcătorul se setează ușor la diferitele tipuri de acumulator, de diferite stări. Următoarele sugestii sunt doar
orientative. Informații mai precise veți putea obține de la producătorul acumulatorului.
Prin apăsarea butonului MODE (10.) puteți selecta dintre funcții.
ATENȚIE! Câteva tipuri de acumulatoare sigilate impun condiții de încărcare aparte. Verificați întotdeauna
instrucțiunile producătorului! În condiții de temperatură ambientală prea ridicată, tensiunea de ieșire scade
automat! Tensiunea nominală de ieșire la vehicule care funcționează cu acumulator de 12 Volți, este de fapt 14,4
Volți!
MOD DE ÎNCĂRCARE PE TIMP DE IARNĂ
În cazul în care temperatura ambientală este scăzută, acumulatorul se încarcă și se descarcă mai greu. La
temperaturi de +1…+5C (de ex. în garaj) se recomandă selectarea modului de încărcare pe timp de iarnă prin
apăsarea butonului MODE (10.). În acest caz tensiunea de încărcare va crește puțin (14,7V/3,8A).
Acumulatoarele sigilate pot fi sensibile la acest mod de încărcare, astfel nu utilizați acest mod, dacă producătorul
recomandă altceva. Este interzisă încărcarea unui acumulator înghețat! Exemplu: timpul necesar de încărcare
pentru un acumulator descărcat de 12V/90Ah poate dura până la 25-30 ore.
Date informative cu privire la atingerea nivelului de încărcare de 80% la un acumulator descărcat:
DEPANARE
Dacă încărcătorul nu comută nici după 3 zile din modul de încărcare complet în modul de întreținere, s-a produs
o eroare. Cauzele posibile sunt:
- Acumulatorul este probabil uzat și trebuie înlocuit.
- Acumulatoarele cu conținut ridicat de antimoniu se pot comporta diferit; ocazional pot permite încărcătorului un
proces de încărcare de durată prea lungă, ajungând la supraîncărcarea acumulatorului. Evitați astfel de situații!
- Acumulatoarele sulfatate, învechite se încarcă mai greu, astfel timpul de încărcare este mai lung. Un
acumulator foarte uzat nu poate fi încărcat complet. Din această cauză trebuie să vă asigurați – înainte de a lăsa
aparatul fără supraveghere – că încărcătorul a comutat după finalizarea procesului de încărcare în modul de
întreținere. În cazul în care s-a inițiat modul de întreținere, totul este în regulă. Dacă încărcătorul nu comută pe
modul de întreținere nici după 3 zile, probabil acumulatorul este neutilizabil și se recomandă schimbarea
acestuia.
Dacă aparatul nu încarcă, probabil s-a produs una din situațiile de mai jos:
- aparatul nu primește tensiune de rețea; verificați fișa cablului de rețea.
- s-a aprins LED-ul de semnalizare malfuncționare (5.), pentru că polaritatea este inversă.
- clemele nu au contact potrivit cu bornele sau s-a produs un scurtcircuit.
- probabil acumulatorul este defect și nu se poate încărca.
MĂSURI DE PRECAUȚIE
Dacă în urma încărcării normale în 4 trepte s-a declanșat încărcarea de întreținere, acumulatorul a fost încărcat
complet. Încărcătorul menține nivelul maxim de încărcare. Durata acestei etape depinde de cantitatea de sarcină
electrică pierdută de acumulator. Încărcătorul poate să rămână conectat de un acumulator neutilizat. În acest
scop anexăm în pachet, pe lângă contactele tip clemă și papuci inelari cu diametru de 8 mm, ce se pot prinde
ușor de borne cu șuruburi. Totodată recomandăm supravegherea și verificarea procesului de încărcare. Nu este
indicat utilizarea încărcătorului pe perioadă lungă, fără supraveghere.
Dacă lucrați / vă aflați în apropierea unui acumulator plumb-acid, asigurați-vă că mai este cineva în apropiere
pentru a vă putea ajuta în caz de nevoie. Dacă acidul a venit în contact cu pielea, spălați suprafața cu apă
abundentă și săpun. Aveți o grijă deosebită, ca lichidul coroziv să nu intre în contact cu ochii. Dacă totuși acidul a
venit în contact cu ochii, spălați ochiul afectat cu apă curată și rece timp de cel puțin 10 minute, apoi adresați-vă
unui medic. Este interzisă prezența și/sau operarea încărcătorului în apropierea copiilor! Folosirea ochelarilor,
mănușilor și hainei de protecție sunt obligatorii. Nu vă atingeți fața sau ochii când lucrați cu acumulator.
Feriți-vă de a scăpa unelte metalice pe acumulator sau pe clemele acumulatorului. Acest lucru poate cauza
scurtcircuit și/sau scânteie și explozie. Nu purtați obiecte metalice (inel, brățară, ceas de mână, lănțișor ...).
Curentul mare de la scurtcircuit poate cauza răni de arsură!
Încărcați acumulator doar în spații bine aerisite, uscate! Supravegheați procesul de încărcare, însă numai din
depărtare! Dacă acumulatorul se încălzește prea mult sau observații acumulare considerabilă de gaze, scoateți
încărcătorul de sub tensiune și continuați procesul mai târziu! Dacă curentul de încărcare atinge valoarea de
14.4 Volți, se poate iniția o cumulare considerabilă de gaze. Șansele scad, când încărcătorul comută pe modul
de încărcare de întreținere și totodată scade considerabil curentul de încărcare.
CURĂȚARE
Înainte de curățare scoateți aparatul de sub tensiunea de rețea prin îndepărtarea fișei cablului de rețea din priză!
Îndepărtați clemele de pe borne și evitați contactul dintre acestea, precum și cu alte obiecte metalice! Utilizați o
lavetă moale, uscată. Nu folosiți detergenți agresivi și lichide!
Atenție! În cazul în care acidul s-a scurs din acumulator, folosind mănuși de protecție ștergeți suprafața afectată
cu o lavetă uscată!
Pericol de electrocutare! Este interzisă demontarea, modificarea aparatului sau a părților
componente! În cazul deteriorării oricărei părți scoateți imediat aparatul de sub tensiune și
adresați-vă unei persoane calificate.
În cazul în care cablul de conectare s-a deteriorat, schimbarea poate fi efectuată doar de către
producător, un service agreat de acesta sau o persoană cu calificare similară!
Protejat împotriva pătrunderii prafului și a jetului de apă. Cablul de conectare nu este protejat,
este recomandat pentru utilizare în interior.
6 V
max.
14,4V/0,8A
max.
14,4V/3,8A
max.
14,7V/3,8A
max.
7,3V/0,8A
Mod de încărcare normal, la curent redus, pentru acumulatoare de 12 Volți, cu o
capacitate mai mică de 14 Ah.
Setare recomandată, la curent mare, pentru acumulatoare de 12 Volți, la cele
tradiționale (plumb-acid) 14-120 Ah, respectiv cele care nu necesită întreținere (cu
electrolit gelifiat, fibră de sticlă).
Setare recomandată pentru încărcarea acumulatoarelor la temperaturi scăzute
hideg (+1…+5°C). Se recomandă de asemenea și în cazul multor acumulatoare
bazate pe tehnologie cu fibră de sticlă absorbantă (AGM).
Acest mod de încărcare la curent mic este unul normal, pentru acumulatoare cu
tensiune nominală de 6 Volți.
Capacitate (Ah)
2
8
14
50
90
Durata de încărcare (h)
2-3
8-10
3-4
12-14
23-26
Mod de lucru
V7.5-10.5 10.5-12.8 14.1 14.4 14.4 12.8
A0.8 3.8 3.0 0.8 0.2 0.8
1 2 3 4 5 6 7