Sonny's Buff-n-Dry TOP Series User manual
Buff-n-Dry™
Owner’s Manual
Sonny's Enterprises, Inc.
5605 Hiatus Road
Tamarac, Florida 33321
16v1

Equipment Program - Manuals
Buff-n-Dry™ / TOP Series
© SONNY’S The CarWash Factory SonnysDirect.com
This document is confidential and proprietary to SONNY’S and cannot be used, disclosed or Page 2 of 25
duplicated without prior written consent. Content, prices and availability subject to change without notice. 6.7.2016
OwnersManual_Dryer_Buff-n-Dry_16v1
*Table of Contents*
WARNING *SAFETY REQUIREMENTS* WARNING..................................................................3
*INTRODUCTION* .......................................................................................................................5
Product Specifications...............................................................................................................6
*INSTALLATION* ........................................................................................................................8
Utilities Requirements ...............................................................................................................8
Dimensions ...............................................................................................................................9
Adjustments and Testing.........................................................................................................19
*GENERAL OPERATION*.........................................................................................................21
*PREVENTIVE MAINTENANCE*...............................................................................................23
*WARRANTY*............................................................................................................................24
*CUSTOMER SERVICE* ...........................................................................................................25

Equipment Program - Manuals
Buff-n-Dry™ / TOP Series
© SONNY’S The CarWash Factory SonnysDirect.com
This document is confidential and proprietary to SONNY’S and cannot be used, disclosed or Page 3 of 25
duplicated without prior written consent. Content, prices and availability subject to change without notice. 6.7.2016
OwnersManual_Dryer_Buff-n-Dry_16v1
WARNING *SAFETY REQUIREMENTS* WARNING
1. All employees must be thoroughly trained in safe operation and standard maintenance
practices. All employees must review this entire manual monthly.
2. Do not enter the wash tunnel when the equipment is operating. Death or dismemberment
may occur.
3. Do not wear loose fitting clothing or jewelry around moving equipment. Do not allow any
part of your body or other objects (including ladders, hoses or tools) to come in contact
with moving equipment. Entanglement may result causing death or dismemberment.
4. Do not leave a ladder or any other items such as wash down hoses or tools in the wash
tunnel while equipment is running. Vehicle damage and injury, including death, can
occur.
5. Always exercise caution when walking (never run) through the wash tunnel as there may
be slippery conditions. Be careful so you do not bump into or trip over equipment.
6. Only those employees specifically instructed and trained by the location management are
permitted to enter the wash tunnel to perform inspections or maintenance. At least two
qualified maintenance people must be present when performing equipment repairs or
preventive maintenance.
7. Do not perform any maintenance or work on equipment unless you first perform Lock-Out
Safety Precautions. All electrically powered equipment must have manually operated
disconnects capable of being locked in the “OFF” position. Equipment that has been
“locked out” for any reason must be restarted only by the person who performed the “lock
out” operation.
8. When working on any equipment that is higher than your shoulders, always use a
fiberglass ladder that is in good condition.
9. Do not attempt to repair or adjust any pressurized liquid or pneumatic part, hose, pipe or
fitting while that equipment is in operation.
10.Electrical connections and repairs must be performed by a Licensed Electrician Only.
11.Emergency “STOP” buttons must be well marked and their location and proper use
reviewed with all personnel. Any activated “STOP” button must be reset only by the
person who activated it. Clear the wash tunnel of any people, ladders, hoses, tools and
other loose items before restarting the equipment. An audible device must sound to warn
people that the equipment is starting.
12.Do not operate any piece of equipment that requires safety covers with those covers
removed or improperly installed. Do not operate any piece of equipment if any
component of that piece is suspected to be defective or malfunctioning.

Equipment Program - Manuals
Buff-n-Dry™ / TOP Series
© SONNY’S The CarWash Factory SonnysDirect.com
This document is confidential and proprietary to SONNY’S and cannot be used, disclosed or Page 4 of 25
duplicated without prior written consent. Content, prices and availability subject to change without notice. 6.7.2016
OwnersManual_Dryer_Buff-n-Dry_16v1
13.Store all cleaning and washing solutions and oils in a well-ventilated area. Clean up fluid
spills immediately to prevent hazardous safety conditions. Be certain to follow all safety
procedures on SDS Sheets for each chemical product used.
14.All hydraulic and electric systems in the wash tunnel equipped with a torque relief or
overload should be checked and set at the minimum amount that will allow for proper
functionality under normal washing conditions.
15.No unauthorized people should ever be permitted in the wash tunnel or near the
equipment at any time. * * *
! ! CAUTION ! !
When a piece of equipment must be in operation during inspection or maintenance, one
qualified technician must stay at the power disconnect switch while another qualified
technician performs the inspection or maintenance.

Equipment Program - Manuals
Buff-n-Dry™ / TOP Series
© SONNY’S The CarWash Factory SonnysDirect.com
This document is confidential and proprietary to SONNY’S and cannot be used, disclosed or Page 5 of 25
duplicated without prior written consent. Content, prices and availability subject to change without notice. 6.7.2016
OwnersManual_Dryer_Buff-n-Dry_16v1
*INTRODUCTION*
This Owner’s Manual contains information that is vital to the successful
installation, operation and maintenance of your SONNY’S vehicle washing
equipment.
Please read, and understand, the full contents of this manual before
installation and operation of the equipment. Keep this booklet in a location
where it may be used for ongoing reference.
Should you have any questions on the operation or servicing of this
equipment please contact
TECHNICAL SERVICES DEPT.
SONNY’S ENTERPRISES INC.
5605 Hiatus Road
TAMARAC, FLORIDA 33321
TELEPHONE: 800-327-8723 FAX: 800-495-4049

Equipment Program - Manuals
Buff-n-Dry™ / TOP Series
© SONNY’S The CarWash Factory SonnysDirect.com
This document is confidential and proprietary to SONNY’S and cannot be used, disclosed or Page 6 of 25
duplicated without prior written consent. Content, prices and availability subject to change without notice. 6.7.2016
OwnersManual_Dryer_Buff-n-Dry_16v1
Product Specifications
Designed to occupy 241” of tunnel length and 144” width
4” x 4” aluminum frame and legs for stability and durability
Pivot bearing is solid UHMW and with a grease fitting to increase
smoothness of operation
Double roller bearings on shaft
6” Unihub
New Wrap header for complete retract
Unit is available as electric or hydraulic drive
Hydraulic brush drive motors use 6GPM @ 800PSI
Electric brush drive motors are 1.5 hp each
Pivot shaft constructed of 1½” stainless steel
Hub that doesn’t absorb water with Drytex™
45 degree Restrict-O-Flex coupling for smooth operation
Pneumatic retract controls standard
Stainless steel brush hangers
Brush tracks the contour of the vehicle using only a counterweight
1/2 inch city water connection

Equipment Program - Manuals
Buff-n-Dry™ / TOP Series
© SONNY’S The CarWash Factory SonnysDirect.com
This document is confidential and proprietary to SONNY’S and cannot be used, disclosed or Page 7 of 25
duplicated without prior written consent. Content, prices and availability subject to change without notice. 6.7.2016
OwnersManual_Dryer_Buff-n-Dry_16v1

Equipment Program - Manuals
Buff-n-Dry™ / TOP Series
© SONNY’S The CarWash Factory SonnysDirect.com
This document is confidential and proprietary to SONNY’S and cannot be used, disclosed or Page 8 of 25
duplicated without prior written consent. Content, prices and availability subject to change without notice. 6.7.2016
OwnersManual_Dryer_Buff-n-Dry_16v1
*INSTALLATION*
Utilities Requirements
UTILITIES INTERCONNECTION AND THE MATERIALS REQUIRED FOR
INTERCONNECTION TO SONNY’S EQUIPMENT ARE THE RESPONSIBILITY OF THE
CUSTOMER !
PERFORM ALL TRADES WORK TO ALL APPLICABLE LOCAL AND
NATIONAL CODES !
Water
The Customer's Plumber is to provide and install a 1/2 inch city water line @60PSI
(nominal) to the solenoid valve on the chemical distribution system for the Washer.
Electrical
The Customer's Electrician is to provide and install single phase power from the (24 or
110 VAC as determined at time of order) from the Customer’s Controller system to the
motor starter coil for the hydraulic power pack or VFD feeding the brush.
The Customer's Electrician is to provide and install single phase power from the remote
push-button station through the tunnel equipment programmer to the supplied air
solenoid valve on the Air Distribution Manifold for retract of both washers upon selective
signal.
Where applicable, the Customer's Electrician is to provide materials and install 208VAC
or 230VAC or 460VAC, 3-phase, 60Hz power ot the electric motor on the hydraulic power
pack or VFD panel from a properly sized three pole circuit breaker and motor starter with
three thermal overloads.
Compressed Air
The Customer's Plumber is to provide and install a 1/2 inch compressed air line from the
Air Compressor to the Air Distribution Manifold for the Retract functions.
Equipment Program - Manuals
Buff-n-Dry™ / TOP Series
© SONNY’S The CarWash Factory SonnysDirect.com
This document is confidential and proprietary to SONNY’S and cannot be used, disclosed or Page 9 of 25
duplicated without prior written consent. Content, prices and availability subject to change without notice. 6.7.2016
OwnersManual_Dryer_Buff-n-Dry_16v1
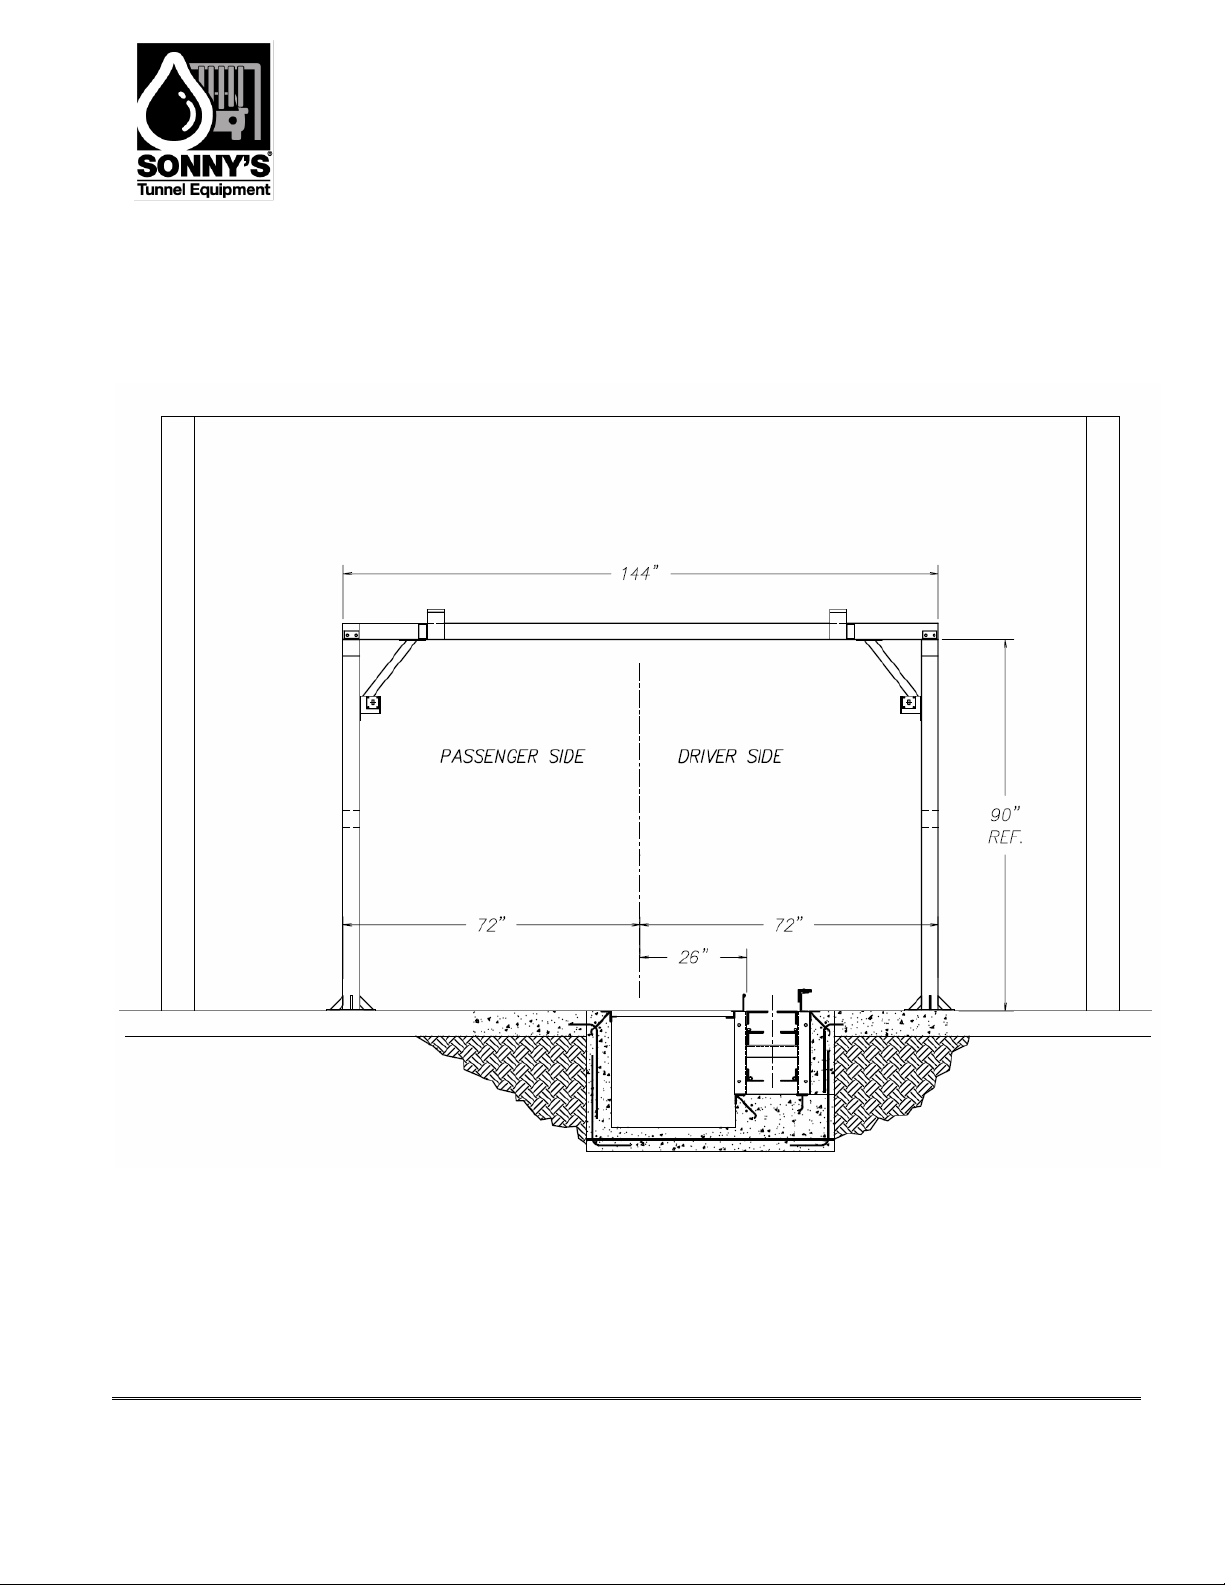
Dimensions
Figure #1

Equipment Program - Manuals
Buff-n-Dry™ / TOP Series
© SONNY’S The CarWash Factory SonnysDirect.com
This document is confidential and proprietary to SONNY’S and cannot be used, disclosed or Page 10 of 25
duplicated without prior written consent. Content, prices and availability subject to change without notice. 6.7.2016
OwnersManual_Dryer_Buff-n-Dry_16v1
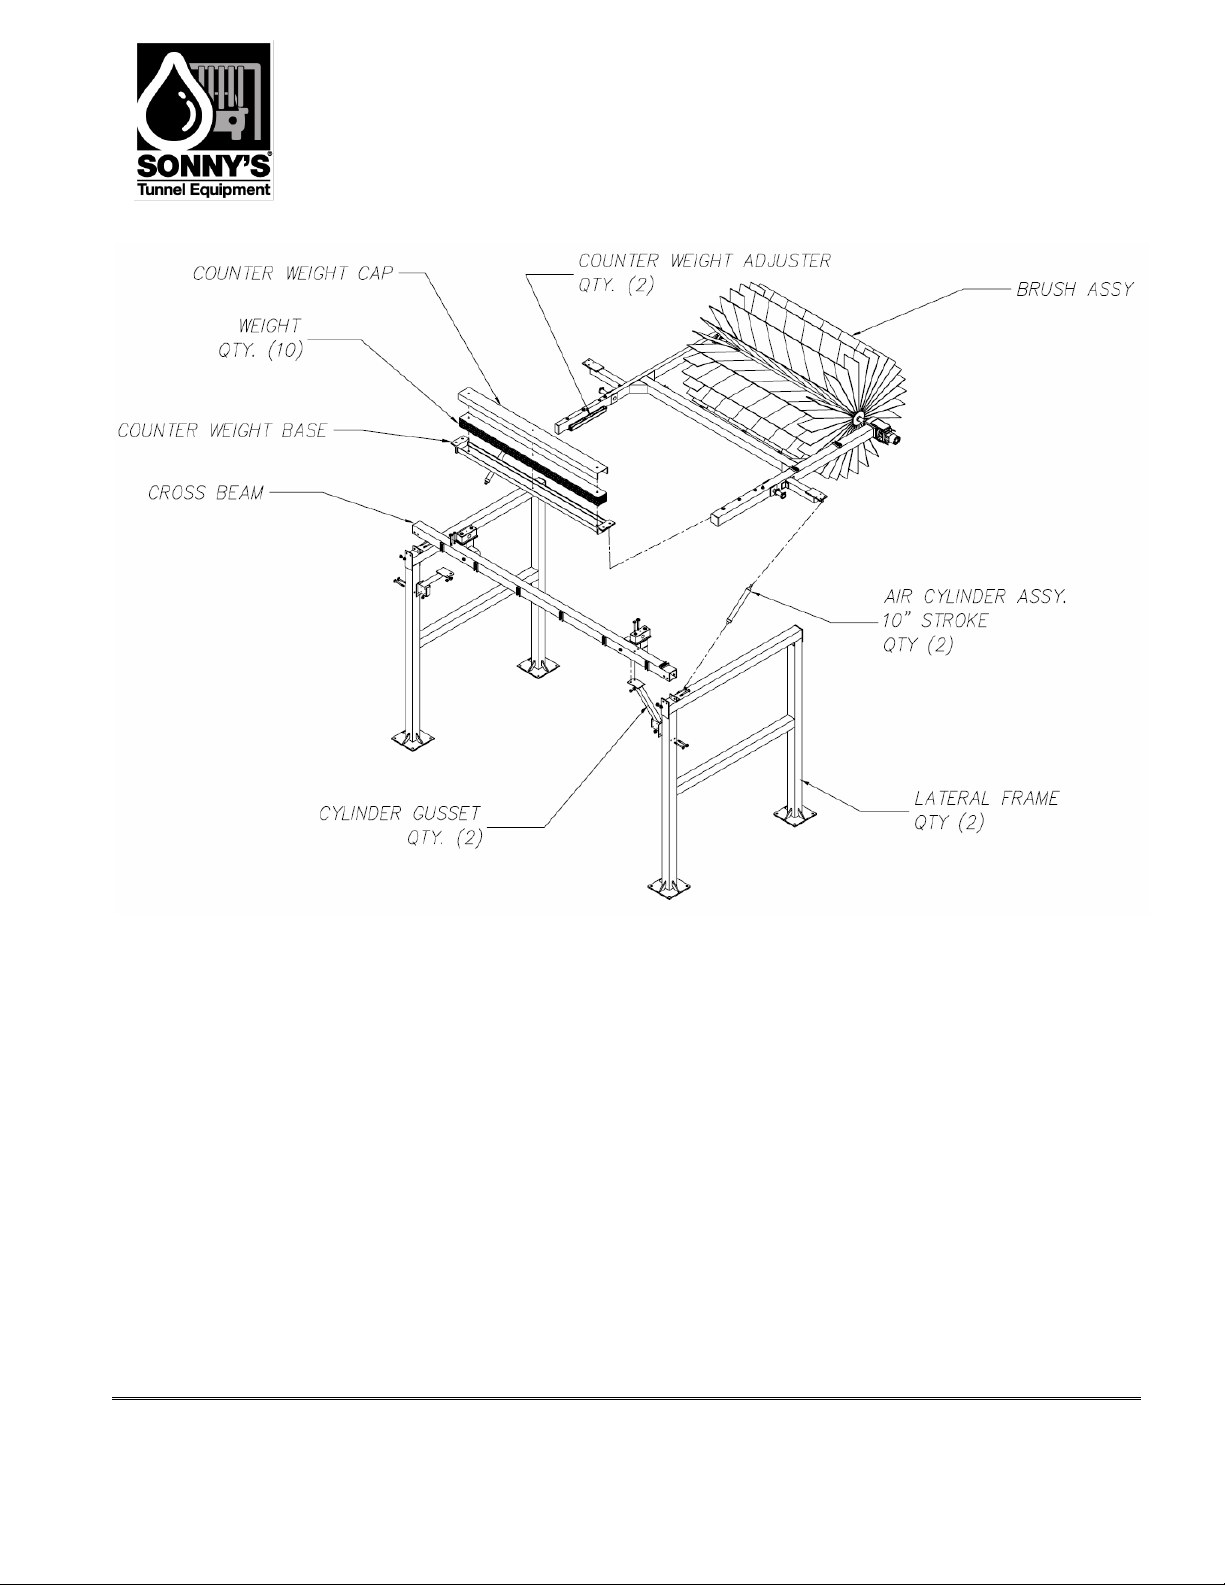
Figure #2
Equipment Program - Manuals
Buff-n-Dry™ / TOP Series
© SONNY’S The CarWash Factory SonnysDirect.com
This document is confidential and proprietary to SONNY’S and cannot be used, disclosed or Page 11 of 25
duplicated without prior written consent. Content, prices and availability subject to change without notice. 6.7.2016
OwnersManual_Dryer_Buff-n-Dry_16v1
Figure #3

Equipment Program - Manuals
Buff-n-Dry™ / TOP Series
© SONNY’S The CarWash Factory SonnysDirect.com
This document is confidential and proprietary to SONNY’S and cannot be used, disclosed or Page 12 of 25
duplicated without prior written consent. Content, prices and availability subject to change without notice. 6.7.2016
OwnersManual_Dryer_Buff-n-Dry_16v1
Figure #4

Equipment Program - Manuals
Buff-n-Dry™ / TOP Series
© SONNY’S The CarWash Factory SonnysDirect.com
This document is confidential and proprietary to SONNY’S and cannot be used, disclosed or Page 13 of 25
duplicated without prior written consent. Content, prices and availability subject to change without notice. 6.7.2016
OwnersManual_Dryer_Buff-n-Dry_16v1
Figure #5

Equipment Program - Manuals
Buff-n-Dry™ / TOP Series
© SONNY’S The CarWash Factory SonnysDirect.com
This document is confidential and proprietary to SONNY’S and cannot be used, disclosed or Page 14 of 25
duplicated without prior written consent. Content, prices and availability subject to change without notice. 6.7.2016
OwnersManual_Dryer_Buff-n-Dry_16v1
Figure #6

Equipment Program - Manuals
Buff-n-Dry™ / TOP Series
© SONNY’S The CarWash Factory SonnysDirect.com
This document is confidential and proprietary to SONNY’S and cannot be used, disclosed or Page 15 of 25
duplicated without prior written consent. Content, prices and availability subject to change without notice. 6.7.2016
OwnersManual_Dryer_Buff-n-Dry_16v1
Figure #7

Equipment Program - Manuals
Buff-n-Dry™ / TOP Series
© SONNY’S The CarWash Factory SonnysDirect.com
This document is confidential and proprietary to SONNY’S and cannot be used, disclosed or Page 16 of 25
duplicated without prior written consent. Content, prices and availability subject to change without notice. 6.7.2016
OwnersManual_Dryer_Buff-n-Dry_16v1
Figure #8

Equipment Program - Manuals
Buff-n-Dry™ / TOP Series
© SONNY’S The CarWash Factory SonnysDirect.com
This document is confidential and proprietary to SONNY’S and cannot be used, disclosed or Page 17 of 25
duplicated without prior written consent. Content, prices and availability subject to change without notice. 6.7.2016
OwnersManual_Dryer_Buff-n-Dry_16v1
Equipment Installation
Buff-n-Dry Installation
Tools
Consumables
1. Safety Glasses
1. Anti-Seize Compound
2. ½” Drive Ratchet Set
2. Marine Grease
3. Standard Combo Wrenches
4. 4' Level
5. Electric Impact Wrench
6. 1" Hammer Drill
7. Tape Measure
8. Sledge Hammer
Work Force
Time (assuming no problems)
Two (2) persons
2.00 –4.00 hours
Installation Steps
1. Determine where the Buff-n-Dry is to be installed (See Figure #1 in the Dimensions
Section and the tunnel layout drawings for your location).
2. Sweep any debris from where the unit will stand.
3. Check all hardware and place a small amount of Anti-Seize Compound on each bolt.
4. Place the assembled frame side legs, cross beams and gussets in the area where the
unit will be permanently located (with the brush counterweight toward the entrance of the
car wash).
5. With the interconnection hardware provided by SONNY'S (boxed and attached to the
assembly frame) join the legs, cross beams and gussets to the frame "finger tight".
6. Place and anchor the unit per the dimensions shown in Figure #1. Be certain that the
entrance and exit cross beams are level (shim mounting feet, if necessary) and that each
of the 4 vertical legs are plumb.
7. Level and square the frame with the centerline of the equipment (see Figure #1 in the
Dimensions Section and the tunnel layout drawings for your location).
Note: Ensure the frame is correctly located before installing any lag bolts. Before lagging
the frame into position have a second person double check all measurements against
your tunnel equipment layout drawings to ensure all measurements were performed
correctly.

Equipment Program - Manuals
Buff-n-Dry™ / TOP Series
© SONNY’S The CarWash Factory SonnysDirect.com
This document is confidential and proprietary to SONNY’S and cannot be used, disclosed or Page 18 of 25
duplicated without prior written consent. Content, prices and availability subject to change without notice. 6.7.2016
OwnersManual_Dryer_Buff-n-Dry_16v1
8. Place an anchor bolt in each corner. Tighten all hardware.
9. Check each leg for plum and the frame for level, and then install the rest of the anchor
bolts in each leg of the frame.
10.Install brush and counterweight assembly on the frame.
11.Place the Sonny’s lift-a-ma-jig onto the frame of the Wrap and bolt into place. Bring the
forklift into the lift-a-ma-jig.
12.Bring the frame into the building as close to its final position as is practical. Lift the frame
into place.
13.Check that the Passenger Side Brush hanger arm is longer than the Driver Side, if not
the frame is not positioned correctly.
14.Check that the shock absorbers on each Brush Hanger do not "bottom out" in their fully
extended position. If this occurs move the shock mounting position to a different hole on
the mounting bracket to prevent a fully extended condition.
15.Move each brush hanger from the center of the wash tunnel so that it is parallel to vehicle
travel. With each brush hanger in this position check that the hanger is level. Up or down
adjustment of the brush hanger can be achieved by placing shim material under the
brush hanger pillow block bearings.
16.Double check that the bottom pillow block bearing for each brush hanger is EXACTLY
below the top pillow block bearing. This is necessary to provide light brush pressure
against the side of the vehicle.
17.Mount the Brush Head, Shaft and Core assembly to each Hanger Arm. Connect the pre-
plumbed hydraulic lines.
18.Orientation of the Brushes is with vehicle travel. As viewed from the top of each Brush
the DRIVER side turns COUNTERCLOCKWISE and the PASSENGER side turns
CLOCKWISE. Rotation speed of each Brush should be according to the Operating
Speeds Chart in the Adjustments and Testing Section.
19.Install the air retract cylinder and run the air lines to the manifold for the retract operation.
20.If electric run and install the power to each brush.
21. If hydraulic run and connect a 1/2 inch PRESSURE line from the Hydraulic Power
Pack to the 1/2 inch male pipe thread fitting on the BLACK high pressure hose on
the frame.
22.Run and connect the 1/2 inch RETURN line to the Hydraulic Power Pack to the 1/2
inch male pipe thread fitting on the ORANGE/RED high pressure hose on the
frame.
23.Rotation of the top brush is against vehicle travel. As viewed from the driver side
the brush turns COUNTERCLOCKWISE.

Equipment Program - Manuals
Buff-n-Dry™ / TOP Series
© SONNY’S The CarWash Factory SonnysDirect.com
This document is confidential and proprietary to SONNY’S and cannot be used, disclosed or Page 19 of 25
duplicated without prior written consent. Content, prices and availability subject to change without notice. 6.7.2016
OwnersManual_Dryer_Buff-n-Dry_16v1
Adjustments and Testing
Adjust the Cleaning Pressure of the Top Brush
Ensure the air solenoid is manually put in the wash position so there is no air pressure applied
to the retract cylinder. Adjust the position of the counterweight so that when the counterweight
is released the brush slowly moves downward. After initial adjustment manually activate and
deactivate the air retract. When deactivated the brush should fall smoothly to the down position.
Final adjustment of the counterweight can be accomplished while running test vehicles. Once
adjusted properly the cloth penetration should be about three to four inches across the entire
vehicle. If brush bounces too much the counterweight has been adjusted to far out. Adjustment
is easiest if made in small amounts, approximately ¼” to ½” at a time.
Adjust Top Brush for Smooth Retract Operation
To adjust the retract operation the air pressure regulator should be adjusted for approximately
30PSI in the retract position. The tunnel controller should be adjusted so that the brush is put
into the wash position prior to the front of the car arriving at the brush. This will entail
deactivating the retracts before the vehicle reaches the brush and setting the look ahead to
check for the proximity of the next car.
Mechanical Adjustment of the Wrap Hanger Arms
1. Install the unit so that the legs are plumb, the hanger arms are level when at the rest position
and the mounting bearings are positioned perpendicular to floor (no pitch).
2. The rest position will vary with operator preference and region. If front license plates are
present the brushes should be open slightly to clear the plate, approximately one inch
between when spinning. If there are no front plates then when spinning the tips of the cloth
should be penetrating about one inch.
3. The two brushes should return to the rest position (middle of the tunnel) with no air pressure
and no pitch to the bearings.
Operating Speeds Chart
Chain Speed
Wrap Speed
Top Speed
Wrap Air
Pressure Driver
Wrap Air
Pressure Pass
50-70CPH
70-75RPM
75-85
0PSI
0PSI
70-80CPH
80-85RPM
75-85
0-5PSI
0-5PSI
80-90CPH
85-90RPM
75-85
5-10PSI
5-15PSI
90-125CPH
90-95RPM
85-95
10-15PSI
15-25PSI

Equipment Program - Manuals
Buff-n-Dry™ / TOP Series
© SONNY’S The CarWash Factory SonnysDirect.com
This document is confidential and proprietary to SONNY’S and cannot be used, disclosed or Page 20 of 25
duplicated without prior written consent. Content, prices and availability subject to change without notice. 6.7.2016
OwnersManual_Dryer_Buff-n-Dry_16v1
Two Solenoid valves, one for each retract, are recommended for 80 or more cars per hour.
To adjust the operation of the brushes without air pressure you may adjust the position of the
pillow block bearings.
1. TO INCREASE THE PRESSURE ON THE SIDE AND BACK OF THE VEHICLE: Adjust
the bottom pillow block bearing away from the center of the tunnel. Move in 1/8 inch
increments at a time.
2. TO DECREASE THE PRESSURE ON THE SIDE AND BACK OF THE VEHICLE: Adjust
the bottom pillow block bearing towards the center of the tunnel. Move in 1/8 inch
increments at a time.
Cloth penetration should be about three to four inches on the flat surface of the car. Each of the
brushes should cover about two thirds of the back of the vehicle, overlapping in the center.
Speed and Torque Adjustment
Hydraulic
a. The speed can be adjusted on the flow control for the power pack
b. To increase the speed move the handle on the flow control closer to the number ten (10).
c. To decrease the speed move the handle on the flow control closer to the number one (1).
d. The torque must be set prior to operation and should be set between 600-900 PSI. for
information on how to set the torque please refer to the Hydraulic Power Pack manual.
Electric
a. The speed can be adjusted on the VFD (Variable Frequency Drive).
b. To increase the speed adjust the Hertz on the VFD to a higher number.
c. To decrease the speed adjust the Hertz on the VFD to a lower number.
d. The Overload on the Motor Starter protector(s) must be set at the lowest level to allow for
operation.
e. Adjust the amps in accordance with the motor(s) name plate.
Table of contents
Popular Cleaning Equipment manuals by other brands


Denios
Denios Bio.x C500 user manual

Ultrasonic
Ultrasonic BT H Series System manual

Ecolab
Ecolab Hybrid 7 Foamatic MA2iM Directions for use

Black & Decker
Black & Decker BEPW1300L Original instructions

Cleantecs
Cleantecs LR-180-GTR operating instructions

Electrolux
Electrolux McCULLOCH Orkan 2200 Important information