Sonoff DW2-Wi-Fi Instruction manual

DW2-Wi-Fi
Quick User Guide V 1.0
Wi-Fi Wireless Door/Window Sensor
EN >DE >ES >FR >IT >RU >PTCN >

1
eWeLink
eWeLink
下载APP
Download APP
APP herunterladen
Descargar la aplicación
Télécharger l'application
Scarica la APP
Cкачать приложение
Baixe o APP
1

安装电池
2Install batteries
Batterien einbauen
Coloque las baterías
Installer les piles
Installazione delle batterie
Установка батареек
Instale as baterias
2-1
2
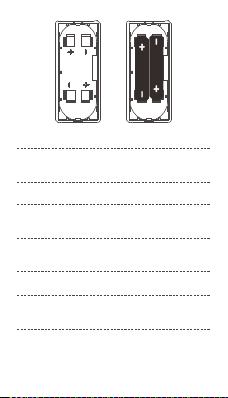
打开发射器后盖。
Remove the back cover of the transmitter.
Entfernen Sie die Rückwand des Senders.
Quite la tapa trasera del transmisor.
Retirer le couvercle arrière de l'émetteur.
Rimuovere il coperchio posteriore del
trasmettitore.
Удалите заднюю крышку передатчика.
Remova a tampa de trás do transmissor
2-2
3
Batterien in das Batteriefach einlegen anhand
der Kennzeichnung der Plus- und Minuspole.
Coloque las baterías dentro del compartimento
de batería En función de los identificadores de
polos positivos y negativos.
Insérer les piles dans le compartiment à piles
en fonction des identificateurs des pôles positif
et négatif.
Inserire le batterie nel vano batterie in base
agli identificatori dei poli positivo e negativo.
Вставьте батарейки в отсек для батареекс
учетом идентификаторов положительного
и отрицательного полюсов.
>
根据正负极标识,装上电池。
Insert batteries into the battery compartment
based on identifiers of positive and negative
poles.
Insira as baterias no lugar adequado
identificando os polos positivos e os negativo.

3
4
安装设备
Install the device
Installieren Sie das Gerät
Instale el dispositivo
Installer l'appareil
Installazione del dispositivo
Установите устройство
Instale o dispositivo
3-1
Schließen Sie die Rückabdeckung.
Cierre la tapa trasera.
Fermer le couvercle arrière.
Chiudere il coperchio posteriore.
Закройте заднюю крышку.
Close the back cover.
Coloque a tampa de novo.
2-3
合上后盖
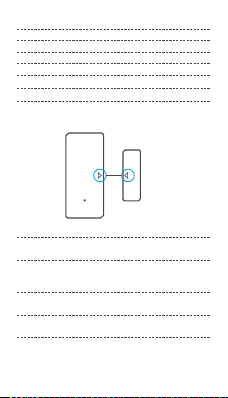
撕下3M胶保护膜。
Tear off the protective film of the 3M adhesive.
Die Schutzfolie des 3M-Klebstoffs abreißen.
Quite la lamina protectora del adhesivo 3M.
Déchirer le film protecteur de l'adhésif 3M.
Rimuovere la pellicola protettiva dell'adesivo 3M.
Оторвите защитную пленку наклейки 3M.
Retire o adesivo de proteção do 3M.
Intentealinear la línea del imán con la que se
encuentra en el transmisor durante la instalación.
Essayer d'aligner la ligne de repère sur l'aimant
avec celle du l'émetteur lors du montage.
Cercare di allineare la linea di riferimento sul
magnete con quella del trasmettitore, durante
l'installazione.
3-2
安装时发射器和磁铁上的安装对位标识尽量对齐。
Try to align the mark line on the magnet with
that on the transmitter during installation.
Versuchen Sie die Markierungslinie auf dem
Magneten bei der Montage mit der auf dem
Sender auszurichten.
5
3-3
分别粘贴在所需开合区域。
Install them in the opening and closing area
separately.
Во время установки попытайтесь совместить
линию отм етки на м а г н ите с лин и е й н а
передатчике.
Tente alinhar a marca de linha do imã com a
do transmissor durante a instalação.
Installieren Sie sie im Öffnungs- und
Schließbereich getrennt.
Instálelos por separado en el área de apertura
y de cierre.
Install them in the opening and closing area
separately.
Installarli separatamente nell'area di apertura
e di chiusura.
Устанавливайте их в област и открытия и
закрытия отдельно.
Instale-os na área de abertura e fechamento
separadamente
6
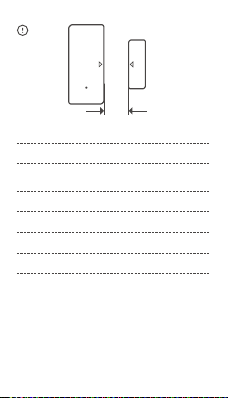
发射器和磁铁安装间隙门窗在闭合状态下小于5mm。
Make sure the installation gap is less than 5mm when
the door or the window is closed.
Achten Sie darauf, dass der Einbauspalt bei
geschlossener Tür oder geschlossenem Fenster
weniger als 5 mm beträgt.
Asegúrese de que la brecha de instalación sea menor
a 5mm cuando la puerta o ventana esté cerrada.
S'assurer que l'espace d'installation est inférieur à
5 mm lorsque la porte ou la fenêtre est fermée.
assicurarsi che la distanza di installazione sia inferiore
a 5 mm quando la porta o la finestra sono chiuse.
зазор при у ста новке должен быть менее 5 мм,
когда за крыта две рь или ок но.
7
<5mm
Certifique-se de que o espaço da instalação, quando
portas ou janelas estiverem fechadas, seja de pelo
menos 5mm.
4Enter pairing mode
Kopplungsmodus eingeben
Entre en modo emparejamiento
Entrer en mode d'appariement
Entrare in modalità di accoppiamento
Вход в режим связывания устройств
Entre no modo de pareamento
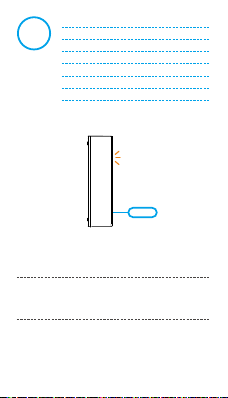
进入配网模式
长按发射器配 对 按 钮5秒直到LED指示灯呈
“闪烁”状态 , 设 备进入配网模式。
Long press the pairing button on the transmitter
for 5s with the eject pin until the LED indicator
flashes, th en the device e nters the pairing
mode.
Drücken Sie die Kopplungstaste am Sender
5 Sekunden lang mit dem Auswurfstift, bis die
LED-Anzeige blinkt, dann geht das Gerät in
den Kopplungsmodu.
8

Appuyer longuement sur le Bouton d'appairage
du l ' é met t e ur p e n dan t 5 s av e c la broc h e
d'éjection jusqu'à ce que le voyant LED clignote,
puis l'appareil passe en mode d'appairage.
Premere a lungo il Pulsante di accoppiamento
sul trasmettitore per 5 sec. con il pin di espulsione
fino a quando l'indicatore LED lampeggia, in
questo modo il dispositivo entra in modalità
di accoppiamento.
В ы п о л н я й т е до л г о е на ж а т и е кн о п к а
сопряжения на передатчике в течение 5 с
выталкивающей шпилькой, пока не начнет
мигать светодиодный инди к атор. После
эт о го у с т р о й с т в о п е р е х од и т в р еж и м
связывания устройств.
9
P r e s s i o n e n o t r a n s m i s s o r o b o t ã o d e
pareamento por 5 segundos com pino de
ejetar até que o indicador LED pisque, então
o dispositivo entrou em modo de pareamento.
Presione de manera sostenida el botón de
del transmisor durante 5 emparejamiento
segundos con el pin de expulsión hasta que
el indicador LED parpadee, luego el dispositivo
entra en modo de emparejamiento.

添加设备
Add the device
Gerät hinzufügen
Añadir el dispositivo
Ajouter l'appareil
Aggiungere il dispositivo
Добавить устройство
Adicione o aparelho
5
Qui ck Pairi ng
WIFI devices can be added in this mo
de(make sure the device is in pairing
mode).
Add D evice
Sca n QR code
GSM devices and devices with QR co
de can be added in this mode.
Bluetooth Connect
Con nect a bl uetoo th devi ce in thi s
mode.
Comp atibl e Pairi ng Mode (AP)
点击“+”,选择“蓝牙配网”,再根据app提
示进行操作。
Tap “+” and select “Bluetooth connect”, then
operate following the prompt on the APP.
Tippen Sie auf „+“, wählen Sie „Bluetooth
verbinden“ und arbeiten Sie dann gemäß der
Aufforderung auf der APP.
10

Tapez sur « + » et sélectionnez « Connexion
Bluetooth », puis suivez l'invite sur l'application.
Toccare “+” e selezionare “Connessione
Bluetooth”, quindi procedere seguendo le
indicazioni dell'APP.
Коснитесь «+» и выберите «Соединение
Bluetooth», затем выполняйте действия
после появления подсказки в приложении.
Toque “+” e selecione “conectar bluetooth”
então prossiga seguindo as instruções do
aplicativo.
Pulse “+” y seleccione “Conectar al Bluetooth”,
luego opere siguiendo las indicaciones de la
aplicación.
11
Escanee el código QR o visite el sitio web
para consultar la guía del usuario detallada.
Scannez le code QR o u visitez le s i te web
pour c onsulter l e guide détaillé.
Scansionare il codice QR o visita il sito web
per consultare la guida utente dettagliata.
Сканируйте этот QR-код или перейдите на
наш веб-сайт для просмотра подробного
руководство пользователя.
12
Scaneie o código QR ou visite o nosso website
para consultardetalhadamente o guia do usuário.
Scannen Sie den QR-Code oder besuchen Sie
d i e We b s i t e u m a u f d i e d e t a i l li er t e
Bedienungsanleitung zuzugreifen.
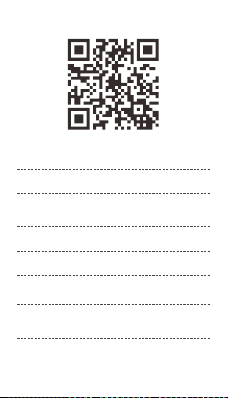
扫码或输入网址查看设备详细说明书和帮助。
User Manual
https://www.sonoff.tech/usermanuals
Scan the QR code or visit the website to learn
about the detailed user guide.

Note: This equipment has bee n tested and
found to comply with the limits for a Class B
digital device, pursuant to part 15 of the FCC
Rules. These limits are designed to provide
r e a s o n a b l e pr o t e c t i o n ag a i n s t ha r m f u l
interference in a residential installation. This
equipment generates, uses and can radiate
radio frequency energy and, if not installed
and used in accordance with the instructions,
may ca u s e h armfu l i n t erfer e n c e to radio
communications. However, there is no guarantee
FCC Radiation Exposure Statement:
This equipment complies with FCC radiation
exposure limits set forth for an uncontrolled
envir o n m e nt. This equipm e n t s hould b e
installed and operated with minimum distance
20cm between the radiator & your body. This
transmitter must not be co-located or operating
in con j u n c tion w i t h a ny oth e r a n tenna or
transmitter.
13
FCC Warning
Ch a ng e s o r m o d i fi c a t i o n s n ot expr e ss l y
approved by the party responsible for compliance
could avoid the user’s authority to operate the
equipment.
This device complies with part 15 of the FCC
Rules. Operation is subject to the following
two conditions: (1) This device may not cause
harmf u l i n terfe r e n c e, and ( 2 ) t his dev i c e
mu s t a c c e p t a ny inte r fe r en c e r ec e iv e d,
including interference that may cause undesired
operation.

14
— Reorient or relocate the receiving antenna.
— Increase the separation between the equipment
and receiver.
— Connect the equipment into an outlet on a
circuit different from that to which the receiver
is connected.
— C on s ul t the d ea l er or a n expe r ie n ced
ra d i o/TV technician for help.
that interference will not occur in a particular
installa t i on. If this equipment do e s cause
harmful i nterference t o radio or t elevision
reception, which can be determined by turning
the equipment off and on, the user is encouraged
to try to correct the interference by one or more
of the following measures:
https://www.sonoff.tech/usermanuals
Hereby, Shenzhen Sonoff Technologies Co.,
Ltd. declares that the radio equipment type
DW2-Wi-Fi is in compliance with Directive
2014/53/EU.The full text of the EU declaration
of conformity is available at the following
internet address:

15
MADE IN CHINA
Shenzhen Sonoff Technologies Co., Ltd.
1001, BLDG8, Lianhua Industrial Park, shenzhen,
GD, China
ZIP code: 518000 Website: sonoff.tech
TX Frequency:
WiFi:
RX Frequency:
WiFi:
BLE Frequency:2402-2480MHz
2412-2462MHz(802.11b)
2412-2462MHz(802.11b)

LIKE IT!
Glad to know you are satisfied with SONOFF
products.
It would mean a lot to us if you can take a minute
to share your buying experience.
Share it with your friends and family
Share it on your social media
Share it on Amazon
New arrival
Promotion
How-to videos
Get the latest news by following us:

We are so sorry for the inconvenience caused
by the product.
Please contact us for help via the email address
below.
HAVE A
PROBLEM?
support@itead.cc
We will get back to you as soon as possible.
Other manuals for DW2-Wi-Fi
5
Table of contents
Other Sonoff Accessories manuals

Sonoff
Sonoff S31 User manual

Sonoff
Sonoff MS01 User manual

Sonoff
Sonoff DW2-Wi-Fi User manual

Sonoff
Sonoff SNZB-02 User manual

Sonoff
Sonoff SNZB-02 User manual

Sonoff
Sonoff SNZB-03 User manual

Sonoff
Sonoff SNZB-03 User manual

Sonoff
Sonoff SNZB-02D User manual

Sonoff
Sonoff DW2-RF User manual

Sonoff
Sonoff SNZB-02P User manual

Sonoff
Sonoff DW2-Wi-Fi User manual

Sonoff
Sonoff DW2-RF User manual

Sonoff
Sonoff DW2-Wi-Fi User manual

Sonoff
Sonoff DW2-Wi-Fi User manual

Sonoff
Sonoff S31 User manual

Sonoff
Sonoff S55 Series User manual

Sonoff
Sonoff DW2-RF User manual

Sonoff
Sonoff S55 Series User manual

Sonoff
Sonoff DW2-RF User manual

Sonoff
Sonoff DIY DUAL R3 User manual


