Setup Guide
4-667-166-21(1)
MSFD-20U
USB 2x Speed
Floppy Disk Drive
with “Memory Stick” Slot
2002 Sony Corporation Printed in China
Read before connecting the drive
Before you can use the drive for the first time, you must
perform the procedures in this guide to install the driver
software.
When using Windows XP
1Turn on your computer. Windows starts.
CAUTION
Be sure to log on as a user with “Administrator” access privileges.
2Insert the supplied CD-ROM into the CD-ROM drive of your computer.
3Connect this drive to the USB connector of your computer.
4The “Found New Hardware
Wizard” dialog box appears.
Select “Install from a list or
specific location (Advanced)”.
5
Click [Next], select “Search for
the best driver in these
locations”, and then select the
“Include this location in the
search” check box in the screen
that appears. Click [Browse] and
select the “WinXP2K.ME” folder
on the supplied CD-ROM.
Note
If the other check box is selected, clear it
before proceeding.
6Click [Next]. Follow the instructions on the screen to complete the
installation.
Once the installation is complete, the computer detects the drive.
Note
If a dialog box prompting you to restart your computer appears, restart your computer.
7Double-click [My Computer] and confirm that a new floppy disk and
“Memory Stick” icon are present. Note
The drive letters assigned depend on your
computer. (In the example, “A” and “E”.)
When using Windows Me
1Turn on your computer. Windows starts.
2Insert the supplied CD-ROM into the CD-ROM drive of your
computer.
3Connect this drive to the USB connector of your computer.
4The “Add New Hardware Wizard” dialog box appears. Select
“Specify the location of the driver (Advanced)”.
Note
In the dialog box below, the new hardware appears as “USB Floppy Drive” (1).
Depending on your computer, the new hardware may appear as “MPF-MSRW1”. This does
not affect the setup procedure of the drive.
5Click [Next], select “Search for the best driver for your device.
(Recommended)”, and then select the “Specify a location” check
box in the screen that appears. Click [Browse] and select the
“WinXP2K.ME” folder on the supplied CD-ROM.
Note
If the other check box is selected, clear it before proceeding.
6Click [Next]. Follow the instructions on the screen to complete the
installation.
Once the installation is complete, the computer detects the drive.
Notes
• Before your computer detects the drive, messages such as “New Hardware Found” appear
and close automatically. These messages may appear several times. Wait until messages
no longer appear before proceeding to the next step.
• If a dialog box prompting you to restart your computer appears, restart your computer.
7Double-click [My Computer] and confirm that a new floppy disk and
removable disk icon are present.
Note
The drive letters assigned depend on your computer. (In the example, “A” and “E”.)
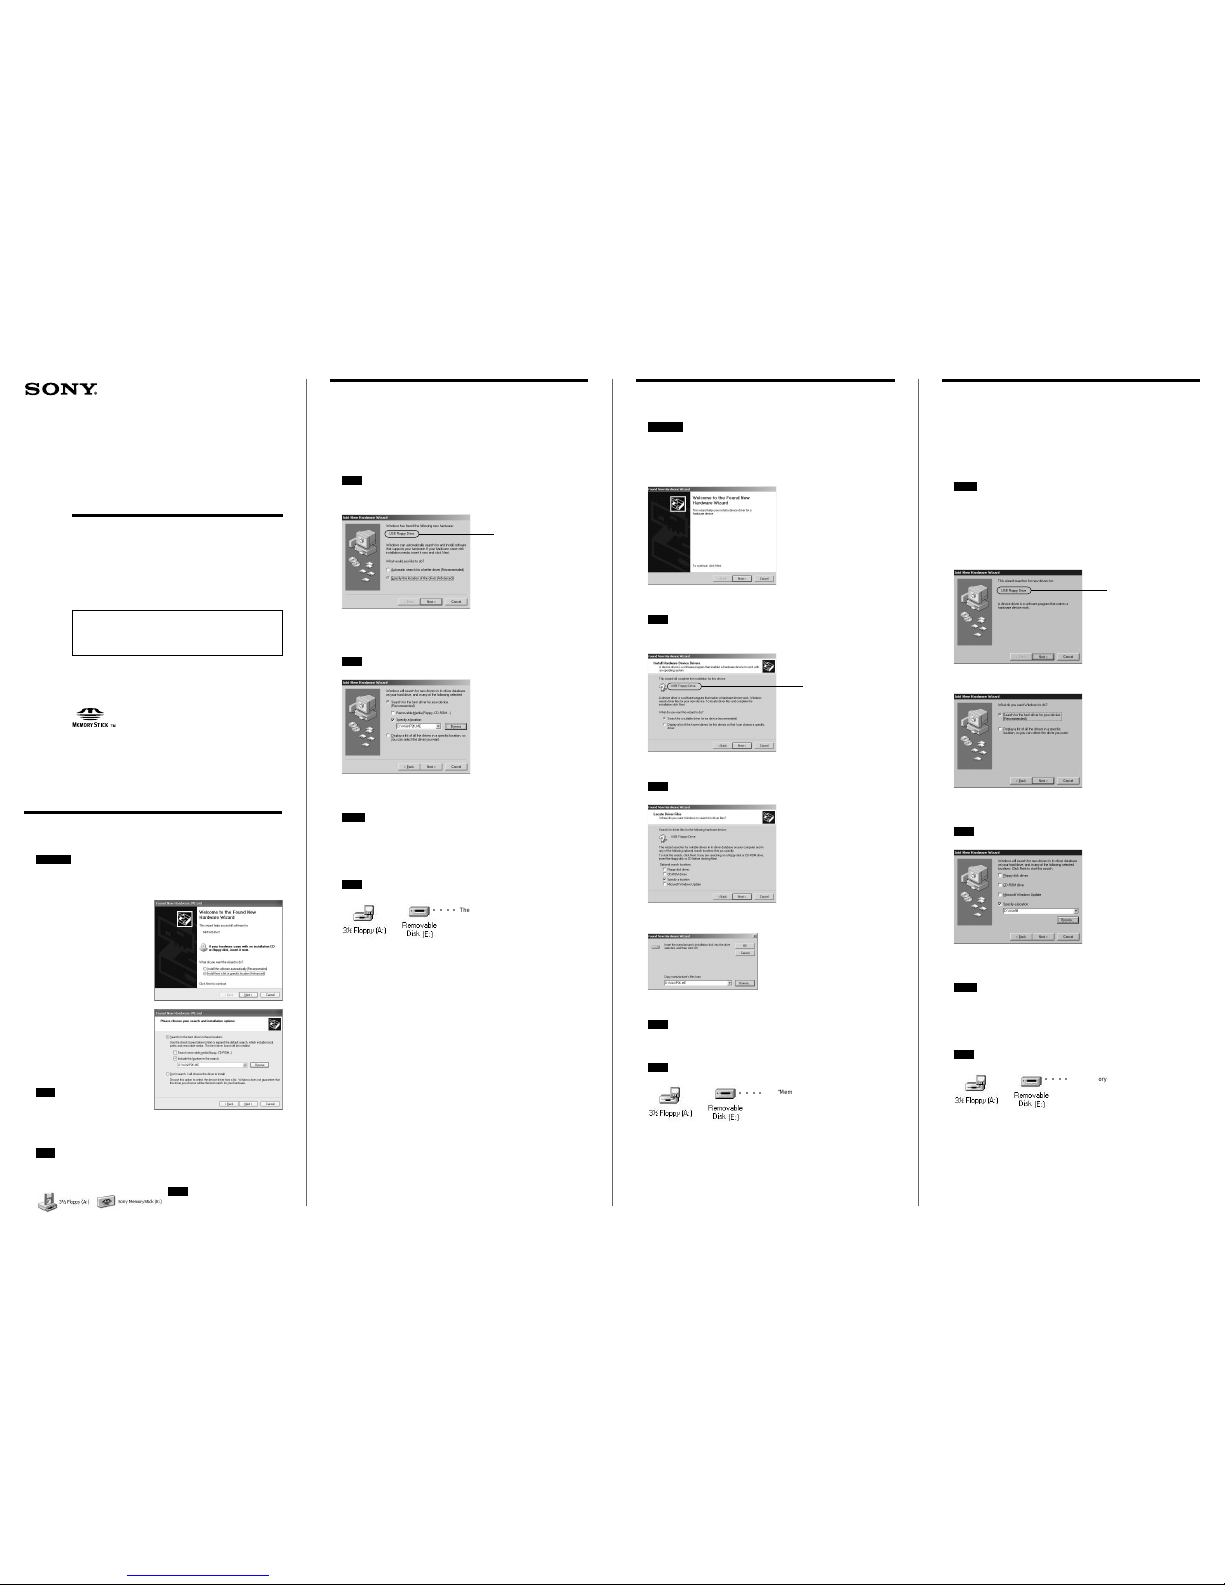
When using Windows 2000
1Turn on your computer. Windows starts.
CAUTION
Be sure to log on as a user with “Administrator” access privileges.
2Insert the supplied CD-ROM into the CD-ROM drive of your
computer.
3Connect this drive to the USB connector of your computer.
The “Found New Hardware Wizard” dialog box appears.
4Click [Next], and then select “Search for a suitable driver for my
device (recommended)” in the screen that appears.
Note
In the dialog box below, the new hardware appears as “USB Floppy Drive” (1).
Depending on your computer, the new hardware may appear as “MPF-MSRW1”. This does
not affect the setup procedure of the drive.
5Click [Next], and then select the “Specify a location” check box in
the screen that appears.
Note
If other check boxes are selected, clear them before proceeding.
6Click [Next], click [Browse], and then select the “WinXP2K.ME”
folder on the supplied CD-ROM in the screen that appears.
7Click [OK].
Follow the instructions on the screen to complete the installation.
Once the installation is complete, the computer detects the drive.
Note
If a dialog box prompting you to restart your computer appears, restart your computer.
8Double-click [My Computer] and confirm that a new floppy disk and
removable disk icon are present.
Note
The drive letters assigned depend on your computer. (In the example, “A” and “E”.)
When using
Windows 98 Second Edition
1Turn on your computer. Windows starts.
2Insert the supplied CD-ROM into the CD-ROM drive of your
computer.
3Connect this drive to the USB connector of your computer.
The “Add New Hardware Wizard” dialog box appears.
Notes
In the dialog box below, the new hardware appears as “USB Floppy Drive” (1).
Depending on your computer, the new hardware may appear as “MPF-MSRW1” or
“Generic USB Hub”.
• If the new hardware appears as “MPF-MSRW1”, proceed to step 4 and continue the setup
procedure.
• If the new hardware appears as “Generic USB Hub”, follow the instructions on the screen
to install the Windows 98 Second Edition Generic USB Hub driver software. Once the
installation is complete, the following dialog box appears. Insert the supplied CD-ROM
into the CD-ROM drive of your computer and proceed to step 4.
4Click [Next], and then select “Search for the best driver for your
device. (Recommended)” in the screen that appears.
5Click [Next], and then select the “Specify a location” check box in
the screen that appears. Click [Browse] and select the “Win98”
folder on the supplied CD-ROM.
Note
If other check boxes are selected, clear them before proceeding.
6Click [Next]. Follow the instructions on the screen to complete the
installation.
Once the installation is complete, the computer detects the drive.
Notes
• Before your computer detects the drive, messages such as “New Hardware Found” appear
and close automatically. These messages may appear several times. Wait until messages
no longer appear before proceeding to the next step.
• If a dialog box prompting you to restart your computer appears, restart your computer.
7Double-click [My Computer] and confirm that a new floppy disk and
removable disk icon are present.
Note
The drive letters assigned depend on your computer. (In the example, “A” and “E”.)
○○○○
The “Memory Stick” reader/writer appears as
“Removable Disk”.
○○○○
The “Memory Stick” reader/writer appears as
“Removable Disk”.
○○○○
The “Memory Stick” reader/writer appears as
“Removable Disk”.
1
1
1