Sony SH800 User manual

January 11,2018
1
Sony SH800 Cell Sorter
SSFF
NEW
ACCOUNTS MUST BE ADDED on BEFORE THE CHIP IS SCANNED
Currently the 70, 100 and 130 µm chips are in use
Notes:
•Make sure to draw all your gates and name everything before you record your data. Once you have recorded data
you cannot draw new gates. You may copy and paste regions to new tubes.
•For sort targeting with real cells
oSet the number of events to sort higher than needed
oTest placement of sorted cell by initiating SORT
oPause and look at deposition
oIt will only do one sort per tube, so if you need to do multiple tests you do not want to reach desired # of events or
it will insist on a new tube being created
1. Start up
NOTE: The upper lid on the cytometer has pneumatic lifters, so attempting to open this with the air line
vented will create an error. The air to the cytometer should be restored before attempting to load a chip, or to
look at filters. The air line
Check the LCD display for pressure reading before opening the chip loader flap door.
1. Decontaminate and clean all surfaces of the collection chamber. And clean sort collection device if desired.
2. No Cavicide should be used on the plates. A 70% EtOH wipe daily should be sufficient. The lower
portion of the sort chamber can be wiped with a small amount of Cavicide.
i. For the 70µm chip
oMicrobubbles are always a greater problem for the 70um than other nozzles and may be contribute
to the instability. In the AM, the air line vent should be closed and the vent valve on the tank turned to
reseat the seal.
oThis nozzle is VERY sensitive and side streams will not form if the plates are not clean and dry
oIF sheath pressure issue occurs, check the lid of the sheath tank.

January 11,2018
2
ii. For the 130µm chip
oYou must have a filled sheath tank
oStream appears very unstable with low sheath fluid volumes. Instability has been noted when tank is less than
50% full so make sure to Top it 0ff !
oDe-bubble the filter
4. Turn pressure on before continuing on to any other steps.
5. Power up the SH800. The display screen will show the active levels of fluids.
6. Disconnect the airline in from the sheath tank. Release pressure using pressure relief ring. Fill sheath tank to below
the upper weld line. The pressure release ring on top of the tank should not be left pointing up, place it in the groove
on the top of relief valve.
7. Empty the waste tank at the sink, wear the face shield while emptying. Add bleach to the tank to the bleach line
indicated on the bottom of the carboy before replacing.
8. *Once the system has been setup, you cannot empty the waste or fill sheath without putting the machine in
“standby” mode. Doing so without putting the machine in standby mode will turn the stream off and the chip will
have to be re-calibrated. Directions for putting the machine in standby are located on page 6*
9. Fill water Sterile Di tank in the left panel on the sorter with sterile water located on shelf to the right above machine
or above the hall sink shelves to the left. When the water tank has been filled, the filter must be de-bubbled through
the software. You will need to open the side access panel and vent the filter into a paper towel.
10. Log into windows using FACS User account (no password).
11. Once the SH800 has gone to standby, start the SH800 software.
12. Log in with your user name and password. If it does not ask you to scan the chip, log out and log in as “facs user.”
13. Turn on aerosol management system if you are sorting a BSL-2 sample.
14. Fill out the Biohazard form on clipboard identifying the type of hazard and clean up procedure.
2. Automated Alignment and Sort Setup (20 minutes)
1. On log in you are prompted to scan and load the new chip – Chips are good for 24h and the previous
day’s chip can be reused if <24h has passed. If continuing use on the current chip, simply open the
instrument front and reload the current chip once it is ejected. Load/ exchange the chip following the
onscreen instructions. Write date and time on the package if using a new chip. Put the old chip in the
previous day’s package and put in box with used chips.
i. To load a chip – feed the chip until the soft stop then gently push into seat.
ii. Select only the 488nm blue laser for initial calibration.
iii. Select filter configuration for 405nm violet laser check box(this is our system not your application
setting).
iv. Follow prompts on screen check sample line for back flush
v. Run the sheath filter de-bubble option available on the bottom of the screen during start up.
vi. Run the sample line clean if this is the first sort of the day, this runs both the bleach 12ml and DI
water 12ml.
2. Run autocalibration–initial calibration needs only the blue laser selected.
i. When prompted, load the calibration beads. The bottle is located in the small fridge to the left of the
sink. Mix the vial gently and dispense 8 drops into a 5ml FACS tube (can be polystyrene or
polypropylene). Make sure the tube goes to the bottom of the tube holder.
ii. Step one of the calibration aligns the chip, finds the target fluorescent sensitivity this takes approximately 5
minutes. Step 2 fine tunes stream profile, side streams and drop charge.
iii. If autocalibration fails, do a sheath filter de-bubble

January 11,2018
3
iv. If this does not resolve issue, check the optical filters, sheath
tank seal, check front cytometer pane for liquid levels.
3. If you fill the di water bottle you will need to de-bubble the di
water filter using the option in the software.
4. Sorting Setup
1. ALL SAMPLES, INCLUDING COMPS, MUST BE
FILTERED
2. Select the experiment you would like to use, or the SSFF
QC Template
3. On the upper right, change the experiment name.
4. Fill in other information for your experiment.
5. Check or uncheck the fluorescent parameters that are
needed, and name the parameters if you wish.
6. Turn on/off lasers for your experiment. Be sure that the
488nm laser is on. The violet laser decreases the life of
the chip. Only turn it on if needed.
7. Click Create New Experiment in the lower right of the
monitor.
When running a compensation matrix
1. There are 2 methods for compensation available the wizard and manual
2. Choose to start compensation wizard if you are sorting with multiple
fluorochromes and have prepared single color controls.
3. Click OK to continue
4. Follow the wizard’s instructions and run the negative control, and
adjust the instrument settings in detector/threshold settings FSC
and BSC to get population on scale. Briefly load a fully stained
sample at this point (do not record it) and verify that none of the
positive populations are off scale. If they are, lower the PMT
value to get them back on scale.
5. Then record negative and adjust the gate such that it is around the
negative population.
6. Positive sample using these adjusted settings.
7. Acquire single-stained controls, then set compensation as directed.
8. Click Close then Finish to end the Wizard.

January 11,2018
4
1. IF no compensation is necessary, Select
Detector and Threshold Settings.
2. Adjust FSC gain and BSC gain such that your
cells are on scale.
3. Acquire enough events for the sample to be
sorted so that you can set gates. Pause the
acquisition.
4. Create plots on the worksheet. Double click
inside gates to create gated plots, or change
the gates by clicking on the gate name at the
top of a plot. Be sure to include a singlet
5. For experimental sample gain settings
6. Adjust gate settings for populations of
interest.
i. Set the value to record to 5,000 or 10,000
events. If your positive population is rare,
record more events.
5. Sorting into Tubes
1. The Sony pre-calculates the sort stream voltage and angle automatically. If you have large cells, or want to test the
sort stream location before sorting:
i. Open “settings” option in the cytometer ribbon
ii. Open “advanced settings”
iii. Load test sort tubes into the collection device
iv. Click “load collection.” Sort streams should come up with assigned voltages.
v. Test sort only works if sample is NOT loaded
vi. Quickly turn on and off the sort test and verify that the assigned voltages produce streams that will go inside
collection tubes.
2. Continue your sort setup: Select the desired sort mode. Purity or Semi-Purity is recommended. (f)
3. Set the L and R sort gates. Indicate the number of
cells to be sorted, or leave the value at 0 to sort
continuously. (g)
4. Place the collection tube holder into the collection
area, and set collection tubes.
5. Click ‘Load Collection’ (d)
6. Make sure flow rate is stable (a), click ‘Sort Start’
(b)
7. Press ‘Record’ to save data for the sample. (c )
8. Run the sample pressure at a maximum of 6
during sorting.
9. From the Cytometer tab, you can adjust
temperature control for the sample and collection,
chamber lights and agitation.
10. Monitor the collection tubes, and change them
when they fill.
i. To change tubes: Pause the sample, Unload
Collection, switch tubes, load collection and the
sort will continue.

January 11,2018
5
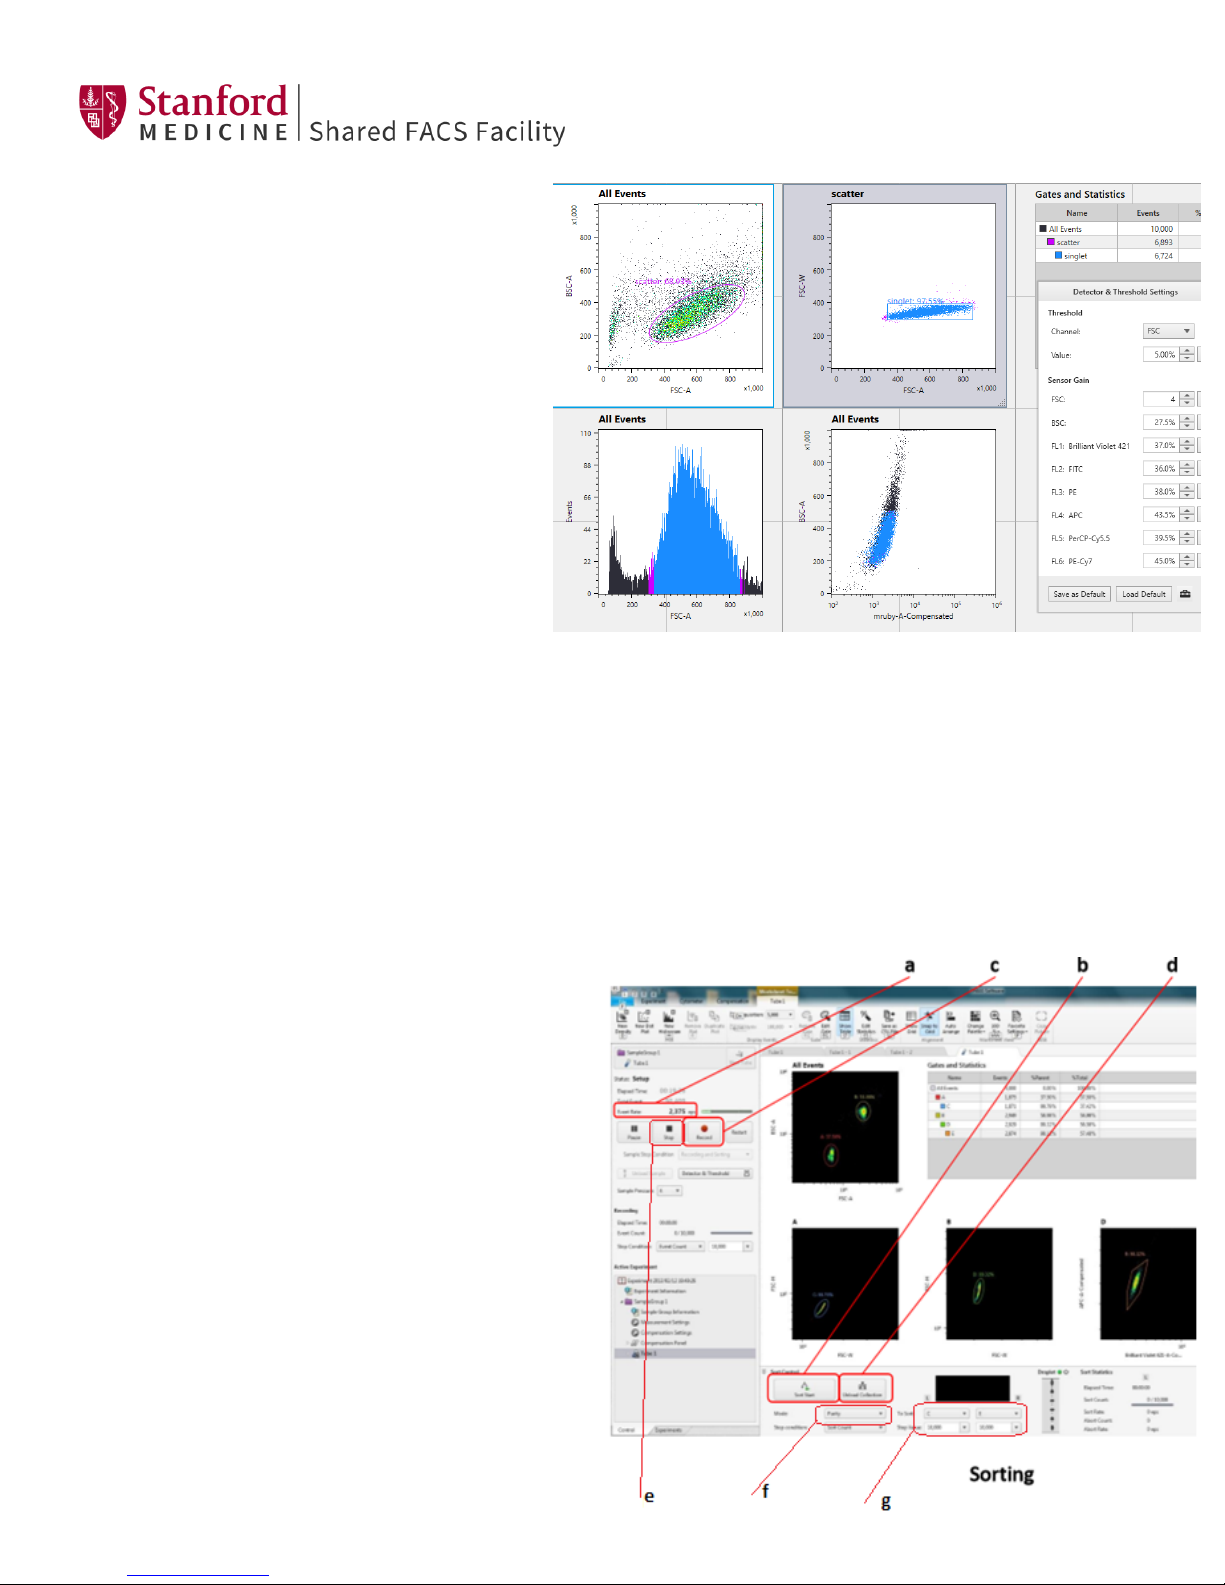
11. To stop the sort, press the black Stop button. (e)
6. Sorting into a Plate
1. Install splash guard, plate stand and plate holder (stored in refrigerator).
2. Change the Sort Method to 96-well plate.
3. Start the sample, then Pause when enough cells are seen to set sorting gates. Pause
the sample and set the gates.
4. Click on Sort Settings to open the 96 well sort setup and plate adjustment.
5. Load a plate with the cover on.
6. Select the Plate Adjustment tab.
7. Select ‘4 corners and center’
8. Click ‘Start’ and the SH800 will sort 50 drops into the corner wells and a center
well.
9. When it finishes, the plate will unload and you can remove it to check the drop
positions over the wells. Note the adjustments needed, and re-load the plate. Click
on each corner one at a time, and adjust the drop position. The default adjustment
of 1 mm can be changed down to 0.1 mm if desired. Once the adjustments are
finished, click ‘Start’ again.
10. Remove the plate to be sure that the adjustments are correct, re-do if necessary.
11. To be sure you will get a nice cell distribution with your actual sample sorting (BSL1 only), verify sorting with the
sample running:
i. In the Plate Sort Settings tab, select a few wells, then the plate settings to sort at least 25 cells of a large
population. Enter values for the sort gate, sort mode, click Add, then close the window.
ii. Keep the cover on the plate and click ‘Sort and Record Start’.
iii. Remove the plate and check to be sure the drops that now have cells inside are centered. If not, go back into sort
settings and re-adjust. If the drops are splattered, the nozzle size is too small for these cells, and you should go to
a larger one.
12. Make a new tube in the experiment (click Next Tube). Click Start, then Pause.
13. Go back into Sort Settings and clear
the wells, then set up the gate and
number of cells per well for your sort.
Check the Index Sort box if desired.
14. Remove the plate lid.
15. Click ‘Sort and Record Start’.
16. When sort is finished, you will have
the option to continue sorting. Click
continue if you wish to sort additional
plates with the same sample. You will
have the opportunity to change sort
criteria. Selecting “no” will require
that you unload/reload the sample.
17. Remove the plate holder (store in refrigerator) and splash guard.
18. To analyze index sort data, click on the Worksheet Tools and ‘Analyze Index Data’
*If the waste needs to be emptied or sheath filled after the auto calibration has already been done, it will need to be
put in standby mode. If you do not put the machine in standby mode and attempt to empty the waste, the stream will
shut off and you will have to run the auto calibration again.
Table of contents
Other Sony Laboratory Equipment manuals
Popular Laboratory Equipment manuals by other brands

Belden
Belden HIRSCHMANN RPI-P1-4PoE installation manual

Koehler
Koehler K1223 Series Operation and instruction manual

Globe Scientific
Globe Scientific GCM-12 quick start guide

Getinge
Getinge 86 SERIES Technical manual

CORNING
CORNING Everon 6000 user manual

Biocomp
Biocomp GRADIENT MASTER 108 operating manual