Sony PMW-PZ1 User manual

C:\_Sony\PT16A020_4586875021_JP+\4586875021\4586875021PMW-
PZ1\00COV-PMWPZ1\00Cover.fm
4KMemoryPlayer
4-586-875-02 (1)
© 2015 Sony Corporation Printed in China
PMW-PZ1
model name[PXW-FS7]
partnumber[4-586-875-02 (1)]
追加機能について JP
About Additional Functions _____________________ GB
À propos des fonctions supplémentaires _________ FR
Informationen zu zusätzlichen Funktionen_________ DE
Informazioni sulle funzioni aggiuntive_____________ IT
Acerca de las funciones adicionales _____________ ES
_________________________________ CS
О дополнительных функциях __________________ RU
_________ KZ
PMW-PZ1
4-586-875-02 (1)

2目次
目次
ネットワーク機能 ..............................3
接続する ..........................................3
ネットワークを設定する..................3
ブラウザから本機を操作する...........3
ネットワークパスワードを変更
する..............................................4
プレイリスト再生 ..............................5
プレイリストを作成する..................5
プレイリストの順に再生する...........6
IN 点-OUT 点区間再生 ...................... 6
IN 点と OUT 点を設定する...............6
IN 点-OUT 点の間だけを再生
する..............................................7
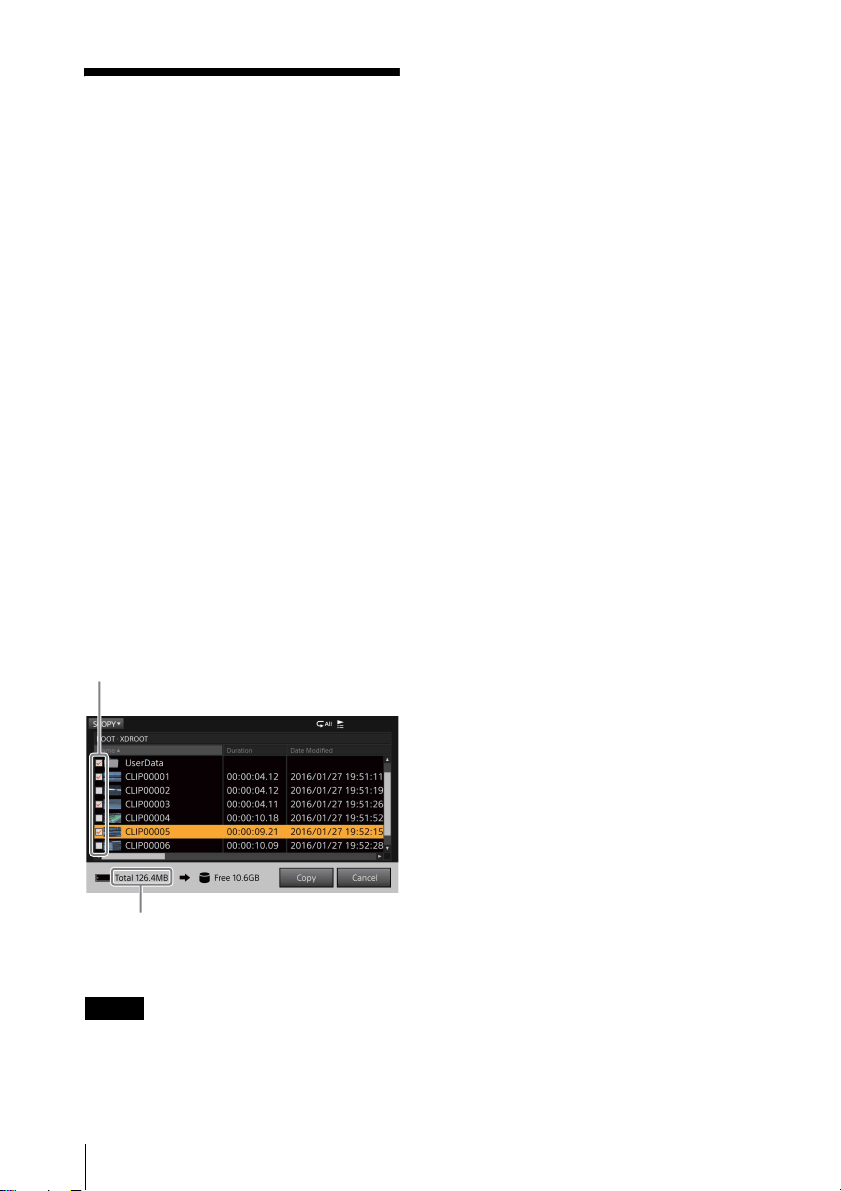
コピー時のファイル選択.................... 8
その他の機能 ..................................... 9
再生可能なフォーマットの追加 .......9
PDW-U2 のファイルプレビュー.......9
ODS-D77U/ODS-D55U への
ファイルコピー ............................9
ダウンコンバート機能 .....................9
コマ送り再生 ...................................9
シームレス再生..............................10
早戻し 1倍速モードの追加 ............10
後面の外部ストレージ接続に
ついて ........................................10
4K フォーマットの伝送方式の
切り換え.....................................10
追加 /変更されたメニューおよび項目
(表示順).......................................... 11
メッセージとアイコン一覧 ..............13
警告メッセージ..............................13
アイコンについて ..........................13
本書は、PMW-PZ1のファームウェア
バージョンVer.1.20によって追加・変更
となる機能について記載しています。
同梱のCD-ROMに収録されている取扱
説明書(PDF形式)と併せて本書をお読
みください。
日本語

ネットワーク機能 3
ネットワーク機能
本機とPC/タブレットなどをLANケーブ
ルで接続することにより、ブラウザの画
面で下記のような操作ができるようにな
りました。
•リスト画面の基本操作
•メニューの設定変更 (ネットワーク関
連項目を除く )
•ファイルの再生操作
接続する
本機後面のCONTROL端子をLANケーブ
ルでPC/タブレットなどに接続します。
•後面にカバーがある場合は、カバー取り付けネ
ジを 2本外してカバーを取り外してください。
•安全のために、周辺機器を接続する際は、過大
電圧を持つ可能性があるコネクターを
CONTROL 端子に接続しないでください。
•CONTROL端子をご使用の際は、輻射ノイズに
よる誤動作を防ぐため、シールドタイプのケー
ブルを使用してください。
ネットワークを設定する
1メニューの「NETWORK
CONNECTION」を「Enable」に設
定する。
ネットワークが有効になります。
2「NETWORK CONFIG」(TCP/IPv4)
または(TCP/IPv6)から
「IP Address」と「Subnet prefix
length」の設定を行う。
•IPアドレスの自動取得機能を使用
するときは「Obtain IP address
automatically」にチェックを入れ
る。
•手動で設定するときは「Obtain IP
address automatically」のチェッ
クを外し、「IP address」および
「Subnet prefix length」を設定す
る。
現在設定されているIP Addressの状
態は、メニューの「VERSION」で確
認できます。
3「OK」を押す。
ネットワークが設定されます。
ブラウザから本機を操作す
る
推奨動作環境:Windows 7以降
推奨ブラウザ:Google Chrome
1ブラウザを起動し、以下のアドレス
にアクセスする。
https://[IP ADDRESS]/
2ログオン画面で以下のように入力す
る。
(アクセスユーザー名:
admin 初期
パスワード:
pmw-pz1)
リスト画面がブラウザ上に表示され
ます。
ご注意
CONTROL 端子
カバー取り付けネジ
JP

4ネットワーク機能
ブラウザ画面のアイコンと操作 (ファイル再生中は、コントロールボタン
系とSETボタン以外は操作できません。)
•ファイルのアップロード中に再生を行うと、
UNDERFLOW(再生ファイルの読み出しが間
に合わない状態)が生じるおそれがあります。
キャラクター表示領域にアップロード中を示す
アイコン( )が表示されている場合は、
アップロードが終了してから再生を行ってくだ
さい。
•ブラウザではサムネイルは表示されません。
•ブラウザからの操作と本体のボタン操作を同時
に行わないでください。
•2台以上のブラウザを接続しないでください。
•SxSから EXT へのコピーは、ブラウザから行
うことはできません。
•ネットワーク関連など、ブラウザから設定でき
ないメニュー項目があります。
ネットワークパスワードを
変更する
ブラウザからネットワークにログオンす
るためのパスワードは、以下の手順で変
更することができます。
1メニューのNETWORK PASSWORD
で「New Password」を選択する。
PUSH SETダイヤルを回して文字を
選択し、「SET」を押すと1文字入力
されます。
番号 表示 マウス操作
1SxS、EXT クリックすると再生対象
メディアが切り換わる。
本機前面の PLAYBACK
SxS/EXT ボタンと同等。
2MENU クリックするとメニュー
が表示される。本機前面
のMENU ボタンと同等。
3Tools クリックすると下記が選
択できるようになる。
• Upload:本機に接続し
ている外部ストレージ
のルートフォルダに
PC のファイルをアッ
プロードする。
•Refresh:ファイルを再
読み込みする。
• About PMW-PZ1
Controller:本機の情報
を表示する。
4Logout クリックでログアウトす
る。
5フォルダパ
ス
上位階層をクリックする
と、そのフォルダに移動
する。
6ファイルリ
スト
ダブルクリックすると対
象ファイルが再生される。
またはフォルダの内容が
表示される。
7コントロー
ルボタン
ファイル再生時にクリッ
クし、走行をコントロー
ルする。
8SET ボタン •ファイル再生中以外:
フォルダを選択してク
リックすると、その
フォルダに移動する。
ファイルを選択してク
リックすると、再生が
開始し、先頭で一時停
止する。
•ファイル再生中:ファ
イルを選択してクリッ
クすると、再生が開始
される。
ご注意
番号 表示 マウス操作

プレイリスト再生 5
これを繰り返してパスワードを設定
します。
2「Confirm Password」の欄も同様に
設定する。
3「OK」を押す。
パスワードが設定されます。
アクセスユーザー名「admin」は変更できません。
プレイリスト再生
プレイリストを作成し、その順番に再生
することができるようになりました。
プレイリストの操作はサムネイル画面で
も行えますが、以下ではリスト画面を例
にします。
プレイリストを作成する
1メニューの「PLAYLIST/IN-OUT」
を「On」に設定する。
2リスト画面でファイルを選択し、
SHIFTボタンを押しながらPUSH
SET ダイヤルを押す。
このファイルのサムネイルに再生順
が数字で表示されます。
また、リストの「Playlist」欄に再生
順が表示されます。
プレイリストからファイルを削除す
るには、対象のファイルを選択し、
再度SHIFTボタンを押しながらPUSH
SET ダイヤルを押します。
•プレイリストは保存できません。
•プレイリストは、以下のようなときに消去され
ます。
ご注意
ご注意
再生順(数字)

6IN 点-OUT 点区間再生
― メモリーカードや外部ストレージが取り外さ
れた。
― 本機の電源がオフになった。
― メニューの「PLAYLIST/IN-OUT」が「Off」
に設定された。
― メニューの「ALL RESET」が実行された。
― メニューの「FILE LISTING」の設定値が変
更された。
プレイリストの順に再生す
る
1メニューの「PLAYLIST/IN-OUT」
が「On」であることを確認する。
2STOPボタンを押しながらPLAY/
PAUSEボタンまたはPUSH SETダイ
ヤル(停止状態から開始するとき)
を押す。
プレイリストの先頭から順番に再生
されます。
電源インジケーターが青色で点灯し
ます。
(PLAY/PAUSEボタンだけを押すと、
通常再生(カーソル位置のファイル
の再生)が行われます。)
IN 点-OUT 点区間
再生
IN 点と OUT 点を設定する
各ファイルごとに一対のIN点とOUT点を
設定できます。
1メニューの「PLAYLIST/IN-OUT」
を「On」に設定する。
2設定を行うファイルを選択し、
PLAY/PAUSEボタンで再生を開始す
る。
3IN点に設定したい箇所で、SHIFTボ
タンを押しながらVOLUME−ボタン
を押す。
4OUT点に設定したい箇所で、SHIFT
ボタンを押しながらVOLUME+ボタ
ンを押す。
リスト画面上でIN点/OUT点の情報が
表示されます。
(リスト画での左右スクロールは、
SHIFTボタンを押しながらPUSH SET
ダイヤルを回します。)
•IN点/OUT 点を消去するには、
SHIFT ボタンを押しながら
VOLUME(−または+)ボタンを
IN 点、OUT 点の表示

IN 点-OUT 点区間再生 7
長押しします。
(消去の操作はリスト画面でも可能
です。)
•OUT点が設定されていないファイ
ルは、ファイルの終点が OUT 点
として扱われます。
•IN点が設定されていないファイル
は、ファイルの先頭が IN 点とし
て扱われます。
•IN点/OUT 点は保存できません。
•IN点/OUT 点は、以下のようなときに消去され
ます。
― メモリーカードや外部ストレージが取り外さ
れた。
― 本機の電源がオフになった。
― メニューの「PLAYLIST/IN-OUT」が「Off」
に設定された。
― メニューの「ALL RESET」が実行された。
― メニューの「FILE LISTING」の設定値が変
更された。
•IN点/OUT 点が設定されているファイルで再度
IN 点/OUT 点を設定すると、上書きされます。
•設定された OUT 点よりうしろに IN 点は設定で
きません。また、設定された IN 点より前に
OUT 点は設定できません。
•PLAY/PAUSEボタンを押して行う通常再生中の
み、IN 点/OUT 点の設定が可能です。
IN 点-OUT 点の間だけを
再生する
1メニューの「PLAYLIST/IN-OUT」
が「On」であることを確認する。
2ファイルを選択し、STOPボタンを
押しながらPLAY/PAUSEボタンまた
はPUSH SETダイヤル(停止状態か
ら開始するとき)を押す。
IN点-OUT点の区間が再生されます。
プレイリストが設定されている場合
は、プレイリスト再生も行われます。
電源インジケーターが青色で点灯し
ます。
(PLAY/PAUSEボタンだけを押すと、
通常再生(カーソル位置のファイル
の再生)が行われます。)
ご注意

8コピー時のファイル選択
コピー時のファイ
ル選択
コピー画面でSxSカード上のファイルや
フォルダが選択ができるようになりまし
た。
1コピー画面で「Select」を選択す
る。コピー画面以外の場合はSHIFT
ボタンを押しながらCOPYボタンを
押す。
2コピーしたいファイルまたはフォル
ダを選び、SHIFT ボタンを押しなが
らSETボタンを押す。
チェックマークが入ります。
3手順2を繰り返し、コピーしたい
ファイルをすべて選択する。
選択したファイルを合計したデータ
のサイズが左下に表示されます。
4「Copy」を選択する。
•フォルダを選択した場合、フォルダ内のすべて
のファイル(通常リスト上に表示されないテキ
ストファイルなどを含む)がコピー対象となり
ます。
•PDW-U2をコピー先やコピー元にすることはで
きません。
• EXT 端子および EXT2 端子に接続した外部スト
レージをコピー元にすることはできません。
•以下のようなときに、ファイル選択が解除され
ます。
― フォルダを移動した。
―PLAYBACK SxS ボタン、PLAYBACK EXT ボ
タンによって画面が移動した。
― コピーが完了した。
ご注意
チェックマーク
合計のデータサイズ

その他の機能 9
その他の機能
再生可能なフォーマットの
追加
巻末の「Playback Formats」をご覧くだ
さい。
PDW-U2 のファイルプレ
ビュー
PDW-U2にあるプロフェッショナル・
ディスクのファイルをプレビューできる
ようになりました。
1本機のEXT端子とPDW-U2を
USB3.0ケーブルで接続する。
リスト画面で「EXT」を選択すると、
PDW-U2のファイルリストが表示さ
れます。
2プレビューしたいファイルを選んで
PLAY/PAUSEボタンを押す。
本機でプレビューできるファイ
ル
• XDCAM フォーマットのファイル
•PDW-U2へのファイルコピーはできません。
•プレビュー開始までに時間がかかることがあり
ます。
• UNDERFLOW が発生することがあります。
ODS-D77U/ODS-D55U へ
のファイルコピー
SxSメモリーカードのファイルをODS-
D77UまたはODS-D55Uにコピーできる
ようになりました。
本機のEXT端子とODS-D77UまたはODS-
D55UをUSB3.0ケーブルで接続すると、
コピー画面でコピー先として表示されま
す。
一括コピーまたはファイル選択コピーが
可能です。
ODS-D77U/ODS-D55U のファイルを本機でプレ
ビューすることはできません。
ダウンコンバート機能
下記のメニューで出力の上限フォーマッ
トを設定できるようになりました。
• HDMI FORMAT LIMIT
• SDI FORMAT LIMIT
上限を超えるフォーマットはダウンコン
バートされて出力されます。
•4K(QFHD を除く)から HD へのダウンコン
バートの場合、左右の端がカットされます。
• PVM-X300 と本機を HDMI 接続するときは、メ
ニューの「HDMI FORMAT LIMIT」を「4K」に
設定してください。
コマ送り再生
ファイル再生中および一時停止中
(PAUSE)にCOPYボタンを押すと、
STILLモードになります。
PLAY/PAUSEボタンとPREVボタン、
NEXTボタンが点滅します。
ご注意
ご注意
ご注意

10 その他の機能
•コマ送りするには、PREV ボタンまた
はNEXT ボタンを押します。
• STILL モードを解除するには、COPY
ボタン、PLAY/PAUSE ボタン、STOP
ボタンのいずれかを押します。
•PLAYMODEがALL の場合などでも、
ファイルは連続してコマ送りされませ
ん。
•ファイルフォーマットによって、コマ
送りに時間がかかります。
シームレス再生
同一フォーマットかつ同一周波数のファ
イルが連続して再生されるとき、ファイ
ルの切り換わり部分がシームレスで再生
されるようになりました。
制限事項
•1秒以下のクリップはシームレス再生
されません。
•再生開始位置または再生モード変更位
置がクリップの再生終点から 1秒以内
などの場合、シームレス再生できない
ことがあります。
•IN点-OUT 点区間再生時、クリップの
フォーマットによってはシームレス再
生されません。
•ファイルの切り換わり直前での送り /
戻し操作が行われると、ファイルが切
り換わってからファイル先頭に移動す
る場合があります。
•PDW-U2など、ファイルの切り換わり
に時間のかかるメディアではシームレ
ス再生できないことがあります。
早戻し 1倍速モードの追加
PLAY/PAUSEボタンを押しながらPREV
ボタンを押す操作で、早戻し1倍速が追
加されました。
後面の外部ストレージ接続
について
本機の後面にEXT2端子が追加されまし
た。前面のEXT端子と同等に使用できま
す。
•使用中はインジケーターが点灯します。
•外部ストレージを外すときは、前面の
UNMOUNT ボタンを押してください。
•EXT端子と EXT2 端子は、同時に使用
できません。
4K フォーマットの伝送方
式の切り換え
出力先のモニターに応じて、メニューの
「SDI MODE」で出力信号を切り換えるこ
とができます

追加 /変更されたメニューおよび項目(表示順) 11
追加 /変更されたメニューおよび項目
(表示順)
(太字/下線はデフォルト)
項目 内容 設定値 /設定項目
PLAYLIST/IN-OUT
(メニュー追加)
プレイリスト再生、IN-OUT 再
生のオン /オフ
Off
On
(再生モードは「PLAY MODE」の設
定による。)
SORT TYPE
(設定値追加)
ファイルのソートの条件 「Audio Codec」、「Playlist」、「IN」、
「OUT」「IN-OUT Duration」が追加さ
れた。
DISPLAY CHARACTER
(設定値変更)
キャラクター表示の行数 Off
3 Lines
2 Lines
CHARACTER AUDIO
LEVEL METER
(メニュー追加)
キャラクター 3行表示時、表示
領域に音声レベルメーターを表
示する機能のオン /オフ
Off
On
AUDIO MONITOR
DELAY
(メニュー追加)
ヘッドホンおよびアナログ出力
のディレイを合わせる出力先の
選択
SDI
HDMI
HDMI AUDIO CHANNEL
(メニュー追加)
HDMI に多重する音声のチャン
ネル数の選択
2ch:2チャンネル
6ch:6チャンネル
(8チャンネルは出力できない)
HDMI FORMAT LIMIT
(メニュー追加)
HDMI のダウンコンバートの設
定(出力フォーマットの上限)
Auto:モニターからの通信にしたが
う。
4K:4K までのフォーマットで出力す
る。
QFHD:QFHD までのフォーマット
で出力する。
HD:HD フォーマットで出力する。
SDI FORMAT LIMIT
(メニュー追加)
SDI のダウンコンバートの設定
(出力フォーマットの上限)
4K:制限を加えず、4K は4K、HD
はHD で出力する。
QFHD:QFHD に制限する。HD は
HD で出力する。
HD(3G Single)
HD(1.5G Single Link)

12 追加 /変更されたメニューおよび項目(表示順)
SDI MODE (4K 50/60P)
(メニュー追加)
4K/QFHD 60P/50P のファイル
再生時における SDI の信号方式
(カッコ内はメニュー一覧時の省
略表示)
2-Sample Interleave 3G Level A x4
(2SI 3G Level A x4)
2-Sample Interleave 3G Level B x4
(2SI 3G Level B x4)
Square Division 3G Level A x4
(SQD 3G Level A x4)
Square Division 3G Level B x4
(SQD 3G Level B x4)
SDI MODE (4K UNDER
30P)
(メニュー追加)
4K/QFHD 30P 以下のファイル
再生時における SDI の信号方式
(カッコ内はメニュー一覧時の省
略表示)
2-Sample Interleave 3G Level B x2
(2SI 3G Level B x2)
Square Division 3G Level B x2
(SQD 3G Level B x2)
Square Division 1.5G x4
(SQD 1.5G x4)
SDI MODE (HD 50/60P)
(「SDI MODE」より名称
を変更)
メニュー画面や HD 60P/50P の
ファイル再生時における 3G SDI
のデータマッピングのタイプ
3G Level A:1.5G のみのフォーマッ
トは 1.5G で出力する。
3G Level B:1.5G のみのフォーマッ
トは 1.5G で出力する。
SDI P/PsF OUT
(メニュー追加)
HD 30P 以下のファイル再生時
における SDI の信号方式(カッ
コ内はメニュー一覧時の省略表
示)
Progressive(P)
Progressive Segmented Frame
(PsF)
GRAPHIC BRIGHTNESS
(メニュー追加)
リスト画面などの明るさ ( 再生
画には影響しない・HDR モード
のモニターに有用 )
Max:明るい
High:やや明るい
Middle:やや暗い
Low:暗い
NETWORK
CONNECTION
(メニュー追加)
ネットワーク機能の有効 /無効
を選択
Disable:無効
Enable:有効
NETWORK CONFIG
(TCP/IPv6)
(メニュー追加)
IPv6 のアドレス設定 Obtain IP address automatically
(IP アドレスを自動的に取得する。)
IP address
Subnet prefix length
NETWORK CONFIG
(TCP/IPv4)
(メニュー追加)
IPv4 のアドレス設定 Obtain IP address automatically
(IP アドレスを自動的に取得する。)
IP address
Subnet prefix length
NETWORK PASSWORD
(メニュー追加)
ネットワークからの接続時に使
用するパスワードの設定
パスワード初期値は「pmw-pz1」
FILE LISTING
(メニュー追加)
XDROOT、BPAV、PDROOT、
M4ROOT の構造フォルダ内をす
べて表示するかどうかの設定
Listing with Index (Quick) :有効な
インデックス情報がある場合に
は、それに基づいて表示する。
Listing without Index (All Files):有効
なインデックス情報があっても
通常の読み出しを行う。(PDW-
U2 接続時は無効)
項目 内容 設定値 /設定項目

メッセージとアイコン一覧 13
メッセージとアイコン一覧
警告メッセージ
アイコンについて
ID メッセージ 状況 対処方法
W101 Low voltage DC IN 電圧低下 電源電圧の確認を行う。
W102 Backup Battery Low バックアップ電池の残量不足 ソニーのサービス担当者に電池の
交換を依頼する。
W103 Backup Battery End バックアップ電池が残量なし
W201 Fan Stopped ファン停止 ファンを交換する。
W202 High temperature 内部温度上昇 風通し、吸排気口を確認する。
W301 Restore SxS Card SxS 異常、修復が必要 PC でストレージのエラーチェッ
クを行う。
W302 Restore EXT Device EXT 異常、修復が必要
W401 SxS Underflow SxS Underflow 発生 転送レートの速いストレージを使
用する。
W402 EXT Underflow EXT Underflow 発生
W802 Set LOCAL DATE/TIME Local Date/Time 不整合 メニューで日時を再設定する。
アイコン 意味
リスト画面 /サムネイル画面 再生時のキャラクター表示領域
警告が発生している。
「警告メッセージ」(13 ページ)をご覧ください。
メニュー「PLAYMODE 」の設定が「 Single Clip Normal」
メニュー「PLAYMODE」の設定が 「Single Clip Repeat」
メニュー「PLAYMODE」の設定が 「All Clip Normal」
メニュー「PLAYMODE」の設定が「 All Clip Repeat」
「PLAYLIST/IN-OUT」が「ON」に設定
されている
STOP+PLAY/PAUSE ボタンでプレイリ
スト再生 / IN 点-OUT 点区間再生が実
行されている。
ファイルのアップロードが実行されている。

14 Table of Contents
Table of Contents
Network Function.................................. 15
Connecting........................................ 15
Configuring the Network Settings .... 15
Operating the Unit using a
Browser ......................................... 15
Changing the Network Password...... 16
Playlist Playback ................................... 17
Creating a Playlist............................. 17
Playing a Playlist Sequence .............. 18
IN Point to OUT Point Playback ......... 18
Setting an IN Point and OUT
Point .............................................. 18
Playing the Region Between IN Point
and OUT Point .............................. 19
File Selection When Copying ............... 20
Other Functions..................................... 21
Added Playback Formats.................. 21
Previewing PDW-U2 Files ............... 21
Copying Files to ODS-D77U/
ODS-D55U.................................... 21
Down Conversion Function.............. 21
Frame-by-frame Playback................. 21
Seamless Playback............................ 21
Reverse Playback (1×) Mode............ 22
Connecting External Storage on Rear
Panel.............................................. 22
Switching the 4K Format Transport
Method .......................................... 22
Added/Changed Menus and Menu Items
(in order of appearance) ....................... 23
Messages and Icons ............................... 25
Warning Messages............................ 25
Icons.................................................. 25
This document describes the added/
changed features introduced by
PMW-PZ1 firmware Ver. 1.20. Read the
following instructions together with the
Operating Instructions (PDF format),
stored on the accompanying CD-ROM.
English

Network Function 15
Network Function
The following actions can be controlled
using a web browser by connecting the unit
to a PC, tablet, or other device using a LAN
cable.
• Basic operations on the list screen.
• Change menu settings (excluding
network-related items)
• File playback operations
Connecting
Connect the CONTROL connector on the
rear panel of the unit to a PC, tablet, or other
device using a LAN cable.
If there is a cover on the rear panel, unscrew the
two screws securing the cover and remove the
cover.
• For safety, do not connect the connector for
peripheral device wiring that might have
excessive voltage to the CONTROL
connector. Follow the instructions for this
connector.
• When you connect the CONTROL connector
of the unit to peripheral device, use a shielded-
type cable to prevent malfunction due to
radiation noise.
Configuring the Network
Settings
1Set [NETWORK CONNECTION]
to “Enable” in the menu.
The network connection is enabled.
2Set [IP Address] and [Subnet prefix
length] in the [NETWORK CONFIG
(TCP/IPv4)] or [NETWORK
CONFIG (TCP/IPv6)] settings.
• To obtain an IP address
automatically, place a check mark in
[Obtain IP address automatically].
• To set the address manually, clear
the check mark in [Obtain IP address
automatically] and set the [IP
address] and [Subnet prefix length].
The currently configured IP address
can be checked using [VERSION] in
the menu.
3Press [OK].
The network configuration is applied.
Operating the Unit using a
Browser
Recommended operating system: Windows
7 or later
Recommended browser: Google Chrome
1Launch the browser, and access the
following URL.
https://[IP ADDRESS]/
2Enter the following on the log on
screen.
Access user name: admin
Default password: pmw-pz1
The list screen appears in the browser.
Note
CAUTION
CONTROL connector
Cover retaining screws
GB

16 Network Function
Parts and functions of
browser screen (During file playback, only the control
buttons and SET button can be operated.)
• Playing a file while uploading the file may
result in an underflow condition (playback file
loading is too slow). If the icon appears in
the text display area while uploading, finish
uploading the file and then start playback.
• Thumbnails are not displayed in a browser.
• The unit should not be operated from a browser
and directly using the buttons on the unit at the
same time.
• Do not connect using two or more browsers at
the same time.
• Copying from SxS to EXT is not supported
from a browser.
• Some menu items, such as network-related
items, cannot be set from a browser.
Changing the Network
Password
Use the following procedure to change the
password used for network log on from a
browser.
1Select [New Password] in
[NETWORK PASSWORD] in the
menu.
Turn the PUSH SET dial to select a
character, and press [SET] to enter the
character.
No. Display Mouse operation
1SxS, EXT Click to switch the target
media for playback. The
function is identical to
the PLAYBACK SxS/
EXT buttons on the front
panel of the unit.
2MENU Click to display the
menu. The function is
identical to the MENU
button on the front panel
of the unit.
3Tools Click to select the
following options.
• Upload: Upload PC
files into the root
directory of external
storage connected to
the unit.
• Refresh: Reload files.
• About PMW-PZ1
Controller: Displays
information about the
unit.
4Logout Click to log out.
5Folder
path
Click a link in the path to
move to that folder.
6File list Double-click a file to
start playback. The list
displays the folder
contents.
7Control
buttons
Click during file
playback to control
playback.
8SET
button
• Not during file
playback: Select a
folder and click to
move to that folder.
Select a file and click
to start playback and
pause at the first frame.
• During file playback:
Select a file and click
to start playback.
Notes
No. Display Mouse operation

Playlist Playback 17
Repeat the operation to set the
password.
2Use the same procedure to set the
“Confirm Password” field.
3Press [OK].
The password is updated.
The “admin” access user name cannot be
changed.
Playlist Playback
Use the following procedure to create a
playlist sequence and play the playlist.
The playlist operation shown below uses the
list screen, but the thumbnail screen can also
be used.
Creating a Playlist
1Set [PLAYLIST/IN-OUT] to “On”
in the menu.
2Select a file on the list screen, then
press and hold the SHIFT button
and press the PUSH SET dial.
The playback sequence is indicated by
a number on the thumbnail for the file.
The playback sequence is also
displayed in the [Playlist] field in the
list.
To delete a file from a playlist, select
the file, then press and hold the SHIFT
button and press the PUSH SET dial.
• Playlists cannot be saved.
• Playlists are removed in the following cases.
– When memory card or external storage is
removed.
– When the unit is turned off.
– When [PLAYLIST/IN-OUT] is set to “Off”
in the menu.
Note
Notes
Playback sequence (number)

18 IN Point to OUT Point Playback
– When [ALL RESET] is executed in the
menu.
– When the [FILE LISTING] value is
changed in the menu.
Playing a Playlist Sequence
1Check that [PLAYLIST/IN-OUT] is
set to “On” in the menu.
2Press and hold the STOP button and
press the PLAY/PAUSE button or
PUSH SET dial (when starting from
stop state).
Playback starts in sequence from the
start of the playlist.
The power supply indicator is lit blue.
(If only the PLAY/PAUSE button is
pressed, normal playback of the file at
the cursor position occurs.)
IN Point to OUT
Point Playback
Setting an IN Point and
OUT Point
You can set an IN point and OUT point for
each file.
1Set [PLAYLIST/IN-OUT] to “On”
in the menu.
2Select the file to set and press the
PLAY/PAUSE button to start
playback.
3At the point to set as the IN point,
press and hold the SHIFT button
and press the VOLUME – button.
4At the point to set as the OUT point,
press and hold the SHIFT button
and press the VOLUME + button.
The IN point and OUT point
information is displayed on the list
screen.
(To scroll the list screen left/right, press
and hold the SHIFT button and turn the
PUSH SET dial.)
• To delete an IN point or OUT point,
press and hold the SHIFT button and
press the VOLUME (– or +) button
IN point and OUT point display

IN Point to OUT Point Playback 19
for a few seconds.
(Points can also be deleted on the list
screen.)
• If an OUT point has not been set, the
end of the file is treated as the OUT
point.
• If an IN point has not been set, the
start of the file is treated as the IN
point.
• IN points and OUT points cannot be saved.
• IN points and OUT points are removed in the
following cases.
– When memory card or external storage is
removed.
– When the unit is turned off.
– When [PLAYLIST/IN-OUT] is set to “Off”
in the menu.
– When [ALL RESET] is executed in the
menu.
– When the [FILE LISTING] value is
changed in the menu.
• If an IN point or OUT point is set for a file that
already has an IN point or OUT point, the
existing point is replaced.
• An IN point cannot be placed to the right of an
OUT point. An OUT point cannot be placed to
the left of an IN point.
• An IN point and OUT point can only be set
during normal playback started using the
PLAY/PAUSE button.
Playing the Region
Between IN Point and OUT
Point
1Check that [PLAYLIST/IN-OUT] is
set to “On” in the menu.
2Select a file, then press and hold the
STOP button and press the PLAY/
PAUSE button or PUSH SET dial
(when starting from stop state).
The IN point to OUT point region is
played back. If the file is in a playlist,
the region is also played during playlist
playback.
The power supply indicator is lit blue.
(If only the PLAY/PAUSE button is
pressed, normal playback of the file at
the cursor position occurs.)
Notes

20 File Selection When Copying
File Selection
When Copying
You can select files and folders on an SxS
card on the Copy screen.
1Select [Select] on the Copy screen.
On screens other than the Copy
screen, press and hold the SHIFT
button and press the COPY button.
2Select the file or folder you want to
copy, then press and hold the SHIFT
button and press the SET button.
A check mark is added.
3Repeat step 2to select all the files you
want to copy.
The total data size of the selected files
is displayed at the bottom left.
4Select [Copy].
• If a folder is selected, all files in the folder will
be copied (including any text or other files not
displayed in the list).
• The PDW-U2 cannot be set as the copy
destination or copy source.
• External storage connected to the EXT
connector or EXT2 connector cannot be set as
the copy source.
• The file selection is canceled in the following
cases.
– When a folder is moved.
– When switching the screen display using the
PLAYBACK SxS button or PLAYBACK
EXT button.
– When copying is finished.
Notes
Check marks
Total data size
Other manuals for PMW-PZ1
4
Table of contents
Languages:
Other Sony Turntable manuals

Sony
Sony PS-LX200H User manual

Sony
Sony PS-X7 Setup guide

Sony
Sony MDH-10 User manual

Sony
Sony PS-J10 Primary User manual

Sony
Sony PS-LX55C User manual

Sony
Sony PS-LX300H User manual

Sony
Sony Betacam SX DNW-A22 User manual

Sony
Sony PS-LX120D User manual

Sony
Sony PS-LX110 User manual

Sony
Sony PS-LX110 User manual

Sony
Sony PS-DJ9000 - Stereo Turntable System User manual

Sony
Sony PS-LX110 User manual

Sony
Sony PS-LX250H User manual

Sony
Sony MDX-C8900 User manual

Sony
Sony HP-210 User manual

Sony
Sony CDX-C800 User manual

Sony
Sony PS-LX230 User manual

Sony
Sony PS-LX250H User manual

Sony
Sony WALKMAN NW-ZX505 User manual

Sony
Sony PS-LX350H User manual