Sony SWR50 User manual

User guide
SmartWatch 3
SWR50

Contents
Getting started............................................................................... 4
Introduction........................................................................................4
Overview............................................................................................4
Charging............................................................................................ 5
Attaching or detaching the wrist band...............................................5
Turning on and off..............................................................................6
Setting up your SmartWatch 3 ..........................................................6
Connecting to Wi-Fi®........................................................................8
Cloud sync.........................................................................................9
Learning the basics......................................................................10
Using the touchscreen.....................................................................10
Dimming and waking up the screen................................................ 10
Home screen....................................................................................11
Wrist gestures..................................................................................11
Cards............................................................................................... 12
Viewing status icons........................................................................14
Basic settings...............................................................................15
Accessing settings...........................................................................15
Screen settings................................................................................15
Airplane mode..................................................................................16
Theatre mode...................................................................................16
Restarting and resetting...................................................................17
Using your SmartWatch 3 ...........................................................18
Staying organised with your SmartWatch 3 ................................... 18
Contacts...........................................................................................18
Handling text messages.................................................................. 18
Handling emails............................................................................... 19
Handling incoming calls...................................................................20
Navigation........................................................................................20
Viewing your outdoor activities........................................................20
Music............................................................................................... 21
Finding your phone or tablet............................................................22
Reminders........................................................................................22
Notes................................................................................................23
Agenda.............................................................................................23
Getting quick answers.....................................................................23
Counting steps.................................................................................24
Setting an alarm...............................................................................24
Setting a timer..................................................................................25
2
This is an Internet version of this publication. © Print only for private use.

Using the stopwatch function..........................................................25
Checking flight and hotel reservations............................................ 25
Getting traffic information................................................................25
Tracking packages...........................................................................25
Using your SmartWatch 3 as a standalone device..........................25
Android Wear application.............................................................27
Android Wear on your phone or tablet............................................ 27
Selecting applications for voice actions..........................................27
Installing suggested applications.....................................................27
Connecting and reconnecting..........................................................27
Pairing with another wearable device..............................................28
Adjusting settings for your SmartWatch 3 ......................................28
Android Wear help...........................................................................29
Important information...................................................................30
Using your accessory in wet and dusty conditions.........................30
Legal information............................................................................. 31
3
This is an Internet version of this publication. © Print only for private use.

Getting started
Introduction
Your SmartWatch 3 accessory is powered by Android Wear and supports voice
commands. You can ask questions like “When is my next meeting?” or “How do I get
to the train station?” and get answers immediately.
You can also use your SmartWatch 3 to receive and reply to messages, view
appointment notifications, and glance at weather updates – all from the convenience
of your wrist.
Your SmartWatch 3 features built-in GPS and Wi-Fi® support, and you can pair your
SmartWatch 3 with your Android™ phone or tablet using NFC or Bluetooth®. When
configuring the Wi-Fi® settings, you can set your SmartWatch 3 to automatically
connect to saved Wi-Fi® networks in cases where the connection between your
SmartWatch 3 and phone or tablet gets lost. By doing this, both devices can stay
synced as long as they have access to a Wi-Fi® network.
The SmartWatch 3 works with any Android™ smartphone or tablet running Android™
version 4.3 or higher. To see if your Android™ device is compatible for use with
Android Wear, go to http://g.co/WearCheck from your phone or tablet. To extend
functionality, you can download new apps from Google Play™ as well as updates to
existing apps. You get automatic notifications when such updates are available.
For optimal performance and functionality, use the SmartWatch 3 together with the wristband
provided.
Overview
1 Microphone
2 Light sensor
3 Touchscreen
4 Power key
5 Main unit
6 NFC™ detection area
7 Cover for Micro USB port
8 Wristband
4
This is an Internet version of this publication. © Print only for private use.

Charging
Before using your SmartWatch 3 for the first time, you need to charge it for
approximately 30 minutes. Sony chargers and USB cables are recommended.
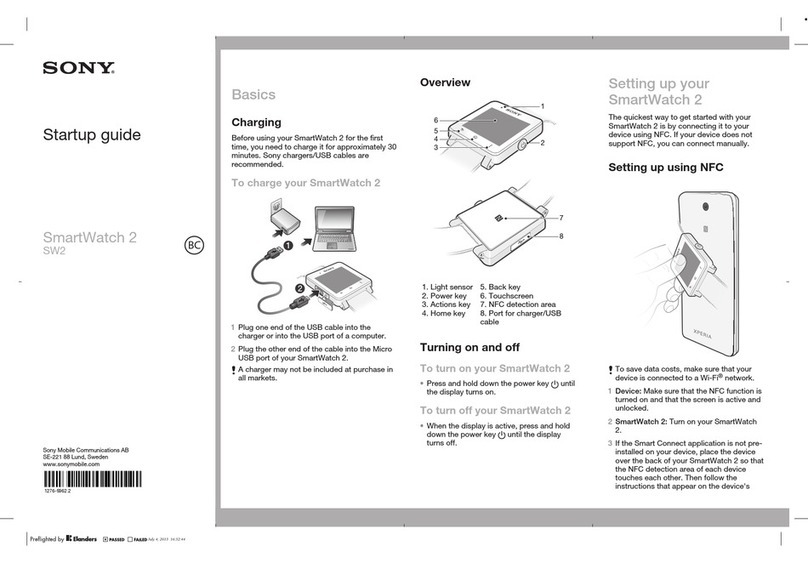
To charge your SmartWatch 3
1Plug one end of the USB cable into the Micro USB port of your SmartWatch 3.
2Plug the other end of the cable into the charger or into the USB port of a
computer.
3Make sure the charger or computer is connected to an active power source.
To view the battery level
•Swipe downwards from the top of the home screen.
Attaching or detaching the wrist band
To attach the SmartWatch 3 to the wrist band
Make sure that you don’t apply strong force to the frame of the wrist band, as this may cause
damage.
1Slide the top of the SmartWatch 3 into the frame.
2Push on the bottom of the SmartWatch 3 to attach it to the wrist band.
5
This is an Internet version of this publication. © Print only for private use.

To detach the SmartWatch 3 from the wrist band
1Gently push the bottom of the SmartWatch 3 downwards while holding the
frame firmly.
2The SmartWatch 3 pops out of the frame.
Turning on and off
To turn on your SmartWatch 3
•Press and hold down the power key until the SmartWatch 3 vibrates.
To turn off your SmartWatch 3
1From the home screen, swipe once from right to left.
2Find and tap Settings > Power off, then tap .
Setting up your SmartWatch 3
For your SmartWatch 3 accessory to work properly, you must first install the latest
version of the Android Wear application on your Android™ phone or tablet and then
pair and connect the phone or tablet with your accessory. There are two ways to
perform this setup. You can use NFC, which automatically links you to a download
page for Android Wear on Google Play™. Alternatively, if your phone or tablet doesn’t
support NFC, you can use the manual setup option. Remember that you can only pair
the SmartWatch 3 with one phone or tablet at a time.
6
This is an Internet version of this publication. © Print only for private use.

To set up your SmartWatch 3 using NFC
1Make sure that your Android™ phone or tablet is connected to a Wi-Fi®
network and that it maintains a Wi-Fi®connection throughout the setup
procedure.
2Phone or tablet: Make sure that the NFC function is turned on and that the
screen is active and unlocked.
3Place your phone or tablet over the SmartWatch 3 so that the NFC detection
area of each device touches the other. A Google Play™ download page for
Android Wear opens on the phone or tablet.
4Phone or tablet: Tap the relevant text or icons on the screen to download and
install Android Wear.
5Phone or tablet: Once Android Wear is installed, open the Android Wear
application, then follow the on-screen instructions.
6Phone or tablet: If Bluetooth®is not turned on, tap Turn on Bluetooth when
prompted.
7Phone or tablet: From the list of available devices, select the SmartWatch 3. A
pairing code now appears on both the SmartWatch 3 and your phone or tablet.
8Confirm on your phone or tablet that the same code is displayed on both
devices. The SmartWatch 3 now checks for updates, installs any required
software and restarts automatically, if necessary.
9Phone or tablet: Follow the on-screen instructions to complete the setup.
10 After setup, the SmartWatch 3 prompts you to turn on some features, such as
Google Now and Location services, to add more functionality and improve the
user experience. If desired, follow the relevant instructions.
The first time you pair and connect the SmartWatch 3 with a new phone or tablet, the
procedure can take several minutes.
If your SmartWatch 3 has already been paired with another phone or tablet, you have to reset
your SmartWatch 3 before pairing it with a new phone or tablet. For more information about
resetting, see
To perform a factory data reset
on page 17 .
To set up your SmartWatch 3 manually
1Make sure that your Android™ phone or tablet is connected to a Wi-Fi®
network and that it maintains a Wi-Fi®connection throughout the setup
procedure.
2Turn on your SmartWatch 3.
3Phone or tablet: Search for the Android Wear application on Google Play™,
then download and install the application.
4Phone or tablet: Once Android Wear is installed, open the Android Wear
application, then follow the on-screen instructions.
5Phone or tablet: If Bluetooth®is not turned on, tap Turn on Bluetooth when
prompted.
6Phone or tablet: From the list of available devices, select the SmartWatch 3. A
pairing code now appears on both the SmartWatch 3 and your phone or tablet.
7Confirm on your phone or tablet that the same code is displayed on both
devices. The SmartWatch 3 now checks for updates, installs any required
software and restarts automatically, if necessary.
8Phone or tablet: Follow the on-screen instructions to complete the setup.
9After setup, the SmartWatch 3 prompts you to turn on some features, such as
Google Now and Location services, to add more functionality and improve the
user experience. If desired, follow the relevant instructions.
The first time you pair and connect the SmartWatch 3 with a new phone or tablet, the
procedure can take several minutes.
If your SmartWatch 3 has already been paired with another phone or tablet, you have to reset
your SmartWatch 3 before pairing it with a new phone or tablet. For more information about
resetting, see
To perform a factory data reset
on page 17 .
7
This is an Internet version of this publication. © Print only for private use.

Connecting to Wi-Fi®
Your SmartWatch 3 supports Wi-Fi® and can automatically connect to saved Wi-Fi®
networks when it loses a Bluetooth® connection with your Android™ phone or tablet.
When your SmartWatch 3 is connected to a Wi-Fi® network, it can automatically stay
synced with your phone or tablet as long as the phone or tablet is also connected to
a Wi-Fi® network. So you can get notifications and use voice search on your
SmartWatch 3 throughout your home or workplace when you leave your phone or
tablet in a different room.
You must first install the latest version of the Android Wear application on your Android™
phone or tablet.
To turn Wi-Fi® on or off
1Make sure that the home screen is active on your SmartWatch 3.
2Swipe once from right to left.
3Tap Settings.
4Find and tap Wi-Fi Settings.
5If Wi-Fi Off is displayed, tap Wi-Fi Off to turn on Wi-Fi®. If Wi-Fi Automatic is
displayed, tap Wi-Fi Automatic to turn off Wi-Fi®.
If Wi-Fi® is activated on your SmartWatch 3, your SmartWatch 3 automatically connects to
any known, available network when your SmartWatch 3 does not have a Bluetooth®
connection to your Android™ phone or tablet.
Turning off Wi-Fi® can extend your battery life.
To connect to a preferred Wi-Fi® network
1Make sure that the home screen is active on your SmartWatch 3.
2Swipe once from right to left.
3Tap Settings.
4Find and tap Wi-Fi Settings.
5Make sure that Wi-Fi® is set to Wi-Fi Automatic.
6Scroll down through the available networks, then select the network that you
want to connect to.
Your SmartWatch 3 cannot connect to Wi-Fi® networks that take you to a login page before
you can connect, for example, Wi-Fi® networks at places like hotels or cafés.
Your SmartWatch 3 automatically chooses the best available Wi-Fi® network.
To forget a known network
1Make sure that the home screen is active on your SmartWatch 3.
2Swipe once from right to left.
3Tap Settings.
4Find and tap Wi-Fi Settings.
5Make sure that Wi-Fi® is turned on.
6Find and tap Saved networks.
7Select the network that you want to forget.
8Tap to confirm.
Disabling Wi-Fi® to extend battery life
If the Wi-Fi® function is using a lot of battery power, it may get turned off
automatically and the message "Wi-Fi® disabled to extend battery life" appears. How
fast your battery drains depends on how much you use your SmartWatch 3 while it's
connected to Wi-Fi®. You can disable the message via the notification settings.
The Wi-Fi® function switches on again automatically when your SmartWatch 3 is recharged.
8
This is an Internet version of this publication. © Print only for private use.

To turn off notifications
1Open the Android Wear application on your Android™ phone or tablet, then
tap .
2Find and tap Block app notification.
3Tap .
4Scroll down to find the app that you want to block, then tap it.
You can also block notifications directly on your SmartWatch 3.
By turning off unnecessary notifications, you save battery power when using Wi-Fi®.
To change how much battery Wi-Fi® can use before it's turned off
1Make sure that the home screen is active on your SmartWatch 3.
2Swipe once from right to left.
3Tap Settings.
4Find and tap Wi-Fi Settings > Advanced > Power save after....
5Scroll down and select an option.
Cloud sync
The Android Wear cloud sync service lets you share data between your SmartWatch
3 and your Android™ phone or tablet over the Internet. The data is saved on the
Android Wear cloud sync server. Before you can use Wi-Fi® on your SmartWatch 3,
you need to turn on the cloud sync feature in the Android Wear application on your
phone or tablet.
To turn on Cloud sync
1Open the Android Wear application on your Android™ phone or tablet, then
tap .
2Find and tap Cloud sync.
3Drag the slider to the On position.
9
This is an Internet version of this publication. © Print only for private use.
Learning the basics
Using the touchscreen
Swiping
Swipe up •View more cards, if available.
•Browse down through options in a list.
Swipe down •View previous cards, if not dismissed.
•Browse up through options in a list.
Swipe left •See more details and actions, if available.
Swipe right •Dismiss a card or close a menu.
Tapping
•Open or select an item.
Dimming and waking up the screen
When your SmartWatch 3 is on and left idle for a period of time, the screen dims
automatically. You can also dim the screen manually and wake it up at any time.
To wake up the screen
Perform one of the following actions:
•When the SmartWatch 3 is on your wrist, turn it towards you.
•Tap the screen or briefly press the power key.
To dim the screen manually
Perform one of the following actions:
•Place the palm of your hand over the screen until it vibrates.
•Briefly press the power key.
10
This is an Internet version of this publication. © Print only for private use.
•Drop the wrist on which you are wearing the SmartWatch 3 to your side.
To dim the screen by dropping your wrist, you must first activate the wrist gesture function.
See
To activate the wrist gesture function
.
Home screen
The home screen can show the time and date and the status of your SmartWatch 3.
From the home screen, you can view cards or take voice actions.
When the screen is dimmed, you can still see the time and date and view the status
of your SmartWatch 3 as long as you choose a suitable watch face.
Wrist gestures
You can use wrist gestures to scroll cards instead of swiping upwards or downwards
on the screen of your SmartWatch 3.
Flick wrist out Scroll down.
Flick wrist in Scroll up.
Push arm down Acts like a tap, or cancels a voice action.
Pivot up Go back one menu, or cancel a voice action.
Shake wrist Go to home screen, or cancel a voice action.
Before you can use wrist gestures, you must activate this function. See
To activate the wrist
gesture function
on page 11 .
To activate the wrist gesture function
1Make sure that the home screen is active on your SmartWatch 3.
2Swipe once from right to left.
3Tap Settings.
4Find and tap Gestures, then tap Wrist gestures.
The drain on the battery increases slightly when the wrist gesture function is activated.
To access the tutorial menu
1Make sure that the home screen is active on your SmartWatch 3.
2Swipe once from right to left.
3Tap Settings.
4Find and tap Gestures, then tap Launch tutorial.
To cancel a voice action
•Use the pivot up or push down gesture to cancel a voice action.
11
This is an Internet version of this publication. © Print only for private use.

To scroll up using wrist gestures
1Make sure that the Wrist gestures function is activated.
2Activate the home screen on your SmartWatch 3.
3Flick your wrist away from you in the upwards direction, then turn it slowly
back towards you.
To scroll down using wrist gestures
1Make sure that the Wrist gestures function is activated.
2Activate the home screen on your SmartWatch 3.
3Slowly turn your wrist away from you in the upwards direction, then quickly
flick it back towards you.
Cards
Much of the information that you need appears on the screen of your SmartWatch 3
as "cards". Depending on the information shown, a card can be compared to a
notification or reminder, an update, a pop-up message or a thumbnail.
You can view cards that show the weather of the day, your daily step count, incoming
text messages and the answer to a simple question that you want to know.
You can swipe through cards, that is, you can swipe from one screen to another to
view more details and take actions. You can dismiss cards when you are finished
viewing them.
12
This is an Internet version of this publication. © Print only for private use.

To view cards
1Swipe upwards on the screen or turn your wrist away from you.
2To see all the text on a card, tap the card.
To view a tutorial about how to handle cards, go to the main application screen on your phone
or tablet, then find and tap Android Wear > > Tutorial. The tutorial is displayed on both your
SmartWatch 3 and your phone or tablet.
To view details of a card and take actions
1To view details of a card, swipe from right to left on the card.
2To take an action, tap one of the available actions on a card. For example, tap
Reply to reply to a text message.
To dismiss a card
•Swipe from left to right on the card.
When you dismiss a card, the related notification also gets dismissed on your phone or tablet.
The content itself, however, does not get deleted.
To restore a dismissed card
1After the card is dismissed, swipe downwards from the top of the screen. If the
dismissed card is the last card available, swipe upwards from the bottom of
the screen.
2Tap .
After you dismiss a card, you only have a several seconds to restore it before it gets deleted.
Controlling notification cards on your SmartWatch 3
If your phone or tablet runs Android™ version 5.0, you can adjust the interruption
settings to select which types of notification cards are allowed on your SmartWatch
3.
If your phone or tablet runs Android™ version 4.3 or 4.4, you can mute or unmute
your SmartWatch 3 to control whether notification cards appear on your SmartWatch
3.
To adjust the interruption settings for your SmartWatch 3
1Make sure that your phone or tablet is running Android™ version 5.0.
2Swipe downwards the whole length of the screen of your SmartWatch 3.
3Select an option.
To mute or unmute your SmartWatch 3
1Make sure that your phone or tablet is running Android™ version 4.3 or 4.4.
2Swipe downwards the whole length of the screen of your SmartWatch 3.
3Tap to mute or to unmute your SmartWatch 3.
After you mute your SmartWatch 3, notification cards stop appearing on the accessory.
Google Now
Google Now, which is part of the Google Search application, recognises repeated
actions that you perform on your phone or tablet and displays more relevant
information to you in the form of "cards".
Google Now cards
A range of Google Now cards can work with Android Wear and appear on your
SmartWatch 3. They cover the following categories:
•Stock news
•Weather
•Reminders
•Sports news
13
This is an Internet version of this publication. © Print only for private use.
•Traffic
•Flights and reservations
•Boarding passes
•Shipping confirmation for packages
•Public transit info on nearby trains and buses
•Friends’ birthdays
•Public alerts
•Reminders to leave on time for upcoming appointments
•Hotel and restaurant reservations
To customise Google Now on your phone or tablet
1From the application screen on your phone or tablet, find and tap Google.
2Drag the left edge of the screen to the right, then tap Customise.
3Select an option and enter the relevant information.
Viewing status icons
Your SmartWatch 3 displays status icons on the home screen. It shows, for example,
the connection status of your accessory and the battery charge status.
Status icons
If your phone or tablet runs Android™ version 4.3 or 4.4, the following status icons
may appear on the home screen of your SmartWatch 3:
Your SmartWatch 3 is disconnected from your phone or tablet
Theatre mode is activated
Your SmartWatch 3 is muted
The battery is charging
Airplane mode is activated
If your phone or tablet runs Android™ version 5.0, the following status icons may
appear on the home screen of your SmartWatch 3:
Your SmartWatch 3 is disconnected from your phone or tablet
Theatre mode is activated
Silent mode is activated
Only allow priority interruptions
The battery is charging
Airplane mode is activated
14
This is an Internet version of this publication. © Print only for private use.
Basic settings
Accessing settings
You can view and change settings directly on your SmartWatch 3 via the Settings
menu. You can access the Settings menu using the power key, voice commands or
the home screen.
To open the Settings menu using the power key
1Make sure that the screen is active on your SmartWatch 3.
2Press and hold down the power key until the app menu appears.
3Find and tap Settings.
To open the Settings menu using voice commands
1Make sure that the screen is active on your SmartWatch 3.
2Say "OK Google". If the command is recognised, the "Speak now" screen
opens.
3Say "Settings".
To open the Settings menu by tapping the screen
1Make sure that the screen is active on your SmartWatch 3.
2Swipe once from right to left.
3Find and tap Settings.
To open the Settings menu, you can also swipe downwards from the top of the home screen
and then swipe from right to left twice and tap .
Screen settings
You can adjust the screen brightness and select to always display a dimmed watch
face when the screen is idle by activating the Always-on screen function. You can
also change the type of watch face that displays on your home screen.
To adjust the screen brightness
1From the Settings menu on your SmartWatch 3, find and tap Adjust brightness.
2Scroll up or down to select the desired brightness level.
To turn the Always-on screen function on or off
•From the Settings menu on your SmartWatch 3, find and tap Always-on screen
accordingly to turn the function on or off.
To change the watch face directly on the SmartWatch 3
1From the Settings menu on your SmartWatch 3, find and tap Change watch
face.
2Swipe left or right to view the watch faces available, then tap the watch face
that you want to use.
You can also touch and hold the home screen to change the watch face.
To change the watch face via the phone or tablet
1On your phone or tablet, open the Android Wear application.
2Under Watch faces, select an option, or tap More to view more watch faces
and then select an option.
To access more watch face options using third-party apps on Google Play™, scroll down to
the bottom of the screen and tap Get more watch faces.
15
This is an Internet version of this publication. © Print only for private use.
To activate the automatic screen lock
1Make sure that the home screen is active on your SmartWatch 3.
2Swipe once from right to left.
3Tap Settings.
4Find and tap Screen lock.
5Tap to confirm.
6To set your unlock pattern, draw a pattern.
7Redraw the pattern to confirm it.
The screen locks automatically when you’re not wearing your SmartWatch 3. It also locks
when your SmartWatch 3 loses its Bluetooth® connection to your Android™ phone or tablet.
To turn off the automatic screen lock
1Make sure that the home screen is active on your SmartWatch 3.
2Swipe once from right to left.
3Tap Settings.
4Find and tap Screen lock.
5Tap to confirm.
6Draw the saved screen unlock pattern.
To lock the screen manually
1Make sure that the home screen and the automatic screen lock are activated
on your SmartWatch 3.
2Swipe once from right to left.
3Tap Settings.
4Find and tap Lock screen now.
5Tap to confirm.
You can immediately lock your SmartWatch 3 screen by manually activating this function.
Airplane mode
In Airplane mode, the Bluetooth®and Wi-Fi®functions of your SmartWatch 3 are
turned off and your SmartWatch 3 is disconnected from your phone or tablet.
However, you can still use some basic features. For example, you can set a timer or
an alarm.
In Airplane mode, you must tap the screen to navigate your SmartWatch 3 and perform tasks.
Voice commands are not available.
To turn on/off Aeroplane mode
•From the Settings menu on your SmartWatch 3, find and tap Aeroplane mode.
Theatre mode
Theatre mode setting turns off the display of your SmartWatch 3 and prevents
notifications from appearing. This function is useful if you are in a place where you
don’t want to be disturbed or disturb others, for example, a theatre or a library.
To turn Theatre mode on or off
1Swipe downwards the whole length of the screen.
2Swipe from right to left until Theatre mode is displayed on the screen.
3To turn on Theatre mode, tap . To turn off Theatre mode, press the power
button.
In Theatre mode, you can only activate the screen of your SmartWatch 3 by pressing the
power key.
You can also quickly press the power key twice to turn Theatre mode on or off.
16
This is an Internet version of this publication. © Print only for private use.

Restarting and resetting
If your SmartWatch 3 stops responding, it is recommended to restart the device
using the power key. When this restart method does not work, you can force the
SmartWatch 3 to shut down. No settings or personal data get deleted during a restart
or shutdown procedure, whether it's forced or not.
You can also reset your SmartWatch 3 to its factory default settings. This procedure
deletes all personal data on your SmartWatch 3 and is sometimes necessary in
situations where your SmartWatch 3 stops functioning properly.
To restart your SmartWatch 3 using the power key
•Press and hold down the power key until your SmartWatch 3 vibrates once and
restarts.
To force your SmartWatch 3 to shut down
•Press and hold down the power key until your SmartWatch 3 vibrates three
times in quick succession and turns off.
Ignore any other single vibrations or restart attempts as you wait for the three successive
vibrations while keeping the power key pressed.
To perform a factory data reset
1From the Settings menu of your SmartWatch 3, find and tap Unpair with phone.
2To confirm, tap .
17
This is an Internet version of this publication. © Print only for private use.

Using your SmartWatch 3
Staying organised with your SmartWatch 3
You can speak to your SmartWatch 3 to set reminders, take notes, check your
schedule, reply to a text message and perform other actions. You can also tap the
screen to act on simple tasks that are listed in the app menu and the task menu.
Most of the features described above work if your language is set to English, French, German,
Italian, Japanese, Korean, Russian, Spanish, or Brazilian Portuguese. Note, however, that
some voice actions may not be available in all languages and countries.
To access the app menu
1Make sure that the home screen is active on your SmartWatch 3.
2Swipe once from right to left. All available apps appear in a list.
To access the task menu
1Make sure that the home screen is active on your SmartWatch 3.
2Say "OK Google". If the command is recognised, the "Speak now" screen
opens.
3To access the task menu, swipe upwards. All available tasks appear in a list.
Applications that work with your SmartWatch 3
The list below shows some applications which, when installed on your Android™
phone or tablet, are compatible for use with your SmartWatch 3. To access a full
range of downloadable apps that support Android Wear, go to Google Play™. It's
recommended to check on Google Play™ regularly as new apps are added all the
time.
•Messaging
•Email
•Calendar
•The Music application from Sony and other standard Android™ music players
•Lifelog
•Google applications such as Google Keep, Google Maps and Gmail
You might need to update these applications to the latest version in order to achieve optimal
compatibility with Android Wear.
Contacts
The contact list on your SmartWatch 3 shows all contacts that you have
communicated with recently. You can use your SmartWatch 3 to send a text or email
message or make a call directly from the contact list.
To view your contact list
1Make sure that the home screen is active on your SmartWatch 3.
2To view your contact list, swipe from right to left twice.
To communicate with contacts directly from the contact list
1Make sure that the home screen is active on your SmartWatch 3.
2Swipe from right to left twice.
3Find and tap the name of the contact with whom you want to communicate.
4Select an option, then follow the on-screen instructions.
Handling text messages
When a text message comes in on your phone or tablet, you can immediately read
the message on your SmartWatch 3 in the form of a card. You can also use your
18
This is an Internet version of this publication. © Print only for private use.

SmartWatch 3 to send text messages to contacts that are saved on your phone or
tablet.
To send a text message
1Make sure that the home screen is active on your SmartWatch 3.
2Say "OK Google". If the command is recognised, the "Speak now" screen
opens.
3Say "Send a text" and the name of a contact that is saved to your phone or
tablet, then say the text that you want to send.
4Alternatively, you can say something like "Text Jack I'm ready" or "Send Jane
a message that I'm back". In both cases, the message gets sent automatically.
To reply to a text message
1Select the card that represents the text message that you want to reply to.
2Swipe from right to left until you see Reply, then tap Reply.
3Swipe upwards and select a predefined message, or enter a spoken reply by
saying your message aloud. Once you're finished, the text message is sent
automatically.
To reply to a text message with emoji
1Select the card that represents the text message that you want to reply to.
2Swipe from right to left until you see Reply, then tap Reply.
3Swipe upwards and select Draw emoji.
4Draw an emoji, for example, a smiley face or a thumbs-up sign. Your
SmartWatch 3 then searches for an emoji that best matches your drawing. If
no match is found, you are shown a selection to choose from. Select an emoji
or swipe from left to right and try drawing another one yourself.
5If desired, add more emoji.
6To delete an emoji, tap to select all the emoji characters that you have drawn,
then tap again to select the particular one that you want to delete and then tap
.
7To send the message, tap .
You can also choose emoji by tapping on the emoji drawing screen.
Handling emails
When an email message comes in on your Android™ phone or tablet, you can read
and reply to it using your SmartWatch 3. Each email is represented by a
corresponding card on the accessory. You can also speak into your SmartWatch 3 to
send email messages to saved contacts.
To send an email message
1Make sure that the home screen is active on your SmartWatch 3.
2Say "OK Google". If the command is recognised, the "Speak now" screen
opens.
3Say "Email" and the name of a contact that is saved to your phone or tablet,
then say the text that you want to send.
4Alternatively, you can say something like "Email Jack that I will be there
tomorrow". In both cases, the message gets sent automatically.
To reply to an email message
1Select the card that represents the email message that you want to reply to.
2Swipe from right to left until you see Reply, then tap Reply.
3Swipe upwards and select a predefined message, or enter a spoken reply by
saying your message aloud. Once you're finished, the message gets sent
automatically.
19
This is an Internet version of this publication. © Print only for private use.

Handling incoming calls
When a call comes in on your Android™ phone or tablet, you can see who is calling
on the screen of your SmartWatch 3. You can then use your SmartWatch 3 to accept
the call and speak, for example, into a Bluetooth®headset to communicate with the
caller. Or you can decline the call on your SmartWatch 3. You can also decide to
decline incoming calls with a predefined text message.
To answer an incoming call
1To accept the incoming call, swipe from right to left on the screen of your
SmartWatch 3.
2Use a phone, tablet or Bluetooth®headset to speak with the caller.
To decline an incoming call
•Swipe from left to right on the screen of your SmartWatch 3.
To reject an incoming call with a predefined message
•Swipe upwards from the bottom of the screen of your SmartWatch 3, then
select a message.
Navigation
You can speak to your SmartWatch 3 to get turn-by-turn directions to a given
destination. You can also find nearby places or businesses and get relevant
information about them.
To navigate using your SmartWatch 3
1Make sure that the home screen is active on your SmartWatch 3.
2Say "OK Google". If the command is recognised, the "Speak now" screen
opens.
3Say "Navigate" and then say your destination. Alternatively, say something like
"Navigate to the nearest hotel". If your command is registered properly, the
route appears on your SmartWatch 3.
On the navigation screen, swipe from right to left to view route information such as time and
distance to the location.
To find a place or business
1Make sure that the home screen is active on your SmartWatch 3.
2Say "OK Google". If the command is recognised, the "Speak now" screen
opens.
3Say something like "Find the Eiffel Tower", "Where is the closest
supermarket?" or "How far is Starbucks from my home?". If your request is
recognised, the relevant information appears on the SmartWatch 3.
Viewing your outdoor activities
When your SmartWatch 3 is disconnected from your phone or tablet, it can still
record data about your activities, for example, the location, speed and distance
walked or run. You can view statistics generated from this data on your phone or
tablet at a later time when the SmartWatch 3 is connected. For example, you can
view your journeys on a map.
You must install a compatible application, such as Lifelog or My Tracks, for the functionality
described above to work.
20
This is an Internet version of this publication. © Print only for private use.
Table of contents
Other Sony Watch manuals

Sony
Sony SmartWatch MN2 User manual

Sony
Sony SmartWatch 2 SW2 User guide

Sony
Sony SmartBand SWR10 Operating instructions

Sony
Sony SmartWatch 3 SWR50 Quick reference guide

Sony
Sony SmartWatch 3 SWR50 User manual

Sony
Sony SmartWatch 2 User manual

Sony
Sony SmartBand 2 Operating instructions

Sony
Sony SmartBand Talk SWR30 User manual

Sony
Sony SmartWatch MN2 User manual

Sony
Sony SmartBand TalkSWR30 User manual