SoundGear Phantom User manual

PHANTOM
OPERATIONS MANUAL
Rechargeable ITE (In-The-Ear)

Congratulations!
The hunt is over for the world’s
best hearing protection! When
in the field or on the range, the
gear you’re sporting simply
cannot fail. SoundGear Phantom
delivers the performance and
reliability top hunters and
shooters demand, so you can
take your game to the next
level. It’s hearing protection with
stopping power!
- Automatically protect your
ears from loud sounds and gun
blasts.
- Hear conversations, game and
environmental sounds with
ease.
- Custom-molded to your ear for
the most personalized fit.
- Stream calls, music or other audio
wirelessly from your phone.
- One, overnight charge ensures
you’re powered all day long.
Included in the box:
• Phantom devices
• Charger
• Charging cord
• Power adapter
• Zipper case
• Lanyard
• Operations manual
• Hear Clear wax guards
• Cleaning brush
Product Overview | 5Table of Contents
Overview
Product Overview � � � � � � � � � � � � � � � � � � � � � � � � 5
Charger Overview � � � � � � � � � � � � � � � � � � � � � � � � 6
Pairing
Pairing with an iOS Device � � � � � � � � � � � � � � � � � 7
Pairing with an Android Device � � � � � � � � � � � � � � 9
Mobile Phone Use � � � � � � � � � � � � � � � � � � � � � � 10
Charging
Charging Your SoundGear Devices � � � � � � � � � � 11
Charger On-Board Battery LEDs � � � � � � � � � � � � 13
Use and Care
Insertion and Removal � � � � � � � � � � � � � � � � � � � � 14
User Controls
Power On & Off � � � � � � � � � � � � � � � � � � � � � � � � � 16
Auto On & Off � � � � � � � � � � � � � � � � � � � � � � � � � � 16
Rotary Volume Control � � � � � � � � � � � � � � � � � � � 17
Volume Control Indicators � � � � � � � � � � � � � � � � � 18
Battery Indicators � � � � � � � � � � � � � � � � � � � � � � � 18
Memory Change and Memory Indicators � � � � � 19
Device Care
SoundGear Device Care � � � � � � � � � � � � � � � � � � 20
Service and Repair � � � � � � � � � � � � � � � � � � � � � � � 23
Charger Care � � � � � � � � � � � � � � � � � � � � � � � � � � � 24
Troubleshooting Guide � � � � � � � � � � � � � � � � � � � 25
Technical Specifications � � � � � � � � � � � � � � � � � � � � � � 28
Limited Warranty Information � � � � � � � � � � � � � � � � � 30
Regulatory Information
Safety Information � � � � � � � � � � � � � � � � � � � � � � � 33
FCC Information� � � � � � � � � � � � � � � � � � � � � � � � � 36
7
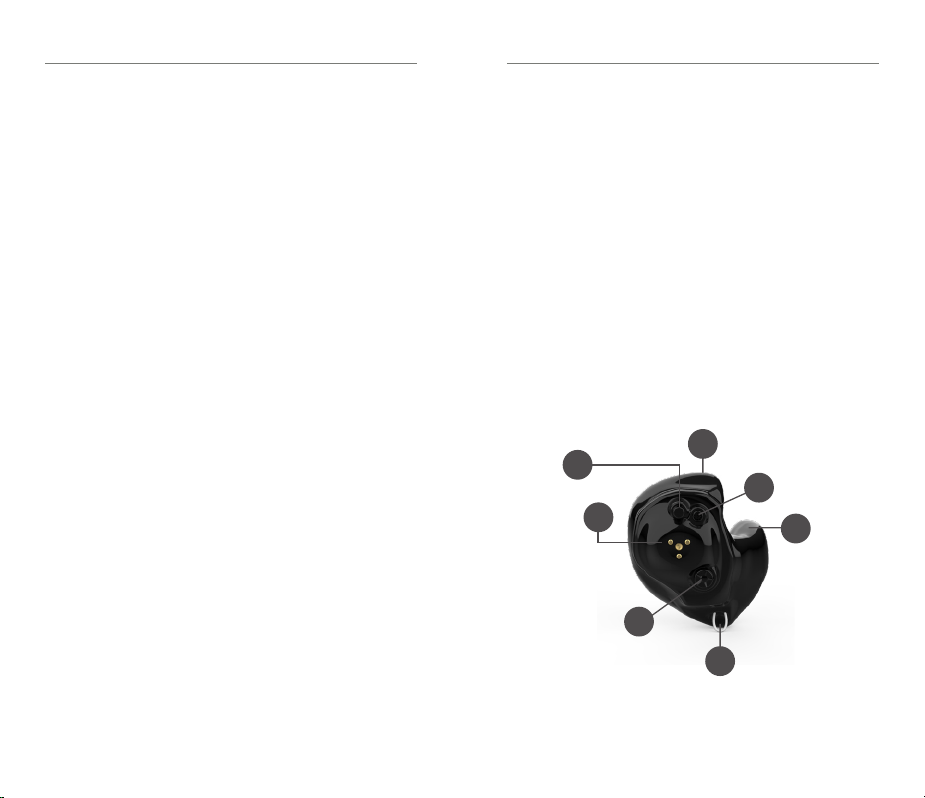
SoundGear Features, Controls and
Identification
Your SoundGear devices include:
1� Microphone
2� Rechargeable battery contact
3� Lanyard loop
4� Sound outlet
5� Multifunction button
6� Rotary volume control
7� Location of serial number
*Not actual size
5
2
3
4
1
6
Pairing | 76 | Charger Overview
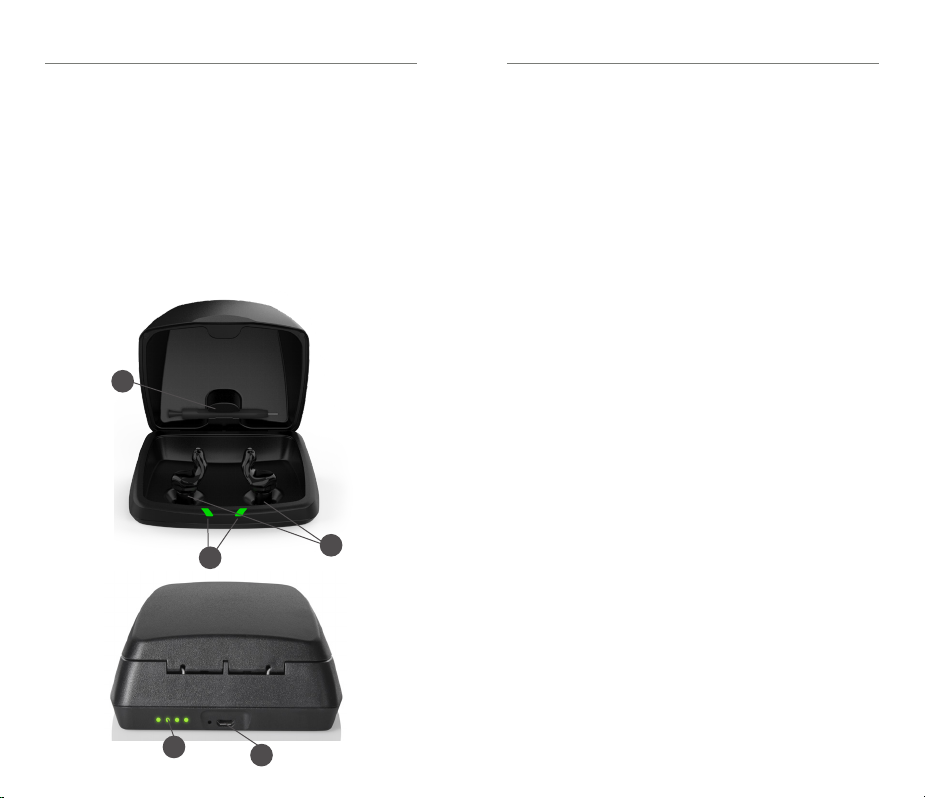
Charger Features, Controls and
Identification
1� Cleaning brush
2� Charging posts
3� Charging LEDs
4� On-board battery LEDs
5� Micro USB port
2
3
1
45
Pairing your SoundGear devices to
your iOS device
1� Ensure the Bluetooth®setting is enabled
on your iOS device� Within the Settings
menu go to Bluetooth and toggle to On�
2� Locate, then tap the Settings icon on your
iOS device�
3� Within the Settings menu go to Settings >
Accessibility > Hearing Devices�
4� While the iOS device searches for the
SoundGear devices, remove the devices
from the charger� This will put the devices
in pairing mode for 3 minutes after
turning on�
5� If your SoundGear devices do not appear
in the “Devices” list within 5–7 seconds,
tap Accessibility in the upper left corner,
then tap Hearing Devices�

Pairing | 98 | Pairing
Native iOS Controls
You are now ready to use your iOS device to
adjust your SoundGear device�
To access the native iOS controls, triple click
the Home button on your iOS device� From
this screen you can adjust the volume or select
a memory�
Right Volume/Left Volume allows you to
increase and decrease Microphone Level for
each SoundGear device individually�
Select any memory shown in the list to change
the SoundGear device to that memory setting�
Pairing your SoundGear devices to
your Android™device
1� Locate, then tap the Settings icon on your
device�
2� Select Bluetooth�
3� In this screen, if Bluetooth appears
Off, change the setting to On� While
the Android device searches for the
SoundGear devices, remove the devices
from the charger� This will put the devices
in pairing mode for 3 minutes after
turning on�
4� Tap the name of each SoundGear device
to connect each SoundGear device to the
Android device�

Charging | 1110 | Use with Mobile Phone
Mobile Phone Use
Your SoundGear devices are designed to
work with a smartphone� When SoundGear
devices are powered on and paired with an
MFi-compatible iOS device or an ASHA-
compatible Android device, incoming phone
calls and other audio will route automatically
to your SoundGear devices� When your
SoundGear devices are not powered on,
incoming calls route only to your smartphone�
iOS allows you to select a preference for how
audio (call audio and media audio) is routed
from your smartphone to your SoundGear
devices�
Microphone Use while Streaming
When an audio stream starts, the
microphones on your SoundGear devices
will automatically mute� The microphone
volume will go back to the previous settings
when the audio stream stops� To modify the
microphone volume while streaming, simply
use rotary volume control on your SoundGear
device� For iOS devices, you can also use the
native iOS controls�
For any questions related to microphone
function or control while streaming, please
contact SoundGear Customer Support for
assistance�
Charging Your SoundGear Devices
• Place your SoundGear devices in the
charger with the charging contacts
touching the charging posts
• Your SoundGear devices will turn off
automatically and begin to charge
• Note: The LEDs corresponding to each
SoundGear device:
– Glowing Green = Charging
– Solid Green = Fully Charged*
– Blinking Red = Fault State – Remove
from charger, wait until LED turns off
and re-insert devices� If Fault State
continues, call your SoundGear dealer
or SoundGear Customer Support�
• Charging occurs with the lid open or
closed
*If you are charging without the cord, the LEDs will turn off when charged,
to save battery.

Charging | 1312 | Charging
• Your SoundGear devices will be
completely charged in approximately
3 ½ hours
• It is safe to keep them in the charger after
they are fully charged and any time that
you are not wearing them
• If you will not be wearing your SoundGear
devices for an extended period of time
(i�e�, weeks) remove the plug from the
charger, remove the SoundGear devices
from the charging posts and manually
power the SoundGear devices off by
pressing the push button for three
seconds� You may store them in the
charger reservoir or in the SoundGear
carry case�
• Your SoundGear devices will automatically
power on when removed from the charger
• When charging without the charger
cord the LEDs will turn off when the
SoundGear devices are fully charged
• To refresh LEDs when the charger is not
plugged in, remove a SoundGear device
from the charging posts for three seconds
and then replace it in the charger (refresh
lasts 10 seconds only – then LEDs will turn
off again)
Charger On-Board Battery LEDs
• When charger is plugged in and fully
charged = 4 solid LEDs will appear
• When charging without the cord the LEDs
will turn off after 10 seconds
• To refresh LEDs, remove a SoundGear
device from the charging post for three
seconds and then replace it in the charger
(refresh lasts 10 seconds only – then LEDs
will turn off again)
• 4 Solid > 75%
• 3 Solid < 75%
• 2 Solid < 50%
• 1 Solid < 25%
• 1 Blinking = Charge Low
• While charging the on-board battery with
the provided cord, the 4 LEDs will be:
• Glowing while charging
Use and Care | 1514 | Use and Care
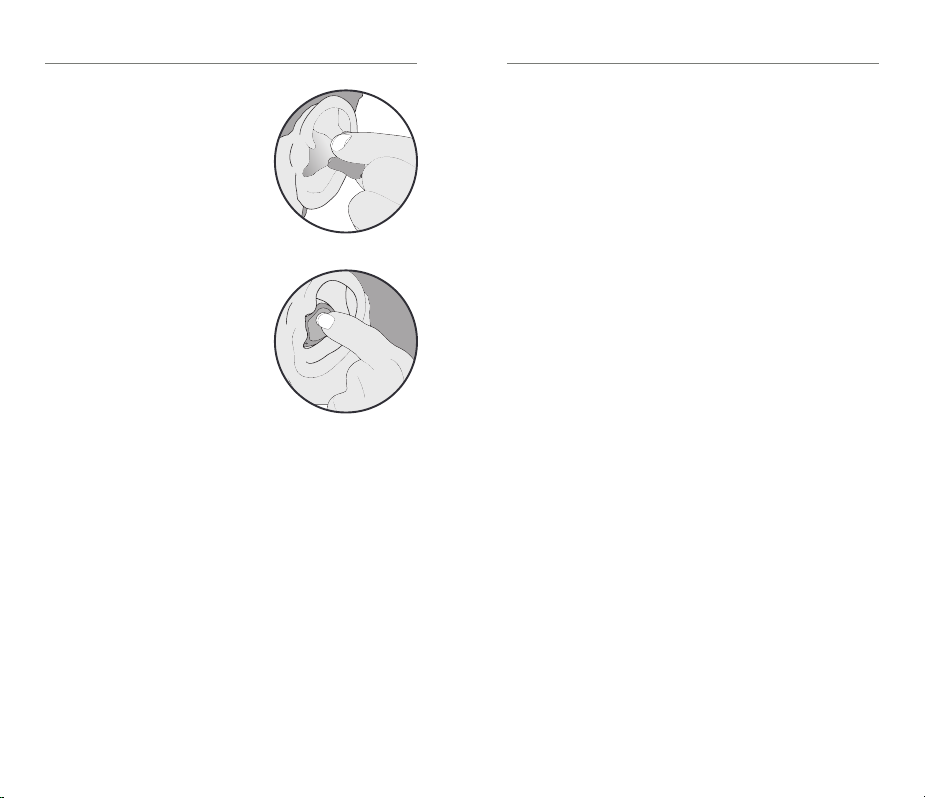
Insertion and Removal
To insert the SoundGear
device:
1� Hold the SoundGear
device with your
thumb and forefinger on
the outer edges of the
case�
2� Tilt your hand slightly
forward
and gently insert
the canal tip of the
SoundGear device
into your ear canal and
rotate the SoundGear device backward�
Softly press the SoundGear device into
place with your fingertip�
To remove the SoundGear device:
Grasp the SoundGear device with your thumb
and forefinger; gently rotate it as you pull
outward�
1
2
Helpful Hints
• Minor irritation and/or inflammation may
occur as your ear becomes accustomed to
having an object in it; if so, please contact
your SoundGear dealer or SoundGear
Customer Support�
• If an actual allergic reaction occurs,
alternative earmold materials are
available; contact your SoundGear dealer
or SoundGear Customer Support�
• Severe swelling, discharge from the ear,
excessive wax or other unusual conditions
warrant immediate consultation with a
physician�

User Controls | 1716 | User Controls
Power On & Off
ON - The SoundGear devices will power on
automatically after removing them from
the charger� There is a delay that allows
time to insert your SoundGear device
into your ear�
ON - If the SoundGear device is manually
powered off, pressing the push button
will power it on� The delay still exists to
give you time to insert the SoundGear
device into your ear�
OFF - The SoundGear devices will power
off automatically when placed on the
charging posts� Charging will proceed�
OFF - The SoundGear devices can be powered
off manually by pressing and holding
down the push button for three seconds�
Auto On/Off
Your SoundGear devices support the ability
to automatically go into a low-powered state
to conserve battery*� Place your SoundGear
device on a flat, stable surface (e�g� a table)
with the tip facing upwards and it will go into
a low-powered state after about 15 minutes�
To resume normal function, pick up your
SoundGear device and place it in your ear�
*Going into a low-powered state helps conserve battery consumption
when used with rechargeable SoundGear devices that are charged on
a daily basis.
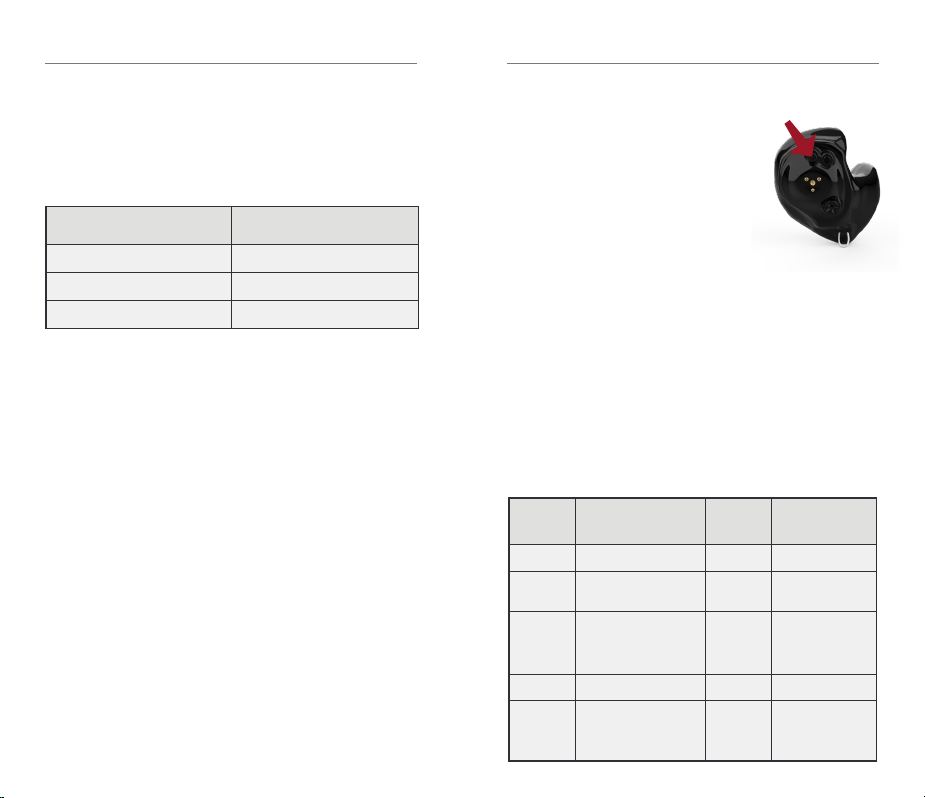
Rotary Volume Control
Your SoundGear device is
equipped with a rotary
volume control� To make
volume adjustments, use
your fingertip to rotate
the volume control�
1� To make sounds
louder, rotate the
control forward,
toward your nose�
2� To make sounds
softer, rotate the
control backwards,
toward the back of
your head�
Increase Volume
Decrease Volume
Your SoundGear device will switch back on
again� You may hear a tone indicating that
your SoundGear device is powered on�
User Controls | 1918 | User Controls
Volume Control Indicators
Your SoundGear devices are configured with
audible indicators, which highlight the current
volume position�
Battery Indicators
An indicator will sound when the battery
voltage is low� You have approximately 30
minutes* of battery life remaining� An indicator
may also sound just before the battery stops
working�
*Actual time between low battery indicator and shut down will vary
depending on environmental noise levels and your use of the
product.
Volume Level Tone
Volume Max 5 Short Beeps •••••
Volume Step One Short Beep •
Volume Min 1 Long Tone –
Memory Change and Memory
Indicators
Your SoundGear devices
are configured with four
memories�
You can access these
memories by using the
push button on your SoundGear device to
increment through the memories�
You will hear an audible indicator when
making a memory change, identifying which
memory your SoundGear devices are in�
See table below for a description of the
memories and the audible memory indicator�
Memory Name Memory
indicator Description
1Outdoor + Max Wind “ONE” Normal use, outdoor
or indoor
2Max Protect + Max Wind “TWO”
Increased
compression for
shooting
3High Frequency Boost +
Max Wind “THREE”
Designed for
individuals with
existing high
frequency hearing
loss
4Mute “MUTE” Mutes device
microphones
Streaming memory none
Automatic memory
when streaming
starts (phone calls,
music, etc)

Device Care | 2120 | Device Care
SoundGear Device Care
Keep your SoundGear devices clean at all
times� Heat, moisture and foreign substances
can result in poor performance�
• After each use, clean over a soft cloth
to prevent damage from a fall on a hard
surface�
• Use the provided cleaning brush to clean
debris from around the microphone and
receiver�
• Never use water, solvents, cleaning fluids
or oil to clean your SoundGear devices�
If needed, your SoundGear dealer or
SoundGear Customer Support can provide
further information on additional maintenance
procedures for your SoundGear devices�
Helpful Hints
• Do not take apart your SoundGear
devices or insert the cleaning tools inside
them�
• When not in use, place SoundGear
devices in charging case or carry case and
store:
– In a dry, safe place
– Away from direct sunlight and heat to
avoid extreme temperatures
– Safely out of reach from children and
pets
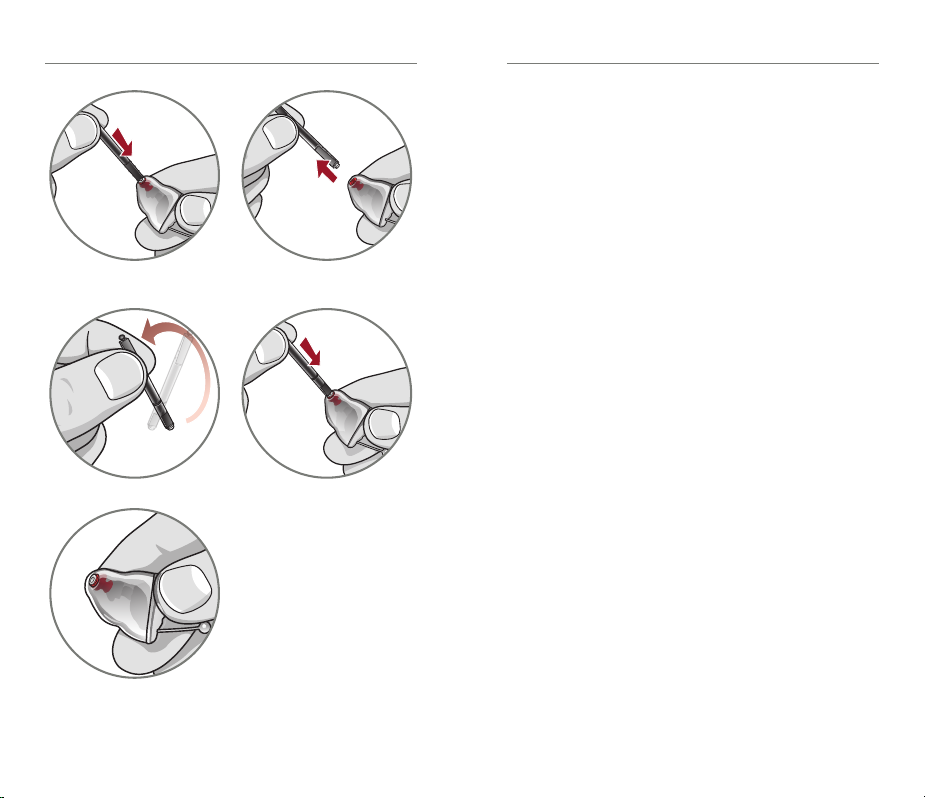
Hear Clear Receiver Wax Guards
SoundGear devices utilize disposable Hear
Clear earwax protection� The innovative wax
guards prevent earwax accumulation in the
SoundGear device receiver�
When you need to replace your wax guards,
please follow the instructions below�
1� Insert the empty end of the application
stick straight into the used wax guard in
the SoundGear device�
2� Pull straight out (do not twist) to remove
used wax guard�
3� Use the opposite end of the stick to firmly
insert the clean wax guard straight into
the SoundGear device�
4� Pull straight out (do not twist) to remove
the stick and discard�
See page 22
Device Care | 2322 | Device Care
1 2
3
4
Custom Microphone Cover
The custom microphone cover protects
the microphone from wax and debris� Your
SoundGear dealer or SoundGear Customer
Support will instruct you on maintenance of
the microphone cover�
Service & Repair
If, for any reason, your SoundGear device
does not operate properly, do NOT attempt to
fix it yourself� Not only are you likely to violate
any applicable warranties, you could easily
cause further damage�
Should your SoundGear device fail or perform
poorly, check the troubleshooting guide on
page 25 for possible solutions�
If problems continue, contact your SoundGear
dealer or SoundGear Customer Support
for advice and assistance� Many common
problems may be solved by your SoundGear
dealer or SoundGear Customer Support�

Troubleshooting | 2524 | Device Care
Charger Care
• Keep your charger clean� Heat, moisture
and foreign materials can result in poor
performance�
– Using the provided cleaning brush
keep the charging posts clear of debris�
– Do not use water, solvents or cleaning
fluids to clean the charging posts�
– Keep lid closed as much as possible to
avoid dust and debris build up�
– Store your charger in a clean and dry
location, such as a dresser or shelf
rather than the bathroom or kitchen�
Troubleshooting Guide
SYMPTOM POSSIBLE
CAUSES
SOLUTIONS
Not Loud
Enough
Blocked
microphone or
receiver
Clean or replace
wax guard as
needed
Debris buildup
Clean both
microphone and
receiver with brush
Inconsistent
Performance
Blocked
microphone or
receiver
Clean or replace
wax guard as
needed
Unclear,
Distorted
Performance
Blocked
microphone or
receiver
Clean or replace
wax guard as
needed
Defective
SoundGear
device
Contact your
SoundGear dealer
or SoundGear
Customer Support
Dead
Charge required
Place in your
charger until the
LEDs stop blinking
and become solid
Blocked
microphone or
receiver
Clean or replace
wax guard as
needed

Troubleshooting | 2726 | Troubleshooting
Charger Troubleshooting Guide
SYMPTOM POSSIBLE
CAUSES
SOLUTIONS
No LED
indicator
when
SoundGear
devices are
inserted onto
the charging
posts
Incorrect
orientation
Reposition your SoundGear
devices on the post with
the faceplate facing down
on the charging post in
charger reservoir� There is
not a right and left post,
your SoundGear devices
will charge in either post�
Dead
charger
battery
Connect the microUSB to
your charger and plug it
into the wall� The on-board
battery LEDs will turn on for
a few seconds to indicate
connection to the power
source� If they do not,
contact your SoundGear
dealer or SoundGear
Customer Support�
Red blinking
LED by
charging
posts
Fault
occurred
Remove the SoundGear
devices from the charging
post, wait until the LED
turns off, reinsert� If the
red blinking LED persists,
contact your SoundGear
dealer or SoundGear
Customer Support�
While
charging
cordless, no
LEDs are
illuminated
Power save
mode
To refresh LEDs, remove a
SoundGear device from the
charging post for 3 seconds
and then reposition the
SoundGear devices on
the charging post� Both
the charging LEDs and the
on-board battery LEDs will
illuminate for 10 seconds�
Charger Troubleshooting Guide
SYMPTOM POSSIBLE
CAUSES
SOLUTIONS
SoundGear
devices
whistling in
the charger
Incorrect
orientation
Reposition your
SoundGear devices
on the post with the
faceplate facing down
on the charging post in
charger reservoir� There
is not a right and left
post, your SoundGear
devices will charge in
either post�
Dead charger
battery
Connect the microUSB
to your charger and
plug it into the wall�
The onboard battery
LEDs will turn on for
a few seconds to
indicate connection
to the power source�
If they do not, contact
your SoundGear
dealer or SoundGear
Customer Support�

Technical Specifications | 2928 | Technical Specifications
NRR = 22dB
Peak Gain 30dB
Peak Output 90dB
Attenuation Data
Measurements were made according to
American National Standards Institute
Specifications ANSI S3� 19-1974�
Total Frequency
(Hz)
Mean Attenuation
(dB)
Standard
Deviation (dB)
125 7�8 4�2
250 23�8 3�8
500 26�9 4�3
1000 29�0 3�7
2000 34�6 3�2
3150 39�5 4�5
4000 41�9 4�7
6300 41�7 3�3
8000 40�7 3�8
Noise Protection
The level of noise entering a person’s ear when
the hearing protector is worn as directed,
is closely approximated by the difference
between the A-weighted environmental noise
level and the NRR�
Example
1� The environmental noise level as measured
at the ear is 140dB(A)�
2� The NRR is 22 decibels (dB)�
3� The level of noise entering the ear is
approximately equal to [140dB(A) – 22dB]
or 118dB(A)�
Caution: For noise environments dominated
by frequencies below 500 Hertz (Hz), the
C-weighted environmental noise levels should
be used�
Improper fit of this device will reduce its
effectiveness in attenuating noise� Consult the
enclosed instructions for proper fit�
Although hearing protectors can be
recommended for protection against the
harmful effects of impulsive noise, the Noise
Reduction Rating (NRR) is based on the
attenuation of continuous noise and may not
be an accurate indicator of the protection
attainable against impulsive noise such as
gunfire�

Limited Warranty Information | 3130 | Limited Warranty Information
LIMITED WARRANTY INFORMATION:
This Limited Warranty provided by Starkey Hearing Technologies,
to you, the original purchaser of a SoundGear device, covers your
new electronic hearing protection device when sold by an authorized
Starkey Hearing Technologies dealer or via the website, www�
soundgear�com� The duration of this Limited Warranty begins when
you first take delivery of your hearing protection device from an
authorized dealer or via the above website and ends twelve (12)
months later (“warranty period”)�
In order to be eligible for service under this Limited Warranty
you MUST register your device by emailing SoundGear at
CustomerSupport@ soundgearhearing�com� Serial number(s) on the
device(s) and a copy of your receipt are required to verify the date of
purchase�
LIMITATION ON DURATION OF IMPLIED WARRANTIES:
IMPLIED WARRANTIES, IF ANY, ARISING BY WAY OF STATE LAW,
INCLUDING ANY IMPLIED WARRANTY OF MERCHANTABILITY
AND/OR ANY IMPLIED WARRANTY OF FITNESS FOR A PARTICULAR
PURPOSE, ARE LIMITED IN DURATION TO THE WARRANTY
PERIOD� There is no warranty of any nature made by Starkey Hearing
Technologies beyond this Limited Warranty� No person has authority
to enlarge, amend or modify this Limited Warranty� Starkey Hearing
Technologies is not responsible for any undertaking, representation,
or warranty (written, express or implied) made by any Starkey Hearing
Technologies dealer or other person beyond those expressly set forth
in this Limited Warranty�
Some States do not allow limitations on how long an implied warranty
lasts, so the above limitation may not apply to you�
WHAT THIS LIMITED WARRANTY COVERS:
This Limited Warranty covers only a “defect” in the workmanship
performed and/or materials used to manufacture your hearing
protection device� “Defect” means the failure of the workmanship
performed and/or materials used to conform the device to Starkey
Hearing Technologies design and manufacturing specifications and
tolerances�
Your authorized Starkey Hearing Technologies dealer may have issued
a warranty or service plan that goes beyond the provisions of this
Limited Warranty� Please contact him or her for further information�
Starkey Hearing Technologies will either replace the hearing
protection device or repair any covered defect in your device,
provided that you deliver your device to one of Starkey Hearing
Technologies authorized dealers or directly to Starkey Hearing
Technologies in the manner described below� In addition, you must
notify the authorized dealer or Starkey Hearing Technologies of
the defect during the warranty period and within thirty (30) days
of discovering the defect� There will be no cost to you for Starkey
Hearing Technologies repair or replacement of the device itself,
but the dealer may charge a fee for services he or she provides�
Performance of warranty repairs on your hearing protection device
shall not extend the duration of the warranty period� Any repairs
performed on your device after the warranty period has expired shall
be considered “good will” repairs, which shall not alter the terms of
this Limited Warranty�
HOW TO OBTAIN WARRANTY SERVICE:
Deliver your hearing protection device (at your expense) to the
Starkey Hearing Technologies authorized dealer from whom you
purchased it, or to Starkey Hearing Technologies, Repair Dept�,
6700 Washington Ave� S�, Eden Prairie, MN 55344� For additional
information you may visit www�soundgear�com or email SoundGear at
CustomerSupport@soundgearhearing�com�
WHAT THIS LIMITED WARRANTY DOES NOT COVER:
Batteries; accessories; or damage to your hearing protection device
caused by misuse or neglect, accident, unauthorized alteration
or failure to provide reasonable and necessary maintenance and
cleaning�
DISCLAIMER OF CONSEQUENTIAL AND INCIDENTAL DAMAGES:
THE PURCHASER SHALL NOT BE ENTITLED TO RECOVER FROM
STARKEY HEARING TECHNOLOGIES ANY CONSEQUENTIAL OR
INCIDENTAL DAMAGES RESULTING FROM ANY DEFECT IN THE
HEARING PROTECTION DEVICE, INCLUDING BY WAY OF EXAMPLE
ONLY, EXPENSES TO DELIVER THE DEVICE TO AN AUTHORIZED
STARKEY HEARING TECHNOLOGIES DEALER OR TO STARKEY
HEARING TECHNOLOGIES, HOTEL ROOMS OR LOST WAGES�
THIS EXCLUSION AND DISCLAIMER OF CONSEQUENTIAL AND
INCIDENTAL DAMAGES SHALL BE DEEMED INDEPENDENT OF,
AND SHALL SURVIVE, ANY FAILURE OF THE ESSENTIAL PURPOSE
OF ANY REMEDY OF THIS LIMITED WARRANTY�
Some states do not allow the exclusion or limitation of consequential
or incidental damages, so the above exclusions may not apply to you�

Regulatory Information | 3332 | Limited Warranty Information
YOUR LEGAL REMEDIES:
THIS LIMITED WARRANTY DOES NOT “EXTEND TO FUTURE
PERFORMANCE�” ANY ACTION TO ENFORCE THIS LIMITED
WARRANTY OR ANY IMPLIED WARRANTIES MAY AND SHALL NOT
BE COMMENCED MORE THAN 90 DAYS AFTER THE EXPIRATION
OF THE WARRANTY PERIOD� THE PERFORMANCE OF REPAIRS
SHALL NOT SUSPEND THIS LIMITATIONS PERIOD FROM EXPIRING�
UNDER NO CIRCUMSTANCES SHALL STARKEY HEARING
TECHNOLOGIES BE OBLIGATED TO REFUND ALL OR ANY PART
OF THE PURCHASE PRICE OF THE HEARING PROTECTION DEVICE�
Some States do not allow the reduction in the limitation period, so the
above reduction in the limitation period may not apply to you�
This warranty gives you specific legal rights� You may also have other
rights, which vary from State to State�
This warranty is valid only in the United States�
Safety Information
SoundGear is designed to comply with the most stringent Standards
of International Electromagnetic Compatibility� However, it is still
possible that you may experience interference caused by power line
disturbances, airport metal detectors, electromagnetic fields from
other medical devices, radio signals and electrostatic discharges�
If you use other medical devices or wear implantable medical
devices such as defibrillators or pacemakers and are concerned that
SoundGear might cause interference with your medical device, please
contact your physician or the manufacturer of your medical device for
information about the risk of disturbance�
SoundGear should not be worn during an MRI procedure or in a
hyperbaric chamber�
SoundGear is not formally certified to operate in explosive
atmospheres that may be found in coal mines or certain chemical
factories�
SoundGear and charger should be stored within the temperature and
humidity ranges of -10°C (14°F) to +45°C (113°F) and 10%-95% rH�
The charging temperature range is between 0°C (32°F) and 40°C
(104°F)�
SoundGear is designed to operate beyond the range of temperatures
comfortable to you, from very cold up to 40°C (104°F)�
CAUTION: If the charger is hot, do not touch it until cool� If the
product is not working, do not disassemble� Due to a shock hazard,
please send in for repair� Keep out of reach from children� Do not
ingest anything in the package, including desiccant, cleaning tool,
etc� Any cords and AC adapters must be approved or listed by a
Nationally Recognized Testing Laboratory�
International Use
SoundGear is approved to operate at a radio frequency specific to
your country or region and might not be approved for use outside
your country or region� Be aware that operation during international
travel may cause interference to other electronic devices, or other
electronic devices may cause interference to SoundGear�
SoundGear should not be used on aircraft unless specifically
permitted by flight personnel�

Regulatory Information | 3534 | Regulatory Information
WIRELESS TECHNICAL DESCRIPTION
SoundGear contains a radio transceiver utilizing Bluetooth Low Energy
wireless technology operating in the 2�4-2�4835 GHz frequency band
with a maximum effective radiated power of -4 dBm using GFSK
transmission modulation� The receiver section of the radio has a
bandwidth of 1�5 MHz�
SoundGear has been tested to, and has passed, the following
emissions and immunity tests:
• IEC 60601-1-2 radiated emissions requirements for a Group 1
Class B device as stated in CISPR 11�
• RF radiated immunity at a field level of 10 V/m between
80 MHz and 2�7 GHz as well as higher field levels from
communications devices as stated in Table 9 of IEC 60601-
1-2�
• Immunity to power frequency magnetic fields at a field level
of 30 A/m�
• Immunity to ESD levels of +/- 8 kV conducted discharge and
+/- 15 kV air discharge�
The Starkey Hearing Technologies Charger has been tested to, and
has passed the following emissions and immunity tests:
• IEC 60601-1-2 radiated and conducted emissions
requirements for a Group 1 Class B device as stated in CISPR
11�
• Harmonic distortion and voltage fluctuations affecting the
power input source as stated in Table 2 of IEC 60601-1-2�
• RF radiated immunity at a field level of 10 V/m between
80 MHz and 2�7 GHz as well as higher field levels from
communications devices as stated in Table 9 of IEC 60601-
1-2�
• Immunity to power frequency magnetic fields at a field level
of 30 A/m�
• Immunity to ESD levels of +/- 8 kV conducted discharge and
+/- 15 kV air discharge�
• Immunity to Electrical fast transients on the power input at a
level of +/- 2 kV at a 100 Hz repetition rate�
• Immunity to Surges on the power input of +/- 1 kV line to
line�
• Immunity to conducted disturbances induced by RF fields on
the power input as stated in Table 6 of IEC 60601-1-2�
• Immunity to voltage dips and interruptions on the power
input as stated in Table 6 of IEC 60601-1-2�
We are required by regulations to provide the following warnings:
WARNING: Use of wireless SoundGear directly next to other
electronic equipment should be avoided because it could result in
improper performance� If such use is necessary, note as to whether
SoundGear and the other equipment are operating normally�
WARNING: Use of accessories, components or replacement
parts other than those provided by the manufacturer could result in
increased electromagnetic emissions and decreased electromagnetic
immunity and could result in degradation of performance�
WARNING: If Portable Radio Frequency communications
equipment is used closer than 30 cm (12 inches) from SoundGear,
degradation of the performance of SoundGear could result� If this
occurs, move away from the communications equipment�
DO NOT OPEN SOUNDGEAR OR CHARGER,
NO USER-SERVICEABLE PARTS INSIDE
The Starkey Hearing Technologies Charger has a rating of IP 5X per
IEC 60529� This means that the Starkey Hearing Technologies Charger
is protected from dust�
The service life of the Starkey Hearing Technologies Charger is 3
years�
Regulatory Information | 3736 | Regulatory Information
REGULATORY NOTICES
FCC ID: EOA-24LIVIOITEL (left), EOA-24LIVIOITER (right)
IC: 6903A-24LIVIOITEL (left), 6903A-24LIVIOITER (right)
FCC NOTICE
This device complies with part 15 of the FCC rules and with ISED
Canada’s license-exempt RSS standard(s)� Operation is subject to
the following two conditions: (1) This device may not cause harmful
interference, and (2) this device must accept any interference
received, including interference that may cause undesired operation
of the device�
Note: The manufacturer is not responsible for any radio or TV
interference caused by unauthorized modifications to this equipment�
Such modifications could void the user’s authority to operate the
equipment�
Hereby, Starkey Hearing Technologies declares that SoundGear is
in compliance with the essential requirements and other relevant
provisions of Directive 2014/53/EU�A copy of the Declaration of
Conformity can be obtained from the addresses below or from
docs�starkeyhearingtechnologies�com
Starkey Hearing Technologies
6700 Washington Ave� South
Eden Prairie, MN 55344 USA
Starkey Laboratories (Germany) G�m�b�H�
Weg beim Jäger 218-222
22335 Hamburg
Germany
Class II Device
Waste from electronic equipment
must be handled according to
local regulations
Consult Operations Manual
INSTRUCTIONS FOR DISPOSAL OF OLD ELECTRONICS
Starkey Hearing Technologies encourages, the EU requires, and your
local community laws may require, that your SoundGear devices and
charger be disposed of via your local electronics recycling/disposal
process�
The instructions below are provided for the benefit of disposal/
recycling personnel� Please include this manual when disposing of
your SoundGear devices and/or charger�
FOR DISPOSAL/RECYCLING PERSONNEL ONLY
These products contain Lithium Ion Polymer batteries� For instructions
on removing the battery from the SoundGear device, please visit
docs�starkeyhearingtechnologies�com� To remove the battery from the
SoundGear Charger:
• Remove the four skid pads on the bottom of the charger base to
access fasteners�
• Remove fasteners using a Phillips head screwdriver�
• Disassemble the charger base from the bezel to expose the battery
cell�
• Cut the THREE battery wire leads ONE AT A TIME close to the
battery cell to avoid shorting�
• Pry battery from base using a wide flat blade making sure not to
puncture the battery cell�
YOUR SOUNDGEAR
This hearing protection instrument is a reusable, level-dependent
earplug, classified as a Class II Personal Protective Device� It is
intended for use in a wide variety of conditions and settings, and
is designed to provide protection from loud, continuous noise and
impulse sounds such as factory noise, farm machinery, gun shots and
more�
To ensure that you receive benefit from your instrument(s), please
read this manual carefully, and follow all instructions provided here
and/or by your hearing professional�
It is vital that you wear your instrument(s) at all times when using or
near firearms, power tools or loud industrial machinery� Proper use will
greatly reduce but not eliminate the risk of damage to your hearing as
a result of exposure to noise that exceeds 85dB�
Hearing loss can occur for a variety of reasons, including disease,
certain medications, the natural aging process and exposure to loud
noise�
Periodic evaluations by a licensed hearing professional are
recommended to monitor any changes in your hearing, or any time
you feel your hearing has been compromised�

NotesNotes
Other manuals for Phantom
1
Table of contents
Other SoundGear Safety Equipment manuals

Popular Safety Equipment manuals by other brands

Vertiqual Engineering
Vertiqual Engineering V9 SQUIRREL instruction manual

Tractel
Tractel Blocmat M Operation and maintenance manual

HOGERT
HOGERT HT5K506 instruction manual

LAHTI PRO
LAHTI PRO L1500600 user manual

Kentek
Kentek XVT KXL-6001RX instructions

CLiC-iT
CLiC-iT RiDER Instruction and maintenance manual


